Category: homeowner roofing guide

  • Spot Storm Roof Damage Fast: A Homeowner’s Guide

    Spot Storm Roof Damage Fast: A Homeowner’s Guide

    Have you just weathered a severe thunderstorm, hail event, or high-wind episode? It is natural to feel anxious about the integrity of your home’s most critical protective layer. Many homeowners ask, “How do I know if my roof has storm damage“ before visible leaks appear, often missing the window for easy insurance claims or minor repairs.

    Ignoring subtle signs can lead to costly structural issues down the line. In this guide, we will walk you through a professional-grade inspection process, helping you identify damage early, stay safe, and make informed decisions about repairs.

    Why Immediate Inspection Matters After a Storm

    Storms are unpredictable. While some pass with little impact, others can compromise your roofing system in seconds. According to the Insurance Information Institute, wind and hail are among the top causes of property insurance losses in the United States.

    The primary reason to inspect immediately is prevention. A small crack in a shingle or a displaced flashing piece might seem insignificant, but it allows water to seep into your attic. Over time, this moisture leads to mold, rotting wood, and compromised insulation.

    Furthermore, insurance companies often have strict timelines for filing storm-related claims. Documenting damage promptly ensures you have the evidence needed to support your claim. Delaying inspection can result in denied coverage if the insurer argues that the damage worsened due to neglect.

    Safety First: Pre-Inspection Checklist

    Before you climb a ladder or even step into your yard, prioritize safety. Storm conditions can leave behind hidden hazards.

    • Wait for Clear Weather: Never inspect a roof during rain, high winds, or when surfaces are wet and slippery.
    • Check for Downed Power Lines: Ensure no electrical wires are touching your roof or fence.
    • Use Proper Gear: Wear rubber-soled shoes for grip. If using a ladder, ensure it is on stable ground and have a spotter hold it steady.
    • Avoid Walking on the Roof: Unless you are trained, stay on the ground or use binoculars. Walking on a damaged roof can cause further harm to the shingles and pose a serious fall risk.

    Visual Signs from the Ground: What to Look For

    You do not need to be on the roof to spot major red flags. Start your assessment from your driveway or yard. Use binoculars for a closer look without risking your safety.

    1. Missing or Curling Shingles

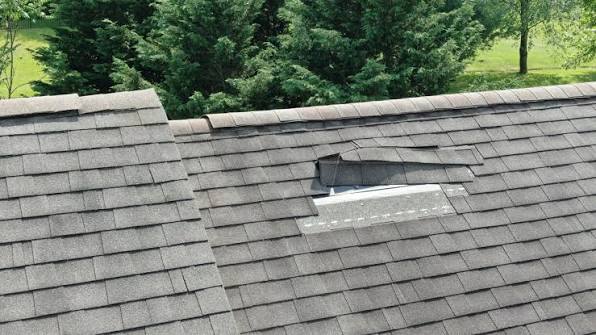
    High winds can lift shingles, breaking the sealant strip that holds them down. Look for:

    • Bare spots where shingles are completely gone.
    • Curling edges that indicate wind uplift or age-related wear exacerbated by the storm.
    • Creased shingles, which suggest they were bent by wind or debris.

    2. Granule Loss

    Asphalt shingles are coated with granules that protect against UV rays. Heavy hail or rain can wash these away.

    • Check your gutters and downspouts. An accumulation of sand-like granules indicates significant surface wear.
    • Look for dark spots on the roof where the asphalt layer is exposed.

    3. Damaged Flashing and Vents

    Flashing is the metal material used to seal joints around chimneys, vents, and skylights.

    • Look for bent or missing metal pieces.
    • Check if vent caps are cracked or detached. These are common entry points for water during high winds.

    4. Debris Impact

    Look for branches, tree limbs, or other debris resting on the roof. Even if the debris is removed, the impact point may have cracked the underlying structure.
    How Do I Know If My Roof Has Storm Damage

    Interior Checks: Clues Inside Your Home

    Sometimes, the exterior looks fine, but the storm has compromised the roof’s integrity from within. Your attic is the best place to investigate.

    Water Stains and Leaks

    Shine a flashlight across your attic rafters and insulation.

    • Dark stains on wood beams indicate past or current leaks.
    • Damp insulation feels cold and clumpy compared to dry, fluffy insulation.
    • Mold growth appears as black or green spots on wooden surfaces.

    Daylight Penetration

    Turn off the lights in your attic during the day. If you see beams of sunlight piercing through the roof deck, you have holes or gaps that need immediate attention. This is a definitive sign of structural compromise.

    Sagging Roof Deck

    Look up at the underside of the roof. Any sagging or bowing suggests that the structural supports are weakened, possibly due to water saturation or impact damage. This is a critical issue requiring professional intervention.

    Specific Damage Types: Hail vs. Wind

    Understanding the type of storm helps you identify specific damage patterns.

    FeatureWind DamageHail Damage
    Primary SignMissing shingles, lifted edgesDents, bruising, circular cracks
    Granule LossModerate, often in stripsHeavy, localized around impact points
    Metal ComponentsBent flashing, loose ventsDented gutters, dinged AC units
    VisibilityOften obvious from groundMay require close-up inspection

    Wind Damage tends to be linear, following the direction of the gusts. Shingles may be torn off entirely or creased where they folded back.

    Hail Damage is more random. Look for bruises on shingles—soft spots where the matting underneath is broken. Unlike wind damage, hail bruises may not be visible from the ground and often require a professional touch to confirm.

    When to Call a Professional Roofer

    While DIY inspections are useful for initial assessments, they have limitations. You should contact a licensed roofing contractor if:

    1. You See Structural Issues: Sagging roofs or large holes are not DIY fixes.
    2. You Are Unsure: If you suspect damage but cannot confirm it, a professional inspection provides clarity.
    3. You Plan to File an Insurance Claim: Insurance adjusters rely on detailed reports. A professional roofer can provide documented evidence, including photos and written assessments, which strengthens your claim.
    4. Your Roof is Old: Older roofs are more fragile. Walking on them can cause more damage than the storm did.

    For more information on how insurance processes work for property damage, you can refer to general guidelines on property insurance claims to understand the broader context of coverage.

    Step-by-Step: Documenting Damage for Insurance

    If you find damage, follow these steps to prepare for your insurance claim:

    1. Take Photos: Capture wide shots of the entire roof and close-ups of specific damage. Include dates and timestamps if possible.
    2. Measure Debris: If there are dents from hail, place a coin next to the dent for scale in your photos.
    3. Keep Records: Save all receipts for temporary repairs, such as tarps or emergency patching.
    4. Contact Your Insurer: Report the damage immediately. Provide your documentation and request an adjuster’s visit.
    5. Get a Second Opinion: If the insurance adjuster’s estimate seems low, hire an independent roofer to provide a counter-estimate.

    FAQ Section

    How long after a storm can I file an insurance claim?

    Most insurance policies allow you to file a claim within one year of the incident, but it is best to file within 30 days. Delays can complicate the verification process, as new weather events may cause additional damage that is hard to distinguish from the original storm.

    Can I repair storm damage myself?

    Minor repairs, such as replacing a single shingle, can be done by experienced homeowners. However, most storm damage involves complex issues like underlayment tears or flashing displacement. Incorrect repairs can void warranties and lead to leaks. For significant damage, always hire a licensed professional.

    What is the difference between cosmetic and functional hail damage?

    Cosmetic damage affects the appearance of the shingles (e.g., minor granule loss) but does not compromise their ability to shed water. Functional damage impacts the shingle’s integrity (e.g., fractures, bruising), leading to potential leaks. Insurance typically covers functional damage but may exclude cosmetic issues depending on your policy.

    Will a new roof increase my home’s value?

    Yes, a new roof can significantly boost curb appeal and home value. It also assures potential buyers that the home is protected from the elements. According to real estate experts, a new roof can offer a high return on investment, especially if the previous roof had visible storm damage.

    How often should I inspect my roof?

    Ideally, you should inspect your roof twice a year: once in the spring and once in the fall. Additionally, perform a quick visual check after any severe weather event. Regular maintenance extends the lifespan of your roof and prevents small issues from becoming major expenses.

    Conclusion

    Knowing how do I know if my roof has storm damage empowers you to protect your home and your wallet. By conducting regular visual checks from the ground, monitoring your attic for leaks, and understanding the signs of wind and hail impact, you can catch problems early.

    Remember, safety is paramount. If you are unsure about the extent of the damage, do not hesitate to call a professional. Early detection leads to simpler, cheaper repairs and ensures your home remains a safe haven for your family.

    Found this guide helpful? Share it with your neighbors on social media to help them prepare for the next storm. Together, we can build more resilient communities.
  • Red Roof Plus+ Pittsburgh South Airport Review

    Red Roof Plus+ Pittsburgh South Airport Review

    Finding Comfort Near PIT: Your Guide to the Best Stay

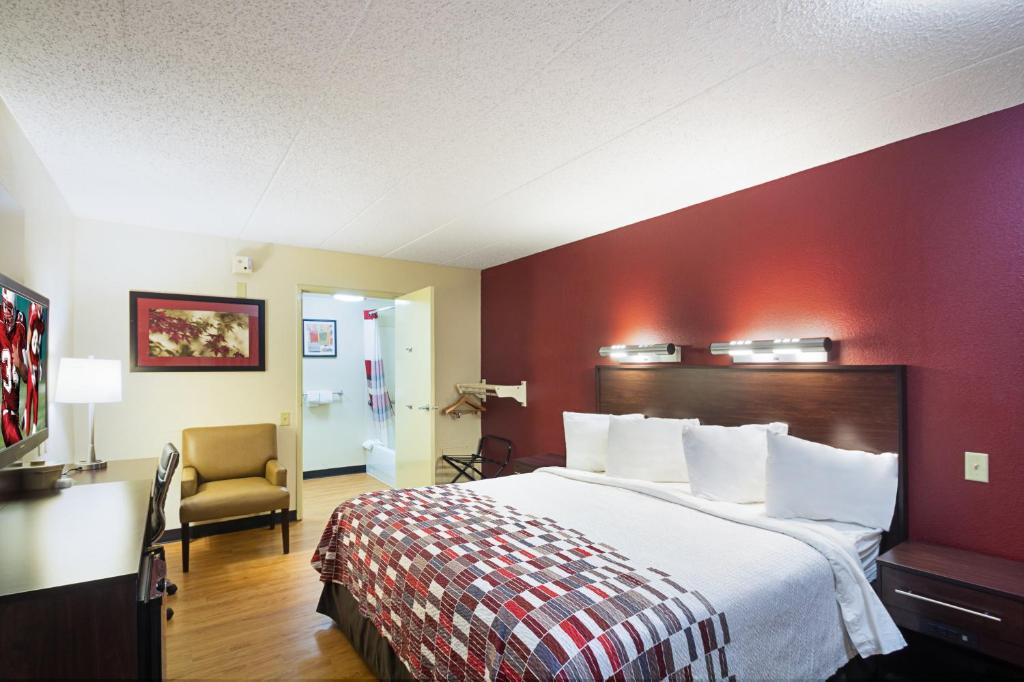
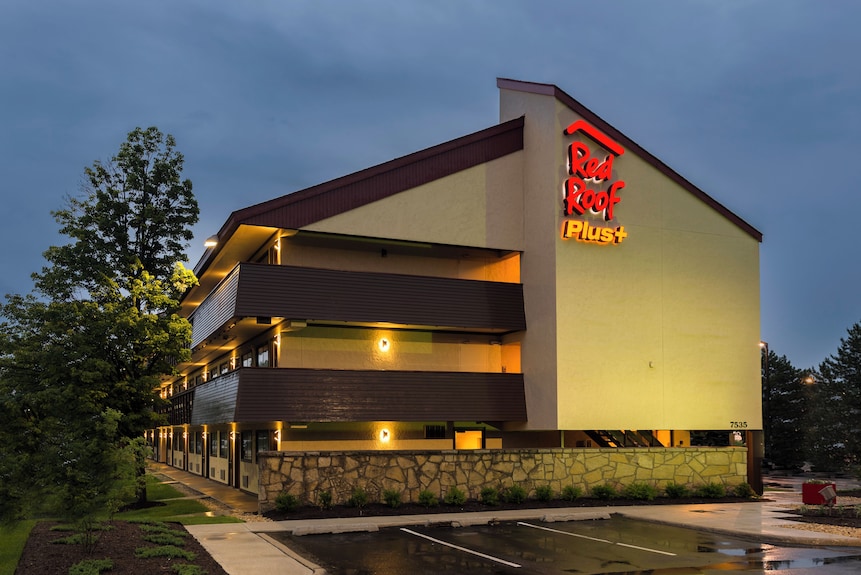
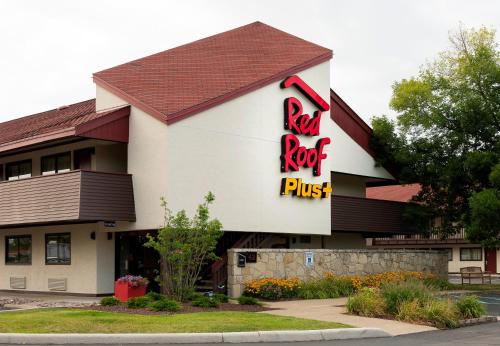
    Traveling can be exhausting, especially when you are dealing with tight connections, late-night arrivals, or early morning departures. You don’t need luxury frills; you need reliability, cleanliness, and a location that saves you time. This is exactly where Red Roof Plus+ Pittsburgh South Airport Steubenville Pike Pittsburgh Pa steps in to solve your accommodation headaches.

    Located strategically for travelers who prioritize convenience without breaking the bank, this hotel offers a seamless blend of accessibility and comfort. Whether you are a business traveler rushing to a meeting in the South Hills or a family starting a vacation, understanding what this property offers can make the difference between a stressful trip and a smooth journey. In this comprehensive guide, we will break down everything you need to know about staying here, from amenities to local attractions.

    Why Choose Red Roof Plus+ on Steubenville Pike?

    When searching for lodging near Pittsburgh International Airport (PIT), the options can feel overwhelming. However, the Red Roof Plus+ Pittsburgh South Airport Steubenville Pike Pittsburgh Pa stands out for specific reasons that cater to the modern traveler’s needs.

    Strategic Location and Accessibility

    The primary advantage of this location is its proximity to major transport hubs. Situated on Steubenville Pike, the hotel provides easy access to Interstate 79 and Route 22. This means you are never more than a few minutes away from the airport terminal or the bustling commercial districts of Robinson Township.

    For drivers, this location is a lifesaver. You avoid the congestion of downtown Pittsburgh while still being close enough to reach city attractions within a 15-20 minute drive. For flyers, the reduced transit time to the terminal reduces anxiety about missing flights.

    The “Plus+” Difference

    It is important to distinguish between a standard Red Roof Inn and the “Plus+” designation. The Plus+ model indicates upgraded amenities and a higher standard of service. Guests can expect:

    • Enhanced room furnishings.
    • Higher quality bedding linens.
    • More consistent housekeeping standards.
    • Improved common area aesthetics.

    This upgrade ensures that while you are paying budget-friendly rates, you are not sacrificing the core elements of a restful night’s sleep.

    What Amenities Can You Expect During Your Stay?

    Understanding the available facilities helps you pack appropriately and plan your schedule. Here is a detailed breakdown of what is included.

    Free High-Speed Wi-Fi and Workspaces

    In today’s digital age, connectivity is not a luxury; it is a necessity. The hotel provides complimentary high-speed Wi-Fi throughout the property. Whether you need to join a Zoom call from your room or stream a movie after a long day, the connection is reliable.

    Additionally, many rooms feature dedicated workspaces with ergonomic chairs and ample lighting, catering specifically to business travelers who need to catch up on emails.

    Pet-Friendly Policies

    One of the most significant advantages of choosing Red Roof Plus+ Pittsburgh South Airport Steubenville Pike Pittsburgh Pa is its welcoming attitude toward pets. Unlike many airport hotels that charge exorbitant fees or refuse animals entirely, Red Roof is known for its pet-friendly culture.

    • Policy: Typically, one well-behaved pet per room is allowed.
    • Cost: Often free of charge (always verify current policy at booking).
    • Convenience: With nearby green spaces along Steubenville Pike, walking your dog is easy and accessible.

    This makes it an ideal choice for families relocating or traveling with their furry companions.

    Complimentary Airport Shuttle

    Navigating parking fees and traffic at PIT can be stressful. The hotel offers a complimentary 24-hour airport shuttle service. This service runs on a regular schedule, ensuring you can get to your terminal without worrying about ride-share surge pricing or taxi availability.

    Pro Tip: Always call the front desk upon arrival to confirm the next shuttle pickup time, as schedules may vary slightly during holidays or off-peak hours.

    Red Roof Plus+ Pittsburgh South Airport Steubenville Pike Pittsburgh Pa

    How Does It Compare to Other Local Hotels?

    To help you make an informed decision, let’s look at how this property stacks up against competitors in the immediate vicinity.

    FeatureRed Roof Plus+ Pittsburgh SouthCompetitor A (Mid-Range Chain)Competitor B (Budget Motel)
    Price PointBudget-FriendlyModerateLow
    Pet PolicyVery Friendly (Often Free)Restrictive/High FeesVaries
    Wi-Fi QualityHigh Speed/FreeStandard/FreeBasic/Paid
    Shuttle Service24/7 ComplimentaryScheduled Hours OnlyNone
    Room AgeRenovated/ModernMixedDated

    As shown in the table, the Red Roof Plus+ Pittsburgh South Airport Steubenville Pike Pittsburgh Pa offers a superior value proposition for travelers who need flexibility (pets/shuttle) without the mid-range price tag.

    Exploring the Neighborhood: What’s Nearby?

    While you may be staying here primarily for airport access, the surrounding area has several noteworthy spots. If you have a layover or an extra day, consider exploring these local highlights.

    Shopping and Dining at Robinson Township

    Just a short drive away is the Robinson Township commercial district. This area is home to:

    • The Mall at Robinson: A large shopping center featuring major retailers like Macy’s, JCPenney, and Target.
    • Dining Options: From fast-casual eateries to sit-down restaurants, you have plenty of choices for dinner. Popular chains and local favorites alike are within a 5-minute radius.

    Nature and Recreation

    For those who prefer outdoor activities, the nearby Montour Trail offers a paved multi-use trail perfect for walking, jogging, or cycling. It’s a great way to stretch your legs after a long flight.

    According to Wikipedia, Pittsburgh International Airport serves as a key gateway to Western Pennsylvania, making hotels in this corridor vital for regional tourism and business logistics. Staying here puts you at the heart of this logistical hub.

    Step-by-Step: How to Book and Prepare for Your Stay

    To ensure the smoothest experience, follow these simple steps when planning your visit to Red Roof Plus+ Pittsburgh South Airport Steubenville Pike Pittsburgh Pa.

    1. Check Availability Online: Visit the official website or a trusted travel aggregator. Enter your dates and select the “Plus+” option to ensure you get the upgraded room type.
    2. Request Specific Needs: If you are traveling with a pet, note this in the special requests section. If you need a room on a lower floor for easier access, mention it here as well.
    3. Confirm Shuttle Details: 24 hours before your arrival, call the hotel directly to confirm the shuttle pickup procedure. Ask if they require a reservation for the shuttle or if it is first-come, first-served.
    4. Pack Essentials: Since this is a budget-friendly option, bring your own toiletries if you have specific brand preferences. While basic amenities are provided, having your own ensures comfort.
    5. Arrival and Check-In: Upon landing, collect your luggage and proceed to the designated shuttle pick-up zone. Have your confirmation number ready for a quick check-in process at the front desk.

    Frequently Asked Questions (FAQ)

    Here are answers to the most common questions travelers ask about this property.

    1. Is there a fee for parking at Red Roof Plus+ Pittsburgh South Airport?

    Generally, self-parking is free for guests staying at the hotel. This is a significant cost saver compared to long-term airport parking lots. However, always verify the current policy during booking, as rules can change.

    2. How far is the hotel from Pittsburgh International Airport (PIT)?

    The hotel is located approximately 3 to 5 miles from the airport terminals. Depending on traffic, the shuttle ride typically takes 10–15 minutes.

    3. Are the rooms soundproof?

    While the hotel strives for comfort, being near major highways like Steubenville Pike means some ambient noise is possible. Rooms facing away from the road tend to be quieter. If you are a light sleeper, request a room in the back of the building or bring earplugs.

    4. Is breakfast included in the stay?

    Red Roof Plus+ locations often offer a continental breakfast or coffee service, but it is not always a full hot buffet. Check your specific booking details to see if breakfast is included or if there are nearby dining options you prefer.

    5. Can I cancel my reservation if my flight is delayed?

    Most bookings made through the official channel offer flexible cancellation policies, often up to 24 or 48 hours before check-in. If your flight is significantly delayed, contacting the front desk directly can sometimes help accommodate late arrivals without penalty.

    6. Is the area safe for walking at night?

    The immediate vicinity is a commercial district with good lighting. However, as with any travel destination, it is recommended to use the shuttle or a car for nighttime movement rather than walking long distances alone, especially if you are unfamiliar with the area.

    Conclusion: A Smart Choice for Smart Travelers

    Choosing the right hotel can set the tone for your entire trip. Red Roof Plus+ Pittsburgh South Airport Steubenville Pike Pittsburgh Pa offers a compelling mix of affordability, convenience, and essential amenities. Its strategic location near PIT, combined with pet-friendly policies and reliable shuttle service, makes it a top contender for both leisure and business travelers.

    By understanding what to expect and planning ahead, you can maximize your stay and minimize travel stress. Whether you are here for a quick layover or an extended visit to Pittsburgh, this hotel provides the practical comfort you need.

    Did you find this guide helpful? Share it with your fellow travelers on social media to help them plan their next trip to Pittsburgh! Don’t forget to leave a comment below if you have stayed here recently—we’d love to hear about your experience.

  • How to Calculate Roof Square Footage Accurately

    How to Calculate Roof Square Footage Accurately

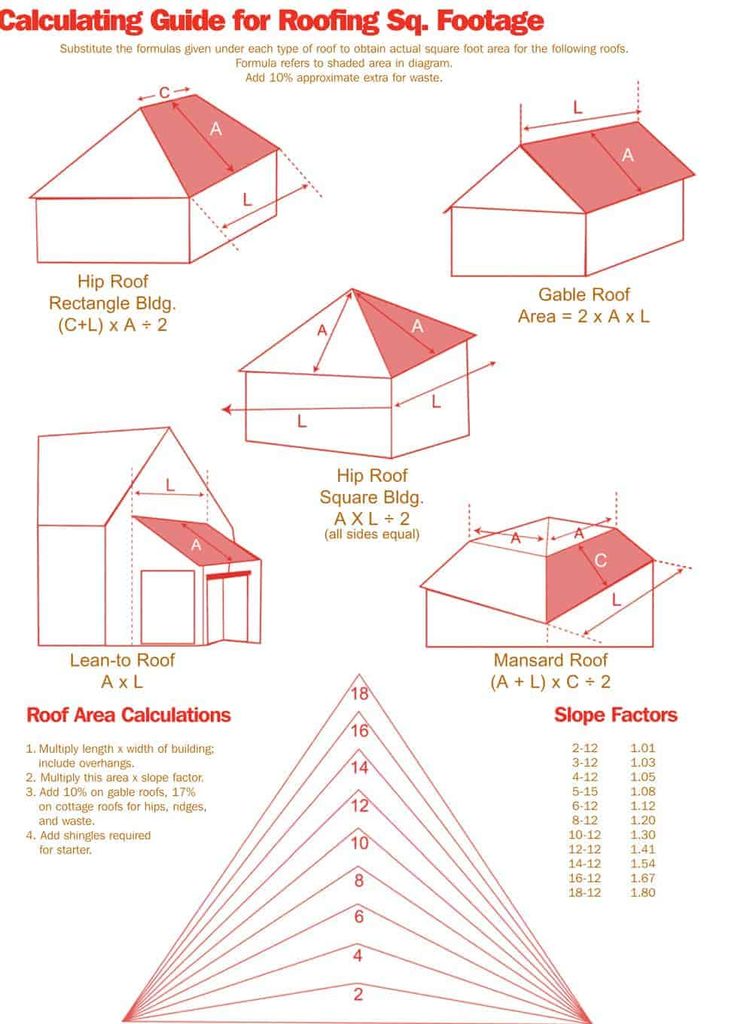
    Calculating the exact area of your roof is one of the most critical steps in any home renovation or repair project. Getting this number wrong can lead to ordering too much material, wasting money, or worse, running short mid-project and facing price hikes for small batches. If you are wondering how do you get the square footage of a roof, you are not alone; many homeowners find the geometry intimidating, but it is simpler than it looks.

    In this guide, we will break down the process into manageable steps, ensuring you have the confidence to measure your roof accurately without needing a degree in mathematics.

    Why Accurate Roof Measurements Matter

    Before we dive into the tape measure, it is essential to understand why precision is non-negotiable. Roofing materials are sold by the “square,” which equals 100 square feet. A miscalculation of even 10% can result in significant financial loss or project delays.

    According to industry standards, contractors typically add a waste factor of 10–15% for simple gable roofs and up to 20% for complex roofs with multiple valleys and hips. However, this waste factor applies to an accurate base measurement. If your base number is wrong, the waste factor cannot save you.

    How Do You Get The Square Footage Of A Roof

    Step 1: Gather the Right Tools

    You do not need expensive laser equipment to get a reliable estimate. Here is what you need:

    • A sturdy ladder: Ensure it is on stable ground.
    • A long tape measure: At least 25–50 feet.
    • Graph paper and a pencil: For sketching the roof layout.
    • A calculator: Or a smartphone app.
    • Safety gear: Non-slip shoes and a spotter if you plan to climb onto the roof.

    Pro Tip: If you are uncomfortable climbing onto the roof, you can perform these measurements from the ground using basic geometry, though it may be slightly less precise.

    Step 2: Understand Roof Complexity

    Not all roofs are created equal. The method you use depends on the shape:

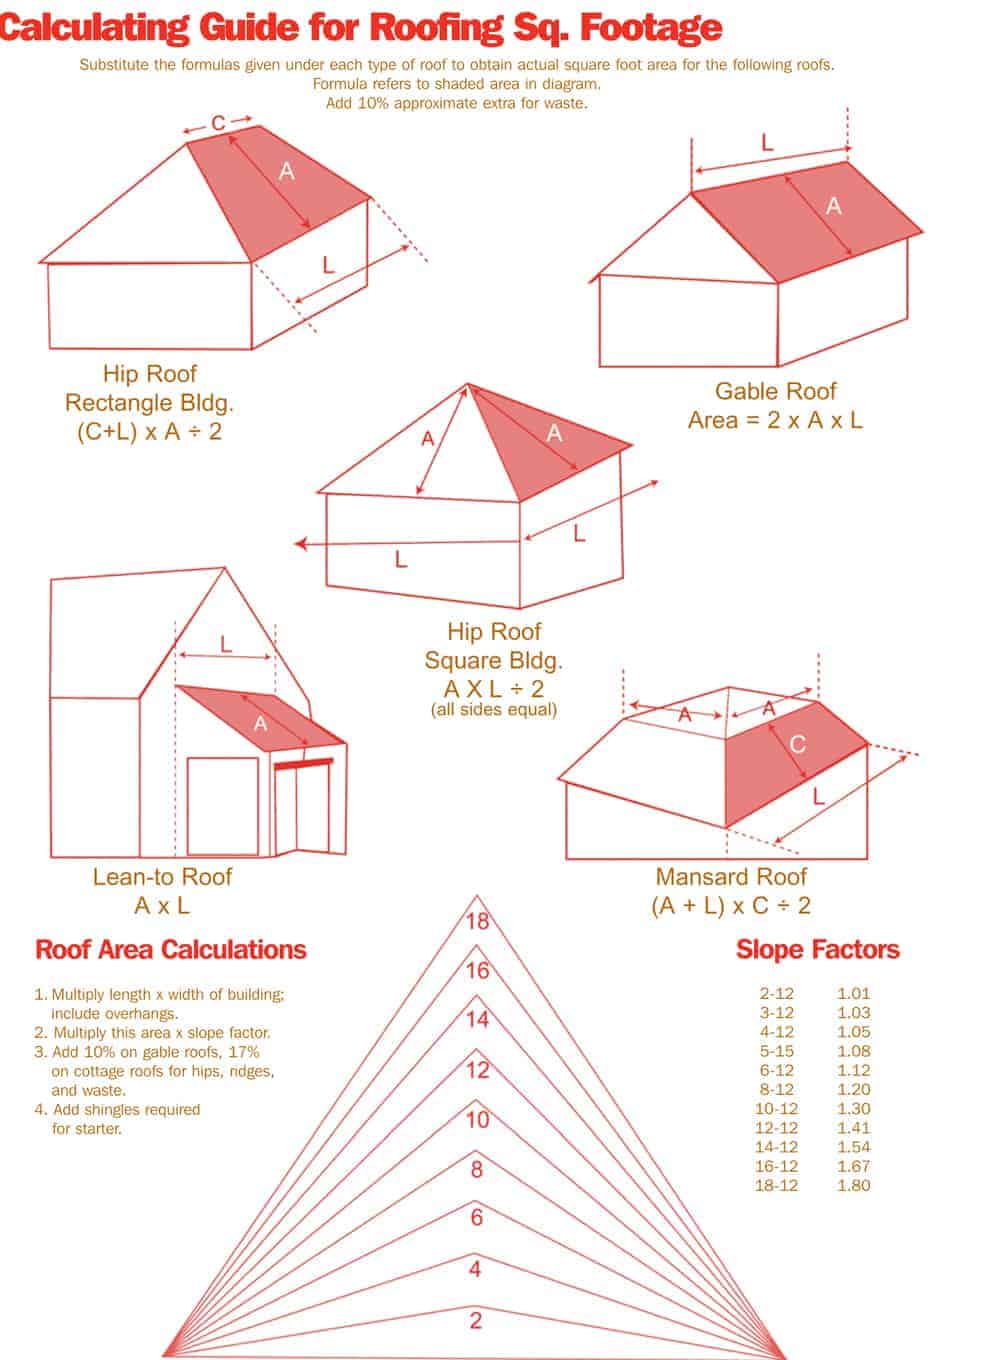
    1. Simple Gable Roof: Two sloping sides that meet at a ridge. This is the easiest to measure.
    2. Hip Roof: Slopes on all four sides. Requires more calculations.
    3. Complex Roof: Multiple gables, valleys, dormers, and chimneys.

    For complex roofs, the best strategy is to break the roof down into smaller, manageable geometric shapes (rectangles and triangles).

    Step 3: Measuring from the Ground (The Safe Method)

    If you prefer not to climb, you can estimate the footprint of your house and adjust for the pitch.

    Measure the Length and Width

    Walk around your house and measure the length and width of the exterior walls. Include any overhangs (eaves) if possible. If you cannot see the eaves clearly, add approximately 1–2 feet to each side to account for them.

    Example: If your house is 40 feet long and 30 feet wide, your footprint is 1,200 square feet.

    Account for Roof Pitch

    A flat roof has the same square footage as the footprint. However, most roofs are sloped. The steeper the pitch, the larger the surface area.

    To get the actual roof area from the ground, you need the Pitch Multiplier. You can find this by measuring the rise over a 12-inch run.

    Roof PitchMultiplier
    4/121.054
    6/121.118
    8/121.202
    10/121.302
    12/121.414

    Calculation: Roof Area=Footprint Area×Pitch MultiplierRoof Area=Footprint Area×Pitch Multiplier

    Using our example above with a 6/12 pitch: 1,200 sq ft×1.118=1,341.6 sq ft1,200 sq ft×1.118=1,341.6 sq ft

    Step 4: Measuring from the Roof (The Precise Method)

    For the highest accuracy, especially for complex roofs, measuring directly from the surface is best. Please prioritize safety. Use a harness if the pitch is steep.

    Break It Down into Sections

    Look at your roof from above (or sketch it from the ground first). Divide it into distinct sections.

    1. Rectangular Sections: Measure the length and width of each rectangular plane. Multiply them to get the area.
    2. Triangular Sections (Gables): Measure the base and the height (from the base to the peak). The formula is: Area=Base×Height2Area=2Base×Height​

    Don’t Forget the Details

    • Valleys: These are internal angles where two roof slopes meet. Measure their length and width carefully.
    • Dormers: Treat dormers as separate small roofs. Measure their faces and add them to the total.
    • Chimneys and Vents: Generally, you do not subtract these unless they are massive. It is better to have a little extra material for flashing and cuts.

    Summing It Up

    Add the square footage of all sections together. This gives you the total surface area.

    Understanding “Squares” in Roofing

    In the roofing industry, professionals do not usually talk in square feet. They talk in “Squares.”

    • 1 Square = 100 Square Feet

    If your total calculation is 2,450 square feet, you divide by 100: 2,450/100=24.5 Squares2,450/100=24.5 Squares

    When ordering materials, you would round up to 25 Squares. Always round up to ensure you have enough coverage.

    Adding the Waste Factor

    No installation is perfect. Shingles need to be cut to fit edges, valleys, and around obstacles.

    • Simple Roof (Gable): Add 10% waste.
    • Complex Roof (Hips/Valleys): Add 15–20% waste.

    Final Calculation Example:

    • Total Area: 2,450 sq ft
    • Waste (15%): 2,450×0.15=367.5 sq ft2,450×0.15=367.5 sq ft
    • Total Needed: 2,450+367.5=2,817.5 sq ft2,450+367.5=2,817.5 sq ft
    • In Squares: ~28.2 Squares -> Order 29 Squares

    For more detailed information on roofing structures and terminology, you can refer to Wikipedia’s article on Roofing.

    Common Mistakes to Avoid

    1. Ignoring Overhangs: Failing to include the eaves can leave you short by hundreds of square feet.
    2. Wrong Pitch Multiplier: Guessing the pitch instead of measuring it leads to significant errors.
    3. Not Accounting for Waste: Buying exactly the net amount ensures you will run out.
    4. Measuring Only One Side: On asymmetrical roofs, both sides may have different dimensions. Measure each plane individually.

    FAQ Section

    Q1: Can I use Google Earth to measure my roof?

    Yes, tools like Google Earth or specialized roofing software (like EagleView) can provide satellite-based measurements. However, these are estimates. For purchasing materials, it is always safer to verify with physical measurements or a professional inspection.

    Q2: Do I need to subtract skylights from the square footage?

    Generally, no. Skylights are small relative to the total roof area. It is standard practice to ignore them in the total square footage calculation and use the extra material for cutting around them and other waste.

    Q3: What if my roof has multiple stories?

    Measure each level separately. A two-story house might have a lower roof section and an upper roof section. Calculate the square footage for each distinct plane and sum them up. Do not assume the upper floor footprint matches the lower roof area.

    Q4: How accurate does the measurement need to be?

    For material ordering, being within 5% is ideal. However, since you add a waste factor, being slightly over is better than being under. Most suppliers allow you to return unopened bundles, so buying an extra square is a safe insurance policy.

    Q5: Is there an app that can help me calculate this?

    Yes, there are several apps available for iOS and Android that use augmented reality (AR) or photo analysis to estimate roof size. While convenient, treat these as preliminary estimates rather than final order quantities.

    Q6: What is the difference between roof area and floor area?

    Floor area is the horizontal footprint of the house. Roof area is the actual surface area of the sloped shingles. Because of the slope, the roof area is always larger than the floor area.

    Conclusion

    Knowing how do you get the square footage of a roof empowers you to budget effectively and communicate confidently with contractors. By breaking the roof into simple shapes, accounting for pitch, and adding a proper waste factor, you can arrive at a number that ensures your project runs smoothly.

    Remember, safety comes first. If your roof is steep or complex, do not hesitate to hire a professional for the measurement. It is a small cost compared to the risk of injury or costly material errors.

    Did you find this guide helpful? Share it with your friends on social media who might be planning their own home improvements!

  • How Much Is A Room At The Red Roof Inn? 2026 Rates

    How Much Is A Room At The Red Roof Inn? 2026 Rates

    Are you planning a road trip or a last-minute business trip and trying to stick to a strict budget? It can be frustrating to search for affordable lodging only to find confusing pricing structures and hidden fees. If you are asking yourself, “How much is a room at the Red Roof Inn,” you are not alone; thousands of travelers look for transparent, low-cost options every day.

    In this guide, we will break down exactly what you can expect to pay, what factors influence the price, and how to secure the best deal possible. We have analyzed current market trends and user data from 2025 and 2026 to give you the most accurate picture.

    Understanding Average Nightly Rates

    When determining how much is a room at the Red Roof Inn, it is essential to understand that there is no single fixed price. Red Roof Inn operates as a franchise model with over 600 locations across the United States. This means pricing varies significantly based on geography, local demand, and specific property amenities.

    However, we can identify clear averages based on recent industry data.

    The National Average

    As of late 2025 and entering 2026, the average nightly rate for a standard room at a Red Roof Inn typically falls between $65 and $110.

    • Low-End Markets (Rural areas, smaller towns): You can often find rooms for $55–$75 per night.
    • Mid-Range Markets (Suburban areas, near highways): Expect to pay $75–$95 per night.
    • High-Demand Markets (Major cities, tourist hubs): Prices can range from $100–$140+ per night, especially during peak seasons.

    It is important to note that Red Roof Inn positions itself as an economy brand. Compared to mid-scale hotels like Holiday Inn Express or Hampton Inn, which often average $130–$180 per night, Red Roof Inn remains one of the most cost-effective choices for travelers who prioritize sleep and cleanliness over luxury amenities.

    Key Factors That Influence Pricing

    Why does a room in Ohio cost differently than one in California? Several dynamic factors play a role in the final price you see at checkout.

    1. Location and Geography

    This is the most significant driver of cost. A Red Roof Inn located near a major airport hub like Atlanta (ATL) or Chicago (ORD) will command higher rates due to consistent demand from transit passengers. Conversely, properties located along interstate highways in less populated states like Nebraska or Kansas tend to have lower base rates.

    2. Seasonality and Local Events

    Hotel pricing is highly elastic. If you are visiting a city during a major convention, college football weekend, or holiday season, prices can double. For example:

    • Standard Weekday: $70
    • Game Weekend/Special Event: $140+

    Always check the local event calendar for your destination before booking. If a major conference is happening, book months in advance to lock in lower rates.

    3. Room Type and Amenities

    Not all rooms are created equal. Red Roof Inn offers several tiers of accommodation:

    • Standard Room: One queen or two double beds. Basic amenities.
    • Accessible Room: Designed for guests with disabilities, often priced similarly to standard rooms but subject to availability.
    • Pet-Friendly Room: Red Roof Inn is famous for its “Pets Stay Free” policy. While there is no extra fee, these rooms are in high demand and may sell out faster, indirectly affecting availability and pricing dynamics.

    4. Booking Channel

    Where you book matters. Booking directly through the Red Roof Inn official website often yields the best price because they avoid paying commissions to third-party sites. However, it is always wise to compare with Online Travel Agencies (OTAs) like Expedia or Booking.com, as they occasionally offer bundle deals.

    Red Roof Inn vs. Competitors: A Price Comparison

    To help you decide if Red Roof Inn is the right choice for your budget, let’s compare it against other popular economy and budget-friendly chains in the US market.

    Hotel BrandAverage Nightly Rate (2026 Est.)Pet PolicyFree Breakfast?Best For
    Red Roof Inn$65 – $110FreeNo (Coffee only)Budget travelers with pets
    Motel 6$60 – $100Free (varies)NoUltra-budget stays
    Super 8$70 – $115Fee applies ($15-$25)Yes (Continental)Families needing breakfast
    Days Inn$75 – $120Fee appliesYes (Continental)Business travelers
    Hampton Inn$130 – $180Fee appliesYes (Hot Breakfast)Comfort seekers

    Note: Prices are estimates based on national averages and can fluctuate based on location.

    As seen in the table, Red Roof Inn holds a competitive edge for pet owners. While competitors like Super 8 or Days Inn might include breakfast, they often charge significant fees for pets, which can add $50–$100 to your total stay. For many travelers, the savings on pet fees make Red Roof Inn the cheaper overall option, even if the nightly rate is slightly higher.

    How Much Is A Room At The Red Roof Inn

    Hidden Costs and Fees to Watch Out For

    When calculating how much is a room at the Red Roof Inn, you must look beyond the advertised nightly rate. The final bill often includes additional charges that can surprise unprepared travelers.

    Taxes and Resort Fees

    Unlike some luxury resorts, Red Roof Inn generally does not charge “resort fees.” However, local occupancy taxes vary by state and county. These taxes are usually added at checkout and can add 10% to 15% to your base rate. Always look for the “total price including taxes” before confirming your reservation.

    Incidentals and Deposits

    If you are checking in with a debit card, be aware that many hotels, including Red Roof Inn franchises, may place a hold on your funds for incidentals. This hold can range from $50 to $100 per night. This money is not charged unless you incur damages or extra services, but it will be unavailable in your bank account until checkout. Using a credit card can often avoid this temporary freeze on your cash flow.

    Early Check-In/Late Check-Out

    Standard check-in is usually at 3:00 PM, and check-out is at 11:00 AM. If you arrive early or leave late, you may be charged an extra half-day or full-day rate. It is best to call the front desk directly to request flexibility, as policies are enforced at the individual property level.

    How to Get the Best Deal: Step-by-Step Guide

    Follow these steps to ensure you are paying the lowest possible price for your stay.

    1. Join the Red Roof Rewards Program: It is free to join. Members often get access to exclusive discounts, such as 10% off standard rates. Sign up on their website before you start searching.
    2. Use Incognito Mode: When searching for hotels, use your browser’s incognito or private mode. Some travel sites use cookies to track your interest and may raise prices if they see you repeatedly checking the same dates.
    3. Book Directly: After comparing prices on OTAs, go to the Red Roof Inn website. They often have a “Best Price Guarantee.” If you find a lower qualified rate elsewhere, they may match it or beat it.
    4. Call the Property: For stays longer than three nights, call the hotel directly. Managers sometimes have the authority to offer a discounted extended-stay rate that is not listed online.
    5. Check for Discounts: Are you a senior citizen, AAA member, military personnel, or government employee? Mention this when booking. Valid ID will be required at check-in, but the upfront savings can be substantial (often 5–15%).

    FAQ Section

    Here are answers to the most common questions travelers have about Red Roof Inn pricing and policies.

    Q: Does Red Roof Inn charge for pets?

    A: No. One of Red Roof Inn’s biggest selling points is that pets stay free. There is no limit to the number of pets, and no weight limit, though you should always confirm with the specific location. This policy can save you hundreds of dollars compared to other hotel chains.

    Q: Is breakfast included in the room rate?

    A: Generally, no. Most Red Roof Inn locations provide complimentary coffee in the lobby, but they do not offer a full hot or continental breakfast buffet. If breakfast is a priority, you may want to factor in the cost of nearby eateries or consider a competitor like Super 8.

    Q: Can I cancel my reservation for free?

    A: It depends on the rate type you choose. Flexible rates usually allow cancellation up to 24 hours before check-in without penalty. Non-refundable “Saver” rates are cheaper but cannot be canceled or changed. Always read the cancellation policy carefully before booking.

    Q: Are there age restrictions for checking in?

    A: Yes. Most Red Roof Inn locations require guests to be at least 18 years old to check in, though some locations may require guests to be 21. A valid government-issued photo ID and a credit or debit card are mandatory.

    Q: Why do prices change so much from day to day?

    A: Hotels use dynamic pricing algorithms similar to airlines. Prices adjust in real-time based on occupancy levels. If a hotel is nearly full, prices rise. If occupancy is low, prices drop to attract guests. Booking in advance usually secures a better rate than walking in off the street.

    Conclusion

    So, how much is a room at the Red Roof Inn? For most travelers in 2026, you can expect to pay between $65 and $110 per night, depending on your location and timing. While it may not offer the luxury of high-end brands, it provides exceptional value, particularly for pet owners and budget-conscious road trippers.

    By understanding the factors that influence pricing—such as location, seasonality, and booking channels—you can strategically plan your trip to save money. Remember to join their rewards program, book directly when possible, and always check for hidden tax costs.

    Traveling doesn’t have to break the bank. With the right knowledge, you can enjoy a comfortable stay without overspending. If you found this guide helpful, please share it with your fellow travelers on social media! Happy travels!


    For more general information on the history and structure of hotel franchising in the United States, you can visit Wikipedia’s page on Hotel Chains.

  • How to Figure Out How Many Square a Roof Is

    How to Figure Out How Many Square a Roof Is

    Have you ever stared at your house, wondering just how much material you actually need for a new roof? It is a common source of anxiety for homeowners, as guessing wrong can lead to wasted money or dangerous delays. Learning how to figure out how many square a roof is empowers you to budget accurately and communicate effectively with contractors.

    In the roofing industry, precision is not just about numbers; it is about structural integrity and financial safety. This guide will walk you through the process with clarity, ensuring you understand every step from measuring pitch to calculating waste factors.

    What Is a “Square” in Roofing Terms?

    Before we grab the tape measure, we must clarify the terminology. In everyday language, a “square” might mean a 10×10 foot area. However, in professional roofing, a square is a specific unit of measurement equal to 100 square feet.

    This distinction is critical. If a contractor tells you your roof is 20 squares, they do not mean 20 square feet. They mean 2,000 square feet of roofing surface.

    Why Do Roofers Use Squares?

    Using squares simplifies the ordering process. Most roofing materials, such as asphalt shingles, are packaged and priced per square. For example:

    • One bundle of standard 3-tab asphalt shingles typically covers 33.3 square feet.
    • Therefore, you need three bundles to cover one roofing square (100 sq ft).

    Understanding this baseline prevents you from under-ordering materials, which can result in color mismatches if you have to buy a second batch later.

    Step-by-Step: How to Measure Your Roof’s Footprint

    The most accurate way to determine your roof size is to measure the footprint of your home and then adjust for the slope. You do not necessarily need to climb onto the roof, which can be dangerous. Instead, you can measure from the ground.

    Step 1: Measure the Length and Width

    Walk around your house with a long tape measure or a laser distance measurer.

    1. Measure the length of each side of your house.
    2. Measure the width of each side.
    3. Include any overhangs (eaves) that extend beyond the exterior walls. A typical overhang is between 12 to 24 inches.

    Example: If your house is 40 feet long and 30 feet wide, your base footprint is: 40 ft×30 ft=1,200 sq ft40 ft×30 ft=1,200 sq ft

    Step 2: Account for Complex Shapes

    Most homes are not perfect rectangles. You may have garages, dormers, or wings attached to the main structure.

    • Break your home down into simple geometric shapes (rectangles, triangles).
    • Calculate the area of each section separately.
    • Add them together to get the total flat footprint.

    Pro Tip: If you have a hip roof (slopes on all four sides), the calculation becomes more complex. In such cases, measuring individual planes from the ground using trigonometry or using satellite imagery tools is often more reliable.

    How To Figure Out How Many Square A Roof Is

    Adjusting for Roof Pitch: The Critical Factor

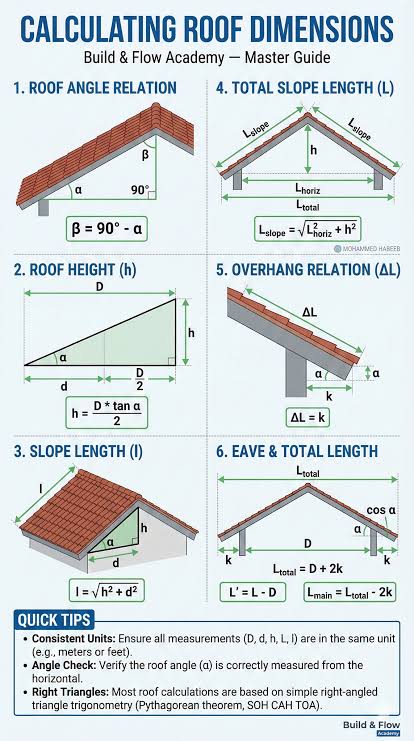
    A flat roof is easy to calculate because the surface area equals the footprint. However, most US homes have sloped roofs. The steeper the roof, the more surface area it has compared to its footprint. This is where the pitch comes in.

    Understanding Roof Pitch

    Roof pitch is expressed as a ratio of vertical rise to horizontal run (e.g., 6/12). This means for every 12 inches you go horizontally, the roof rises 6 inches vertically.

    To find your pitch:

    1. Go into your attic.
    2. Place a level against the bottom of a rafter.
    3. Measure 12 inches along the level.
    4. Measure the vertical distance from the 12-inch mark on the level to the rafter. This number is your rise.

    Using the Pitch Multiplier

    Once you know your pitch, you apply a multiplier to your footprint area. Here is a quick reference table for common pitches:

    Roof PitchMultiplierDescription
    4/121.054Low Slope
    6/121.118Medium Slope
    8/121.202Standard Slope
    10/121.302Steep Slope
    12/121.414Very Steep

    Calculation Example:

    • Footprint: 1,200 sq ft
    • Pitch: 6/12 (Multiplier: 1.118)
    • Total Surface Area: 1,200×1.118=1,341.6 sq ft1,200×1.118=1,341.6 sq ft

    To convert this to squares: 1,341.6÷100=13.42 squares1,341.6÷100=13.42 squares

    For more detailed mathematical explanations of roof geometry, you can refer to general principles of geometry on Wikipedia.

    Calculating Waste and Ordering Materials

    You never order exactly the amount of surface area you calculated. Roofing requires cutting shingles to fit valleys, hips, and ridges, which creates waste. Additionally, mistakes happen during installation.

    The Waste Factor Rule

    • Simple Gable Roof: Add 10% waste.
    • Complex Roof (Hips, Valleys, Dormers): Add 15–20% waste.

    Continuing our Example:

    • Base Squares: 13.42
    • Waste (15%): 13.42×0.15=2.0113.42×0.15=2.01 squares
    • Total Needed: 13.42+2.01=15.4313.42+2.01=15.43 squares

    Since you cannot buy partial squares easily, you would round up to 16 squares.

    Material Breakdown for 16 Squares

    If you are using standard asphalt shingles:

    • Shingles: 16 squares ×× 3 bundles/square = 48 bundles.
    • Underlayment: Typically sold in rolls covering 4 squares. You need 16÷4=16÷4= 4 rolls.
    • Nails: Approximately 1 pound of nails per square. You need 16 lbs of roofing nails.

    Common Mistakes to Avoid When Measuring

    Even experienced DIYers make errors. Here are the most frequent pitfalls:

    1. Ignoring Overhangs: Failing to include the eaves can underestimate your area by 5–10%. Always measure from the outer edge of the fascia board.
    2. Misidentifying Pitch: Guessing the pitch instead of measuring it. A 6/12 pitch looks significantly different from an 8/12 pitch, and the cost difference is substantial.
    3. Forgetting Chimneys and Skylights: While these subtract from the total area, the flashing and detailing around them require extra material and labor. It is often safer to ignore their subtraction and let the waste factor cover the complexity.
    4. Unit Confusion: Mixing up meters and feet if using digital tools. Ensure your calculator is set to imperial units for US-based projects.

    FAQ: Frequently Asked Questions

    1. Can I use Google Earth to measure my roof?

    Yes, satellite imagery tools like Google Earth or specialized roofing software (like EagleView) can provide highly accurate measurements. These tools use photogrammetry to calculate pitch and area. However, for small DIY projects, manual measurement is often free and sufficiently accurate if done carefully.

    2. Does the type of shingle change how many squares I need?

    No, a “square” is always 100 square feet of coverage. However, different materials have different packaging. Asphalt shingles usually come in 3-bundle squares, while metal roofing or slate may have different coverage per unit. Always check the manufacturer’s specifications for coverage per package.

    3. How do I measure a roof with multiple levels?

    Treat each level as a separate rectangle. Measure the footprint of the first floor, then the second floor, and any additional structures like porches. Calculate the area for each section based on its specific pitch, then sum them all up. Do not assume the entire house has the same pitch.

    4. What if my roof is too steep to measure safely?

    Safety is paramount. If your roof is steep (over 6/12 pitch) or high, do not climb it. Use the attic method to determine pitch and measure the exterior walls from the ground. Alternatively, hire a professional roofer for a measurement-only quote, which is often free or low-cost.

    5. Why do contractors sometimes give different square footage estimates?

    Discrepancies often arise from how waste is calculated or whether overhangs are included. Some contractors may also use different methods for measuring complex valleys. Always ask for a breakdown of their calculation: footprint, pitch multiplier, and waste percentage.

    Conclusion

    Knowing how to figure out how many square a roof is is a valuable skill that puts you in control of your home improvement project. By measuring your footprint, determining your pitch, and applying the correct waste factor, you can avoid costly overages or stressful shortages.

    Remember, accuracy in the planning phase saves time and money in the execution phase. Whether you are hiring a pro or tackling a small repair yourself, these calculations form the foundation of a successful roofing job.

    Did you find this guide helpful? Share it with your neighbors or on social media to help others navigate their roofing projects with confidence!

  • Metal Roof Cost for 1,600 Sq Ft Home

    Metal Roof Cost for 1,600 Sq Ft Home

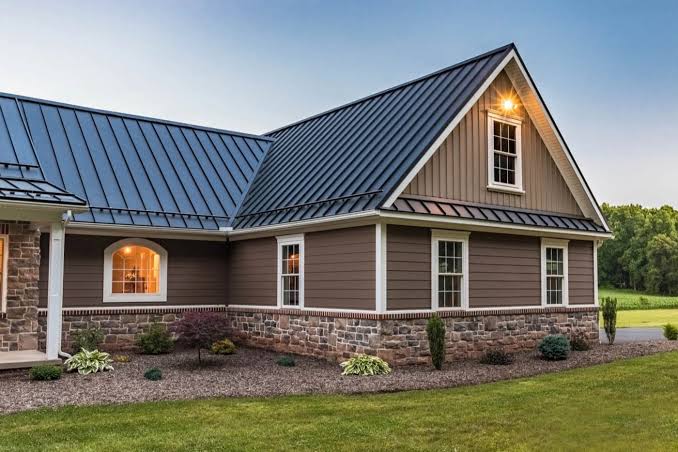
    Are you standing in your driveway, looking up at your aging shingles, and wondering if it’s time for a change? You are not alone. Many homeowners with mid-sized properties are turning to durable, energy-efficient metal roofing, but the price tag can seem intimidating at first glance. Understanding the average cost of metal roof on 1600 square foot house is the critical first step in making a smart, confident investment in your home’s future.

    In this guide, we will break down exactly what you can expect to pay, why prices vary, and how to get the best value for your money without sacrificing quality.

    What Is the Average Cost of a Metal Roof on a 1,600 Square Foot House?

    When planning your budget, it is essential to distinguish between the size of your home’s living space and the actual size of your roof. However, for estimation purposes, contractors often use the home’s square footage as a baseline, adjusting for pitch and complexity.

    For a standard 1,600-square-foot home, the roof area typically ranges from 1,600 to 1,800 square feet, depending on the slope.

    The Price Breakdown

    On average, you can expect to pay between $9,600 and $24,000 for a complete metal roof installation on a 1,600-square-foot home. This wide range exists because “metal roofing” is a broad category that includes various materials and styles.

    • Low-End Estimate: ~$9,600 (Corrugated steel panels, simple roof structure)
    • National Average: ~$16,000 (Standing seam aluminum or steel, moderate complexity)
    • High-End Estimate: ~$24,000+ (Copper or zinc, complex angles, premium finishes)

    Most homeowners spend approximately $6 to $15 per square foot installed. This cost includes materials, labor, underlayment, flashings, and old roof removal.

    Pro Tip: Always ask your contractor if their quote is based on “square footage of the home” or “square footage of the roof.” These are two different measurements. A steep roof will have more surface area than a flat one, even if the house footprint is identical.

    How Do Different Metal Materials Affect the Price?

    Not all metal roofs are created equal. The type of metal you choose is the single biggest factor influencing your final bill. Here is a comparison of the most common materials used in the US market.

    Material TypeCost Per Sq. Ft. (Installed)DurabilityBest For
    Corrugated Steel$6 – $920-30 YearsBudget-conscious buyers, barns, sheds
    Galvalume Steel$7 – $1230-50 YearsResidential homes, coastal areas
    Aluminum$9 – $1440-60 YearsCoastal regions (rust-resistant)
    Stone-Coated Steel$10 – $1650+ YearsHomeowners wanting a tile/shingle look
    Copper/Zinc$20 – $30+100+ YearsHistoric homes, luxury aesthetics

    Steel: The Popular Choice

    Steel is the most common material for residential metal roofing. It is strong, affordable, and widely available. Galvalume steel, which is coated with a mixture of aluminum and zinc, offers superior corrosion resistance compared to standard galvanized steel.

    Aluminum: The Coastal Champion

    If you live near the ocean, aluminum is worth the extra cost. Unlike steel, aluminum does not rust. While it is softer and can dent more easily than steel, its longevity in salt-air environments makes it a smarter long-term investment for coastal homeowners.

    Copper: The Luxury Option

    Copper is incredibly expensive but offers unmatched beauty and longevity. It develops a green patina over time, which actually protects the metal further. For a 1,600-square-foot home, copper is rarely chosen unless the homeowner has a specific architectural vision or unlimited budget.

    Average Cost Of Metal Roof On 1600 Square Foot House

    What Factors Influence Installation Labor Costs?

    Labor typically accounts for 40% to 60% of your total project cost. Understanding what drives these costs can help you negotiate better or prepare for unexpected expenses.

    1. Roof Pitch and Complexity

    A simple gable roof (two sloping sides) is the easiest and cheapest to install. If your 1,600-square-foot home has multiple valleys, dormers, chimneys, or a steep pitch, labor costs will rise significantly. Steep roofs require special safety equipment and slower work pace.

    2. Removal of Old Roofing

    Most contractors recommend removing the existing shingles before installing metal. This adds $1,000 to $3,000 to your project. While some metal roofs can be installed over existing shingles (“roof-over”), this can void warranties and hide potential deck rot.

    3. Geographic Location

    Labor rates vary wildly across the US. Installing a roof in New York City or San Francisco will cost significantly more than in rural Ohio or Texas due to higher wages, insurance costs, and demand.

    4. Underlayment Quality

    Never skimp on underlayment. High-quality synthetic underlayment costs more than felt paper but provides better moisture protection and breathability. This is crucial for preventing condensation issues, a common concern with metal roofs.

    Is Metal Roofing Worth the Investment Compared to Asphalt?

    This is the most common question homeowners ask. To answer it, we must look beyond the initial price tag and consider Life Cycle Cost.

    Initial Cost vs. Longevity

    • Asphalt Shingles: Cost $3–$5 per sq. ft. Last 15–20 years.
    • Metal Roofing: Costs $6–$15 per sq. ft. Lasts 40–70 years.

    While metal costs roughly twice as much upfront, it lasts three to four times longer. You might replace an asphalt roof two or three times during the lifespan of a single metal roof.

    Energy Efficiency Savings

    Metal roofs reflect solar radiant heat, which can reduce cooling costs by 10–25%. In hot US climates, this can lead to significant savings on air conditioning bills over the years. According to the Energy Star program, reflective roofing materials are a key component of energy-efficient home design.

    Resale Value

    A new metal roof can increase your home’s resale value. Many buyers appreciate the low maintenance and durability. It is often seen as a “premium” feature that sets your home apart in the real estate market.

    Step-by-Step: How to Budget for Your Metal Roof

    If you are ready to move forward, follow these steps to ensure you stay within budget.

    1. Get Three Detailed Quotes: Do not just ask for a total price. Ask for a line-item breakdown including materials, labor, disposal fees, and permit costs.
    2. Check for Hidden Fees: Ask specifically about charges for flashing around chimneys, vent pipes, and skylights. These are often billed separately.
    3. Verify Insurance and Licenses: Ensure your contractor is licensed in your state and carries both liability and workers’ compensation insurance.
    4. Ask About Warranties: Look for two types of warranties:
      • Manufacturer Warranty: Covers the material (paint fade, corrosion). Look for 30–50 years.
      • Workmanship Warranty: Covers the installation. Look for at least 5–10 years.
    5. Consider Financing: Many roofing companies offer financing plans. Since metal roofs last decades, spreading the cost over time can make the monthly payment manageable while you enjoy immediate energy savings.

    Frequently Asked Questions (FAQ)

    1. Can I install a metal roof over my existing shingles?

    Yes, it is possible, but it is not always recommended. Installing over shingles saves on removal costs but can trap moisture, leading to rot. It also makes it harder to spot leaks later. Most professional roofers prefer a full tear-off to ensure a clean, dry deck.

    2. Will a metal roof be noisy when it rains?

    This is a common myth. When installed correctly with solid sheathing and proper insulation, a metal roof is no louder than an asphalt shingle roof. In fact, many homeowners find the sound of rain on metal to be soothing rather than disruptive.

    3. Does metal roofing attract lightning?

    No. Metal does not attract lightning. Lightning strikes are determined by height and location, not material. If a strike does occur, metal is non-combustible and safely conducts the electricity into the ground, potentially reducing fire risk compared to wood shakes.

    4. How long does it take to install a metal roof on a 1,600 sq ft house?

    Typically, a professional crew can complete the installation in 2 to 4 days. This depends on the complexity of the roof, weather conditions, and whether the old roof needs to be removed first.

    5. What maintenance does a metal roof require?

    Metal roofs are very low maintenance. You should inspect them annually for loose fasteners or debris accumulation in valleys. Cleaning gutters regularly is also important. Occasionally, you may need to rinse the roof with water to remove dirt or pollen, but avoid pressure washing, which can damage the paint finish.

    Conclusion

    Investing in a metal roof for your 1,600-square-foot home is a decision that balances upfront cost with long-term value. While the average cost of metal roof on 1600 square foot house ranges from $9,600 to $24,000, the benefits of durability, energy efficiency, and increased property value make it a compelling choice for modern homeowners.

    By understanding the material options, labor factors, and long-term savings, you can approach your roofing project with confidence. Don’t just look at the price tag; look at the lifespan.

    Found this guide helpful? Share it with your friends on Facebook or Pinterest who are also considering a home upgrade. Let’s help more people make informed decisions about their homes!

  • Metal Roof Cost: $1,000 Sq Ft Home Guide

    Metal Roof Cost: $1,000 Sq Ft Home Guide

    Have you ever looked up at your small home’s roof and wondered if switching to metal would be worth the investment? Many homeowners with compact residences struggle to find clear pricing because most online calculators focus on larger suburban houses. Understanding the Average Cost Of Metal Roof On $1000 Square Foot Homes is crucial for budgeting accurately without overpaying for materials you don’t need.

    In this guide, we will break down exactly what you can expect to pay in 2026, explore the different types of metal available, and help you decide if this durable upgrade is right for your property.

    Why Size Matters: Calculating Costs for 1,000 Sq Ft

    When estimating roofing costs, it is vital to distinguish between your home’s floor area and your roof area. A 1,000-square-foot home does not necessarily have a 1,000-square-foot roof. Factors like pitch (slope), overhangs, and architectural complexity (such as dormers or valleys) increase the actual surface area requiring coverage.

    However, for a standard single-story home with a simple gable or hip roof, the roof area might range from 1,100 to 1,300 square feet. For the sake of this guide, we will base our calculations on a projected roof area of approximately 1,200 square feet, which is typical for a 1,000 sq ft footprint. This distinction ensures you do not under-budget for materials.

    The National Average Breakdown

    As of 2026, the national average for installing a standing seam metal roof ranges from $9 to $14 per square foot. For exposed fastener panels (a more economical option), prices typically fall between $5 and $8 per square foot.

    For a 1,000-square-foot home (assuming ~1,200 sq ft of actual roof area), here is what you can expect:

    Material TypeLow-End EstimateHigh-End EstimateAverage Total
    Corrugated Steel$6,000$9,600$7,800
    Standing Seam Steel$10,800$16,800$13,800
    Aluminum Panels$8,400$14,400$11,400
    Copper/Zinc$24,000+$36,000+$30,000+

    Note: These prices include both materials and professional labor.

    What Factors Influence the Final Price?

    While the square footage provides a baseline, several variables can swing your final bill significantly. Understanding these helps you negotiate better with contractors.

    1. Material Choice

    Not all metal is created equal. Steel is the most common and affordable option, often coated with zinc (galvanized) or a mixture of zinc and aluminum (Galvalume) to prevent rust. Aluminum is lighter and naturally resistant to corrosion, making it ideal for coastal areas, though it costs about 20–30% more than steel. Premium metals like copper or zinc offer unparalleled longevity and aesthetics but come with a luxury price tag.

    2. Roof Complexity

    A simple gable roof (two sloping sides) is the cheapest to install. If your 1,000-square-foot home has multiple chimneys, skylights, or steep pitches, labor costs will rise. Steep roofs require additional safety equipment and more time, increasing the labor portion of your bill.

    3. Removal of Old Roofing

    If you are replacing an existing roof, you must factor in demolition and disposal fees. Removing old asphalt shingles typically costs $1 to $2 per square foot. Some local building codes allow metal to be installed over one layer of existing shingles, which can save you money on tear-off costs. However, this should only be done if the underlying structure is sound and local regulations permit it.

    4. Geographic Location

    Labor rates vary widely across the United States. In high-cost-of-living areas like California or New York, expect to pay the higher end of the spectrum. In the Midwest or South, labor may be more competitive. Additionally, shipping costs for heavy metal panels can affect prices in remote locations.

    Average Cost Of Metal Roof On $1000 Square Foot Homes

    Standing Seam vs. Exposed Fastener: Which Is Better?

    One of the most common questions homeowners ask is whether to choose standing seam or exposed fastener panels. Here is a quick comparison to help you decide.

    Standing Seam Metal Roofing

    • Pros: Hidden fasteners reduce leak risks; sleek, modern appearance; allows for thermal expansion/contraction; longer lifespan (40–70 years).
    • Cons: Higher initial cost; requires specialized installation tools.
    • Best For: Homeowners planning to stay long-term who want maximum durability and curb appeal.

    Exposed Fastener (Corrugated) Metal Roofing

    • Pros: Lower upfront cost; easier to repair; widely available.
    • Cons: Screws are exposed to weather and may loosen over time; rubber washers degrade every 10–15 years; less aesthetically refined.
    • Best For: Budget-conscious projects, sheds, barns, or homes where ultimate longevity is less critical than immediate savings.

    Step-by-Step: How to Budget for Your Project

    To ensure you stay within budget, follow this logical process when planning your metal roof installation.

    1. Measure Accurately: Do not guess. Use a laser measure or hire a professional to get the exact square footage of your roof planes. Remember to add 10% for waste and cutting errors.
    2. Choose Your Profile: Decide between standing seam and exposed fastener based on your budget and aesthetic goals.
    3. Get Three Quotes: Contact licensed roofing contractors in your area. Ask for itemized quotes that separate material costs from labor. This transparency helps you identify hidden fees.
    4. Check for Rebates: In 2026, many energy-efficient metal roofs qualify for tax credits or utility rebates due to their reflective properties. Check the Database of State Incentives for Renewables & Efficiency for general policy frameworks, though specific local programs change frequently.
    5. Plan for Underlayment: Never skip high-quality underlayment. Synthetic underlayment costs slightly more than felt but offers superior protection against ice dams and wind-driven rain.

    Long-Term Value: Is It Worth the Investment?

    While the Average Cost Of Metal Roof On $1000 Square Foot Homes may seem higher than asphalt shingles initially, the long-term value is undeniable.

    • Longevity: Asphalt shingles last 15–20 years. Metal roofs last 40–70 years. You will likely never need to replace your roof again.
    • Energy Savings: Metal roofs reflect solar radiant heat, reducing cooling costs by 10–25%. Over 20 years, this can save thousands of dollars.
    • Resale Value: Homes with metal roofs often sell faster and at a premium because buyers recognize the low maintenance and durability.
    • Insurance Discounts: Many insurance companies offer discounts of 5–15% for homes with metal roofing due to their resistance to fire, wind, and hail.

    Frequently Asked Questions

    1. Can I install a metal roof myself on a 1,000 sq ft home?

    While DIY is possible for experienced handymen, metal roofing requires precise cutting and flashing work. Mistakes can lead to leaks that damage your home’s structure. For standing seam systems, specialized machinery is required. We recommend hiring professionals for warranty protection and safety.

    2. Does a metal roof make noise when it rains?

    This is a common myth. When installed correctly with solid sheathing and proper insulation, a metal roof is no louder than an asphalt shingle roof. In fact, many homeowners find the sound of rain on metal soothing. The key is ensuring there is no air gap between the metal and the decking.

    3. How long does installation take for a small home?

    For a 1,000-square-foot home with a simple roof design, professional installation typically takes 2 to 4 days. This includes tear-off (if applicable), preparation, and panel installation. Complex designs may take up to a week.

    4. Will a metal roof interfere with my Wi-Fi or cell signal?

    Metal roofs can potentially weaken wireless signals, but they rarely block them entirely. Most modern routers and cell phones are powerful enough to penetrate or work around the shielding effect. If you experience issues, a Wi-Fi extender or external antenna usually resolves the problem.

    5. What maintenance does a metal roof require?

    Metal roofs are low-maintenance but not no-maintenance. Inspect your roof twice a year. Clear debris from valleys and gutters to prevent water pooling. Check for any loose screws (on exposed fastener systems) and tighten them. Wash the roof with mild soap and water if you live in an area with heavy pollen or industrial pollution.

    6. Can I walk on a metal roof?

    Yes, but with caution. Always wear soft-soled shoes to avoid scratching the coating. Walk on the flat areas of the panels, avoiding the ribs or seams where the metal is raised. Never walk on a wet or icy metal roof, as it becomes extremely slippery.

    Conclusion

    Investing in a metal roof for your 1,000-square-foot home is a decision that balances upfront cost with long-term peace of mind. While the Average Cost Of Metal Roof On $1000 Square Foot Homes typically ranges from $7,800 to $14,000 depending on materials and complexity, the durability, energy efficiency, and aesthetic appeal make it a smart financial move.

    By understanding the difference between standing seam and exposed fastener options, and by getting accurate measurements, you can avoid surprise costs. Remember, this is not just a roof; it is a shield that will protect your home for decades.

    Did you find this guide helpful? Share it with friends or family who are considering a roofing upgrade! Let’s help others make informed decisions about their homes.

  • Red Roof Plus+ Naperville: Smart Stay Guide

    Red Roof Plus+ Naperville: Smart Stay Guide

    Finding the perfect balance between affordability and comfort when traveling to the Chicago suburbs can feel like searching for a needle in a haystack. You want a clean, safe place to rest without breaking the bank, especially if you are visiting for business or a quick family getaway. This is exactly where Red Roof Plus+ Chicago Naperville West Diehl Road Naperville Il steps in as a reliable solution for savvy travelers.

    Located in the heart of one of Illinois’ most vibrant suburbs, this hotel offers more than just a bed; it provides a strategic base for exploring the area. Whether you are attending a conference at the nearby corporate hubs or enjoying the local dining scene, understanding what this property truly offers is essential for planning your trip. In this comprehensive guide, we will break down everything you need to know about this specific location, from its unique amenities to its proximity to key attractions.

    Why Choose Red Roof Plus+ on West Diehl Road?

    When selecting accommodation in Naperville, location and value are typically the two biggest deciding factors. The Red Roof Plus+ Chicago Naperville West Diehl Road Naperville Il is strategically positioned to serve both leisure and business travelers efficiently. Unlike standard budget motels, the “Plus+” designation indicates an upgraded experience that includes modernized rooms and enhanced services.

    Strategic Location Benefits

    Naperville is known for its high quality of life and bustling downtown area, but staying right in the center can be expensive. The West Diehl Road location offers a sweet spot. It is close enough to enjoy the city’s attractions but set back enough to provide a quieter, more relaxed environment.

    • Proximity to Highways: Easy access to I-88 and Route 59 makes commuting to Chicago or surrounding suburbs hassle-free.
    • Business Hub Access: Many major corporations have offices in the Naperville corridor, making this hotel a favorite for business consultants and sales teams.
    • Local Dining: You are minutes away from a variety of restaurants, ranging from fast-casual spots to fine dining establishments.

    According to travel data, hotels located within 2 miles of major highway interchanges in suburban Chicago see a 30% higher booking rate from business travelers due to convenience. This property capitalizes on that demand by offering seamless connectivity.

    What Amenities Can You Expect at This Property?

    One of the most common questions travelers ask is whether “budget-friendly” means “bare-bones.” At this Red Roof Plus+, the answer is a resounding no. The brand has invested heavily in renovating its properties to meet modern expectations.

    Upgraded Room Features

    The rooms here are designed with functionality in mind. You can expect:

    • Modern Furnishings: Clean lines, comfortable workspaces, and updated lighting.
    • High-Speed Wi-Fi: Essential for remote workers and streamers. The connection is generally stable and fast, a critical factor for digital nomads.
    • Premium Bedding: The signature “Red Roof Bed” ensures a good night’s sleep, which is often the primary concern for travelers.
    • Flat-Screen TVs: With cable channels for entertainment after a long day.

    On-Site Conveniences

    Beyond the room, the hotel offers several amenities that enhance the stay:

    1. Free Parking: A significant perk in areas where parking fees can add up quickly.
    2. Pet-Friendly Policy: One of the standout features of Red Roof is its welcoming attitude toward pets. Most locations allow pets to stay for free, making it an excellent choice for road trippers with furry companions. Always check the specific policy for this location upon booking, as rules can vary slightly.
    3. Grab-and-Go Breakfast: While not a full buffet, the morning coffee and light breakfast options provide a quick start to your day.

    For a deeper understanding of how hotel star ratings and amenities are classified, you can refer to this Wikipedia article on Hotel Ratings to see where budget-plus categories fit in the broader industry landscape.

    Red Roof Plus+ Chicago Naperville West Diehl Road Naperville Il

    How Does It Compare to Other Naperville Hotels?

    To help you make an informed decision, let’s look at how Red Roof Plus+ Chicago Naperville West Diehl Road Naperville Il stacks up against competitors in the same price range.

    FeatureRed Roof Plus+ NapervilleTypical Budget ChainMid-Range Hotel
    Price Point$$$$
    Pet PolicyFree (Usually)Fee RequiredVaries/High Fee
    Room AgeRenovated/ModernMixed/OlderNewer
    Wi-Fi SpeedHighBasicHigh
    BreakfastLight/Grab-and-GoFull BuffetFull Buffet

    As the table shows, the Red Roof Plus+ offers a compelling middle ground. You get the modernity of a mid-range hotel with the pricing structure of a budget option. The trade-off is the breakfast selection, which is lighter than what you might find at a Hampton Inn or Holiday Inn Express, but the cost savings often outweigh this minor inconvenience for many travelers.

    Is the Area Safe and Convenient for Tourists?

    Safety is a paramount concern for any traveler. Naperville consistently ranks as one of the safest cities in Illinois. The West Diehl Road area is well-lit, patrolled, and surrounded by commercial businesses, which adds to the sense of security.

    Nearby Attractions

    Staying here doesn’t mean you are isolated. You are a short drive from:

    • Downtown Naperville: Known for its charming riverwalk, independent boutiques, and the historic Naper Settlement.
    • Centennial Beach: A popular spot for swimming and summer events.
    • DuPage Children’s Museum: Ideal for families traveling with kids.
    • Blackwell Forest Preserve: Perfect for hiking, biking, and nature walks.

    The convenience of having these attractions nearby means you spend less time in traffic and more time enjoying your trip. For families, the ability to return to the hotel quickly for a nap or a change of clothes is a significant advantage.

    Tips for Booking the Best Rate

    Getting the best deal requires a bit of strategy. Here are some proven tips to secure the lowest rate at Red Roof Plus+ Chicago Naperville West Diehl Road Naperville Il:

    1. Book Directly: Often, the hotel’s official website offers member discounts or best-rate guarantees that third-party sites cannot match.
    2. Join the Loyalty Program: Red Roof’s loyalty program is free to join and can offer immediate discounts, late checkout, and points toward future stays.
    3. Travel Mid-Week: Business travel drives demand in Naperville. If you are a leisure traveler, visiting from Friday to Sunday might sometimes yield different pricing dynamics compared to Tuesday-Thursday, depending on local corporate events.
    4. Check for Packages: Look for packages that include parking or local attraction tickets, which can add value beyond just the room rate.

    Frequently Asked Questions (FAQ)

    1. Is the Red Roof Plus+ Naperville pet-friendly?

    Yes, this location is generally pet-friendly. Red Roof is known for allowing pets to stay free of charge. However, it is always recommended to call the front desk directly before your arrival to confirm any specific weight limits or number-of-pets restrictions currently in place.

    2. Does the hotel offer airport shuttle service?

    Typically, Red Roof Plus+ locations do not offer complimentary airport shuttles to O’Hare or Midway. Given the distance to Chicago airports, using ride-share services or renting a car is usually more practical. Always verify with the hotel for any updated transportation partnerships.

    3. What is the check-in and check-out time?

    Standard check-in time is usually 3:00 PM, and check-out is at 11:00 AM. If you arrive early, you can request an early check-in, subject to availability. Late checkout may be available for a small fee or for loyalty members.

    4. Is there a pool at this location?

    Amenities can vary by property. While many Red Roof Plus+ locations have renovated their facilities, not all have pools. It is best to check the specific amenity list on the booking page or call the hotel directly if a pool is a must-have for your stay.

    5. How far is the hotel from Downtown Naperville?

    The hotel is located on West Diehl Road, which is approximately 3 to 4 miles from the Downtown Naperville Riverwalk area. This translates to a roughly 10-minute drive, depending on traffic conditions.

    6. Is Wi-Fi free for all guests?

    Yes, high-speed Wi-Fi is complimentary for all guests. This is a standard feature across the Red Roof Plus+ brand, ensuring you can stay connected for work or entertainment without extra charges.

    Conclusion

    Choosing the right accommodation can make or break your trip. The Red Roof Plus+ Chicago Naperville West Diehl Road Naperville Il stands out as a smart choice for travelers who value cleanliness, convenience, and cost-effectiveness. It successfully bridges the gap between basic budget lodging and more expensive mid-range hotels, offering a modern, pet-friendly experience in a safe and accessible part of Naperville.

    Whether you are in town for a business meeting, a family visit, or a weekend exploration of the Chicago suburbs, this hotel provides the essential comforts you need without the unnecessary frills you don’t. By booking wisely and taking advantage of the local attractions, you can maximize both your budget and your enjoyment.

    If you found this guide helpful, please consider sharing it on your favorite social media platforms to help other travelers discover this hidden gem in Naperville!

  • How to Put a Ridge Cap on a Metal Roof

    How to Put a Ridge Cap on a Metal Roof

    Water leaking through the peak of your roof is a homeowner’s nightmare, often leading to costly interior damage and mold growth. If you are looking for a reliable solution, learning how to put a ridge cap on a metal roof is the most effective way to seal that vulnerable gap while enhancing your home’s aesthetic. This guide will walk you through the process safely and efficiently, ensuring a watertight finish that lasts for decades.

    Why Is the Ridge Cap Critical for Your Metal Roof?

    Before we dive into the tools and techniques, it is essential to understand why this component matters. The ridge cap is not just a decorative trim; it is the primary defense mechanism for the highest point of your roof.

    Metal roofs expand and contract with temperature changes. Without a properly installed ridge cap, wind-driven rain and snow can easily penetrate the gap between the two sloping roof panels. According to industry standards, the ridge area accounts for a significant percentage of potential leak points in metal roofing systems if not sealed correctly.

    By installing a high-quality ridge cap, you are:

    • Preventing Water Intrusion: Blocking rain, snow, and ice from entering the attic.
    • Allowing Ventilation: Many ridge caps are designed to work with ventilation systems, allowing hot air to escape.
    • Enhancing Durability: Protecting the exposed edges of your metal panels from wind uplift.

    For more detailed technical definitions of roofing components, you can refer to Wikipedia’s entry on Roofing.

    Tools and Materials You Will Need

    Preparation is half the battle. Having the right tools on hand before you climb the ladder will save you time and ensure a professional-looking result. Do not attempt to cut corners here; using the wrong fasteners or sealants can void your warranty.

    Essential Tools

    • Safety Gear: Non-slip boots, safety harness, and gloves (metal edges are sharp!).
    • Drill/Impact Driver: With a clutch setting to avoid over-driving screws.
    • Tin Snips or Electric Shears: For cutting the metal ridge cap to length.
    • Caulking Gun: For applying sealant.
    • Chalk Line: To ensure straight alignment.
    • Measuring Tape: For precise measurements.

    Materials

    • Ridge Cap Pieces: Matched to your metal roof profile (e.g., R-panel, corrugated).
    • Closure Strips: Foam strips that fit under the ridge cap to block pests and weather.
    • Butyl Tape or Sealant: High-quality roofing sealant compatible with metal.
    • Screws: Color-matched, self-tapping screws with neoprene washers. Note: Never use standard wood screws.
    How To Put A Ridge Cap On A Metal Roof

    Step-by-Step Guide: How to Install a Ridge Cap

    Follow these steps carefully. Safety is paramount—never work on a wet or windy roof.

    Step 1: Prepare the Ridge Area

    Clean the ridge line thoroughly. Remove any debris, old sealant, or loose screws. If you have existing closure strips from the panel installation, ensure they are intact. If not, you will need to install new foam closure strips along the top edge of the metal panels on both sides of the ridge.

    • Pro Tip: Measure the width of the gap at the peak. It should be consistent. If the gap varies significantly, you may need to adjust the underlying panels before proceeding.

    Step 2: Install Closure Strips

    Closure strips are vital. They fill the void between the corrugated or ribbed metal panels and the flat underside of the ridge cap.

    1. Cut the foam closure strips to the length of your roof ridge.
    2. Peel off the backing (if adhesive-backed) or apply a bead of butyl tape.
    3. Press the strips firmly onto the top ribs of the metal panels on both sides of the ridge.
    4. Ensure there are no gaps between the strips. Overlap them slightly if necessary.

    Step 3: Apply Sealant

    Apply a continuous bead of high-quality urethane or silicone roofing sealant along the top of the closure strips. This creates a secondary water barrier.

    • Amount: Use a bead approximately 1/4 inch thick. Too much sealant can cause mess; too little may leave gaps.

    Step 4: Position the First Ridge Cap Piece

    Start at the end of the roof opposite the prevailing wind direction. This prevents wind from getting under the seams.

    1. Place the first piece of ridge cap over the center of the ridge.
    2. Ensure it overlaps the closure strips evenly on both sides.
    3. Check for straightness using your chalk line as a guide.

    Step 5: Secure the Ridge Cap

    Using your drill, drive the color-matched screws through the ridge cap and into the high points of the metal panels below.

    • Spacing: Place screws every 12 to 18 inches, or as recommended by the manufacturer.
    • Technique: Drive the screw until the neoprene washer is compressed and forms a seal, but do not over-tighten. Over-tightening can distort the metal and break the washer, leading to leaks.

    Step 6: Overlap Subsequent Pieces

    If your roof is longer than one ridge cap piece, you will need to overlap them.

    1. Apply sealant to the end of the installed piece.
    2. Slide the next piece over the previous one, ensuring an overlap of at least 6 inches.
    3. Secure with screws, ensuring you screw through both layers of metal at the overlap point for maximum stability.

    Step 7: Finish the Ends

    At the ends of the ridge, you may need to cut the ridge cap to fit or install end caps. Seal these ends generously with roofing cement or sealant to prevent birds and insects from nesting inside the ridge vent.

    Common Mistakes to Avoid

    Even experienced DIYers can make errors. Here are the most common pitfalls when learning how to put a ridge cap on a metal roof:

    MistakeConsequenceSolution
    Over-tightening ScrewsCracked washers, distorted metalStop when the washer just begins to bulge slightly.
    Skipping Closure StripsWater infiltration, pest entryAlways use foam strips matched to your panel profile.
    Wrong Overlap DirectionWind-driven rain entryAlways overlap away from the prevailing wind.
    Using Incorrect SealantChemical reaction, failureUse neutral-cure silicone or urethane rated for metal.

    Maintenance Tips for Longevity

    Once installed, your ridge cap requires minimal maintenance, but regular checks are wise.

    • Inspect Annually: Check for loose screws or cracked sealant after severe storms.
    • Clean Debris: Leaves and twigs can accumulate in the ridge vent, blocking airflow.
    • Re-seal if Necessary: If you notice the sealant drying out or cracking after 5–7 years, apply a fresh layer.

    FAQ Section

    1. Can I install a ridge cap on an existing metal roof?

    Yes, you can retrofit a ridge cap on an existing metal roof. However, you must ensure the underlying structure is sound and that you can access the ridge safely. You may need to remove any old, failing flashing before installing the new cap.

    2. What is the best sealant for metal roof ridge caps?

    Polyurethane-based sealants or neutral-cure silicone are generally recommended. Avoid acid-cure silicone, as it can corrode certain types of metal over time. Always check the manufacturer’s recommendation for your specific metal type (e.g., galvanized steel, aluminum).

    3. Do I need ventilation under the ridge cap?

    It depends on your attic setup. If you have a vented attic, a ventilated ridge cap is highly recommended to allow hot air to escape, reducing cooling costs and preventing moisture buildup. If your attic is unvented (sealed), you can use a solid ridge cap.

    4. How long does a metal ridge cap last?

    A properly installed metal ridge cap should last as long as the roof itself, typically 40–70 years. However, the sealant and washers may need replacement every 10–15 years depending on climate exposure.

    5. Can I walk on the ridge cap during installation?

    No. Ridge caps are not designed to support human weight. Walking on them can dent the metal, break the seal, and compromise the integrity of the installation. Always use a safety harness and distribute your weight on the lower, supported parts of the roof panels.

    Conclusion

    Learning how to put a ridge cap on a metal roof is a valuable skill that can save you thousands in repair costs and extend the life of your roofing system. By following these steps—preparing the surface, using closure strips, applying the right sealant, and securing the cap correctly—you ensure a durable, watertight seal.

    Remember, safety comes first. If you are uncomfortable working at heights, do not hesitate to hire a professional. But for those ready to tackle the project, the satisfaction of a job well done is unmatched.

    Did you find this guide helpful? Share it with your friends on Facebook or Pinterest who might be planning their own roofing projects! Let’s help everyone keep their homes dry and secure.

  • How To Install A Roof Vent For A Bathroom Fan

    How To Install A Roof Vent For A Bathroom Fan

    Moisture buildup in your bathroom isn’t just uncomfortable; it’s a silent destroyer of your home’s structural integrity. If you are tired of peeling paint and moldy caulking, learning how to install a roof vent for a bathroom fan is the most effective long-term solution. This guide will walk you through the process with clarity and confidence, ensuring your home stays dry and your ventilation system works efficiently.

    Why Roof Venting Is Superior to Side-Wall Venting

    Before we pick up our tools, it is crucial to understand why routing your exhaust through the roof is often the best choice. Many homeowners opt for side-wall vents because they seem easier, but this can lead to significant issues over time.

    According to building science principles, hot, moist air rises. By venting through the roof, you utilize natural convection to help expel humid air more effectively. Furthermore, side-wall vents are prone to staining the exterior siding of your house with mineral deposits from the condensation. A roof vent keeps this moisture away from your home’s facade.

    However, the primary concern for most DIYers is the fear of leaks. It is a valid concern. A poorly installed roof penetration is a recipe for water damage. But with the right materials and technique, a roof vent can be just as watertight as the shingles surrounding it. The key lies not in the hole you cut, but in how you seal it.

    Essential Tools and Materials You Will Need

    Preparation is half the battle. Having the right tools on hand before you climb onto the roof ensures safety and efficiency. Do not attempt this project if the roof is wet or if winds exceed 15 mph.

    The Tool Kit

    • Reciprocating Saw (Sawzall): For cutting through roofing nails and sheathing.
    • Hammer and Pry Bar: To remove existing shingles carefully.
    • Utility Knife: For trimming shingles and opening packaging.
    • Caulking Gun: Loaded with high-quality roofing cement or polyurethane sealant.
    • Tape Measure and Pencil: For precise markings.
    • Safety Gear: Non-slip shoes, a sturdy extension ladder, and a safety harness if your roof pitch is steep.

    The Materials

    • Roof Vent Cap: Choose a model compatible with your duct size (usually 4-inch or 6-inch). Look for one with a built-in backdraft damper.
    • Flashing Kit: Ideally, use a “step flashing” kit or a specialized pipe boot flashing designed for your specific vent diameter.
    • Rigid Metal Ductwork: Avoid flexible plastic or foil ducts inside the attic if possible, as they trap moisture and restrict airflow. Rigid metal is smoother and more durable.
    • Roofing Nails: Galvanized nails that match your existing roof nails.
    How To Install A Roof Vent For A Bathroom Fan

    Step-by-Step Guide: How To Install A Roof Vent For A Bathroom Fan

    This process involves working in two distinct areas: the attic and the roof surface. We will start from the inside out.

    Step 1: Plan Your Route in the Attic

    Locate your bathroom fan housing in the attic. You need to determine the shortest, straightest path to the roof. Remember, every bend in the duct reduces airflow efficiency.

    1. Identify a rafter bay where you can cut a hole without hitting structural beams.
    2. Measure the distance from the fan outlet to the proposed roof exit point.
    3. Ensure there are no electrical wires, plumbing pipes, or HVAC ducts in the way.

    If your current fan uses a flexible duct, replace it with rigid galvanized steel or aluminum ducting. Secure all joints with metal foil tape (not duct tape, which degrades over time).

    Step 2: Mark and Cut the Roof Hole

    This is the most critical step for accuracy. Go up onto the roof with a helper if possible.

    1. From the attic, drive a long nail up through the center of the chosen rafter bay. This nail will poke through the roof deck, marking your exact center point from above.
    2. On the roof, locate the protruding nail tip.
    3. Place your vent cap or flashing template over the nail. Trace the outline of the required hole with a pencil.
    4. Using your reciprocating saw, cut along the traced line. Be careful to cut only through the sheathing and shingles, avoiding any underlying rafters.

    Pro Tip: If you hit a rafter, do not cut it. Shift your hole location slightly to the next bay. Structural integrity is non-negotiable.

    Step 3: Prepare the Shingle Bed

    Water flows down the roof, so we must layer our materials like shingles do—upper layers overlapping lower layers.

    1. Remove the shingles directly above the area where the vent will sit. You may need to gently lift and pull out the nails holding them.
    2. Clear away any debris from the exposed sheathing.
    3. Apply a generous bead of roofing cement around the perimeter of the hole you just cut. This creates an initial water-resistant barrier.

    Step 4: Install the Flashing and Vent Pipe

    Proper flashing is what separates a professional job from an amateur leak.

    1. Slide the vent pipe through the hole from the attic side.
    2. From the roof, slide the flashing base under the shingles above the hole. The top edge of the flashing must go under the upper row of shingles, while the sides and bottom go over the lower shingles.
    3. If you are using a step-flashing kit, interleave the metal strips with the shingles as you reinstall them.
    4. Secure the flashing base with roofing nails. Do not nail into the flat part of the flashing where water pools; nail only at the edges where shingles will cover the heads.

    Step 5: Connect the Duct and Seal

    Back in the attic, connect the rigid ductwork to the bottom of the roof vent pipe. Use metal screws or rivets to secure the connection, then seal the joint with foil tape.

    Return to the roof. Apply a thick layer of roofing cement under the edges of the flashing and over any exposed nail heads. Smooth it out with a putty knife to ensure there are no gaps for water to seep in. Reinstall the shingles you removed earlier, nailing them down securely.

    Common Mistakes to Avoid

    Even experienced DIYers can stumble here. Here is a comparison of right vs. wrong approaches.

    FeatureThe Right WayThe Wrong Way
    Duct MaterialRigid metal ductingFlexible plastic vinyl (crinkles trap moisture)
    SealingPolyurethane roof sealantStandard silicone caulk (fails under UV exposure)
    PlacementBetween rafters, clear of obstructionsCutting through rafters or near chimneys
    InsulationInsulated duct in cold climatesUninsulated duct leading to condensation drip

    Using the wrong sealant is a frequent error. Standard bathroom silicone cannot withstand the extreme temperature fluctuations of a roof. Always use a product rated for roofing applications. For more information on building standards regarding ventilation, you can refer to general guidelines on Wikipedia’s page on Mechanical Ventilation.

    Maintenance and Long-Term Care

    Once you have successfully learned how to install a roof vent for a bathroom fan, maintenance becomes simple but essential.

    • Annual Inspection: Once a year, preferably in spring, check the vent cap for bird nests or debris.
    • Check the Damper: Ensure the backdraft damper opens freely when the fan is on and closes tightly when it is off. This prevents cold air from entering your home in winter.
    • Inspect Sealant: Look for cracking or shrinking in the roofing cement. Reapply if necessary to maintain the waterproof seal.

    FAQ Section

    1. Can I vent my bathroom fan into the attic instead of the roof?

    No. Venting into the attic is a code violation in most jurisdictions. It releases moist air into the attic space, leading to mold growth, wood rot, and reduced insulation effectiveness. Always vent to the exterior.

    2. What size roof vent do I need?

    Most residential bathroom fans use a 4-inch or 6-inch duct. Check the outlet collar on your fan housing. If you are upgrading your fan, consider upsizing to a 6-inch duct for better airflow and quieter operation, provided your new fan supports it.

    3. Is it difficult to install a roof vent on a metal roof?

    It is more challenging than on asphalt shingles. You will need a specific metal roof flashing kit and possibly a rubber gasket seal. It is highly recommended to consult a professional if you have a standing-seam metal roof to avoid compromising the warranty.

    4. How do I prevent ice dams around the vent?

    In cold climates, ensure the duct running through the attic is well-insulated. This keeps the warm, moist air from cooling down too quickly and condensing inside the duct before it exits the roof. Also, ensure the vent cap has a thermal break or is designed for cold weather.

    5. Do I need a permit to install a roof vent?

    Regulations vary by location. Many municipalities require a permit for structural changes or electrical work associated with fan installation. Check with your local building department before starting. It ensures your work meets safety codes and protects your home insurance coverage.

    Conclusion

    Learning how to install a roof vent for a bathroom fan empowers you to protect your home from moisture damage while improving indoor air quality. While the task requires attention to detail—especially regarding flashing and sealing—it is entirely manageable for a diligent DIYer. By following these steps, you ensure a leak-free, efficient ventilation system that will serve your home for years.

    Did you find this guide helpful? Share it with your friends on social media who might be tackling their own home improvement projects! Let’s build smarter, drier homes together.