Water leaking through the peak of your roof is a homeowner’s nightmare, often leading to costly interior damage and mold growth. If you are looking for a reliable solution, learning how to put a ridge cap on a metal roof is the most effective way to seal that vulnerable gap while enhancing your home’s aesthetic. This guide will walk you through the process safely and efficiently, ensuring a watertight finish that lasts for decades.
Why Is the Ridge Cap Critical for Your Metal Roof?
Before we dive into the tools and techniques, it is essential to understand why this component matters. The ridge cap is not just a decorative trim; it is the primary defense mechanism for the highest point of your roof.
Metal roofs expand and contract with temperature changes. Without a properly installed ridge cap, wind-driven rain and snow can easily penetrate the gap between the two sloping roof panels. According to industry standards, the ridge area accounts for a significant percentage of potential leak points in metal roofing systems if not sealed correctly.
By installing a high-quality ridge cap, you are:
- Preventing Water Intrusion: Blocking rain, snow, and ice from entering the attic.
- Allowing Ventilation: Many ridge caps are designed to work with ventilation systems, allowing hot air to escape.
- Enhancing Durability: Protecting the exposed edges of your metal panels from wind uplift.
For more detailed technical definitions of roofing components, you can refer to Wikipedia’s entry on Roofing.
Tools and Materials You Will Need
Preparation is half the battle. Having the right tools on hand before you climb the ladder will save you time and ensure a professional-looking result. Do not attempt to cut corners here; using the wrong fasteners or sealants can void your warranty.
Essential Tools
- Safety Gear: Non-slip boots, safety harness, and gloves (metal edges are sharp!).
- Drill/Impact Driver: With a clutch setting to avoid over-driving screws.
- Tin Snips or Electric Shears: For cutting the metal ridge cap to length.
- Caulking Gun: For applying sealant.
- Chalk Line: To ensure straight alignment.
- Measuring Tape: For precise measurements.
Materials
- Ridge Cap Pieces: Matched to your metal roof profile (e.g., R-panel, corrugated).
- Closure Strips: Foam strips that fit under the ridge cap to block pests and weather.
- Butyl Tape or Sealant: High-quality roofing sealant compatible with metal.
- Screws: Color-matched, self-tapping screws with neoprene washers. Note: Never use standard wood screws.
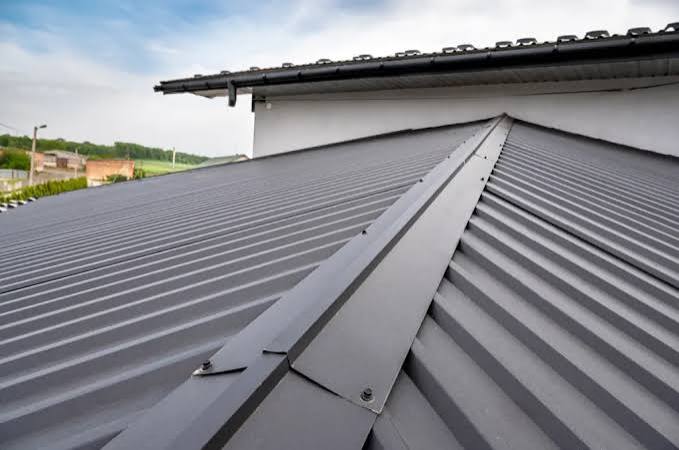
Step-by-Step Guide: How to Install a Ridge Cap
Follow these steps carefully. Safety is paramount—never work on a wet or windy roof.
Step 1: Prepare the Ridge Area
Clean the ridge line thoroughly. Remove any debris, old sealant, or loose screws. If you have existing closure strips from the panel installation, ensure they are intact. If not, you will need to install new foam closure strips along the top edge of the metal panels on both sides of the ridge.
- Pro Tip: Measure the width of the gap at the peak. It should be consistent. If the gap varies significantly, you may need to adjust the underlying panels before proceeding.
Step 2: Install Closure Strips
Closure strips are vital. They fill the void between the corrugated or ribbed metal panels and the flat underside of the ridge cap.
- Cut the foam closure strips to the length of your roof ridge.
- Peel off the backing (if adhesive-backed) or apply a bead of butyl tape.
- Press the strips firmly onto the top ribs of the metal panels on both sides of the ridge.
- Ensure there are no gaps between the strips. Overlap them slightly if necessary.
Step 3: Apply Sealant
Apply a continuous bead of high-quality urethane or silicone roofing sealant along the top of the closure strips. This creates a secondary water barrier.
- Amount: Use a bead approximately 1/4 inch thick. Too much sealant can cause mess; too little may leave gaps.
Step 4: Position the First Ridge Cap Piece
Start at the end of the roof opposite the prevailing wind direction. This prevents wind from getting under the seams.
- Place the first piece of ridge cap over the center of the ridge.
- Ensure it overlaps the closure strips evenly on both sides.
- Check for straightness using your chalk line as a guide.
Step 5: Secure the Ridge Cap
Using your drill, drive the color-matched screws through the ridge cap and into the high points of the metal panels below.
- Spacing: Place screws every 12 to 18 inches, or as recommended by the manufacturer.
- Technique: Drive the screw until the neoprene washer is compressed and forms a seal, but do not over-tighten. Over-tightening can distort the metal and break the washer, leading to leaks.
Step 6: Overlap Subsequent Pieces
If your roof is longer than one ridge cap piece, you will need to overlap them.
- Apply sealant to the end of the installed piece.
- Slide the next piece over the previous one, ensuring an overlap of at least 6 inches.
- Secure with screws, ensuring you screw through both layers of metal at the overlap point for maximum stability.
Step 7: Finish the Ends
At the ends of the ridge, you may need to cut the ridge cap to fit or install end caps. Seal these ends generously with roofing cement or sealant to prevent birds and insects from nesting inside the ridge vent.
Common Mistakes to Avoid
Even experienced DIYers can make errors. Here are the most common pitfalls when learning how to put a ridge cap on a metal roof:
| Mistake | Consequence | Solution |
|---|---|---|
| Over-tightening Screws | Cracked washers, distorted metal | Stop when the washer just begins to bulge slightly. |
| Skipping Closure Strips | Water infiltration, pest entry | Always use foam strips matched to your panel profile. |
| Wrong Overlap Direction | Wind-driven rain entry | Always overlap away from the prevailing wind. |
| Using Incorrect Sealant | Chemical reaction, failure | Use neutral-cure silicone or urethane rated for metal. |
Maintenance Tips for Longevity
Once installed, your ridge cap requires minimal maintenance, but regular checks are wise.
- Inspect Annually: Check for loose screws or cracked sealant after severe storms.
- Clean Debris: Leaves and twigs can accumulate in the ridge vent, blocking airflow.
- Re-seal if Necessary: If you notice the sealant drying out or cracking after 5–7 years, apply a fresh layer.
FAQ Section
1. Can I install a ridge cap on an existing metal roof?
Yes, you can retrofit a ridge cap on an existing metal roof. However, you must ensure the underlying structure is sound and that you can access the ridge safely. You may need to remove any old, failing flashing before installing the new cap.
2. What is the best sealant for metal roof ridge caps?
Polyurethane-based sealants or neutral-cure silicone are generally recommended. Avoid acid-cure silicone, as it can corrode certain types of metal over time. Always check the manufacturer’s recommendation for your specific metal type (e.g., galvanized steel, aluminum).
3. Do I need ventilation under the ridge cap?
It depends on your attic setup. If you have a vented attic, a ventilated ridge cap is highly recommended to allow hot air to escape, reducing cooling costs and preventing moisture buildup. If your attic is unvented (sealed), you can use a solid ridge cap.
4. How long does a metal ridge cap last?
A properly installed metal ridge cap should last as long as the roof itself, typically 40–70 years. However, the sealant and washers may need replacement every 10–15 years depending on climate exposure.
5. Can I walk on the ridge cap during installation?
No. Ridge caps are not designed to support human weight. Walking on them can dent the metal, break the seal, and compromise the integrity of the installation. Always use a safety harness and distribute your weight on the lower, supported parts of the roof panels.
Conclusion
Learning how to put a ridge cap on a metal roof is a valuable skill that can save you thousands in repair costs and extend the life of your roofing system. By following these steps—preparing the surface, using closure strips, applying the right sealant, and securing the cap correctly—you ensure a durable, watertight seal.
Remember, safety comes first. If you are uncomfortable working at heights, do not hesitate to hire a professional. But for those ready to tackle the project, the satisfaction of a job well done is unmatched.
Did you find this guide helpful? Share it with your friends on Facebook or Pinterest who might be planning their own roofing projects! Let’s help everyone keep their homes dry and secure.
Leave a Reply