Tag: Ridge Cap Flashing

  • How To Install A Ridge Cap On A Metal Roof

    How To Install A Ridge Cap On A Metal Roof

    Water leaking through the peak of your roof is one of the most stressful issues a homeowner can face. It threatens the structural integrity of your home and can lead to costly interior damage if not addressed immediately. If you are looking for a reliable, weather-tight solution, learning how to install a ridge cap on a metal roof is the critical final step in ensuring your roofing system performs as designed.

    Many DIY enthusiasts hesitate at this stage, fearing they might compromise the warranty or create new leaks. However, with the right tools, preparation, and attention to detail, installing a ridge cap is a manageable task that significantly enhances both the durability and aesthetic appeal of your metal roof. This guide will walk you through the process with professional precision, ensuring you get it right the first time.

    Why Is the Ridge Cap Critical for Metal Roofs?

    Before diving into the tools and steps, it is essential to understand why this component matters. The ridge cap is not merely decorative; it is the primary defense against wind-driven rain and snow entering the gap where two roof planes meet.

    According to industry standards, the ridge is the highest point of vulnerability on any roof. Without a properly sealed ridge cap, water can easily bypass the overlapping metal panels. A well-installed cap directs water away from the seam and allows for necessary ventilation, preventing heat buildup and moisture condensation in your attic.

    Expert Insight: “The ridge cap is the handshake between your two roof slopes. If that handshake isn’t firm and sealed, the entire system fails.” – National Roofing Contractors Association (NRCA) Guidelines

    Tools and Materials You Will Need

    Preparation is half the battle. Gathering the correct materials before you climb the ladder ensures a smooth workflow and reduces the time spent exposed to the elements.

    Essential Tools

    • Drill/Impact Driver: With a clutch setting to avoid over-driving screws.
    • Metal Snips or Electric Shears: For cutting the ridge cap to length.
    • Caulking Gun: For applying sealant.
    • Chalk Line: To ensure straight alignment.
    • Safety Gear: Non-slip boots, gloves, safety glasses, and a harness if the pitch is steep.

    Materials Checklist

    • Ridge Cap Flashing: Match the profile and color of your existing metal panels.
    • Closure Strips (Foam or Rubber): These fill the gap between the ribbed panel and the flat ridge cap.
    • Butyl Tape or Sealant: High-quality, UV-resistant roofing sealant.
    • Screws: Color-matched, self-tapping metal screws with neoprene washers.
    • Ventilation Strip (Optional): If you are installing a vented ridge cap for airflow.

    For more detailed information on metal roofing components and their engineering standards, you can refer to the general overview on Wikipedia’s Metal Roofing page.
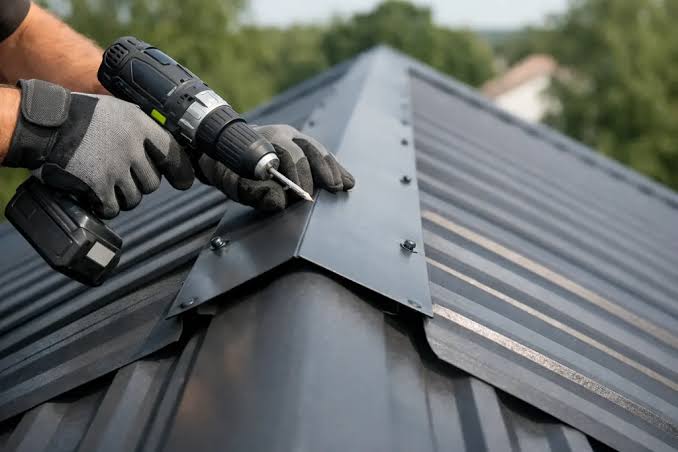
    How To Install A Ridge Cap On A Metal Roof

    Step-by-Step Guide: How To Install A Ridge Cap On A Metal Roof

    Follow these steps meticulously. Rushing this process is the most common cause of future leaks.

    Step 1: Prepare the Roof Surface

    Ensure the area along the ridge is clean and dry. Remove any debris, old sealant, or loose screws. If you have existing closure strips from the panel installation, check that they are intact. If not, you will need to install new ones.

    • Tip: Work on a cool day. Metal expands in heat, which can make alignment difficult. Ideal temperatures are between 10°C and 25°C (50°F–77°F).

    Step 2: Install Closure Strips

    Closure strips are foam or rubber pieces that match the contour of your metal panels. They sit under the ridge cap to block wind, dust, and insects.

    1. Measure the length of your ridge.
    2. Cut the closure strips to fit snugly into the ribs of the metal panels along the entire ridge line.
    3. Press them firmly into place. Some professionals use a dab of adhesive to keep them from shifting during cap installation.

    Step 3: Apply Sealant Tape

    Apply a continuous bead of butyl tape or high-grade roofing sealant along the top of the closure strips. This creates a secondary water barrier.

    • Do not skimp here. Use a bead approximately 6mm (1/4 inch) thick. Ensure it is centered so it will be compressed evenly when the cap is screwed down.

    Step 4: Position the First Ridge Cap Piece

    Start at the end of the roof opposite the prevailing wind direction. This prevents wind from getting under the seams of the caps.

    1. Place the first piece of ridge cap over the closure strips.
    2. Ensure it overhangs the edge of the roof by at least 2–3 inches (5–7 cm) for proper drip edge function.
    3. Check for squareness using your chalk line if necessary.

    Step 5: Secure the Ridge Cap

    Using your drill, drive screws through the pre-drilled holes (or mark your own) in the ridge cap.

    • Screw Placement: Screws should go through the high points of the metal panels, not the flat areas, to ensure a tight seal.
    • Spacing: Place screws every 12 to 18 inches (30–45 cm) along the ridge.
    • Torque Control: Tighten until the neoprene washer is compressed and forms a seal, but do not over-tighten. Over-tightening can distort the metal or crush the closure strip, creating gaps.

    Step 6: Overlap Subsequent Pieces

    If your ridge is longer than one piece of flashing, you will need to overlap them.

    1. Apply sealant to the end of the first piece where the next one will sit.
    2. Overlap the second piece by at least 6 inches (15 cm).
    3. Screw down the second piece, ensuring the overlap is tight and sealed.
    4. Continue this process until you reach the other end of the ridge.

    Step 7: Final Inspection and Cleanup

    Once all pieces are installed, walk the ridge (safely) or inspect from a ladder.

    • Check for any visible gaps in the sealant.
    • Ensure all screw heads are flush and sealed.
    • Wipe away any excess sealant that squeezed out for a clean look.

    Common Mistakes to Avoid

    Even experienced DIYers can stumble on these pitfalls. Here is a comparison of right vs. wrong approaches:

    MistakeConsequenceCorrect Approach
    Over-tightening ScrewsCrushes foam strips, distorts metal, causes leaks.Tighten until washer seals, then stop.
    Ignoring Wind DirectionWind lifts cap edges, allowing water ingress.Start installation against the prevailing wind.
    Skipping Closure StripsLeaves gaps for pests and drafts.Always use profile-matched closure strips.
    Insufficient OverlapWater seeps through joints during heavy rain.Maintain minimum 6-inch overlap with sealant.

    FAQ: Frequently Asked Questions

    1. Can I install a ridge cap without closure strips?

    While technically possible, it is highly discouraged. Without closure strips, there is no barrier against wind-driven rain, insects, or dust entering the attic space. The ridge cap will also rattle in the wind, potentially loosening screws over time.

    2. What type of sealant is best for metal roofs?

    Use a high-quality, UV-resistant polyurethane or butyl-based sealant. Avoid standard silicone caulk, as it may not adhere well to certain metal coatings and can degrade faster under UV exposure. Look for products specifically labeled for “metal roofing” or “extreme weather.”

    3. How often do I need to replace the ridge cap?

    A properly installed metal ridge cap should last as long as the roof itself, typically 40–70 years. However, you should inspect the sealant and screws every 2–3 years. If you notice cracking sealant or loose screws, address them immediately to prevent leaks.

    4. Do I need a vented ridge cap?

    It depends on your attic ventilation design. If your roof relies on passive airflow, a vented ridge cap can significantly improve energy efficiency by allowing hot air to escape. If you already have sufficient soffit and gable vents, a solid cap may be sufficient. Consult your local building codes or an HVAC specialist.

    5. Can I install a ridge cap in the rain?

    No. Never install ridge caps or apply sealant on a wet surface. Moisture prevents proper adhesion of sealants and tapes, leading to immediate failure. Wait for a dry forecast with at least 24 hours of no rain after installation.

    Conclusion

    Learning how to install a ridge cap on a metal roof is a valuable skill that protects your biggest investment. By following these steps—preparing the surface, using closure strips, applying quality sealant, and securing the cap correctly—you ensure a watertight, durable finish that withstands the harshest weather conditions.

    Remember, patience and precision are key. Take your time with the alignment and sealing, and your roof will reward you with decades of reliable performance.

    Did you find this guide helpful? Share it with your friends on Facebook or Pinterest who might be tackling their own roofing projects. If you have questions or tips of your own, leave a comment below!
  • How to Put a Ridge Cap on a Metal Roof

    How to Put a Ridge Cap on a Metal Roof

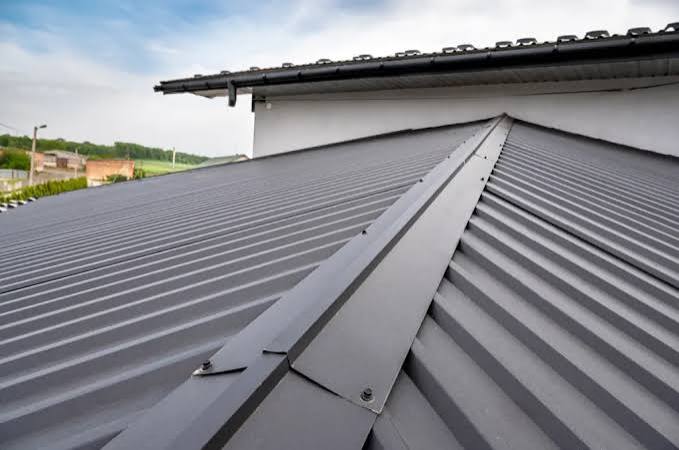
    Water leaking through the peak of your roof is a homeowner’s nightmare, often leading to costly interior damage and mold growth. If you are looking for a reliable solution, learning how to put a ridge cap on a metal roof is the most effective way to seal that vulnerable gap while enhancing your home’s aesthetic. This guide will walk you through the process safely and efficiently, ensuring a watertight finish that lasts for decades.

    Why Is the Ridge Cap Critical for Your Metal Roof?

    Before we dive into the tools and techniques, it is essential to understand why this component matters. The ridge cap is not just a decorative trim; it is the primary defense mechanism for the highest point of your roof.

    Metal roofs expand and contract with temperature changes. Without a properly installed ridge cap, wind-driven rain and snow can easily penetrate the gap between the two sloping roof panels. According to industry standards, the ridge area accounts for a significant percentage of potential leak points in metal roofing systems if not sealed correctly.

    By installing a high-quality ridge cap, you are:

    • Preventing Water Intrusion: Blocking rain, snow, and ice from entering the attic.
    • Allowing Ventilation: Many ridge caps are designed to work with ventilation systems, allowing hot air to escape.
    • Enhancing Durability: Protecting the exposed edges of your metal panels from wind uplift.

    For more detailed technical definitions of roofing components, you can refer to Wikipedia’s entry on Roofing.

    Tools and Materials You Will Need

    Preparation is half the battle. Having the right tools on hand before you climb the ladder will save you time and ensure a professional-looking result. Do not attempt to cut corners here; using the wrong fasteners or sealants can void your warranty.

    Essential Tools

    • Safety Gear: Non-slip boots, safety harness, and gloves (metal edges are sharp!).
    • Drill/Impact Driver: With a clutch setting to avoid over-driving screws.
    • Tin Snips or Electric Shears: For cutting the metal ridge cap to length.
    • Caulking Gun: For applying sealant.
    • Chalk Line: To ensure straight alignment.
    • Measuring Tape: For precise measurements.

    Materials

    • Ridge Cap Pieces: Matched to your metal roof profile (e.g., R-panel, corrugated).
    • Closure Strips: Foam strips that fit under the ridge cap to block pests and weather.
    • Butyl Tape or Sealant: High-quality roofing sealant compatible with metal.
    • Screws: Color-matched, self-tapping screws with neoprene washers. Note: Never use standard wood screws.
    How To Put A Ridge Cap On A Metal Roof

    Step-by-Step Guide: How to Install a Ridge Cap

    Follow these steps carefully. Safety is paramount—never work on a wet or windy roof.

    Step 1: Prepare the Ridge Area

    Clean the ridge line thoroughly. Remove any debris, old sealant, or loose screws. If you have existing closure strips from the panel installation, ensure they are intact. If not, you will need to install new foam closure strips along the top edge of the metal panels on both sides of the ridge.

    • Pro Tip: Measure the width of the gap at the peak. It should be consistent. If the gap varies significantly, you may need to adjust the underlying panels before proceeding.

    Step 2: Install Closure Strips

    Closure strips are vital. They fill the void between the corrugated or ribbed metal panels and the flat underside of the ridge cap.

    1. Cut the foam closure strips to the length of your roof ridge.
    2. Peel off the backing (if adhesive-backed) or apply a bead of butyl tape.
    3. Press the strips firmly onto the top ribs of the metal panels on both sides of the ridge.
    4. Ensure there are no gaps between the strips. Overlap them slightly if necessary.

    Step 3: Apply Sealant

    Apply a continuous bead of high-quality urethane or silicone roofing sealant along the top of the closure strips. This creates a secondary water barrier.

    • Amount: Use a bead approximately 1/4 inch thick. Too much sealant can cause mess; too little may leave gaps.

    Step 4: Position the First Ridge Cap Piece

    Start at the end of the roof opposite the prevailing wind direction. This prevents wind from getting under the seams.

    1. Place the first piece of ridge cap over the center of the ridge.
    2. Ensure it overlaps the closure strips evenly on both sides.
    3. Check for straightness using your chalk line as a guide.

    Step 5: Secure the Ridge Cap

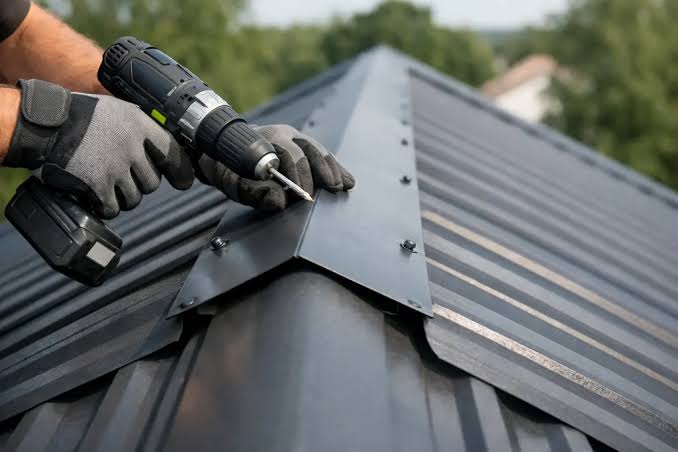
    Using your drill, drive the color-matched screws through the ridge cap and into the high points of the metal panels below.

    • Spacing: Place screws every 12 to 18 inches, or as recommended by the manufacturer.
    • Technique: Drive the screw until the neoprene washer is compressed and forms a seal, but do not over-tighten. Over-tightening can distort the metal and break the washer, leading to leaks.

    Step 6: Overlap Subsequent Pieces

    If your roof is longer than one ridge cap piece, you will need to overlap them.

    1. Apply sealant to the end of the installed piece.
    2. Slide the next piece over the previous one, ensuring an overlap of at least 6 inches.
    3. Secure with screws, ensuring you screw through both layers of metal at the overlap point for maximum stability.

    Step 7: Finish the Ends

    At the ends of the ridge, you may need to cut the ridge cap to fit or install end caps. Seal these ends generously with roofing cement or sealant to prevent birds and insects from nesting inside the ridge vent.

    Common Mistakes to Avoid

    Even experienced DIYers can make errors. Here are the most common pitfalls when learning how to put a ridge cap on a metal roof:

    MistakeConsequenceSolution
    Over-tightening ScrewsCracked washers, distorted metalStop when the washer just begins to bulge slightly.
    Skipping Closure StripsWater infiltration, pest entryAlways use foam strips matched to your panel profile.
    Wrong Overlap DirectionWind-driven rain entryAlways overlap away from the prevailing wind.
    Using Incorrect SealantChemical reaction, failureUse neutral-cure silicone or urethane rated for metal.

    Maintenance Tips for Longevity

    Once installed, your ridge cap requires minimal maintenance, but regular checks are wise.

    • Inspect Annually: Check for loose screws or cracked sealant after severe storms.
    • Clean Debris: Leaves and twigs can accumulate in the ridge vent, blocking airflow.
    • Re-seal if Necessary: If you notice the sealant drying out or cracking after 5–7 years, apply a fresh layer.

    FAQ Section

    1. Can I install a ridge cap on an existing metal roof?

    Yes, you can retrofit a ridge cap on an existing metal roof. However, you must ensure the underlying structure is sound and that you can access the ridge safely. You may need to remove any old, failing flashing before installing the new cap.

    2. What is the best sealant for metal roof ridge caps?

    Polyurethane-based sealants or neutral-cure silicone are generally recommended. Avoid acid-cure silicone, as it can corrode certain types of metal over time. Always check the manufacturer’s recommendation for your specific metal type (e.g., galvanized steel, aluminum).

    3. Do I need ventilation under the ridge cap?

    It depends on your attic setup. If you have a vented attic, a ventilated ridge cap is highly recommended to allow hot air to escape, reducing cooling costs and preventing moisture buildup. If your attic is unvented (sealed), you can use a solid ridge cap.

    4. How long does a metal ridge cap last?

    A properly installed metal ridge cap should last as long as the roof itself, typically 40–70 years. However, the sealant and washers may need replacement every 10–15 years depending on climate exposure.

    5. Can I walk on the ridge cap during installation?

    No. Ridge caps are not designed to support human weight. Walking on them can dent the metal, break the seal, and compromise the integrity of the installation. Always use a safety harness and distribute your weight on the lower, supported parts of the roof panels.

    Conclusion

    Learning how to put a ridge cap on a metal roof is a valuable skill that can save you thousands in repair costs and extend the life of your roofing system. By following these steps—preparing the surface, using closure strips, applying the right sealant, and securing the cap correctly—you ensure a durable, watertight seal.

    Remember, safety comes first. If you are uncomfortable working at heights, do not hesitate to hire a professional. But for those ready to tackle the project, the satisfaction of a job well done is unmatched.

    Did you find this guide helpful? Share it with your friends on Facebook or Pinterest who might be planning their own roofing projects! Let’s help everyone keep their homes dry and secure.

  • How To Install The Ridge Cap On A Metal Roof

    How To Install The Ridge Cap On A Metal Roof

    Installing a metal roof is a significant investment in your home’s longevity, but the ridge line remains its most vulnerable point. If not sealed correctly, wind-driven rain can infiltrate your attic, causing costly water damage and mold issues. Knowing how to install the ridge cap on a metal roof properly is the single most critical step in ensuring your roofing system remains watertight for decades.

    Many homeowners feel intimidated by working at heights or handling metal panels, but with the right tools and preparation, this task is manageable. This guide will walk you through the process with precision, focusing on safety, accuracy, and durability. We aren’t just covering up a gap; we are engineering a weather-resistant barrier that protects your biggest asset.

    Why Is the Ridge Cap Critical for Metal Roofs?

    Before diving into the installation, it is essential to understand why this component matters. The ridge cap is not merely decorative; it is the final piece of the roofing puzzle that seals the intersection where two roof slopes meet.

    According to industry standards, improper flashing installation accounts for over 90% of roof leaks. The ridge cap directs water away from the open peak and allows for necessary ventilation if you are using a vented system. Without a properly installed ridge cap, your metal roof is susceptible to:

    • Wind Uplift: Strong gusts can get under loose caps and peel them back.
    • Water Infiltration: Rain driven by wind can enter the gap between panels.
    • Pest Entry: Birds and insects often seek shelter in unprotected roof peaks.

    By mastering how to install the ridge cap on a metal roof, you are effectively securing the integrity of the entire structure. For more detailed information on roofing components and their functions, you can refer to Wikipedia’s article on Roofing.

    What Tools and Materials Do You Need?

    Preparation is half the battle. Having everything within reach before you climb the ladder ensures you stay focused and safe. Here is a comprehensive checklist:

    Essential Tools

    • Drill/Impact Driver: With a clutch setting to avoid over-driving screws.
    • Tin Snips or Electric Shears: For cutting metal caps to length.
    • Chalk Line: To ensure straight alignment along the ridge.
    • Measuring Tape: At least 25 feet long.
    • Caulking Gun: For applying sealant.
    • Safety Harness and Rope: Non-negotiable for steep pitches.

    Materials

    • Ridge Cap Panels: Pre-formed to match your roof profile (e.g., R-panel, corrugated).
    • Closure Strips: Foam strips that fit under the cap to block pests and wind.
    • Butyl Tape or Sealant: High-quality, UV-resistant roofing sealant.
    • Screws: Color-matched, self-tapping metal roofing screws with neoprene washers.
    • Ventilation Strip (Optional): If installing a vented ridge cap.
    How To Install The Ridge Cap On A Metal Roof

    Step-by-Step Guide: How To Install The Ridge Cap On A Metal Roof

    Follow these steps meticulously. Rushing this process can lead to misalignment and leaks.

    Step 1: Prepare the Ridge Line

    Ensure the top edges of your metal roof panels are cut evenly. If the panels extend too far past the ridge beam, trim them so they are symmetrical on both sides. There should be a gap of approximately 2–4 inches at the peak, depending on your specific roof design and ventilation needs.

    Clean the area thoroughly. Remove any metal shavings, dust, or debris. A clean surface is vital for the adhesion of sealants and closure strips.

    Step 2: Install Closure Strips

    Closure strips are foam pieces designed to fill the void between the irregular shape of the metal panel ribs and the flat underside of the ridge cap.

    1. Peel the backing off the adhesive side of the closure strip.
    2. Press the strip firmly onto the top rib of the metal panels on both sides of the ridge.
    3. Ensure there are no gaps. If necessary, use additional pieces to fill larger voids.

    Pro Tip: Do not compress the foam too much during installation; it needs to expand slightly to create a tight seal when the cap is screwed down.

    Step 3: Apply Sealant

    Apply a bead of high-quality butyl sealant or roofing cement along the top of the closure strips and the center of the ridge beam. This acts as a secondary barrier against water.

    • Use a continuous bead, about 1/4 inch thick.
    • Avoid using silicone-based sealants unless specified by the manufacturer, as they can sometimes inhibit paint adhesion or degrade certain rubber washers over time.

    Step 4: Position the First Ridge Cap Piece

    Start at the end of the roof opposite the prevailing wind direction. This prevents wind from getting under the seams as you work.

    1. Place the first ridge cap section over the peak.
    2. Align it carefully using your chalk line as a guide.
    3. Ensure it overhangs the edge of the roof by at least 1–2 inches for proper drip edge function.

    Step 5: Secure the Ridge Cap

    Using your drill, drive screws through the pre-drilled holes in the ridge cap.

    • Screw Placement: Drive screws into the high points of the metal panels below, not into the low valleys.
    • Tightness: Tighten until the neoprene washer is compressed and forms a seal, but do not over-tighten. Over-driving can distort the metal and crack the washer, leading to immediate leaks.
    • Spacing: Follow the manufacturer’s recommendation, typically every 12 to 18 inches.

    Step 6: Overlap Subsequent Sections

    Metal expands and contracts with temperature changes. Therefore, proper overlapping is crucial.

    • Overlap Length: Overlap each subsequent ridge cap piece by at least 6 inches.
    • Sealing the Lap: Apply a generous amount of sealant between the overlapping sections before screwing them down. This prevents water from wicking up into the overlap via capillary action.

    Step 7: Install the End Caps

    Once you reach the end of the ridge, you will need to close off the open ends of the ridge cap.

    1. Cut the end of the ridge cap to fit flush with the roof edge.
    2. Install pre-formed end caps or fabricate them from scrap metal.
    3. Seal all edges with roofing cement and secure with screws.

    Common Mistakes to Avoid

    Even experienced DIYers can stumble. Here are the most frequent errors:

    MistakeConsequenceSolution
    Over-tightening ScrewsCracked washers, distorted metalStop when washer is snug and sealed
    Insufficient OverlapWater infiltration at seamsMaintain minimum 6-inch overlap
    Ignoring Wind DirectionWind uplift damageStart installation against the wind
    Skipping Closure StripsPest entry, whistling noiseAlways use foam closures for fit

    Frequently Asked Questions (FAQ)

    1. Can I install a ridge cap without closure strips?

    While physically possible, it is highly discouraged. Without closure strips, wind can whistle through the gaps, and pests like birds or bats can easily enter your attic. Closure strips provide a critical air and pest barrier.

    2. How often do I need to replace the ridge cap?

    A properly installed metal ridge cap should last as long as the roof itself, typically 40–70 years. However, inspect the sealant and screws every 2–3 years. If you notice cracked washers or dried-out sealant, perform maintenance immediately.

    3. Do I need a vented ridge cap?

    This depends on your attic ventilation strategy. If you have soffit vents, a vented ridge cap creates a natural airflow cycle (stack effect), pulling hot air out of the attic. If your attic is sealed or uses other ventilation methods, a solid cap is sufficient. Check local building codes for requirements.

    4. What type of sealant is best for metal roofs?

    Butyl tape or polyurethane-based roofing sealants are generally recommended. They remain flexible over time, accommodating the thermal expansion and contraction of metal. Avoid cheap acrylic caulks, which tend to crack and shrink after a few seasons.

    5. Is it safe to install a ridge cap on a steep roof?

    If your roof pitch exceeds 6:12 (6 inches of rise for every 12 inches of run), it is considered steep. You must use a proper fall arrest system, including a harness anchored to a secure point. If you are uncomfortable with heights, hire a professional. No DIY project is worth a serious injury.

    Conclusion

    Learning how to install the ridge cap on a metal roof is a valuable skill that can save you thousands in potential repair costs. By following these steps—preparing the surface, using closure strips, applying quality sealant, and securing the caps correctly—you ensure a durable, leak-free finish.

    Remember, patience and attention to detail are your best tools. Take your time with the alignment and sealing processes, and always prioritize safety above all else.

    Did you find this guide helpful? Share it with your friends on social media who might be tackling their own roofing projects! Let’s help everyone build safer, stronger homes.