Tag: DIY Roof Repair

  • How to Apply Ice and Water Shield on a Roof

    How to Apply Ice and Water Shield on a Roof

    Water damage from ice dams is one of the most destructive forces a homeowner can face, often leading to costly interior repairs and structural rot. If you live in a region with harsh winters, knowing how to apply ice and water shield on a roof is not just a maintenance task—it is a critical investment in your home’s longevity. This guide will walk you through the process with professional precision, ensuring your roof remains watertight when it matters most.

    Why Is Ice and Water Shield Essential?

    Before we dive into the application process, it is crucial to understand why this specific material is necessary. Standard roofing felt (tar paper) is breathable and allows moisture to pass through, which is fine for general rain protection. However, it fails when water backs up under shingles due to ice dams.

    Ice dams occur when snow melts on the warmer upper parts of the roof and refreezes at the colder eaves. This blockage forces water upward under the shingles. According to data from the Insurance Information Institute, water damage and freezing are among the top causes of homeowners insurance claims in the United States.

    An ice and water shield is a self-adhering, rubberized asphalt membrane that creates an impermeable barrier. Unlike traditional felt, it seals around nail penetrations and adheres directly to the roof deck, preventing water from seeping into the wood structure. For a deeper understanding of roofing materials and their historical development, you can refer to Wikipedia’s entry on Roofing.

    What Tools and Materials Do You Need?

    Preparation is half the battle. Having the right tools ready before you climb the ladder ensures a smoother, safer installation. Here is a checklist of what you will need:

    • Ice and Water Shield Membrane: Calculate your square footage accurately. Most rolls cover 100 square feet (one “square”).
    • Utility Knife with Extra Blades: A sharp blade is essential for clean cuts. Dull blades tear the membrane.
    • Chalk Line or Straight Edge: To ensure straight alignment.
    • Roofing Nails or Staples: Only if required by local code for temporary holding (most shields are self-adhering).
    • Caulking Gun and Roofing Cement: For sealing edges and overlaps.
    • Safety Gear: Non-slip boots, harness, and gloves.
    • Cleaner/Primer: Some manufacturers recommend a primer for dusty or cold decks to improve adhesion.
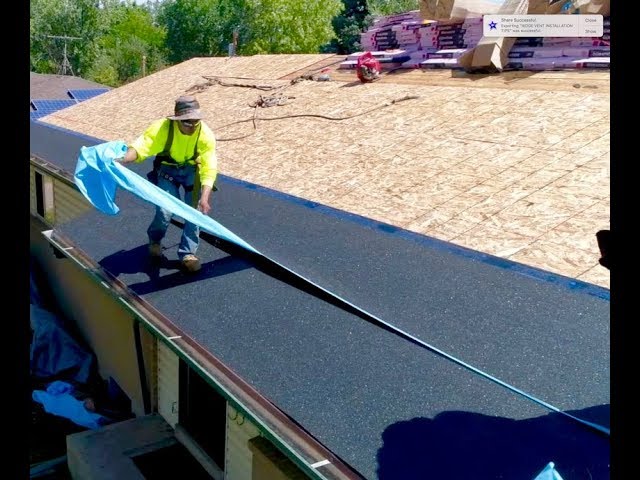
    How To Apply Ice And Water Shield On A Roof

    Step-by-Step Guide: How to Apply Ice and Water Shield

    Applying this membrane requires attention to detail. Follow these steps strictly to maintain warranty validity and ensure maximum protection.

    1. Prepare the Roof Deck

    The surface must be clean, dry, and free of debris. Any nails protruding from the deck should be hammered flush. If the wood is wet, allow it to dry completely; trapping moisture beneath the shield can lead to rot.

    • Temperature Check: Ideally, apply the shield when temperatures are above 40°F (4°C). If it is colder, store the rolls in a warm place for 24 hours prior to installation to make the adhesive more pliable.

    2. Start at the Eaves

    Begin at the lowest edge of the roof (the eave). This is the most critical area for ice dam formation.

    • Unroll the first strip along the edge.
    • Ensure the membrane extends at least 24 inches inside the exterior wall line of the house. Many building codes now require coverage up to 36–48 inches or even the entire roof surface in severe climate zones. Check your local building codes.
    • Peel back the release film slowly as you unroll. Do not remove the entire film at once, or the material may stick to itself or blow away in the wind.

    3. Smooth and Adhere

    Once the membrane is positioned, press it firmly onto the roof deck.

    • Use a hand roller or a soft broom to smooth out air bubbles and wrinkles.
    • Pro Tip: If there are wrinkles, cut them carefully with an “X” pattern, overlap the flaps, and seal with roofing cement. Air pockets can compromise the seal over time.

    4. Overlap Correctly

    When applying subsequent rows, proper overlapping is vital to prevent water intrusion.

    • Horizontal Overlaps: Overlap side edges by at least 2 inches.
    • Vertical Overlaps: If you are working up the roof, overlap the upper layer over the lower layer by at least 4–6 inches. Always follow the manufacturer’s specific instructions, as some premium brands require different overlap widths.

    5. Seal Around Penetrations

    Roofs have vents, chimneys, and skylights. These are high-risk areas for leaks.

    • Cut the membrane to fit around the base of these structures.
    • Use roofing cement to seal the edges of the membrane to the penetration flashing.
    • Ensure the shield goes under the flashing where possible, creating a shingle-like effect that directs water outward.

    6. Secure the Edges

    While the membrane is self-adhering, wind uplift can be an issue during installation.

    • Some contractors use a few roofing nails along the top edge to hold it in place until the shingles are installed.
    • Ensure any nails used are covered by the next layer of membrane or shingles to maintain the waterproof seal.

    Common Mistakes to Avoid

    Even experienced DIYers can make errors. Here is a comparison of correct vs. incorrect practices:

    FeatureCorrect PracticeIncorrect Practice
    Surface PrepClean, dry, and dust-free deckDirty, wet, or oily surface
    TemperatureApplied above 40°F (or warmed roll)Applied in freezing temps without prep
    OverlapMinimum 2–4 inches as specifiedButt joints with no overlap
    AdhesionRolled out smoothly, no bubblesWrinkles and air pockets left intact
    CoverageExtends 24″+ inside wall lineStops exactly at the edge of the eave

    Frequently Asked Questions (FAQ)

    Can I install ice and water shield in cold weather?

    Yes, but it is challenging. The adhesive becomes stiff in cold temperatures. To mitigate this, store the rolls indoors overnight to warm them up. Additionally, use a propane torch gently to warm the adhesive side before sticking it down, but be careful not to melt the membrane. Always check the manufacturer’s minimum temperature rating.

    How far up the roof should the shield go?

    Building codes vary, but the International Residential Code (IRC) typically requires ice and water shield to extend from the eave up to a point at least 24 inches horizontally inside the exterior wall line. In areas prone to heavy ice dams, many professionals recommend covering the entire roof deck for maximum protection.

    Can I put shingles directly over ice and water shield?

    Yes, absolutely. Ice and water shield is designed to be the underlayment. You do not need traditional felt paper underneath it. Once the shield is installed, you can proceed directly to installing your drip edge (if not already done) and then your asphalt shingles.

    Does ice and water shield expire?

    Unopened rolls generally have a shelf life of 12–24 months if stored in a cool, dry place. Once opened or installed, it is durable and designed to last as long as the roof itself. However, if the roll has been sitting in direct sunlight for weeks before installation, the adhesive may degrade.

    Is ice and water shield necessary in warm climates?

    While primarily designed for ice dams, it is also highly effective in warm climates for protecting against wind-driven rain. If you live in a hurricane-prone area, using ice and water shield on the entire roof deck can provide superior secondary water resistance compared to standard felt.

    Conclusion

    Learning how to apply ice and water shield on a roof is a valuable skill that protects your home from one of the most common causes of roof failure. By following these steps—preparing the surface, starting at the eaves, overlapping correctly, and sealing penetrations—you create a robust defense against water intrusion.

    Remember, while this is a DIY-friendly task, safety should always be your priority. If your roof has a steep pitch or complex architecture, consider consulting a professional roofer.

    Did you find this guide helpful? Share it with your neighbors or on social media to help others protect their homes this winter season!

  • How to Calculate Roof Pitch in Degrees

    How to Calculate Roof Pitch in Degrees

    Have you ever stood in your attic or looked up at your home’s exterior, wondering exactly how steep your roof is? Whether you are planning a renovation, installing solar panels, or simply curious about your home’s architecture, knowing the angle is crucial. Understanding how to calculate the pitch of a roof in degrees is the first step toward ensuring safety, accuracy, and cost-efficiency in any roofing project.

    Many homeowners find themselves confused by the difference between “pitch” (often expressed as a ratio like 4:12) and “degrees” (the actual angle). While contractors often speak in ratios, degrees are essential for specific calculations involving trigonometry, such as determining snow load capacity or fitting skylights. In this guide, we will break down the process into simple, manageable steps so you can measure your roof with confidence.

    Why Convert Roof Pitch to Degrees?

    Before we dive into the math, it is important to understand why you might need this specific measurement. In the United States, the construction industry predominantly uses the “rise over run” ratio. For example, a “6/12 pitch” means the roof rises 6 inches for every 12 inches of horizontal distance.

    However, degrees provide a universal standard for angle measurement. Here is why converting to degrees matters:

    • Solar Panel Installation: Solar installers require precise angles to maximize energy efficiency.
    • Safety Assessments: Steeper roofs (higher degrees) require different safety equipment and harnesses.
    • Material Compatibility: Certain roofing materials, such as clay tiles or slate, have minimum degree requirements to prevent water infiltration.
    • Architectural Design: If you are adding a dormer or an extension, matching the existing angle in degrees ensures structural harmony.

    According to building science principles, the angle of incidence affects how water sheds and how wind interacts with the structure. Getting this number right is not just about aesthetics; it is about performance.

    Tools You Will Need for Accurate Measurement

    You do not need expensive laser equipment to get a reliable reading. For most DIY purposes, basic tools found in a standard toolbox will suffice. However, precision is key.

    • A Level: A 2-foot or 4-foot carpenter’s level is ideal. Ensure it is calibrated correctly before starting.
    • A Tape Measure: A standard retractable tape measure with clear markings.
    • A Calculator: One with trigonometric functions (specifically arctangent or tan⁻¹). Your smartphone’s calculator app works perfectly for this.
    • Safety Gear: If measuring from the outside, always use a sturdy ladder, non-slip shoes, and consider having a spotter.

    Safety Note: Never attempt to walk on a roof that is wet, icy, or excessively steep (over 30 degrees) without professional fall protection gear.

    How To Calculate The Pitch Of A Roof In Degrees

    Step-by-Step: How to Calculate the Pitch of a Roof in Degrees

    Calculating the angle requires a bit of high school geometry, but don’t worry—we will walk through it together. The core concept relies on the tangent function in trigonometry.

    Step 1: Measure the Rise and Run

    The most accurate way to measure is from inside the attic, where you can access the underside of the roof rafters.

    1. Place one end of your level against the bottom edge of a rafter.
    2. Adjust the level until the bubble is perfectly centered, indicating it is horizontal. This horizontal distance is your Run. For simplicity, let’s assume a standard run of 12 inches.
    3. From the 12-inch mark on the level, measure vertically straight up to the bottom of the rafter. This vertical distance is your Rise.

    Example: If you measure 6 inches from the level to the rafter, your rise is 6 inches.

    Step 2: Determine the Ratio

    Now you have your ratio. In our example, the rise is 6 and the run is 12. This gives us a ratio of 6/12.

    If you measured a different run (e.g., 24 inches), ensure you normalize it to a 12-inch base for standard comparison, or simply use the actual numbers in the formula below.

    Step 3: Apply the Trigonometric Formula

    To convert this ratio into degrees, we use the inverse tangent function (arctan). The formula is:

    Angle in Degrees=arctan⁡(RiseRun)Angle in Degrees=arctan(RunRise​)

    Using our example:

    1. Divide the Rise by the Run: 6÷12=0.56÷12=0.5
    2. Calculate the arctangent of 0.5.
    3. On your calculator, press shift or 2nd followed by tan (or look for tan⁻¹).
    4. Enter 0.5.

    The result is approximately 26.57 degrees.

    Step 4: Verify with External Measurement (Optional)

    If you cannot access the attic, you can measure from the outside using the gable end of the house. Measure the total width of the house (Run x 2) and the height from the top of the wall plate to the peak (Rise). Divide the total rise by half the width to get the same ratio, then apply the formula above.

    For more detailed information on roof framing standards, you can refer to general construction guidelines on Wikipedia.

    Common Roof Pitches and Their Degree Equivalents

    To help you visualize where your roof falls on the spectrum, here is a quick reference table. This eliminates the need for constant calculation if you know your standard ratio.

    Pitch Ratio (Rise/Run)Angle in DegreesClassification
    2/129.46°Low Slope
    4/1218.43°Conventional Low
    6/1226.57°Conventional
    8/1233.69°Steep
    10/1239.81°Very Steep
    12/1245.00°Extreme

    Key Insight: A 12/12 pitch is exactly 45 degrees because the rise equals the run. Any pitch higher than 12/12 will exceed 45 degrees, which significantly increases installation difficulty and cost.

    Factors That Influence Roof Pitch Choice

    Why do some houses have flat roofs while others are steep? Several factors dictate the optimal pitch for a structure.

    Climate and Weather Patterns

    In regions with heavy snowfall, such as the Northeastern US, steeper pitches (above 30 degrees) are preferred. Gravity helps shed snow before it accumulates enough weight to cause structural damage. Conversely, in hurricane-prone areas, lower pitches may be used to reduce wind uplift forces, though this must be balanced with drainage needs.

    Architectural Style

    Your home’s design plays a massive role. Colonial and Cape Cod styles typically feature steeper pitches (8/12 to 12/12), while Ranch-style homes often utilize low slopes (2/12 to 4/12). Modern architecture may even employ flat roofs (less than 2/12), which technically still require a slight pitch for water drainage.

    Material Constraints

    Not all roofing materials work on all angles.

    • Asphalt Shingles: Can be installed on pitches as low as 2/12 with special underlayment.
    • Clay Tiles: Generally require a minimum of 4/12 to prevent water backing up under the tiles.
    • Slate: Often requires 4/12 or steeper for proper longevity.

    Frequently Asked Questions (FAQ)

    What is the difference between roof slope and roof pitch?

    While often used interchangeably in casual conversation, there is a technical difference. Slope is the ratio of vertical rise to horizontal run (e.g., 6:12). Pitch is technically the ratio of the rise to the total span (width) of the house. However, in modern US construction, “pitch” is commonly accepted to mean the slope ratio. When calculating degrees, we use the slope (rise/run).

    Can I use a smartphone app to measure roof pitch?

    Yes, there are many inclinometer apps available for iOS and Android that use your phone’s gyroscope. While convenient, they can be less accurate than manual measurements due to calibration issues or uneven surfaces. Use them for a quick estimate, but rely on manual math for critical projects like structural modifications.

    What is the minimum roof pitch for shingles?

    Most asphalt shingle manufacturers require a minimum slope of 2:12 (approximately 9.5 degrees). Below this threshold, the roof is considered “flat,” and specialized membrane roofing systems (like EPDM or TPO) are required to ensure waterproofing. Always check the specific warranty requirements of your chosen material.

    How does roof pitch affect cooling costs?

    A steeper roof pitch can contribute to better attic ventilation. Hot air rises, and a higher peak allows for larger ridge vents, facilitating natural airflow. This can reduce the heat load on your HVAC system during summer months, potentially lowering energy bills. However, the impact is secondary to proper insulation and radiant barriers.

    Is a 45-degree roof too steep?

    A 45-degree roof (12/12 pitch) is quite steep but not uncommon in traditional American architecture. It is challenging to walk on and requires strict safety protocols for maintenance. While it offers excellent water and snow shedding, it also increases the surface area of the roof, leading to higher material costs compared to a lower-pitched roof of the same footprint.

    Conclusion

    Learning how to calculate the pitch of a roof in degrees empowers you to make informed decisions about your home. Whether you are hiring a contractor, buying materials, or assessing safety risks, knowing the exact angle removes guesswork from the equation. By using a simple level, tape measure, and the arctangent formula, you can achieve professional-grade accuracy without professional-grade costs.

    Remember, accuracy is vital. A small error in measurement can lead to significant issues in material ordering or structural fit. Take your time, double-check your numbers, and prioritize safety above all else.

    Did you find this guide helpful? Share it with your fellow DIY enthusiasts on social media to help them tackle their next roofing project with confidence!

  • How To Find A Roof Leak Without An Attic

    How To Find A Roof Leak Without An Attic

    Water stains on your ceiling are more than just an eyesore; they are a distress signal from your home’s most critical protective layer. For homeowners with cathedral ceilings, flat roofs, or truss systems that eliminate crawl space, discovering the source of a leak can feel like solving a mystery with half the clues missing. If you are wondering how to find a leak in a roof without attic access, you are not alone, and there is no need to panic.

    While lacking an attic removes the easiest method of tracing water trails, it does not make detection impossible. It simply requires a more systematic, detective-like approach from both the interior and exterior of your home. This guide will walk you through professional-grade techniques to locate and address these elusive leaks safely and effectively.

    Why Is Finding Leaks Harder Without an Attic?

    In traditional homes with vented attics, water often travels along rafters or drips onto insulation, creating a visible trail that leads directly to the breach in the roofing material. However, modern architectural designs frequently utilize cathedral ceilings or scissor trusses. These structures create a sealed envelope between the living space and the roof deck.

    When water enters this sealed space, it doesn’t drip immediately into your living room. Instead, it may travel horizontally along the underside of the roof sheathing for several feet before finding a weak point—such as a nail hole, a light fixture gap, or a seam in the drywall—to enter your home. This phenomenon is known as “water migration,” and it means the stain on your ceiling is rarely directly below the actual hole in your roof.

    According to building science principles, understanding the path of least resistance for water is crucial. Without the visual aid of an attic, you must rely on logical deduction and careful observation.

    Step 1: Interior Detective Work (The Safe Start)

    Before climbing a ladder, start inside. Your goal is to narrow down the general area of the leak.

    Analyze the Stain Pattern

    Look closely at the water damage. The shape and location tell a story:

    • Circular Stains: Often indicate a slow, consistent drip from a single point, such as a nail pop or small puncture.
    • Linear Stains or Streaks: Suggest water running along a beam, pipe, or the slope of the roof deck before dripping.
    • Discoloration Near Walls: If the stain is near the top of a wall where it meets the ceiling, check the siding or flashing in that exterior corner first.

    Check Penetrations First

    Most leaks do not occur in the middle of a shingle field. They happen where something penetrates the roof. From inside, look for:

    • Recessed lighting fixtures.
    • Ceiling fans.
    • Plumbing vents (you might see a pipe boot outline).
    • Chimney chases.

    If you see moisture around a light fixture, turn off the electricity to that circuit immediately. Water and electricity are a deadly combination.

    Step 2: Exterior Inspection (Safety First)

    Once you have identified the general zone indoors, move outside. Never walk on a wet or steep roof. Use a sturdy extension ladder and binoculars for the initial survey.

    Inspect Flashing and Valleys

    Flashing is the metal or rubber material used to seal joints. It is the number one culprit for leaks.

    • Step Flashing: Look where the roof meets a vertical wall (like a chimney or dormer). Rust, cracks, or lifted sections are red flags.
    • Valley Flashing: This is where two roof slopes meet. Debris accumulation here can force water under shingles.

    Examine Roof Penetrations

    Check the rubber boots around plumbing vents. Over time, UV radiation causes these to crack and crumble. If the rubber looks dry or split, it needs replacement. Similarly, inspect the base of any skylights for cracked sealant.

    Pro Tip: According to the National Roofing Contractors Association, improper flashing installation accounts for the majority of residential roof leaks, not shingle failure.

    Step 3: The Garden Hose Test (Controlled Simulation)

    If visual inspection doesn’t reveal the issue, you can perform a controlled water test. This requires two people: one on the roof (or with a hose) and one inside watching for leaks.

    Safety Warning: Do not use high-pressure washers. Use a standard garden hose with a gentle spray nozzle.

    1. Isolate the Area: Start at the lowest point of the suspected leak area.
    2. Apply Water Slowly: Have your partner soak a specific section (approx. 3×3 feet) for 5–10 minutes.
    3. Wait and Watch: The person inside should monitor the stain. If no leak appears, move the hose up the roof slope by a few feet and repeat.
    4. Document Results: Note exactly which section triggered the drip.

    This method mimics rain but allows you to control the variable. It helps distinguish between a leak caused by wind-driven rain (which hits sideways) and gravity-driven rain.

    How To Find A Leak In A Roof Without Attic

    Common Culprits in No-Attic Homes

    Potential CauseSigns to Look ForDifficulty to Fix
    Cracked Vent BootsDry, crumbling rubber around pipes.Low (DIY Friendly)
    Failed SealantCracked caulk around chimneys/skylights.Low (DIY Friendly)
    Ice Dam DamageLeaks only in spring/winter; stained eaves.High (Professional)
    CondensationMoisture without rain; mold growth.Medium (Insulation fix)

    Differentiating Leaks from Condensation

    In homes without attics, ventilation is key. Sometimes, what looks like a leak is actually condensation forming due to poor airflow or inadequate insulation.

    • Leak: Occurs during or shortly after rain/wind. The water is usually clear (unless it picks up dust).
    • Condensation: Occurs during temperature shifts (e.g., cold nights). You may see widespread dampness rather than a distinct drip point. Mold or mildew smells are common.

    If you suspect condensation, check your bathroom exhaust fans. Are they venting into the roof cavity or outside? Venting into the roof structure is a major cause of moisture buildup in cathedral ceilings.

    When to Call a Professional

    While DIY detection is empowering, some scenarios require expert intervention:

    1. Steep Pitch: If your roof pitch is greater than 6:12, it is dangerous to walk on.
    2. Multiple Leaks: If you have stains in various rooms, the issue may be systemic (ventilation or structural).
    3. No Visible Source: If you’ve tried the hose test and still can’t find it, professionals use infrared thermal imaging to detect temperature differences caused by wet insulation or sheathing behind walls.

    FAQ Section

    1. Can I find a roof leak from inside if I don’t have an attic?

    Yes, but it requires patience. You must trace the water stain to its highest point on the ceiling or wall. Remember, water travels sideways, so the entry point on the roof is likely higher up and further out than the stain suggests.

    2. What is the cheapest way to find a roof leak?

    The cheapest method is a thorough visual inspection using binoculars from the ground, followed by a manual garden hose test with a helper. This costs nothing but time and effort.

    3. Does homeowners insurance cover roof leaks?

    It depends on the cause. Insurance typically covers “sudden and accidental” damage (like a storm tearing off shingles). However, they often deny claims for leaks caused by lack of maintenance, wear and tear, or old age. Always document your findings with photos.

    4. How long can a roof leak go unnoticed?

    In a no-attic home, a small leak can go unnoticed for months until the drywall saturates enough to show a stain. However, structural damage to the wood sheathing can begin within weeks. Early detection is vital to prevent rot.

    5. Can I use a drone to find my leak?

    Yes, consumer drones with high-resolution cameras are excellent tools for inspecting roofs without climbing ladders. They can provide close-up views of flashing and shingles that are hard to see from the ground.

    6. What if the leak only happens when it winds?

    This indicates a failure in the side-lap flashing or a vent cap that isn’t weather-tight against horizontal rain. Focus your inspection on areas exposed to prevailing winds, such as ridge vents or gable ends.

    Conclusion

    Learning how to find a leak in a roof without attic space transforms a stressful situation into a manageable project. By combining interior observation with systematic exterior checks and controlled water testing, you can pinpoint the problem area with confidence. Remember, water is persistent, but so are you.

    Early detection saves thousands in repair costs and preserves the structural integrity of your home. If you found this guide helpful, please share it on social media to help other homeowners tackle their roof mysteries. Stay dry, stay safe, and keep your home secure.

  • How To Install A Ridge Cap On A Metal Roof

    How To Install A Ridge Cap On A Metal Roof

    Water leaking through the peak of your roof is one of the most stressful issues a homeowner can face. It threatens the structural integrity of your home and can lead to costly interior damage if not addressed immediately. If you are looking for a reliable, weather-tight solution, learning how to install a ridge cap on a metal roof is the critical final step in ensuring your roofing system performs as designed.

    Many DIY enthusiasts hesitate at this stage, fearing they might compromise the warranty or create new leaks. However, with the right tools, preparation, and attention to detail, installing a ridge cap is a manageable task that significantly enhances both the durability and aesthetic appeal of your metal roof. This guide will walk you through the process with professional precision, ensuring you get it right the first time.

    Why Is the Ridge Cap Critical for Metal Roofs?

    Before diving into the tools and steps, it is essential to understand why this component matters. The ridge cap is not merely decorative; it is the primary defense against wind-driven rain and snow entering the gap where two roof planes meet.

    According to industry standards, the ridge is the highest point of vulnerability on any roof. Without a properly sealed ridge cap, water can easily bypass the overlapping metal panels. A well-installed cap directs water away from the seam and allows for necessary ventilation, preventing heat buildup and moisture condensation in your attic.

    Expert Insight: “The ridge cap is the handshake between your two roof slopes. If that handshake isn’t firm and sealed, the entire system fails.” – National Roofing Contractors Association (NRCA) Guidelines

    Tools and Materials You Will Need

    Preparation is half the battle. Gathering the correct materials before you climb the ladder ensures a smooth workflow and reduces the time spent exposed to the elements.

    Essential Tools

    • Drill/Impact Driver: With a clutch setting to avoid over-driving screws.
    • Metal Snips or Electric Shears: For cutting the ridge cap to length.
    • Caulking Gun: For applying sealant.
    • Chalk Line: To ensure straight alignment.
    • Safety Gear: Non-slip boots, gloves, safety glasses, and a harness if the pitch is steep.

    Materials Checklist

    • Ridge Cap Flashing: Match the profile and color of your existing metal panels.
    • Closure Strips (Foam or Rubber): These fill the gap between the ribbed panel and the flat ridge cap.
    • Butyl Tape or Sealant: High-quality, UV-resistant roofing sealant.
    • Screws: Color-matched, self-tapping metal screws with neoprene washers.
    • Ventilation Strip (Optional): If you are installing a vented ridge cap for airflow.

    For more detailed information on metal roofing components and their engineering standards, you can refer to the general overview on Wikipedia’s Metal Roofing page.

    How To Install A Ridge Cap On A Metal Roof

    Step-by-Step Guide: How To Install A Ridge Cap On A Metal Roof

    Follow these steps meticulously. Rushing this process is the most common cause of future leaks.

    Step 1: Prepare the Roof Surface

    Ensure the area along the ridge is clean and dry. Remove any debris, old sealant, or loose screws. If you have existing closure strips from the panel installation, check that they are intact. If not, you will need to install new ones.

    • Tip: Work on a cool day. Metal expands in heat, which can make alignment difficult. Ideal temperatures are between 10°C and 25°C (50°F–77°F).

    Step 2: Install Closure Strips

    Closure strips are foam or rubber pieces that match the contour of your metal panels. They sit under the ridge cap to block wind, dust, and insects.

    1. Measure the length of your ridge.
    2. Cut the closure strips to fit snugly into the ribs of the metal panels along the entire ridge line.
    3. Press them firmly into place. Some professionals use a dab of adhesive to keep them from shifting during cap installation.

    Step 3: Apply Sealant Tape

    Apply a continuous bead of butyl tape or high-grade roofing sealant along the top of the closure strips. This creates a secondary water barrier.

    • Do not skimp here. Use a bead approximately 6mm (1/4 inch) thick. Ensure it is centered so it will be compressed evenly when the cap is screwed down.

    Step 4: Position the First Ridge Cap Piece

    Start at the end of the roof opposite the prevailing wind direction. This prevents wind from getting under the seams of the caps.

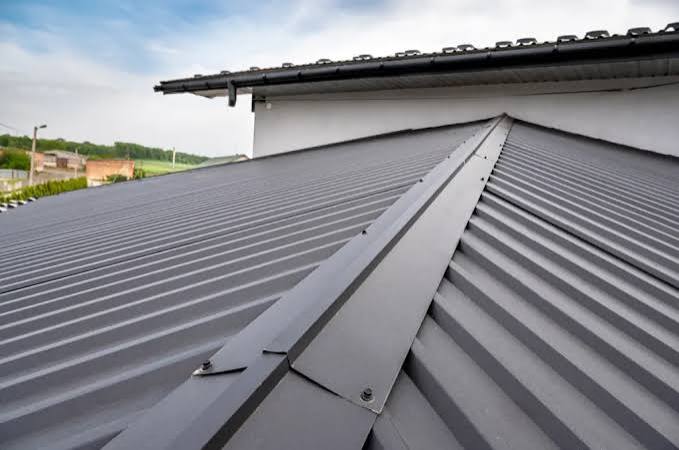
    1. Place the first piece of ridge cap over the closure strips.
    2. Ensure it overhangs the edge of the roof by at least 2–3 inches (5–7 cm) for proper drip edge function.
    3. Check for squareness using your chalk line if necessary.

    Step 5: Secure the Ridge Cap

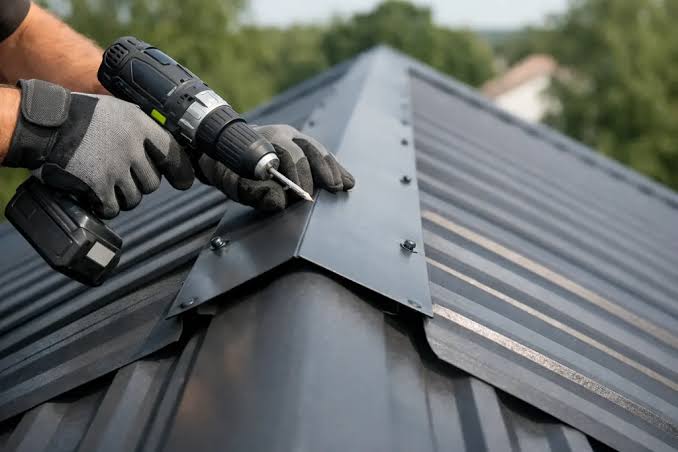
    Using your drill, drive screws through the pre-drilled holes (or mark your own) in the ridge cap.

    • Screw Placement: Screws should go through the high points of the metal panels, not the flat areas, to ensure a tight seal.
    • Spacing: Place screws every 12 to 18 inches (30–45 cm) along the ridge.
    • Torque Control: Tighten until the neoprene washer is compressed and forms a seal, but do not over-tighten. Over-tightening can distort the metal or crush the closure strip, creating gaps.

    Step 6: Overlap Subsequent Pieces

    If your ridge is longer than one piece of flashing, you will need to overlap them.

    1. Apply sealant to the end of the first piece where the next one will sit.
    2. Overlap the second piece by at least 6 inches (15 cm).
    3. Screw down the second piece, ensuring the overlap is tight and sealed.
    4. Continue this process until you reach the other end of the ridge.

    Step 7: Final Inspection and Cleanup

    Once all pieces are installed, walk the ridge (safely) or inspect from a ladder.

    • Check for any visible gaps in the sealant.
    • Ensure all screw heads are flush and sealed.
    • Wipe away any excess sealant that squeezed out for a clean look.

    Common Mistakes to Avoid

    Even experienced DIYers can stumble on these pitfalls. Here is a comparison of right vs. wrong approaches:

    MistakeConsequenceCorrect Approach
    Over-tightening ScrewsCrushes foam strips, distorts metal, causes leaks.Tighten until washer seals, then stop.
    Ignoring Wind DirectionWind lifts cap edges, allowing water ingress.Start installation against the prevailing wind.
    Skipping Closure StripsLeaves gaps for pests and drafts.Always use profile-matched closure strips.
    Insufficient OverlapWater seeps through joints during heavy rain.Maintain minimum 6-inch overlap with sealant.

    FAQ: Frequently Asked Questions

    1. Can I install a ridge cap without closure strips?

    While technically possible, it is highly discouraged. Without closure strips, there is no barrier against wind-driven rain, insects, or dust entering the attic space. The ridge cap will also rattle in the wind, potentially loosening screws over time.

    2. What type of sealant is best for metal roofs?

    Use a high-quality, UV-resistant polyurethane or butyl-based sealant. Avoid standard silicone caulk, as it may not adhere well to certain metal coatings and can degrade faster under UV exposure. Look for products specifically labeled for “metal roofing” or “extreme weather.”

    3. How often do I need to replace the ridge cap?

    A properly installed metal ridge cap should last as long as the roof itself, typically 40–70 years. However, you should inspect the sealant and screws every 2–3 years. If you notice cracking sealant or loose screws, address them immediately to prevent leaks.

    4. Do I need a vented ridge cap?

    It depends on your attic ventilation design. If your roof relies on passive airflow, a vented ridge cap can significantly improve energy efficiency by allowing hot air to escape. If you already have sufficient soffit and gable vents, a solid cap may be sufficient. Consult your local building codes or an HVAC specialist.

    5. Can I install a ridge cap in the rain?

    No. Never install ridge caps or apply sealant on a wet surface. Moisture prevents proper adhesion of sealants and tapes, leading to immediate failure. Wait for a dry forecast with at least 24 hours of no rain after installation.

    Conclusion

    Learning how to install a ridge cap on a metal roof is a valuable skill that protects your biggest investment. By following these steps—preparing the surface, using closure strips, applying quality sealant, and securing the cap correctly—you ensure a watertight, durable finish that withstands the harshest weather conditions.

    Remember, patience and precision are key. Take your time with the alignment and sealing, and your roof will reward you with decades of reliable performance.

    Did you find this guide helpful? Share it with your friends on Facebook or Pinterest who might be tackling their own roofing projects. If you have questions or tips of your own, leave a comment below!

  • How To Install Roof Drip Edge On An Existing Roof

    How To Install Roof Drip Edge On An Existing Roof

    Water stains on your ceiling or peeling paint on your fascia boards are often silent screams for help from your roofing system. Many homeowners overlook the critical role of metal flashing until significant water damage has already occurred behind the walls. If you are wondering how to install roof drip edge on an existing roof, you are taking a vital step toward protecting your home’s structural integrity without needing a full roof replacement.

    Why Drip Edge Is Non-Negotiable for Roof Health

    Before we dive into the tools and hammers, it is essential to understand why this piece of metal matters. A drip edge is a metal flashing installed at the edges of your roof to direct water away from the fascia and into the gutters. Without it, wind-driven rain can curl back under your shingles, soaking the roof deck and rotting the wooden fascia board behind it.

    According to building science principles, proper water management is the single most important factor in roof longevity. While asphalt shingles get all the attention, the drip edge is the unsung hero that ensures water leaves the roof efficiently. Ignoring this component can lead to costly repairs down the line, including fascia replacement and interior drywall fixes.

    Tools and Materials You Will Need

    Preparation is half the battle in any DIY roofing project. Having the right tools on hand prevents mid-job trips to the hardware store and ensures a professional finish.

    Essential Tools

    • Tin Snips or Aviation Shears: For cutting the aluminum or steel drip edge to length.
    • Hammer: A standard 16-oz claw hammer works best.
    • Roofing Nails: Use 1-1/4 inch galvanized roofing nails with large heads to prevent pull-through.
    • Chalk Line: To ensure straight alignment along the fascia.
    • Ladder: Ensure it is stable and extends at least three feet above the roofline.
    • Safety Gear: Non-slip shoes, gloves, and safety glasses.

    Materials

    • Drip Edge Flashing: Typically sold in 10-foot sections. Choose aluminum for rust resistance or galvanized steel for durability. Match the color to your fascia or trim for aesthetic appeal.
    • Roofing Cement (Optional): For sealing overlaps in high-wind areas.
    How To Install Roof Drip Edge On An Existing Roof

    Step-by-Step Guide: Installing Drip Edge on an Existing Roof

    Installing drip edge on an existing roof is trickier than doing it during a new build because you must work around the existing shingles. However, with patience, it is entirely manageable.

    Step 1: Safety First and Site Preparation

    Never work on a wet or windy roof. Ensure your ladder is on solid ground and use a spotter if possible. Clear any debris, leaves, or old caulk from the fascia board where the drip edge will sit. If there is old, damaged drip edge, carefully remove it using a pry bar, being cautious not to damage the underlying wood.

    Step 2: Measure and Cut the Drip Edge

    Measure the length of your eaves (the horizontal lower edges of the roof). It is better to cut slightly long and trim later than to come up short. Using your tin snips, cut the drip edge sections to size. For corners, you may need to make relief cuts to bend the metal neatly around the angle.

    Step 3: Positioning the Drip Edge

    This is the most critical step for an existing roof. You cannot simply slide the drip edge under the shingles easily without risking breakage. Instead, follow this technique:

    1. Lift the bottom row of shingles gently. Do not force them; asphalt shingles become brittle in cold weather and sticky in hot weather. Ideally, perform this task when temperatures are between 50°F and 70°F.
    2. Slide the upper flange of the drip edge under the existing shingles and over the roof deck.
    3. Ensure the lower flange hangs over the fascia board by about 1/4 to 1/2 inch. This overhang ensures water drips clear of the wood.

    Pro Tip: If lifting the shingles proves too difficult or risky, you can install the drip edge over the existing shingles at the very edge. While not ideal for water shedding compared to going under, it is still significantly better than having no drip edge at all. Seal the top edge with roofing cement to prevent water intrusion.

    Step 4: Securing the Drip Edge

    Once positioned, nail the drip edge in place. Place nails every 8 to 12 inches along the top flange (the part under the shingles). Drive the nails firmly but do not dent the metal excessively. Ensure the nails are placed high enough so that the next row of shingles (if you were adding one) or the existing shingle overlap covers them.

    Step 5: Overlapping Sections

    If your roof edge is longer than 10 feet, you will need to join multiple pieces of drip edge. Overlap the sections by at least 2 inches. Always overlap the upstream piece over the downstream piece (following the direction of water flow) to prevent water from seeping into the joint. Apply a dab of roofing cement under the overlap for added security.

    Step 6: Gutter Alignment

    Ensure the drip edge extends into the gutter channel. If your gutters are already installed, you may need to loosen the gutter hangers slightly to tuck the drip edge behind the gutter’s front lip. This ensures that water flows directly into the gutter rather than running down the face of the fascia.

    Common Mistakes to Avoid

    Even experienced DIYers can stumble here. Avoid these pitfalls to ensure a watertight seal.

    MistakeConsequenceSolution
    Nailing too lowWater can seep behind the drip edgeNail only the top flange, hidden under shingles
    No overhangWater runs down the fascia boardEnsure 1/4–1/2 inch overhang past the fascia
    Gaps at cornersWind-driven rain entryMiter cut corners or use pre-formed corner pieces
    Ignoring slopeWater poolingEnsure drip edge follows the roof’s natural slope

    When to Call a Professional

    While this is a feasible DIY project, certain scenarios require expert intervention. If your roof has a steep pitch (greater than 6:12), the risk of falling increases significantly. Additionally, if you discover rotted fascia wood upon removing the old drip edge, structural repairs are needed before installing new flashing. In such cases, consulting a licensed roofer is wise. For more information on roofing standards, you can refer to general construction guidelines on Wikipedia.

    FAQ Section

    Can I install drip edge without removing shingles?

    Yes, but it is less effective. The ideal method is sliding the drip edge under the shingles. If you cannot lift them, installing it over the shingle edge and sealing it with roofing cement is an acceptable alternative for existing roofs.

    What type of drip edge is best for existing roofs?

    Aluminum drip edge is generally preferred for DIY projects because it is lightweight, easy to cut, and resistant to rust. Galvanized steel is stronger but harder to work with and can rust if the coating is scratched.

    How far should the drip edge hang over the gutter?

    The drip edge should extend into the gutter by about 1/2 inch. It should not touch the bottom of the gutter, as this can cause noise during rainstorms, but it must be deep enough to direct water away from the fascia.

    Do I need drip edge on all sides of the roof?

    Technically, drip edge is required on the eaves (bottom edges). On the rakes (side edges), a different type of flashing called “rake edge” or “gable trim” is used. However, many modern building codes recommend drip edge on all perimeter edges for maximum protection.

    Will installing drip edge void my roof warranty?

    Generally, no. Adding protective flashing is considered maintenance. However, if you damage existing shingles during the process, that specific area might not be covered. Always check your specific manufacturer’s warranty terms.

    Conclusion

    Learning how to install roof drip edge on an existing roof is a powerful skill that can save you thousands in water damage repairs. By directing water away from your fascia and into your gutters, you extend the life of your roof and maintain your home’s curb appeal. Remember to prioritize safety, take your time with the shingle lifting, and ensure proper overlapping of sections.

    If you found this guide helpful, please share it with your neighbors or on social media. Helping others protect their homes creates a stronger, safer community. Have you tackled a roofing project before? Share your experiences in the comments below!

  • How to Install a Ridge Vent on an Existing Roof

    How to Install a Ridge Vent on an Existing Roof

    Is your attic trapping heat like a sauna, causing your air conditioner to work overtime? Poor ventilation can lead to premature shingle damage, ice dams in winter, and skyrocketing energy bills. If you are looking for a cost-effective solution, learning how to install a ridge vent on an existing roof is one of the best upgrades you can make to your home’s efficiency and longevity.

    Many homeowners assume that adding proper ventilation requires a complete roof tear-off. However, with the right tools and careful planning, you can retrofit a high-performance ridge vent system without replacing your entire roof. This guide will walk you through the process, ensuring you achieve professional-grade results while adhering to safety standards and building codes.

    Why Upgrade Your Roof Ventilation?

    Before we dive into the tools and steps, it is crucial to understand why this project matters. Proper attic ventilation is not just about comfort; it is about protecting your investment.

    According to the U.S. Department of Energy, adequate ventilation helps maintain a cool attic in summer and a dry attic in winter. Without it, moisture buildup can rot roof decking, while excessive heat can bake asphalt shingles from the underside, reducing their lifespan by up to 50%.

    A ridge vent works in tandem with soffit vents (intake) to create a continuous flow of air. Hot air rises and escapes through the ridge, pulling fresh, cooler air in from the eaves. This natural convection cycle is the most efficient way to regulate attic temperature.

    Tools and Materials You Will Need

    Preparation is half the battle. Having the right equipment ready before you climb the ladder will save time and ensure safety.

    Essential Tools

    • Circular Saw: With a depth-adjustable blade.
    • Chalk Line: For marking straight cut lines.
    • Hammer and Pry Bar: To remove existing ridge cap shingles.
    • Roofing Nailer or Hammer: For securing the vent.
    • Utility Knife: For trimming shingles and underlayment.
    • Caulking Gun: For applying roofing cement.
    • Safety Gear: Non-slip shoes, harness, gloves, and eye protection.

    Materials

    • Ridge Vent Roll: Choose a high-quality, weather-resistant vent (shingle-over type is easiest for DIY).
    • Roofing Nails: 1-1/4 inch galvanized or stainless steel nails.
    • Roofing Cement: High-quality sealant for end caps and overlaps.
    • Replacement Shingles: To match your existing roof color and style.

    Safety Note: Always check the weather forecast. Never work on a wet, icy, or windy roof. If your roof pitch is steep (greater than 6/12), consider hiring a professional.

    How To Install A Ridge Vent On An Existing Roof

    Step-by-Step Guide: How to Install a Ridge Vent on an Existing Roof

    Follow these detailed steps to ensure a watertight and effective installation.

    Step 1: Remove the Existing Ridge Cap Shingles

    Start at one end of the roof ridge. Use your pry bar to carefully lift and remove the existing ridge cap shingles. Work your way across the entire length of the ridge where the vent will be installed.

    • Tip: Save any usable shingles if they match your current roof, but typically, you will need new ones for a seamless finish.
    • Clean Up: Remove all old nails and debris from the ridge area. A clean surface is vital for proper adhesion.

    Step 2: Mark the Cut Lines

    You need to cut an opening along the peak of the roof to allow air to escape. The width of this cut depends on the specific ridge vent product you purchased, but it is typically 2 inches wide.

    1. Measure 1 inch out from the center of the ridge on both sides.
    2. Snap a chalk line along these measurements to create two parallel lines running the length of the ridge.
    3. Ensure the lines stop about 6–12 inches from the gable ends to maintain structural integrity and allow for end-capping.

    Step 3: Cut the Roof Decking

    Set your circular saw blade depth to exactly the thickness of your roof sheathing (usually 1/2 inch or 5/8 inch). Do not cut deeper, as you risk damaging the rafters or trusses underneath.

    Carefully cut along the chalk lines. It is helpful to have a helper vacuum the dust or blow it away to keep the line visible. Once cut, remove the strip of wood between the lines. You should now see the open attic space below.

    Step 4: Prepare the Opening

    Inspect the opening for any protruding nails or rough edges. Smooth them out. If there is existing roofing underlayment, trim it back neatly so it does not interfere with the vent installation.

    For added protection against wind-driven rain, some professionals recommend installing a baffle or filter material inside the attic opening, though most modern ridge vents come with integrated filters.

    Step 5: Install the Ridge Vent

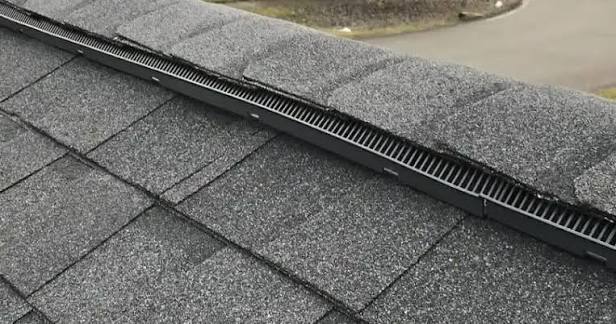
    Unroll the ridge vent material along the peak. Most DIY-friendly vents are flexible and come in long rolls.

    1. Start at one end: Align the vent centrally over the cut opening.
    2. Nail it down: Using roofing nails, secure the vent flange to the roof deck. Place nails every 6–8 inches along both sides of the vent.
      • Critical: Do not nail through the center mesh or filter area, as this will block airflow.
    3. Overlap sections: If using multiple rolls, overlap the ends by at least 2 inches and seal the joint with roofing cement to prevent leaks.

    Step 6: Seal the Ends

    The ends of the ridge vent are vulnerable points. Apply a generous bead of roofing cement under the end flaps of the vent. Fold the flaps down and nail them securely. This prevents wind from lifting the vent and water from seeping in.

    Step 7: Re-Shingle Over the Vent

    Now, cover the ridge vent with new shingles to blend it with the rest of the roof.

    1. Start at the end opposite the prevailing wind direction.
    2. Cut standard three-tab shingles into individual tabs or use pre-cut ridge cap shingles.
    3. Lay the first shingle flat over the vent end. Nail it according to manufacturer instructions (usually 4 nails per shingle).
    4. Continue laying shingles up the ridge, overlapping each subsequent shingle by about 5 inches.
    5. Ensure nails are driven firmly but not so deep that they puncture the vent’s internal structure.

    Ridge Vent vs. Other Ventilation Methods

    Is a ridge vent the right choice for you? Let’s compare it to other common options.

    FeatureRidge VentBox VentsTurbine Vents
    AestheticsExcellent (Hidden)VisibleVisible
    MaintenanceLowLowMedium (Moving parts)
    AirflowContinuous & EvenSpot VentilationWind-Dependent
    Installation DifficultyModerateEasyModerate
    NoiseSilentSilentCan hum in wind

    As noted by building science experts, continuous ridge ventilation provides more uniform airflow than spot vents, reducing the risk of “dead air” pockets in the attic. For more technical details on building envelope science, you can refer to resources like Wikipedia’s entry on Roof Ventilation.

    Common Mistakes to Avoid

    Even experienced DIYers can stumble. Here are pitfalls to watch out for:

    • Cutting Too Deep: Damaging rafters compromises roof structure. Always measure blade depth twice.
    • Insufficient Intake: A ridge vent only works if there is enough air coming in. Ensure your soffit vents are not blocked by insulation.
    • Over-Nailing: Driving too many nails or placing them incorrectly can create leak paths. Follow the manufacturer’s nailing pattern strictly.
    • Ignoring Local Codes: Some municipalities have specific requirements for net free vent area (NFVA). Check your local building codes before starting.

    FAQ Section

    1. Can I install a ridge vent if I don’t have soffit vents?

    Technically, yes, but it is not recommended. Ridge vents rely on the “stack effect,” which requires intake air from the eaves. Without soffit vents, the ridge vent may pull air from other unintended gaps, potentially bringing moist air into the attic. It is best to install soffit vents simultaneously.

    2. How much does it cost to install a ridge vent professionally?

    Professional installation typically ranges from $500 to $1,500, depending on roof size and complexity. DIY installation can reduce this cost significantly, primarily covering materials ($100–$300).

    3. Will installing a ridge vent cause leaks?

    If installed correctly, no. The key is proper sealing of the cut edges and correct shingling over the vent. Using high-quality roofing cement and following the manufacturer’s overlap guidelines ensures a watertight seal.

    4. How long does a ridge vent last?

    Most high-quality ridge vents are made from durable plastics or metals designed to last as long as the roof itself—typically 20 to 30 years. However, the shingles covering it will need replacement during normal roof maintenance.

    5. Do I need a permit to install a ridge vent?

    In many jurisdictions, modifying the roof structure requires a permit. Since you are cutting into the roof deck, it is wise to check with your local building department. Failure to obtain a permit could affect your home insurance or resale value.

    Conclusion

    Learning how to install a ridge vent on an existing roof

    is a powerful skill that can enhance your home’s energy efficiency, protect your roof structure, and improve indoor comfort. By following this step-by-step guide, you can achieve a professional-looking result that stands the test of time.

    Remember, safety is paramount. Take your time, double-check your measurements, and ensure your attic has adequate intake ventilation to maximize the benefits of your new ridge vent.

    Did you find this guide helpful? Share it with your friends on Facebook or Pinterest who might be considering similar home improvements. If you have questions or want to share your own DIY success story, leave a comment below!

  • How to Put a Ridge Cap on a Metal Roof

    How to Put a Ridge Cap on a Metal Roof

    Water leaking through the peak of your roof is a homeowner’s nightmare, often leading to costly interior damage and mold growth. If you are looking for a reliable solution, learning how to put a ridge cap on a metal roof is the most effective way to seal that vulnerable gap while enhancing your home’s aesthetic. This guide will walk you through the process safely and efficiently, ensuring a watertight finish that lasts for decades.

    Why Is the Ridge Cap Critical for Your Metal Roof?

    Before we dive into the tools and techniques, it is essential to understand why this component matters. The ridge cap is not just a decorative trim; it is the primary defense mechanism for the highest point of your roof.

    Metal roofs expand and contract with temperature changes. Without a properly installed ridge cap, wind-driven rain and snow can easily penetrate the gap between the two sloping roof panels. According to industry standards, the ridge area accounts for a significant percentage of potential leak points in metal roofing systems if not sealed correctly.

    By installing a high-quality ridge cap, you are:

    • Preventing Water Intrusion: Blocking rain, snow, and ice from entering the attic.
    • Allowing Ventilation: Many ridge caps are designed to work with ventilation systems, allowing hot air to escape.
    • Enhancing Durability: Protecting the exposed edges of your metal panels from wind uplift.

    For more detailed technical definitions of roofing components, you can refer to Wikipedia’s entry on Roofing.

    Tools and Materials You Will Need

    Preparation is half the battle. Having the right tools on hand before you climb the ladder will save you time and ensure a professional-looking result. Do not attempt to cut corners here; using the wrong fasteners or sealants can void your warranty.

    Essential Tools

    • Safety Gear: Non-slip boots, safety harness, and gloves (metal edges are sharp!).
    • Drill/Impact Driver: With a clutch setting to avoid over-driving screws.
    • Tin Snips or Electric Shears: For cutting the metal ridge cap to length.
    • Caulking Gun: For applying sealant.
    • Chalk Line: To ensure straight alignment.
    • Measuring Tape: For precise measurements.

    Materials

    • Ridge Cap Pieces: Matched to your metal roof profile (e.g., R-panel, corrugated).
    • Closure Strips: Foam strips that fit under the ridge cap to block pests and weather.
    • Butyl Tape or Sealant: High-quality roofing sealant compatible with metal.
    • Screws: Color-matched, self-tapping screws with neoprene washers. Note: Never use standard wood screws.
    How To Put A Ridge Cap On A Metal Roof

    Step-by-Step Guide: How to Install a Ridge Cap

    Follow these steps carefully. Safety is paramount—never work on a wet or windy roof.

    Step 1: Prepare the Ridge Area

    Clean the ridge line thoroughly. Remove any debris, old sealant, or loose screws. If you have existing closure strips from the panel installation, ensure they are intact. If not, you will need to install new foam closure strips along the top edge of the metal panels on both sides of the ridge.

    • Pro Tip: Measure the width of the gap at the peak. It should be consistent. If the gap varies significantly, you may need to adjust the underlying panels before proceeding.

    Step 2: Install Closure Strips

    Closure strips are vital. They fill the void between the corrugated or ribbed metal panels and the flat underside of the ridge cap.

    1. Cut the foam closure strips to the length of your roof ridge.
    2. Peel off the backing (if adhesive-backed) or apply a bead of butyl tape.
    3. Press the strips firmly onto the top ribs of the metal panels on both sides of the ridge.
    4. Ensure there are no gaps between the strips. Overlap them slightly if necessary.

    Step 3: Apply Sealant

    Apply a continuous bead of high-quality urethane or silicone roofing sealant along the top of the closure strips. This creates a secondary water barrier.

    • Amount: Use a bead approximately 1/4 inch thick. Too much sealant can cause mess; too little may leave gaps.

    Step 4: Position the First Ridge Cap Piece

    Start at the end of the roof opposite the prevailing wind direction. This prevents wind from getting under the seams.

    1. Place the first piece of ridge cap over the center of the ridge.
    2. Ensure it overlaps the closure strips evenly on both sides.
    3. Check for straightness using your chalk line as a guide.

    Step 5: Secure the Ridge Cap

    Using your drill, drive the color-matched screws through the ridge cap and into the high points of the metal panels below.

    • Spacing: Place screws every 12 to 18 inches, or as recommended by the manufacturer.
    • Technique: Drive the screw until the neoprene washer is compressed and forms a seal, but do not over-tighten. Over-tightening can distort the metal and break the washer, leading to leaks.

    Step 6: Overlap Subsequent Pieces

    If your roof is longer than one ridge cap piece, you will need to overlap them.

    1. Apply sealant to the end of the installed piece.
    2. Slide the next piece over the previous one, ensuring an overlap of at least 6 inches.
    3. Secure with screws, ensuring you screw through both layers of metal at the overlap point for maximum stability.

    Step 7: Finish the Ends

    At the ends of the ridge, you may need to cut the ridge cap to fit or install end caps. Seal these ends generously with roofing cement or sealant to prevent birds and insects from nesting inside the ridge vent.

    Common Mistakes to Avoid

    Even experienced DIYers can make errors. Here are the most common pitfalls when learning how to put a ridge cap on a metal roof:

    MistakeConsequenceSolution
    Over-tightening ScrewsCracked washers, distorted metalStop when the washer just begins to bulge slightly.
    Skipping Closure StripsWater infiltration, pest entryAlways use foam strips matched to your panel profile.
    Wrong Overlap DirectionWind-driven rain entryAlways overlap away from the prevailing wind.
    Using Incorrect SealantChemical reaction, failureUse neutral-cure silicone or urethane rated for metal.

    Maintenance Tips for Longevity

    Once installed, your ridge cap requires minimal maintenance, but regular checks are wise.

    • Inspect Annually: Check for loose screws or cracked sealant after severe storms.
    • Clean Debris: Leaves and twigs can accumulate in the ridge vent, blocking airflow.
    • Re-seal if Necessary: If you notice the sealant drying out or cracking after 5–7 years, apply a fresh layer.

    FAQ Section

    1. Can I install a ridge cap on an existing metal roof?

    Yes, you can retrofit a ridge cap on an existing metal roof. However, you must ensure the underlying structure is sound and that you can access the ridge safely. You may need to remove any old, failing flashing before installing the new cap.

    2. What is the best sealant for metal roof ridge caps?

    Polyurethane-based sealants or neutral-cure silicone are generally recommended. Avoid acid-cure silicone, as it can corrode certain types of metal over time. Always check the manufacturer’s recommendation for your specific metal type (e.g., galvanized steel, aluminum).

    3. Do I need ventilation under the ridge cap?

    It depends on your attic setup. If you have a vented attic, a ventilated ridge cap is highly recommended to allow hot air to escape, reducing cooling costs and preventing moisture buildup. If your attic is unvented (sealed), you can use a solid ridge cap.

    4. How long does a metal ridge cap last?

    A properly installed metal ridge cap should last as long as the roof itself, typically 40–70 years. However, the sealant and washers may need replacement every 10–15 years depending on climate exposure.

    5. Can I walk on the ridge cap during installation?

    No. Ridge caps are not designed to support human weight. Walking on them can dent the metal, break the seal, and compromise the integrity of the installation. Always use a safety harness and distribute your weight on the lower, supported parts of the roof panels.

    Conclusion

    Learning how to put a ridge cap on a metal roof is a valuable skill that can save you thousands in repair costs and extend the life of your roofing system. By following these steps—preparing the surface, using closure strips, applying the right sealant, and securing the cap correctly—you ensure a durable, watertight seal.

    Remember, safety comes first. If you are uncomfortable working at heights, do not hesitate to hire a professional. But for those ready to tackle the project, the satisfaction of a job well done is unmatched.

    Did you find this guide helpful? Share it with your friends on Facebook or Pinterest who might be planning their own roofing projects! Let’s help everyone keep their homes dry and secure.

  • How To Install The Ridge Cap On A Metal Roof

    How To Install The Ridge Cap On A Metal Roof

    Installing a metal roof is a significant investment in your home’s longevity, but the ridge line remains its most vulnerable point. If not sealed correctly, wind-driven rain can infiltrate your attic, causing costly water damage and mold issues. Knowing how to install the ridge cap on a metal roof properly is the single most critical step in ensuring your roofing system remains watertight for decades.

    Many homeowners feel intimidated by working at heights or handling metal panels, but with the right tools and preparation, this task is manageable. This guide will walk you through the process with precision, focusing on safety, accuracy, and durability. We aren’t just covering up a gap; we are engineering a weather-resistant barrier that protects your biggest asset.

    Why Is the Ridge Cap Critical for Metal Roofs?

    Before diving into the installation, it is essential to understand why this component matters. The ridge cap is not merely decorative; it is the final piece of the roofing puzzle that seals the intersection where two roof slopes meet.

    According to industry standards, improper flashing installation accounts for over 90% of roof leaks. The ridge cap directs water away from the open peak and allows for necessary ventilation if you are using a vented system. Without a properly installed ridge cap, your metal roof is susceptible to:

    • Wind Uplift: Strong gusts can get under loose caps and peel them back.
    • Water Infiltration: Rain driven by wind can enter the gap between panels.
    • Pest Entry: Birds and insects often seek shelter in unprotected roof peaks.

    By mastering how to install the ridge cap on a metal roof, you are effectively securing the integrity of the entire structure. For more detailed information on roofing components and their functions, you can refer to Wikipedia’s article on Roofing.

    What Tools and Materials Do You Need?

    Preparation is half the battle. Having everything within reach before you climb the ladder ensures you stay focused and safe. Here is a comprehensive checklist:

    Essential Tools

    • Drill/Impact Driver: With a clutch setting to avoid over-driving screws.
    • Tin Snips or Electric Shears: For cutting metal caps to length.
    • Chalk Line: To ensure straight alignment along the ridge.
    • Measuring Tape: At least 25 feet long.
    • Caulking Gun: For applying sealant.
    • Safety Harness and Rope: Non-negotiable for steep pitches.

    Materials

    • Ridge Cap Panels: Pre-formed to match your roof profile (e.g., R-panel, corrugated).
    • Closure Strips: Foam strips that fit under the cap to block pests and wind.
    • Butyl Tape or Sealant: High-quality, UV-resistant roofing sealant.
    • Screws: Color-matched, self-tapping metal roofing screws with neoprene washers.
    • Ventilation Strip (Optional): If installing a vented ridge cap.
    How To Install The Ridge Cap On A Metal Roof

    Step-by-Step Guide: How To Install The Ridge Cap On A Metal Roof

    Follow these steps meticulously. Rushing this process can lead to misalignment and leaks.

    Step 1: Prepare the Ridge Line

    Ensure the top edges of your metal roof panels are cut evenly. If the panels extend too far past the ridge beam, trim them so they are symmetrical on both sides. There should be a gap of approximately 2–4 inches at the peak, depending on your specific roof design and ventilation needs.

    Clean the area thoroughly. Remove any metal shavings, dust, or debris. A clean surface is vital for the adhesion of sealants and closure strips.

    Step 2: Install Closure Strips

    Closure strips are foam pieces designed to fill the void between the irregular shape of the metal panel ribs and the flat underside of the ridge cap.

    1. Peel the backing off the adhesive side of the closure strip.
    2. Press the strip firmly onto the top rib of the metal panels on both sides of the ridge.
    3. Ensure there are no gaps. If necessary, use additional pieces to fill larger voids.

    Pro Tip: Do not compress the foam too much during installation; it needs to expand slightly to create a tight seal when the cap is screwed down.

    Step 3: Apply Sealant

    Apply a bead of high-quality butyl sealant or roofing cement along the top of the closure strips and the center of the ridge beam. This acts as a secondary barrier against water.

    • Use a continuous bead, about 1/4 inch thick.
    • Avoid using silicone-based sealants unless specified by the manufacturer, as they can sometimes inhibit paint adhesion or degrade certain rubber washers over time.

    Step 4: Position the First Ridge Cap Piece

    Start at the end of the roof opposite the prevailing wind direction. This prevents wind from getting under the seams as you work.

    1. Place the first ridge cap section over the peak.
    2. Align it carefully using your chalk line as a guide.
    3. Ensure it overhangs the edge of the roof by at least 1–2 inches for proper drip edge function.

    Step 5: Secure the Ridge Cap

    Using your drill, drive screws through the pre-drilled holes in the ridge cap.

    • Screw Placement: Drive screws into the high points of the metal panels below, not into the low valleys.
    • Tightness: Tighten until the neoprene washer is compressed and forms a seal, but do not over-tighten. Over-driving can distort the metal and crack the washer, leading to immediate leaks.
    • Spacing: Follow the manufacturer’s recommendation, typically every 12 to 18 inches.

    Step 6: Overlap Subsequent Sections

    Metal expands and contracts with temperature changes. Therefore, proper overlapping is crucial.

    • Overlap Length: Overlap each subsequent ridge cap piece by at least 6 inches.
    • Sealing the Lap: Apply a generous amount of sealant between the overlapping sections before screwing them down. This prevents water from wicking up into the overlap via capillary action.

    Step 7: Install the End Caps

    Once you reach the end of the ridge, you will need to close off the open ends of the ridge cap.

    1. Cut the end of the ridge cap to fit flush with the roof edge.
    2. Install pre-formed end caps or fabricate them from scrap metal.
    3. Seal all edges with roofing cement and secure with screws.

    Common Mistakes to Avoid

    Even experienced DIYers can stumble. Here are the most frequent errors:

    MistakeConsequenceSolution
    Over-tightening ScrewsCracked washers, distorted metalStop when washer is snug and sealed
    Insufficient OverlapWater infiltration at seamsMaintain minimum 6-inch overlap
    Ignoring Wind DirectionWind uplift damageStart installation against the wind
    Skipping Closure StripsPest entry, whistling noiseAlways use foam closures for fit

    Frequently Asked Questions (FAQ)

    1. Can I install a ridge cap without closure strips?

    While physically possible, it is highly discouraged. Without closure strips, wind can whistle through the gaps, and pests like birds or bats can easily enter your attic. Closure strips provide a critical air and pest barrier.

    2. How often do I need to replace the ridge cap?

    A properly installed metal ridge cap should last as long as the roof itself, typically 40–70 years. However, inspect the sealant and screws every 2–3 years. If you notice cracked washers or dried-out sealant, perform maintenance immediately.

    3. Do I need a vented ridge cap?

    This depends on your attic ventilation strategy. If you have soffit vents, a vented ridge cap creates a natural airflow cycle (stack effect), pulling hot air out of the attic. If your attic is sealed or uses other ventilation methods, a solid cap is sufficient. Check local building codes for requirements.

    4. What type of sealant is best for metal roofs?

    Butyl tape or polyurethane-based roofing sealants are generally recommended. They remain flexible over time, accommodating the thermal expansion and contraction of metal. Avoid cheap acrylic caulks, which tend to crack and shrink after a few seasons.

    5. Is it safe to install a ridge cap on a steep roof?

    If your roof pitch exceeds 6:12 (6 inches of rise for every 12 inches of run), it is considered steep. You must use a proper fall arrest system, including a harness anchored to a secure point. If you are uncomfortable with heights, hire a professional. No DIY project is worth a serious injury.

    Conclusion

    Learning how to install the ridge cap on a metal roof is a valuable skill that can save you thousands in potential repair costs. By following these steps—preparing the surface, using closure strips, applying quality sealant, and securing the caps correctly—you ensure a durable, leak-free finish.

    Remember, patience and attention to detail are your best tools. Take your time with the alignment and sealing processes, and always prioritize safety above all else.

    Did you find this guide helpful? Share it with your friends on social media who might be tackling their own roofing projects! Let’s help everyone build safer, stronger homes.