Water damage from ice dams is one of the most destructive forces a homeowner can face, often leading to costly interior repairs and structural rot. If you live in a region with harsh winters, knowing how to apply ice and water shield on a roof is not just a maintenance task—it is a critical investment in your home’s longevity. This guide will walk you through the process with professional precision, ensuring your roof remains watertight when it matters most.
Why Is Ice and Water Shield Essential?
Before we dive into the application process, it is crucial to understand why this specific material is necessary. Standard roofing felt (tar paper) is breathable and allows moisture to pass through, which is fine for general rain protection. However, it fails when water backs up under shingles due to ice dams.
Ice dams occur when snow melts on the warmer upper parts of the roof and refreezes at the colder eaves. This blockage forces water upward under the shingles. According to data from the Insurance Information Institute, water damage and freezing are among the top causes of homeowners insurance claims in the United States.
An ice and water shield is a self-adhering, rubberized asphalt membrane that creates an impermeable barrier. Unlike traditional felt, it seals around nail penetrations and adheres directly to the roof deck, preventing water from seeping into the wood structure. For a deeper understanding of roofing materials and their historical development, you can refer to Wikipedia’s entry on Roofing.
What Tools and Materials Do You Need?
Preparation is half the battle. Having the right tools ready before you climb the ladder ensures a smoother, safer installation. Here is a checklist of what you will need:
- Ice and Water Shield Membrane: Calculate your square footage accurately. Most rolls cover 100 square feet (one “square”).
- Utility Knife with Extra Blades: A sharp blade is essential for clean cuts. Dull blades tear the membrane.
- Chalk Line or Straight Edge: To ensure straight alignment.
- Roofing Nails or Staples: Only if required by local code for temporary holding (most shields are self-adhering).
- Caulking Gun and Roofing Cement: For sealing edges and overlaps.
- Safety Gear: Non-slip boots, harness, and gloves.
- Cleaner/Primer: Some manufacturers recommend a primer for dusty or cold decks to improve adhesion.
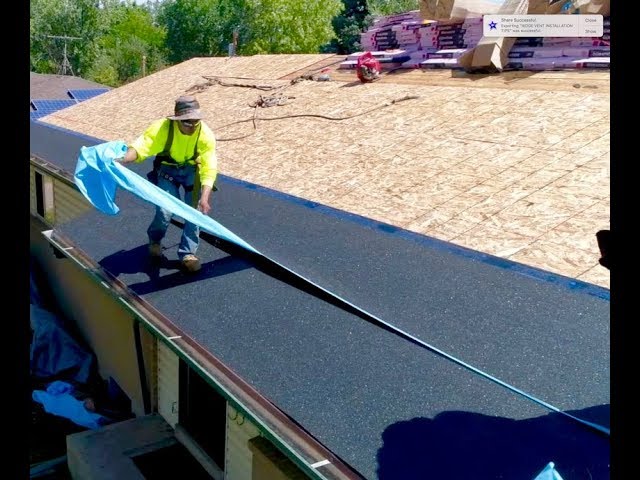
Step-by-Step Guide: How to Apply Ice and Water Shield
Applying this membrane requires attention to detail. Follow these steps strictly to maintain warranty validity and ensure maximum protection.
1. Prepare the Roof Deck
The surface must be clean, dry, and free of debris. Any nails protruding from the deck should be hammered flush. If the wood is wet, allow it to dry completely; trapping moisture beneath the shield can lead to rot.
- Temperature Check: Ideally, apply the shield when temperatures are above 40°F (4°C). If it is colder, store the rolls in a warm place for 24 hours prior to installation to make the adhesive more pliable.
2. Start at the Eaves
Begin at the lowest edge of the roof (the eave). This is the most critical area for ice dam formation.
- Unroll the first strip along the edge.
- Ensure the membrane extends at least 24 inches inside the exterior wall line of the house. Many building codes now require coverage up to 36–48 inches or even the entire roof surface in severe climate zones. Check your local building codes.
- Peel back the release film slowly as you unroll. Do not remove the entire film at once, or the material may stick to itself or blow away in the wind.
3. Smooth and Adhere
Once the membrane is positioned, press it firmly onto the roof deck.
- Use a hand roller or a soft broom to smooth out air bubbles and wrinkles.
- Pro Tip: If there are wrinkles, cut them carefully with an “X” pattern, overlap the flaps, and seal with roofing cement. Air pockets can compromise the seal over time.
4. Overlap Correctly
When applying subsequent rows, proper overlapping is vital to prevent water intrusion.
- Horizontal Overlaps: Overlap side edges by at least 2 inches.
- Vertical Overlaps: If you are working up the roof, overlap the upper layer over the lower layer by at least 4–6 inches. Always follow the manufacturer’s specific instructions, as some premium brands require different overlap widths.
5. Seal Around Penetrations
Roofs have vents, chimneys, and skylights. These are high-risk areas for leaks.
- Cut the membrane to fit around the base of these structures.
- Use roofing cement to seal the edges of the membrane to the penetration flashing.
- Ensure the shield goes under the flashing where possible, creating a shingle-like effect that directs water outward.
6. Secure the Edges
While the membrane is self-adhering, wind uplift can be an issue during installation.
- Some contractors use a few roofing nails along the top edge to hold it in place until the shingles are installed.
- Ensure any nails used are covered by the next layer of membrane or shingles to maintain the waterproof seal.
Common Mistakes to Avoid
Even experienced DIYers can make errors. Here is a comparison of correct vs. incorrect practices:
| Feature | Correct Practice | Incorrect Practice |
|---|---|---|
| Surface Prep | Clean, dry, and dust-free deck | Dirty, wet, or oily surface |
| Temperature | Applied above 40°F (or warmed roll) | Applied in freezing temps without prep |
| Overlap | Minimum 2–4 inches as specified | Butt joints with no overlap |
| Adhesion | Rolled out smoothly, no bubbles | Wrinkles and air pockets left intact |
| Coverage | Extends 24″+ inside wall line | Stops exactly at the edge of the eave |
Frequently Asked Questions (FAQ)
Can I install ice and water shield in cold weather?
Yes, but it is challenging. The adhesive becomes stiff in cold temperatures. To mitigate this, store the rolls indoors overnight to warm them up. Additionally, use a propane torch gently to warm the adhesive side before sticking it down, but be careful not to melt the membrane. Always check the manufacturer’s minimum temperature rating.
How far up the roof should the shield go?
Building codes vary, but the International Residential Code (IRC) typically requires ice and water shield to extend from the eave up to a point at least 24 inches horizontally inside the exterior wall line. In areas prone to heavy ice dams, many professionals recommend covering the entire roof deck for maximum protection.
Can I put shingles directly over ice and water shield?
Yes, absolutely. Ice and water shield is designed to be the underlayment. You do not need traditional felt paper underneath it. Once the shield is installed, you can proceed directly to installing your drip edge (if not already done) and then your asphalt shingles.
Does ice and water shield expire?
Unopened rolls generally have a shelf life of 12–24 months if stored in a cool, dry place. Once opened or installed, it is durable and designed to last as long as the roof itself. However, if the roll has been sitting in direct sunlight for weeks before installation, the adhesive may degrade.
Is ice and water shield necessary in warm climates?
While primarily designed for ice dams, it is also highly effective in warm climates for protecting against wind-driven rain. If you live in a hurricane-prone area, using ice and water shield on the entire roof deck can provide superior secondary water resistance compared to standard felt.
Conclusion
Learning how to apply ice and water shield on a roof is a valuable skill that protects your home from one of the most common causes of roof failure. By following these steps—preparing the surface, starting at the eaves, overlapping correctly, and sealing penetrations—you create a robust defense against water intrusion.
Remember, while this is a DIY-friendly task, safety should always be your priority. If your roof has a steep pitch or complex architecture, consider consulting a professional roofer.
Did you find this guide helpful? Share it with your neighbors or on social media to help others protect their homes this winter season!
Leave a Reply