Tag: Ice Dam Protection

  • How to Apply Ice and Water Shield on a Roof

    How to Apply Ice and Water Shield on a Roof

    Water damage from ice dams is one of the most destructive forces a homeowner can face, often leading to costly interior repairs and structural rot. If you live in a region with harsh winters, knowing how to apply ice and water shield on a roof is not just a maintenance task—it is a critical investment in your home’s longevity. This guide will walk you through the process with professional precision, ensuring your roof remains watertight when it matters most.

    Why Is Ice and Water Shield Essential?

    Before we dive into the application process, it is crucial to understand why this specific material is necessary. Standard roofing felt (tar paper) is breathable and allows moisture to pass through, which is fine for general rain protection. However, it fails when water backs up under shingles due to ice dams.

    Ice dams occur when snow melts on the warmer upper parts of the roof and refreezes at the colder eaves. This blockage forces water upward under the shingles. According to data from the Insurance Information Institute, water damage and freezing are among the top causes of homeowners insurance claims in the United States.

    An ice and water shield is a self-adhering, rubberized asphalt membrane that creates an impermeable barrier. Unlike traditional felt, it seals around nail penetrations and adheres directly to the roof deck, preventing water from seeping into the wood structure. For a deeper understanding of roofing materials and their historical development, you can refer to Wikipedia’s entry on Roofing.

    What Tools and Materials Do You Need?

    Preparation is half the battle. Having the right tools ready before you climb the ladder ensures a smoother, safer installation. Here is a checklist of what you will need:

    • Ice and Water Shield Membrane: Calculate your square footage accurately. Most rolls cover 100 square feet (one “square”).
    • Utility Knife with Extra Blades: A sharp blade is essential for clean cuts. Dull blades tear the membrane.
    • Chalk Line or Straight Edge: To ensure straight alignment.
    • Roofing Nails or Staples: Only if required by local code for temporary holding (most shields are self-adhering).
    • Caulking Gun and Roofing Cement: For sealing edges and overlaps.
    • Safety Gear: Non-slip boots, harness, and gloves.
    • Cleaner/Primer: Some manufacturers recommend a primer for dusty or cold decks to improve adhesion.
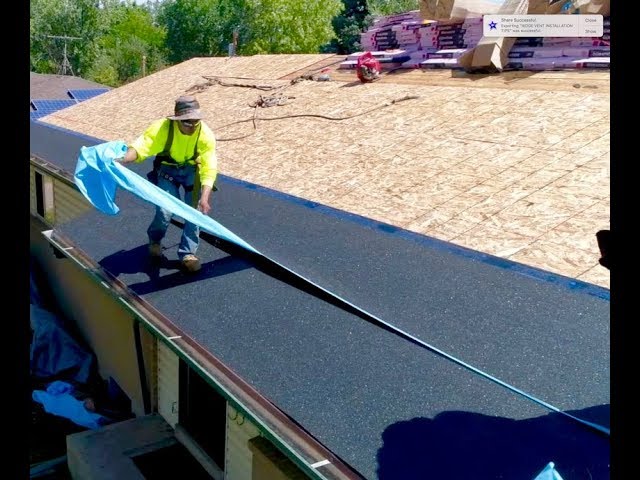
    How To Apply Ice And Water Shield On A Roof

    Step-by-Step Guide: How to Apply Ice and Water Shield

    Applying this membrane requires attention to detail. Follow these steps strictly to maintain warranty validity and ensure maximum protection.

    1. Prepare the Roof Deck

    The surface must be clean, dry, and free of debris. Any nails protruding from the deck should be hammered flush. If the wood is wet, allow it to dry completely; trapping moisture beneath the shield can lead to rot.

    • Temperature Check: Ideally, apply the shield when temperatures are above 40°F (4°C). If it is colder, store the rolls in a warm place for 24 hours prior to installation to make the adhesive more pliable.

    2. Start at the Eaves

    Begin at the lowest edge of the roof (the eave). This is the most critical area for ice dam formation.

    • Unroll the first strip along the edge.
    • Ensure the membrane extends at least 24 inches inside the exterior wall line of the house. Many building codes now require coverage up to 36–48 inches or even the entire roof surface in severe climate zones. Check your local building codes.
    • Peel back the release film slowly as you unroll. Do not remove the entire film at once, or the material may stick to itself or blow away in the wind.

    3. Smooth and Adhere

    Once the membrane is positioned, press it firmly onto the roof deck.

    • Use a hand roller or a soft broom to smooth out air bubbles and wrinkles.
    • Pro Tip: If there are wrinkles, cut them carefully with an “X” pattern, overlap the flaps, and seal with roofing cement. Air pockets can compromise the seal over time.

    4. Overlap Correctly

    When applying subsequent rows, proper overlapping is vital to prevent water intrusion.

    • Horizontal Overlaps: Overlap side edges by at least 2 inches.
    • Vertical Overlaps: If you are working up the roof, overlap the upper layer over the lower layer by at least 4–6 inches. Always follow the manufacturer’s specific instructions, as some premium brands require different overlap widths.

    5. Seal Around Penetrations

    Roofs have vents, chimneys, and skylights. These are high-risk areas for leaks.

    • Cut the membrane to fit around the base of these structures.
    • Use roofing cement to seal the edges of the membrane to the penetration flashing.
    • Ensure the shield goes under the flashing where possible, creating a shingle-like effect that directs water outward.

    6. Secure the Edges

    While the membrane is self-adhering, wind uplift can be an issue during installation.

    • Some contractors use a few roofing nails along the top edge to hold it in place until the shingles are installed.
    • Ensure any nails used are covered by the next layer of membrane or shingles to maintain the waterproof seal.

    Common Mistakes to Avoid

    Even experienced DIYers can make errors. Here is a comparison of correct vs. incorrect practices:

    FeatureCorrect PracticeIncorrect Practice
    Surface PrepClean, dry, and dust-free deckDirty, wet, or oily surface
    TemperatureApplied above 40°F (or warmed roll)Applied in freezing temps without prep
    OverlapMinimum 2–4 inches as specifiedButt joints with no overlap
    AdhesionRolled out smoothly, no bubblesWrinkles and air pockets left intact
    CoverageExtends 24″+ inside wall lineStops exactly at the edge of the eave

    Frequently Asked Questions (FAQ)

    Can I install ice and water shield in cold weather?

    Yes, but it is challenging. The adhesive becomes stiff in cold temperatures. To mitigate this, store the rolls indoors overnight to warm them up. Additionally, use a propane torch gently to warm the adhesive side before sticking it down, but be careful not to melt the membrane. Always check the manufacturer’s minimum temperature rating.

    How far up the roof should the shield go?

    Building codes vary, but the International Residential Code (IRC) typically requires ice and water shield to extend from the eave up to a point at least 24 inches horizontally inside the exterior wall line. In areas prone to heavy ice dams, many professionals recommend covering the entire roof deck for maximum protection.

    Can I put shingles directly over ice and water shield?

    Yes, absolutely. Ice and water shield is designed to be the underlayment. You do not need traditional felt paper underneath it. Once the shield is installed, you can proceed directly to installing your drip edge (if not already done) and then your asphalt shingles.

    Does ice and water shield expire?

    Unopened rolls generally have a shelf life of 12–24 months if stored in a cool, dry place. Once opened or installed, it is durable and designed to last as long as the roof itself. However, if the roll has been sitting in direct sunlight for weeks before installation, the adhesive may degrade.

    Is ice and water shield necessary in warm climates?

    While primarily designed for ice dams, it is also highly effective in warm climates for protecting against wind-driven rain. If you live in a hurricane-prone area, using ice and water shield on the entire roof deck can provide superior secondary water resistance compared to standard felt.

    Conclusion

    Learning how to apply ice and water shield on a roof is a valuable skill that protects your home from one of the most common causes of roof failure. By following these steps—preparing the surface, starting at the eaves, overlapping correctly, and sealing penetrations—you create a robust defense against water intrusion.

    Remember, while this is a DIY-friendly task, safety should always be your priority. If your roof has a steep pitch or complex architecture, consider consulting a professional roofer.

    Did you find this guide helpful? Share it with your neighbors or on social media to help others protect their homes this winter season!
  • Where Does Ice And Water Shield Go On A Roof?

    Where Does Ice And Water Shield Go On A Roof?

    Have you ever woken up to a mysterious water stain on your ceiling after a heavy snowstorm? It is a frustrating and costly surprise that many homeowners in colder climates face, often due to improper roof protection. Understanding exactly where does ice and water shield go on a roof is the first step in preventing these damaging leaks and ensuring your home stays dry and secure during winter.

    Why Proper Placement Matters for Your Roof’s Health

    Before we dive into the specific locations, it is crucial to understand why this material is different from standard roofing felt. Ice and water shield is a self-adhering, rubberized asphalt membrane. Unlike traditional underlayment, which relies on gravity to shed water, this shield bonds directly to the roof deck.

    This bond creates a watertight seal around nails and staples. When ice dams form, they can push melting water back up under your shingles. Without a proper barrier, that water finds its way into your attic. According to building science principles, managing liquid water intrusion is just as critical as managing vapor transmission. You can read more about the general physics of building envelopes on Wikipedia.

    Getting the placement right isn’t just about best practices; in many regions, it is a legal requirement dictated by local building codes.

    The Critical Zones: Exactly Where to Install It

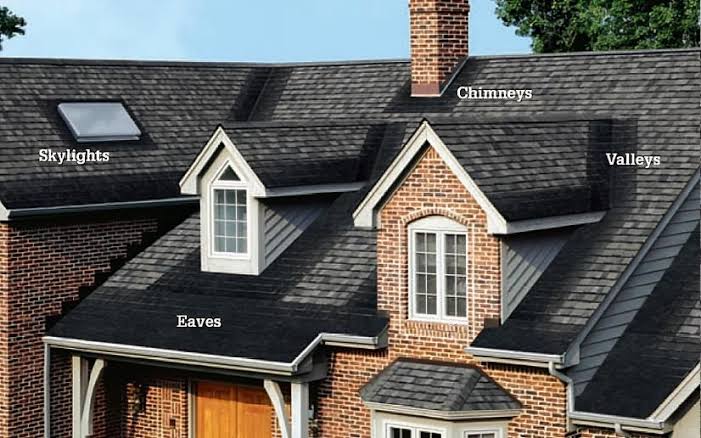
    If you are asking, “Where does ice and water shield go on a roof?” the answer involves three specific zones. While requirements vary by climate zone, these are the universal standards for maximum protection.

    1. The Eaves (The Most Important Area)

    The eaves are the edge of the roof that overhangs the walls of the house. This is the primary battleground against ice dams.

    • Starting Point: The shield should start at the very edge of the roof deck (the drip edge) or slightly over the fascia board, depending on local code.
    • Vertical Reach: It must extend up the roof slope to a point at least 24 inches inside the exterior wall line of the home.
      • Why? Heat escaping from your attic melts snow on the upper roof. The water runs down until it hits the cold eave, refreezes, and creates a dam. The water backs up behind this dam. If your shield only covers the edge, the water will bypass it. Extending it 24 inches past the interior wall ensures that even significant backup is caught.

    2. Valleys

    Roof valleys are the V-shaped channels where two roof slopes meet. They act as funnels for massive amounts of water runoff.

    • Installation Rule: Apply the shield along the entire length of the valley.
    • Width Requirement: The membrane should be at least 36 inches wide, centered in the valley.
    • Layering: If using multiple strips, overlap them by at least 6 inches. This area experiences high water velocity, so a robust, continuous seal is non-negotiable.

    3. Roof Penetrations and Low Slopes

    Any place where an object pierces the roof is a potential leak source.

    • Penetrations: Use ice and water shield around chimneys, plumbing vents, skylights, and dormer walls. Create a “boot” or collar effect by wrapping the material up the side of the penetration and onto the roof deck.
    • Low-Slope Roofs: If your roof has a pitch of less than 4:12 (meaning it rises 4 inches for every 12 inches of horizontal run), water drains slowly. Many experts recommend covering the entire roof deck with ice and water shield for low-slope applications to prevent wind-driven rain infiltration.
    Where Does Ice And Water Shield Go On A Roof

    Step-by-Step Installation Guide

    Installing this material requires precision. Here is a simplified professional workflow.

    1. Prepare the Surface: Ensure the roof deck (usually plywood or OSB) is clean, dry, and free of debris. Any moisture trapped underneath can cause rot later.
    2. Install Drip Edge: Install metal drip edge along the eaves first. Some codes allow the shield to go over the drip edge; others require it under. Check your local regulations, but generally, placing the shield over the drip edge at the eave provides a better seal against wind-driven rain.
    3. Roll Out the Membrane: Start at the bottom edge. Unroll the ice and water shield horizontally across the eave.
    4. Adhere and Smooth: Peel back the release film gradually. Press the membrane firmly onto the deck. Use a J-roller or a hand roller to ensure there are no air bubbles or wrinkles. Good adhesion is critical.
    5. Overlap Correctly: If you need a second row to reach the 24-inch mark, overlap the upper sheet over the lower sheet by at least 2 to 4 inches. Never overlap the lower sheet over the upper one, as this creates a channel for water to enter.
    6. Seal the Edges: In valleys and around penetrations, use roofing cement or compatible tape to seal the edges if recommended by the manufacturer.

    Ice and Water Shield vs. Traditional Felt: A Comparison

    Many DIYers wonder if they can save money by using standard #15 or #30 asphalt felt everywhere. Here is why that is a risky gamble.

    FeatureIce and Water ShieldTraditional Asphalt Felt
    AdhesionSelf-adhering (sticks to deck)Loose-laid or nailed
    Water ResistanceWatertight seal around nailsWater can wick through nail holes
    Ice Dam ProtectionExcellentPoor to Moderate
    CostHigher ($)Lower ($)
    Best Use CaseEaves, valleys, penetrationsUpper roof field (in moderate climates)

    Key Takeaway: While felt is cheaper, it cannot stop water that has been forced upward by ice pressure. Ice and water shield is an insurance policy for your roof structure.

    Common Mistakes to Avoid

    Even professionals make errors. Here are the most frequent pitfalls:

    • Not Extending Far Enough: Stopping the shield exactly at the wall line is a common error. Always go the extra 24 inches inward.
    • Installing in Cold Weather: The adhesive needs warmth to bond. If it is below 40°F (4°C), the material may not stick properly. Store rolls in a warm place before installation.
    • Wrinkles and Bubbles: A wrinkled shield creates weak points. Take your time to smooth it out.
    • Ignoring Manufacturer Instructions: Different brands have specific temperature ranges and overlap requirements. Always read the label.

    FAQ Section

    1. Do I need ice and water shield on the entire roof?

    In most cases, no. It is typically required only at the eaves, valleys, and penetrations. However, in extreme climate zones (like Northern Canada or Minnesota) or on low-slope roofs, some builders choose to cover the entire deck for maximum peace of mind. Check your local building code for specific mandates.

    2. Can I install ice and water shield over existing shingles?

    No. Ice and water shield must be installed directly onto the roof deck (the wood sheathing). Installing it over old shingles will prevent proper adhesion and void the warranty. It is part of the underlayment layer, not the outer layer.

    3. How long does ice and water shield last?

    The material itself is durable and can last as long as the roof shingles (20–30 years). However, its effectiveness depends on proper installation. If it is not adhered correctly during installation, it may fail prematurely. Once covered by shingles, it is protected from UV rays, which helps it last longer.

    4. What happens if I don’t use ice and water shield?

    Without it, you are at high risk for ice dam damage. Melting water can seep under shingles, soak into the roof deck, rot the wood, damage insulation, and cause mold growth in your attic. The cost of repairing structural rot far exceeds the cost of the shield.

    5. Is ice and water shield the same as peel-and-stick underlayment?

    Essentially, yes. “Ice and water shield” is the functional name describing its purpose, while “peel-and-stick” describes the installation method. Most modern ice and water shields are self-adhering. However, always verify the product specifications to ensure it is rated for ice dam protection.

    Conclusion

    Knowing where does ice and water shield go on a roof is fundamental to protecting your home from the harsh realities of winter weather. By focusing on the eaves (extending 24 inches past the interior wall), valleys, and penetrations, you create a robust defense system against ice dams and wind-driven rain.

    While it may add to the initial cost of your roofing project, the long-term savings in prevented water damage make it an invaluable investment. Don’t cut corners on your roof’s first line of defense.

    Did you find this guide helpful? Share this article with your neighbors or on social media to help others protect their homes this winter season!