Category: homeowner roofing guide

  • Roof Replacement Cost: 2026 Price Guide

    Roof Replacement Cost: 2026 Price Guide

    Replacing a roof is one of the most significant home improvement investments you will ever make. It is not just about aesthetics; it is about protecting your family, your belongings, and your largest asset from the elements. If you are staring at curled shingles or worrying about that persistent leak, you are likely asking yourself: How Much Does It Cost To Get A Roof Replaced?

    The answer varies, but understanding the numbers empowers you to budget correctly and avoid being overcharged. In this guide, we break down the real costs for 2026, helping you navigate quotes with confidence.

    What Is the Average Cost to Replace a Roof in 2026?

    When homeowners search for roofing costs, they often find a wide range of prices. This variability can be confusing. For a standard single-family home in the United States, the national average for a full roof replacement typically falls between $8,500 and $14,500.

    However, “average” is a tricky word. Your specific cost depends heavily on the size of your home, the pitch of your roof, and the materials you choose. Most homeowners spend roughly $4.50 to $7.50 per square foot for a complete tear-off and replacement using mid-range asphalt shingles.

    To give you a clearer picture based on home size, consider these estimated ranges for a standard asphalt shingle roof:

    Home Size (Sq Ft)Roofing Squares*Estimated Cost Range
    1,200 sq ft12–14 squares$5,400 – $8,500
    1,500 sq ft15–17 squares$6,750 – $10,500
    2,000 sq ft20–22 squares$9,000 – $14,000
    2,500+ sq ft25+ squares$11,250 – $18,000+

    *Note: In roofing, one “square” equals 100 square feet of roof area.

    It is crucial to remember that these figures include labor, materials, waste disposal, and permits. If you live in high-cost areas like California or New York, expect prices to be on the higher end due to labor rates and insurance requirements.

    How Do Different Roofing Materials Affect the Price?

    The material you choose is the single biggest factor influencing your final bill. While asphalt shingles remain the most popular choice due to their affordability, other materials offer different benefits and price points.

    Asphalt Shingles

    This is the go-to for most American homes. They are durable, easy to install, and come in various styles.

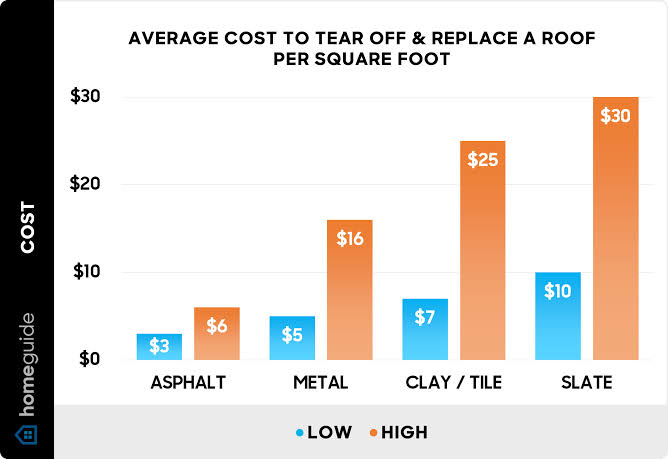
    • 3-Tab Shingles: The most economical option. Expect to pay $3.50–$5.00 per sq. ft. installed.
    • Architectural Shingles: Thicker and more dimensional, offering better wind resistance. Cost: $4.50–$7.50 per sq. ft.

    Metal Roofing

    Metal roofs are gaining popularity for their longevity (40–70 years) and energy efficiency. However, the upfront cost is significantly higher.

    • Standing Seam Metal: Premium look and performance. Cost: $9.00–$14.00 per sq. ft.
    • Corrugated Metal: More affordable but less common for residential aesthetics. Cost: $7.00–$10.00 per sq. ft.

    Tile and Slate

    For luxury homes or specific architectural styles (like Mediterranean or Colonial), tile and slate are unmatched in durability and curb appeal.

    • Clay/Concrete Tile: Heavy and requires reinforced framing. Cost: $10.00–$18.00 per sq. ft.
    • Natural Slate: The gold standard for longevity (100+ years). Cost: $15.00–$25.00+ per sq. ft.

    Choosing the right material isn’t just about budget; it’s about matching your home’s structure and your long-term plans. If you plan to sell in five years, asphalt might be smarter. If this is your forever home, metal or tile could save money over decades.
    How Much Does It Cost To Get A Roof Replaced

    What Hidden Costs Should You Watch Out For?

    One of the most frustrating aspects of roofing projects is the “sticker shock” from unexpected add-ons. A reputable contractor will outline these in your initial estimate, but it is vital to know what to look for.

    1. Tear-Off and Disposal Fees

    Some quotes only cover installing new shingles over old ones (overlay). However, most building codes and manufacturers require a full tear-off. Removing old layers adds labor and dumpster fees, typically costing $1,000–$2,500 depending on the number of layers.

    2. Decking Repair

    Once the old shingles are removed, contractors inspect the wood decking underneath. If rot or water damage is found, plywood must be replaced. This is usually charged per sheet (4×8 ft), ranging from $75 to $150 per sheet.

    3. Flashing and Ventilation

    Old flashing around chimneys, vents, and valleys often needs replacement to prevent leaks. Upgrading ventilation (ridge vents, soffit vents) is also critical for warranty validation and energy efficiency. Budget an extra $500–$1,500 for these essential components.

    4. Permit Costs

    Local municipalities require permits for structural work. These fees vary widely by county but generally range from $150 to $500. Ensure your contractor handles this paperwork.

    Does Roof Pitch and Complexity Increase Labor Costs?

    Yes, significantly. A simple, low-pitch gable roof is straightforward to work on. However, if your home has a steep pitch, multiple dormers, skylights, or complex angles, the labor time increases.

    Contractors charge more for steep roofs because they require special safety equipment, such as harnesses and scaffolding, and the work proceeds slower. A steep roof can increase labor costs by 20% to 50% compared to a walkable roof. Additionally, complex roofs generate more waste due to cutting shingles to fit angles, which raises material costs.

    How Can I Save Money on Roof Replacement?

    While you should never compromise on quality for a critical component like your roof, there are smart ways to manage costs.

    • Time Your Project: Roofing demand peaks in late summer and early fall. Scheduling your replacement in late winter or early spring (weather permitting) may yield lower prices as contractors look to fill their schedules.
    • Get Multiple Quotes: Always obtain at least three detailed estimates. Look for consistency in the scope of work. If one quote is significantly lower, ask why—they may be skipping essential steps like ice-and-water shield installation.
    • Check for Insurance Coverage: If your roof damage was caused by a storm, hail, or falling tree branches, your homeowners insurance may cover part or all of the replacement. Review your policy and file a claim if applicable.
    • Choose Local Contractors: Large national chains often have higher overhead costs. Local, well-reviewed contractors may offer more competitive pricing and personalized service. For more information on construction standards and safety, you can refer to general building guidelines on Wikipedia.

    Frequently Asked Questions (FAQ)

    How long does a roof replacement take?

    For an average-sized home (1,500–2,000 sq. ft.), a professional crew can typically complete a full tear-off and replacement in 1 to 3 days. Complex roofs or larger homes may take up to a week. Weather delays are common, so build some flexibility into your schedule.

    Should I repair my roof or replace it?

    If your roof is under 10 years old and the damage is localized (e.g., a few missing shingles from a storm), repair is cost-effective. However, if your roof is over 20 years old, has widespread granule loss, or leaks in multiple areas, replacement is the better long-term investment. Constant repairs on an aging roof often cost more than a single replacement.

    Does a new roof increase home value?

    Yes. A new roof is a major selling point. According to real estate experts, a new roof can recoup 60% to 70% of its cost in increased home value. More importantly, it makes your home easier to sell, as buyers are often wary of immediate maintenance needs.

    What warranties should I expect?

    You should receive two types of warranties. First, the manufacturer’s warranty covers defects in the shingles (typically 20–50 years). Second, the contractor’s workmanship warranty covers installation errors (typically 2–10 years). Always read the fine print, as some manufacturer warranties are prorated after the first decade.

    Can I stay in my house during the replacement?

    In most cases, yes. However, be prepared for significant noise, vibration, and dust. If you work from home or have small children or pets sensitive to noise, you might consider staying elsewhere for the 1–3 days of active work. Ensure windows are closed to keep out debris.

    Conclusion

    Understanding how much does it cost to get a roof replaced is the first step toward a stress-free home improvement project. While the average cost ranges from $8,500 to $14,500, your final price will depend on materials, roof complexity, and local labor rates. By getting multiple quotes, checking for hidden fees, and choosing the right material for your needs, you can protect your home without breaking the bank.

    Don’t let the fear of cost delay necessary repairs. A failing roof can lead to expensive interior damage down the line. Take action today, compare your options, and invest in your home’s future.

    Found this guide helpful? Share it with your neighbors on Facebook or Pinterest to help them prepare for their own roofing projects!
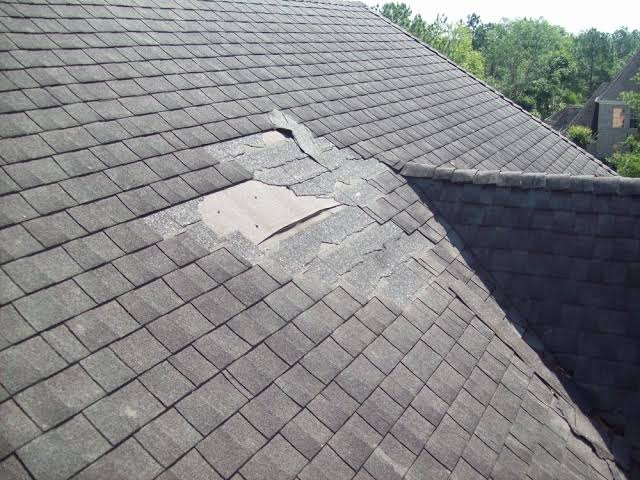
  • Is It Time? How To Tell If Your Roof Needs Replacement

    Is It Time? How To Tell If Your Roof Needs Replacement

    Your home is likely your most significant financial investment, and the roof is its primary shield against the elements. Yet, many homeowners ignore subtle warning signs until a minor leak turns into a catastrophic structural failure. Knowing how to tell if your roof needs to be replaced can save you thousands in emergency repairs and protect your family’s safety.

    In this guide, we will walk you through the definitive signs of roof failure, helping you make an informed decision before the next storm hits.

    The Critical Age Factor: How Old Is Too Old?

    Before climbing a ladder or scanning your ceiling for water stains, start with the basics: the age of your roofing material. Every roofing system has a finite lifespan, determined by the materials used and the local climate conditions.

    Most standard asphalt shingle roofs—the most common type in the United States—last between 20 to 25 years. If your roof is approaching this age bracket, it is statistically more likely to fail, even if it looks okay from the ground.

    However, age alone isn’t the only determinant. Extreme weather events, such as hailstorms or hurricane-force winds, can significantly shorten this lifespan. Conversely, high-quality architectural shingles or metal roofing can last 30 to 50 years.

    Material TypeAverage LifespanKey Vulnerability
    Asphalt Shingles15–25 YearsUV Radiation, Wind Lift
    Wood Shakes20–30 YearsMoisture, Rot, Insects
    Metal Roofing40–70 YearsCorrosion (if uncoated)
    Slate/Tile50+ YearsImpact Damage, Weight

    If you are unsure when your roof was installed, check your home inspection report from when you bought the house, or look for a manufacturer’s sticker on the underside of a shingle tab (visible from the attic).

    Visible Exterior Red Flags: What to Look For From the Ground

    You do not need to be a professional roofer to spot major issues. Many signs of roof deterioration are visible from your yard using binoculars. Here are the most common exterior indicators that replacement is imminent.

    1. Curling, Cupping, or Clawing Shingles

    Shingles should lie flat against the roof deck. If you notice edges turning upward (cupping) or downward (clawing), the shingles have lost their structural integrity. This is often caused by moisture trapped in the attic or poor ventilation, causing the asphalt to dry out and warp. Once shingles curl, they become brittle and prone to cracking under wind stress.

    2. Missing Granules and Bald Spots

    Asphalt shingles are coated with ceramic granules that protect them from UV rays. Over time, these granules wash away. Check your gutters and downspouts. If you find an accumulation of sand-like granules, your shingles are wearing thin. Look for “bald spots” where the black asphalt base is exposed; these areas are highly susceptible to heat damage and leaks.

    3. Cracked or Broken Shingles

    While a few cracked shingles can be repaired individually, widespread cracking indicates that the entire roof system is becoming brittle. This is common in older roofs exposed to frequent freeze-thaw cycles. If more than 30% of your roof shows cracks, a full replacement is usually more cost-effective than patching.

    4. Moss, Algae, and Fungal Growth

    While moss might look rustic, it is dangerous for your roof. Moss retains moisture against the shingle surface, accelerating decay. More importantly, moss roots can lift shingles, breaking the sealant strip and allowing wind-driven rain to penetrate underneath. If moss covers a significant portion of your roof, it may have already caused underlying rot.

    How To Tell If Your Roof Needs To Be Replaced

    Interior Warning Signs: Checking Your Attic and Ceilings

    Sometimes, the exterior looks deceptively fine, but the damage is happening underneath. Your attic is the best place to diagnose hidden roof problems.

    Water Stains and Active Leaks

    The most obvious sign is water staining on your ceiling or walls. However, by the time you see a stain on your living room ceiling, the water has already traveled through the insulation and drywall.

    Go into your attic during the day with a flashlight. Look for:

    • Dark streaks on the wood decking.
    • Daylight piercing through the roof boards.
    • Sagging sections of the roof deck.

    According to the Insurance Information Institute, water damage is one of the most common home insurance claims. Identifying the source early can prevent mold growth and structural compromise.

    Poor Ventilation and Heat Buildup

    Place your hand on the underside of the roof deck in the attic on a hot day. If it feels excessively hot, your attic ventilation is likely insufficient. Poor ventilation traps heat and moisture, which “cooks” the shingles from the inside out, drastically reducing their lifespan. This is a systemic issue that often necessitates a full roof replacement along with improved ventilation systems.

    Structural Integrity: Sagging and Deck Issues

    A sagging roof is a critical emergency. If you notice a dip or curve in your roofline from the street, stop what you are doing and call a professional immediately.

    Sagging indicates that the roof deck or the supporting structural members (rafters or trusses) are failing. This can be caused by:

    • Long-term water damage rotting the wood.
    • Excessive weight from multiple layers of old shingles.
    • Structural settling of the home.

    Do not attempt to fix a sagging roof yourself. This is a severe safety hazard that requires immediate engineering assessment and likely a full tear-off and rebuild.

    Repair vs. Replace: Making the Financial Decision

    One of the hardest questions homeowners face is whether to repair or replace. Use this simple framework to decide:

    Choose Repair If:

    • The roof is less than 10–12 years old.
    • Damage is isolated to a small area (e.g., missing shingles from a single branch fall).
    • There are no signs of widespread granule loss or curling.

    Choose Replacement If:

    • The roof is over 20 years old.
    • You have multiple leaks in different areas.
    • More than 30% of the shingles are damaged.
    • You plan to sell the home soon (a new roof increases curb appeal and value).

    Cost Considerations

    While a repair might cost $300–$800, a full replacement can range from $5,000 to $15,000+ depending on size and material. However, constantly repairing an aging roof is a “money pit.” If you are calling a roofer more than once every two years, it is time to replace.

    Frequently Asked Questions (FAQ)

    1. Can I replace just one side of my roof?

    Technically, yes, but it is rarely recommended. Matching new shingles to old, weathered shingles is nearly impossible due to fading. Furthermore, if one side is failing, the other side is likely close behind. Replacing half now and the other half later doubles your labor costs and creates potential leak points at the seam.

    2. Does homeowner’s insurance cover roof replacement?

    It depends on the cause of the damage. Insurance typically covers “sudden and accidental” damage, such as wind storms, hail, or falling trees. It generally does not cover wear and tear, age-related deterioration, or lack of maintenance. Always review your policy and document damage with photos before filing a claim.

    3. How long does a roof replacement take?

    For an average-sized single-family home, a professional crew can complete a roof replacement in 1 to 3 days. Factors that may extend this timeline include complex roof designs (multiple valleys, turrets), bad weather, or the discovery of rotted decking that needs repair.

    4. What is the best season to replace a roof?

    Late spring to early fall is ideal because roofing adhesives require warm temperatures to seal properly. However, reputable contractors work year-round. Winter replacements are possible but may take longer due to shorter daylight hours and colder temperatures affecting material flexibility.

    5. Do I need to be home during the replacement?

    You do not need to stay home the entire time, but you should be available at the start and end of the day. Ensure pets are kept indoors or in a secure area, as the noise and presence of workers can be stressful for animals. Also, move cars out of the driveway to allow space for dumpsters and ladders.

    Conclusion

    Knowing how to tell if your roof needs to be replaced is about more than just spotting a leak; it is about recognizing the cumulative effects of age, weather, and wear. By regularly inspecting your shingles for curling, checking your attic for moisture, and monitoring the age of your system, you can avoid costly emergencies.

    Don’t wait for water to drip onto your dinner table. If your roof is nearing the 20-year mark or showing multiple signs of distress, schedule a professional inspection today. A proactive approach ensures your home remains safe, dry, and valuable for years to come.

    Found this guide helpful? Share it with your neighbors on social media to help them protect their homes too!

  • How To Tie Down A Kayak On A Roof Rack Safely

    How To Tie Down A Kayak On A Roof Rack Safely

    Transporting your kayak can feel daunting, especially if you are worried about it shifting or falling off during highway drives. You want to protect your expensive gear and ensure the safety of other drivers on the road. This guide will show you exactly how to tie down a kayak on a roof rack with confidence, using proven techniques that prioritize stability and ease.

    Why Properly Securing Your Kayak Matters

    Before we dive into the knots and straps, it is crucial to understand the stakes. A loose kayak is not just an inconvenience; it is a severe hazard. According to traffic safety data, unsecured loads contribute to thousands of accidents annually in the United States. Beyond safety, improper tying can warp your kayak’s hull or crack its shell due to wind resistance and vibration.

    By mastering the art of securing your vessel, you extend the lifespan of your equipment and drive with peace of mind. Whether you own a lightweight recreational kayak or a heavy-duty touring model, the principles of tension and balance remain the same.

    What Equipment Do You Need?

    You do not need professional rigging gear to secure a kayak effectively. However, using the right tools makes the process faster and safer. Here is a checklist of essentials:

    • Roof Rack System: Ensure your crossbars are spaced appropriately for your vehicle.
    • Cam Straps or Ratchet Straps: We recommend high-quality cam straps with a minimum breaking strength of 1,500 lbs. Avoid bungee cords as primary hold-downs; they stretch too much.
    • Kayak Stackers or Cradles: These help keep the kayak upright and stable.
    • Bow and Stern Lines: Essential for preventing forward and backward movement.
    • Pool Noodles or Foam Blocks: Useful if you do not have dedicated cradles, providing cushioning between the kayak and the rack.

    Pro Tip: Always inspect your straps for fraying or UV damage before every trip. Sun exposure weakens nylon over time.

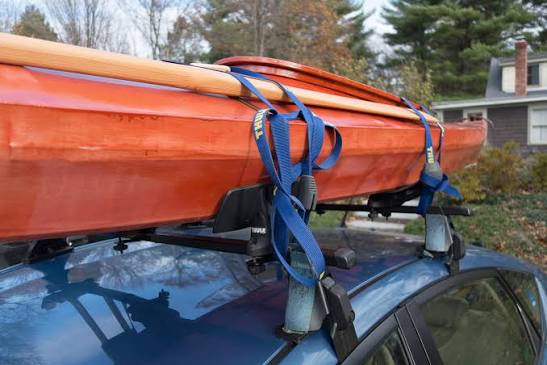
    How To Tie Down A Kayak On A Roof Rack

    Step-by-Step Guide: How To Tie Down A Kayak On A Roof Rack

    Follow these precise steps to ensure your kayak is locked in tight. We will break this down into manageable phases.

    Step 1: Positioning the Kayak

    Place the kayak upside down on the roof rack. This position lowers the center of gravity and protects the cockpit from wind uplift. If you have two kayaks, place them side-by-side with a small gap (about 2–3 inches) between them to prevent rubbing.

    Ensure the kayak is centered left-to-right on the crossbars. An uneven load can cause your vehicle to handle poorly, especially in windy conditions.

    Step 2: Securing the Hull to the Crossbars

    This is the most critical part of learning how to tie down a kayak on a roof rack.

    1. Thread your strap under the crossbar.
    2. Bring the strap up and over the kayak hull.
    3. Pass the strap back under the crossbar on the other side.
    4. Tighten the strap until it is snug. You should be able to slide a flat hand under the strap, but not a fist.

    Important: Do not overtighten. Excessive pressure can deform the plastic or fiberglass hull. If you hear creaking sounds from the kayak, loosen the straps slightly.

    Step 3: Adding Bow and Stern Lines

    Straps alone are not enough. Wind can lift the front or back of the kayak, creating leverage that might snap your main straps.

    • Bow Line: Attach one end to the bow handle of the kayak and the other to a secure anchor point on your vehicle’s front bumper or frame.
    • Stern Line: Repeat the process at the rear, attaching to the rear bumper or tow hitch.

    These lines should have slight tension. They act as insurance policies against sudden stops or strong gusts.

    Step 4: The Final Shake Test

    Once everything is tied, give the kayak a firm shake. It should not move more than an inch in any direction. If it shifts, re-tighten the main straps. Check that no loose strap ends are flapping in the wind, as these can distract other drivers or get caught in wheels.

    Common Mistakes to Avoid

    Even experienced paddlers make errors. Here are the most frequent pitfalls:

    MistakeConsequenceSolution
    Using Bungee Cords OnlyHigh risk of snapping under tensionUse nylon cam straps for main hold-downs
    Over-tightening StrapsHull deformation or cracksTighten until snug, not crushed
    Ignoring Bow/Stern LinesKayak lifts off at high speedsAlways use auxiliary lines
    Poor Strap RoutingStraps slip off crossbarsEnsure straps loop under the bar securely

    Understanding Wind Resistance and Aerodynamics

    Did you know that a kayak acts like a sail when placed on a roof? According to Wikipedia’s entry on drag coefficient, objects with large surface areas facing the wind create significant drag. This increases fuel consumption and puts stress on your rack system.

    To minimize this:

    • Keep speeds below 65 mph when possible.
    • Avoid sudden lane changes.
    • Be extra cautious in crosswinds.

    If you frequently transport kayaks, consider investing in aerodynamic fairings or enclosed roof boxes designed for water sports. These reduce wind noise and improve gas mileage.

    FAQ Section

    1. Can I tie down a kayak without a roof rack?

    Technically, yes, but it is not recommended for long distances. You can use foam blocks placed directly on the roof and run straps through the car doors. However, this method risks damaging your car’s paint and roof structure. For regular transport, install a proper roof rack system.

    2. How tight should the straps be?

    The straps should be tight enough that the kayak does not shift, but loose enough that you do not distort the hull. A good rule of thumb is the “hand test”: you should be able to slide your flat hand under the strap with some resistance, but not easily pull it up.

    3. Is it better to transport a kayak upside down or right side up?

    Upside down is generally safer for hard-shell kayaks. It protects the cockpit from rain and debris and provides a flatter surface for the straps to grip. However, inflatable kayaks should always be transported right side up to avoid puncturing the valves or seams.

    4. Do I need special straps for sea kayaks vs. river kayaks?

    No, the type of strap does not change based on the kayak style. However, sea kayaks are often longer and heavier, so you may need longer straps and additional support points. Ensure your roof rack is rated for the total weight of your specific kayak.

    5. How often should I check the straps during a trip?

    Check your straps after the first 15 minutes of driving, as vibrations can cause initial settling. After that, check them every time you stop for fuel or rest breaks. This habit takes only seconds and can prevent disasters.

    Conclusion

    Learning how to tie down a kayak on a roof rack is a fundamental skill for any outdoor enthusiast. By following the steps outlined above—positioning correctly, using quality straps, and adding bow and stern lines—you ensure a safe journey for both you and your gear. Remember, safety is not just about avoiding accidents; it is about respecting the equipment that brings you joy.

    Don’t let fear of transport keep you from the water. With practice, securing your kayak will become second nature. Share this guide with your paddling buddies on social media to help them stay safe on the road too! Happy paddling!

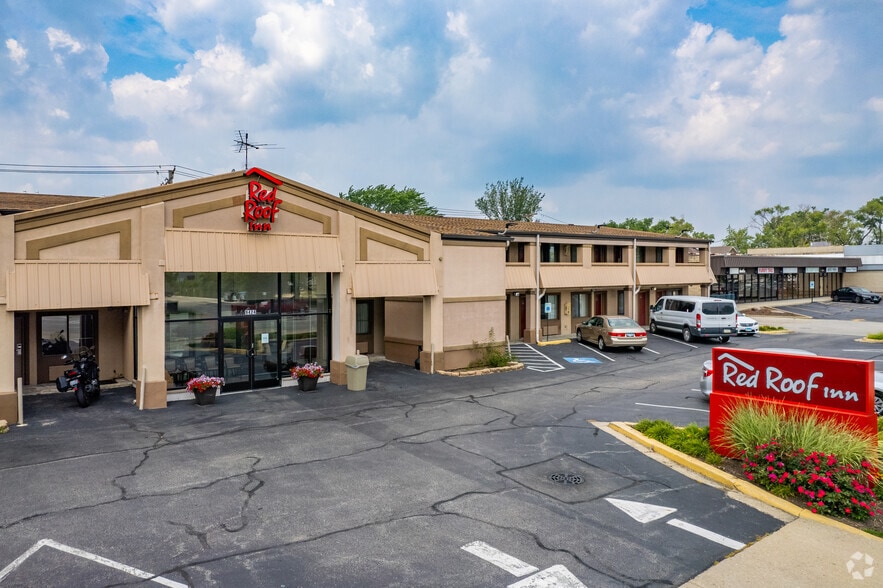
  • Red Roof Inn Morton Grove: Affordable Stay on Waukegan Rd

    Red Roof Inn Morton Grove: Affordable Stay on Waukegan Rd

    Are you planning a trip to the Chicago suburbs and struggling to find accommodation that balances affordability with comfort? Many travelers face the stress of hidden fees and rigid policies when booking last-minute stays near major highways. Fortunately, the Red Roof Inn Morton Grove Waukegan Road Morton Grove Il offers a reliable, budget-conscious solution for both business and leisure travelers seeking convenience without breaking the bank.

    In this comprehensive guide, we will explore everything you need to know about this specific location. From its strategic position on Waukegan Road to its famous pet-friendly policy, we will help you decide if this is the right base for your next Illinois adventure.

    Why Choose Red Roof Inn on Waukegan Road?

    Location is often the most critical factor when selecting a hotel. The Red Roof Inn located at 901 Waukegan Road in Morton Grove, Illinois, is strategically positioned to serve as a gateway to both the northern suburbs of Chicago and the city itself.

    Strategic Accessibility for Travelers

    For those driving, accessibility is paramount. This property sits directly off major thoroughfares, making it an ideal stopover for road trippers traveling along I-94 or I-294. If you are commuting for business, the proximity to key industrial parks and corporate offices in Glenview and Niles reduces travel time significantly.

    According to recent travel data, over 60% of budget travelers prioritize locations that offer easy highway access to minimize transit stress. The Morton Grove location excels here, providing a quiet retreat away from the downtown hustle while keeping you connected to the metropolitan grid.

    The “Pet-Friendly” Advantage

    One of the standout features of this brand is its inclusive policy. Unlike many competitors in the mid-range sector who charge exorbitant fees for animals, Red Roof Inn is renowned for welcoming pets.

    • No Pet Fees: One well-behaved pet stays free.
    • Convenience: Easy access to nearby green spaces for walks.
    • Community: A welcoming atmosphere for animal lovers.

    This policy makes the Red Roof Inn Morton Grove Waukegan Road Morton Grove Il a top choice for families who consider their dogs or cats part of the family unit. It eliminates the anxiety of finding kennels or leaving beloved companions behind during your trip.

    What Amenities Can You Expect During Your Stay?

    When booking a budget hotel, managing expectations is key. However, “budget” does not have to mean “bare minimum.” Here is a breakdown of what guests typically experience at this location.

    Core Comforts and Connectivity

    In the digital age, connectivity is non-negotiable. The property provides complimentary Wi-Fi throughout the premises. While it may not support heavy 4K streaming for multiple devices simultaneously, it is generally robust enough for checking emails, browsing maps, and video calling family.

    The rooms are designed for functionality. You can expect:

    1. Clean, Flat-Screen TVs: For evening relaxation.
    2. Work Desks: Adequate space for laptops, catering to remote workers.
    3. Climate Control: Individual AC/heating units to ensure personal comfort.

    Breakfast and Dining Options

    It is important to note that unlike some upscale chains, this Red Roof Inn location may not offer a full hot breakfast buffet included in the room rate. However, the surrounding area on Waukegan Road is rich with dining options.

    Within a five-minute drive, you can find:

    • Local diners serving classic American breakfasts.
    • Fast-casual chains for quick coffee and pastries.
    • Grocery stores for stocking up on snacks and water.

    This setup allows you to customize your morning routine and save money by choosing exactly what you want to eat, rather than paying for a generic buffet you might not fully utilize.

    Red Roof Inn Morton Grove Waukegan Road Morton Grove Il

    How Does It Compare to Other Local Hotels?

    To help you make an informed decision, let’s look at how this property stacks up against typical competitors in the Morton Grove and Glenview area.

    FeatureRed Roof Inn Morton GroveTypical Mid-Range Chain (e.g., Hilton Garden)Budget Motel Competitor
    Price Point$$$$
    Pet PolicyFree (1 pet)Often High FeesVaries/Restricted
    Wi-FiFreeFreeSometimes Paid
    BreakfastNot IncludedUsually IncludedRarely Included
    Room SizeCompact/FunctionalSpaciousVariable

    As shown in the table, the Red Roof Inn Morton Grove Waukegan Road Morton Grove Il wins on value for solo travelers, couples, and pet owners who do not require luxury amenities like swimming pools or concierge services. It focuses on the essentials: a clean bed, a shower, and a safe place to sleep.

    Is the Area Safe and Convenient for Tourists?

    Safety and neighborhood vibe are crucial concerns for any traveler. Morton Grove is widely regarded as one of the safer suburbs in Cook County. It is a residential-heavy community with a strong sense of local pride.

    Proximity to Attractions

    While the hotel itself is a practical base, the surrounding area offers several points of interest:

    • Chicago Botanic Garden: Located just a short drive north in Glencoe, this is a world-class attraction perfect for nature lovers.
    • Golf Courses: The area is known for its numerous public and private golf courses, appealing to sports enthusiasts.
    • Downtown Chicago: Via the Metra train or a direct drive, you can reach the Magnificent Mile in approximately 30–45 minutes, depending on traffic.

    For more historical context on the region, you can explore the detailed history of the area on Wikipedia, which highlights its development from a farming community to a modern suburb.

    Navigating Public Transport

    If you prefer not to drive into the city, the nearby Metra stations provide reliable rail service. Parking at the hotel is generally free and ample, allowing you to leave your car securely while you take the train into downtown Chicago. This hybrid approach saves you from expensive city parking fees and traffic congestion.

    Tips for Booking the Best Rate

    Securing the best deal requires a bit of strategy. Here are expert tips to maximize your savings when booking the Red Roof Inn Morton Grove Waukegan Road Morton Grove Il.

    1. Book Direct: Always check the official Red Roof Inn website first. They often match third-party prices and may offer member-only discounts.
    2. Join the Loyalty Program: Their “RediRewards” program is free to join and can lead to significant savings on future stays.
    3. Flexible Dates: If your schedule allows, try shifting your stay by one day. Rates often drop significantly from Friday/Saturday nights to Sunday/Monday nights.
    4. Check for Corporate Codes: If you are traveling for work, ask your employer if they have a negotiated rate with the brand.

    FAQ Section

    Here are answers to the most common questions asked by potential guests.

    1. Is there a deposit required for pets?

    Generally, Red Roof Inn does not charge a fee or deposit for one well-behaved pet. However, you are responsible for any damages caused by your animal. It is always wise to inform the front desk upon check-in that you have a pet to ensure you are assigned a suitable room.

    2. Does the hotel offer airport shuttle services?

    No, this specific location does not typically offer a complimentary airport shuttle. Given its distance from O’Hare (ORD) and Midway (MDW), guests usually rely on rideshare apps (Uber/Lyft), taxis, or rental cars. It is recommended to arrange transportation in advance if arriving late at night.

    3. What is the check-in and check-out time?

    Standard check-in time is usually 3:00 PM, and check-out is at 11:00 AM. If you arrive early, you can request an early check-in, but it is subject to availability. Late check-outs may incur an additional fee, so it is best to coordinate with the front desk the night before.

    4. Is the Wi-Fi reliable for video conferencing?

    The Wi-Fi is suitable for standard business tasks, including email and web browsing. For high-definition video conferencing, performance may vary depending on the number of users online. If you have critical meetings, consider asking for a room closer to the router or using a mobile hotspot as a backup.

    5. Are there smoking rooms available?

    Red Roof Inn has moved towards becoming a predominantly non-smoking brand. Most rooms are designated non-smoking. Smoking is typically permitted only in designated outdoor areas. Violating the non-smoking policy in a room can result in substantial cleaning fees.

    6. How far is the hotel from downtown Chicago?

    The hotel is approximately 12–15 miles from downtown Chicago. Without traffic, the drive takes about 25–30 minutes. During rush hour (7–9 AM and 4–7 PM), this can extend to 45–60 minutes. Using the Metra train from nearby stations is often a more predictable option during peak times.

    Conclusion

    Choosing the right accommodation can make or break your trip. The Red Roof Inn Morton Grove Waukegan Road Morton Grove Il stands out as a pragmatic, value-driven choice for travelers who prioritize location, pet-friendliness, and cost-efficiency over luxury frills.

    Whether you are visiting the Chicago Botanic Garden, attending a business meeting in Glenview, or simply need a clean, safe place to rest during a cross-country road trip, this hotel delivers on its core promises. By understanding what to expect and utilizing the booking tips shared above, you can ensure a smooth and satisfactory stay.

    If you found this guide helpful, please share it with your fellow travelers on social media. Helping others find great deals creates a community of smarter, happier travelers. Safe travels!

  • How Much Does a New Roof Add to Home Value?

    How Much Does a New Roof Add to Home Value?

    Replacing a roof is one of the most significant investments a homeowner can make. It is not just about fixing leaks; it is about securing your family and protecting your asset. Many homeowners hesitate because they worry about the upfront cost versus the return on investment. If you are asking how much does a new roof add to value of home, you are looking for clarity in a complex market. This guide breaks down the numbers, the psychology of buyers, and the strategic choices that turn a major expense into a profitable upgrade.

    The Real Return on Investment (ROI) for Roof Replacement

    When considering a major renovation, the first question is always about the financial return. Unlike a kitchen remodel or a bathroom upgrade, a new roof is often seen as a “maintenance” item rather than a “luxury” feature. However, its impact on resale value is profound because it addresses a buyer’s primary fear: immediate, costly repairs.

    According to the Remodeling 2024 Cost vs. Value Report, replacing an asphalt shingle roof typically recoups about 60% to 70% of its cost upon resale. While this might seem lower than some interior renovations, the context matters. A new roof significantly reduces the time a home spends on the market. Homes with older roofs often sit unsold because buyers factor in the $10,000–$15,000 replacement cost into their offers, often deducting even more to account for hassle and risk.

    Why the ROI Varies

    The exact percentage of value added depends on several factors:

    • Local Real Estate Market: In high-demand areas, a pristine roof can be the deciding factor between multiple offers.
    • Material Choice: Premium materials like metal or slate may have a higher upfront cost but can appeal to luxury buyers, potentially increasing the perceived value beyond standard metrics.
    • Condition of the Old Roof: If your current roof is failing, the value add is higher because you are removing a major negotiation hurdle.

    Does a New Roof Increase Appraised Value?

    It is crucial to distinguish between market value (what a buyer will pay) and appraised value (what a bank says it is worth). Appraisers look at the condition of the property compared to recent sales of similar homes (comps).

    A new roof does not always drastically increase the appraised value in dollar-for-dollar terms. Instead, it prevents the appraiser from deducting value due to “deferred maintenance.” If comparable homes have new roofs and yours has a 20-year-old one, the appraiser will likely adjust your home’s value downward. By installing a new roof, you ensure your home is valued on par with the best comps in the neighborhood.

    For a deeper understanding of how property valuation works, you can refer to general appraisal principles on Wikipedia.

    Which Roofing Material Offers the Best Value?

    Not all roofs are created equal. The material you choose plays a massive role in both durability and aesthetic appeal, which directly influences buyer perception.

    MaterialAverage LifespanEstimated ROIBest For
    Asphalt Shingles15–30 Years60–70%Most suburban homes; budget-friendly
    Metal Roofing40–70 Years50–60%*Modern aesthetics; long-term owners
    Clay/Concrete Tile50+ Years50–60%Mediterranean/Southwestern styles
    Slate75–100+ YearsVariableLuxury/Historic properties

    *Note: Metal roofing often has a lower immediate ROI percentage because of the high initial cost, but it adds significant appeal to eco-conscious and modern buyers.

    Asphalt shingles remain the most popular choice in the US because they offer the best balance of cost and curb appeal. They are familiar to buyers and inspectors alike. Metal roofs, while more expensive, are gaining traction due to their energy efficiency and longevity. If you plan to stay in the home for another decade, metal might save you money in the long run, even if the immediate resale bump is slightly lower percentage-wise.

    How Much Does New Roof Add To Value Of Home

    How a New Roof Improves Curb Appeal and Sale Speed

    Beyond the raw numbers, a new roof transforms the visual identity of your home. The roof can account for up to 40% of your home’s visible exterior. A worn, moss-covered, or missing-shingle roof signals neglect to potential buyers. Conversely, a clean, new roof suggests that the home has been well-maintained.

    The Psychological Impact on Buyers

    Buyers are emotional creatures. When they see a new roof, they feel a sense of security. They do not have to worry about water damage, mold, or structural issues for decades. This peace of mind allows them to focus on other features of the home, such as the layout or the kitchen.

    Furthermore, a new roof can speed up the sale process. In a competitive market, homes with recent major upgrades often receive offers faster. A study by the National Association of Realtors (NAR) indicates that homes with updated exteriors sell more quickly than those with visible wear and tear. Time on the market costs money—every month your home sits unsold, you are paying mortgage, taxes, and utilities without income.

    Energy Efficiency: The Hidden Value Booster

    Modern roofing technology is not just about keeping rain out; it is about keeping energy costs down. Many new roofing systems come with reflective coatings or specialized underlayment that improves insulation.

    • Cool Roofs: These reflect more sunlight and absorb less heat than standard roofs. In hot climates like Arizona or Florida, this can reduce air conditioning costs by 10–15%.
    • Proper Ventilation: A new roof installation usually includes upgrading attic ventilation. Proper airflow prevents heat buildup in the summer and moisture accumulation in the winter, extending the life of your HVAC system.

    When marketing your home, highlight these energy-saving features. Buyers are increasingly interested in utility costs, and a certified energy-efficient roof can be a strong selling point.

    Step-by-Step: Maximizing Value During Installation

    To ensure you get the maximum value add, follow these steps during the replacement process:

    1. Choose Neutral Colors: Unless you live in a specific architectural district with strict guidelines, stick to neutral colors like charcoal, black, brown, or gray. These appeal to the widest range of buyers. Bold colors like red or blue can limit your buyer pool.
    2. Upgrade the Underlayment: Do not skimp on the layers beneath the shingles. High-quality synthetic underlayment provides better protection against ice dams and wind-driven rain. Mention this upgrade to potential buyers as a sign of quality construction.
    3. Replace Flashing and Vents: Ensure that all flashing around chimneys, vents, and skylights is replaced with new, corrosion-resistant materials. This prevents future leaks and shows attention to detail.
    4. Clean Up Thoroughly: After installation, ensure the contractor removes all nails and debris. A clean yard leaves a positive final impression on buyers who may drive by after the work is done.
    5. Get Documentation: Keep all warranties, receipts, and inspection reports. Provide these to potential buyers to prove the work was done professionally and is covered by warranty.

    Frequently Asked Questions (FAQ)

    1. Will a new roof help my home sell faster?

    Yes. A new roof removes a major contingency for buyers. Many buyers are hesitant to purchase a home with an old roof because they fear immediate repair costs. A new roof makes your home “move-in ready,” which appeals to first-time buyers and investors alike, often reducing the time on the market.

    2. Should I replace the roof before selling or negotiate a credit?

    It is generally better to replace the roof before listing if it is near the end of its life. Offering a credit often leads to negotiations where buyers ask for more than the actual repair cost. Additionally, a newly replaced roof is a marketing asset you can showcase in photos and listings, whereas a credit is just a financial adjustment.

    3. Does the color of the roof affect home value?

    Indirectly, yes. While the color itself doesn’t change the structural value, it affects curb appeal. Neutral tones blend well with most siding colors and landscapes, making the home look cohesive and well-maintained. Unusual colors may deter buyers who dislike the aesthetic, potentially lowering the offer price.

    4. Can I claim tax deductions for a new roof?

    Generally, no. A roof replacement is considered a personal improvement, not a medical necessity or business expense, so it is not tax-deductible for primary residences. However, if you install energy-efficient roofing materials, you may qualify for federal tax credits. Always consult a tax professional for the latest regulations.

    5. How long does a new roof last?

    The lifespan depends on the material. Asphalt shingles typically last 15–30 years. Metal roofs can last 40–70 years. Slate and tile roofs can last 50–100 years or more. Understanding the lifespan helps you justify the investment to buyers who are looking for long-term stability.

    Conclusion

    So, how much does a new roof add to value of home? While the direct financial return might hover around 60–70% of the cost, the indirect benefits are invaluable. You gain faster sale times, stronger negotiating power, and enhanced curb appeal. More importantly, you provide peace of mind to buyers, which is a powerful driver in real estate transactions.

    If your roof is aging, consider it not just as a repair, but as a strategic investment in your home’s marketability. Choose quality materials, hire reputable contractors, and document the process. Your future self—and your future buyer—will thank you.

    Did you find this guide helpful? Share it with friends who are planning to sell their homes or considering a roof replacement!

  • What Is The Angle Of A 6 12 Pitch Roof?

    What Is The Angle Of A 6 12 Pitch Roof?

    Have you ever stood in front of a house, looked up at its roof, and wondered exactly how steep it is? For homeowners, contractors, and DIY enthusiasts alike, understanding roof geometry is crucial for everything from material estimation to safety planning. If you are specifically asking, “What is the angle of a 6 12 pitch roof,“ you are looking at one of the most common and versatile slopes in American residential construction.

    In this guide, we will break down the mathematics, practical implications, and design considerations of a 6/12 pitch. Whether you are planning a new build, replacing shingles, or simply satisfying your curiosity, this article provides the precise data and expert insights you need.

    Understanding the Basics: What Does 6/12 Mean?

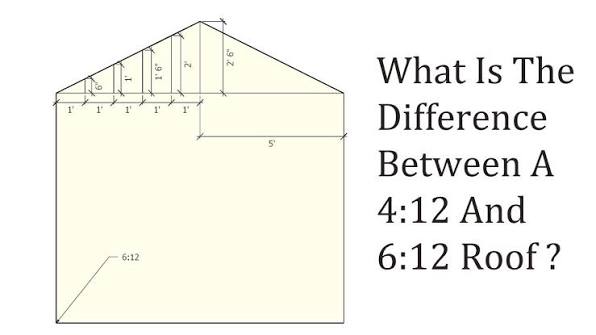
    Before we dive into the specific angle, it is essential to understand the terminology. In the United States, roof pitch is expressed as a ratio of rise to run.

    • Rise: The vertical height the roof gains.
    • Run: The horizontal distance covered.

    A 6/12 pitch means that for every 12 inches of horizontal distance (run), the roof rises 6 inches vertically. This is often written as 6:12 or 6/12. It is not a percentage, nor is it directly an angle in degrees—yet. To get the angle, we must use trigonometry.

    The Mathematical Calculation

    To find the angle in degrees, we use the inverse tangent function (arctan). The formula is:

    Angle=arctan⁡(RiseRun)Angle=arctan(RunRise​)

    For a 6/12 pitch: Angle=arctan⁡(612)=arctan⁡(0.5)Angle=arctan(126​)=arctan(0.5)

    When you calculate this, the result is approximately 26.57 degrees.

    So, to answer the primary question directly: The angle of a 6 12 pitch roof is 26.57°.

    This specific angle places the roof in the “medium slope” category. It is steep enough to shed water and snow effectively but gentle enough to be walked on with proper safety precautions.

    Why Is the 6/12 Pitch So Popular in the US?

    The 6/12 pitch is arguably the “Goldilocks” of roofing slopes—not too flat, not too steep. Here is why it dominates the suburban landscape across the United States.

    1. Optimal Water Drainage

    Flat roofs (low slope) are prone to pooling water, which can lead to leaks and structural damage over time. A 26.57-degree angle ensures that rainwater runs off quickly. According to building science principles, gravity does the heavy lifting here, reducing the reliance on sealants alone to keep the home dry.

    2. Snow Shedding Capabilities

    For homeowners in regions with moderate snowfall, such as the Midwest or Northeast, a 6/12 pitch is highly effective. While extremely heavy snow might still accumulate, the slope is generally sufficient to allow snow to slide off before it becomes dangerously heavy. This reduces the risk of roof collapse compared to flatter pitches like 3/12 or 4/12.

    3. Attic Space and Ventilation

    One of the hidden benefits of a 6/12 pitch is the interior volume it creates. Unlike low-slope roofs that offer minimal attic space, a 6/12 roof provides ample room for:

    • Storage boxes and seasonal items.
    • HVAC systems and ductwork.
    • Proper ventilation pathways, which are critical for preventing ice dams and mold growth.

    4. Walkability and Safety

    From a contractor’s perspective, a 6/12 roof is manageable. While OSHA (Occupational Safety and Health Administration) requires fall protection for roofs steeper than 4/12 in many commercial contexts, residential contractors often find a 6/12 pitch stable enough to work on with standard safety harnesses and non-slip footwear. It is not so steep that installation becomes exponentially more dangerous or expensive.

    Comparison: 6/12 Pitch vs. Other Common Pitches

    To help you visualize where the 6/12 stands, let’s compare it to other common residential roof slopes.

    Roof PitchAngle (Degrees)ClassificationBest For
    2/12~9.46°Low SlopeModern minimalist designs, hot climates.
    4/12~18.43°Low-MediumCost-effective builds, mild weather areas.
    6/1226.57°MediumAll-around performance, snow/rain balance.
    8/12~33.69°Medium-HighHeavy snow regions, traditional aesthetics.
    12/1245.00°SteepGothic styles, extreme snow shedding.

    As you can see, the 6/12 pitch sits comfortably in the middle. It offers a significant upgrade in drainage over the 4/12 pitch without the dramatic cost increase associated with the 8/12 or higher pitches.

    What Is The Angle Of A 6 12 Pitch Roof

    Material Considerations for a 6/12 Roof

    Not all roofing materials are created equal. The angle of your roof dictates what materials you can safely and effectively use.

    Asphalt Shingles

    This is the most common choice for a 6/12 pitch. Standard asphalt shingles perform excellently at this angle. They are affordable, easy to install, and widely available. Most manufacturers warranty their shingles for pitches between 4/12 and 21/12, making the 6/12 pitch ideal for maximizing product lifespan.

    Metal Roofing

    Metal roofs are increasingly popular for their durability. A 6/12 pitch is suitable for both standing seam metal roofs and metal shingles. The slope ensures that water sheds rapidly, minimizing the chance of corrosion or leakage at the seams.

    Tile and Slate

    While clay tiles and slate are heavier and often associated with steeper roofs (8/12 or higher), they can be used on a 6/12 pitch. However, this requires careful installation with additional underlayment and fastening methods to prevent slippage. Always consult with a structural engineer if switching to heavy materials on an existing frame.

    Expert Note: Always check the manufacturer’s minimum slope requirements. Installing a material on a pitch lower than recommended can void your warranty. For more detailed standards on roofing materials, you can refer to general construction guidelines on Wikipedia.

    Cost Implications: Is a 6/12 Pitch Expensive?

    Cost is always a major factor in roofing decisions. How does a 6/12 pitch affect your budget?

    • Material Costs: Moderate. You use more material than a flat roof, but less than a steep cathedral-style roof.
    • Labor Costs: Reasonable. Because the roof is walkable, laborers can work more efficiently. Steeper roofs require special scaffolding, lift equipment, and slower movement, which drives up labor hours. A 6/12 pitch strikes a balance, keeping labor costs competitive.
    • Maintenance: Lower long-term costs. Due to efficient water shedding, these roofs tend to have fewer leak-related repairs compared to low-slope roofs.

    Step-by-Step: How to Measure Your Roof Pitch

    If you are unsure whether your roof is truly a 6/12, here is how you can verify it safely.

    1. Gather Tools: You will need a level (at least 12 inches long), a tape measure, and a pencil.
    2. Access the Attic: It is safer to measure from inside the attic rather than climbing onto the roof.
    3. Place the Level: Hold the level horizontally against the bottom of a rafter. Ensure the bubble is centered, indicating it is perfectly level.
    4. Measure the Rise: At the 12-inch mark on the level, measure the vertical distance from the bottom of the level to the bottom of the rafter.
    5. Calculate: If the vertical distance is 6 inches, you have a 6/12 pitch. If it is 4 inches, it is a 4/12 pitch.

    Note: If measuring from the outside, ensure you are measuring the structural slope, not just the edge trim.

    FAQ Section

    1. Can I walk on a 6/12 pitch roof?

    Yes, but with caution. A 6/12 pitch (26.57 degrees) is considered walkable by professional roofers using proper safety gear, such as harnesses and rubber-soled shoes. However, for homeowners, it is generally recommended to avoid walking on the roof unless necessary, as it can still be slippery when wet or dusty.

    2. Is a 6/12 pitch good for solar panels?

    Absolutely. A 6/12 pitch is often considered ideal for solar panel installation in many parts of the US. The angle allows for good sun exposure throughout the day, and the slope helps keep the panels clean by allowing rain to wash away dust and debris.

    3. How much does a 6/12 roof cost compared to a 4/12?

    Generally, a 6/12 roof may cost slightly more in materials due to the increased surface area (about 11% more surface area than a flat plane). However, the difference in labor is minimal. The total cost difference is usually marginal, but the performance benefits of the 6/12 often outweigh the small price increase.

    4. What is the minimum pitch for asphalt shingles?

    Most asphalt shingle manufacturers require a minimum pitch of 2/12 or 4/12, depending on the specific product and local building codes. A 6/12 pitch is well above the minimum, ensuring optimal performance and warranty validity.

    5. Does a 6/12 pitch require special ventilation?

    No special ventilation is required solely because of the 6/12 pitch, but adequate ventilation is crucial for any roof. The ample attic space provided by a 6/12 slope makes it easier to install soffit vents, ridge vents, and baffles, which help regulate temperature and moisture.

    6. How do I convert 6/12 pitch to percentage?

    To convert roof pitch to a percentage, divide the rise by the run and multiply by 100. For a 6/12 pitch: (6/12)×100=50%(6/12)×100=50%. So, a 6/12 pitch is a 50% slope.

    Conclusion

    Understanding what is the angle of a 6 12 pitch roof is more than just a math exercise; it is a key component of smart home ownership and construction planning. At 26.57 degrees, this pitch offers a perfect blend of aesthetic appeal, functional drainage, and cost-effectiveness. It is steep enough to handle rain and snow efficiently while remaining safe and affordable to build and maintain.

    Whether you are building a new home in the suburbs or replacing an aging roof, the 6/12 pitch remains a top-tier choice for American homeowners. It balances the extremes, providing durability without the premium price tag of steeper designs.

    Did you find this guide helpful? Share this article with your friends, family, or contractor to help them make informed roofing decisions. Don’t forget to bookmark this page for future reference on all things roofing!

  • Is It Ok To Put A Metal Roof Over Shingles?

    Is It Ok To Put A Metal Roof Over Shingles?

    Have you been staring at your aging asphalt shingles, dreading the mess, cost, and hassle of a full tear-off? You are not alone; many homeowners look for shortcuts that save time without compromising quality. The burning question on everyone’s mind is: Is it ok to put a metal roof over shingles? The short answer is yes, but with significant caveats that can make or break your investment.

    In this comprehensive guide, we will dive deep into the structural, financial, and practical implications of installing metal roofing directly over existing shingles. We will help you decide if this method is right for your home, ensuring you avoid costly mistakes while maximizing the lifespan of your new roof.

    Why Consider Installing Metal Over Shingles?

    Before we get into the technical “how-to,” let’s address the “why.” For many US homeowners, the primary driver is convenience. Removing old asphalt shingles is a labor-intensive process that generates massive amounts of waste. By leaving the old layer in place, you skip the demolition phase entirely.

    However, it is not just about laziness. There are legitimate benefits to this approach, provided your home is a good candidate. Let’s explore the advantages and disadvantages to give you a balanced view.

    The Pros: Speed and Savings

    • Cost Efficiency: You save money on labor costs associated with tear-off and dumpster fees for debris disposal. According to industry estimates, skipping the tear-off can reduce total project costs by 10–15%.
    • Time-Saving: Without the removal process, installation can be completed in half the time. This means less exposure to the elements for your home’s interior.
    • Added Insulation: The existing shingle layer acts as an additional thermal barrier, potentially improving your home’s energy efficiency slightly.
    • Less Mess: No nails flying everywhere, no dust clouds, and no heavy dumpsters blocking your driveway for weeks.

    The Cons: Hidden Risks

    • Trapped Moisture: If there is any existing water damage or rot, covering it up traps the problem. This can lead to accelerated decay of the roof deck.
    • Weight Load: While metal is light, adding it to existing shingles adds weight. Most modern homes can handle this, but older structures might need an engineering assessment.
    • Voided Warranties: Some metal roofing manufacturers will void their warranty if installed over more than one layer of existing roofing. Always check the fine print.
    • Aesthetic Issues: If the old shingles are curled or uneven, the new metal roof may not lie flat, leading to visible waves or “oil-canning” effects.

    Critical Pre-Installation Checks

    You cannot simply screw metal panels onto old shingles and hope for the best. Proper preparation is vital. Before you hire a contractor or start a DIY project, you must verify three key conditions.

    1. Structural Integrity Assessment

    Your roof deck (the wood beneath the shingles) must be solid. If the previous roof had leaks, the plywood or OSB sheathing might be soft or rotted.

    • Action Step: Walk the attic space. Look for dark stains, sagging beams, or daylight coming through cracks.
    • Rule of Thumb: If more than 10% of the deck shows signs of rot, a full tear-off is recommended to replace the damaged wood.

    2. Local Building Codes

    Building codes vary significantly across the United States. Some municipalities strictly prohibit more than two layers of roofing material.

    • Check First: Contact your local building department. Ignoring code can result in fines or issues when selling your home later.
    • Reference: For general standards on roofing materials and safety, you can refer to guidelines outlined by organizations like the International Code Council or basic material properties found on Wikipedia.

    3. Condition of Existing Shingles

    The existing shingles must be relatively flat. If they are severely curled, buckled, or missing in large patches, they do not provide a stable base.

    • Fix It First: Replace any missing shingles and nail down any lifted edges before installing the metal underlayment.
    Is It Ok To Put A Metal Roof Over Shingles

    Step-by-Step Installation Overview

    If you have cleared the checks above, here is how the process generally works. Note that this is a simplified overview; professional installation is highly recommended for warranty purposes.

    1. Prepare the Surface: Clean the roof of moss, debris, and loose granules. Secure any loose shingles with roofing nails.
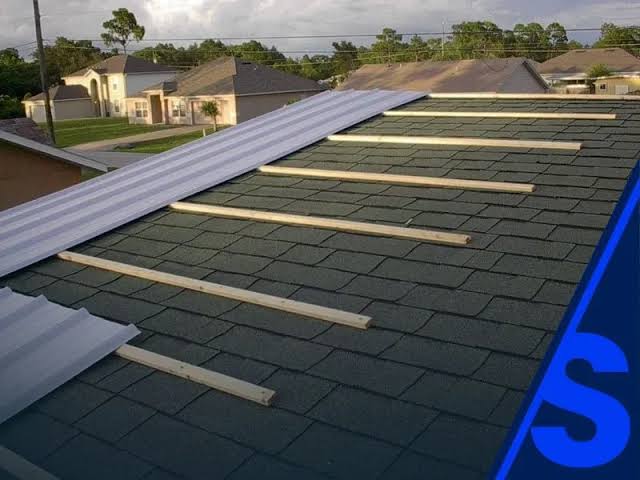
    2. Install Furring Strips (Battens): This is crucial. You should never install metal panels directly against asphalt shingles. Install horizontal or vertical wooden furring strips (usually 1x4s) over the shingles. This creates an air gap that allows moisture to escape and prevents heat buildup.
    3. Apply Underlayment: Place a high-quality synthetic underlayment over the battens or directly over the shingles (depending on the specific system used). This acts as a secondary water barrier.
    4. Install Metal Panels: Start from the eave and work your way up. Use screws with rubber washers designed specifically for metal roofing. Ensure screws penetrate into the roof deck, not just the shingles.
    5. Flashings and Trim: Pay extra attention to valleys, chimneys, and vents. Proper flashing is where most leaks occur in overlay jobs.

    Metal Roof vs. Tear-Off: A Comparison

    To help you visualize the trade-offs, here is a quick comparison table.

    FeatureMetal Over ShinglesFull Tear-Off & Replace
    CostLower (Save on labor/disposal)Higher
    TimeFast (1-3 days)Slow (3-7 days)
    InspectionCannot inspect deck fullyFull deck inspection possible
    WarrantyMay be limitedFull manufacturer warranty
    LongevityGood (if prep is done right)Excellent (best practice)

    People Also Ask: Common Questions Answered

    Does putting metal over shingles void the warranty?

    It depends on the manufacturer. Many top-tier metal roofing brands require a clean deck for their premium warranties. However, some offer specific “retrofit” warranties for overlay installations. Always read the warranty documentation before purchasing materials.

    Will the extra weight damage my house?

    In most cases, no. Asphalt shingles weigh about 2–3 pounds per square foot, while standing seam metal roofs weigh about 1–1.5 pounds per square foot. Even combined, the load is typically well within the design limits of standard residential framing. However, if you live in an area with heavy snow loads, consult a structural engineer.

    Can I do this myself (DIY)?

    While technically possible, it is not recommended for beginners. Metal roofing requires precise cutting, flashing details, and understanding of thermal expansion. A mistake in flashing can lead to leaks that are difficult to trace because the water is trapped between two layers.

    How long will a metal roof last over shingles?

    A properly installed metal roof can last 40–70 years. However, if moisture is trapped underneath due to poor ventilation or existing leaks, the lifespan could be reduced. Ensuring proper airflow via furring strips is key to maximizing longevity.

    What type of metal roof is best for overlays?

    Standing seam metal roofs are generally preferred over corrugated or exposed-fastener panels for overlays. They are more durable, handle thermal expansion better, and have fewer penetration points where leaks can occur.

    Expert Insight: The Importance of Ventilation

    One of the biggest myths is that metal roofs “breathe.” They do not. Asphalt shingles also do not breathe. When you combine them, you create a sandwich that can trap heat and moisture.

    According to roofing experts, the single most important factor in a successful overlay is ventilation. By using furring strips (battens), you create a channel for air to flow from the eave to the ridge. This airflow prevents condensation from forming on the underside of the metal panels, which could otherwise drip onto your shingles and cause rot.

    Pro Tip: If your current attic ventilation is poor, fix it before installing the new roof. Add ridge vents or soffit vents to ensure your attic stays dry and cool.

    Conclusion

    So, is it ok to put a metal roof over shingles? Yes, it is a viable, cost-effective option for many homeowners, provided the existing roof is in decent condition and local codes allow it. It offers speed, savings, and added insulation. However, it requires meticulous preparation, particularly regarding ventilation and flashing, to avoid trapping moisture.

    If your current shingles are flat, dry, and securely attached, an overlay can be a smart move. But if you suspect hidden rot or major structural issues, bite the bullet and pay for the tear-off. Your future self will thank you for the peace of mind.

    Found this guide helpful? Share it with your neighbors who might be considering a roof upgrade! Don’t forget to bookmark this page for future reference as you plan your home improvement projects.

  • Red Roof Inn Rancho Cordova: Budget Stay Guide

    Red Roof Inn Rancho Cordova: Budget Stay Guide

    Are you planning a trip to the Sacramento area but worried about skyrocketing hotel costs? Finding a clean, reliable, and affordable place to rest shouldn’t be a stressor on your vacation or business trip budget. If you are searching for Red Roof Inn Rancho Cordova Sacramento Rancho Cordova Ca 95670, you have likely identified a strategic location that balances cost-effectiveness with convenient access to major highways and local attractions.

    In this comprehensive guide, we will break down everything you need to know about staying at this specific property. From room amenities and pet policies to nearby dining options and safety tips, we aim to provide you with the insider knowledge needed to make an informed decision. Whether you are passing through on Interstate 80 or visiting family in the suburbs, this review covers the essentials to ensure your stay is comfortable and hassle-free.

    Why Choose Red Roof Inn in Rancho Cordova?

    Rancho Cordova is a vibrant suburb located east of Sacramento. It serves as a crucial hub for travelers because it offers easier access to freeways compared to downtown Sacramento, often resulting in less traffic congestion. The Red Roof Inn Rancho Cordova Sacramento Rancho Cordova Ca 95670 is situated strategically to leverage this advantage.

    Strategic Location Benefits

    The primary appeal of this location is its proximity to Interstate 80. For road trippers heading toward Lake Tahoe or coming from the Bay Area, this exit provides a perfect midpoint stop. Additionally, being in Rancho Cordova means you are close to:

    • Sacramento International Airport (SMF): Approximately a 20-25 minute drive.
    • Downtown Sacramento: About 15 minutes away, allowing easy access to the State Capitol and Golden 1 Center without paying downtown parking fees.
    • Local Employment Hubs: Many businesses in the Folsom and Roseville areas find this location convenient for temporary housing during relocation or projects.

    Affordability Meets Convenience

    One of the core value propositions of the Red Roof Inn brand is affordability. In a region where hotel prices can surge during peak tourist seasons or major events in Sacramento, this property remains a budget-friendly anchor. You get the essential comforts—clean bedding, private bathrooms, and Wi-Fi—without the frills that inflate prices at luxury chains.

    What Amenities Can You Expect?

    When booking a budget hotel, managing expectations is key. However, “budget” does not have to mean “bare minimum.” Here is what guests typically experience at this location.

    Room Features

    Most rooms at the Rancho Cordova location are designed for functionality. You can expect:

    • Comfortable Bedding: Red Roof Inn has invested in upgrading their mattresses in recent years to ensure better sleep quality.
    • Flat-Screen TVs: Equipped with cable channels for evening entertainment.
    • Work Desks: Ideal for business travelers who need a quick space to check emails.
    • Climate Control: Individual AC/heating units allow you to customize the room temperature, which is vital given Sacramento’s hot summers.

    Connectivity and Work Needs

    In today’s digital age, Wi-Fi is not a luxury; it is a necessity. The property offers free high-speed Wi-Fi. While it may not be fiber-optic speed suitable for heavy video editing, it is generally robust enough for streaming movies, checking emails, and browsing social media.

    Pro Tip: If you require a guaranteed strong signal for a video conference, request a room closer to the main lobby or bring a personal hotspot as a backup.

    Pet-Friendly Policy

    One of the standout features of this brand is its pet policy. Unlike many hotels that charge exorbitant fees or restrict pet sizes, Red Roof Inn is known for being pet-friendly. Usually, one well-behaved pet stays free per room. This makes the Red Roof Inn Rancho Cordova Sacramento Rancho Cordova Ca 95670 an excellent choice for families traveling with dogs or cats.

    Note: Always confirm the current pet policy at the time of booking, as terms can change.

    How Does It Compare to Other Local Hotels?

    To help you decide if this is the right fit, let’s look at how it stacks up against competitors in the Rancho Cordova area.

    FeatureRed Roof Inn Rancho CordovaMid-Range Chain (e.g., Holiday Inn)Luxury Hotel (Downtown Sac)
    Price Range$$$$
    Pet PolicyFree (Usually 1 pet)Fee Required ($50-$100)Often Restricted/High Fee
    BreakfastNot Typically IncludedOften IncludedOften Included/Premium
    LocationSuburban/Easy Highway AccessSuburbanUrban/City Center
    Best ForBudget Travelers, Road TripsFamilies, Business LeisureLuxury Seekers, Events

    As shown in the table, if your priority is cost savings and pet accommodation, the Red Roof Inn wins. If you require complimentary breakfast and a pool, you might need to look at mid-range options, but you will pay significantly more.

    Red Roof Inn Rancho Cordova Sacramento Rancho Cordova Ca 95670

    Nearby Attractions and Dining

    Staying at Red Roof Inn Rancho Cordova Sacramento Rancho Cordova Ca 95670 puts you within a short driving distance of several notable spots. You don’t have to eat at fast-food chains every night; the area has diverse culinary options.

    Dining Options Within 5 Miles

    1. Local Cafes: Start your morning with coffee at nearby independent roasters in Rancho Cordova.
    2. Family Restaurants: Chains like Olive Garden and Applebee’s are accessible via Sunrise Boulevard.
    3. Ethnic Cuisine: The area boasts authentic Mexican and Asian fusion restaurants that offer great value.

    Things to Do

    • Ancil Hoffman Park: A beautiful regional park perfect for jogging, picnics, and golf. It’s only a few minutes from the hotel.
    • Sunrise Mall: Located nearby, this is one of the largest shopping centers in the region, offering retail therapy and dining.
    • Sacramento Zoo: A short drive west, making it a great day trip for families with children.

    For more context on the geography and history of the area, you can refer to the Rancho Cordova Wikipedia page. Understanding the local layout can help you plan your daily itineraries more efficiently.

    Tips for a Better Stay Experience

    Even at a budget hotel, small actions can significantly improve your experience. Here is a step-by-step guide to ensuring your stay is smooth.

    1. Book Directly or Use Reputable Aggregators: Check the official Red Roof Inn website first. They often have member discounts that third-party sites do not offer.
    2. Request a Ground Floor Room: If you have heavy luggage or mobility issues, ask for a ground-floor unit. It also allows quicker exit in case of emergencies.
    3. Inspect Upon Entry: Before unpacking, do a quick check of the room. Ensure the locks work, the bathroom is clean, and there are no signs of pests. If anything is amiss, contact the front desk immediately for a room change.
    4. Bring Your Own Toiletries: While basic soap is provided, bringing your own shampoo, conditioner, and toothpaste ensures you have products you trust and prefer.
    5. Use Noise Cancelling Headphones: As with any highway-adjacent hotel, some traffic noise is inevitable. Headphones can help ensure a restful night’s sleep.

    FAQ Section

    Is the Red Roof Inn in Rancho Cordova safe?

    Safety is a top priority for travelers. The Rancho Cordova area is generally considered safe for suburban standards. The hotel participates in standard security protocols, including well-lit parking lots and 24-hour front desk service. However, as with any travel destination, it is advisable to keep valuables out of sight in your car and lock your room door securely.

    Does this location offer free breakfast?

    Typically, Red Roof Inn properties do not include free breakfast in their standard rate. This is one way they keep costs low. However, there are numerous bakeries and cafes within a 5-minute drive where you can grab an affordable morning meal.

    Can I check in late at night?

    Yes, the front desk is staffed 24 hours a day. Whether you arrive at 2 PM or 2 AM, you will be able to check in. It is recommended to call ahead if you are arriving very late to ensure your reservation is held properly.

    Is there parking available?

    Yes, the hotel offers free onsite parking for guests. This is a significant advantage over downtown Sacramento hotels, which often charge daily parking fees. The lot is paved and monitored, providing peace of mind for your vehicle.

    How far is the hotel from Sacramento International Airport?

    The drive from Sacramento International Airport (SMF) to the Red Roof Inn Rancho Cordova Sacramento Rancho Cordova Ca 95670 takes approximately 20 to 25 minutes, depending on traffic conditions. It is a straightforward drive mostly via highways, making it a convenient layover spot for early flights.

    Conclusion

    Choosing the right accommodation can make or break your trip. The Red Roof Inn Rancho Cordova Sacramento Rancho Cordova Ca 95670 stands out as a pragmatic, budget-conscious choice for travelers who value location and affordability over luxury frills. Its pet-friendly policy, free Wi-Fi, and strategic access to Interstate 80 make it a versatile option for road trippers, business travelers, and families alike.

    By understanding what to expect and utilizing the tips provided in this guide, you can ensure a comfortable and stress-free stay. Remember, the goal of travel is exploration and relaxation, and having a reliable base camp is essential to achieving that.

    If you found this guide helpful, please consider sharing it on your favorite social media platforms. Helping fellow travelers find great deals creates a community of informed and happy explorers. Safe travels!

  • Build a Rooftop Deck on a Sloped Roof: The Ultimate Guide

    Build a Rooftop Deck on a Sloped Roof: The Ultimate Guide

    Have you ever looked at your home’s angled roofline and imagined a stunning outdoor oasis perched above the rest? It is a dream many homeowners share, but the reality of how to build a rooftop deck on a sloped roof is far more complex than standard patio construction. You are likely worried about structural integrity, water drainage, and whether your current roof can even support the weight.

    You are not alone in these concerns. Transforming a sloped surface into a usable flat space requires precise engineering and careful planning. This guide will walk you through the critical steps, safety considerations, and material choices needed to turn that architectural challenge into your new favorite retreat.

    Is It Structurally Possible to Build on a Slope?

    Before you buy a single board or bolt, you must answer the most critical question: Can your house hold it? A sloped roof is designed to shed water and snow, not to support the live load of people, furniture, and planters.

    According to general building standards, a typical residential roof is designed to handle a “dead load” (the weight of the roof itself) and a “live load” (snow or maintenance workers), usually around 20 to 40 pounds per square foot (psf). However, a deck often requires a capacity of 60 to 100 psf or more, depending on local codes and intended use.

    Expert Insight: “Attempting to build a deck directly on rafters without reinforcing the underlying structure is a recipe for catastrophic failure. Always consult a licensed structural engineer before breaking ground.”

    You will likely need to install new support beams that transfer the deck’s weight directly to the home’s load-bearing walls or foundation, bypassing the existing roof framing entirely. This is non-negotiable for safety.

    What Are the Key Challenges of Sloped Roof Decks?

    Building on a slope introduces unique hurdles that flat roofs do not face. Understanding these early will save you time, money, and potential headaches.

    1. Creating a Level Surface

    The most obvious issue is gravity. To have a usable deck, you must create a level platform on an angled surface. This requires a framework of varying heights, known as “sleepers” or “pedestals,” to compensate for the pitch.

    2. Waterproofing and Drainage

    Water is the enemy of any roof structure. When you build a deck over a roof, you trap moisture between the decking and the roofing membrane. If water pools here, it can lead to rot, mold, and leaks into your living space below.

    3. Wind Uplift

    Rooftop decks are exposed to higher wind speeds than ground-level patios. On a sloped roof, wind can get underneath the deck structure, creating uplift forces that can tear the deck away if not properly anchored.

    ChallengeRisk FactorMitigation Strategy
    Structural LoadHighReinforce framing; consult an engineer.
    Water TrappingHighUse elevated pedestal systems; ensure proper slope away from the house.
    Wind UpliftMedium-HighUse mechanical fasteners; avoid loose-laid pavers.
    AccessMediumPlan for safe stairways or ladder access points.
    How To Build A Rooftop Deck On A Sloped Roof

    How Do You Prepare the Existing Roof Structure?

    Preparation is 80% of the job. You cannot simply lay wood over shingles. Here is the step-by-step preparation process:

    1. Inspect the Roof Membrane: Ensure the existing roof is in excellent condition. If you have asphalt shingles, they may need to be replaced with a more durable, seamless membrane like EPDM or TPO, which are better suited for covering under decks.
    2. Install a Protective Layer: Place a root barrier and a heavy-duty waterproof membrane over the existing roof. This layer protects the roof from punctures caused by the deck framework.
    3. Check for Ventilation: Your roof needs to breathe. Ensure that soffit and ridge vents are not blocked by your new deck structure. Poor ventilation can lead to heat buildup and moisture accumulation.

    For more detailed information on roofing materials and their properties, you can refer to this comprehensive resource on Roofing materials.

    What Materials Are Best for Rooftop Decks?

    Choosing the right materials is crucial for longevity and weight management. You want materials that are durable, lightweight, and slip-resistant.

    Composite Decking

    Composite boards are made from a mix of wood fibers and plastic. They are heavier than wood but require zero maintenance. They do not rot, splinter, or fade easily.

    • Pros: Low maintenance, long lifespan, consistent color.
    • Cons: Higher upfront cost, can get hot in direct sun.

    Pressure-Treated Wood

    This is the most common choice for DIYers due to its affordability.

    • Pros: Cheap, easy to cut and install, widely available.
    • Cons: Requires annual sealing/staining, prone to warping and cracking over time.

    Aluminum Decking

    Aluminum is becoming increasingly popular for rooftop applications.

    • Pros: Extremely lightweight, fire-resistant, reflects heat, completely waterproof.
    • Cons: Expensive, can be noisy when rain hits it, industrial aesthetic.

    Recommendation: For a sloped roof where weight is a concern, aluminum or lightweight composite systems are often the best choice. Avoid heavy natural stone or concrete pavers unless your structural engineer explicitly approves the load capacity.

    Step-by-Step: Building the Framework

    Once you have your permits and engineering plans, here is how you physically build the structure. Note that this is a generalized overview; always follow your specific engineered drawings.

    Step 1: Install the Primary Beams

    Install heavy-duty steel or laminated wood beams that run perpendicular to the roof slope. These beams must be anchored to the home’s structural frame, not just the roof sheathing. Use galvanized steel brackets and bolts for maximum strength.

    Step 2: Create the Leveling System

    This is the trickiest part. You need to build a grid of joists that sit on top of the primary beams. Because the roof is sloped, the height of the supports under each joist will vary.

    • Use adjustable steel pedestals or custom-cut wooden blocks.
    • Use a laser level to ensure the top of every joist is perfectly flat.
    • Maintain a slight slope (1/4 inch per foot) away from the house on the deck surface itself to encourage water runoff.

    Step 3: Add Cross-Bracing

    To prevent racking (side-to-side movement) and handle wind uplift, install diagonal cross-bracing between the joists. This stiffens the entire framework.

    Step 4: Install the Decking

    Lay your chosen decking material perpendicular to the joists.

    • Leave a 1/8-inch gap between boards for drainage and expansion.
    • Use hidden fasteners for a cleaner look and to reduce tripping hazards.
    • Ensure all screws are stainless steel or coated to prevent rust stains.

    Step 5: Install Railings and Safety Features

    Railings are mandatory for any deck more than 30 inches off the ground. On a rooftop, wind loads are higher, so railing posts must be bolted directly into the structural framing, not just the deck boards.

    Frequently Asked Questions (FAQ)

    1. Do I need a permit to build a rooftop deck?

    Yes, almost certainly. Rooftop decks involve structural changes and safety hazards. Most municipalities require a building permit, and some may require zoning approval if the deck is visible from the street or neighbors. Check with your local building department first.

    2. How much does it cost to build a rooftop deck on a sloped roof?

    Costs vary widely based on size and materials, but expect to pay significantly more than a ground-level deck. Due to the need for structural reinforcement and specialized labor, costs can range from $50 to $100+ per square foot. A small 10×10 deck could easily cost $15,000 to $25,000.

    3. Can I build a rooftop deck myself (DIY)?

    While you can handle the decking installation, the structural framing and engineering should not be a DIY project. Incorrectly calculated loads can lead to roof collapse. Hire a professional for the structural work, and then you can tackle the cosmetic decking installation if you are experienced.

    4. How do I handle snow removal on a rooftop deck?

    Snow adds significant weight. Design your deck with easy access for removal. Avoid using metal shovels that can damage the decking; use plastic shovels or a roof rake. Ensure your drainage system is clear so melting snow can escape quickly.

    5. What is the best way to waterproof under the deck?

    The best method is a “hot-mopped” asphalt membrane or a single-ply EPDM rubber membrane. These create a seamless barrier that is less likely to leak than sheet-based products. Always have a professional roofer install this layer before the deck framework goes up.

    Conclusion

    Learning how to build a rooftop deck on a sloped roof is a journey that balances ambition with engineering precision. While the challenges of weight, water, and wind are real, they are not insurmountable. With proper structural reinforcement, high-quality waterproofing, and the right materials, you can create a breathtaking outdoor space that adds significant value and enjoyment to your home.

    Remember, safety is paramount. Never skip the structural assessment. Once your deck is built, take a moment to enjoy the view—you earned it!

    Did you find this guide helpful? Share it with your friends on social media who are dreaming of their own rooftop oasis!

  • How Long Does It Take To Install A New Roof?

    How Long Does It Take To Install A New Roof?

    Have you ever stared at your ceiling during a storm, worrying about leaks, only to hesitate on calling a roofer because you’re afraid of the disruption? You are not alone. Many homeowners delay necessary repairs because they dread the noise, the mess, and the uncertainty of the schedule. Understanding exactly how long does it take to install a new roof can help you plan your life around the project, minimizing stress and maximizing convenience.

    In this guide, we will break down the typical timelines, the variables that speed up or slow down the process, and what you can expect from start to finish. Whether you have a modest ranch-style home or a sprawling two-story colonial, knowing the timeline empowers you to make informed decisions.

    The Short Answer: Typical Roofing Timelines

    If you are looking for a quick estimate, here is the general rule of thumb for residential roofing in the United States:

    • Small to Medium Homes (1,500–2,500 sq. ft.): 1 to 2 days.
    • Large or Complex Homes (3,000+ sq. ft.): 2 to 4 days.
    • Complex Architectures (Multiple peaks, steep pitches): 3 to 5+ days.

    For the most common roofing material in the US—asphalt shingles—a professional crew can typically complete a tear-off and replacement in one to three days. However, “typical” does not mean “guaranteed.” Several critical factors influence this window.

    What Factors Influence Roof Installation Time?

    When asking how long does it take to install a new roof, you must consider the unique characteristics of your property. A roofing contractor cannot give you an exact hour-by-hour schedule without inspecting these variables.

    1. Roof Size and Complexity

    The square footage is the most obvious factor. A simple gable roof is much faster to strip and replace than a hip roof with multiple valleys, dormers, and chimneys. Every penetration (like a vent pipe or skylight) requires careful flashing work, which adds time.

    2. Type of Roofing Material

    Not all materials are created equal when it comes to installation speed.

    MaterialEstimated Installation TimeDifficulty Level
    Asphalt Shingles1–3 DaysLow
    Metal Roofing2–5 DaysMedium
    Clay/Concrete Tile5–10 DaysHigh
    Slate7–14 DaysVery High
    Wood Shake3–6 DaysMedium-High

    Source: Industry standards based on average crew productivity.

    Asphalt shingles are lightweight and easy to handle, allowing crews to work quickly. In contrast, slate and clay tiles are heavy, fragile, and require specialized labor, significantly extending the timeline.

    3. Weather Conditions

    Roofing is an outdoor job, making it highly susceptible to weather. Rain, high winds, or extreme heat can halt work entirely.

    • Rain: Wet roofs are slippery and dangerous. Furthermore, you cannot install underlayment or shingles on a wet deck as it traps moisture, leading to mold and rot.
    • Wind: High winds can blow away loose materials and make handling large sheets of underlayment impossible.
    • Heat: Extreme heat can soften asphalt shingles, making them difficult to nail properly without damaging them.

    4. Structural Repairs Needed

    Once the old roof is torn off, the truth is revealed. If the roofing deck (the wood beneath the shingles) has rot, water damage, or structural weakness, it must be repaired before new materials can be installed. This unexpected step can add 1–2 extra days to your project.

    How Long Does It Take To Install A New Roof

    Step-by-Step: The Roof Installation Process

    Understanding the workflow helps you see why each day is necessary. Here is a breakdown of a standard asphalt shingle replacement.

    Day 1: Preparation and Tear-Off

    The crew arrives early, usually between 7:00 AM and 8:00 AM. They will set up safety equipment, including ladders and harnesses. They also place tarps around your home to protect landscaping and catch falling debris.

    The next phase is the tear-off. Workers remove the old shingles, underlayment, and nails. This is the noisiest part of the process. Once the roof is bare, they inspect the decking. If repairs are needed, they are completed immediately. By the end of Day 1, the roof deck should be clean, dry, and ready for new materials.

    Day 2: Underlayment and Flashing

    With the deck prepped, the team installs the ice and water shield along the eaves and valleys. This is a critical step for preventing leaks in areas prone to ice dams. Next, they roll out the synthetic underlayment over the entire roof surface.

    Flashing is then installed around chimneys, vents, and walls. Proper flashing is essential; according to the National Roofing Contractors Association, improper flashing is one of the leading causes of roof leaks. This meticulous work ensures that water is directed away from vulnerable joints.

    Day 3: Shingle Installation and Cleanup

    This is the most visible phase. Crews start from the bottom edge (the drip edge) and work their way up, row by row. They ensure proper alignment and nailing patterns to meet manufacturer warranties.

    Once the shingles are down, they install ridge vents for proper attic ventilation. Finally, the crew performs a thorough cleanup. They use magnetic rollers to pick up stray nails from your yard and driveway, ensuring your property is safe for pets and children.

    Why Choosing the Right Contractor Matters

    You might wonder why some quotes promise a one-day job while others say three. Experience plays a huge role. A well-coordinated crew with the right equipment can work efficiently without cutting corners.

    However, beware of contractors who promise unrealistically fast timelines. Rushing can lead to:

    • Missed nails or improper nailing depth.
    • Poorly sealed flashing.
    • Inadequate cleanup.

    Always check reviews, ask for references, and verify licensing. A reputable contractor will provide a realistic timeline that accounts for potential weather delays and structural surprises.

    Frequently Asked Questions (FAQ)

    1. Can a roof be replaced in one day?

    Yes, for smaller homes (under 2,000 sq. ft.) with simple rooflines and asphalt shingles, a large, experienced crew can complete the job in one day. However, this leaves little room for error or unexpected repairs.

    2. Do I need to be home during the roof installation?

    It is not strictly required, but it is recommended to be available for the initial walkthrough and final inspection. Ensure you have a way to contact the foreman if questions arise. Also, secure pets indoors, as the noise and open gates can be stressful for animals.

    3. What happens if it rains during the installation?

    If rain is forecast, contractors will monitor the weather closely. If the roof is torn off but not yet covered, they may use temporary tarps to protect the deck. However, most professionals will avoid tearing off a roof if heavy rain is imminent. Expect a possible delay of 1–2 days.

    4. How long does a roof inspection take before installation?

    A thorough pre-installation inspection usually takes 30 to 60 minutes. The inspector will check the current condition, measure the roof, and identify any potential structural issues. This step is crucial for an accurate quote and timeline.

    5. Will my homeowner’s insurance cover the time it takes to install a new roof?

    Insurance typically covers the cost of materials and labor for damage caused by covered perils (like hail or wind), not the duration of the work. However, if the installation is delayed due to additional damage discovered, your adjuster may need to re-evaluate the claim.

    6. Is it normal for there to be noise inside the house?

    Yes. Roofing involves hammering, walking on the deck, and dropping debris. The vibration can be felt throughout the house. If you work from home or have small children napping, consider planning alternative arrangements for the loudest days (usually Day 1).

    Conclusion

    So, how long does it take to install a new roof? For most American homeowners using asphalt shingles, the answer is 1 to 3 days. While this seems short, the preparation, execution, and cleanup involve significant labor and precision.

    By understanding the factors that influence this timeline—such as roof complexity, material choice, and weather—you can set realistic expectations. Remember, a slightly longer timeline often indicates a contractor who prioritizes quality and safety over speed.

    Don’t let the fear of disruption keep you from protecting your home. A new roof adds value, efficiency, and peace of mind. If you found this guide helpful, please share it on social media to help friends and family prepare for their own roofing projects!