Category: homeowner roofing guide

  • Does a Metal Roof Boost Home Value?

    Does a Metal Roof Boost Home Value?

    Have you ever looked up at your aging shingle roof and wondered if replacing it with metal is a smart financial move or just an expensive aesthetic choice? You are not alone; many homeowners struggle to balance immediate costs with long-term equity gains. Understanding how much does a new metal roof increase home value is crucial for making an informed decision that benefits both your wallet and your comfort.

    The Real ROI: Breaking Down the Numbers

    When considering a major home improvement, the Return on Investment (ROI) is usually the first question on every homeowner’s mind. Unlike a kitchen remodel, which might offer a subjective return based on buyer preference, a roof is a functional necessity. However, metal roofs have transcended their industrial roots to become a premium feature in the residential market.

    According to recent data from the Remodeling 2025-2026 Cost vs. Value Report, metal roof replacements typically recoup between 60% to 85% of their cost upon resale. While this might seem lower than some minor interior updates, the context matters. A metal roof often lasts 40 to 70 years, compared to 15 to 20 years for traditional asphalt shingles. This longevity means the “value” isn’t just in the immediate sale price, but in the deferred maintenance costs for the next owner.

    For a typical US home, installing a standing seam metal roof can cost between $15,000 and $30,000, depending on size and material quality. If this installation increases your home’s market value by $20,000, you have gained significant equity. More importantly, you have eliminated a major liability that could derail a future sale. Buyers are increasingly wary of homes needing immediate major repairs, so a new metal roof acts as a powerful negotiating tool.

    Why Do Buyers Pay More for Metal Roofs?

    To understand the valuation increase, we must look at buyer psychology. In the current US real estate market, energy efficiency and durability are top priorities. A metal roof signals to potential buyers that the home is modern, low-maintenance, and resilient.

    Energy Efficiency Savings

    One of the primary drivers of increased value is energy savings. Metal roofs reflect solar radiant heat, which can reduce cooling costs by 10-25%. For buyers in hot climates like Texas, Florida, or Arizona, this is a tangible monthly saving. When appraisers evaluate a home, they increasingly consider these operational costs. A home that is cheaper to run is inherently more valuable.

    Durability and Weather Resistance

    With climate change leading to more frequent severe weather events, durability is no longer a luxury—it’s a necessity. Metal roofs are resistant to:

    • High winds (up to 140 mph)
    • Fire (Class A fire rating)
    • Hail damage (depending on gauge)
    • Mold and mildew

    This resilience often translates to lower homeowners insurance premiums. Some insurers offer discounts of up to 35% for homes with metal roofing. When a buyer sees that they will save money on insurance and utilities, they are willing to pay a premium for the home itself.

    Metal Roof vs. Asphalt Shingles: A Value Comparison

    It is helpful to visualize the difference in value proposition between traditional asphalt shingles and modern metal roofing. Below is a comparison to help you weigh the options.

    FeatureAsphalt ShinglesMetal Roofing
    Lifespan15–20 Years40–70+ Years
    MaintenanceModerate to HighVery Low
    Energy EfficiencyLow (Absorbs Heat)High (Reflects Heat)
    Resale AppealStandard/ExpectedPremium/Luxury
    Insurance ImpactNeutralPotential Discounts
    Initial CostLowHigh

    While asphalt shingles are the standard expectation, a metal roof is an upgrade. In real estate terms, upgrades drive value. If two identical houses are on the market, and one has a brand-new metal roof while the other has 10-year-old shingles, the former will likely sell faster and for a higher price.

    How Much Does A New Metal Roof Increase Home Value

    Factors That Influence Value Increase

    Not all metal roofs create equal value. Several variables determine exactly how much equity you will gain.

    1. Quality of Installation

    A poorly installed metal roof can lead to leaks and noise issues, which detract from value. Ensure you hire certified installers who specialize in residential metal roofing. Look for contractors with strong reviews and warranties that cover both materials and labor.

    2. Style and Aesthetics

    Gone are the days when metal roofs looked like barns. Modern metal roofing comes in various styles, including panels that mimic slate, tile, or wood shakes. Choosing a style that complements your home’s architecture is vital. A sleek standing seam roof might look out of place on a historic Victorian home, whereas a stone-coated steel tile might blend perfectly. Aesthetic harmony boosts curb appeal, which directly influences perceived value.

    3. Local Market Trends

    In areas prone to wildfires or hurricanes, the value increase of a metal roof is significantly higher. For example, in California or the Southeastern US, the fire and wind resistance of metal is a major selling point. In contrast, in regions with mild weather and low construction costs, the ROI might be slightly lower, though still positive due to longevity.

    How to Maximize Your Roof’s Value Contribution

    If you decide to proceed, here are steps to ensure you get the maximum return on your investment.

    1. Choose the Right Material: Aluminum is great for coastal areas due to corrosion resistance, while steel is stronger and often more affordable inland. Copper is luxurious but very expensive; it may not yield a proportional ROI unless you are in a high-end luxury market.
    2. Add Insulation: Pair your metal roof with proper attic insulation. This enhances the energy-efficiency narrative, allowing you to market the home as “green” or “eco-friendly.”
    3. Document Everything: Keep all receipts, warranty documents, and before-and-after photos. Provide these to potential buyers to prove the quality of the installation and the remaining lifespan of the roof.
    4. Highlight Benefits in Listings: When selling, explicitly mention the energy savings, insurance discounts, and warranty details in your listing description. Don’t assume buyers know the benefits; educate them.

    For more detailed technical specifications on metal roofing materials, you can refer to the comprehensive overview on Wikipedia’s Metal Roofing page.

    Frequently Asked Questions (FAQ)

    1. Does a metal roof interfere with Wi-Fi or cell signals?

    This is a common myth. Generally, a metal roof does not significantly block Wi-Fi or cell signals. Most modern routers and cell phones are powerful enough to penetrate the roof, or signals enter through windows and walls. If you have concerns, a Wi-Fi extender can easily solve any minor connectivity issues.

    2. Is a metal roof noisy during rain or hail?

    No, not if installed correctly. Modern metal roofs are installed over solid sheathing and often include an underlayment that acts as a sound barrier. In fact, many homeowners report that metal roofs are quieter than asphalt shingles during rain because they dampen the sound rather than amplifying it.

    3. Will a metal roof void my home warranty?

    No, installing a metal roof should not void your existing home warranty, provided the installation is done by a licensed professional. However, always check with your specific warranty provider. Conversely, the new roof will come with its own manufacturer’s warranty, which can be a strong selling point.

    4. How long does it take to install a metal roof?

    Installation time varies based on the size of the home and complexity of the roofline. On average, a residential metal roof installation takes 3 to 7 days. This is comparable to or slightly longer than asphalt shingle installation due to the precision required.

    5. Can I install a metal roof over my existing shingles?

    In many cases, yes. This is called a “retrofit” installation. It saves on disposal costs and protects the existing roof deck. However, local building codes vary, and a structural inspection is necessary to ensure your home can support the additional weight. Always consult with a local contractor.

    Conclusion

    So, how much does a new metal roof increase home value? While the exact dollar amount varies by location and home size, the consensus is clear: it adds significant equity, enhances curb appeal, and offers a compelling selling point through energy efficiency and durability. With an ROI of up to 85% and a lifespan that outlasts traditional options by decades, a metal roof is not just an expense—it is a strategic investment in your home’s future.

    If you are planning to sell soon or simply want to protect your largest asset, a metal roof is a upgrade that pays dividends. Share this article with friends or family who are considering a roof replacement, and help them make a smarter financial decision!
  • How To Figure Out How Many Roof Shingles You Need

    How To Figure Out How Many Roof Shingles You Need

    Replacing a roof is one of the most significant investments a homeowner can make. Whether you are tackling a small repair or planning a full replacement, the anxiety of buying too much or, worse, not enough material is real. Getting the estimate wrong can lead to costly delays, mismatched dye lots, or wasted budget on excess materials that cannot be returned.

    Understanding how to figure out how many roof shingles you need is the first critical step in ensuring your project runs smoothly. This guide will walk you through the precise calculations, industry standards, and expert tips to help you measure your roof with confidence. By the end of this article, you will have a clear, actionable plan to purchase the right amount of shingles for your home.

    Why Accurate Measurement Matters More Than You Think

    Before we dive into the math, it is essential to understand why precision is non-negotiable. Roofing shingles are sold by the “bundle,” and three bundles typically make up one “square” (which equals 100 square feet). However, roofs are rarely simple flat rectangles. They have hips, valleys, dormers, and chimneys that complicate the surface area.

    According to industry data, approximately 10–15% of material is wasted during standard roofing installations due to cutting and fitting. If you underestimate this waste factor, you may find yourself short on materials halfway through the job. Conversely, overestimating significantly ties up your cash flow. Striking the right balance requires a methodical approach, not just a guess.

    Step 1: Measure Your Roof’s Footprint

    The most accurate way to determine shingle quantity is to measure the actual dimensions of your roof planes. If you are comfortable climbing onto the roof with a tape measure, this is the gold standard. If not, you can use aerial imagery tools or measure from the ground using the eaves and rake edges, though this method is slightly less precise.

    Breaking Down the Geometry

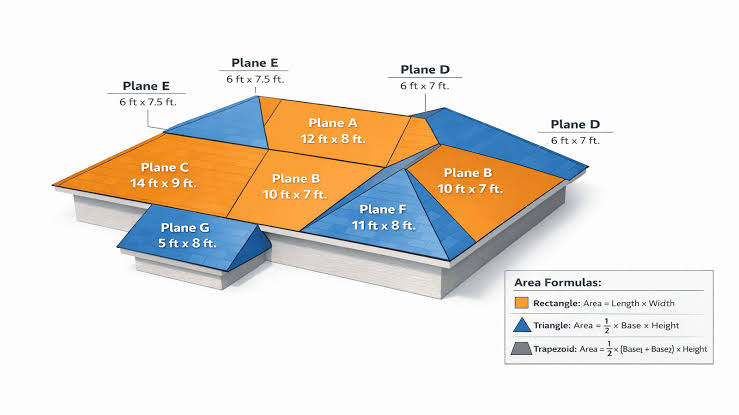
    Most residential roofs consist of basic geometric shapes: rectangles and triangles.

    1. For Rectangular Sections: Measure the length (horizontal) and the width (vertical slope). Multiply these two numbers to get the square footage of that section.
    2. For Triangular Sections (Gables): Measure the base and the height. Multiply the base by the height, then divide by two.

    Example Calculation:

    • Section A (Main Rectangle): 40 feet long x 20 feet wide = 800 sq. ft.
    • Section B (Gable Triangle): Base 20 feet x Height 10 feet / 2 = 100 sq. ft.
    • Total Area: 800 + 100 = 900 sq. ft.

    Repeat this process for every distinct plane on your roof and sum the totals.

    Step 2: Calculate Roof Squares and Bundles

    Once you have the total square footage, you need to convert it into roofing terms. In the US roofing industry, materials are estimated in “squares.”

    • 1 Square = 100 Square Feet

    To find the number of squares, divide your total square footage by 100.

    Using our previous example of 900 sq. ft.: 900 sq. ft./100=9 Squares900 sq. ft./100=9 Squares

    Next, convert squares to bundles. Most standard architectural shingles require 3 bundles per square. Some heavier or premium shingles may require 4 or 5 bundles per square, so always check the manufacturer’s specifications on the wrapper.

    9 Squares×3 Bundles/Square=27 Bundles9 Squares×3 Bundles/Square=27 Bundles

    So, for a simple 900 sq. ft. roof, you would theoretically need 27 bundles. But we are not done yet.

    Step 3: Account for Waste and Complexity

    This is where most DIYers make mistakes. You cannot buy exactly 27 bundles because you will lose material when cutting shingles to fit around vents, chimneys, and along the hips and valleys.

    The Waste Factor Rule of Thumb

    • Simple Gable Roof: Add 10% for waste.
    • Complex Roof (Hips, Valleys, Dormers): Add 15–20% for waste.

    Let’s apply a 15% waste factor to our 27 bundles: 27 Bundles×0.15=4.05 Bundles27 Bundles×0.15=4.05 Bundles

    Round up to the nearest whole bundle: 4 additional bundles.

    Total Order: 27+4=3127+4=31 Bundles.

    It is always better to have one extra bundle left over than to run short. Keep in mind that shingle colors can vary between production batches (dye lots). If you run out and buy more later, the new shingles might not match the old ones perfectly.

    How To Figure Out How Many Roof Shingles You Need

    Understanding Shingle Types and Coverage

    Not all shingles cover the same area. While the 3-bundle-per-square rule is standard for architectural shingles, other types differ.

    Shingle TypeBundles per SquareBest For
    3-Tab Asphalt3Budget-friendly, simple roofs
    Architectural3Standard residential, durability
    Premium/Luxury4–5High-end aesthetics, heavy weather protection
    Wood Shake4–5Historic homes, rustic look

    Note: Always verify the coverage area printed on the specific product packaging.

    Don’t Forget the Underlayment and Flashing

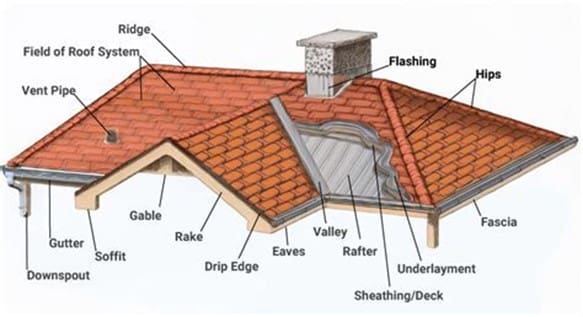
    Shingles are only part of the equation. A proper roof system includes underlayment, starter strips, and flashing. Ignoring these can void your warranty and lead to leaks.

    • Underlayment: Typically comes in rolls covering 4 squares (400 sq. ft.) or 10 squares (1,000 sq. ft.). Calculate your total squares and divide by the roll coverage.
    • Starter Strips: These go along the eaves and rakes. Measure the linear footage of your eaves and rakes. One bundle of starter strip usually covers 20–25 linear feet.
    • Hip and Ridge Caps: These cover the peaks. Measure the total linear footage of all hips and ridges. One bundle of ridge cap shingles typically covers 33–35 linear feet.

    For more detailed information on roofing components and their historical development, you can refer to Wikipedia’s article on Roofing, which provides a broad overview of materials and techniques used globally.

    Common Mistakes to Avoid

    1. Ignoring Pitch: If you are measuring from the ground, you must account for the roof’s pitch (slope). A steep roof has more surface area than its footprint suggests. Use a pitch multiplier if you cannot measure the roof directly.
    2. Forgetting Penetrations: Skylights, chimneys, and vent pipes require extra cutting and flashing. Do not subtract their area from your total; instead, let the waste factor cover them.
    3. Rounding Down: Always round up to the nearest whole bundle. You cannot buy half a bundle.

    FAQ Section

    Q1: Can I estimate my roof size without climbing on it?

    Yes. You can measure the length and width of your house from the ground, including overhangs. Then, use a roof pitch multiplier based on your roof’s slope angle. However, this method is less accurate for complex roofs with multiple levels or dormers.

    Q2: How much does a bundle of shingles weigh?

    A standard bundle of architectural shingles weighs between 60 and 80 pounds. This is important for logistics, as you need to ensure your ladder and roof structure can handle the load, and you may need help carrying them up.

    Q3: What if I have leftover shingles?

    Keep at least one full bundle of leftover shingles for future repairs. Store them in a cool, dry place away from direct sunlight. This ensures you have an exact color match if a storm damages a few shingles years later.

    Q4: Do I need to remove old shingles before calculating?

    No, you calculate based on the surface area, regardless of whether you are tearing off the old roof or installing over it. However, local building codes often limit the number of layers allowed (usually two). Check with your local building department.

    Q5: How accurate are online roofing calculators?

    Online calculators are good for rough estimates but often fail to account for complex architectural features like valleys and dormers. Use them as a starting point, but verify with manual measurements for accuracy.

    Q6: What is the difference between 3-tab and architectural shingles in terms of quantity?

    In terms of coverage, both typically require 3 bundles per square. However, architectural shingles are thicker and heavier. Ensure your roof deck and structure can support the weight if you are switching from 3-tab to architectural.

    Conclusion

    Learning how to figure out how many roof shingles you need empowers you to take control of your home improvement project. By measuring each roof plane, converting to squares, and adding a prudent waste factor, you can avoid the stress of mid-project shortages or financial waste from overbuying.

    Remember, precision is key. Take your time with the tape measure, double-check your math, and always round up. A well-planned roofing project not only saves money but also ensures your home remains protected against the elements for decades to come.

    If you found this guide helpful, please share it with your friends or on social media to help other homeowners tackle their DIY projects with confidence!

  • New Roof Insurance Savings: What to Expect

    New Roof Insurance Savings: What to Expect

    Replacing a roof is one of the most significant investments a homeowner can make. It is not just about protecting your family from the elements; it is also a strategic financial move that can lower your ongoing housing costs. Many homeowners are surprised to learn that how much does a new roof save on homeowners insurance can vary significantly, often resulting in substantial annual premium reductions.

    If you are staring at an aging roof or dealing with recent storm damage, understanding the insurance implications is crucial. This guide will walk you through the potential savings, the factors that influence them, and how to maximize your return on investment when upgrading your home’s primary defense system.

    Why Do Insurance Companies Offer Discounts for New Roofs?

    To understand the savings, you must first understand the insurer’s perspective. Insurance companies operate on risk assessment. An old roof is a liability; a new roof is an asset.

    Reducing the Risk of Claims

    Older roofs are prone to leaks, wind damage, and structural failure. According to industry data, roof-related claims are among the most frequent and expensive payouts for insurers. By installing a new roof, you drastically reduce the likelihood of filing a claim. Insurers pass these reduced risk costs back to you in the form of lower premiums.

    Enhancing Home Durability

    Modern roofing materials are engineered to withstand extreme weather conditions better than those used decades ago. Whether it is impact-resistant shingles or fire-retardant tiles, new materials offer superior protection. This durability translates directly into financial savings for both the insurer and the homeowner.

    How Much Does a New Roof Save on Homeowners Insurance?

    The million-dollar question—or rather, the thousand-dollar question—is the specific amount you can expect to save. While there is no single fixed number, industry standards provide a clear range.

    Typical Discount Percentages

    Most insurance carriers offer discounts ranging from 10% to 20% on your homeowners insurance premium for a new roof. In some cases, if you install high-impact resistant materials in hurricane-prone areas, this discount can go up to 30%.

    Calculating Your Potential Savings

    Let’s look at a concrete example. If your annual homeowners insurance premium is $2,500:

    • A 10% discount saves you $250 per year.
    • A 20% discount saves you $500 per year.
    • Over a 10-year period, a 20% discount could save you $5,000, which helps offset the initial cost of the roof replacement.

    Note: These figures are estimates. Your actual savings depend on your location, insurance carrier, and the specific materials used.

    Factors That Influence Your Insurance Discount

    Not all new roofs are created equal in the eyes of an insurance adjuster. Several key factors determine the size of your discount.

    1. Age of the Roof

    Most insurers require the roof to be less than 10–15 years old to qualify for the “new roof” discount. Some companies may offer smaller discounts for roofs up to 20 years old, provided they are in excellent condition.

    2. Type of Roofing Material

    The material you choose plays a pivotal role. Here is a comparison of common materials and their typical insurance impact:

    Material TypeDurabilityInsurance ImpactEstimated Discount Potential
    Asphalt ShinglesModerateStandard10–15%
    Metal RoofingHighHigh (Wind/Fire Resistant)15–25%
    Clay/Concrete TilesVery HighHigh (Fire Resistant)15–20%
    SlateExtremely HighPremium20–30%
    Impact-Resistant ShinglesHighVery High (Hail/Wind)20–35%

    3. Location and Weather Risks

    If you live in an area prone to hurricanes, hail, or wildfires, insurers place a higher value on impact-resistant and fire-rated materials. For more context on how different regions assess risk, you can refer to general climate data on Wikipedia.

    4. Insurance Carrier Policies

    Each insurance company has its own underwriting guidelines. Some carriers are more generous with roofing discounts than others. It is essential to shop around and ask specific questions about their roofing credits.

    How Much Does A New Roof Save On Homeowners Insurance

    Steps to Claim Your New Roof Insurance Discount

    Getting the discount isn’t automatic. You need to proactively inform your insurer and provide proof of the upgrade. Follow these steps to ensure you receive your savings.

    Step 1: Hire a Licensed Contractor

    Ensure your roofing contractor is licensed, bonded, and insured. Unlicensed work may void your warranty and disqualify you from insurance discounts. Keep all contracts and receipts.

    Step 2: Obtain Necessary Permits

    Most local jurisdictions require permits for roof replacements. Having official permits proves that the work was done to code, which insurers love to see.

    Step 3: Document the Installation

    Take photos of the installation process, especially the underlayment and flashing details. Once completed, take high-quality photos of the finished roof from multiple angles.

    Step 4: Request a Roof Certification

    Many roofing companies offer a certification letter stating the date of installation, materials used, and expected lifespan. This document is gold for insurance agents.

    Step 5: Contact Your Insurance Agent

    Do not wait for your renewal notice. Call your agent immediately after the roof is installed. Provide them with:

    • The invoice showing the date of completion.
    • The manufacturer’s warranty information.
    • Photos of the new roof.
    • Any inspection reports or certifications.

    Step 6: Verify the Adjustment

    Ask for a written confirmation of the new premium rate. Check your next bill to ensure the discount has been applied correctly.

    Common Mistakes Homeowners Make

    Avoid these pitfalls to ensure you maximize your savings.

    • Assuming It’s Automatic: Insurers won’t know you have a new roof unless you tell them. Silence means no discount.
    • Choosing Cheap Materials: Opting for the lowest bid might save money upfront but could result in lower insurance discounts and higher long-term maintenance costs.
    • Ignoring Local Codes: Failing to pull permits can lead to fines and insurance issues later. Always follow local building codes.

    FAQ Section

    Q1: Will a new roof always lower my insurance premium?

    A: In most cases, yes. However, if your overall risk profile increases due to other factors (like adding a swimming pool or having a prior claim history), the base rate might rise, but the roof discount should still apply to the calculation.

    Q2: Do I need to replace the entire roof to get the discount?

    A: Generally, yes. Most insurers require a full replacement to qualify for the maximum “new roof” discount. Minor repairs or partial replacements may not trigger the same level of savings, though they might help maintain your current rate.

    Q3: How long does the discount last?

    A: The discount typically lasts as long as the roof is considered “new” by the insurer, usually 10–15 years. After that, the discount may decrease or disappear until the roof is replaced again.

    Q4: Can I switch insurance companies to get a better roof discount?

    A: Absolutely. If your current insurer offers a low discount, shopping around is wise. New customers often receive competitive rates, and some companies specialize in discounts for updated homes.

    Q5: Does the color of the roof affect insurance savings?

    A: Indirectly. Lighter-colored roofs can reflect heat, potentially reducing energy costs and wear on the structure, but insurance discounts are primarily based on material durability and impact resistance rather than color.

    Q6: What if my roof is damaged by a storm before I replace it?

    A: File a claim for the damage. If the insurance company pays for the replacement, you will still benefit from having a new roof afterward, which will lower your future premiums. Ensure the contractor uses materials that qualify for discounts.

    Conclusion

    Investing in a new roof is about more than just curb appeal; it is a smart financial strategy that enhances your home’s safety and value. By understanding how much does a new roof save on homeowners insurance, you can make informed decisions that protect your budget for years to come. With potential savings of 10–30% on your annual premiums, the return on investment is clear.

    Remember to document every step of the process, choose high-quality materials, and communicate proactively with your insurance provider. Your future self—and your wallet—will thank you.

    Found this guide helpful? Share it with your friends on social media who are considering a home upgrade!

  • Better To Live On The Corner Of A Roof Meaning

    Better To Live On The Corner Of A Roof Meaning

    Have you ever felt so drained by the people around you that being alone seemed like a luxury? You are not alone in feeling this way. Many people search for the “Better To Live On The Corner Of A Roof Meaning“ to understand an ancient piece of wisdom that perfectly describes the pain of living with conflict versus the peace of isolation.

    This phrase comes from the Bible, specifically Proverbs 25:24. It paints a vivid picture: it is better to live in a tiny, exposed space on a roof than to share a large, comfortable house with a quarrelsome wife or husband. But what does this really mean for your modern life? Is it advocating for loneliness? Or is it a warning about emotional toxicity?

    In this guide, we will break down the historical context, the psychological implications, and how you can apply this timeless advice to your relationships today.

    What Is the Literal Origin of This Phrase?

    To truly grasp the meaning, we must look at the source. The phrase originates from the Book of Proverbs in the Old Testament. Proverbs is a collection of moral instructions and wise sayings, traditionally attributed to King Solomon.

    The specific verse, Proverbs 25:24 (and its parallel in Proverbs 21:9), states:

    “It is better to live on a corner of the roof than share a house with a quarrelsome wife.”

    The Architectural Context

    In ancient Near Eastern architecture, roofs were flat and accessible. They were often used for drying crops, sleeping during hot nights, or private prayer. However, living on the “corner of the roof” meant:

    • Exposure to Elements: No protection from rain, wind, or extreme sun.
    • Lack of Privacy: You were visible to neighbors.
    • Discomfort: It was hard, uneven, and unsafe compared to a furnished room inside.

    Despite these harsh conditions, the writer argues that this physical discomfort is preferable to the mental and emotional torment of constant domestic conflict. This hyperbole emphasizes the severity of a toxic home environment.

    For more historical context on ancient Hebrew housing structures, you can refer to Wikipedia’s article on Ancient Israelite and Judean houses.

    Why Is Solitude Preferred Over Conflict?

    The core message here isn’t about hating marriage or family. It is about the destructive power of chronic strife. When we analyze the “Better To Live On The Corner Of A Roof Meaning,” we find a profound psychological truth: Peace is more valuable than comfort.

    The Cost of Constant Tension

    Living in a state of high alert triggers the body’s stress response. According to health studies, chronic exposure to interpersonal conflict can lead to:

    1. Elevated cortisol levels.
    2. Increased risk of heart disease.
    3. Anxiety and depression.

    When your home—supposedly your sanctuary—becomes a battlefield, your nervous system never gets to rest. The “roof” represents solitude, which allows the mind to reset. While lonely, it is safe from verbal attacks, criticism, and unpredictability.

    Quality Over Quantity of Space

    You could have a mansion, but if the atmosphere is hostile, it feels like a prison. Conversely, a small, quiet space can feel like a palace if it offers peace. This proverb teaches us that the emotional climate of a home matters more than its square footage or luxury amenities.

    How Does This Apply to Modern Relationships?

    While the original text mentions a “quarrelsome wife,” modern interpretations apply this wisdom to any toxic relationship dynamic. This includes spouses, roommates, family members, or even business partners.

    Identifying a “Quarrelsome” Dynamic

    Not every argument makes a relationship toxic. Healthy couples disagree. However, a “quarrelsome” dynamic is characterized by:

    • Contempt: Rolling eyes, mocking, or name-calling.
    • Defensiveness: Refusing to take responsibility.
    • Stonewalling: Shutting down communication entirely.
    • Criticism: Attacking character rather than behavior.

    If you find yourself walking on eggshells in your own home, you might relate to the desire to escape to the “roof.”

    The Gender-Neutral Lesson

    Today, we understand that men can be quarrelsome too. The principle remains the same: It is better to be alone than to be abused. Whether you are dealing with a nagging partner, a volatile roommate, or a critical parent, the wisdom holds true. Your mental health is worth more than social appearances or shared assets.

    Better To Live On The Corner Of A Roof Meaning

    Practical Steps to Find Peace Without Moving to the Roof

    You don’t need to literally sleep outside to apply this wisdom. Here are actionable steps to restore peace in your living situation.

    1. Establish Boundaries

    Clear boundaries reduce conflict. Define what behavior is unacceptable.

    • Example: “I will not engage in conversations where voices are raised. If you start shouting, I will leave the room until we can speak calmly.”

    2. Create Physical Safe Spaces

    Designate a area in your home as a “conflict-free zone.” This could be a bedroom, a study, or even a cozy corner.

    • Use noise-canceling headphones.
    • Keep this space clutter-free and calming.

    3. Seek Professional Mediation

    If the conflict is deep-seated, consider therapy. A neutral third party can help translate feelings and reduce misunderstandings.

    • Look for licensed marriage and family therapists (LMFT).
    • Consider cognitive behavioral therapy (CBT) for anger management.

    4. Evaluate the Relationship

    Sometimes, the “roof” is a temporary retreat; other times, it’s a sign that the relationship is unsustainable. Ask yourself:

    • Do I feel drained or energized after interacting with this person?
    • Is there mutual respect?
    • Are efforts to change one-sided?

    Comparison: Comfort with Conflict vs. Solitude with Peace

    To visualize the trade-off described in the proverb, consider this comparison:

    FeatureLiving in Luxury with ConflictLiving Simply in Solitude
    Physical ComfortHigh (Soft beds, AC, good food)Low (Exposure, basic amenities)
    Mental StateAnxious, stressed, on edgeCalm, reflective, peaceful
    Health ImpactNegative (High blood pressure, insomnia)Neutral/Positive (Lower stress)
    Social PerceptionAppears successful to outsidersMay appear lonely or odd
    Long-term OutcomeBurnout, resentment, health issuesSelf-discovery, emotional stability

    As the table shows, the external appearance of success means little if the internal reality is suffering. This is the crux of the “Better To Live On The Corner Of A Roof Meaning.”

    FAQ Section

    1. Does this proverb mean I should get divorced?

    Not necessarily. It is a hyperbolic statement emphasizing the pain of conflict. It serves as a wake-up call to address issues. However, if abuse is present, separation may be the healthiest option. Always consult a professional counselor before making major life decisions.

    2. Is it better to be alone than in a bad relationship?

    Yes, according to this wisdom. Chronic negativity erodes self-esteem and mental health. Solitude allows for healing and self-reflection, whereas a toxic relationship often prevents growth.

    3. What does “corner of the roof” symbolize today?

    Today, it symbolizes any place of solitude and simplicity. It could be a small apartment, a quiet cabin, or simply setting strict boundaries to protect your peace. It represents choosing mental well-being over material comfort.

    4. Can this apply to friendships or roommates?

    Absolutely. Any close living arrangement requires mutual respect. If a roommate or friend creates a hostile environment, distancing yourself (your version of the “roof”) is a valid self-preservation strategy.

    5. Is loneliness the same as being alone?

    No. Loneliness is a painful feeling of isolation. Being alone is a physical state. The proverb advocates for chosen solitude to escape pain, not forced isolation. Many people find joy and peace in being alone.

    6. How can I fix a quarrelsome home without leaving?

    Start with communication. Use “I” statements instead of “You” accusations. Seek counseling together. Establish house rules for arguments (e.g., no yelling, no name-calling). Change starts with one person refusing to participate in the cycle of conflict.

    Conclusion

    The “Better To Live On The Corner Of A Roof Meaning“ is a powerful reminder that our environment shapes our soul. While we all desire comfort and companionship, these things lose their value when accompanied by constant strife.

    Whether you are dealing with a difficult partner, a chaotic household, or just the noise of modern life, remember that peace is priceless. Sometimes, stepping back—metaphorically or literally—is the bravest thing you can do for your mental health.

    Don’t let fear of being alone keep you in a place where you are not respected. Choose peace. Choose dignity. Choose your well-being.

    Did this article resonate with you? Share it with a friend who might need this reminder today. Let’s spread the wisdom of choosing peace over pretense.

  • How Much Is A 12 Ft Sheet Of Metal Roofing?

    How Much Is A 12 Ft Sheet Of Metal Roofing?

    Are you planning a roof replacement or a new build and feeling overwhelmed by the fluctuating prices of construction materials? You are not alone; many homeowners struggle to budget accurately when facing complex pricing structures. Understanding exactly how much is a 12 ft sheet of metal roofing is the first step toward taking control of your project’s finances and avoiding unexpected costs.

    In this guide, we will break down the current market rates, explain the variables that affect pricing, and help you determine if metal roofing is the right investment for your home.

    What Is the Average Cost of a 12 Ft Metal Roofing Sheet?

    When asking how much is a 12 ft sheet of metal roofing, it is crucial to understand that there is no single fixed price. The cost varies significantly based on the type of metal, the gauge (thickness), and the finish. However, we can look at average market data for late 2026 to give you a realistic baseline.

    For a standard 12-foot long panel, which typically covers about 3 feet in width (depending on the profile), you are looking at a range rather than a flat fee.

    Price Breakdown by Material Type

    Material TypeEstimated Cost per 12ft SheetBest For
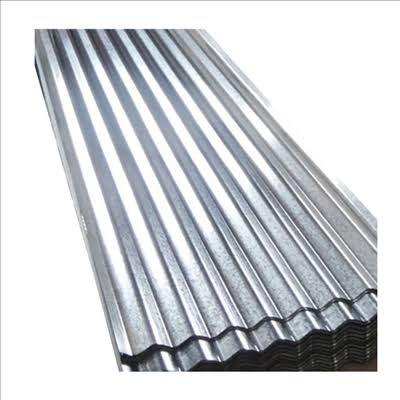
    Galvanized Steel$45 – $75Budget-conscious projects, barns, sheds
    Galvalume Steel$55 – $85Residential roofs, high corrosion resistance
    Aluminum$70 – $110Coastal areas, salt-air environments
    Copper/Zinc$250 – $400+Historic homes, luxury aesthetics

    Note: Prices above are for materials only and do not include fasteners, underlayment, or labor.

    Most residential homeowners opt for Galvalume steel because it offers the best balance between durability and cost. A 12-foot sheet of 29-gauge Galvalume might cost around $60, while a heavier 26-gauge panel could run closer to $85. Remember, a lower gauge number means thicker, stronger metal.

    Why Do Prices Vary So Much for Metal Panels?

    If you have visited three different supply stores and received three different quotes, you might be confused. Several key factors drive the price differences in the metal roofing industry.

    1. Gauge and Thickness

    The thickness of the metal is measured in gauges. Common residential gauges are 29, 26, and 24.

    • 29-Gauge: Thinner, lighter, and cheaper. Prone to denting from hail or heavy branches.
    • 26-Gauge: The industry standard for homes. Stronger and holds up better to weather.
    • 24-Gauge: Premium thickness. Used in areas with severe weather conditions.

    A 12-foot sheet in 24-gauge will cost significantly more than the same length in 29-gauge due to the increased amount of raw material used.

    2. Protective Coatings and Paint Systems

    Bare metal rusts. To prevent this, manufacturers apply coatings.

    • Unpainted/Galvanized: Cheapest option, industrial look.
    • PVDF (Kynar 500): High-end paint finish that resists fading and chalking for decades. This adds $10–$20 per sheet but extends the lifespan significantly.

    3. Profile Style

    The shape of the panel affects manufacturing complexity.

    • Corrugated: Simple wavy pattern, generally cheaper.
    • R-Panel/Agri-Panel: Standard ribbed style, moderate price.
    • Standing Seam: Hidden fasteners, premium look, highest cost due to engineering and installation complexity.
    How Much Is A 12 Ft Sheet Of Metal Roofing

    How to Calculate Total Material Needs for Your Roof

    Knowing the unit price is helpful, but calculating the total project cost requires precision. Buying too little leads to delays; buying too much wastes money.

    Step-by-Step Calculation Guide

    1. Measure Your Roof Area: Calculate the square footage of each roof plane. Length × Width = Square Footage.
    2. Add Waste Factor: Metal roofing requires cutting. Add 10% for simple gable roofs and 15–20% for complex hips and valleys.
    3. Determine Coverage Width: Most 12-foot sheets have a coverage width of 36 inches (3 feet), even if the actual panel is wider. Check your specific product specs.
    4. Calculate Sheets Needed:
      • Total Square Footage ÷ 3 (coverage width) = Linear Feet needed.
      • Linear Feet ÷ 12 (length of sheet) = Number of Sheets.

    Pro Tip: Always round up to the nearest whole sheet. You cannot buy half a panel from most suppliers.

    For more detailed technical standards on metal roofing installations, you can refer to general construction guidelines available on Wikipedia.

    Installation Costs: DIY vs. Professional Hiring

    One of the biggest questions homeowners face is whether to install the 12-foot sheets themselves or hire a pro. While the material cost for how much is a 12 ft sheet of metal roofing is straightforward, labor changes the equation entirely.

    DIY Installation

    • Pros: Saves 50–60% of total project cost.
    • Cons: High risk of leaks if installed incorrectly. Requires specialized tools (nibblers, seamers, drill drivers).
    • Safety: Working on a roof is dangerous. Falls are a leading cause of home improvement injuries.

    Professional Installation

    • Cost: Typically ranges from $8 to $15 per square foot installed.
    • Benefits: Warranty protection, proper flashing details, and speed.
    • Value: A professionally installed metal roof can increase home resale value by up to 6%.

    If you choose to DIY, ensure you use the correct screws with neoprene washers. Over-driving these screws can crush the washer, leading to immediate leaks. Under-driving them leaves gaps. It requires a delicate touch and practice.

    Long-Term Value: Is Metal Roofing Worth the Upfront Cost?

    When analyzing how much is a 12 ft sheet of metal roofing, look beyond the initial price tag. Consider the lifecycle cost.

    • Lifespan: Asphalt shingles last 15–20 years. Metal roofs last 40–70 years.
    • Maintenance: Metal requires minimal maintenance. Occasional cleaning and inspection of sealants are usually sufficient.
    • Energy Efficiency: Reflective metal roofs can reduce cooling costs by 10–25% in hot climates.

    While a 12-foot sheet of asphalt shingle equivalent might cost less initially, you will replace it two or three times before your metal roof needs attention. This makes metal a superior long-term financial decision.

    Frequently Asked Questions (FAQ)

    1. Can I cut a 12 ft metal roofing sheet to size?

    Yes, you can cut metal roofing sheets. Use electric shears or a nibbler tool for clean cuts. Avoid using abrasive saws (like angle grinders) as the heat damages the protective coating, leading to rust along the cut edge.

    2. What is the weight of a 12 ft metal roofing sheet?

    Weight depends on the gauge. A 12-foot, 3-foot wide sheet of 29-gauge steel weighs approximately 40–50 lbs. A 26-gauge sheet weighs roughly 60–70 lbs. Aluminum is lighter, weighing about 30–40 lbs for the same dimensions.

    3. Do I need special permits for metal roofing?

    In most US jurisdictions, replacing a roof requires a building permit. Check with your local county or city building department. Some HOAs also have restrictions on metal roof colors and profiles.

    4. How long does it take to install a 12 ft sheet?

    For an experienced professional, installing a single 12-foot sheet takes about 5–10 minutes, including alignment and fastening. For a DIYer, expect 15–20 minutes per sheet as you learn the rhythm.

    5. What is the best screw for metal roofing?

    Use self-tapping hex-head screws with EPDM rubber washers. These are designed to penetrate the metal and create a watertight seal. Ensure the screw length is appropriate for penetrating both the panel and the purlin or deck below.

    Conclusion

    Understanding how much is a 12 ft sheet of metal roofing involves more than just checking a price tag. It requires evaluating the gauge, material type, and long-term benefits. While the upfront cost of $50–$100 per sheet may seem higher than traditional shingles, the durability, energy efficiency, and longevity of metal make it a wise investment for any US homeowner.

    By carefully calculating your needs and choosing the right material for your climate, you can secure a roof that protects your home for decades. If you found this guide helpful, please share it with friends or family who are considering a roof upgrade. Your network will thank you for saving them from costly mistakes!

  • How Many Square Feet Are In A Square Of Roofing?

    How Many Square Feet Are In A Square Of Roofing?

    Planning a roof replacement or repair can feel overwhelming, especially when contractors start throwing around industry jargon that doesn’t quite make sense to the average homeowner. You might find yourself staring at a quote and wondering, “How many square feet are in a square of roofing?” It is a simple question with a critical answer that directly impacts your budget and material orders.

    Understanding this basic unit of measurement is the first step toward taking control of your home improvement project. In this guide, we will break down the math, explain why this unit exists, and show you how to calculate your needs accurately so you never overpay or under-order again.


    What Is a “Square” in Roofing Terminology?

    If you have never worked in construction, the term “square” can be misleading. In everyday language, a square is a geometric shape. However, in the roofing industry, it is a specific unit of area used to simplify calculations for large surfaces.

    A roofing square is equal to 100 square feet.

    This means that if your roof has an area of 2,500 square feet, it is considered a 25-square roof. This standardization helps contractors, suppliers, and manufacturers communicate efficiently. Instead of saying, “I need enough shingles to cover 1,850 square feet,” a pro will simply say, “I need materials for 18.5 squares.”

    Why Do Roofers Use Squares?

    The primary reason is simplicity and speed. Roofs are large, and dealing with thousands of individual square feet can lead to calculation errors during quick estimates. By grouping every 100 square feet into one “square,” the numbers become more manageable.

    • Easier Material Ordering: Shingles and underlayment are often sold by the square or in bundles that equate to a fraction of a square.
    • Standardized Pricing: Most contractors quote prices per square (e.g., $350 per square), making it easier for homeowners to compare bids.
    • Reduced Error: It minimizes the risk of misplacing zeros when calculating large areas.

    How to Calculate Your Roof’s Square Footage

    Before you can determine how many squares you need, you must accurately measure your roof’s total square footage. While it might seem tempting to just use your home’s floor plan, this method is often inaccurate because roofs extend beyond the walls (overhangs) and have complex pitches.

    Step 1: Measure Each Plane

    Break your roof down into individual rectangular planes. For each section:

    1. Measure the length from ridge to eave (or edge to edge).
    2. Measure the width along the eave.
    3. Multiply length by width to get the area of that plane.

    Example: If one section is 40 feet long and 20 feet wide, the area is 800 square feet.

    Step 2: Account for Overhangs

    Do not forget the eaves and rakes. Measure any overhanging sections separately and add them to your total. Even a small 6-inch overhang can add significant square footage across the perimeter of a large home.

    Step 3: Sum the Areas

    Add the square footage of all planes together to get your total gross square footage.

    Step 4: Convert to Squares

    Divide your total square footage by 100.

    Formula: Total Square Feet ÷ 100 = Number of Squares

    Example: 2,400 sq ft ÷ 100 = 24 Squares.

    How Many Square Feet Are In A Square Of Roofing

    The Critical Factor: Roof Pitch and Waste

    Knowing the flat footprint of your roof is not enough. The steepness of your roof, known as the pitch, dramatically affects the actual surface area. A steep roof has more surface area than a flat roof covering the same floor space.

    Understanding Roof Pitch

    Roof pitch is expressed as a ratio of vertical rise to horizontal run (e.g., 6/12). This means for every 12 inches you go horizontally, the roof rises 6 inches vertically.

    To get the true surface area, you must apply a pitch multiplier. You can find these multipliers in standard roofing charts or use the Pythagorean theorem.

    Roof PitchMultiplierImpact on Area
    4/121.054+5.4%
    6/121.118+11.8%
    8/121.202+20.2%
    12/121.414+41.4%

    Note: For detailed mathematical definitions of geometric slopes, you can refer to general resources on Wikipedia.

    Calculating Waste Factor

    You cannot buy exactly the amount of material needed for the exact square footage. Cutting shingles to fit valleys, hips, and ridges creates waste. Additionally, mistakes happen.

    • Simple Gable Roof: Add 10% waste factor.
    • Complex Roof (Multiple Valleys/Hips): Add 15–20% waste factor.

    Final Calculation Example:

    1. Flat Area: 2,000 sq ft (20 Squares)
    2. Pitch Adjustment (6/12 pitch): 2,000 x 1.118 = 2,236 sq ft
    3. Waste Factor (15%): 2,236 x 1.15 = 2,571 sq ft
    4. Total Squares Needed: 2,571 ÷ 100 = 25.71 Squares (Round up to 26 Squares)

    Materials Per Square: What Do You Actually Buy?

    Once you know your square count, you need to translate that into bundles of shingles or rolls of underlayment. This varies by material type, but here are the industry standards for asphalt shingles, the most common roofing material in the US.

    Asphalt Shingles

    • Bundles per Square: Typically 3 bundles make 1 square.
    • Shingles per Bundle: Usually contains 20–26 shingles, depending on the brand and style.
    • Weight: A square of asphalt shingles weighs between 200 to 350 pounds.

    Other Materials

    • Wood Shakes: Often require 4 bundles per square due to thicker spacing.
    • Metal Roofing: Sold by linear feet or panels, not typically by the “square” in the same way, though coverage is still calculated in square feet.
    • Slate/Tile: Much heavier and often requires specialized structural support. Coverage varies significantly by tile size.

    Pro Tip: Always check the manufacturer’s specifications on the bundle wrapper. Some architectural or premium shingles may require 4 or even 5 bundles to cover one square due to their thickness and exposure requirements.


    Common Mistakes When Estimating Roof Squares

    Even with the right formula, homeowners and DIYers often stumble. Here are the most frequent errors to avoid:

    1. Ignoring the Chimneys and Vents: While small, these penetrations require flashing and extra cutting. While they don’t add much area, they increase labor and waste.
    2. Using Floor Plan Square Footage: Your home’s living area is not your roof area. A two-story house with a 2,000 sq ft footprint might only have a 1,000 sq ft roof if it’s a simple gable, or much more if it’s complex. Never assume 1:1 correlation.
    3. Forgetting Dormers: Dormers add significant surface area. Measure each dormer face separately and add it to the total.
    4. Rounding Down: Always round up when ordering materials. Running short mid-project means delaying work while waiting for a new delivery, which risks weather exposure to the open roof deck.

    FAQ Section

    Q1: Does a square of roofing always equal 100 square feet?

    A: Yes. In the US roofing industry, a “square” is universally defined as 100 square feet. This standard applies regardless of the roofing material (asphalt, metal, tile, etc.).

    Q2: How many bundles of shingles do I need for one square?

    A: For standard 3-tab asphalt shingles, you typically need 3 bundles to cover one square (100 sq ft). For thicker architectural shingles, check the label, as some may require 4 bundles per square.

    Q3: Can I measure my roof from the ground?

    A: You can get a rough estimate using ground measurements and photos, but it is not accurate for ordering materials. Factors like pitch, overhangs, and complex angles are hard to judge from the ground. For precise quotes, professionals use laser measures or drone technology.

    Q4: Why do contractors charge per square instead of per square foot?

    A: Charging per square simplifies the billing process. It allows for quicker mental math during negotiations and aligns with how materials are packaged and shipped. It also helps buffer minor measurement discrepancies without renegotiating every single foot.

    Q5: How much does a square of roofing cost?

    A: Costs vary widely based on material and location. As of recent trends, asphalt shingles might range from $350 to $550 per square installed, while metal or slate can exceed $1,000 per square. Always get multiple local quotes for accurate pricing.

    Q6: Is there a difference between a “square” and a “bundle”?

    A: Yes. A square is a unit of area (100 sq ft). A bundle is a physical package of shingles. It usually takes 3 bundles to make one square, but this depends on the shingle type.


    Conclusion

    Understanding how many square feet are in a square of roofing is fundamental to any successful roofing project. Remember, one square equals 100 square feet. By accurately measuring your roof’s planes, adjusting for pitch, and adding a waste factor, you can order the right amount of material and avoid costly delays.

    Whether you are hiring a professional or tackling a small shed roof yourself, this knowledge empowers you to speak the same language as contractors and verify quotes with confidence. Don’t let measurement errors eat into your budget.

    Found this guide helpful? Share it with friends or family who are planning home improvements, and bookmark it for your next renovation project! Accurate measurements save money—start calculating today.

  • Roof Capacity: Promaster EV Cargo Van Guide

    Roof Capacity: Promaster EV Cargo Van Guide

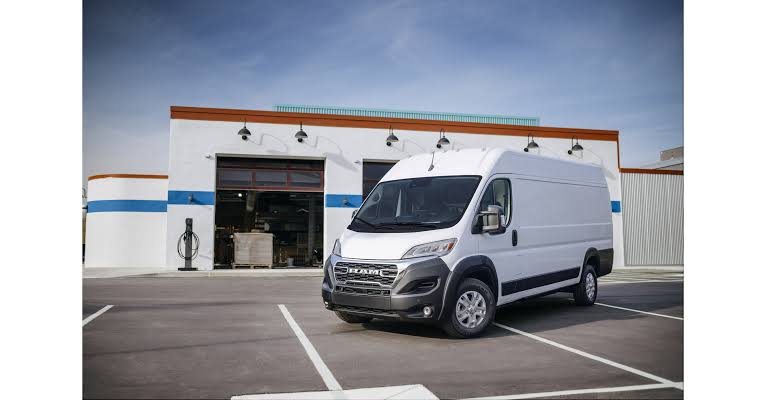
    If you are transitioning your delivery fleet to electric or simply upgrading your personal workhorse, knowing the structural limits of your vehicle is critical. Many business owners find themselves asking, “What Is The Roof Capacity Of Promaster Ev Cargo Van“ before installing essential equipment like solar panels, ladders, or HVAC units. Understanding this limit ensures you maintain vehicle safety, warranty validity, and optimal battery efficiency.

    The shift to electric vehicles (EVs) brings unique considerations regarding weight distribution and aerodynamics. Unlike traditional gas vans, every pound added to the roof of an EV can subtly impact range and handling. In this guide, we will break down the exact specifications, safety margins, and best practices for maximizing your Ram ProMaster EV’s utility without compromising its integrity.

    Understanding the Official Roof Load Limits

    When discussing roof capacity, it is vital to distinguish between static and dynamic load ratings. Most manufacturers provide two different numbers, and confusing them can lead to catastrophic structural failure.

    Dynamic vs. Static Load: What’s the Difference?

    • Dynamic Load: This is the weight the roof can support while the vehicle is in motion. For most high-roof cargo vans, including the Ram ProMaster series, this limit is typically conservative to account for wind resistance, braking forces, and cornering G-forces.
    • Static Load: This refers to the weight the roof can hold when the vehicle is parked on level ground. This number is significantly higher because there are no kinetic forces acting against the structure.

    For the Ram ProMaster (both gasoline and upcoming EV variants based on the STLA Frame platform), the general industry standard for dynamic roof loading is approximately 150 to 200 pounds (68–90 kg) distributed evenly across the roof ribs. However, because the EV variant may have slight structural reinforcements to accommodate battery packaging and different weight distributions, relying on older gas-model data can be risky.

    Expert Note: Always consult the specific Owner’s Manual for your model year. As of late 2025 and early 2026, Ram has emphasized that the high-strength steel roof structure remains consistent with previous generations, but the total vehicle payload is more strictly monitored in EVs due to battery weight.

    The Impact of the “High Roof” Configuration

    The ProMaster is famous for its high-roof option, which provides nearly 6 feet of interior standing height. While excellent for ergonomics, a higher center of gravity means that roof loads affect stability more than they would on a low-roof van.

    If you are carrying heavy items on the roof of a High Roof ProMaster EV:

    1. Wind Drag Increases: This reduces your electric range.
    2. Handling Changes: The vehicle may feel “top-heavy” during sharp turns.
    3. Structural Stress: The vertical pillars endure more torque during sudden stops.

    Therefore, staying well below the maximum dynamic limit is not just about preventing roof collapse; it is about maintaining safe driving dynamics.

    How Roof Weight Affects EV Range and Performance

    One of the most common questions we receive from fleet managers is how roof racks and cargo impact the efficiency of an electric van. The answer lies in physics: aerodynamics and mass.

    Aerodynamic Drag Coefficient

    Electric vans are designed with smooth lines to minimize air resistance. Adding a roof rack, even an empty one, disrupts this airflow. According to studies on commercial EVs, a poorly designed or loaded roof rack can increase energy consumption by 10% to 25% at highway speeds.

    Item on RoofEstimated Range Impact (Highway)Notes
    Empty Aero Rack-5% to -8%Minimal disruption if streamlined.
    Loaded Ladder Rack-10% to -15%Significant drag due to irregular shape.
    Solar Panel Array-2% to -5%Flat profile helps maintain aerodynamics.
    Heavy Cargo Box-15% to -20%High drag and added weight.

    Battery Efficiency and Weight

    The Ram ProMaster EV utilizes a large lithium-ion battery pack, which already constitutes a significant portion of the vehicle’s curb weight. Adding weight to the roof raises the center of gravity, forcing the suspension and electronic stability control systems to work harder.

    While the motor torque is instant and powerful, the energy required to accelerate that extra mass comes directly from your battery reserve. If you are calculating routes for last-mile delivery, every 100 pounds added to the roof could reduce your daily operational range by several miles, depending on terrain and driving style.

    What Is The Roof Capacity Of Promaster Ev Cargo Van

    Best Practices for Installing Roof Racks on the ProMaster EV

    To safely utilize your roof capacity, proper installation is non-negotiable. The ProMaster’s roof has specific reinforcement points, usually aligned with the internal structural ribs.

    Step-by-Step Installation Guide

    1. Locate the Reinforcement Ribs: Use a stud finder or tap the roof gently to hear the solid sound of the metal ribs. Do not drill or clamp into the thin sheet metal between ribs.
    2. Choose the Right Mounting System: Opt for clamp-on racks that grip the rain gutters or door frames if you want to avoid drilling. If drilling is necessary for heavy-duty use, ensure you use stainless steel bolts and marine-grade sealant to prevent rust—a critical concern for fleet longevity.
    3. Distribute Weight Evenly: Never place all heavy items on one side. Balance the load left-to-right and front-to-back.
    4. Torque Specifications: Follow the manufacturer’s torque settings strictly. Over-tightening can warp the roof panel; under-tightening can lead to rattling and eventual fatigue failure.

    For detailed structural diagrams and engineering standards regarding vehicle roof loads, you can refer to general automotive safety resources such as the National Highway Traffic Safety Administration (NHTSA) or technical overviews found on Wikipedia’s Automotive Design page for broader context on vehicle structural integrity.

    Common Roof Loads: What Can You Actually Carry?

    Let’s break down typical items contractors and delivery drivers put on their roofs to see if they fit within the safe capacity.

    • Ladders: A standard 24-foot extension ladder weighs about 60–70 lbs. Two ladders would approach the 150-lb dynamic limit. Verdict: Safe, but monitor speed.
    • Solar Panels: A typical 100W monocrystalline panel weighs around 15–20 lbs. A set of four panels plus mounting hardware might weigh 100 lbs. Verdict: Very Safe and recommended for off-grid charging.
    • HVAC Units: Small rooftop AC units for camper conversions can weigh 50–80 lbs. Verdict: Safe for static use, caution advised for dynamic driving.
    • Storage Boxes: Large plastic cargo boxes can weigh 40 lbs empty and 100+ lbs when full. Verdict: Use only for lightweight items like insulation or empty containers.

    FAQ Section

    1. What is the exact dynamic roof capacity of the 2026 Ram ProMaster EV?

    While Ram officially cites a general limit of 150–200 lbs for dynamic loads across the ProMaster line, the EV model’s specific owner’s manual should be your final authority. The structural roof ribs are similar to the gas model, but the increased curb weight of the EV means you should aim for the lower end of that spectrum (150 lbs) to preserve handling safety.

    2. Can I install a solar panel array on my ProMaster EV roof?

    Yes, absolutely. Solar panels are one of the best uses for roof space because they are flat (low aerodynamic drag) and relatively lightweight. A typical setup of 400–600 watts of solar panels will likely stay under the 100-lb mark, well within safe limits. This can also help trickle-charge auxiliary systems, preserving your main drive battery.

    3. Does adding a roof rack void the warranty on my electric van?

    Generally, no, provided the installation does not damage the vehicle’s structure or electrical components. However, if you drill into the roof improperly and cause water leaks that damage the high-voltage battery or interior electronics, those specific repairs may not be covered. Always use professional installers for drilled mounts.

    4. How does wind affect a loaded roof on an electric van?

    Wind resistance increases exponentially with speed. At 65 mph, the drag from a loaded roof rack can require significantly more power to overcome than at 35 mph. For EVs, this means a disproportionate drop in range. Try to keep highway speeds moderate when carrying heavy roof loads to maximize efficiency.

    5. Is it safer to carry weight inside the van or on the roof?

    It is almost always safer and more efficient to carry weight inside the van, low to the floor. This keeps the center of gravity low, improving handling and reducing rollover risk. It also maintains the vehicle’s aerodynamic profile, preserving your electric range. Only use the roof for items that do not fit inside or require external access.

    6. Are there specific roof rack brands recommended for the ProMaster EV?

    Brands like Thule, Yakima, and VanTech offer models specifically engineered for the Ram ProMaster’s rib spacing. Look for racks labeled as “high-load” or “commercial grade.” Avoid universal fit racks that rely solely on friction clamps without reinforcing the contact points, as they may slip or damage the paint seal.

    Conclusion

    Knowing what is the roof capacity of Promaster EV cargo van is essential for any professional looking to optimize their mobile workspace. While the general guideline hovers around 150 to 200 pounds for dynamic loads, the key to success lies in smart distribution, aerodynamic awareness, and strict adherence to safety margins.

    By keeping your roof load light and balanced, you protect your vehicle’s structural integrity, maintain better handling, and preserve your precious electric range. Remember, the roof is a valuable asset, but it should be used strategically—not as a dumping ground for heavy equipment.

    Found this guide helpful? Share it with your fellow fleet managers or contractor friends on social media to help them drive safer and smarter! Don’t forget to bookmark this page for future reference as you outfit your new electric workhorse.

  • 1969 D Penny Value: Is It Worth Millions?

    1969 D Penny Value: Is It Worth Millions?

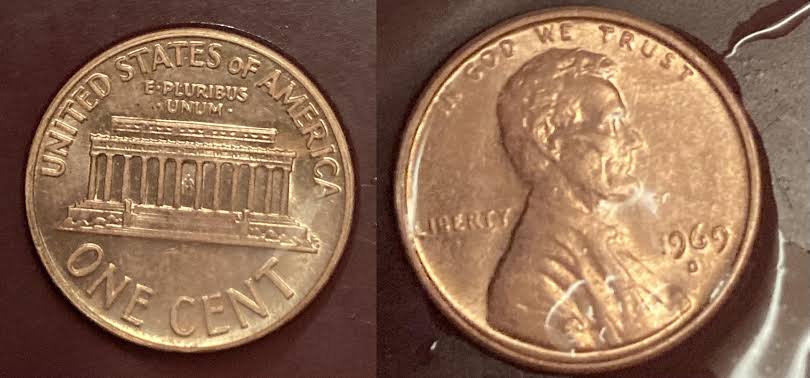
    Have you ever dug through a jar of loose change and found a copper penny that looked slightly different, sparking hopes of a hidden fortune? Many collectors have heard rumors about specific errors, leading them to ask the burning question: How Much Is A 1969 D Floating Roof Penny Worth?

    It is completely understandable to feel excited by the possibility of finding a rare treasure in your pocket change. However, the world of numismatics (coin collecting) is filled with both genuine rarities and persistent myths. In this guide, we will separate fact from fiction, providing you with accurate, expert-backed information to help you understand the true value of your 1969-D Lincoln cent.

    The Truth About the “Floating Roof” Myth

    Before we discuss dollar amounts, we must address the terminology. If you search for “1969 D floating roof penny,” you will likely encounter conflicting information. This is because “floating roof” is not an officially recognized mint error by major grading services like PCGS (Professional Coin Graders Service) or NGC (Numismatic Guaranty Company).

    In many cases, what collectors describe as a “floating roof” is actually a result of:

    • Heavy Wear: Circulation can wear down the details of the Lincoln Memorial on the reverse side, making the roof appear detached or blurry.
    • Die Deterioration: As coins are struck, the dies wear out, causing softer images that may look unusual to the untrained eye.
    • Misidentification: Confusion with the famous 1969-S Doubled Die Obverse, which is a completely different and highly valuable coin.

    Why Does This Myth Persist?

    The internet amplifies rare coin stories. A single misidentified coin sold on an auction site for a high price (often due to buyer ignorance) can create a false benchmark for value. It is crucial to rely on authoritative sources rather than anecdotal forum posts. For a comprehensive history of Lincoln cents, you can refer to the detailed records on Wikipedia.

    Real Value: What Is a 1969-D Penny Actually Worth?

    The 1969-D Lincoln penny was minted in Denver, indicated by the small “D” mint mark below the date. The U.S. Mint produced over 1.5 billion of these coins in 1969. Because of this massive mintage, the standard 1969-D penny is considered common.

    Here is a breakdown of the current market values based on condition (grade):

    Condition GradeDescriptionEstimated Value (USD)
    Good (G-4)Heavily worn, flat details$0.01 – $0.05
    Fine (F-12)Moderate wear, some details visible$0.05 – $0.10
    Extremely Fine (EF-40)Light wear, sharp details$0.10 – $0.25
    Uncirculated (MS-60)No wear, but may have bag marks$0.50 – $1.00
    Mint State (MS-65+)Brilliant, no visible flaws$2.00 – $5.00
    Perfect Gem (MS-67+)Flawless, top-tier preservation$15.00 – $30.00

    Note: Prices are approximate and based on recent sales data from major numismatic databases. Copper content also adds slight intrinsic value.

    The Copper Factor

    Pennies minted before 1982 are composed of 95% copper and 5% zinc. With fluctuating copper prices, the melt value of a pre-1982 penny is often close to or slightly above its face value. While you cannot legally melt U.S. currency for profit, this metal content makes older pennies attractive to bulk collectors.

    How Much Is A 1969 D Floating Roof Penny Worth

    Common Errors vs. The “Floating Roof”

    If your coin isn’t worth millions, does it have any other value? Yes, if it has a genuine mint error. Here are the actual errors to look for in 1969-D pennies:

    1. Repunched Mint Mark (RPM)

    Sometimes, the mint mark (“D”) was punched into the die more than once, slightly off-center. This creates a doubling effect on the letter itself.

    • Value: $5 – $50, depending on visibility and grade.

    2. Die Cracks or Cuds

    A “cud” is a blob of metal on the edge of the coin caused by a broken die. Die cracks appear as raised lines across the coin’s surface.

    • Value: $10 – $100+ for prominent cuds.

    3. Off-Center Strikes

    If the planchet (blank coin) was not properly aligned during striking, part of the design may be missing.

    • Value: $20 – $200, depending on the percentage of off-center strike.

    Important Distinction: Do not confuse the 1969-D with the 1969-S. The 1969-S Doubled Die Obverse is one of the most famous modern errors, with values ranging from $1,000 to over $50,000. However, this error only occurred at the San Francisco Mint (“S”), not Denver (“D”).

    How to Identify Your Coin’s Condition

    To determine if your 1969-D penny has any premium value, you need to assess its grade accurately. Follow these steps:

    1. Cleanliness Check: Never clean your coin! Cleaning removes the natural patina and drastically reduces value. If it is dirty, leave it alone.
    2. Examine the Luster: Hold the coin under a light source. Uncirculated coins will have a original shine (luster) that moves across the surface. Circulated coins will look dull.
    3. Check for Wear: Look at Lincoln’s cheekbone and the details of the Memorial on the back. If these areas are flat or smooth, the coin is circulated.
    4. Inspect the Edges: Use a magnifying glass (10x is ideal) to check for re-punched mint marks or die cracks.

    Factors That Influence Coin Value

    Understanding why some pennies are worth more than others helps you evaluate your collection.

    • Scarcity: While 1.5 billion were made, very few survive in perfect condition. High-grade examples are scarce.
    • Demand: Collector interest drives prices. Currently, there is moderate demand for high-grade Lincoln Memorial cents.
    • Eye Appeal: Coins with attractive coloration (like red or brown toning) often sell for more than bland, grayish coins.
    • Authentication: Coins graded by third-party services (PCGS, NGC, ANACS) command higher prices because their authenticity and grade are guaranteed.

    FAQ: Common Questions About 1969 Pennies

    1. Is there such a thing as a 1969 D double die penny?

    No, there is no recognized “doubled die” error for the 1969-D penny. The famous doubled die is the 1969-S (San Francisco). Any doubling seen on a 1969-D is likely “machine doubling,” which has no significant collector value.

    2. Why do people call it a “floating roof”?

    This is a colloquial term used by some sellers to describe coins where the roof of the Lincoln Memorial appears detached due to heavy wear, poor striking, or die deterioration. It is not a technical numismatic term.

    3. How can I sell my 1969-D penny?

    For common circulated coins, local coin shops or bulk sales are best. For high-grade or error coins, consider online auction platforms like eBay or Heritage Auctions. Always research recent sold listings to set a realistic price.

    4. What is the most valuable 1969 penny?

    The 1969-S Doubled Die Obverse is the most valuable, fetching tens of thousands of dollars. Among Denver-minted coins, high-grade MS-67+ Red examples are the most valuable, typically selling for under $50.

    5. Should I get my coin professionally graded?

    Only if you believe it is in Mint State (uncirculated) condition or has a major, visible error. Grading fees can cost $30–$100+, which may exceed the value of a standard 1969-D penny.

    6. Does the color of the penny matter?

    Yes. Pennies are graded as “Red” (original copper color), “Brown,” or “Black.” Red coins are more desirable and valuable because they indicate less oxidation and better preservation.

    Conclusion

    So, how much is a 1969 D floating roof penny worth? In short, if you have a standard 1969-D penny, it is likely worth between 1 cent and 5 cents in circulated condition, up to $30 if it is in perfect, gem-quality condition. The term “floating roof” is generally a misnomer for wear or minor die issues, not a rare error commanding huge sums.

    While you may not have found a million-dollar ticket, every coin has a story. Understanding the difference between myth and reality empowers you to build a knowledgeable and valuable collection.

    Did you find a unique 1969 penny in your change? Share your photos and questions in the comments below, or share this article with fellow coin enthusiasts on social media to help debunk the myths together!

  • Hang Christmas Lights on Metal Roof: No Gutters?

    Hang Christmas Lights on Metal Roof: No Gutters?

    Decorating your home for the holidays should be a joy, not a source of anxiety. If you have a modern or industrial-style home with a sleek metal roof, you might feel stuck wondering how to hang Christmas lights on metal roof without gutters. You are not alone; many homeowners struggle to find secure attachment points that won’t damage their expensive roofing material.

    The good news is that you don’t need gutters to create a magical display. With the right tools and techniques, you can achieve a professional look while keeping your roof intact and your family safe. This guide will walk you through the safest, most effective methods used by lighting professionals today.

    Why Traditional Methods Fail on Metal Roofs

    Before diving into solutions, it is crucial to understand why standard hanging techniques often fail on metal surfaces. Traditional plastic gutter clips rely on the lip of a rain gutter to snap into place. Without that lip, these clips are useless.

    Furthermore, metal roofs present unique challenges:

    • Slippery Surface: Metal becomes incredibly slick when wet or icy, making ladder work dangerous.
    • Thermal Expansion: Metal expands and contracts with temperature changes. Rigid attachments can pop off or tear the material.
    • Coating Damage: Most metal roofs have protective paint or galvanized coatings. Puncturing these with nails or screws invites rust and voids warranties.

    According to industry standards, preserving the integrity of your roof’s weather barrier is paramount. A small puncture can lead to significant leaks over time, costing thousands in repairs. Therefore, non-invasive methods are not just preferred; they are essential.

    Method 1: Using Strong Magnetic Clips (The Best Option)

    If your metal roof is ferrous (contains iron, like steel), magnetic clips are the gold standard for gutter-free hanging. They offer a strong hold without any adhesives or penetrations.

    How It Works

    Magnetic clips use powerful neodymium magnets to clamp onto the metal surface. Many designs include a channel or hook specifically built to hold standard C7, C9, or mini LED light strands.

    Step-by-Step Installation

    1. Clean the Surface: Wipe down the edge of your roof where the lights will sit. Use a mixture of water and mild dish soap to remove dust, pollen, or bird droppings. Dry thoroughly. Dirt reduces magnetic strength.
    2. Test Magnet Strength: Before buying in bulk, test a single clip on your roof. Ensure it holds firmly even when you tug on it gently. Note: Aluminum roofs are non-magnetic. If you have aluminum, skip to Method 2.
    3. Attach Clips: Place the magnetic clip on the vertical face or the flat edge of the roof panel, depending on the clip design. Space them approximately 12–18 inches apart for standard string lights.
    4. Insert Lights: Snap your light strand into the clip’s holder. Ensure the bulb faces outward for maximum visibility.
    5. Secure the Cord: Use additional small magnetic cable managers every 3–4 feet to keep the power cord tidy and prevent wind from whipping it around.

    Pro Tip: Look for magnets coated in rubber or plastic. This prevents the magnet from sliding across the paint and protects the finish from scratches.

    Method 2: Adhesive Hooks and Tape (For Non-Magnetic Roofs)

    If you have an aluminum, copper, or zinc roof, magnets will not work. In this case, high-strength outdoor adhesive is your best friend. However, not all adhesives are created equal.

    Choosing the Right Adhesive

    You need an adhesive that is:

    • UV Resistant: Sunlight degrades cheap glue quickly.
    • Weatherproof: It must withstand rain, snow, and freezing temperatures.
    • Removable: It should come off cleanly in January without leaving residue.

    VHB (Very High Bond) Tape by 3M is a popular choice among professionals. Alternatively, clear outdoor-rated command strips designed for smooth surfaces can work for lighter mini-lights.

    Installation Steps

    1. Prep the Area: Clean the attachment spot with isopropyl alcohol (rubbing alcohol). This removes invisible oils that prevent adhesion. Let it dry completely.
    2. Apply the Hook: Peel the backing off the adhesive hook. Press it firmly against the metal for at least 30 seconds. Apply steady pressure.
    3. Wait: This is the most skipped step. Wait at least one hour (ideally 24 hours) before hanging any weight. The adhesive needs time to cure and bond with the metal surface.
    4. Hang Lights: Gently place your light strand into the hook. Do not pull down on the hook; let the light rest in it.
    FeatureMagnetic ClipsAdhesive Hooks
    Best ForSteel/Iron RoofsAluminum/Copper Roofs
    ReusabilityHigh (Indefinite)Low (One Season)
    Installation SpeedFastSlow (Requires curing time)
    Risk of DamageNoneLow (If removed correctly)
    Wind ResistanceHighModerate

    Method 3: Clip-On Eave Clamps

    For those who want a more permanent but still non-penetrating solution, eave clamps are an excellent option. These are small metal or plastic brackets that slide under the edge of the metal panel if there is a slight overhang or lip at the fascia line.

    Even without gutters, many metal roofs have a “drip edge” or a slight bend at the bottom. Eave clamps grip this edge mechanically.

    • Advantage: They are extremely secure and handle heavy ice loads well.
    • Disadvantage: They require a specific roof profile to fit. Measure the thickness of your metal edge before purchasing.
    How To Hang Christmas Lights On Metal Roof Without Gutters

    Safety First: Navigating a Metal Roof

    Hanging lights on a metal roof is inherently riskier than shingles due to slip hazards. According to the Consumer Product Safety Commission, thousands of people are treated in emergency rooms annually for falls related to holiday decorating.

    To stay safe:

    • Use a Stabilizer: If using a ladder, attach a ladder stabilizer to bridge over gutters (if present nearby) or to stand off from the wall.
    • Wear Proper Footing: Use shoes with soft rubber soles. Avoid hard plastics or leather soles which slide easily on metal.
    • Work in Dry Conditions: Never attempt to hang lights on a wet, icy, or snowy roof. Wait for a clear, dry day.
    • Use a Spotter: Have someone hold the base of the ladder and watch your progress.
    • Consider Ground-Level Hanging: If your roof pitch is steep (greater than 6/12), consider using a light pole or hanging lights from lower architectural features instead of climbing up.

    Maintaining Your Display

    Once your lights are up, maintenance is minimal but important. Metal roofs shed snow quickly, which can sometimes pull lights down if they are snagged.

    • Check After Storms: Inspect your clips after heavy wind or snow events.
    • LED is Best: Use LED lights. They emit very little heat, reducing the risk of melting adhesive or damaging roof coatings. Incandescent bulbs get hot and can degrade adhesives faster.
    • Timer Usage: Use a smart plug or timer to turn lights off during the day. This extends the life of your bulbs and saves energy.

    FAQ Section

    1. Will magnetic clips scratch my metal roof?

    High-quality magnetic clips with rubberized coatings will not scratch your roof. However, cheap bare magnets can trap dirt between the magnet and the roof, acting like sandpaper when they shift. Always clean the roof first and choose coated magnets.

    2. Can I use adhesive hooks in freezing temperatures?

    Most adhesives do not bond well below 40°F (4°C). If you are installing lights in late November or December when it is already cold, apply the hooks indoors or in a heated garage if possible, or wait for a warmer afternoon. Once cured, they can withstand freezing temps.

    3. What if my metal roof is aluminum?

    Aluminum is non-magnetic. You must use adhesive hooks, VHB tape, or clip-on eave clamps. Do not waste money on magnetic clips for aluminum roofs.

    4. How far apart should I space my light clips?

    For standard C9 bulbs, space clips 12–18 inches apart. For smaller mini-lights, you can space them 6–12 inches apart. Spacing them too far apart causes the wire to sag, which looks messy and puts stress on the attachment points.

    5. Is it safe to walk on a metal roof to hang lights?

    It is generally not recommended unless you have proper fall protection equipment (harnesses and anchors). Metal roofs are slippery, especially with dew or frost. Using a tall ladder with a stabilizer from the ground is often safer for single-story homes.

    6. Will removing adhesive hooks leave residue?

    If you use high-quality outdoor removable tape (like 3M Command Outdoor), residue should be minimal. If some remains, use a citrus-based adhesive remover or Goo Gone. Avoid scraping with metal tools, which will scratch the roof.

    Conclusion

    Learning how to hang Christmas lights on metal roof without gutters is entirely achievable with the right approach. Whether you choose the convenience of magnetic clips for steel roofs or the versatility of adhesive hooks for aluminum, the key is preparation and safety.

    By avoiding nails and screws, you protect your investment and ensure your roof remains leak-free for years to come. Remember to clean your surfaces, test your materials, and prioritize safety over speed.

    Now that you have the knowledge, it’s time to brighten up your home! Share this guide with friends who have modern homes, and tag us in your photos when your dazzling, gutter-free display is complete. Happy Holidays!

  • How High Should A Plumbing Vent Be Above The Roof?

    How High Should A Plumbing Vent Be Above The Roof?

    Have you ever heard that annoying gurgling sound from your toilet or noticed a slow-draining sink? These issues often point to a hidden culprit: improper ventilation. If you are tackling a roofing project or installing new pipes, knowing exactly how high should a plumbing vent be above the roof is critical for both compliance and functionality.

    Getting this measurement wrong isn’t just a code violation; it can lead to dangerous sewer gas leaks into your home or water siphoning out of your traps. In this guide, we will break down the specific height requirements, explain the “why” behind the rules, and provide actionable steps to ensure your plumbing system breathes correctly.

    The Golden Rule: Minimum Height Requirements

    When asking how high should a plumbing vent be above the roof, the answer depends largely on where you live in the United States. However, most local building codes are based on two major model codes: the International Plumbing Code (IPC) and the Uniform Plumbing Code (UPC).

    The 6-Inch Standard

    According to the International Plumbing Code (IPC), which is adopted by many states, a vent pipe must extend at least 6 inches (152 mm) above the roof surface. This is the absolute minimum.

    However, there is a catch. If your roof is used for purposes other than weather protection—such as a rooftop garden, patio, or walking area—the requirement jumps significantly. In these cases, the vent must extend at least 7 feet (2134 mm) above the roof level to prevent people from accidentally inhaling sewer gases.

    The Snow Line Factor

    If you live in a region with heavy snowfall, the 6-inch rule might not be enough. If snow accumulates deeper than 6 inches, your vent could become blocked, causing pressure buildup in your pipes.

    • Best Practice: Check your local historical snowfall data.
    • Recommendation: Extend the vent at least 12–18 inches above the expected maximum snow depth, or install a snow shield.

    Why Does Height Matter? The Science of Airflow

    You might wonder why we can’t just flush the vent flat against the roof. The answer lies in physics and public health. Plumbing vents serve two primary functions: equalizing pressure and expelling gases.

    Preventing Siphonage

    When water rushes down a drain, it creates a vacuum behind it. Without adequate air intake from the vent, this vacuum can suck the water out of your P-traps (the U-shaped pipe under sinks). Once the water seal is gone, sewer gases enter your home. A vent extending above the roof ensures it draws in fresh air rather than being blocked by debris or wind pressure.

    Dispersion of Sewer Gases

    Sewer gas contains methane, hydrogen sulfide, and other potentially harmful compounds. By extending the vent above the roofline, these gases are released into the upper atmosphere where they can dissipate safely, rather than lingering near windows or air intake units.

    For a deeper understanding of how ventilation systems protect indoor air quality, you can refer to general building science principles outlined on Wikipedia’s page on Building Ventilation.

    Critical Distance Rules: Windows and Air Intakes

    Height is not the only factor. Location matters just as much. Even if your vent is 10 feet high, it is useless if it is positioned directly below a window.

    The 10-Foot Horizontal Rule

    Most codes require that a plumbing vent terminal be located at least 10 feet (3 meters) horizontally away from any openable window, door, skylight, or air intake. This distance prevents sewer odors from being sucked back into the living space.

    Vertical Clearance

    If the vent is below a window or air intake, it must extend at least 2 feet (610 mm) above the top of that opening. This vertical buffer ensures that rising gases do not drift directly into fresh air sources.

    FeatureMinimum Distance Required
    Roof Surface6 inches (152 mm)
    Expected Snow LineAbove maximum depth
    Openable Windows/Doors10 feet (3 m) horizontal
    Air Intake Vents10 feet (3 m) horizontal
    Below Window/Skylight2 feet (610 mm) vertical

    Step-by-Step: Installing and Extending Your Vent

    If you are determining how high should a plumbing vent be above the roof for a new installation or repair, follow these concrete steps. Always prioritize safety and wear appropriate protective gear.

    1. Check Local Codes: Before cutting any pipes, call your local building department. Some municipalities have stricter rules than the standard IPC.
    2. Measure the Roof Pitch: On steep roofs, measuring vertical height can be tricky. Use a level to ensure your measurement is truly vertical, not along the slope of the shingles.
    3. Cut the Pipe: Using a hacksaw or reciprocating saw, cut the PVC or ABS vent pipe to the desired length. Remember to account for the fitting you will add on top.
      • Tip: If you need 6 inches above the roof, and your flashing adds 2 inches, cut the pipe so the total assembly reaches 6 inches.
    4. Install a Storm Collar: Slide a storm collar over the pipe. This rubber or metal ring helps seal the gap between the pipe and the roof flashing, preventing rain leaks.
    5. Attach the Vent Cap: Install a proper vent cap. Avoid cheap plastic caps that can crack in UV light. Look for caps with screens to keep birds and rodents out, but ensure the screen mesh is large enough not to clog with lint or dust.
    6. Seal and Secure: Apply roofing cement around the base of the flashing and secure the storm collar. Ensure the pipe is stable and won’t wobble in high winds.
    How High Should A Plumbing Vent Be Above The Roof

    Common Mistakes to Avoid

    Even professional plumbers can make errors when rushing. Here are the most frequent issues regarding vent height:

    • Ignoring Wind Effects: In high-wind areas, strong gusts can create positive pressure at the vent tip, forcing gases back down. If you live in a windy zone, consider using a perforated vent cap or increasing the height slightly to clear turbulence zones.
    • Using Reducers Incorrectly: Never reduce the size of the vent pipe as it goes through the roof. The diameter must remain consistent to maintain airflow capacity. A 3-inch pipe inside must remain 3 inches outside.
    • Blocking with Debris: Leaves and pine needles love to settle around vent pipes. If your vent is too low, it becomes a trap for debris. Regular maintenance checks are essential.

    FAQ: Quick Answers to Your Venting Questions

    1. Can I hide my plumbing vent inside the attic?

    No. Plumbing vents must terminate outdoors. Ending a vent in an attic, crawlspace, or inside the wall violates every major building code in the US. This creates a severe health hazard due to moisture buildup and gas accumulation.

    2. What if my roof is flat?

    For flat roofs, the 6-inch minimum still applies. However, because water pools on flat roofs, you must ensure the vent is high enough to stay dry during heavy rains. Some experts recommend 12 inches for flat roofs to prevent water splash-back from entering the pipe.

    3. Do I need a vent cap?

    Yes. While not always explicitly mandated by code, a vent cap is highly recommended. It prevents rain, snow, birds, and rodents from entering the pipe. Without a cap, nests can block the vent, causing the very drainage issues you are trying to avoid.

    4. Can I combine multiple vents into one?

    Yes, this is called “wet venting” or combining fixtures. However, the combined vent must be sized correctly according to the total fixture units connected to it. The height requirement above the roof remains the same (minimum 6 inches), but the diameter may need to increase.

    5. My vent is only 2 inches above the roof. Is this a problem?

    Yes. At 2 inches, rain splash, snow, or even heavy dew can bridge the gap and enter the pipe. More importantly, it may not provide sufficient clearance for proper air dispersion. You should extend it to meet the 6-inch minimum.

    6. Does the color of the vent pipe matter?

    For functionality, no. But for aesthetics and heat absorption, yes. White PVC is standard and reflects heat. Black ABS absorbs heat, which can help prevent freezing in cold climates but may degrade faster under intense UV exposure. Always use UV-resistant materials if the pipe is exposed.

    Conclusion

    Understanding how high should a plumbing vent be above the roof is more than just memorizing a number; it’s about ensuring the health and comfort of your home. By adhering to the 6-inch minimum rule (or higher for snow/walking surfaces) and maintaining proper distance from windows, you protect your family from sewer gases and keep your drains flowing smoothly.

    Remember, while DIY is empowering, plumbing codes vary by location. When in doubt, consult a licensed plumber or your local building inspector. A small adjustment now can save you from costly repairs and health hazards later.

    Found this guide helpful? Share it with your fellow DIY enthusiasts on social media to help them breathe easier!