Have you ever stared up at your home’s roof, wondering just how much material you actually need for a repair or replacement? It is a common dilemma for homeowners, as guessing wrong can lead to wasted money on excess shingles or dangerous delays due to shortages. Knowing how do you calculate the square footage of a roof is the critical first step in any roofing project, ensuring you budget correctly and hire contractors with confidence.
Why Accurate Roof Measurements Matter
Before we dive into the math, it is essential to understand why precision is non-negotiable. Roofing materials are expensive. Asphalt shingles, metal panels, and tiles are typically sold by the “square,” which is a industry term for 100 square feet. If you underestimate your needs, you risk color mismatches if you have to buy a second batch later. If you overestimate, you are throwing money away on returns or disposal fees.
Furthermore, accurate measurements protect you during contractor negotiations. Many homeowners rely solely on a roofer’s quote, but having your own baseline calculation prevents being upsold on unnecessary materials. According to industry standards, a precise measurement also helps in calculating the correct amount of underlayment, ice and water shield, and ventilation components required for a durable system.
Understanding the Difference: Floor Plan vs. Roof Area
A common mistake beginners make is assuming the roof’s square footage is the same as the home’s living area. This is rarely true. Your roof covers more than just the footprint of your house; it includes overhangs, eaves, and often extends beyond the exterior walls.
Additionally, the pitch (slope) of your roof significantly increases the surface area. A flat roof might closely match your home’s footprint, but a steeply pitched roof will have a much larger surface area. Ignoring the slope is the number one reason for calculation errors. To get an accurate number, you must account for both the horizontal footprint and the vertical rise.
Step-by-Step Guide: How Do You Calculate The Square Footage Of A Roof
Calculating your roof’s area doesn’t require a degree in engineering, but it does require attention to detail. Follow these steps to get a reliable estimate.
Step 1: Measure the Footprint
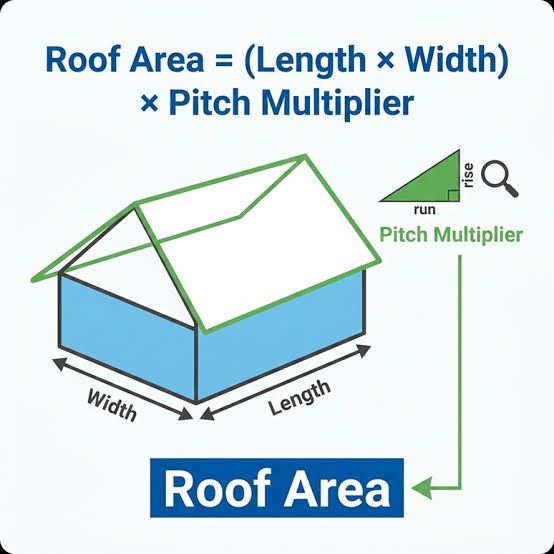
Start by measuring the length and width of your home from the ground. Use a laser measurer for accuracy, or a standard tape measure if necessary. Include any attached structures like garages or porches that share the same roofline.
- Length: Measure the longest side of the house.
- Width: Measure the widest side.
- Calculate Base Area: Multiply Length × Width.
Example: If your home is 40 feet long and 30 feet wide, your base footprint is 1,200 square feet.
Step 2: Account for Overhangs
Roofs rarely end exactly at the wall. Most have eaves that extend 1 to 2 feet beyond the exterior walls. To be safe, add 1 foot to each side of your length and width measurements before multiplying.
- Adjusted Length: 40 + 2 = 42 feet
- Adjusted Width: 30 + 2 = 32 feet
- New Base Area: 42 × 32 = 1,344 square feet
This small adjustment ensures you have enough material for the edges, which are crucial for water diversion.
Step 3: Determine the Roof Pitch
The pitch is the slope of the roof, expressed as a ratio of vertical rise to horizontal run (e.g., 6:12). This means for every 12 inches you go horizontally, the roof rises 6 inches vertically.
If you don’t know your pitch, you can estimate it:
- Place a level against the roof rake (edge) or in the attic against a rafter.
- Measure 12 inches along the level.
- Measure the vertical distance from the 12-inch mark to the roof surface.
If that vertical distance is 6 inches, your pitch is 6:12.
Step 4: Apply the Pitch Multiplier
Once you have the pitch, you need to apply a multiplier to your base area. This accounts for the extra surface area created by the slope. You can find these multipliers in standard roofing charts.
| Roof Pitch | Multiplier |
|---|---|
| 4:12 | 1.054 |
| 6:12 | 1.118 |
| 8:12 | 1.202 |
| 10:12 | 1.302 |
| 12:12 | 1.414 |
Using our example: If your pitch is 6:12, the multiplier is 1.118. Calculation: 1,344 sq ft (Base Area) × 1.118 = 1,502.59 square feet.
Step 5: Add Complexity Factors
Does your roof have dormers, chimneys, or valleys? These features add surface area and complexity. For simple gable roofs, the calculation above is usually sufficient. However, for complex roofs with multiple intersecting planes, it is best to break the roof into smaller rectangular sections, calculate each individually, and sum them up.
For a general DIY estimate, adding 10% to your total is a safe buffer for waste, cuts, and complex geometry.
Final Estimate: 1,502.59 × 1.10 = 1,652.85 square feet.
Converting Square Footage to Roofing Squares
In the roofing industry, materials are not sold by the square foot but by the “square.” One roofing square equals 100 square feet.
To find out how many squares you need:
- Take your total square footage (1,652.85).
- Divide by 100.
- Result: 16.53 squares.
Since you cannot buy partial bundles easily, you would round up to 17 squares. Always confirm with your supplier how many bundles make up a square, as this varies by material type (e.g., 3 bundles per square for standard asphalt shingles).
Tools and Technology for Modern Measurement
While manual calculation is reliable, technology has made the process easier and safer. You no longer need to climb a ladder with a tape measure.
- Satellite Imagery Apps: Tools like Google Earth or specialized roofing apps allow you to trace your roof’s perimeter digitally. These programs often include built-in pitch estimators.
- Laser Measurers: Handheld laser devices provide instant distance readings with high precision, reducing human error associated with tape measures.
- Drone Surveys: For large or complex commercial roofs, drones can create 3D models that provide exact surface areas.
For more information on traditional construction measurement standards, you can refer to resources on building measurement techniques to understand the historical context of these practices.
Common Mistakes to Avoid
Even with a guide, errors happen. Here are the most frequent pitfalls:
- Ignoring Waste Factor: Never order the exact calculated amount. Shingles need to be cut for hips, ridges, and valleys. A 10-15% waste factor is standard.
- Misidentifying Pitch: Guessing the pitch can lead to a 10-20% error in material costs. Always measure or check blueprints.
- Forgetting Accessories: Square footage only covers shingles. Don’t forget to calculate linear feet for ridge caps, drip edges, and flashing.
FAQ Section
1. Can I calculate roof square footage from inside the attic?
Yes, this is often safer and easier. Measure the length and width of the attic floor. Then, measure the rise of the rafters to determine the pitch. This method avoids the dangers of climbing onto the roof.
2. Does the chimney affect the square footage calculation?
Technically, yes, but the surface area of a chimney is negligible compared to the whole roof. Instead of subtracting it, most professionals leave it as part of the waste factor. It is better to have slightly too much material than too little.
3. What if my roof has multiple levels?
Treat each level as a separate rectangle. Calculate the square footage for each section individually using the steps above, then add them together. Ensure you apply the correct pitch multiplier for each section if they differ.
4. Is there a difference between “square feet” and “squares”?
Yes. “Square feet” is the actual area measurement. A “square” is a unit of measure used in roofing equal to 100 square feet. Always clarify which unit your contractor is using to avoid confusion.
5. How accurate are online roof calculators?
Online calculators using satellite data are generally within 5-10% accuracy. They are excellent for preliminary estimates but should not replace professional measurements for final material orders, especially for complex roofs.
Conclusion
Learning how do you calculate the square footage of a roof empowers you to take control of your home improvement projects. By measuring your footprint, accounting for overhangs, applying the correct pitch multiplier, and adding a waste factor, you can arrive at a highly accurate estimate. This knowledge not only saves money but also ensures your roof is installed with the right amount of material for maximum longevity.
Don’t let the math intimidate you. Take your time, double-check your numbers, and use the tools available to you. If you found this guide helpful, please share it with friends or family who might be planning their own roofing projects. Accurate information is the foundation of a successful home renovation!
Leave a Reply