Does your home’s exterior look tired, or have you noticed pests sneaking into your attic through gaps under the eaves? You are not alone; many homeowners struggle with deteriorating trim that compromises both aesthetics and structural integrity. Knowing how to install soffit and fascia on a gable roof is the key to solving these issues, sealing your home against moisture, and giving your property a crisp, finished look.
In this comprehensive guide, we will walk you through every step of the process. Whether you are a seasoned DIYer or a motivated beginner, this tutorial is designed to help you achieve professional results while saving money on labor costs.
Why Soffit and Fascia Matter for Your Gable Roof
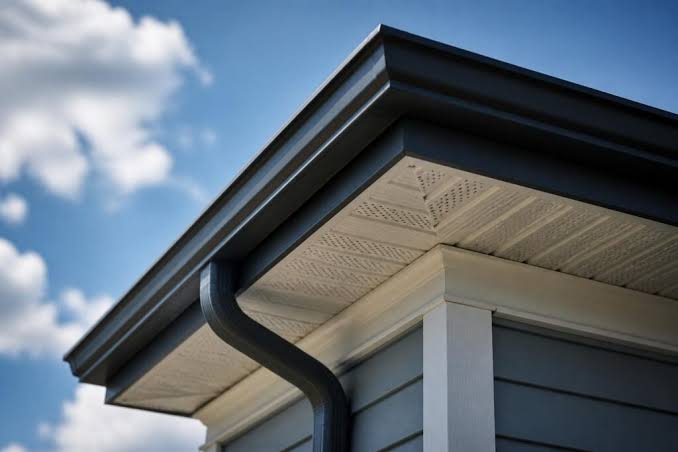
Before we pick up a hammer, it is crucial to understand what we are building. The fascia is the vertical board that runs along the lower edge of your roof, directly attached to the ends of the rafters. It supports the bottom row of tiles and carries the gutters. The soffit is the horizontal underside of the eave, bridging the gap between the siding and the fascia.
Together, they form a critical barrier. According to industry data, proper ventilation provided by soffits can reduce attic temperatures by up to 50°F in summer, significantly lowering cooling costs. More importantly, they prevent water intrusion, which is the leading cause of roof rot and mold growth.
For a deeper understanding of roof anatomy and terminology, you can refer to this resource on Roofing components.
Tools and Materials You Will Need
Preparation is half the battle. Having the right tools on hand ensures a smooth workflow and prevents mid-project trips to the hardware store.
Essential Tools:
- Tape measure and speed square
- Circular saw or miter saw (for precise cuts)
- Drill/driver with screw bits
- Chalk line
- Ladder (ensure it is stable and rated for your height)
- Safety gear: Gloves, safety glasses, and non-slip shoes
Materials:
- Fascia boards (typically 1×6 or 1×8 pressure-treated pine or aluminum)
- Soffit panels (vinyl or aluminum are popular for durability)
- F-channel (J-channel) for soffit support
- Corrosion-resistant screws (galvanized or stainless steel)
- Drip edge flashing
- Caulk (paintable, exterior grade)
Step 1: Removing Old Trim and Preparing the Surface
If you are replacing existing trim, start by carefully prying off the old fascia and soffit. Use a pry bar gently to avoid damaging the underlying rafters or siding. Once removed, inspect the rafter tails for signs of rot or insect damage.
Critical Check: If you find soft, spongy wood, you must cut out the damaged section and splice in new pressure-treated lumber. Installing new trim over rotten wood is a temporary fix that will fail quickly.
Clean the area thoroughly. Remove any old nails, debris, or peeling paint. A clean surface ensures that your new materials sit flush and secure.
Step 2: Installing the Drip Edge and F-Channel
Before installing the visible boards, you need to set up the foundation for water management and soffit support.
- Install Drip Edge: Place the metal drip edge along the top of the fascia line, under the roofing shingles if possible, or over the rafter tails. This directs rainwater away from the wood, preventing rot.
- Install F-Channel: Measure the distance from the house wall to the outer edge of the rafter. Cut aluminum or vinyl F-channel (also known as J-channel) to length. Screw this channel into the bottom of the rafters, about 1 inch from the wall. This channel will hold one side of your soffit panels.
Pro Tip: Ensure the F-channel is level. Use a chalk line to mark your screw positions across all rafters for a uniform look.
Step 3: Cutting and Installing the Soffit Panels
Soffit panels often come in 12-foot lengths. For a gable roof, you may need to cut these to fit between the F-channel and the fascia line.
- Measure and Cut: Measure the width of the eave. Subtract 1/4 inch to allow for thermal expansion (especially important for vinyl). Cut the soffit panels using a fine-toothed blade to prevent cracking.
- Insert Panels: Slide one end of the panel into the F-channel attached to the wall. Flex the panel slightly to snap the other end into place or prepare it for the fascia attachment.
- Secure the Panels: If your design requires screwing the soffit to the fascia (before the fascia board is fully closed), use corrosion-resistant screws. Do not overtighten; leave a tiny gap for expansion.
Ventilation Note: If your attic lacks adequate airflow, consider using vented soffit panels. Install them according to the manufacturer’s spacing guidelines, typically every few feet, to ensure consistent air intake.
Step 4: Installing the Fascia Boards
The fascia board covers the ends of the rafters and the edge of the soffit. It is the “face” of your eave.
- Cut to Length: Measure the length of each rafter tail section. For gable roofs, you may need to miter-cut the corners where the fascia meets the gable end. A 45-degree angle usually provides a clean joint.
- Positioning: Hold the fascia board against the rafter tails. It should cover the edge of the soffit panel and align with the bottom of the drip edge.
- Fastening: Use two screws per rafter tail to secure the fascia. Pre-drill holes if using hardwood to prevent splitting. Ensure the board is straight and tight against the soffit.
| Material Type | Pros | Cons | Best For |
|---|---|---|---|
| Vinyl | Low maintenance, rot-proof | Can crack in extreme cold | Budget-friendly DIY |
| Aluminum | Durable, lightweight, paintable | Can dent easily | Coastal areas |
| Wood | Classic look, easy to cut | Requires painting, prone to rot | Historic homes |
Step 5: Finishing Touches and Sealing
Once all boards are installed, step back and inspect your work. Look for gaps, uneven lines, or exposed screw heads.
- Caulking: Apply a bead of exterior-grade caulk along the top edge of the fascia where it meets the roof deck (if visible) and at any corner joints. This prevents water from seeping behind the trim.
- Painting: If you used wood or primed aluminum, now is the time to paint. Use high-quality exterior paint to seal the wood and match your home’s color scheme. Two coats are recommended for longevity.
- Gutter Reattachment: If you removed gutters, reattach them to the new fascia board using sturdy hangers. Ensure they slope slightly toward the downspouts for proper drainage.
FAQ Section
1. Can I install soffit and fascia without removing the roof shingles?
Yes, in most cases. You can install new fascia and soffit without disturbing the shingles. However, if the drip edge is damaged or missing, you may need to lift the bottom row of shingles slightly to insert the new drip edge properly. Be cautious not to crack the shingles.
2. What is the best material for soffit and fascia in humid climates?
In humid or coastal climates, vinyl or aluminum is highly recommended. Wood is prone to rot and termite damage in high-moisture environments. Vinyl resists moisture entirely, while aluminum does not rust if properly coated.
3. How do I ensure proper attic ventilation with soffits?
Ensure that the soffit vents are not blocked by insulation inside the attic. Use baffles (chutes) to keep insulation away from the eaves. Additionally, calculate the required net free vent area based on your attic square footage—typically 1 square foot of ventilation for every 150 square feet of attic floor space.
4. Do I need a permit to replace soffit and fascia?
Regulations vary by location. In many US jurisdictions, minor repairs like replacing soffit and fascia do not require a permit. However, if you are altering the structure or changing the ventilation system significantly, check with your local building department. Always prioritize local code compliance.
5. Why is my new soffit buckling?
Buckling is usually caused by improper installation regarding thermal expansion. Vinyl and aluminum expand and contract with temperature changes. If you screw the panels too tightly or fail to leave the recommended 1/4-inch gap in the channels, the material has nowhere to go but outward, causing warping.
Conclusion
Learning how to install soffit and fascia on a gable roof is a rewarding project that enhances your home’s value and protection. By following these steps—preparing the surface, installing the F-channel, fitting the soffit, and securing the fascia—you create a durable barrier against the elements.
Remember, patience and precision are your best tools. Take your time with measurements, ensure proper ventilation, and seal everything tightly. Your future self will thank you when you see lower energy bills and a beautiful, well-maintained exterior.
Did you find this guide helpful? Share it with your friends on Facebook or Pinterest who might be tackling their own home improvement projects! If you have questions or tips of your own, leave a comment below—we love hearing from our community.
Leave a Reply