Category: homeowner roofing guide

  • Stop Roof Damage: Get Rid of Woodpeckers Now

    Stop Roof Damage: Get Rid of Woodpeckers Now

    Have you ever woken up to the relentless tap-tap-tap echoing through your attic, only to realize a feathered intruder is treating your home like its personal drum set? It is frustrating, loud, and potentially damaging to your property. If you are wondering how to get rid of a woodpecker on my roof, you are not alone; thousands of homeowners face this noisy nuisance every spring and fall.

    Woodpeckers are protected by federal law in the United States under the Migratory Bird Treaty Act, which means lethal force or trapping without a permit is illegal. Therefore, the solution lies in effective, humane deterrents that encourage the bird to move elsewhere. In this guide, we will explore science-backed strategies to protect your roof, silence the noise, and restore peace to your home without harming these fascinating birds.

    Why Is a Woodpecker Pecking at My Roof?

    Before implementing solutions, it is crucial to understand the why. Woodpeckers do not peck at roofs out of malice; they are driven by specific biological instincts. Identifying the motive helps you choose the right deterrent.

    1. Foraging for Food

    Your roof or siding may harbor insects. Carpenter bees, termites, or larvae living under the eaves or in the wood trim are a delicacy for woodpeckers. If you see small, irregular holes, the bird is likely hunting.

    2. Drumming for Communication

    “Drumming” is a non-vocal form of communication used to establish territory and attract mates. Unlike foraging, drumming creates rapid, rhythmic bursts of sound. They prefer resonant surfaces, and unfortunately, hollow vinyl siding, metal gutters, or loose roof shingles create the perfect echo chamber.

    3. Roosting or Nesting

    If you notice a large, round hole, the bird may be attempting to excavate a nest cavity. This usually happens in softer woods or decaying sections of your roof structure.

    Expert Insight: According to ornithological studies, woodpeckers can strike a tree up to 20 times per second. This force, equivalent to hitting a wall at 15 mph, can quickly compromise roofing materials if left unchecked.

    Immediate Visual Deterrents That Work

    Visual scares are the first line of defense. Woodpeckers are wary of predators and sudden movements. However, they are also intelligent and can habituate to static objects quickly. Rotation is key.

    Reflective Objects

    Shiny, moving objects disorient birds and mimic the eyes of predators.

    • Aluminum Foil Strips: Hang strips of aluminum foil from the eaves. The wind causes them to flutter and reflect sunlight, creating an unpredictable visual environment.
    • Old CDs or DVDs: String these together near the problem area. The rainbow reflection is highly effective during sunny days.
    • Reflective Tape: Specialized bird scare tape is available commercially. It combines visual flash with a crinkling sound when the wind blows.

    Predator Decoys

    Plastic owls, hawks, or snakes can work, but only if moved regularly. A static plastic owl becomes part of the scenery within 48 hours.

    • Tip: Move the decoy to a different spot on the roof or porch every two days.
    • Enhancement: Add realistic movement by attaching the decoy to a spring-loaded mount so it bobs in the wind.

    How To Get Rid Of A Woodpecker On My Roof

    Physical Barriers: The Most Effective Long-Term Solution

    If visual deterrents fail, physical exclusion is the gold standard. This method prevents the woodpecker from accessing the specific surface it targets.

    Bird Netting

    Netting is highly effective for covering large areas like eaves or entire roof sections.

    1. Measure the Area: Determine the square footage of the affected zone.
    2. Choose the Right Mesh: Use netting with a mesh size of no more than 3/4 inch to prevent the bird from getting stuck or reaching through.
    3. Installation: Attach the netting to the roofline using hooks or clips. Ensure there is a gap of at least 3 inches between the netting and the roof surface. This gap prevents the bird from landing on the roof through the net.

    Metal Flashing

    For localized damage, such as a specific beam or corner where the bird drums, cover the area with sheet metal or hardware cloth. Woodpeckers cannot peck through metal, and the change in texture and sound often discourages them.

    Auditory and Taste Repellents

    Sometimes, you need to attack the problem from multiple sensory angles.

    Sound Deterrents

    • Distress Calls: Playing recorded woodpecker distress calls can signal danger. However, use this sparingly to avoid disturbing neighbors.
    • Wind Chimes: Heavy metal wind chimes create unpredictable noises that can disrupt the rhythmic drumming pattern woodpeckers seek.

    Taste Repellents

    If the bird is foraging for insects, making the surface taste bad can help.

    • Hot Pepper Spray: Mix water with cayenne pepper or capsaicin-based sprays. Apply this to the affected wood trim (test on a small area first to ensure it doesn’t stain).
    • Note: Taste repellents wash away with rain and need frequent reapplication. They are less effective for drumming, as the bird is not eating the surface.

    Addressing the Root Cause: Insect Control

    If your woodpecker problem is driven by hunger, no amount of shiny tape will solve it permanently. You must eliminate the food source.

    Sign of InfestationLikely PestAction Required
    Small, round holes in woodCarpenter BeesApply insecticidal dust into holes
    Mud tubes on foundation/sidingTermitesProfessional extermination required
    Sawdust piles near eavesCarpenter AntsUse bait stations and seal entry points

    For severe infestations, consult a licensed pest control professional. Eliminating the insects removes the primary motivation for the woodpecker to return. For more information on common wood-boring insects, you can refer to this Wikipedia article on Woodpeckers which details their ecological role and feeding habits.

    Legal Considerations and Ethical Removal

    It is vital to remember that woodpeckers are protected species.

    • Do Not: Trap, poison, or shoot woodpeckers.
    • Do Not: Destroy active nests with eggs or chicks. This is a federal offense.
    • Do: Focus on exclusion and harassment techniques before nesting season begins (early spring).

    If a woodpecker has already established a nest, you must wait until the fledglings have left the nest (usually late summer) before sealing any holes. Sealing a hole with babies inside is illegal and inhumane.

    FAQ: Common Questions About Woodpecker Removal

    1. Will mothballs keep woodpeckers away?

    While some homeowners swear by mothballs, their effectiveness is anecdotal and limited. The smell may deter birds temporarily, but mothballs contain naphthalene or paradichlorobenzene, which are toxic chemicals. They are not recommended for outdoor use due to environmental contamination and potential harm to pets and children.

    2. How long does it take for deterrents to work?

    There is no fixed timeline. Some woodpeckers may leave within 24 hours of seeing reflective tape, while others may take two weeks of consistent harassment. Consistency is crucial. If you stop the deterrents too early, the bird will return.

    3. Can I use ultrasonic repellers?

    Ultrasonic devices emit high-frequency sounds intended to annoy pests. However, scientific evidence suggests they are largely ineffective against birds. Birds do not rely heavily on the frequency ranges targeted by these devices, and most experts consider them a waste of money for woodpecker control.

    4. What if the woodpecker is damaging my solar panels?

    Woodpeckers may peck at the edges of solar panels if insects are nesting underneath. Install mesh screening around the perimeter of the solar array to block access. This protects both the panels and the wiring from pecking damage.

    5. Is it safe to climb on my roof to install netting?

    Roof work can be dangerous. If your roof is steep, high, or slippery, hire a professional wildlife removal service or a roofer. Safety should always be your priority over DIY savings.

    Conclusion

    Dealing with a woodpecker on your roof is a test of patience, but it is entirely manageable. By understanding how to get rid of a woodpecker on my roof through a combination of visual deterrents, physical barriers, and insect control, you can protect your home without harming wildlife.

    Remember, the key is consistency. Rotate your visual scares, maintain your physical barriers, and address any underlying insect problems. With these steps, you can enjoy a quiet home and an intact roof.

    Found this guide helpful? Share it with your neighbors on Facebook or Twitter who might be dealing with similar noisy visitors. Let’s help each other keep our homes peaceful and woodpecker-free!
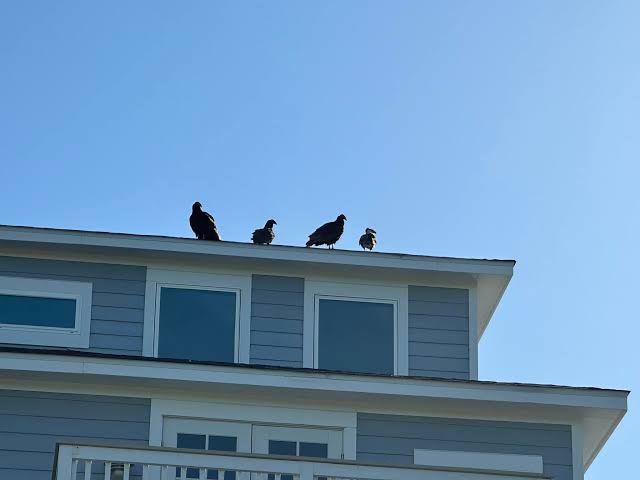
  • How to Get Rid of Vultures on Your Roof Fast

    How to Get Rid of Vultures on Your Roof Fast

    Have you ever looked up to see a massive, ominous shadow circling above, only to realize a vulture has claimed your rooftop as its personal lounge? It is more than just an eyesore; it can be a source of significant stress, hygiene concerns, and potential property damage. If you are asking yourself, “How do I get rid of vultures on my roof,” you are not alone, and there are effective, humane ways to reclaim your space.

    Vultures are protected by federal law in the United States, which means you cannot harm, trap, or kill them. However, this does not mean you have to live with them. By understanding their behavior and using strategic deterrents, you can encourage them to move on without violating the Migratory Bird Treaty Act. This guide will walk you through safe, legal, and effective methods to keep your roof vulture-free.

    Why Are Vultures Choosing My Roof?

    Before we dive into solutions, it is crucial to understand why they are there. Vultures, particularly Black Vultures and Turkey Vultures, are scavengers. They do not hunt live prey; they look for easy meals.

    If vultures are congregating on your roof, it is rarely random. They are likely attracted by one of three factors:

    1. Food Sources: Is there a nearby landfill, compost pile, or pet food left outside? Even a dead animal in your yard can act as a beacon.
    2. Safety and Visibility: Roofs offer a high vantage point to spot carrion while staying safe from ground predators.
    3. Roosting Habits: Once a few vultures start using a spot, others follow. They are social birds and prefer established roosting sites.

    According to the Cornell Lab of Ornithology, vultures have an exceptional sense of smell (especially Black Vultures) and sight. Removing the attractants is the first step in any successful deterrence strategy.

    Legal Considerations: What You Can and Cannot Do

    This is the most critical section of this guide. Many homeowners make the mistake of trying to shoot, poison, or trap vultures, which can lead to severe federal fines.

    The Migratory Bird Treaty Act

    In the U.S., vultures are protected under the Migratory Bird Treaty Act of 1918. This federal law makes it illegal to:

    • Kill vultures.
    • Capture or possess them without a permit.
    • Destroy their active nests or eggs.

    Note: While you cannot harm the birds, you are allowed to use harassment techniques to disperse them, provided no physical harm comes to the animals. Always check with your local state wildlife agency for specific regional regulations, as some states have additional protections.

    Proven Methods to Deter Vultures

    Now that we know the rules, let’s look at actionable strategies. The key to success is consistency and combining multiple methods.

    1. Visual Deterrents

    Vultures are wary of threats. You can exploit this fear by making your roof look dangerous or occupied by predators.

    • Decoy Predators: Place realistic owl or hawk decoys on your roof. Pro Tip: Move them every 2–3 days. Vultures are intelligent and will realize a stationary plastic owl is fake if it never moves.
    • Reflective Objects: Hang old CDs, aluminum foil strips, or specialized reflective tape. The flashing light disorients their vision and makes landing uncomfortable.
    • Eye-Spot Balloons: Large balloons with predatory eyes painted on them can be effective. The “staring” effect triggers an instinctual avoidance response.

    2. Physical Barriers

    If visual tricks fail, you need to make the physical act of landing difficult.

    • Bird Spikes: Install stainless steel or polycarbonate bird spikes along the ridges and edges of your roof. These do not hurt the birds but prevent them from finding a flat surface to perch on.
    • Slope Modifiers: Vultures prefer flat surfaces. If you have a flat roof section they favor, consider installing angled boards or netting to reduce usable landing space.
    • Wire Mesh: For chimneys or vents, use heavy-duty wire mesh to block entry points. Ensure the mesh is tight enough so they cannot squeeze through.

    3. Sound and Motion Activated Devices

    Technology can be a great ally in wildlife control.

    • Ultrasonic Repellers: These devices emit high-frequency sounds that are annoying to birds but inaudible to humans. Effectiveness varies, so look for models with good reviews.
    • Motion-Activated Sprinklers: If the vultures are landing on lower roof sections or gutters, a motion-activated water sprinkler can startle them. The sudden burst of water is harmless but highly effective at breaking their habit.
    • Distress Calls: Playing recorded vulture distress calls can signal danger. However, use this sparingly, as neighbors may find the noise disturbing, and birds may eventually habituate to it.

    Comparison of Deterrent Methods

    MethodCostEffectivenessMaintenance LevelBest For
    Visual DecoysLowModerateHigh (Move frequently)Small infestations
    Bird SpikesMediumHighLowRidge lines & edges
    Reflective TapeVery LowLow-ModerateMediumBudget-friendly options
    Motion SprinklersMediumHighMediumLower roofs/gutters
    Professional ExclusionHighVery HighVery LowPersistent problems
    How Do I Get Rid Of Vultures On My Roof

    Step-by-Step Guide to Clearing Your Roof

    If you have a current infestation, follow these steps to clear them out safely.

    1. Inspect the Area: Identify exactly where they are landing and look for any food sources nearby. Remove trash, secure compost bins, and bring pet food indoors.
    2. Choose Your Deterrents: Select a combination of visual and physical barriers. For example, use spikes on the ridge and reflective tape on the eaves.
    3. Install During Absence: Try to install deterrents when the vultures are not present (usually mid-day when they are soaring). If they are present, make loud noises (clapping, air horns) to scatter them before installing.
    4. Monitor and Adjust: Check your roof daily for the first week. If they return, change the location of your decoys or add a new deterrent type.
    5. Clean Up Safely: Vulture droppings are acidic and can carry bacteria. Wear a mask, gloves, and eye protection. Soak the area with a disinfectant solution before wiping it away to avoid inhaling dust.

    When to Call a Professional

    Sometimes, DIY methods are not enough. If you have a large colony, or if the vultures have nested (which is rare on residential roofs but possible in rural areas), you need expert help.

    Professional wildlife control operators have the permits and equipment to handle large-scale exclusions. They can also install industrial-grade netting or electrical tracking systems that are too complex for typical homeowners. Look for companies certified by the National Wildlife Control Operators Association (NWCOA).

    FAQ Section

    1. Will vinegar repel vultures?

    While vinegar is often cited as a general bird repellent due to its strong smell, there is little scientific evidence that it effectively deters vultures specifically. Vultures have a keen sense of smell, but they are driven more by the scent of carrion. Vinegar may mask odors temporarily, but it is not a reliable long-term solution compared to physical barriers.

    2. Can I use poison to get rid of vultures?

    No. Using poison is illegal under federal law and is extremely cruel. It can also harm other wildlife, pets, and even children. Furthermore, vultures play a vital ecological role by cleaning up carcasses; poisoning them disrupts the local ecosystem and can lead to secondary poisoning of other predators.

    3. Do vultures damage roofs?

    Yes, they can. Vulture droppings are highly acidic and can corrode roofing materials, paint, and metal fixtures over time. Additionally, their large size and weight can dislodge loose shingles or tiles. Their talons can also scratch soft roofing materials like wood shakes or asphalt shingles.

    4. How long does it take to get rid of vultures?

    It varies depending on the severity of the problem and the methods used. With consistent application of deterrents, you may see results in 1–2 weeks. However, if the site has been a long-term roost, it may take a month or more of persistent effort to break their habit. Consistency is key.

    5. Are vultures dangerous to humans?

    Vultures are generally not aggressive toward humans. They are scavengers, not predators. However, they can carry diseases such as salmonella and E. coli due to their diet of decaying matter. Their droppings can also pose health risks if inhaled or touched. It is best to avoid direct contact and clean any contaminated areas with proper protective gear.

    Conclusion

    Dealing with vultures on your roof is challenging, but it is entirely manageable with the right approach. Remember, the goal is exclusion and deterrence, not harm. By removing food sources, installing physical barriers like bird spikes, and using visual deterrents, you can make your roof an unappealing place for these scavengers.

    Always prioritize legal and humane methods. If the problem persists, do not hesitate to consult a licensed wildlife professional. A vulture-free roof means a cleaner, safer, and more peaceful home environment.

    Found this guide helpful? Share it with your neighbors on social media to help them protect their homes too! Together, we can manage wildlife conflicts responsibly and effectively.

  • Do You Need A Permit To Re Roof Your House?

    Do You Need A Permit To Re Roof Your House?

    Most homeowners dread the thought of bureaucratic red tape when planning a major home improvement project. You just want your leak fixed or your shingles updated, but the question “Do You Need A Permit To Re Roof Your House“ often halts progress before it begins. Navigating local building codes can feel overwhelming, but understanding these requirements is crucial for protecting your investment and ensuring your home remains safe and compliant.

    Why Most Roof Replacements Require a Permit

    The short answer is: Yes, in most cases, you do need a permit.

    While regulations vary significantly by municipality, county, and state across the US, the majority of jurisdictions require a building permit for a full roof replacement. This is not merely a way for local governments to generate revenue; it is a safety mechanism. Your roof is your home’s first line of defense against the elements, and improper installation can lead to structural damage, water intrusion, and even fire hazards.

    Building codes exist to ensure that roofing materials are installed correctly, that the underlying structure can support the weight of new materials, and that proper ventilation and flashing techniques are used. When you pull a permit, you are essentially inviting a third-party inspector to verify that the work meets minimum safety standards.

    The Risk of Skipping the Permit

    Many homeowners consider skipping the permit process to save time or money. However, this “shortcut” can lead to severe long-term consequences:

    • Voided Warranties: Most major roofing manufacturers (such as GAF, CertainTeed, and Owens Corning) will void their material warranties if the roof was installed without a proper permit and inspection.
    • Insurance Denials: If your new roof fails during a storm and you file a claim, your insurance company may request proof of permitted work. Without it, they may deny your claim entirely.
    • Resale Issues: When selling your home, unpermitted work can show up during inspections. This can delay closing, force you to pay for retroactive permits, or lower your home’s appraised value.
    • Fines and Penalties: Local building departments can issue hefty fines for unpermitted work. In some cases, you may be forced to remove the new roof to allow for inspection of the decking underneath.

    Factors That Determine Permit Requirements

    Not every roofing job is treated equally. Several factors influence whether your specific project requires a permit. Understanding these nuances can help you prepare for conversations with your local building department.

    1. Scope of Work: Repair vs. Replacement

    There is a distinct difference between a repair and a replacement in the eyes of building codes.

    • Minor Repairs: Fixing a few missing shingles, replacing a small section of flashing, or sealing a minor leak typically does not require a permit. Most jurisdictions allow homeowners to repair up to a certain percentage of the roof (often 25% or less) without permitting.
    • Full Replacement: Stripping off the old roofing material down to the deck and installing new underlayment and shingles almost always requires a permit.
    • Overlaying: Installing new shingles over existing ones (known as a “roof-over”) may or may not require a permit, depending on local codes. However, many areas now prohibit overlaying more than two layers due to weight concerns.

    2. Structural Changes

    If your roofing project involves any structural modifications, a permit is mandatory. This includes:

    • Changing the pitch or slope of the roof.
    • Adding or removing skylights, chimneys, or vents.
    • Reinforcing rafters or trusses.
    • Converting an attic space into living area.

    3. Local Jurisdiction Rules

    Building codes are enforced at the local level. What applies in New York City may differ vastly from rural Texas.

    Location TypeTypical Permit StrictnessCommon Requirements
    Major CitiesVery HighDetailed plans, engineering stamps, multiple inspections.
    Suburban CountiesModerateStandard application, fee payment, final inspection.
    Rural AreasLow to ModerateMay only require notification or simple registration.

    To find your specific local requirements, you should visit your city or county’s official building department website. For a broader understanding of how building codes are standardized across the US, you can refer to resources like Wikipedia’s article on Building Codes, which explains the model codes (like the International Residential Code) that most localities adopt.

    Do You Need A Permit To Re Roof Your House

    How to Obtain a Roofing Permit: A Step-by-Step Guide

    If you determine that a permit is required, the process is generally straightforward. Here is how to navigate it efficiently.

    Step 1: Contact Your Local Building Department

    Start by visiting your local municipal or county building department’s website. Look for the “Permits” or “Building Services” section. Many jurisdictions now offer online applications, which can speed up the process significantly.

    Step 2: Gather Required Documentation

    You will typically need to provide:

    • Property Address and Legal Description: Found on your deed or tax bill.
    • Contractor Information: If hiring a pro, their license number and insurance details.
    • Scope of Work Description: A brief summary of what will be done (e.g., “Remove existing asphalt shingles, replace plywood decking where damaged, install new synthetic underlayment and architectural shingles”).
    • Material Specifications: Types of shingles, underlayment, and flashing to be used.

    Step 3: Pay the Permit Fee

    Permit fees vary widely. In some small towns, the fee might be $50–$100. In larger cities, it could range from $200 to $500 or more, sometimes calculated based on the square footage of the roof or the total project cost.

    Step 4: Schedule Inspections

    Once the permit is issued, you must schedule inspections. Typically, there are two key inspection points:

    1. Deck Inspection: After the old roof is removed but before new materials are installed. The inspector checks the wood decking for rot or damage.
    2. Final Inspection: After the roof is completely finished. The inspector ensures proper nailing patterns, flashing, and cleanup.

    Note: Do not cover up the deck until the initial inspection is passed. Failing to do so can result in having to tear off the new roof to expose the deck for inspection.

    Who Should Pull the Permit: You or Your Contractor?

    This is a common point of confusion. Generally, there are two scenarios:

    Scenario A: You Hire a Licensed Contractor

    In most cases, your contractor should pull the permit. Professional roofing companies are familiar with local codes and have established relationships with building inspectors. They include the permit cost in their overall quote.

    • Benefit: It transfers the liability and administrative burden to the professional.
    • Caution: Always verify that the permit has actually been pulled. Ask to see the permit card or number. If a contractor says, “Don’t worry about the permit, it saves you money,” this is a major red flag.

    Scenario B: You Are DIY-ing the Project

    If you are doing the work yourself, you must pull the permit as the homeowner. You will be responsible for scheduling inspections and ensuring the work meets code. Be honest with the building department about your DIY status; they may offer additional guidance or require more frequent inspections to ensure safety.

    Cost Breakdown: Is the Permit Worth It?

    Let’s look at the financials. While a permit adds an upfront cost, it protects your much larger investment.

    • Average Permit Cost: $150 – $500
    • Average Roof Replacement Cost: $8,000 – $25,000+
    • Cost of Unpermitted Work Risks: Potential fines ($500–$5,000), voided warranty ($0 value), reduced home value (thousands).

    As you can see, the permit fee is a small insurance premium against catastrophic financial loss. It ensures that your $15,000 roof is actually worth $15,000.

    FAQ Section

    1. Can I get a permit after the roof is already installed?

    Yes, this is called a “retroactive permit.” However, it is more expensive and complicated. The inspector may require you to remove sections of the new roof to inspect the decking and underlayment. It is always better to get the permit before work begins.

    2. Does changing the color of my shingles require a permit?

    No. Simply changing the aesthetic color of your shingles does not require a permit, provided you are not changing the material type or weight significantly. However, if you are replacing the shingles entirely, the replacement itself requires a permit, regardless of color.

    3. How long does it take to get a roofing permit?

    In many jurisdictions, roofing permits are issued “over the counter” or instantly online if the paperwork is complete. In busier cities, it may take 3–10 business days for review. Always check with your local department for current processing times.

    4. What happens if my roof fails inspection?

    If you fail an inspection, the inspector will provide a list of corrections needed (e.g., “insufficient nailing,” “improper flashing”). You must fix these issues and schedule a re-inspection. There is usually no extra fee for the first re-inspection, but subsequent failures may incur additional costs.

    5. Do HOA rules replace building permits?

    No. Homeowners Association (HOA) rules and building permits are separate. You may need HOA approval for the appearance of your roof (color, style), but you still need a building permit from the city/county for the structural and safety aspects of the installation. You often need both.

    Conclusion

    So, do you need a permit to re roof your house? For the vast majority of full replacements, the answer is a definitive yes. While it adds a step to your project timeline, it is a critical safeguard for your home’s integrity, your insurance coverage, and your future resale value.

    Don’t let the bureaucracy discourage you. View the permit process as a quality control check that ensures your new roof will protect your family for decades to come. Always consult with your local building department and choose reputable contractors who prioritize compliance.

    Found this guide helpful? Share it with your neighbors on Facebook or Twitter to help them avoid costly roofing mistakes!

  • Do Metal Roofs Increase Home Value? Roof Color Matters

    Do Metal Roofs Increase Home Value? Roof Color Matters

    Have you ever stood in front of your house, looking up at your aging shingles, and wondered if a switch to metal would actually pay off when it’s time to sell? It is a common dilemma for homeowners who want to invest wisely without overspending on features that buyers might not appreciate. Understanding do metal roofs increase home value color of the roof plays a critical role in this decision can help you maximize your return on investment while enhancing your home’s aesthetic appeal.

    In this guide, we will break down the financial benefits of metal roofing, explain why color choice is not just about personal preference, and provide actionable advice to help you make the best decision for your property.

    The Financial Impact: Does a Metal Roof Really Boost Value?

    When considering a major home improvement project, the first question is always about the bottom line. Unlike interior renovations like kitchen remodels, which can be subjective, a new roof is a structural necessity that buyers immediately notice.

    High Return on Investment (ROI)

    According to recent real estate data, installing a metal roof can yield a significant return on investment. While traditional asphalt shingles typically recoup about 60-70% of their cost upon resale, metal roofs often see a recoup rate of 85% or higher. In some high-end markets, this number can climb even further.

    Why is this? Because buyers perceive metal roofs as a “lifetime” solution. They understand that they won’t need to replace the roof again for decades, which is a massive selling point.

    Longevity Equals Value

    A standard asphalt shingle roof lasts 15–20 years. A quality metal roof, however, can last 40–70 years. This longevity translates directly into perceived value. When a home inspector notes a 5-year-old standing seam metal roof, it removes a major contingency from the buyer’s mind, potentially speeding up the sale process.

    Expert Insight: Real estate agents often report that homes with newer metal roofs spend fewer days on the market. The durability signal reduces buyer anxiety about immediate maintenance costs.

    Why Roof Color Is Critical for Resale Value

    Many homeowners make the mistake of thinking all metal roofs look the same. However, the color of your roof can significantly influence both energy efficiency and curb appeal, two factors that directly impact home value. This is where the query “do metal roofs increase home value color of the roof” becomes highly relevant.

    The Psychology of Curb Appeal

    First impressions matter. A roof covers approximately 40% of your home’s visible exterior. If the color clashes with your siding or looks dated, it can detract from the home’s overall value. Conversely, a harmonious color palette creates a cohesive, high-end look that attracts buyers.

    • Neutral Tones: Colors like charcoal, slate gray, and bronze are timeless. They appeal to the broadest range of buyers because they complement various architectural styles, from modern farmhouses to traditional colonials.
    • Bold Choices: While red or blue roofs might suit your personality, they can limit your buyer pool. Niche colors may require a specific buyer who loves that aesthetic, potentially lowering the final offer price.

    Energy Efficiency and Cooling Costs

    The color of your metal roof affects its thermal performance. Lighter colors reflect more sunlight, keeping your attic cooler in summer. Darker colors absorb heat, which can be beneficial in colder climates but detrimental in hot regions like Arizona or Texas.

    For US homeowners, energy efficiency is a growing priority. A roof color that helps lower utility bills is a tangible selling point that can be highlighted in listings.

    Roof ColorSolar ReflectanceBest ClimateImpact on Value
    White/Light TanHighHot/SunnyIncreases value via energy savings
    Charcoal/BlackLowCold/NorthernClassic look; neutral appeal
    Slate GrayMediumMixed/TemperateHighest resale versatility
    Forest GreenMediumRural/WoodedNiche appeal; good for cabins
    Do Metal Roofs Increase Home Value Color Of The Roof

    How to Choose the Right Color for Maximum ROI

    Choosing the right color isn’t just about picking your favorite shade. It requires a strategic approach to ensure it enhances your home’s marketability. Here is a step-by-step guide to selecting the optimal color.

    Step 1: Analyze Your Home’s Architecture

    Look at the style of your home. A Victorian home might look stunning with a deep burgundy or copper tone, while a mid-century modern home pairs best with sleek blacks or grays. Aligning the roof color with the architectural era ensures authenticity, which buyers appreciate.

    Step 2: Consider Your Geographic Location

    As mentioned earlier, climate plays a role. If you are selling in a hot state, opt for lighter colors or “cool roof” certified pigments. These specialized coatings reflect infrared light, reducing cooling loads by up to 20%. You can read more about the science of solar reflectance on Wikipedia’s page on Cool Roofs.

    Step 3: Test Samples in Natural Light

    Paint chips look different indoors than they do under the sun. Order large physical samples of your top three color choices. Attach them to your roofline and observe them at different times of the day—morning, noon, and dusk. Note how they interact with your brick, stone, or siding.

    Step 4: Check HOA Guidelines

    If you live in a community with a Homeowners Association, check their covenants before falling in love with a specific color. Violating HOA rules can lead to fines and force you to repaint before selling, eating into your profits.

    Comparing Metal Roofing to Traditional Options

    To truly understand the value proposition, let’s compare metal roofing against the most common alternative: asphalt shingles.

    Durability and Maintenance

    • Metal Roofs: Resistant to fire, wind, and hail. They do not crack or curl. Maintenance is minimal, usually requiring only an annual rinse.
    • Asphalt Shingles: Prone to wind damage and algae growth. They require periodic inspections and may need replacement every 15 years.

    Aesthetic Versatility

    Modern metal roofing comes in various profiles, including shakes, tiles, and standing seams. This means you can get the look of slate or clay tile without the weight or fragility. This aesthetic flexibility allows you to upgrade the look of luxury without the associated maintenance costs, a huge plus for potential buyers.

    Environmental Appeal

    Today’s US homebuyers are increasingly eco-conscious. Metal roofs are often made from 25-95% recycled content and are 100% recyclable at the end of their life. Asphalt shingles, on the other hand, contribute significantly to landfill waste. Highlighting the sustainability of your metal roof can be a unique selling proposition in competitive markets.

    Frequently Asked Questions (FAQ)

    1. Will a dark-colored metal roof make my house hotter?

    It depends on the coating. Modern metal roofs often come with reflective pigments even in darker shades. While a black roof will absorb more heat than a white one, the air gap between the metal and the roof deck (if installed with battens) provides ventilation that mitigates heat transfer. Always look for ENERGY STAR® rated products.

    2. Does the type of metal affect home value?

    Yes. Standing seam aluminum or steel roofs are generally perceived as higher quality than corrugated galvanized steel. Copper and zinc roofs are considered luxury items and can significantly boost value in high-end neighborhoods, though the initial cost is much higher.

    3. Can I paint my existing metal roof to change the color before selling?

    Yes, but it must be done professionally using coatings designed for metal adhesion. A poorly painted roof can look cheap and deter buyers. If the existing finish is fading, a professional recoat can restore curb appeal and protect the metal, adding value.

    4. How long does it take to install a metal roof?

    For an average-sized single-family home, installation typically takes 3 to 5 days. This is comparable to asphalt shingle installation but results in a product that lasts three times longer. Minimal disruption is a selling point for buyers who may be living in the home during the process.

    5. Is a metal roof noisy during rain?

    This is a common myth. When installed correctly with solid sheathing and proper insulation, a metal roof is no noisier than an asphalt roof. In fact, many homeowners find the sound of rain on metal to be soothing. Ensuring your contractor uses adequate underlayment is key to noise reduction.

    6. Does insurance cover metal roofs better?

    In many cases, yes. Because metal roofs are fire-resistant and durable against wind and hail, many insurance companies offer discounts on premiums. You can mention these potential savings to buyers as an ongoing cost benefit.

    Conclusion

    So, do metal roofs increase home value color of the roof matters? Absolutely. A metal roof is one of the few home improvements that offers a high return on investment, primarily due to its longevity, durability, and low maintenance requirements. However, the color you choose acts as the finishing touch that ties the entire exterior together.

    By selecting a neutral, climate-appropriate color, you maximize curb appeal and attract a broader range of buyers. Remember, you are not just buying a roof; you are buying peace of mind for the next owner. That peace of mind has a price tag, and it’s one that US homebuyers are willing to pay.

    If you found this guide helpful, please share it with friends or family who are considering a roofing upgrade. Spreading knowledge helps everyone make smarter home investment decisions!

  • Metal Over Shingles: The Ultimate Guide

    Metal Over Shingles: The Ultimate Guide

    Have you ever looked up at your aging asphalt shingle roof and wondered if there was a faster, less messy way to replace it? Many homeowners face this dilemma, fearing the high cost and disruption of a full tear-off. You are likely asking yourself: Can you put a metal roof over an existing roof? The short answer is yes, but it requires careful planning and adherence to strict building codes to ensure longevity and safety.

    In this comprehensive guide, we will walk you through everything you need to know about installing metal roofing over shingles. We will cover the structural requirements, cost benefits, potential pitfalls, and step-by-step considerations to help you make an informed decision for your home.

    Is It Structurally Safe to Install Metal Over Shingles?

    Before diving into the aesthetics or cost savings, we must address the most critical factor: structural integrity. Your home’s framing was designed to hold a specific weight load. Adding a new layer of roofing material adds weight, even if metal is lighter than many other materials.

    Understanding the Weight Load

    Asphalt shingles typically weigh between 2.5 to 4 pounds per square foot. Standing seam metal roofs, by comparison, weigh only 1 to 1.5 pounds per square foot. This means that in many cases, replacing heavy shingles with light metal actually reduces the overall load on your roof structure. However, if you are leaving the old shingles in place, you are adding that 1–1.5 lbs/sq ft on top of the existing 3 lbs/sq ft.

    For most modern homes built after 1970, the framing can easily support this additional weight. However, older homes, particularly those with historical timber framing or previous water damage, may not be as robust.

    Expert Tip: Always hire a licensed structural engineer or a certified roofing contractor to inspect your attic and rafters before proceeding. They can determine if your roof deck can handle the combined load of two roofing systems.

    The Condition of the Existing Deck

    The “deck” is the wooden surface (usually plywood or OSB) that holds your shingles. If your current roof has soft spots, rot, or significant water damage, you cannot simply cover it up. Trapping moisture under a new metal roof will accelerate decay and lead to catastrophic failure within a few years. Any compromised sections of the deck must be replaced before installation begins.

    What Are the Benefits of Roofing Over Existing Shingles?

    Why do so many contractors and homeowners choose this method? The advantages go beyond just convenience. Here is a breakdown of why this approach is gaining popularity across the United States.

    1. Significant Cost Savings

    The most immediate benefit is financial. A full roof tear-off involves labor-intensive removal, dumpster rentals, and disposal fees. By skipping the tear-off, you can save between $1,000 and $2,500 depending on the size of your home and local landfill fees. Additionally, the installation process is faster, which reduces labor costs.

    2. Enhanced Insulation and Energy Efficiency

    Leaving the existing shingle layer in place creates an additional thermal barrier. This extra layer can improve your home’s R-value (resistance to heat flow), helping to keep your house cooler in summer and warmer in winter. When combined with proper ventilation strategies, this can lead to noticeable reductions in energy bills.

    3. Reduced Noise and Weather Protection

    During the installation process, your home remains protected from the elements. Since the old roof stays in place, there is no risk of rain leaking into your attic while workers are stripping the old material. Furthermore, the solid base of the old shingles can help dampen the sound of rain or hail hitting the metal panels, addressing a common concern among homeowners.

    4. Environmental Friendliness

    Roofing waste is a major contributor to landfills. According to the EPA, construction and demolition debris accounts for a significant portion of total waste generated in the US. By avoiding a tear-off, you keep tons of asphalt shingles out of the landfill, making this a more sustainable choice for eco-conscious homeowners.

    What Are the Risks and Drawbacks to Consider?

    While the benefits are appealing, it is not all smooth sailing. There are specific risks associated with “roof-over” installations that you must understand to avoid costly mistakes.

    FeatureTear-Off ReplacementRoof-Over Installation
    CostHigher (Labor + Disposal)Lower (No Disposal Fees)
    InspectionFull deck visibilityLimited visibility
    WarrantyOften longer/full coverageMay be voided or limited
    LongevityMaximum potential lifespanSlightly reduced due to heat trap
    Future RepairsEasier to diagnose leaksHarder to locate leak source

    Voided Manufacturer Warranties

    This is a critical point often overlooked. Many metal roofing manufacturers will void their warranty if their product is installed over more than one layer of existing roofing. Always read the fine print of your chosen metal brand. Some may allow it if specific underlayment and ventilation protocols are followed, while others strictly prohibit it.

    Trapped Moisture and Heat

    If the existing shingles are curled or uneven, they can create air pockets. Without proper ventilation, heat and moisture can get trapped between the two layers. This “greenhouse effect” can cause the wood deck to rot from the inside out, even if the metal roof looks perfect from the outside. Proper airflow is non-negotiable.

    Difficulty in Future Inspections

    If you develop a leak five years down the road, identifying the source becomes much harder. Water can travel laterally between the shingles and the metal before dripping into your attic. This makes repairs more complex and potentially more expensive in the long run.

    Can You Put A Metal Roof Over An Existing Roof

    How Is the Installation Process Different?

    Installing metal over shingles is not the same as installing it on a bare deck. The process requires specific techniques to ensure a flat, secure, and ventilated finish.

    Step 1: Preparation and Repair

    First, remove any loose shingles, protruding nails, or vent pipes that are no longer needed. Secure any loose shingles with roofing cement. Ensure the roof surface is as flat as possible.

    Step 2: Installing Furring Strips (Battens)

    You should never screw metal panels directly into old shingles. Instead, install horizontal or vertical furring strips (also known as battens). These are usually 1×4 or 2×4 wooden strips spaced 24 inches apart.

    • Why? Battens create a level surface over the uneven shingles.
    • Ventilation: They create an air channel between the old roof and the new metal, allowing heat and moisture to escape. This is crucial for preventing condensation buildup.

    Step 3: Adding Underlayment

    A high-quality synthetic underlayment should be installed over the battens or directly over the shingles (depending on the batten system used). This acts as a secondary water barrier. For more details on roofing materials and standards, you can refer to general construction guidelines on Wikipedia.

    Step 4: Panel Installation

    The metal panels are then screwed into the battens, not the deck. Use screws with rubber washers designed for metal roofing to prevent leaks. Ensure that the screws are driven straight and not over-tightened, which can damage the washer.

    Frequently Asked Questions (FAQ)

    1. Can I put a metal roof over two layers of shingles?

    Generally, no. Most building codes in the US limit roofing to two layers total. If you already have two layers of shingles, you must tear them off before installing metal. Even if code allows it, the unevenness and weight make it highly inadvisable.

    2. Will my homeowner’s insurance cover a roof-over installation?

    Most insurance companies accept metal roofs installed over shingles, provided the installation meets local building codes and manufacturer specifications. However, some insurers may offer lower premiums for a full tear-off because it eliminates the risk of hidden deck damage. Always check with your provider.

    3. Does installing metal over shingles affect resale value?

    Yes, positively. Metal roofs are known for their durability (40–70 years) and energy efficiency. As long as the installation is professional and disclosed properly, it can increase your home’s curb appeal and market value. Buyers appreciate the low maintenance aspect.

    4. How long does a metal roof last when installed over shingles?

    A properly installed metal roof can last 40 to 70 years. However, the underlying shingles will eventually degrade. While the metal protects them from rain, heat buildup can shorten the life of the organic materials beneath. The metal itself will remain intact, but the system’s overall performance relies on the initial condition of the shingles.

    5. Do I need a permit to install a metal roof over my existing roof?

    Yes, in almost all jurisdictions in the US, you need a building permit for re-roofing. The inspector will check the structural load and ensure the installation meets fire and wind resistance codes. Skipping permits can lead to fines and issues when selling your home.

    Conclusion

    So, can you put a metal roof over an existing roof? Absolutely. It is a viable, cost-effective, and environmentally friendly option for many homeowners. By saving on disposal costs and gaining an extra layer of insulation, you can upgrade your home’s protection without breaking the bank.

    However, success depends on execution. You must ensure your roof structure is sound, use furring strips for ventilation, and choose a metal manufacturer that supports this installation method. Never cut corners on inspection or preparation.

    If you are considering this upgrade, take the time to get multiple quotes from certified metal roofing specialists. Ask them specifically about their experience with roof-over installations and request references.

    Found this guide helpful? Share it with your friends on Facebook or Pinterest who might be contemplating their own roofing projects. Knowledge is power when it comes to protecting your biggest investment—your home!

  • Tile Roof Replacement Cost Guide 2026

    Tile Roof Replacement Cost Guide 2026

    Replacing a roof is one of the most significant investments a homeowner can make, often causing stress due to the uncertainty of final pricing. If you are currently researching how much does it cost to replace a tile roof, you are likely looking for clarity amidst varying quotes and hidden fees. This guide breaks down the real costs, helping you plan your budget with confidence and avoid unexpected financial surprises.

    Understanding the Average Cost of Tile Roof Replacement

    When planning a major home renovation, knowing the baseline numbers is crucial. In 2026, the national average cost to replace a tile roof in the United States typically ranges between $10,000 and $25,000, depending on the size of the home and the type of tile used. However, for larger estates or premium materials, this figure can easily climb to $30,000 or more.

    To give you a clearer picture, let’s look at the cost per square foot. On average, homeowners pay between $10 and $25 per square foot for a complete tile roof replacement. This includes both materials and labor. It is important to note that “square” in roofing terms refers to 100 square feet, so a 2,000-square-foot roof is actually 20 squares.

    Several factors influence where your project falls within this range:

    • Geographic Location: Labor rates in states like California or New York are significantly higher than in the Midwest.
    • Roof Complexity: Steep pitches, multiple chimneys, and skylights increase labor time and difficulty.
    • Material Choice: Natural clay tiles are generally more expensive than concrete alternatives.

    Clay vs. Concrete Tiles: Which Is More Affordable?

    One of the most common questions homeowners face is choosing between clay and concrete tiles. While both offer exceptional durability and aesthetic appeal, their price points differ notably.

    Concrete Tiles

    Concrete tiles are the most popular choice for modern tile roofs due to their balance of cost and performance. They are manufactured from sand, cement, and water, making them highly customizable in terms of color and shape.

    • Average Cost: $8 – $15 per square foot (installed).
    • Pros: Less expensive, wide variety of styles, durable.
    • Cons: Heavier than clay, may require additional structural support.

    Clay Tiles

    Clay tiles are the traditional choice, often seen in Mediterranean and Spanish-style architecture. They are fired in kilns, resulting in a natural, long-lasting finish that improves with age.

    • Average Cost: $12 – $25+ per square foot (installed).
    • Pros: Extremely durable (can last 100+ years), natural fire resistance, unique aesthetic.
    • Cons: Higher initial cost, fragile during installation, heavier.
    FeatureConcrete TilesClay Tiles
    Material CostLowerHigher
    Lifespan50–75 Years75–100+ Years
    WeightHeavyVery Heavy
    MaintenanceLowLow
    Best ForBudget-conscious durabilityHistoric/Luxury aesthetics

    Hidden Costs: What Else Affects the Price?

    The sticker price of the tiles themselves is only part of the equation. When calculating how much does it cost to replace a tile roof, you must account for several ancillary expenses that contractors may not highlight in initial estimates.

    1. Removal and Disposal of Old Roofing

    Before new tiles can be installed, the old roofing material must be removed. This process is labor-intensive and generates significant waste.

    • Cost: $1 – $5 per square foot.
    • Note: Tile is heavy and requires special disposal methods, which can increase dumpster fees compared to asphalt shingle removal.

    2. Structural Reinforcement

    Tile roofs are significantly heavier than asphalt shingles. If your home was originally built with a lighter roof in mind, your framing may need reinforcement to support the added weight.

    • Cost: $1,000 – $5,000+, depending on the extent of engineering required.
    • Tip: Always have a structural engineer inspect your attic before signing a contract if you are switching from shingles to tile.

    3. Underlayment and Flashing

    The underlayment is the waterproof barrier beneath the tiles. High-quality synthetic underlayment lasts longer than traditional felt paper but costs more. Similarly, flashing around vents, chimneys, and valleys must be replaced to prevent leaks.

    • Cost: $500 – $1,500 for high-grade materials.

    4. Permit Fees

    Most municipalities require permits for roof replacements to ensure compliance with local building codes.

    • Cost: $100 – $500, varying by city and county.
    How Much Does It Cost To Replace A Tile Roof

    The Installation Process: Step-by-Step

    Understanding the workflow helps you appreciate the labor costs involved. A professional tile roof replacement is not a DIY-friendly project due to the weight and precision required.

    1. Site Preparation: The crew sets up safety equipment, including scaffolding and harnesses. They protect landscaping and install dumpsters for debris.
    2. Tear-Off: Existing roofing materials are stripped down to the decking. Any rotten wood is identified and marked for replacement.
    3. Deck Repair: Damaged plywood or OSB sheathing is replaced to ensure a solid foundation.
    4. Underlayment Installation: A fresh layer of ice-and-water shield or synthetic underlayment is rolled out and secured. This is your primary defense against water intrusion.
    5. Flashing Installation: Metal flashing is installed around penetrations (vents, pipes) and in valleys where two roof planes meet.
    6. Tile Installation: Tiles are laid starting from the bottom edge (eave) and working upward. They are secured with nails or adhesive, depending on the pitch and local wind codes.
    7. Ridge Cap Installation: The peak of the roof is sealed with ridge caps, often mortared or mechanically fixed for wind resistance.
    8. Cleanup and Inspection: All debris is removed, and a final inspection ensures all tiles are secure and properly aligned.

    For more detailed information on roofing materials and their historical context, you can refer to Wikipedia’s entry on Roofing.

    Maintenance Tips to Extend Your Roof’s Lifespan

    Once you have invested in a new tile roof, proper maintenance ensures it lasts for decades. While tile is low-maintenance, it is not no-maintenance.

    • Annual Inspections: Hire a professional to walk the roof once a year. They can spot cracked tiles or loose flashing that you might miss from the ground.
    • Clean Gutters Regularly: Clogged gutters cause water to back up under the tiles, leading to rot in the decking. Clean them at least twice a year.
    • Trim Overhanging Branches: Trees can scratch tiles or drop heavy limbs during storms. Keep branches at least 10 feet away from the roof surface.
    • Walk Carefully: If you must go on the roof, step on the lower third of the tile where it overlaps the next row. Walking on the center or upper edge can crack the tile.

    Frequently Asked Questions (FAQ)

    1. How long does a tile roof last?

    A well-installed concrete tile roof can last 50 to 75 years, while clay tiles can last 75 to 100 years or more. This longevity often makes tile cheaper in the long run compared to asphalt shingles, which typically need replacement every 15–20 years.

    2. Can I install tile over my existing shingles?

    Generally, no. Most building codes prohibit installing tile over existing shingles due to weight concerns and the inability to properly inspect the decking. Additionally, the uneven surface of shingles can cause tiles to break. A full tear-off is usually required.

    3. Does a tile roof increase home value?

    Yes. A tile roof is considered a premium feature that boosts curb appeal and signals durability to potential buyers. Appraisers often recognize the extended lifespan of tile, which can positively impact your home’s resale value.

    4. Are tile roofs noisy during rain?

    No, this is a common myth. Because tile roofs are installed over solid decking and underlayment, they are just as quiet as any other roofing material. In fact, the mass of the tile can help dampen external noise like traffic or hail.

    5. What is the cheapest type of tile roof?

    Concrete tiles are the most affordable option in the tile category. While still more expensive than asphalt shingles, they offer a similar aesthetic to clay at a lower price point. Some manufacturers also offer “lightweight” concrete tiles that reduce structural reinforcement costs.

    6. Do I need special insurance for a tile roof?

    Most standard homeowners insurance policies cover tile roofs. However, because tile is brittle, some insurers may require an inspection before issuing a policy or may charge a slightly higher premium due to the cost of repair after hail damage. Always check with your provider.

    Conclusion

    Determining how much does it cost to replace a tile roof involves more than just picking a material; it requires understanding labor, structural needs, and long-term value. While the upfront cost of $10,000 to $25,000+ may seem steep, the durability, energy efficiency, and aesthetic appeal of tile roofing make it a wise investment for many homeowners.

    By choosing the right material—whether concrete for budget-friendliness or clay for luxury—and hiring a reputable contractor, you ensure your home is protected for generations. Don’t let the initial price tag deter you; consider the cost per year of service, where tile often outperforms cheaper alternatives.

    If you found this guide helpful, please share it on social media to help friends and family make informed decisions about their home improvements!

  • How Many Solar Panels Fit on My Roof?

    How Many Solar Panels Fit on My Roof?

    Have you ever looked at your electricity bill and wondered if your roof could actually power your entire home? It is a common question among homeowners looking to cut costs and reduce their carbon footprint. Determining exactly how many solar panels can I put on my roof is the critical first step in your solar journey, balancing physical space with energy needs.

    Understanding the Basics: Size Matters

    Before we dive into complex calculations, we need to establish a baseline. Not all solar panels are created equal. In the current US market, residential solar panels typically range from 15 to 20 square feet each.

    The most common standard panel size is approximately 65 inches by 39 inches (about 17.5 square feet). However, high-efficiency models might be slightly larger or smaller depending on the manufacturer.

    Why Panel Efficiency Counts

    Efficiency refers to how much sunlight a panel converts into electricity. Higher efficiency panels (20%+) produce more power per square foot. This means if you have a small roof, you might need fewer, more expensive high-efficiency panels to meet your energy goals compared to using standard, lower-efficiency modules.

    Calculating Your Available Roof Space

    The physical dimensions of your roof are the hard limit. You cannot install panels where there is no roof. However, “total roof area” is not the same as “usable solar area.”

    The Usable Area Rule of Thumb

    Professional installers rarely use 100% of your roof surface. Here is why:

    • Obstructions: Chimneys, vents, skylights, and HVAC units take up space.
    • Setbacks: Fire codes often require clear pathways (setbacks) along the edges of the roof and around obstacles for firefighter access.
    • Shading: Areas shaded by trees or neighboring buildings are inefficient for solar production.

    A good rule of thumb is that only 70–80% of your total roof area is usable for solar installations.

    Quick Calculation Example:

    If you have a 1,500 square foot roof:

    1. Calculate usable space: 1,500×0.75=1,1251,500×0.75=1,125 square feet.
    2. Divide by panel size: 1,125/17.5≈641,125/17.5≈64 panels.

    Note: This is a theoretical maximum. Your actual number will depend on your energy needs, which we will discuss next.

    Matching Panels to Your Energy Consumption

    Just because you can fit 64 panels doesn’t mean you should. The goal is to offset your electricity usage, not necessarily to cover every inch of shingle.

    Step 1: Check Your Kilowatt-Hours (kWh)

    Look at your past 12 months of electricity bills. Find your average monthly kWh usage. For example, the average US household uses about 899 kWh per month (according to the U.S. Energy Information Administration).

    Step 2: Determine System Size Needed

    To calculate the system size (in kilowatts, kW) you need: System Size (kW)=Monthly kWh UsageAverage Peak Sun Hours×30System Size (kW)=Average Peak Sun Hours×30Monthly kWh Usage​

    • Peak Sun Hours: This varies by location. Arizona might get 6 hours, while Washington might get 3.5 hours.
    • Example: If you use 900 kWh/month and live in an area with 4.5 peak sun hours: 9004.5×30=900135≈6.67 kW system4.5×30900​=135900​≈6.67 kW system

    Step 3: Convert kW to Number of Panels

    Most residential panels today are between 350 to 400 watts. Let’s assume you choose 400-watt panels. Number of Panels=System Size (Watts)Panel WattageNumber of Panels=Panel WattageSystem Size (Watts)​ 6,670 Watts400 Watts≈17 panels400 Watts6,670 Watts​≈17 panels

    So, while your roof could hold 64 panels, you only need 17 to cover your bill. This leaves plenty of room for future expansion or battery storage integration.

    How Many Solar Panels Can I Put On My Roof

    Roof Orientation and Tilt Impact

    The direction your roof faces significantly impacts how many panels you need to generate the same amount of power.

    Roof DirectionEfficiency ImpactNotes
    South-Facing100% (Baseline)Ideal for maximum sun exposure in the Northern Hemisphere.
    East/West-Facing~80-85%Good for morning/evening production; may require 15-20% more panels.
    North-Facing~60-70%Generally not recommended unless high-efficiency panels are used.

    If your roof is East-West facing, you might need to install more panels to achieve the same energy output as a South-facing roof. This is a crucial factor when asking, “How many solar panels can I put on my roof to meet my specific goals?”

    Structural Integrity and Weight Limits

    Solar panels are not heavy, but they do add load to your structure. A typical solar panel weighs about 40–50 pounds. When you add the racking system, the weight increases to roughly 2–4 pounds per square foot.

    Most modern roofs are built to handle this additional load. However, if your home was built before 1990, or if your roof is nearing the end of its life, you must have a structural engineer or a certified solar installer assess your roof’s integrity.

    Expert Tip: Never install solar panels on a roof that needs replacement within the next 5 years. Removing and reinstalling solar arrays to fix a leak or replace shingles is costly and inconvenient.

    Local Regulations and HOA Rules

    Even if your roof has space and structural strength, local laws may limit your installation.

    1. Permits: Every municipality has different building codes. Some require specific setbacks from the roof edge.
    2. HOA Restrictions: While many states have “solar rights” laws that prevent HOAs from banning solar, they may still dictate aesthetics, such as requiring black-on-black panels or hiding wiring.
    3. Grid Interconnection: Your local utility company may have limits on how much excess energy you can send back to the grid (net metering caps).

    For more detailed information on solar technology standards and safety, you can refer to resources like Wikipedia’s page on Photovoltaics, which provides a broad overview of the scientific principles behind solar energy generation.

    Cost vs. Benefit: Is More Always Better?

    Installing the maximum number of panels possible isn’t always the best financial decision.

    • Diminishing Returns: If you produce far more energy than you use, your utility company might not credit you at the full retail rate.
    • Upfront Cost: More panels mean higher initial investment.
    • Maintenance: Larger systems have more components that could potentially require maintenance.

    It is often smarter to right-size your system to cover 80–100% of your historical usage rather than maximizing roof coverage.

    Frequently Asked Questions (FAQ)

    1. Can I add more solar panels later if I need them?

    Yes, but it depends on your inverter capacity. If you have a string inverter, it may be maxed out. Microinverters or power optimizers make adding panels easier in the future. Always ask your installer about “future-proofing” your system.

    2. Do solar panels damage my roof?

    When installed correctly by licensed professionals, solar panels do not damage your roof. In fact, they can protect the shingles underneath from UV rays and weather elements. Proper flashing and sealing are key to preventing leaks.

    3. What if my roof is too small for the panels I need?

    If your roof space is limited, consider high-efficiency panels (like monocrystalline silicon). They produce more power per square foot. Alternatively, you can supplement with a community solar program or ground-mounted panels if you have yard space.

    4. How much weight can my roof hold?

    Most residential roofs can support an additional load of 20–30 pounds per square foot. Solar arrays typically add only 2–4 pounds per square foot. However, a professional assessment is mandatory to confirm your specific roof’s capacity, especially for older homes.

    5. Does snow affect how many panels I need?

    In snowy regions, solar production drops in winter. You may need to oversize your system slightly (add 10–15% more panels) to compensate for lower winter production and ensure you meet your annual energy goals.

    Conclusion

    Determining how many solar panels can I put on my roof is a blend of physics, geometry, and personal energy habits. While your roof’s physical dimensions set the upper limit, your electricity usage and local sun exposure determine the optimal number.

    By calculating your usable roof space, understanding your kWh needs, and considering orientation, you can design a system that maximizes savings without wasting space. Remember, the goal is energy independence and cost reduction, not just filling up your roof.

    Ready to go solar? Share this guide with friends who are curious about renewable energy, or leave a comment below with your roof’s approximate square footage—we’d love to help you estimate your potential!

  • Metal Roof vs Shingles: Which Is Cheaper?

    Metal Roof vs Shingles: Which Is Cheaper?

    Choosing the right roofing material is one of the most significant financial decisions a homeowner can make. It protects your largest asset from the elements while defining your home’s curb appeal. Many homeowners find themselves stuck in a dilemma, asking the critical question: is it cheaper to get a metal roof or shingles?

    The answer isn’t as simple as looking at the price tag at the hardware store. While asphalt shingles are famously affordable upfront, metal roofing offers durability that can save you money over decades. In this guide, we will dissect the true costs, longevity, and value proposition of both options to help you make an informed choice for your US home.

    Understanding the Upfront Costs: The Initial Price Tag

    When most people ask if metal or shingles are cheaper, they are referring to the installation cost. This is the “sticker shock” phase of any roofing project.

    Asphalt Shingles: The Budget-Friendly Entry Point

    Asphalt shingles remain the most popular roofing material in the United States, primarily due to their low initial cost. They are lightweight, easy to install, and widely available.

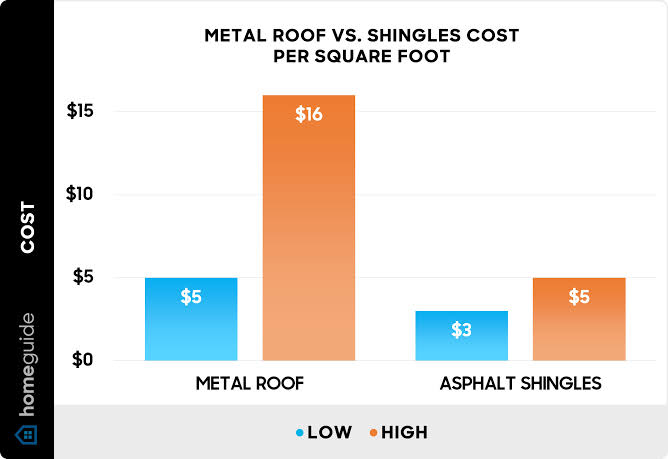
    • Average Cost: Between $3.50 and $5.50 per square foot installed.
    • Total Project Cost: For an average 2,000-square-foot home, you might pay between $7,000 and $11,000.

    The labor required for shingles is less specialized, which keeps contractor fees lower. Additionally, the materials themselves are mass-produced at a very low cost.

    Metal Roofing: The Premium Investment

    Metal roofing (including steel, aluminum, and copper) requires more specialized labor and higher-quality materials. The installation process is more complex, often requiring specific fasteners and underlayment systems to prevent noise and condensation.

    • Average Cost: Between $8.00 and $14.00+ per square foot installed.
    • Total Project Cost: For the same 2,000-square-foot home, expect to pay between $16,000 and $28,000.

    At first glance, metal appears to be two to three times more expensive than shingles. However, this is only half of the financial story. To truly understand which is cheaper, we must look beyond the installation day.

    Long-Term Value: Lifespan and Replacement Cycles

    This is where the math begins to shift in favor of metal. The concept of “cost per year” is far more accurate than “total installation cost.”

    The Lifespan Gap

    • Asphalt Shingles: Typically last 15 to 25 years, depending on climate and quality (3-tab vs. architectural). In hotter climates like Arizona or Texas, UV radiation can degrade them faster.
    • Metal Roofs: Can last 40 to 70 years. High-quality standing seam metal roofs often come with warranties of 50 years or more.

    The Replacement Factor

    If you choose asphalt shingles, you will likely need to replace your roof two or even three times during the lifespan of a single metal roof.

    Let’s do a quick calculation over a 50-year period:

    1. Metal Roof: One installation at $20,000. Total cost: $20,000.
    2. Asphalt Shingles: Three installations at $9,000 each (assuming slight inflation adjustments). Total cost: $27,000+.

    In this scenario, the metal roof becomes the cheaper option over time, despite the higher initial barrier. Furthermore, you avoid the hassle, debris, and potential interior damage associated with multiple tear-off projects.

    Is It Cheaper To Get A Metal Roof Or Shingles

    Maintenance and Repair Costs Over Time

    Beyond replacement, daily maintenance plays a role in the total cost of ownership.

    FeatureAsphalt ShinglesMetal Roofing
    Wind DamageProne to lifting/curling in high winds.Highly resistant to wind uplift.
    Impact ResistanceCan crack from hail or falling branches.Dents may occur, but rarely leaks.
    Moss/AlgaeSusceptible; requires cleaning/treatment.Resistant; rain usually cleans it.
    Repair ComplexityEasy to patch individual shingles.Harder to match panels; may require pro.

    While individual shingle repairs are cheap and DIY-friendly, metal roofs generally require less frequent attention. However, if a metal panel is severely damaged, repair costs can be higher because entire sections may need replacement to maintain aesthetic uniformity.

    Energy Efficiency: Hidden Savings on Utility Bills

    One often-overlooked factor in the “cheaper” debate is energy efficiency. Your roof acts as a massive solar collector, influencing your home’s internal temperature.

    Metal roofs reflect solar radiant heat rather than absorbing it. According to studies, this can reduce cooling costs by 10–25%. In states with hot summers, this translates to significant annual savings.

    Asphalt shingles, particularly darker ones, absorb heat. This increases the load on your air conditioning system. While cool-roof shingles exist, standard asphalt does not offer the same reflective properties as bare or coated metal.

    If you live in a warm climate, the monthly utility savings from a metal roof can help offset the higher initial investment within the first decade of ownership.

    Resale Value and Return on Investment (ROI)

    Does a new roof add value to your home? Absolutely. But buyers perceive metal and shingles differently.

    • Curb Appeal: Metal roofs are often associated with premium, modern, or rustic luxury homes. They can significantly boost curb appeal.
    • Buyer Confidence: A home with a 10-year-old metal roof is seen as having “zero future liability” for roofing. A home with a 10-year-old shingle roof is seen as needing replacement soon.

    Real estate data suggests that metal roofing can increase a home’s resale value by 1% to 6%. More importantly, it makes the property easier to sell. Buyers are willing to pay a premium for a home that won’t require a major capital expenditure immediately after purchase.

    For more detailed information on roofing materials and their historical usage, you can refer to Wikipedia’s entry on Roofing.

    Environmental Impact and Sustainability

    For eco-conscious homeowners, “cost” also includes environmental impact.

    • Asphalt Shingles: Are petroleum-based and contribute heavily to landfill waste. Approximately 11 million tons of asphalt shingle waste end up in US landfills annually. Recycling options exist but are not universally available.
    • Metal Roofing: Often contains 25–95% recycled content. At the end of its life, metal is 100% recyclable.

    Choosing metal reduces your carbon footprint and supports a circular economy. While this doesn’t put cash directly in your pocket today, it aligns with growing market trends and potential future green building incentives.

    FAQ: Common Questions About Roofing Costs

    1. Is metal roofing louder than shingles during rain?

    This is a common myth. When installed correctly with solid sheathing and proper insulation, a metal roof is no louder than an asphalt shingle roof. In fact, many homeowners report that the sound of rain on metal is soothing rather than disruptive.

    2. Will a metal roof interfere with my Wi-Fi or cell signal?

    Generally, no. Modern metal roofs do not block signals significantly more than other building materials. If you have issues, they are likely due to other structural factors. However, if you have a weak signal, a signal booster may be helpful regardless of roofing type.

    3. Can I install a metal roof over existing shingles?

    In many cases, yes. This is called a “retrofit” or “overlay.” It saves on tear-off costs and landfill fees. However, local building codes vary, and you must ensure the roof structure can support the additional weight (though metal is lightweight). Always consult a local professional.

    4. Do insurance companies offer discounts for metal roofs?

    Yes, many insurance providers offer discounts ranging from 5% to 15% for metal roofs. This is because metal is fire-resistant and withstands severe weather better than shingles, reducing the insurer’s risk of paying out claims.

    5. What is the cheapest type of metal roofing?

    Corrugated galvanized steel is typically the most affordable metal roofing option. It is durable and functional, though it may not have the sleek aesthetic of standing seam aluminum or zinc. It is a great middle-ground option for budget-conscious buyers wanting metal benefits.

    6. How does hail affect metal roofs compared to shingles?

    Hail can dent metal roofs, but it rarely punctures them. Asphalt shingles, however, can lose granules or crack under hail impact, leading to immediate leaks and reduced lifespan. Most insurance policies cover hail damage for both, but metal is less likely to need a full replacement after a storm.

    Conclusion: Making the Right Choice for Your Wallet

    So, is it cheaper to get a metal roof or shingles?

    If you are looking at the short term (next 1–5 years) and have a tight budget, asphalt shingles are the cheaper option. They allow you to protect your home with minimal upfront cash flow impact.

    However, if you view your home as a long-term investment (15+ years), metal roofing is often the cheaper choice when factoring in longevity, energy savings, insurance discounts, and avoided replacement costs. It transforms a recurring expense into a one-time investment.

    Consider your plans for the home. If you plan to sell in five years, shingles might make more financial sense. If you plan to stay for decades, metal pays for itself.

    Found this guide helpful? Share it with friends who are planning home renovations on Facebook or Pinterest, and let us know in the comments which roofing style you prefer!

  • How Often Should a Roof Be Replaced?

    How Often Should a Roof Be Replaced?

    Most homeowners dread the thought of a major home renovation, but ignoring your roof can lead to catastrophic water damage and costly repairs. If you are staring at curling shingles or worrying about the age of your home, you are likely asking: how often should a roof be replaced on a house? The answer isn’t one-size-fits-all, but understanding the variables can save you thousands of dollars and significant stress.

    In this guide, we will break down the average lifespans of common roofing materials, identify the critical warning signs that indicate it’s time for a replacement, and provide actionable advice on how to extend the life of your current roof. Whether you are buying a new home or maintaining your current one, this information is essential for protecting your biggest investment.

    Understanding Average Roof Lifespans by Material

    The primary factor determining when you need to replace your roof is the material used. Different materials have vastly different durability levels, resistance to weather, and maintenance requirements. Here is a breakdown of what you can expect from the most common roofing types in the United States.

    1. Asphalt Shingles

    Asphalt shingles are the most popular roofing material in North America due to their affordability and ease of installation. However, they also have the shortest lifespan among common materials.

    • 3-Tab Asphalt Shingles: These basic shingles typically last 15 to 20 years. They are prone to wind damage and thermal cracking.
    • Architectural (Dimensional) Shingles: These are thicker and more durable, lasting 25 to 30 years. Many come with warranties up to 30 years, but real-world performance depends heavily on ventilation and climate.

    2. Metal Roofing

    Metal roofs are gaining popularity for their longevity and energy efficiency.

    • Steel or Aluminum: With proper coating and maintenance, these can last 40 to 70 years.
    • Copper or Zinc: These premium metals can last 100+ years, often outliving the structure itself. While the upfront cost is higher, the long-term value is undeniable.

    3. Wood Shakes and Shingles

    Wood offers a rustic, natural aesthetic but requires significant maintenance.

    • Lifespan: Approximately 20 to 30 years.
    • Considerations: Wood is susceptible to mold, moss, and fire. In humid climates, regular treatment is necessary to prevent rot.

    4. Slate and Tile

    These are the heavyweights of roofing, known for extreme durability and classic beauty.

    • Clay/Concrete Tiles: Last 50 to 100 years. They are fire-resistant and excellent for hot climates.
    • Natural Slate: Can last 100+ years. Slate is incredibly durable but heavy, requiring reinforced roof framing.
    MaterialAverage LifespanCost LevelMaintenance Need
    Asphalt (3-Tab)15–20 YearsLowModerate
    Asphalt (Architectural)25–30 YearsMediumLow
    Metal40–70 YearsHighLow
    Wood Shake20–30 YearsMedium-HighHigh
    Slate/Tile50–100+ YearsVery HighLow

    Key Factors That Shorten Roof Life

    Even the highest quality materials can fail prematurely if external factors are not managed. Understanding these variables helps you assess your specific situation accurately.

    Climate and Weather Exposure

    Your geographic location plays a massive role. Homes in areas with frequent hail storms, high winds, or extreme temperature fluctuations will see faster degradation. For instance, UV radiation breaks down the asphalt binders in shingles, causing them to become brittle. Conversely, constant moisture in rainy climates promotes algae and moss growth, which can lift shingles and trap water underneath.

    Ventilation and Insulation

    This is often the most overlooked factor. A poorly ventilated attic traps heat and moisture. In summer, this “bakes” the shingles from underneath, shortening their life. In winter, poor insulation can lead to ice dams, which force water under the shingles. According to building science principles, proper airflow is critical to maintaining the structural integrity of both the roof deck and the covering material. You can read more about the physics of building envelopes on Wikipedia.

    Installation Quality

    A roof is only as good as its installation. Improper nailing patterns, inadequate flashing around chimneys and vents, or poor underlayment installation can lead to leaks within just a few years, regardless of the material quality. Always hire licensed, insured, and highly-reviewed contractors.

    How Often Should A Roof Be Replaced On A House

    Warning Signs It’s Time for a Replacement

    How do you know if it’s time to call a professional? Look for these definitive signs.

    1. Age of the Roof

    If your asphalt shingle roof is approaching the 20-year mark, start planning for a replacement. Even if it looks okay from the ground, the materials may be nearing the end of their functional life.

    2. Curling or Cupping Shingles

    Shingles should lie flat. If you see edges curling upward (cupping) or downward (clawing), the shingles are losing their integrity. This is often caused by moisture imbalance or age.

    3. Missing Granules

    Check your gutters. If you find an accumulation of sand-like granules, your shingles are shedding their protective UV layer. This exposes the asphalt to the sun, accelerating deterioration. Bald spots on the roof are a clear red flag.

    4. Daylight Through the Roof Boards

    If you can see sunlight coming through your attic ceiling, you have gaps in your roof deck. This indicates severe structural issues or missing shingles that require immediate attention.

    5. Sagging Roof Deck

    A sagging roof is a critical structural issue. It usually indicates problems with the rafters or trusses, often due to long-term water damage or excessive weight. This requires immediate professional assessment.

    Step-by-Step: How to Assess Your Roof’s Condition

    You don’t need to be a contractor to perform a basic visual inspection. Follow these steps twice a year, ideally in spring and fall.

    1. Ground-Level Inspection: Use binoculars to walk around your house. Look for missing, cracked, or curled shingles. Check for rusted flashing around chimneys and vents.
    2. Gutter Check: Clean out your gutters and look for granule buildup. Excessive granules suggest the shingles are wearing out.
    3. Attic Inspection: Go into your attic during the day. Look for any pinpoints of light. Check for water stains, dark spots, or mold on the underside of the roof deck. Smell for musty odors, which indicate trapped moisture.
    4. Professional Evaluation: If you notice any of the above issues, or if your roof is over 15 years old, hire a certified roof inspector. They can provide a detailed report on the remaining life expectancy of your roof.

    Frequently Asked Questions (FAQ)

    1. Can I replace just part of my roof?

    While technically possible, it is generally not recommended. Matching new shingles to old ones is difficult due to fading and weathering. Furthermore, mixing old and new materials can create uneven surfaces that are prone to leaks. Most professionals recommend a full replacement for consistency and warranty purposes.

    2. Does homeowners insurance cover roof replacement?

    Insurance typically covers roof replacement if the damage is caused by a sudden, covered peril like a storm, hail, or falling tree. However, they usually do not cover wear and tear, age-related deterioration, or lack of maintenance. Always review your policy specifics.

    3. How much does a roof replacement cost?

    Costs vary widely based on size, material, and location. For an average 2,000-square-foot home, an asphalt shingle roof might cost between $8,000 and $15,000. Metal roofs can range from $15,000 to $30,000+, while slate and tile can exceed $50,000. Always get at least three quotes from reputable contractors.

    4. How can I extend the life of my roof?

    Regular maintenance is key. Keep gutters clean to prevent water backup. Trim overhanging tree branches to reduce debris and shade (which promotes moss). Ensure your attic is properly ventilated and insulated. Schedule professional inspections every 2–3 years.

    5. What is the best time of year to replace a roof?

    Late spring to early fall is ideal because roofing materials (especially asphalt) require warm temperatures to seal properly. However, reputable contractors work year-round. Avoid replacing roofs during heavy rain or extreme cold if possible, as it can affect the quality of the installation.

    Conclusion

    Knowing how often should a roof be replaced on a house is crucial for maintaining your home’s value and safety. While asphalt shingles typically last 20–30 years, metal, slate, and tile options offer significantly longer lifespans. By recognizing the warning signs—such as curling shingles, granule loss, and attic leaks—you can plan for replacement before minor issues become major disasters.

    Remember, proactive maintenance and professional inspections are your best tools for extending your roof’s life. Don’t wait for a leak to appear; take action today to protect your home.

    Found this guide helpful? Share it with your friends on social media to help them protect their homes too!

  • How to Add a Front Porch Roof to Your Home

    How to Add a Front Porch Roof to Your Home

    Adding a covered entryway is one of the most impactful ways to enhance your home’s exterior, yet many homeowners hesitate due to perceived complexity. You want that welcoming shelter from rain and sun, but you are unsure where to start or how to integrate it with your current structure. This guide simplifies the process, showing you exactly how to add a front porch roof to existing house frameworks without compromising structural integrity or breaking the bank.

    Why Install a Front Porch Roof?

    Before diving into the nuts and bolts, it is essential to understand the value proposition. A front porch roof is not just an aesthetic upgrade; it is a functional investment. According to recent real estate trends, homes with covered porches often see a higher return on investment (ROI) because they expand usable living space.

    Beyond property value, a roof protects your front door from weather damage, reduces energy costs by shading entryways, and provides a cozy spot for morning coffee. However, the key to success lies in proper planning and execution.

    Understanding Structural Requirements and Permits

    The first step in learning how to add a front porch roof to existing house walls is navigating the legal and structural landscape. In the United States, building codes vary significantly by state and municipality. Ignoring these can lead to costly fines or forced removal of your new structure.

    Do You Need a Permit?

    In most US jurisdictions, any permanent structure attached to your home requires a building permit. This ensures that the roof can withstand local wind loads, snow weights, and seismic activity.

    • Check Local Codes: Visit your city’s building department website.
    • HOA Rules: If you live in a community with a Homeowners Association, review their architectural guidelines.
    • Utility Lines: Ensure no power lines interfere with the proposed roof height.

    Load-Bearing Considerations

    Your existing house wall may not be designed to hold the extra weight of a roof. You must determine if the attachment point is load-bearing. If you are attaching the roof to a non-load-bearing wall, you will need to install additional support columns or reinforce the framing. For detailed definitions of structural terms, you can refer to Wikipedia’s article on Load-bearing walls to better understand the engineering principles involved.

    Choosing the Right Roof Style

    Not all roofs fit every home. The style you choose should complement your home’s architecture while meeting your budget.

    Roof StyleBest ForProsCons
    Gable RoofTraditional/Craftsman HomesExcellent water runoff, classic lookRequires more material, complex framing
    Hip RoofModern/Ranch StylesStable in high winds, elegant appearanceMore expensive, less headroom at edges
    Shed RoofContemporary/Budget ProjectsSimple construction, cost-effectiveCan look too plain, potential drainage issues if pitch is low
    Flat RoofModern MinimalistEasy to build, usable space aboveHigher maintenance, prone to leaking if not sealed properly

    For most DIYers adding a roof to an existing facade, a shed roof (single-slope) is the most manageable option. It attaches directly to the house wall and slopes downward toward the front columns.

    How To Add A Front Porch Roof To Existing House

    Step-by-Step Guide: How to Add a Front Porch Roof

    This section breaks down the physical construction process. Please note that this is a general guide. Always consult a structural engineer for specific load calculations.

    Step 1: Planning and Measurement

    Measure the width of your desired porch. Standard depths range from 6 to 10 feet. Mark the height where the roof will attach to the house. A minimum slope of 1/4 inch per foot is recommended for proper water drainage.

    Step 2: Installing the Ledger Board

    The ledger board is the horizontal beam that attaches to your house. This is the most critical structural component.

    1. Remove siding where the board will sit to expose the sheathing and studs.
    2. Use a level to mark a straight line across the studs.
    3. Secure a pressure-treated 2×8 or 2×10 lumber board directly into the wall studs using lag screws or through-bolts. Do not rely on nails alone.

    Step 3: Setting the Support Posts

    Determine the location of your front columns. These typically align with the outer edge of the porch floor.

    1. Dig post holes below the frost line (varies by region, often 24–48 inches deep).
    2. Pour concrete footings and insert post anchors.
    3. Cut pressure-treated 4×4 or 6×6 posts to height. The top of the post should meet the outer edge of your future rafters.

    Step 4: Framing the Rafters

    Rafters connect the ledger board to the front beam (which sits atop your posts).

    1. Cut rafters from 2×6 or 2×8 lumber, depending on the span.
    2. Use metal rafter ties to secure one end to the ledger board and the other to the front header beam.
    3. Space rafters 16 inches or 24 inches on center, consistent with your local code.

    Step 5: Adding Sheathing and Underlayment

    Once the frame is secure:

    1. Nail plywood or OSB sheathing over the rafters.
    2. Apply a waterproof roofing underlayment (felt paper or synthetic membrane). This layer is crucial for preventing leaks where the new roof meets the old house.

    Step 6: Installing Roofing Material

    Match your new roof to your existing home if possible. Asphalt shingles are the most common choice for US homes due to their affordability and ease of installation.

    • Start from the bottom edge and work your way up.
    • Use drip edge flashing along the eaves.
    • Install step flashing where the new roof intersects with the house wall to direct water away from the joint.

    Common Mistakes to Avoid

    Even experienced DIYers can stumble. Here are the most frequent errors when figuring out how to add a front porch roof to existing house structures:

    • Ignoring Water Proofing: Failing to install proper flashing between the new roof and the house wall is the number one cause of leaks. Water will seep behind the siding and rot the framing.
    • Incorrect Slope: A flat-looking roof needs a minimum pitch. If the slope is too shallow, water will pool, leading to premature deterioration and ice dams in winter.
    • Undersized Lumber: Using 2x4s for long spans can cause sagging. Always check span tables for your specific lumber grade and roof load.

    Maintenance Tips for Longevity

    Once your project is complete, maintenance is key to preserving your investment.

    • Clean Gutters: If you install gutters, clean them twice a year to prevent overflow.
    • Inspect Flashing: Check the sealant around the house connection annually. Re-caulk if you see cracks.
    • Paint or Stain: Protect wooden posts and beams from UV damage and moisture by applying a fresh coat of sealant every 2–3 years.

    FAQ Section

    1. How much does it cost to add a front porch roof?

    Costs vary widely based on size and materials. On average, homeowners in the US spend between $3,000 and $8,000 for a basic covered porch roof. High-end materials like cedar or metal can push this figure higher.

    2. Can I attach the roof to my brick house?

    Yes, but it requires special masonry anchors. You cannot simply screw into brick. You must drill into the mortar joints or use wedge anchors designed for masonry. It is often easier to attach to the wooden framing behind the brick veneer if accessible.

    3. Do I need a professional roofer?

    While framing can be a DIY project, installing the final roofing material (shingles, metal, tile) is best left to professionals if you are uncomfortable with heights or waterproofing techniques. Improper installation can void warranties and cause leaks.

    4. What is the best roofing material for a porch?

    Asphalt shingles are cost-effective and match most homes. Metal roofing is durable and sheds snow well but can be noisy during rain. Polycarbonate panels are great for letting light in but offer less insulation.

    5. How long does the construction take?

    For a skilled DIYer, framing and sheathing might take a weekend. Adding roofing materials and finishing touches can take another 2–3 days. Weather permitting, the entire project can be completed in under a week.

    6. Will adding a porch roof increase my home insurance premium?

    Generally, no. In fact, it might lower it slightly by protecting your entryway. However, you must notify your insurance provider of any structural changes to ensure you remain covered.

    Conclusion

    Learning how to add a front porch roof to existing house structures is a rewarding journey that blends creativity with practical construction skills. By following proper permitting procedures, choosing the right materials, and ensuring watertight connections, you can create a beautiful, functional space that enhances your home’s curb appeal and value.

    Remember, safety comes first. If at any point you feel unsure about the structural integrity of your design, consult a licensed contractor or structural engineer.

    Did you find this guide helpful? Share it with your friends on Facebook or Pinterest who might be planning their own home improvement projects! Let’s build better homes together.