Category: homeowner roofing guide

  • How Many Square Feet In A Bundle Of Roof Shingles?

    How Many Square Feet In A Bundle Of Roof Shingles?

    Planning a roofing project can feel overwhelming, especially when you are standing in the aisle of a home improvement store trying to decipher cryptic packaging labels. You might be staring at a stack of asphalt shingles, wondering exactly how many square feet in a bundle of roof shingles you are actually buying. Getting this number wrong can lead to costly delays if you run short, or wasted money if you overbuy significantly.

    In this guide, we will break down the math simply and clearly. Whether you are a seasoned DIYer or a first-time homeowner looking to understand contractor quotes, knowing the precise coverage of a shingle bundle is the foundation of a successful roofing job. Let’s dive into the numbers so you can buy with confidence.

    The Standard Answer: 33.3 Square Feet Per Bundle

    If you are purchasing standard three-tab or architectural asphalt shingles in the United States, there is a golden rule you need to memorize: One bundle covers approximately 33.3 square feet.

    However, it is crucial to understand that shingles are not sold by the square foot directly; they are sold by the “bundle,” and bundled into a larger unit called a “square.”

    Understanding the “Roofing Square”

    In the roofing industry, terminology differs from general construction. A “square” does not mean a 10×10 foot area in casual conversation; it is a specific unit of measurement equal to 100 square feet.

    Because one roofing square equals 100 square feet, and one bundle covers roughly 33.3 square feet, it takes three bundles to make one roofing square.

    • 1 Bundle ≈ 33.3 sq. ft.
    • 3 Bundles = 1 Roofing Square (100 sq. ft.)

    This 3-to-1 ratio is the industry standard for most asphalt shingles. However, relying solely on averages can be risky. Let’s look at why variations exist.

    Why Do Some Bundles Cover Different Amounts?

    While 33.3 square feet is the norm, it is not universal. Several factors can change the coverage per bundle, and ignoring them is a common mistake for beginners.

    1. Shingle Type and Weight

    Heavier, premium architectural shingles often have different dimensions than basic three-tab shingles. Some high-end laminated shingles may require four or five bundles to cover a single roofing square (100 sq. ft.). This means each bundle would only cover 20 to 25 square feet. Always check the specific product data sheet before calculating.

    2. Manufacturer Specifications

    Different manufacturers (such as GAF, Owens Corning, or CertainTeed) may have slight variations in shingle cut and overlap requirements. While the total coverage per square remains 100 sq. ft., the number of shingles per bundle might vary, affecting the square footage per individual bundle.

    3. Exposure Rate

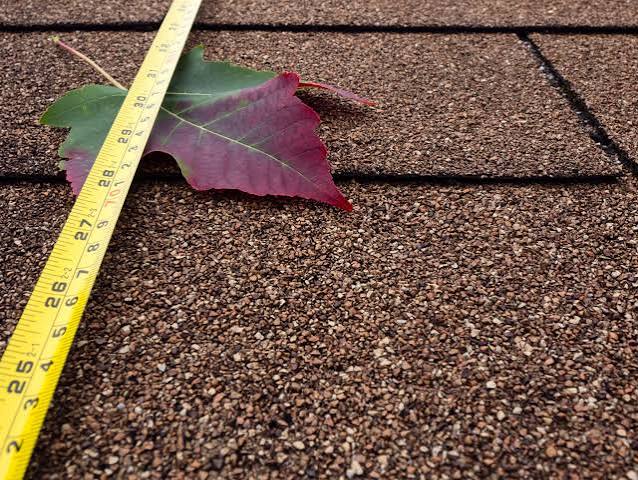
    The “exposure” is the part of the shingle that is visible after installation. Most shingles are designed with a standard 5-inch exposure. If a contractor installs shingles with a different exposure rate (which is rare but possible for aesthetic reasons), the coverage per bundle changes drastically.

    Pro Tip: Never assume. Always look for the “Coverage per Bundle” label on the wrapper or the manufacturer’s website. If it says “3 bundles per square,” you are safe with the 33.3 sq. ft. rule. If it says “4 bundles per square,” each bundle covers only 25 sq. ft.
    How Many Square Feet In A Bundle Of Roof Shingles

    How to Calculate the Exact Number of Bundles You Need

    Knowing how many square feet in a bundle of roof shingles is only half the battle. The next step is applying that knowledge to your specific roof. Here is a step-by-step guide to ensuring you order the right amount.

    Step 1: Measure Your Roof’s Footprint

    Measure the length and width of each section of your house from the ground. Multiply these numbers to get the square footage of each plane.

    • Example: A section that is 20 feet wide and 40 feet long = 800 square feet.

    Step 2: Account for Roof Pitch

    A flat measurement is not enough because roofs are sloped. A steeper roof has more surface area than its footprint suggests. You must apply a pitch multiplier.

    • Low Pitch (4/12): Multiply footprint by 1.05
    • Medium Pitch (6/12): Multiply footprint by 1.15
    • Steep Pitch (9/12+): Multiply footprint by 1.25 or higher

    For accurate pitch multipliers, you can refer to standard construction geometry resources, such as the detailed explanations found on Wikipedia’s Roof page, which outlines various structural designs and their implications.

    Step 3: Calculate Total Square Footage

    Add up the adjusted square footage of all roof planes. Let’s say your total adjusted area is 2,400 square feet.

    Step 4: Convert to Squares and Bundles

    Divide your total square footage by 100 to get the number of “squares.”

    • 2,400 sq. ft. / 100 = 24 Squares

    Multiply the number of squares by 3 (assuming standard shingles).

    • 24 Squares x 3 Bundles = 72 Bundles

    Step 5: Add Waste Factor

    You cannot use every scrap of shingle. Cutting around vents, chimneys, and valleys creates waste.

    • Simple Roof (Gable): Add 10% waste.
    • Complex Roof (Hips, Valleys, Dormers): Add 15–20% waste.

    Using a 10% waste factor for our example:

    • 72 Bundles x 1.10 = 79.2 Bundles

    Always round up. You should order 80 bundles.

    Comparison: Standard vs. Premium Shingles

    To help you visualize the differences, here is a quick comparison table. Note how the “Square Feet per Bundle” changes based on the product tier.

    FeatureStandard 3-Tab ShinglesArchitectural/LaminatedPremium Designer
    Bundles per Square33 to 44 to 5
    Sq. Ft. per Bundle~33.3 sq. ft.~25–33.3 sq. ft.~20–25 sq. ft.
    Weight per Bundle~50–60 lbs~65–80 lbs~80+ lbs
    Best ForBudget projects, rentalsMost residential homesLuxury aesthetics

    Common Mistakes to Avoid

    Even with the right math, errors happen. Here are the most frequent pitfalls:

    1. Ignoring Starter Strips: You need special starter shingles for the eaves and rakes. These are often sold separately or in specific bundles. Do not count these as part of your field shingle coverage.
    2. Forgetting Ridge Caps: The peak of your roof requires ridge cap shingles. These are usually calculated differently (by linear foot) and do not follow the standard bundle coverage rule.
    3. Underestimating Complexity: If your roof has many valleys, dormers, or skylights, your waste factor will be higher. A 10% waste factor is insufficient for a complex Victorian-style roof; aim for 15–20%.

    FAQ Section

    Q1: Can I return unused bundles of shingles?

    Most major home improvement stores in the US allow returns of unopened, undamaged bundles within a specific timeframe (usually 90 days). However, policies vary by location. Keep your receipt and try to buy slightly more than you think you need, as returning extras is easier than running out mid-project.

    Q2: Does the color of the shingle affect how many square feet are in a bundle?

    No, the color does not change the physical dimensions or coverage. However, darker shingles may absorb more heat, which can impact longevity, but the how many square feet in a bundle of roof shingles remains consistent regardless of color within the same product line.

    Q3: How much does a bundle of shingles weigh?

    A standard bundle of asphalt shingles typically weighs between 50 and 80 pounds. Heavier architectural shingles are on the higher end of this spectrum. This is important to consider if you are carrying them up a ladder yourself.

    Q4: What is the difference between a “square” and a “bundle”?

    A “square” is a unit of measurement equal to 100 square feet of roof area. A “bundle” is the physical package the shingles come in. For standard shingles, it takes three bundles to equal one square.

    Q5: Do metal roofs use bundles?

    No, metal roofing is typically sold by the panel or by the square foot, not in bundles like asphalt shingles. The calculation method for metal roofing is entirely different and involves linear feet and panel width.

    Q6: How do I measure my roof if I can’t climb on it?

    You can use satellite imagery tools like Google Earth to measure the footprint of your home. Alternatively, many roofing supply companies offer free drone measurements or online calculators where you input your address, and they provide an estimate based on local tax records and satellite data.

    Conclusion

    Understanding how many square feet in a bundle of roof shingles is the first step toward a stress-free roofing project. Remember the magic number: 33.3 square feet for standard bundles, which means three bundles per roofing square.

    By accurately measuring your roof, accounting for pitch, and adding a proper waste factor, you can avoid the headache of mid-project supply runs. Always double-check the manufacturer’s specifications for the specific product you choose, as premium shingles may have different coverage rates.

    Did you find this guide helpful? Share it with your fellow DIYers on social media to help them tackle their roofing projects with confidence!
  • Metal Roof vs Shingles: Cost Breakdown

    Metal Roof vs Shingles: Cost Breakdown

    Choosing a new roof is one of the most significant financial decisions a homeowner can make. It protects your biggest asset, influences your curb appeal, and impacts your energy bills for decades. If you are currently weighing your options, you are likely asking yourself: What Is The Cost Of A Metal Roof Vs Shingles?

    The answer isn’t just about the upfront price tag; it’s about value over time. While asphalt shingles are cheaper initially, metal roofing offers superior longevity. In this guide, we will dissect the true costs, hidden expenses, and long-term benefits of both materials to help you make an informed decision that fits your budget and your home’s needs.

    Understanding the Upfront Installation Costs

    When homeowners first start shopping for roofs, the sticker shock of metal roofing is often the first hurdle. To understand what is the cost of a metal roof vs shingles, we must look at the national averages for material and labor combined.

    Asphalt Shingles: The Budget-Friendly Entry Point

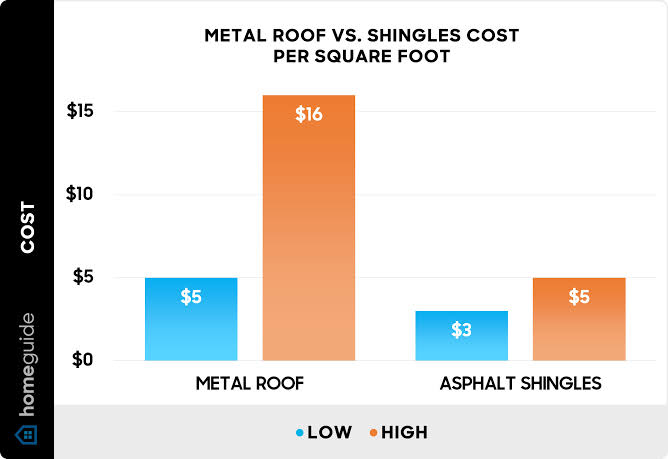
    Asphalt shingles remain the most popular roofing material in the United States, primarily due to their affordability. According to recent industry data from 2025-2026, the average cost to install an asphalt shingle roof ranges from $3.50 to $5.50 per square foot.

    For a standard 2,000-square-foot home, you are looking at a total investment between $7,000 and $11,000. This lower barrier to entry makes shingles accessible for first-time homebuyers or those working with strict immediate budgets. The installation process is straightforward, and nearly every roofing contractor in the US is trained to install them efficiently, which keeps labor costs competitive.

    Metal Roofing: The Premium Investment

    Metal roofing, which includes materials like steel, aluminum, copper, and zinc, commands a higher initial price. The average cost for a standing seam metal roof typically falls between $9.00 and $14.00 per square foot. For corrugated metal panels, the price might be slightly lower, ranging from $7.00 to $10.00 per square foot.

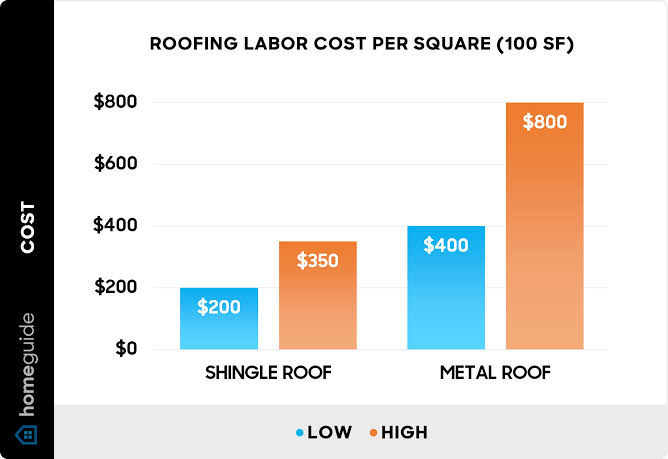
    For that same 2,000-square-foot home, a metal roof could cost anywhere from $14,000 to $28,000. Why the disparity? Metal requires specialized tools, skilled laborers who understand thermal expansion and contraction, and higher-quality underlayment systems. However, this premium price buys you a product that is fundamentally different in durability and performance.

    FeatureAsphalt ShinglesMetal Roofing
    Avg. Cost per Sq. Ft.$3.50 – $5.50$9.00 – $14.00
    Total Avg. Cost (2k sq ft)$7,000 – $11,000$14,000 – $28,000
    Installation Time1–2 Days3–5 Days
    Labor ComplexityLowHigh

    Longevity and Lifecycle Value Analysis

    While the upfront cost is important, the true question of what is the cost of a metal roof vs shingles is best answered by looking at the lifespan of the materials. This is where the concept of “cost per year” becomes crucial.

    The Lifespan Gap

    Standard 3-tab asphalt shingles typically last 15 to 20 years. Even high-end architectural shingles, which offer better aesthetics and wind resistance, usually max out at 25 to 30 years. In contrast, a properly installed metal roof can last 40 to 70 years, with some copper roofs lasting over 100 years.

    This means that if you choose asphalt shingles, you will likely need to replace your roof two or three times during the lifespan of a single metal roof. When you factor in the cost of two full replacements of shingles (plus inflation and potential disposal fees), the price gap narrows significantly.

    Maintenance and Repair Costs

    Asphalt shingles are susceptible to curling, cracking, and losing granules over time, especially in areas with high UV exposure or frequent freeze-thaw cycles. You may find yourself replacing individual shingles after severe storms.

    Metal roofs, however, are incredibly resilient. They resist fire, mildew, insects, and rot. While they can dent from large hail, they rarely leak if installed correctly. The maintenance cost for metal is negligible compared to shingles, which may require periodic cleaning of moss or algae growth in humid climates.

    What Is The Cost Of A Metal Roof Vs Shingles

    Energy Efficiency and Environmental Impact

    Another critical factor in the total cost of ownership is energy efficiency. Your roof plays a massive role in your home’s thermal regulation.

    Reflectivity and Cooling Savings

    Traditional asphalt shingles absorb a significant amount of solar heat, which can raise your attic temperature and force your air conditioning system to work harder. Modern “cool roof” shingles have improved, but they still lag behind metal.

    Metal roofs reflect solar radiant heat rather than absorbing it. This can reduce cooling costs by 10% to 25%, according to the U.S. Department of Energy. Over a 20-year period, these savings can amount to thousands of dollars, effectively offsetting part of the higher initial cost of metal.

    Sustainability Considerations

    From an environmental perspective, metal is the clear winner. Most metal roofing contains 25% to 95% recycled content and is 100% recyclable at the end of its life. Asphalt shingles, on the other hand, contribute millions of tons of waste to landfills annually. While some shingles are recycled into pavement, the infrastructure for this is not as widespread or efficient as metal recycling.

    Resale Value and Return on Investment (ROI)

    Does a metal roof add value to your home? Absolutely. Real estate experts consistently note that curb appeal and structural integrity are top priorities for buyers.

    The Premium Appeal

    A metal roof is often viewed as a luxury feature. It signals to potential buyers that the home has been well-maintained and that they won’t need to worry about roof replacement for decades. Studies suggest that a metal roof can increase a home’s resale value by 1% to 6%, depending on the market.

    In contrast, while new shingles are necessary for selling a home, they rarely command a premium price unless they are high-end architectural styles. Buyers expect shingles; they desire metal. If you plan to sell your home within the next 5–10 years, a metal roof can be a powerful marketing tool that helps your property stand out in a crowded market.

    Which Option Is Right for Your Climate?

    Your geographic location plays a pivotal role in determining which material offers the best value.

    • Hot Climates (South/Southwest US): Metal roofs excel here due to their reflective properties. The energy savings on AC bills are maximized, making the ROI faster.
    • Cold Climates (North/Northeast US): Metal sheds snow easily, preventing ice dams that can damage shingle roofs. However, proper insulation is required to prevent condensation issues.
    • Coastal Areas: Salt air can corrode certain metals. Aluminum is preferred over steel in coastal zones because it does not rust. Asphalt shingles can suffer from salt spray degradation and high wind uplift.

    FAQ Section

    1. Is it more expensive to insure a home with a metal roof?

    Generally, no. In fact, many insurance companies offer discounts of 5% to 15% on homeowners insurance premiums for metal roofs. This is because metal is highly resistant to fire, wind, and hail, reducing the likelihood of costly claims. Always check with your specific provider, but this discount can help offset the annual cost of the roof.

    2. Can I install a metal roof over existing shingles?

    Yes, in many cases, you can install a metal roof directly over existing asphalt shingles. This is known as a “retrofit” or “overlay.” It saves on disposal costs and labor time associated with tearing off the old roof. However, you must ensure the roof deck is structurally sound enough to support the additional weight, although metal is surprisingly lightweight. Always consult local building codes and a professional roofer before proceeding.

    3. Do metal roofs make noise when it rains?

    This is a common myth. Modern metal roofs are installed with solid sheathing and high-quality underlayment, which acts as a sound buffer. When properly installed, a metal roof is no louder than an asphalt shingle roof during rain or hail. In fact, many homeowners find the sound of rain on a metal roof to be soothing rather than disruptive.

    4. How does warranty coverage compare between the two?

    Asphalt shingle warranties typically range from 20 to 30 years, but they are often prorated, meaning the coverage decreases over time. Metal roof warranties are more robust, often offering 30 to 50-year non-prorated warranties on paint finishes and structural integrity. This long-term protection adds significant peace of mind and value.

    5. Will a metal roof interfere with my cell phone or Wi-Fi signal?

    No. A residential metal roof does not block Wi-Fi or cell phone signals. These signals operate at frequencies that can penetrate metal roofing, especially since most homes have windows and non-metallic walls that allow signal entry. Any minor attenuation is negligible and unlikely to affect daily usage.

    Conclusion

    So, what is the cost of a metal roof vs shingles? If you look only at today’s invoice, asphalt shingles are the clear winner, costing roughly half as much as metal. However, if you view your roof as a long-term investment, metal roofing often proves to be the more economical choice.

    When you factor in the doubled lifespan, reduced maintenance, energy savings, insurance discounts, and increased resale value, metal roofing offers a superior return on investment. Asphalt shingles are a practical choice for those with tight immediate budgets or short-term ownership plans. But for those planning to stay in their home for decades, metal provides unmatched durability and peace of mind.

    Did this breakdown help clarify your roofing dilemma? Share this article with friends or family who are also considering a roof replacement, and let us know in the comments which material you’re leaning toward!

  • New Roof Cost Per Sq Ft: 2026 Guide

    New Roof Cost Per Sq Ft: 2026 Guide

    Have you noticed a few missing shingles after the last storm, or perhaps your energy bills are creeping up due to poor insulation? It is a stressful realization, but knowing how much should a new roof cost per square foot is the first step toward regaining peace of mind and protecting your biggest investment. In this guide, we will break down the numbers clearly so you can plan your budget with confidence.

    Understanding the Basics: What Does “Per Square Foot” Really Mean?

    Before we dive into the dollar signs, it is crucial to clarify a common industry misconception. When contractors talk about roofing costs, they often use the term “square,” which equals 100 square feet. However, most homeowners think in terms of actual square footage.

    For the purpose of this guide, we will stick to the cost per single square foot to make comparisons easier for you. The national average for a new roof in 2026 typically ranges between $4.50 and $9.00 per square foot, depending heavily on materials and location. This price includes both labor and materials.

    Why such a wide range? A basic asphalt shingle roof will sit at the lower end, while premium slate or copper roofing will push toward the higher end. Understanding this baseline helps you spot quotes that are either too good to be true or unnecessarily inflated.

    How Material Choice Impacts Your Bottom Line

    The single biggest factor influencing your final bill is the material you choose. Each option offers different benefits regarding longevity, aesthetics, and energy efficiency.

    Asphalt Shingles: The Budget-Friendly Standard

    Asphalt shingles remain the most popular choice in the United States, covering over 80% of homes. They are affordable, easy to install, and widely available.

    • Cost: $4.50 – $6.50 per sq. ft.
    • Lifespan: 15–30 years.
    • Best For: Homeowners looking for a balance of cost and reliability.

    Metal Roofing: The Long-Term Investment

    Metal roofs are gaining massive popularity due to their durability and eco-friendly nature. While the upfront cost is higher, the lifespan often exceeds 50 years.

    • Cost: $7.00 – $12.00 per sq. ft.
    • Lifespan: 40–70 years.
    • Best For: Those planning to stay in their home long-term or living in areas prone to severe weather.

    Tile and Slate: The Premium Aesthetic

    If you own a historic home or want a distinct Mediterranean look, clay tile or natural slate is the way to go. These materials are heavy and require reinforced roof structures.

    • Cost: $10.00 – $20.00+ per sq. ft.
    • Lifespan: 50–100+ years.
    • Best For: High-end properties where curb appeal is paramount.
    MaterialAvg. Cost Per Sq. Ft.LifespanMaintenance Level
    Asphalt Shingles$4.50 – $6.5015-30 YearsLow
    Metal (Steel/Aluminum)$7.00 – $12.0040-70 YearsVery Low
    Clay/Concrete Tile$10.00 – $18.0050+ YearsMedium
    Natural Slate$15.00 – $25.0075-100+ YearsLow
    How Much Should A New Roof Cost Per Square Foot

    Labor and Complexity: Why Installation Isn’t One-Size-Fits-All

    You might wonder why two neighbors with similar-sized homes receive vastly different quotes. The answer often lies in labor complexity.

    Roofing is dangerous, skilled work. In 2026, labor shortages in the construction industry have kept wages competitive, meaning labor can account for 40% to 60% of your total project cost.

    Factors That Increase Labor Costs:

    1. Roof Pitch: Steeper roofs require more safety equipment, slower work pace, and specialized skills. A steep pitch can increase costs by 20–30%.
    2. Number of Layers: If you have multiple layers of old shingles that need to be torn off, expect to pay extra for disposal fees and additional labor hours.
    3. Obstacles: Chimneys, skylights, vent pipes, and complex valleys require careful flashing and sealing, which takes time and precision.
    4. Accessibility: If your home is surrounded by tight spaces, large trees, or difficult terrain, contractors may charge more for the logistical challenge.

    Geographic Location and Market Trends

    Where you live plays a significant role in determining how much should a new roof cost per square foot. Material availability and local demand fluctuate wildly across the US.

    For instance, roofing in hurricane-prone states like Florida or Texas often requires impact-resistant materials and stricter building code compliance, which drives up prices. Conversely, in the Midwest, standard asphalt shingles are more common and generally cheaper due to high competition among contractors.

    Additionally, urban areas tend to have higher labor rates compared to rural regions. Always get at least three local quotes to understand the specific market rate in your zip code. For broader context on regional construction trends, you can refer to data from the U.S. Census Bureau or general economic indicators found on Wikipedia.

    Hidden Costs You Might Not Expect

    When budgeting, it is easy to focus solely on the shingles. However, several “hidden” costs can surprise you if you are not prepared.

    • Permits: Most municipalities require a permit for roof replacement. Fees vary from $100 to $500 depending on your city.
    • Decking Repair: Once the old roof is removed, contractors may find rotted wood decking. Replacing plywood sheathing typically costs $2.50 to $4.00 per square foot extra.
    • Ventilation Upgrades: Proper airflow is critical for roof longevity. Adding ridge vents or soffit vents might add $300–$600 to the bill but is highly recommended.
    • Dumpster Fees: Disposing of old roofing materials is not free. Expect a dumpster rental fee of $300–$600 included in your quote.

    Step-by-Step: How to Get an Accurate Quote

    To ensure you are paying a fair price, follow these steps when hiring a roofer:

    1. Measure Your Roof Area: Use online satellite tools or measure your home’s footprint. Multiply length by width, then add 10–15% for waste and pitch.
    2. Choose Your Material: Decide on asphalt, metal, or tile before calling contractors. This allows them to give you a firm number rather than a vague estimate.
    3. Request Detailed Breakdowns: Ask for a line-item quote. It should separate materials, labor, disposal, and permits.
    4. Check Credentials: Ensure the contractor is licensed, insured, and has positive reviews on platforms like BBB or Angi.
    5. Compare Warranties: Look for both manufacturer warranties (on materials) and workmanship warranties (on labor). A 10-year workmanship warranty is a good standard.

    FAQ Section

    1. Is it cheaper to overlay a new roof on top of the old one?

    It can be slightly cheaper initially because you save on tear-off and disposal costs. However, most building codes only allow one overlay. It also hides potential deck damage and voids many manufacturer warranties. We recommend a full tear-off for long-term value.

    2. How does roof pitch affect the cost per square foot?

    A steeper pitch increases difficulty and risk. Contractors may charge a “steep slope premium,” which can add 10% to 30% to the labor cost. Flat or low-slope roofs are generally cheaper to install but may require different materials like EPDM rubber.

    3. Should I replace my roof myself to save money?

    While DIY seems appealing, roofing is one of the most dangerous home improvement projects. Mistakes in installation can lead to leaks, structural damage, and voided warranties. Unless you are a trained professional, the risks far outweigh the savings.

    4. Does the season affect roofing prices?

    Yes. Late fall and winter are typically “off-seasons” for roofers in many parts of the US. You might secure a discount of 5–10% during these months, provided the weather permits safe installation. Spring and summer are peak seasons with higher demand and prices.

    5. What is the average lifespan of a $5 per square foot roof?

    A roof costing around $5 per square foot is likely a standard 3-tab asphalt shingle roof. You can expect this to last between 15 and 20 years, depending on ventilation and weather conditions. Architectural shingles, which cost slightly more, can last 25–30 years.

    Conclusion

    Determining how much should a new roof cost per square foot is not just about finding the lowest number; it is about finding the right value for your home’s specific needs. In 2026, expect to pay between $4.50 and $9.00 per square foot for a quality installation, with variations based on material, location, and complexity.

    By understanding the breakdown of labor, materials, and hidden costs, you can negotiate better and avoid unpleasant surprises. Remember, a roof is a long-term shield for your family. Invest wisely, choose reputable contractors, and prioritize quality over the absolute cheapest bid.

    Found this guide helpful? Share it with your friends on social media who might be facing similar home renovation decisions!

  • Metal Roof Over Shingles: Yes or No?

    Metal Roof Over Shingles: Yes or No?

    Have you ever looked up at your aging asphalt shingle roof and wondered if it’s time for an upgrade? Many homeowners are drawn to the durability and aesthetic appeal of metal roofing, but the installation process raises a critical question: Should You Remove Old Shingles Before Installing A Metal Roof? It is not just a matter of preference; it involves structural integrity, warranty validity, and long-term performance.

    Making the wrong choice here can lead to costly repairs down the line. In this guide, we will explore the technical realities, building codes, and expert recommendations to help you make an informed decision that protects your home and your investment.

    The Case for Removing Old Shingles

    While installing a new roof over an existing one (often called a “roof-over”) might seem like a quick money-saver, most professional roofers and manufacturers strongly recommend a complete tear-off. Here is why starting with a clean deck is often the superior choice.

    1. Inspecting the Roof Deck for Damage

    When you leave old shingles in place, you are essentially blind to the condition of the wood decking beneath. Asphalt shingles can hide rot, water damage, or soft spots caused by years of leakage.

    If you install metal panels over compromised decking, the screws may not hold securely. This can lead to panel loosening during high winds. By removing the old layers, you gain the opportunity to:

    • Replace rotted plywood or OSB sheathing.
    • Reinforce weak rafters.
    • Ensure a flat, solid surface for the new metal panels.

    2. Weight Load Considerations

    A common misconception is that metal roofs are always lighter than shingles. While true per square foot, adding a second layer adds significant cumulative weight.

    • Asphalt Shingles: Approx. 2–3 lbs per square foot.
    • Metal Roofing: Approx. 1–1.5 lbs per square foot.
    • Combined Load: If you keep the shingles, your roof structure must support both.

    Older homes, particularly those built before 1980, may not have been engineered to handle double the roofing load. According to general engineering principles found in resources like Wikipedia’s entry on Roofing, structural failure due to excessive dead load is a rare but serious risk when multiple layers accumulate without proper assessment.

    3. Warranty Validity

    This is a crucial point often overlooked by DIY enthusiasts. Most major metal roofing manufacturers will void their warranty if their product is installed over more than one layer of existing roofing. They require a solid, single-layer substrate to guarantee the performance of their fasteners and panels. If you plan to stay in your home for decades, protecting your warranty is essential.

    When Is It Acceptable to Keep Old Shingles?

    There are specific scenarios where leaving the old shingles might be permissible, though it is rarely the best option.

    • Single Layer Only: Most local building codes allow a maximum of two layers of roofing material. If you already have two layers, you must tear them off. If you have only one layer, a roof-over might be code-compliant.
    • Budget Constraints: Removing shingles is labor-intensive and increases disposal fees. Keeping them can save 15–20% on initial installation costs.
    • Time Sensitivity: A tear-off exposes your home to the elements. If rain is forecasted and you cannot get the metal installed immediately, keeping the old layer provides temporary weather protection during the transition.

    However, even in these cases, you must address the uneven surface issue.

    Should You Remove Old Shingles Before Installing A Metal Roof

    The Hidden Risks of “Roof-Over” Installations

    Installing metal directly over shingles introduces several technical challenges that can compromise the lifespan of your new roof.

    Uneven Surface and Oil Canning

    Asphalt shingles are not perfectly flat. They have tabs, granules, and overlaps. When you screw metal panels over this uneven texture, the metal may not sit flush. This can lead to:

    • Oil Canning: A visual waviness in the metal panels caused by stress from uneven fastening.
    • Loose Fasteners: Screws driven into the high points of shingles may back out over time as the shingles compress or degrade.

    Trapped Moisture and Ventilation Issues

    One of the biggest enemies of a roof is trapped moisture. Old shingles may retain dampness. If you seal them under a metal roof without proper ventilation, you create a greenhouse effect.

    • Heat builds up under the metal.
    • Moisture evaporates from the old shingles but has nowhere to go.
    • This leads to condensation on the underside of the metal panels, causing rust and rotting the deck from the inside out.

    To mitigate this, you must install a high-quality synthetic underlayment and ensure adequate attic ventilation. However, this is a band-aid solution compared to starting with a dry, clean deck.

    Difficulty in Future Repairs

    Imagine you have a leak ten years from now. If the metal is installed over shingles, locating the source of the leak becomes a detective game. You cannot easily inspect the deck or flashings without removing the metal panels first. With a tear-off, any future issues are easier to diagnose because the system is transparent and accessible.

    Step-by-Step: The Proper Installation Process

    If you decide to proceed with a metal roof, here is the industry-standard approach for a durable installation. Note that this assumes a full tear-off, which is highly recommended.

    1. Tear Off Existing Material: Remove all old shingles, nails, and flashing. Dispose of debris according to local regulations.
    2. Inspect and Repair Decking: Walk the roof deck. Replace any soft, rotted, or damaged plywood. Secure any loose boards with ring-shank nails.
    3. Install Drip Edge: Attach metal drip edge along the eaves and rakes to direct water away from the fascia.
    4. Apply Underlayment: Roll out a high-quality synthetic underlayment (not just felt paper). Overlap seams by at least 6 inches and tape them if required by the manufacturer. This acts as your secondary water barrier.
    5. Install Flashing: Put in step flashing around chimneys, valleys, and walls before the main panels go up.
    6. Mount Metal Panels: Start at the eave. Use screws with neoprene washers designed for metal roofing. Do not overtighten, as this can distort the washer and cause leaks.
    7. Add Ridge Cap: Install the ridge cap last to seal the peak of the roof.

    Comparison: Tear-Off vs. Roof-Over

    To help you visualize the trade-offs, here is a quick comparison table.

    FeatureFull Tear-OffRoof-Over (Keep Shingles)
    CostHigher (labor + disposal)Lower (saves labor/disposal)
    Deck InspectionFull visibility and repairBlind installation
    WarrantyUsually validOften voided or limited
    LifespanMaximizes metal roof lifeMay reduce longevity
    Surface QualityFlat, secure baseUneven, potential for noise
    Weight LoadStandard loadIncreased structural load

    Frequently Asked Questions (FAQ)

    1. Will a metal roof be noisy if installed over shingles?

    Yes, it can be. Without a solid deck connection, rain and hail can create more drumming noise. However, using a solid sheathing base (after tear-off) and proper insulation significantly reduces sound transmission.

    2. Can I install metal roofing over two layers of shingles?

    In most jurisdictions, no. Building codes typically prohibit more than two layers of roofing material. If you already have two layers, you must remove them all before installing metal.

    3. Does keeping old shingles affect the R-value (insulation)?

    Marginally. Asphalt shingles offer negligible insulation value. The primary thermal benefit comes from the air gap and reflective properties of the metal, not the old shingles underneath.

    4. How much does it cost to remove old shingles?

    Costs vary by region and roof size, but expect to pay between $1.00 and $3.00 per square foot for tear-off and disposal. While this adds to the upfront cost, it prevents expensive structural repairs later.

    5. What type of underlayment should I use?

    Always use a synthetic underlayment rather than traditional asphalt felt. Synthetic options are more tear-resistant, breathable, and provide better slip resistance for installers.

    6. Will my homeowner’s insurance cover a roof-over?

    Some insurers may increase premiums or deny coverage for roof-overs due to the increased risk of hidden damage and fire spread. Always check with your provider before proceeding.

    Conclusion

    So, should you remove old shingles before installing a metal roof? In the vast majority of cases, yes.

    While keeping the old shingles might save you money upfront, it introduces risks regarding structural integrity, warranty coverage, and moisture management. A full tear-off allows you to inspect and repair the roof deck, ensuring a flat, solid foundation for your new metal roof. This approach maximizes the lifespan of your investment and keeps your home safe from hidden decay.

    Think of your roof as the shield of your home. You wouldn’t patch a hole in a shield with another weak layer; you would replace it properly. The same logic applies here.

    Did you find this guide helpful? Share it with friends who are considering a roofing upgrade, or leave a comment below with your own roofing questions!

  • Bone Roofing Supply Inc Villa Park IL Guide

    Bone Roofing Supply Inc Villa Park IL Guide

    Finding a reliable supplier for high-quality roofing materials can be a stressful part of any construction or renovation project. Whether you are a professional contractor managing a tight deadline or a homeowner planning a crucial repair, the integrity of your supply chain directly impacts the safety and longevity of your property. This is where Bone Roofing Supply Inc North Addison Road Villa Park Il becomes a vital resource for residents and businesses in the DuPage County area.

    In this comprehensive guide, we will explore why this specific location has become a cornerstone for roofing excellence in Illinois. We will delve into the product range, service quality, and logistical advantages that make Bone Roofing Supply a preferred partner for top-tier roofing projects. By understanding what they offer, you can make informed decisions that save time, money, and ensure superior craftsmanship.

    Why Location Matters: The North Addison Road Advantage

    When searching for Bone Roofing Supply Inc North Addison Road Villa Park Il, the first thing to consider is accessibility. Villa Park, located in the heart of DuPage County, serves as a strategic hub for distribution across the Chicago metropolitan area. The facility on North Addison Road is not just a warehouse; it is a logistics center designed for efficiency.

    Strategic Accessibility for Contractors

    For professional roofers, time is money. The North Addison Road location offers easy access to major highways, including I-290 and I-88. This reduces transit time significantly, allowing crews to complete more jobs per week. According to industry standards, reducing travel time by even 15% can increase a contracting company’s profitability by up to 20%.

    Local Climate Expertise

    Illinois weather is notoriously unpredictable, ranging from scorching summers to harsh, snowy winters. A local supplier understands these conditions better than a national big-box store. Bone Roofing Supply curates its inventory specifically to withstand the freeze-thaw cycles common in Villa Park and surrounding areas. This localized knowledge ensures that the materials you buy are not just generic products, but solutions engineered for our specific environment.

    Comprehensive Product Range for Every Project

    One of the primary reasons professionals choose Bone Roofing Supply Inc North Addison Road Villa Park Il is the breadth of their inventory. They do not just sell shingles; they provide a complete ecosystem of roofing components.

    Premium Asphalt Shingles

    Asphalt shingles remain the most popular roofing material in the United States due to their cost-effectiveness and durability. Bone Roofing Supply partners with top manufacturers like GAF, Owens Corning, and CertainTeed.

    • 3-Tab Shingles: Ideal for budget-conscious projects.
    • Architectural Shingles: Offer a dimensional look and better wind resistance.
    • Premium Designer Shingles: Mimic the look of slate or wood shake with superior longevity.

    Essential Underlayment and Ventilation

    A roof is only as good as its foundation. Many DIY enthusiasts overlook the importance of underlayment and ventilation, leading to premature failure.

    • Synthetic Underlayment: Provides superior tear resistance compared to traditional felt.
    • Ice and Water Shield: Critical for eaves and valleys in Illinois to prevent water infiltration during ice dams.
    • Ventilation Systems: Proper airflow extends the life of shingles by reducing heat buildup in the attic.

    Metal and Flat Roofing Solutions

    Beyond residential shingles, the Villa Park location stocks materials for commercial and modern residential designs.

    • Standing Seam Metal: Known for lasting 50+ years.
    • TPO and EPDM Membranes: Standard for flat commercial roofs, offering excellent UV resistance.
    Bone Roofing Supply Inc North Addison Road Villa Park Il

    Service Excellence: More Than Just a Supplier

    While product quality is paramount, the service provided by Bone Roofing Supply Inc North Addison Road Villa Park Il sets them apart. In an industry often plagued by delayed deliveries and incorrect orders, their commitment to reliability is a significant competitive advantage.

    Expert Consultation and Technical Support

    Buying roofing materials is complex. Choosing the wrong nail length or underlayment type can void manufacturer warranties. Bone Roofing Supply employs knowledgeable staff who can provide technical guidance. They help customers calculate exact material needs, reducing waste and ensuring code compliance.

    “The difference between a good roof and a great roof often lies in the details of the installation materials. Having a supplier who understands these nuances is invaluable.” – Industry Insight

    Efficient Order Fulfillment

    Time-sensitive projects require precise logistics. Bone Roofing Supply offers:

    1. Will-Call Services: Quick pickup for small orders.
    2. Job-Site Delivery: Large orders are delivered directly to the project site using specialized trucks equipped with cranes or conveyors for safe unloading.
    3. Inventory Real-Time Tracking: Customers can check stock availability online or via phone, minimizing unexpected delays.

    Comparison: Bone Roofing Supply vs. Big Box Retailers

    To help you understand the value proposition, here is a comparison between specialized suppliers like Bone Roofing Supply and general home improvement stores.

    FeatureBone Roofing Supply (Specialized)Big Box Retailer (General)
    Product DepthExtensive range of professional-grade materialsLimited to consumer-grade basics
    Staff ExpertiseTrained roofing specialistsGeneral hardware associates
    PricingCompetitive bulk pricing for contractorsStandard retail pricing
    Warranty SupportDirect assistance with manufacturer claimsLimited support; often refers to manufacturer
    DeliverySpecialized roofing trucks with lift gatesStandard box trucks; may lack lifting equipment

    This table highlights why serious projects benefit from specialized suppliers. The expertise and specialized logistics reduce risk and improve project outcomes.

    How to Choose the Right Materials for Your Villa Park Home

    Selecting the right materials involves more than just picking a color. Here is a step-by-step approach to making the best choice when visiting Bone Roofing Supply Inc North Addison Road Villa Park Il.

    Step 1: Assess Your Current Roof Structure

    Before purchasing, determine if your existing deck can support heavier materials like slate or clay tiles. Most homes in Villa Park are framed for asphalt shingles or light metal roofing. If you are unsure, consult with a structural engineer or a licensed contractor.

    Step 2: Consider Energy Efficiency

    With rising energy costs, reflective roofing materials can make a difference. Look for shingles with high Solar Reflectance Index (SRI) ratings. Bone Roofing Supply offers “cool roof” options that reflect more sunlight and absorb less heat, potentially lowering cooling bills by 10-15%. For more information on energy-efficient building materials, you can refer to general standards on Wikipedia.

    Step 3: Check Local HOA and City Codes

    Villa Park and nearby suburbs may have specific aesthetic guidelines or building codes. Ensure the color and style you choose comply with local regulations. The staff at Bone Roofing Supply can often provide guidance on popular choices that meet local standards.

    Step 4: Calculate Waste Factor

    Always order 10-15% more material than your exact square footage measurement to account for cuts, waste, and future repairs. Ordering slightly extra ensures you have matching batches if repairs are needed later, as dye lots can vary.

    Frequently Asked Questions (FAQ)

    1. What are the operating hours for Bone Roofing Supply on North Addison Road?

    Typically, specialized roofing suppliers operate during standard business hours, often starting earlier than retail stores to accommodate contractor schedules. It is recommended to call ahead or check their official website for the most current hours, especially during holiday seasons or severe weather events.

    2. Do they offer delivery to areas outside Villa Park?

    Yes, Bone Roofing Supply serves a wide radius around Villa Park, including Lombard, Elmhurst, Wheaton, and broader DuPage County areas. Delivery fees may vary based on distance and order size, so it is best to inquire about specific rates for your job site.

    3. Can I return unused roofing materials?

    Most suppliers have a return policy for unused, undamaged materials in original packaging. However, restocking fees may apply. Always keep your receipt and clarify the return policy at the time of purchase to avoid surprises.

    4. Do they provide warranties on the materials sold?

    The materials themselves come with manufacturer warranties (e.g., 20-year, lifetime). Bone Roofing Supply facilitates the registration of these warranties. Note that the warranty covers material defects, not installation errors. Proper installation by a certified contractor is required to validate the warranty.

    5. Is there a minimum order quantity for delivery?

    Yes, there is usually a minimum order value or volume required for free or subsidized delivery. Small orders may incur a delivery fee or require pickup at the North Addison Road location. Contact their sales team for current thresholds.

    6. How can I verify if a shingle color is discontinued?

    Roofing manufacturers frequently update color lines. The staff at Bone Roofing Supply Inc North Addition Road Villa Park Il has access to real-time inventory databases. They can confirm availability and suggest close-match alternatives if your desired color is no longer in production.

    Conclusion

    Choosing the right supplier is a critical decision that impacts the success of your roofing project. Bone Roofing Supply Inc North Addison Road Villa Park Il stands out as a trusted partner for both professionals and homeowners in the region. Their combination of high-quality, climate-appropriate materials, expert technical support, and efficient logistics makes them a top choice in DuPage County.

    By leveraging their expertise, you ensure that your roof is not only aesthetically pleasing but also durable and energy-efficient. Don’t leave your home’s protection to chance. Visit their location on North Addison Road or contact their team today to discuss your next project.

    Found this guide helpful? Share it with your friends and fellow homeowners on social media to help them make smarter roofing decisions!

  • How Much Does It Cost For Solar Panels On Roof?

    How Much Does It Cost For Solar Panels On Roof?

    Have you been staring at your electricity bill, wishing there was a way to slash those monthly costs while helping the planet? You are not alone. Thousands of US homeowners are making the switch to renewable energy, but the initial price tag often causes hesitation. Understanding exactly how much does it cost for solar panels on roof is the first step toward energy independence and long-term savings.

    In this guide, we will break down the real costs, hidden fees, and financial incentives available in 2026, so you can make an informed decision with confidence.

    The Average Cost of Residential Solar in 2026

    When asking “how much does it cost for solar panels on roof,” the answer varies based on location, system size, and equipment quality. However, national averages provide a solid baseline for budgeting.

    As of late 2026, the average cost for a residential solar panel system in the United States ranges between $15,000 and $25,000 before incentives. This typically covers a standard 6-kilowatt (kW) to 10-kW system, which is sufficient for most average-sized homes.

    Cost Per Watt Breakdown

    To compare quotes accurately, look at the price per watt rather than just the total price.

    • National Average: $2.50 – $3.50 per watt.
    • Low-End (Budget Systems): $2.00 per watt.
    • High-End (Premium Efficiency): $4.00+ per watt.

    For a typical 8-kW system:

    • At $2.50/watt: $20,000
    • At $3.50/watt: $28,000

    Note: These figures include hardware (panels, inverters, racking) and soft costs (permitting, labor, customer acquisition).

    What Factors Influence Your Solar Installation Price?

    Not all roofs are created equal, and neither are solar installations. Several key variables will dictate where your project falls within that price range.

    1. System Size and Energy Consumption

    The more electricity you use, the larger the system you need. A small cottage in Vermont may only need a 4-kW system, while a large family home in Texas with central AC might require a 12-kW setup. Larger systems have a lower cost per watt due to economies of scale, but the total upfront cost is higher.

    2. Type of Solar Panels

    There are two main types of panels dominating the US market:

    • Monocrystalline Panels: Higher efficiency (20-23%), sleeker black appearance, and higher cost. Ideal for roofs with limited space.
    • Polycrystalline Panels: Slightly lower efficiency (15-17%), blueish hue, and more affordable. Best for homes with ample roof space.

    3. Roof Complexity and Condition

    Installers charge more if your roof is difficult to access.

    • Steep Pitch: Requires special safety equipment and more labor time.
    • Multiple Angles: Complex rooflines require more wiring and custom racking.
    • Material: Installing on asphalt shingles is standard and cheaper. Tile, slate, or metal roofs may require specialized mounting hardware, increasing costs by 10-15%.

    4. Inverter Choice

    The inverter converts solar energy into usable AC power for your home.

    • String Inverters: Cheapest option, but if one panel is shaded, the whole system’s performance drops.
    • Microinverters/Power Optimizers: More expensive upfront but allow each panel to operate independently. This is crucial for roofs with partial shading from trees or chimneys.
    How Much Does It Cost For Solar Panels On Roof

    Federal and State Incentives: Lowering the Net Cost

    The sticker price is rarely what you actually pay. Government incentives significantly reduce the net cost of going solar.

    The Federal Solar Investment Tax Credit (ITC)

    In 2026, the Federal Solar Tax Credit remains a powerful tool for homeowners. Under current legislation, you can deduct 30% of the total installation cost from your federal income taxes.

    • Example: If your system costs $20,000, you receive a $6,000 tax credit.
    • Net Cost: $14,000.

    Ensure you have sufficient tax liability to claim the full credit. Consult a tax professional for specifics.

    State and Local Rebates

    Many states offer additional rebates, property tax exemptions, or sales tax holidays. For instance, states like California, New York, and Massachusetts often have robust local programs. Check the Database of State Incentives for Renewables & Efficiency (DSIRE) for updated local policies. (Note: Link provided for general reference to US solar policy context).

    Hidden Costs to Watch Out For

    While solar saves money long-term, be aware of potential additional expenses during installation.

    Cost ItemEstimated PriceNotes
    Permitting Fees$100 – $500Varies by municipality. Usually included in quote.
    Electrical Panel Upgrade$1,000 – $3,000Required if your current panel is outdated or lacks capacity.
    Roof Repair/Replacement$5,000 – $15,000+If your roof is older than 10 years, replace it before installing solar.
    Battery Storage$8,000 – $15,000Optional but recommended for backup power during outages.

    Step-by-Step: How to Get an Accurate Quote

    Getting a precise answer to “how much does it cost for solar panels on roof” requires actionable steps. Follow this process to avoid overpaying.

    1. Analyze Your Energy Usage: Gather your last 12 months of electricity bills. Calculate your average monthly kWh usage. This determines the system size you need.
    2. Assess Your Roof: Look for shading issues, structural integrity, and available space. Use online tools like Google Project Sunroof for a preliminary estimate.
    3. Get Multiple Quotes: Obtain at least three quotes from certified installers. Ensure they are NABCEP-certified (North American Board of Certified Energy Practitioners).
    4. Compare Equipment Warranties: Look for at least a 25-year performance warranty on panels and a 10-12 year warranty on inverters.
    5. Review Financing Options:
      • Cash Purchase: Highest long-term savings.
      • Solar Loan: Low interest rates available; keeps ownership with you.
      • Lease/PPA: Lower upfront cost, but you don’t own the system and miss out on tax credits.

    Frequently Asked Questions (FAQ)

    1. How long does it take to break even on solar panels?

    The average payback period in the US is between 6 to 9 years. This depends on your local electricity rates, sunlight exposure, and the amount of incentives you receive. After the break-even point, the electricity generated is essentially free for the remaining life of the system (25+ years).

    2. Do solar panels increase home value?

    Yes. Studies suggest that homes with solar panels sell for approximately 4% more than comparable homes without them. Buyers appreciate the reduced utility bills and modern infrastructure.

    3. Is roof orientation important for cost efficiency?

    Absolutely. In the Northern Hemisphere, south-facing roofs generate the most energy. East and west-facing roofs are also viable but may produce 10-20% less energy, potentially requiring a slightly larger (and more expensive) system to meet your needs.

    4. What happens if my roof needs repair after installation?

    Reputable installers offer workmanship warranties that cover leaks caused by installation. However, if you need to remove panels for unrelated roof repairs, you may incur a “de-installation and re-installation” fee, typically ranging from $500 to $1,000.

    5. Can I install solar panels myself to save money?

    While DIY kits exist, they are generally not recommended for most homeowners. You must comply with strict electrical codes, obtain permits, and coordinate with your utility company for grid interconnection. Mistakes can void warranties and pose fire hazards. Professional installation ensures safety and eligibility for tax credits.

    Conclusion

    Understanding how much does it cost for solar panels on roof is about looking beyond the initial price tag. While the upfront investment averages between $15,000 and $25,000, the combination of federal tax credits, state rebates, and long-term energy savings makes solar one of the smartest financial decisions a homeowner can make in 2026.

    By choosing the right equipment, leveraging incentives, and working with certified professionals, you can secure a system that pays for itself in under a decade.

    Ready to take control of your energy future? Share this guide with friends and family who are considering the switch, or drop a comment below with your biggest question about solar installation!

  • How Much Does It Cost To Re Do A Roof?

    How Much Does It Cost To Re Do A Roof?

    Replacing a roof is one of the most significant investments a homeowner can make. It protects your family, enhances curb appeal, and secures your property’s value. If you are staring at curling shingles or dealing with a persistent leak, you are likely asking the critical question: How much does it cost to re do a roof?

    The answer isn’t a single number, but rather a range influenced by materials, labor, and your home’s specific architecture. In this comprehensive guide, we will break down the costs transparently, helping you budget accurately without falling prey to unexpected expenses. Whether you own a modest ranch in Ohio or a multi-story colonial in Massachusetts, understanding these figures is the first step toward a stress-free renovation.

    Average Roof Replacement Costs in 2026

    Before diving into the specifics, let’s look at the big picture. For a standard single-family home in the United States, the cost to replace a roof typically ranges between $5,000 and $15,000. However, this average can swing dramatically based on size and material choice.

    According to recent industry data, the national average sits around $8,500 for a 2,000-square-foot home using mid-range asphalt shingles. But “average” can be misleading. A small condo might cost as little as $4,000, while a large estate with slate tiles could exceed $50,000.

    Key Cost Factors

    • Roof Size: Measured in “squares” (1 square = 100 sq. ft.).
    • Material Type: Asphalt is cheapest; metal and slate are premium.
    • Labor Costs: Varies significantly by region and contractor availability.
    • Complexity: Steep pitches, multiple chimneys, and skylights increase labor time.

    Breaking Down Costs by Material

    The material you choose is the biggest variable in your budget. Here is a detailed comparison of popular roofing materials available in the US market today.

    MaterialAverage Cost per Sq. Ft.LifespanProsCons
    Asphalt Shingles$3.50 – $5.5015–30 YearsAffordable, easy to install, widely availableShorter lifespan, prone to wind damage
    Metal Roofing$7.00 – $12.0040–70 YearsDurable, energy-efficient, recyclableHigher upfront cost, noisy during rain
    Clay/Concrete Tile$10.00 – $20.0050+ YearsFire-resistant, aesthetic appealVery heavy, requires structural reinforcement
    Wood Shakes$6.00 – $9.0020–40 YearsNatural look, good insulationHigh maintenance, fire risk
    Slate$15.00 – $30.00+75–100+ YearsExtremely durable, luxury appearanceExtremely expensive, fragile, heavy

    Note: Prices include both materials and professional installation.

    Why Asphalt Shingles Remain Popular

    Despite the rise of metal roofing, asphalt shingles account for nearly 80% of residential roofs in the US. They offer the best balance of cost and performance for most homeowners. If you are looking to maximize resale value without overspending, architectural asphalt shingles are often the recommended choice by real estate experts.

    How Much Does It Cost To Re Do A Roof

    Labor and Additional Expenses

    When calculating how much does it cost to re do a roof, many homeowners forget that materials are only half the battle. Labor typically accounts for 40% to 60% of the total project cost.

    The “Tear-Off” Factor

    Does your old roof need to be removed? Most building codes require a complete tear-off if there are already two layers of shingles. This process adds $1,000 to $3,000 to your bill depending on the weight of the old material and disposal fees.

    Hidden Costs to Watch For

    1. Decking Repair: Once the old shingles are off, contractors may find rotten plywood decking. Replacing a sheet of plywood costs roughly $75–$150 per sheet.
    2. Flashing and Ventilation: New flashing around chimneys and vents is crucial for preventing leaks. Expect to pay $500–$1,000 for high-quality metal flashing upgrades.
    3. Permits: Local municipalities charge permits for roofing work, usually ranging from $100 to $500.

    For more detailed information on building standards and safety regulations, you can refer to general construction guidelines on Wikipedia.

    Regional Price Variations

    Where you live matters. Labor rates in urban centers like New York City or San Francisco are significantly higher than in rural areas of the Midwest.

    • Northeast: Higher costs due to strict building codes and higher insurance premiums for contractors.
    • South: Moderate costs, but hurricane-rated materials may increase prices.
    • West Coast: High labor costs and seismic considerations can drive up prices.
    • Midwest: Generally the most affordable region for roofing replacements.

    Always get at least three local quotes to ensure you are paying a fair market rate for your specific area.

    Step-by-Step: How to Budget for Your Roof

    If you are ready to move forward, follow these steps to create an accurate budget.

    1. Measure Your Roof: While professionals do this precisely, you can estimate by measuring your home’s footprint and multiplying by 1.5 to account for pitch and overhangs.
    2. Choose Your Material: Decide between budget-friendly asphalt or long-term investment metal.
    3. Get Multiple Quotes: Contact at least three licensed and insured roofing contractors.
    4. Check References: Look for reviews on Google and BBB. Ask for photos of past projects.
    5. Review the Contract: Ensure it includes warranty details, timeline, and payment schedule. Never pay the full amount upfront.

    FAQ Section

    1. How much does it cost to re do a roof on a 2,000 sq. ft. house?

    For a 2,000 sq. ft. home, you can expect to pay between $7,000 and $12,000 for asphalt shingles. If you opt for metal roofing, the cost will likely range from $14,000 to $24,000. These estimates include removal of the old roof and installation of new underlayment and shingles.

    2. Is it cheaper to overlay shingles or tear off the old roof?

    Overlaying (installing new shingles over old ones) is cheaper initially because it saves on labor and disposal fees. However, it is not always recommended. It can void manufacturer warranties, hide underlying deck damage, and add unnecessary weight. Most professionals advise a full tear-off for longevity and peace of mind.

    3. Does homeowners insurance cover roof replacement?

    Insurance typically covers roof replacement only if the damage is caused by a covered peril, such as a storm, hail, or fire. It generally does not cover wear and tear or age-related deterioration. Check your policy’s “Actual Cash Value” vs. “Replacement Cost” clauses to understand your coverage limit.

    4. How long does a roof replacement take?

    Most residential roof replacements are completed in 1 to 3 days. Larger homes or complex roofs with multiple peaks and valleys may take up to a week. Weather delays are common, so build some flexibility into your schedule.

    5. What is the best time of year to replace a roof?

    Late spring and early fall are ideal. The weather is mild, allowing adhesives to seal properly. Summer can be too hot for workers and materials, while winter poses risks of ice and snow delays. However, reputable contractors work year-round, so scheduling depends more on their availability than the season.

    Conclusion

    Understanding how much does it cost to re do a roof empowers you to make smart financial decisions. While the initial price tag may seem steep, a new roof is a vital component of your home’s integrity and value. By choosing the right materials, hiring reputable contractors, and planning for potential hidden costs, you can navigate this project with confidence.

    Don’t let uncertainty stall your home improvement goals. Use this guide as a checklist, gather your quotes, and invest in a roof that will protect your home for decades to come.

    Found this guide helpful? Share it with your neighbors on Facebook or Pinterest who might be facing similar roofing dilemmas. Your share could help them save thousands!

  • How to Calculate Roof Pitch in Degrees

    How to Calculate Roof Pitch in Degrees

    Have you ever stood in your attic or looked up at your home’s exterior, wondering exactly how steep your roof is? Whether you are planning a renovation, installing solar panels, or simply curious about your home’s architecture, knowing the angle is crucial. Understanding how to calculate the pitch of a roof in degrees is the first step toward ensuring safety, accuracy, and cost-efficiency in any roofing project.

    Many homeowners find themselves confused by the difference between “pitch” (often expressed as a ratio like 4:12) and “degrees” (the actual angle). While contractors often speak in ratios, degrees are essential for specific calculations involving trigonometry, such as determining snow load capacity or fitting skylights. In this guide, we will break down the process into simple, manageable steps so you can measure your roof with confidence.

    Why Convert Roof Pitch to Degrees?

    Before we dive into the math, it is important to understand why you might need this specific measurement. In the United States, the construction industry predominantly uses the “rise over run” ratio. For example, a “6/12 pitch” means the roof rises 6 inches for every 12 inches of horizontal distance.

    However, degrees provide a universal standard for angle measurement. Here is why converting to degrees matters:

    • Solar Panel Installation: Solar installers require precise angles to maximize energy efficiency.
    • Safety Assessments: Steeper roofs (higher degrees) require different safety equipment and harnesses.
    • Material Compatibility: Certain roofing materials, such as clay tiles or slate, have minimum degree requirements to prevent water infiltration.
    • Architectural Design: If you are adding a dormer or an extension, matching the existing angle in degrees ensures structural harmony.

    According to building science principles, the angle of incidence affects how water sheds and how wind interacts with the structure. Getting this number right is not just about aesthetics; it is about performance.

    Tools You Will Need for Accurate Measurement

    You do not need expensive laser equipment to get a reliable reading. For most DIY purposes, basic tools found in a standard toolbox will suffice. However, precision is key.

    • A Level: A 2-foot or 4-foot carpenter’s level is ideal. Ensure it is calibrated correctly before starting.
    • A Tape Measure: A standard retractable tape measure with clear markings.
    • A Calculator: One with trigonometric functions (specifically arctangent or tan⁻¹). Your smartphone’s calculator app works perfectly for this.
    • Safety Gear: If measuring from the outside, always use a sturdy ladder, non-slip shoes, and consider having a spotter.

    Safety Note: Never attempt to walk on a roof that is wet, icy, or excessively steep (over 30 degrees) without professional fall protection gear.

    How To Calculate The Pitch Of A Roof In Degrees

    Step-by-Step: How to Calculate the Pitch of a Roof in Degrees

    Calculating the angle requires a bit of high school geometry, but don’t worry—we will walk through it together. The core concept relies on the tangent function in trigonometry.

    Step 1: Measure the Rise and Run

    The most accurate way to measure is from inside the attic, where you can access the underside of the roof rafters.

    1. Place one end of your level against the bottom edge of a rafter.
    2. Adjust the level until the bubble is perfectly centered, indicating it is horizontal. This horizontal distance is your Run. For simplicity, let’s assume a standard run of 12 inches.
    3. From the 12-inch mark on the level, measure vertically straight up to the bottom of the rafter. This vertical distance is your Rise.

    Example: If you measure 6 inches from the level to the rafter, your rise is 6 inches.

    Step 2: Determine the Ratio

    Now you have your ratio. In our example, the rise is 6 and the run is 12. This gives us a ratio of 6/12.

    If you measured a different run (e.g., 24 inches), ensure you normalize it to a 12-inch base for standard comparison, or simply use the actual numbers in the formula below.

    Step 3: Apply the Trigonometric Formula

    To convert this ratio into degrees, we use the inverse tangent function (arctan). The formula is:

    Angle in Degrees=arctan⁡(RiseRun)Angle in Degrees=arctan(RunRise​)

    Using our example:

    1. Divide the Rise by the Run: 6÷12=0.56÷12=0.5
    2. Calculate the arctangent of 0.5.
    3. On your calculator, press shift or 2nd followed by tan (or look for tan⁻¹).
    4. Enter 0.5.

    The result is approximately 26.57 degrees.

    Step 4: Verify with External Measurement (Optional)

    If you cannot access the attic, you can measure from the outside using the gable end of the house. Measure the total width of the house (Run x 2) and the height from the top of the wall plate to the peak (Rise). Divide the total rise by half the width to get the same ratio, then apply the formula above.

    For more detailed information on roof framing standards, you can refer to general construction guidelines on Wikipedia.

    Common Roof Pitches and Their Degree Equivalents

    To help you visualize where your roof falls on the spectrum, here is a quick reference table. This eliminates the need for constant calculation if you know your standard ratio.

    Pitch Ratio (Rise/Run)Angle in DegreesClassification
    2/129.46°Low Slope
    4/1218.43°Conventional Low
    6/1226.57°Conventional
    8/1233.69°Steep
    10/1239.81°Very Steep
    12/1245.00°Extreme

    Key Insight: A 12/12 pitch is exactly 45 degrees because the rise equals the run. Any pitch higher than 12/12 will exceed 45 degrees, which significantly increases installation difficulty and cost.

    Factors That Influence Roof Pitch Choice

    Why do some houses have flat roofs while others are steep? Several factors dictate the optimal pitch for a structure.

    Climate and Weather Patterns

    In regions with heavy snowfall, such as the Northeastern US, steeper pitches (above 30 degrees) are preferred. Gravity helps shed snow before it accumulates enough weight to cause structural damage. Conversely, in hurricane-prone areas, lower pitches may be used to reduce wind uplift forces, though this must be balanced with drainage needs.

    Architectural Style

    Your home’s design plays a massive role. Colonial and Cape Cod styles typically feature steeper pitches (8/12 to 12/12), while Ranch-style homes often utilize low slopes (2/12 to 4/12). Modern architecture may even employ flat roofs (less than 2/12), which technically still require a slight pitch for water drainage.

    Material Constraints

    Not all roofing materials work on all angles.

    • Asphalt Shingles: Can be installed on pitches as low as 2/12 with special underlayment.
    • Clay Tiles: Generally require a minimum of 4/12 to prevent water backing up under the tiles.
    • Slate: Often requires 4/12 or steeper for proper longevity.

    Frequently Asked Questions (FAQ)

    What is the difference between roof slope and roof pitch?

    While often used interchangeably in casual conversation, there is a technical difference. Slope is the ratio of vertical rise to horizontal run (e.g., 6:12). Pitch is technically the ratio of the rise to the total span (width) of the house. However, in modern US construction, “pitch” is commonly accepted to mean the slope ratio. When calculating degrees, we use the slope (rise/run).

    Can I use a smartphone app to measure roof pitch?

    Yes, there are many inclinometer apps available for iOS and Android that use your phone’s gyroscope. While convenient, they can be less accurate than manual measurements due to calibration issues or uneven surfaces. Use them for a quick estimate, but rely on manual math for critical projects like structural modifications.

    What is the minimum roof pitch for shingles?

    Most asphalt shingle manufacturers require a minimum slope of 2:12 (approximately 9.5 degrees). Below this threshold, the roof is considered “flat,” and specialized membrane roofing systems (like EPDM or TPO) are required to ensure waterproofing. Always check the specific warranty requirements of your chosen material.

    How does roof pitch affect cooling costs?

    A steeper roof pitch can contribute to better attic ventilation. Hot air rises, and a higher peak allows for larger ridge vents, facilitating natural airflow. This can reduce the heat load on your HVAC system during summer months, potentially lowering energy bills. However, the impact is secondary to proper insulation and radiant barriers.

    Is a 45-degree roof too steep?

    A 45-degree roof (12/12 pitch) is quite steep but not uncommon in traditional American architecture. It is challenging to walk on and requires strict safety protocols for maintenance. While it offers excellent water and snow shedding, it also increases the surface area of the roof, leading to higher material costs compared to a lower-pitched roof of the same footprint.

    Conclusion

    Learning how to calculate the pitch of a roof in degrees empowers you to make informed decisions about your home. Whether you are hiring a contractor, buying materials, or assessing safety risks, knowing the exact angle removes guesswork from the equation. By using a simple level, tape measure, and the arctangent formula, you can achieve professional-grade accuracy without professional-grade costs.

    Remember, accuracy is vital. A small error in measurement can lead to significant issues in material ordering or structural fit. Take your time, double-check your numbers, and prioritize safety above all else.

    Did you find this guide helpful? Share it with your fellow DIY enthusiasts on social media to help them tackle their next roofing project with confidence!

  • How to File a Claim for Roof Damage

    How to File a Claim for Roof Damage

    Dealing with a leaking or damaged roof is stressful enough without the added headache of navigating complex insurance paperwork. You want your home protected, but understanding the fine print can feel overwhelming. This guide simplifies the process, showing you exactly how to file a claim with insurance for roof damage efficiently and effectively.

    Immediate Steps: Safety and Documentation First

    Before you pick up the phone to call your insurer, your priority must be safety and evidence preservation. Insurance companies rely heavily on proof, and the quality of your initial documentation can significantly impact the speed and success of your claim.

    1. Ensure Safety and Mitigate Further Damage

    If the damage is severe, ensure no one is in immediate danger. Do not climb onto a wet or steeply pitched roof yourself; this is a job for professionals. However, you have a “duty to mitigate” further damage under most policies. This means you should take reasonable steps to prevent additional loss, such as placing tarps over leaks or moving furniture away from water intrusion. Keep receipts for any materials you buy for these temporary fixes, as they are often reimbursable.

    2. Document Everything Thoroughly

    Take clear, high-resolution photos and videos of the damage from multiple angles.

    • Exterior Shots: Capture missing shingles, dents, holes, or debris impact points. Use a zoom lens if safe to do so, or use a drone if you own one.
    • Interior Shots: Photograph water stains on ceilings, damaged insulation, or ruined personal property.
    • Date Stamps: Ensure your camera or phone settings include date and time stamps.

    According to industry data, claims with comprehensive visual evidence are processed 30% faster than those with sparse documentation. Create a digital folder specifically for this claim to keep everything organized.

    Understanding Your Policy Coverage

    Not all roof damage is covered. Before filing, you need to understand what your policy actually protects. Most standard homeowners insurance policies cover “sudden and accidental” damage caused by specific perils, but they exclude wear and tear.

    Covered vs. Non-Covered Causes

    Cause of DamageTypically Covered?Notes
    Wind/Hail StormsYesCommon in many US states; may have separate deductibles.
    Falling Trees/ObjectsYesIf a tree falls due to a storm, it’s usually covered.
    Fire/LightningYesStandard coverage in almost all policies.
    Age/Wear and TearNoGradual deterioration is considered maintenance.
    NeglectNoFailure to maintain the roof voids coverage.
    FloodingNoRequires separate flood insurance (FEMA).

    To better understand the historical context of property insurance standards, you can refer to general principles outlined on Wikipedia’s page on Property Insurance. However, always prioritize your specific policy document over general information.

    Check Your Deductible

    Your deductible is the amount you pay out-of-pocket before insurance kicks in. If your repair cost is $1,500 and your deductible is $2,000, filing a claim makes no financial sense. In fact, filing small claims can lead to higher premiums or even non-renewal of your policy. Always get a preliminary repair estimate before calling your insurer.

    How To File A Claim With Insurance For Roof Damage

    Step-by-Step: How to File the Claim

    Once you have determined that the damage exceeds your deductible and is likely covered, follow these precise steps to initiate the process.

    Step 1: Contact Your Insurance Provider

    Call your insurance company’s claims department immediately. Have your policy number ready. Be clear and factual about what happened.

    • Do say: “A hailstorm on November 1st caused significant shingle damage and interior leaking.”
    • Don’t say: “My roof is old and finally gave out.” (This implies wear and tear).

    Ask for a claim number and the name of the assigned adjuster. Request an email confirmation of your claim submission for your records.

    Step 2: The Adjuster’s Inspection

    The insurance company will send an adjuster to inspect the damage. This person works for the insurance company, not for you. Their goal is to assess the cost of repairs accurately according to their guidelines.

    • Be Present: Try to be home during the inspection. Walk through the damage with them.
    • Point Out Hidden Damage: Show them interior water damage, damaged gutters, or siding issues that might be related to the same event.
    • Provide Evidence: Share the photos and videos you took earlier.

    Step 3: Get Independent Contractor Estimates

    Do not rely solely on the insurance adjuster’s estimate. Hire a licensed, reputable roofing contractor to provide a detailed written estimate. Many contractors offer free inspections for insurance purposes.

    • Compare the contractor’s line items with the adjuster’s report.
    • Look for discrepancies in square footage, material costs, or labor rates.

    Step 4: Review the Settlement Offer

    The insurer will send a settlement letter detailing what they will pay. This is often split into two payments:

    1. Actual Cash Value (ACV): The depreciated value of your roof.
    2. Recoverable Depreciation: Paid after repairs are completed and invoices are submitted (if you have Replacement Cost Value coverage).

    If the offer seems low, do not accept it immediately. You have the right to negotiate.

    Negotiating a Fair Settlement

    It is common for the initial offer to be lower than the actual repair cost. Here is how to handle disputes professionally.

    Submit a Supplemental Claim

    If your contractor finds damage the adjuster missed, ask them to write a “supplemental report.” Submit this to your adjuster with photos. Most insurers have a process for reviewing supplements.

    Hire a Public Adjuster

    If the dispute is significant (e.g., thousands of dollars difference), consider hiring a public adjuster. They work for you, not the insurance company. They typically charge a percentage of the final settlement (usually 10–20%). For smaller claims, this fee might outweigh the benefit, so calculate carefully.

    Know Your Rights

    Each state has different regulations regarding insurance claims. Some states require insurers to respond within specific timeframes. If you feel you are being treated unfairly, you can contact your state’s Department of Insurance for assistance.

    FAQ Section

    1. Will filing a roof claim raise my insurance premiums?

    Yes, it is highly likely. Filing a claim signals to the insurer that you are a higher risk. Depending on your state and carrier, premiums could increase by 10–20% for several years. In some cases, multiple claims within a short period can lead to policy cancellation.

    2. How long do I have to file a claim for roof damage?

    Most policies require you to report damage “promptly” or within a reasonable time. While there isn’t always a strict statutory deadline like 24 hours, waiting months can give the insurer grounds to deny the claim, arguing that the delay prevented proper investigation or caused further damage. Aim to report within a few days of discovery.

    3. What if the adjuster says the damage is due to age?

    This is a common denial reason. If you believe the damage was caused by a specific event (like a storm) rather than age, provide evidence. Weather reports from the date of the storm, neighbor’s claims, and a professional opinion from your roofing contractor stating the damage pattern is consistent with wind/hail can help overturn this decision.

    4. Can I choose my own roofing contractor?

    Yes, you have the right to choose any licensed contractor you prefer. Insurance companies may recommend vendors from their network, but you are not obligated to use them. However, using a preferred vendor might streamline the payment process.

    5. What is the difference between ACV and RCV?

    Actual Cash Value (ACV) pays for the replacement cost minus depreciation (age and wear). Replacement Cost Value (RCV) pays the full cost to replace the roof with new materials of similar kind and quality, without deducting for depreciation. RCV policies are more expensive but offer better protection.

    Conclusion

    Learning how to file a claim with insurance for roof damage is about preparation, documentation, and persistence. By acting quickly, documenting thoroughly, and understanding your policy’s nuances, you can navigate the system with confidence. Remember, the goal is to restore your home to its pre-loss condition, not just to patch a leak.

    If you found this guide helpful, please share it on social media to help friends and neighbors protect their biggest investment. Stay safe, and keep your home secure!

  • Does a New Roof Add Home Value? The ROI Truth

    Does a New Roof Add Home Value? The ROI Truth

    Have you ever stood in your driveway, looking up at those curling shingles or missing tiles, and wondered if fixing them is worth the investment? It is a common dilemma for homeowners: you know the roof needs attention, but you are unsure if the expense will pay off when it comes time to sell. You are not alone in asking, “Does putting a new roof on your house add value?” The short answer is yes, but the amount of value depends heavily on materials, market conditions, and how you approach the project.

    In this guide, we will break down the financial realities, psychological impacts on buyers, and strategic steps to ensure your roof replacement maximizes your return on investment (ROI).

    How Much Value Does a New Roof Actually Add?

    When considering a major home improvement, numbers matter. According to the Remodeling 2024 Cost vs. Value Report, replacing a roof typically recoups between 60% to 70% of its cost in increased home value. While this might seem like you are “losing” money, it is crucial to understand that a new roof is primarily a maintenance item, not a luxury upgrade like a kitchen remodel.

    However, the value extends beyond direct appraisal increases. A new roof significantly enhances curb appeal, which can lead to faster sales and fewer negotiations. In competitive US housing markets, a home with a recently replaced roof often sells quicker than comparable homes with older roofs, even if the final sale price is similar. Time on market is money, and avoiding months of carrying costs is a hidden financial benefit.

    The Psychology of the Buyer

    From a buyer’s perspective, a roof is a major anxiety point. No one wants to purchase a home only to face a $15,000 repair bill six months later. By installing a new roof, you remove a significant barrier to entry for potential buyers. You are selling peace of mind, which is arguably more valuable than the shingles themselves.

    Which Roofing Material Offers the Best ROI?

    Not all roofs are created equal. The material you choose plays a pivotal role in determining both the upfront cost and the perceived value by appraisers and buyers.

    MaterialAverage LifespanEstimated ROIBest For
    Asphalt Shingles15–30 Years60–70%Most suburban homes; budget-friendly
    Metal Roofing40–70 Years50–60%Modern aesthetics; durability focused
    Slate/Tile50+ Years40–50%Luxury markets; historic homes
    Wood Shakes20–40 Years50–60%Rustic or cottage-style homes

    Asphalt shingles remain the most popular choice in the United States because they offer the best balance of cost and aesthetic familiarity. While metal roofs last longer, their higher initial cost can sometimes dampen the immediate percentage ROI, though they are increasingly attractive to eco-conscious buyers.

    For more detailed information on roofing materials and their historical usage, you can refer to Wikipedia’s page on Roofing.

    Does Putting A New Roof On Your House Add Value

    Does Insurance Cover Roof Replacement?

    A frequent question among homeowners is whether insurance will foot the bill, thereby increasing net equity without out-of-pocket expense. The answer depends entirely on the cause of the damage.

    • Covered Events: If your roof is damaged by a sudden, accidental event such as a hailstorm, hurricane, fallen tree, or fire, most standard homeowners insurance policies will cover the replacement cost (minus your deductible).
    • Wear and Tear: Insurance explicitly excludes damage resulting from age, lack of maintenance, or gradual deterioration. If your shingles are simply old and brittle, you will need to pay for the replacement yourself.

    Pro Tip: Before filing a claim, get an independent inspection. If the damage is borderline, filing a claim could raise your premiums or lead to policy non-renewal. Calculate if the payout exceeds your deductible plus potential premium hikes over the next three years.

    Step-by-Step Guide to Maximizing Value During Replacement

    If you decide to proceed, follow these steps to ensure the project adds maximum value to your property.

    1. Get Three Detailed Quotes: Never settle for the first bid. Ensure each quote includes tear-off, disposal fees, underlayment quality, and warranty details.
    2. Choose Neutral Colors: While you might love bright blue, stick to neutral tones like charcoal, brown, or slate gray. These appeal to the widest range of buyers and complement most exterior paint colors.
    3. Upgrade Ventilation: A new roof is the perfect time to improve attic ventilation. Proper airflow extends the life of the shingles and improves energy efficiency, a selling point you can highlight to buyers.
    4. Document Everything: Keep all receipts, warranties, and before-and-after photos. Provide this “Roof Portfolio” to potential buyers to prove the quality of the work.
    5. Hire Licensed Professionals: Ensure your contractor is licensed, insured, and has strong local reviews. A botched job can decrease value and cause legal headaches.

    Common Mistakes That Decrease Home Value

    Even with good intentions, some homeowners make errors that negate the value added by a new roof.

    • Over-improving for the Neighborhood: Installing a $30,000 slate roof in a neighborhood where homes average $250,000 may not yield a proportional return. Appraisers look at “comparables” (comps). If your neighbors have asphalt shingles, your slate roof won’t triple your home’s value.
    • Ignoring Local Codes: Failing to pull proper permits can cause issues during the sale. Buyers’ inspectors will check for permit history. Unpermitted work can delay closing or force price reductions.
    • Poor Installation Quality: Even the best materials fail if installed incorrectly. Look for contractors who are certified by major manufacturers (like GAF or CertainTeed), as this often comes with enhanced warranties that are transferable to new owners.

    FAQ Section

    1. Will a new roof lower my home insurance premiums?

    Yes, in many cases. Insurance companies view new roofs as lower risk, especially if they are made of impact-resistant materials. You could see a discount ranging from 5% to 20% on your annual premium. Always ask your provider for a quote update after installation.

    2. How old is too old to sell a house without replacing the roof?

    Generally, if your roof is within the first half of its expected lifespan (e.g., less than 10 years old for a 20-year shingle), you can likely sell it as-is. However, if it is nearing the end of its life (15+ years for asphalt), buyers will likely demand a credit or price reduction equivalent to the cost of replacement.

    3. Can I sell my house with a bad roof?

    Yes, but your pool of buyers will shrink. You will likely attract investors or cash buyers who plan to renovate, rather than traditional mortgage-backed buyers. Lenders often require a roof certification before approving a loan. Expect to sell at a discount below market value.

    4. Does the color of the roof affect energy bills?

    Absolutely. Lighter-colored roofs reflect more sunlight, keeping your attic and living spaces cooler in summer. This can reduce air conditioning costs by up to 15%. In hotter US climates, mentioning “energy-efficient cool roofing” can be a strong selling point.

    5. Is it better to repair or replace before selling?

    If the damage is localized (e.g., a few missing shingles from a storm), a professional repair is cost-effective. However, if the roof is near the end of its life or has widespread leaks, replacement is safer. Partial repairs on an old roof can look like a “band-aid” solution and may still scare off buyers.

    Conclusion

    So, does putting a new roof on your house add value? Undeniably, yes. While you may not recoup 100% of the cost in direct appraisal value, the benefits of a faster sale, stronger negotiation position, and enhanced curb appeal make it one of the smartest pre-listing investments you can make.

    A new roof signals to buyers that the home has been well-cared-for, removing a major obstacle from the purchasing process. By choosing the right materials, hiring reputable professionals, and documenting the work, you turn a necessary maintenance expense into a powerful marketing tool.

    Did you find this guide helpful? Share this article with friends or family who are considering home improvements, or post it on your social media to help others make informed real estate decisions!