Installing a new roof is often the most daunting part of any shed building project. Many homeowners worry about leaks, complex measurements, or the sheer physical effort required to lift heavy materials. However, learning how to put on a metal roof on a shed can transform this chore into a satisfying weekend project that adds decades of life to your structure.
Metal roofing is no longer just for barns and industrial warehouses. It has become the gold standard for residential outbuildings due to its longevity, aesthetic appeal, and resistance to harsh weather. If you are ready to swap out rotting shingles or cover a new frame, this guide will walk you through the process with clarity and confidence. We will focus on safety, precision, and best practices to ensure your shed stays dry for years to come.
Why Choose Metal Over Traditional Shingles?
Before diving into the tools and steps, it is crucial to understand why metal is the superior choice for many shed owners. While asphalt shingles are cheap upfront, they typically last only 15–20 years. In contrast, a properly installed metal roof can last 40–70 years.
According to industry data, metal roofs reflect solar radiant heat, which can reduce cooling costs by 10–25%. For a shed used as a workshop or storage space, this temperature regulation helps protect sensitive tools and equipment from extreme heat buildup.
| Feature | Asphalt Shingles | Metal Roofing |
|---|---|---|
| Lifespan | 15–20 Years | 40–70+ Years |
| Maintenance | High (prone to moss/curling) | Low (occasional cleaning) |
| Weather Resistance | Moderate | Excellent (wind/fire/hail) |
| Weight | Heavy | Lightweight |
| Cost Over Time | Higher (replacement needed) | Lower (one-time install) |
What Tools and Materials Do You Need?
Preparation is half the battle. Having the right gear prevents mid-project trips to the hardware store and ensures a cleaner, safer installation.
Essential Tools
- Circular Saw or Tin Snips: For cutting metal panels to size. Tin snips are better for small adjustments; a saw with a metal-cutting blade is faster for long cuts.
- Drill/Impact Driver: With a hex-head bit for driving screws.
- Measuring Tape & Chalk Line: For precise alignment.
- Safety Gear: Gloves (metal edges are sharp), safety glasses, and non-slip boots.
- Ladder & Scaffolding: Ensure stable access to the roof peak.
Materials Checklist
- Metal Panels: Corrugated or R-panel styles are common for sheds. Calculate square footage plus 10% for waste.
- Roofing Underlayment: A synthetic felt or peel-and-stick membrane to prevent condensation and leaks.
- Screws: Use self-tapping roofing screws with rubber washers (neoprene seals). Never use standard wood screws.
- Trim Pieces: Drip edge, ridge cap, and gable trim.
- Closure Strips: Foam strips that fit under the ribs of the metal to block pests and wind.
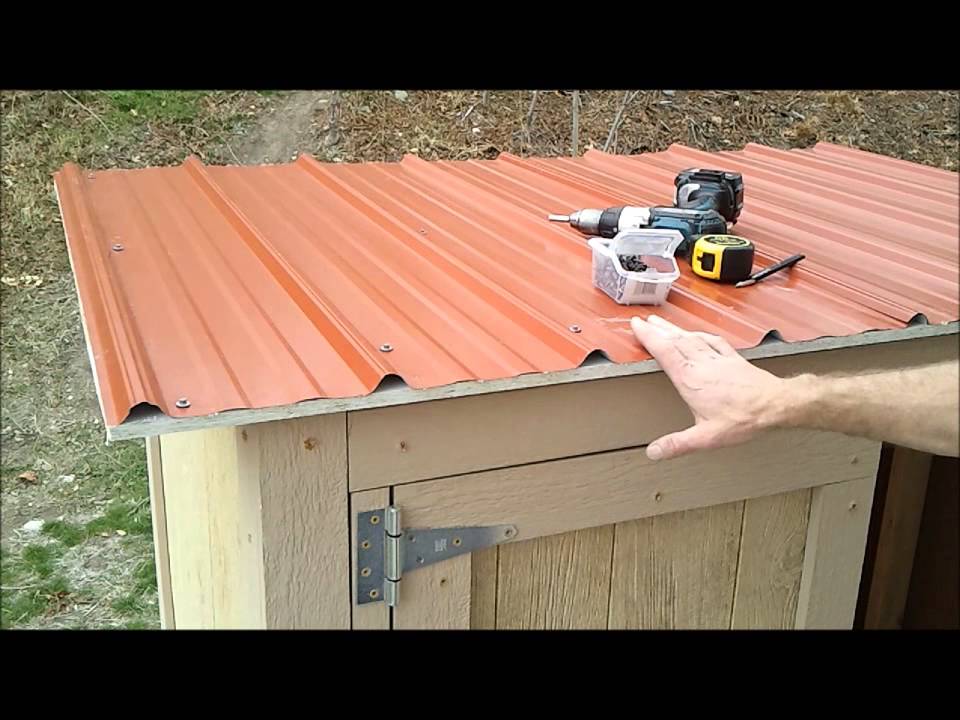
Step-by-Step Guide: How To Put On A Metal Roof On A Shed
Follow these steps meticulously. Rushing the preparation phase is the number one cause of leaks in metal roofing.
1. Prepare the Roof Deck
If you are replacing an old roof, remove all existing shingles and nails. The deck must be clean, dry, and structurally sound. Inspect the plywood or OSB sheathing for rot. Replace any soft spots.
If building new, ensure your rafters are spaced correctly (usually 16 or 24 inches on center) to support the metal panels without sagging.
2. Install the Underlayment
Roll out your roofing underlayment horizontally across the roof deck. Start at the eaves (bottom edge) and work your way up to the ridge.
- Overlap each row by at least 4–6 inches.
- Secure the underlayment with cap nails or staples, following the manufacturer’s spacing guidelines.
- This layer acts as a secondary barrier against water infiltration if wind-driven rain gets under the metal seams.
3. Attach the Drip Edge
Install the drip edge along the eaves first. This metal flashing directs water away from the fascia board and into the gutters.
- Place the drip edge over the underlayment.
- Secure it with roofing nails every 12 inches.
- For the sides (rake edges), install the gable trim later, after the panels are up, or install side drip edges now depending on your specific trim profile.
4. Measure and Cut Your First Panel
Accuracy here determines the success of the entire roof. Measure the width of your shed. Most metal panels have a “covering width” (e.g., 36 inches) which is slightly less than the total width due to overlapping ribs.
- Lay the first panel on the ground to measure.
- Mark your cut line with a straight edge.
- Cut using tin snips or a circular saw. Pro Tip: Cut with the finished side down if using a saw to prevent chipping, or wear protective film if cutting side-up.
5. Install the First Panel
Lift the first panel onto the roof. It is highly recommended to have a helper for this step.
- Align the panel so it overhangs the drip edge by about 1–2 inches.
- Ensure the panel is square with the eave. If it is off by even an inch at the start, it will be off by several inches at the ridge.
- Temporarily secure the panel with one screw at the top corner to hold it in place while you adjust.
6. Fasten the Panels Correctly
This is the most critical technical step. Improper screwing leads to leaks and stripped holes.
- Where to screw: Drive screws through the flat part of the panel, not the high ribs (unless specified by the manufacturer). Screwing into the ribs can cause the metal to dimple and break the seal.
- Tightness: Tighten the screw until the rubber washer is compressed and flush with the metal. Do not overtighten. If you see the washer bulging out excessively or the metal dimpling deeply, you have gone too far. This compromises the watertight seal.
- Spacing: Typically, place screws every 12–24 inches along the purlins (roof supports).
7. Overlap and Install Subsequent Panels
Place the second panel next to the first, overlapping the side lap (the ribbed edge).
- Check alignment frequently with your chalk line.
- Secure the overlap according to the panel’s instructions. Some systems require screws in the overlap; others rely on the rib interlock.
- Continue this process across the entire roof width.
8. Install Ridge Cap and Trim
Once all field panels are installed, finish the roof with the ridge cap.
- Apply closure strips (foam filler) under the ridge cap to seal the gap between the panel ribs and the cap.
- Screw the ridge cap into the high points of the metal panels.
- Install gable trim on the sides to cover the exposed edges of the metal and underlayment.
For more detailed information on material properties and sustainability, you can refer to Metal Roofing on Wikipedia.
Common Mistakes to Avoid
Even experienced DIYers can stumble on these pitfalls. Being aware of them saves time and money.
- Walking on the Ribs: Always step on the flat parts of the panel where the screws are. Walking on the ribs can dent the metal and break the seal.
- Ignoring Thermal Expansion: Metal expands and contracts with temperature changes. Do not drive screws in too tightly, and allow for slight movement as recommended by the manufacturer.
- Mixing Metals: Never use aluminum flashings with steel roofing without proper separation. Galvanic corrosion can occur, eating away at the metal over time. Stick to compatible metals or use coated fasteners.
FAQ Section
Can I install a metal roof over existing shingles?
Yes, in many cases, you can install metal roofing over one layer of existing asphalt shingles. This saves disposal costs and labor. However, check your local building codes first. Ensure the roof deck is solid and the shingles are flat. You must still use underlayment between the shingles and the new metal.
What is the best slope for a metal roof on a shed?
Metal roofing can be installed on low-slope roofs, but a minimum pitch of 3:12 (3 inches of rise for every 12 inches of run) is recommended for standard lapped panels. For lower slopes, you may need a standing seam system or special sealants to prevent water backup.
Do I need special screws for metal roofing?
Absolutely. You must use self-tapping screws with a neoprene or EPDM rubber washer. These washers create a watertight seal around the screw hole. Standard wood or deck screws will rust quickly and leak, leading to structural damage.
How do I cut metal roofing panels without damaging them?
Use tin snips for small cuts and notches. For long straight cuts, use a circular saw with a fine-toothed metal-cutting blade or a nibbler tool. Avoid using abrasive grinding wheels, as the heat generated can damage the protective coating (galvanization or paint) on the metal, leading to premature rust.
Is a metal roof noisy during rain?
This is a common myth. When installed correctly with solid sheathing (plywood/OSB) and proper underlayment, a metal roof is no louder than an asphalt shingle roof. The solid deck dampens the sound significantly. Without solid decking (e.g., on open purlins), it can be louder, but sheds usually have solid decks.
Conclusion
Learning how to put on a metal roof on a shed is a rewarding investment in your property. By choosing durable materials, preparing the deck thoroughly, and following precise installation steps, you create a shelter that withstands the elements with minimal maintenance. Remember, patience during the alignment and screwing phases is key to a leak-free result.
Now that you have the knowledge, it’s time to gather your tools and get started. If you found this guide helpful, please share it with your fellow DIY enthusiasts on social media. Happy building!
Leave a Reply