Blog

  • Are There Lymph Nodes In The Roof Of Your Mouth?

    Are There Lymph Nodes In The Roof Of Your Mouth?

    It can be incredibly unsettling to feel a new lump or bump on the roof of your mouth. Your mind might immediately jump to serious health concerns, leading you to ask a very specific question: Are there lymph nodes in the roof of your mouth? You are not alone in this worry; many people experience similar anxieties when they detect changes in their oral cavity.

    The short answer is no, but the reality of what you are feeling is still important to understand. While true lymph nodes are not located in the hard or soft palate, the area is rich in other immune tissues that can swell and mimic the sensation of a lymph node. In this guide, we will clear up the anatomical confusion, explain what those bumps likely are, and help you determine if you need professional medical attention.

    The Anatomical Truth: Do Lymph Nodes Exist in the Palate?

    To answer the question “Are there lymph nodes in the roof of your mouth“ accurately, we must look at human anatomy. The roof of your mouth is divided into two sections: the hard palate (the bony front part) and the soft palate (the muscular back part).

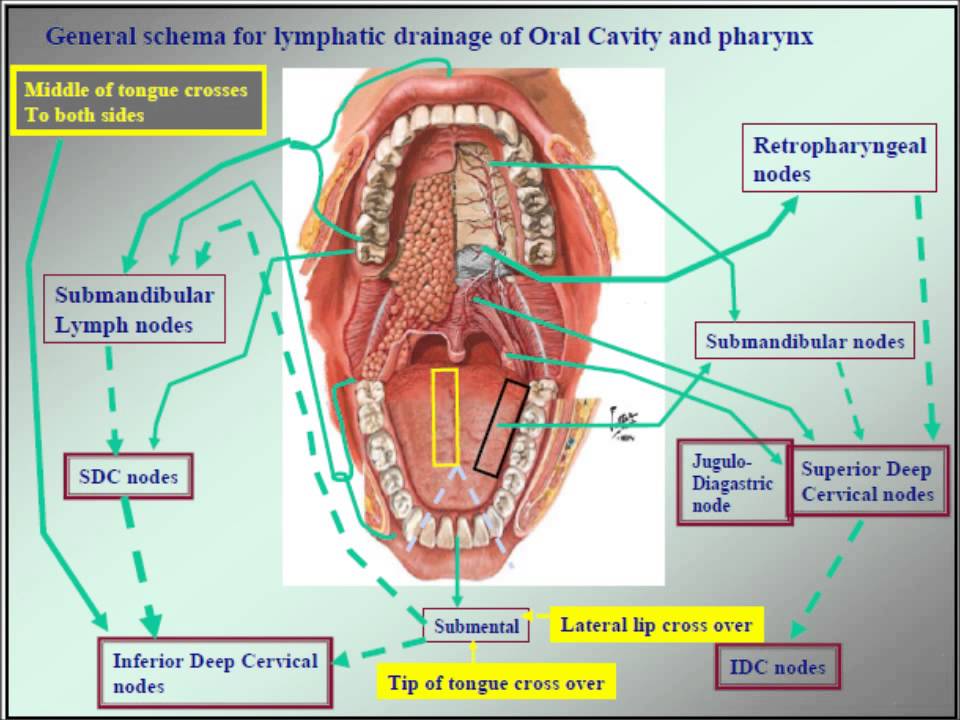
    According to standard anatomical structures, there are no true lymph nodes embedded within the tissue of the hard or soft palate. Lymph nodes are typically clustered in specific regions of the head and neck, such as under the jaw (submandibular), behind the ears (postauricular), and along the sides of the neck (cervical).

    However, this does not mean the roof of your mouth lacks immune defense. The oral cavity is lined with mucosa that contains lymphoid tissue. This includes minor salivary glands and collections of immune cells that can become inflamed or swollen. When these tissues react to infection or irritation, they create bumps that feel remarkably like swollen lymph nodes, leading to the common misconception.

    For a deeper understanding of head and neck anatomy, you can refer to detailed diagrams on Wikipedia.org.

    Why Does It Feel Like There Is a Lump?

    If there are no lymph nodes, why does it feel like there is one? Several common conditions can cause swelling or lumps on the roof of the mouth. Understanding these can alleviate unnecessary fear.

    1. Swollen Salivary Glands

    The roof of your mouth contains hundreds of minor salivary glands. If one of these ducts gets blocked by mucus or debris, it can form a small, fluid-filled cyst known as a mucocele. These are usually harmless, painless, and may resolve on their own.

    2. Torus Palatinus

    Some people have a benign bony growth in the center of the hard palate called a torus palatinus. This is not a sign of disease but rather a genetic trait. It feels hard and immovable, unlike a soft, swollen lymph node.

    3. Infection and Inflammation

    Viral or bacterial infections, such as strep throat or the common cold, can cause the lymphoid tissue in the back of the throat (near the soft palate) to swell. This area includes the adenoids and tonsils, which are part of the lymphatic system. While not “nodes” in the palate itself, their proximity can make it feel like the roof of your mouth is affected.

    4. Irritation from Food

    Burns from hot pizza cheese or scratches from sharp chips can cause localized inflammation. This swelling is the bodyโ€™s natural healing response and can feel like a tender lump.
    Are There Lymph Nodes In The Roof Of Your Mouth

    Common Causes of Bumps on the Roof of the Mouth

    When you search for information about oral lumps, it is crucial to differentiate between benign issues and those requiring care. Here is a breakdown of common culprits.

    ConditionTexturePain LevelTypical Duration
    MucoceleSoft, fluid-filledPainlessDays to weeks
    Torus PalatinusHard, bonyPainlessPermanent
    Canker SoreSoft, ulceratedPainful1โ€“2 weeks
    AbscessFirm, swollenVery PainfulUntil treated
    Allergic ReactionSwollen tissueItchy/TenderHours to days

    Note: This table is for informational purposes only and does not replace professional diagnosis.

    When Should You Be Concerned?

    While most lumps on the roof of the mouth are harmless, some symptoms warrant a visit to a dentist or doctor. You should seek professional advice if you experience:

    • Persistent Swelling: A lump that does not go away after two weeks.
    • Rapid Growth: A bump that increases in size quickly.
    • Bleeding: Unexplained bleeding from the area.
    • Difficulty Swallowing: Any obstruction that affects eating or breathing.
    • Numbness: Loss of sensation in the palate or surrounding teeth.

    These symptoms could indicate a more serious underlying issue, such as an dental abscess or, in rare cases, oral cancer. Early detection is key to effective treatment.

    How to Relieve Discomfort at Home

    If you have identified a minor irritation or a small mucocele, you can manage the discomfort with simple home remedies. Here is a step-by-step approach to soothing your palate:

    1. Salt Water Rinse: Mix 1/2 teaspoon of salt in a glass of warm water. Swish gently for 30 seconds and spit out. This helps reduce inflammation and keeps the area clean.
    2. Avoid Irritants: Stay away from spicy, acidic, or very hot foods that can aggravate the sensitive tissue.
    3. Stay Hydrated: Drink plenty of water to keep your mouth moist and support saliva production, which naturally cleanses the oral cavity.
    4. Cold Compress: If there is external swelling or pain, applying a cold compress to the outside of your cheek can help numb the area and reduce inflammation.

    Remember, these steps are for minor irritations. If pain persists or worsens, do not hesitate to consult a healthcare provider.

    FAQ Section

    1. Can stress cause lumps on the roof of my mouth?

    Stress itself does not directly create lumps, but it can weaken your immune system, making you more susceptible to canker sores or viral infections that cause swelling. Additionally, stress can lead to teeth grinding, which may irritate the palate.

    2. Is a lump on the roof of my mouth a sign of cancer?

    While oral cancer can present as a lump, it is relatively rare compared to benign causes like mucoceles or torus palatinus. However, any persistent lump that does not heal within two weeks should be evaluated by a professional to rule out serious conditions.

    3. What is the difference between a lymph node and a swollen gland in the mouth?

    True lymph nodes are distinct organs located in specific clusters in the neck and head. “Swollen glands” in the mouth usually refer to inflamed salivary glands or lymphoid tissue. They function similarly in immune response but are anatomically different.

    4. Can allergies cause swelling in the roof of the mouth?

    Yes, allergic reactions to food, pollen, or medications can cause angioedema, which is rapid swelling of the deeper layers of the skin and mucous membranes. This can affect the roof of the mouth and may require immediate medical attention if it affects breathing.

    5. How do I know if my bump is a mucocele?

    A mucocele typically appears as a clear or bluish, fluid-filled blister. It is usually soft to the touch and painless. It often results from trauma to a salivary gland, such as biting your cheek or palate.

    Conclusion

    So, are there lymph nodes in the roof of your mouth? Anatomically, no. However, the presence of salivary glands, lymphoid tissue, and other structures means that swelling and lumps are common and often mistaken for lymph nodes. Most of these occurrences are benign and resolve on their own with proper care.

    Understanding the difference between normal anatomical variations and signs of infection empowers you to take better care of your oral health. Donโ€™t let anxiety dictate your reaction; instead, observe the symptoms, use home remedies for minor issues, and consult a professional if concerns persist.

    If you found this article helpful, please share it with friends and family who might have similar questions. Spreading accurate health information helps everyone stay informed and calm.
  • Does a New Roof Qualify for Energy Tax Credit 2024?

    Does a New Roof Qualify for Energy Tax Credit 2024?

    Replacing a roof is one of the most significant investments a homeowner can make. It is stressful, expensive, and often unexpected. If you are currently planning a replacement or dealing with storm damage, you are likely looking for every possible way to offset the cost. A common question that arises during this process is: Does a new roof qualify for energy tax credit 2024?

    The short answer is: It depends entirely on the materials you choose.

    A standard asphalt shingle roof generally does not qualify. However, if you install specific energy-efficient roofing products that meet strict federal standards, you may be eligible for a valuable tax credit. In this guide, we will break down exactly what qualifies, how much money you can save, and the steps you need to take to ensure you donโ€™t miss out on this financial benefit.

    Understanding the 2024 Energy Efficient Home Improvement Credit

    To understand whether your new roof qualifies, we first need to look at the legislation behind it. The credit you are likely referring to is part of the Inflation Reduction Act, which extended and modified the Nonbusiness Energy Property Credit (often called the “Energy Efficient Home Improvement Credit”).

    For the 2024 tax year, this credit allows homeowners to claim 30% of the cost of qualifying energy-efficient improvements, up to a maximum annual limit.

    Key Changes for 2024

    Prior to recent updates, the limits were lower and the rules were more complex. For 2024, the IRS has streamlined the process, but the criteria for what constitutes an “energy-efficient” roof remain strict. The goal of the government is not just to reward home improvement, but to specifically incentivize reductions in household energy consumption.

    According to the Internal Revenue Service, the credit is designed to help taxpayers reduce their energy bills while lowering the national carbon footprint. This context is crucial because it explains why a basic cosmetic roof upgrade does not qualifyโ€”the primary intent must be energy efficiency.

    What Roofing Materials Actually Qualify?

    This is the most critical section for your wallet. Many contractors may vaguely mention “tax credits,” but you need to verify the specific product certification.

    1. Metal Roofs with Pigmented Coatings

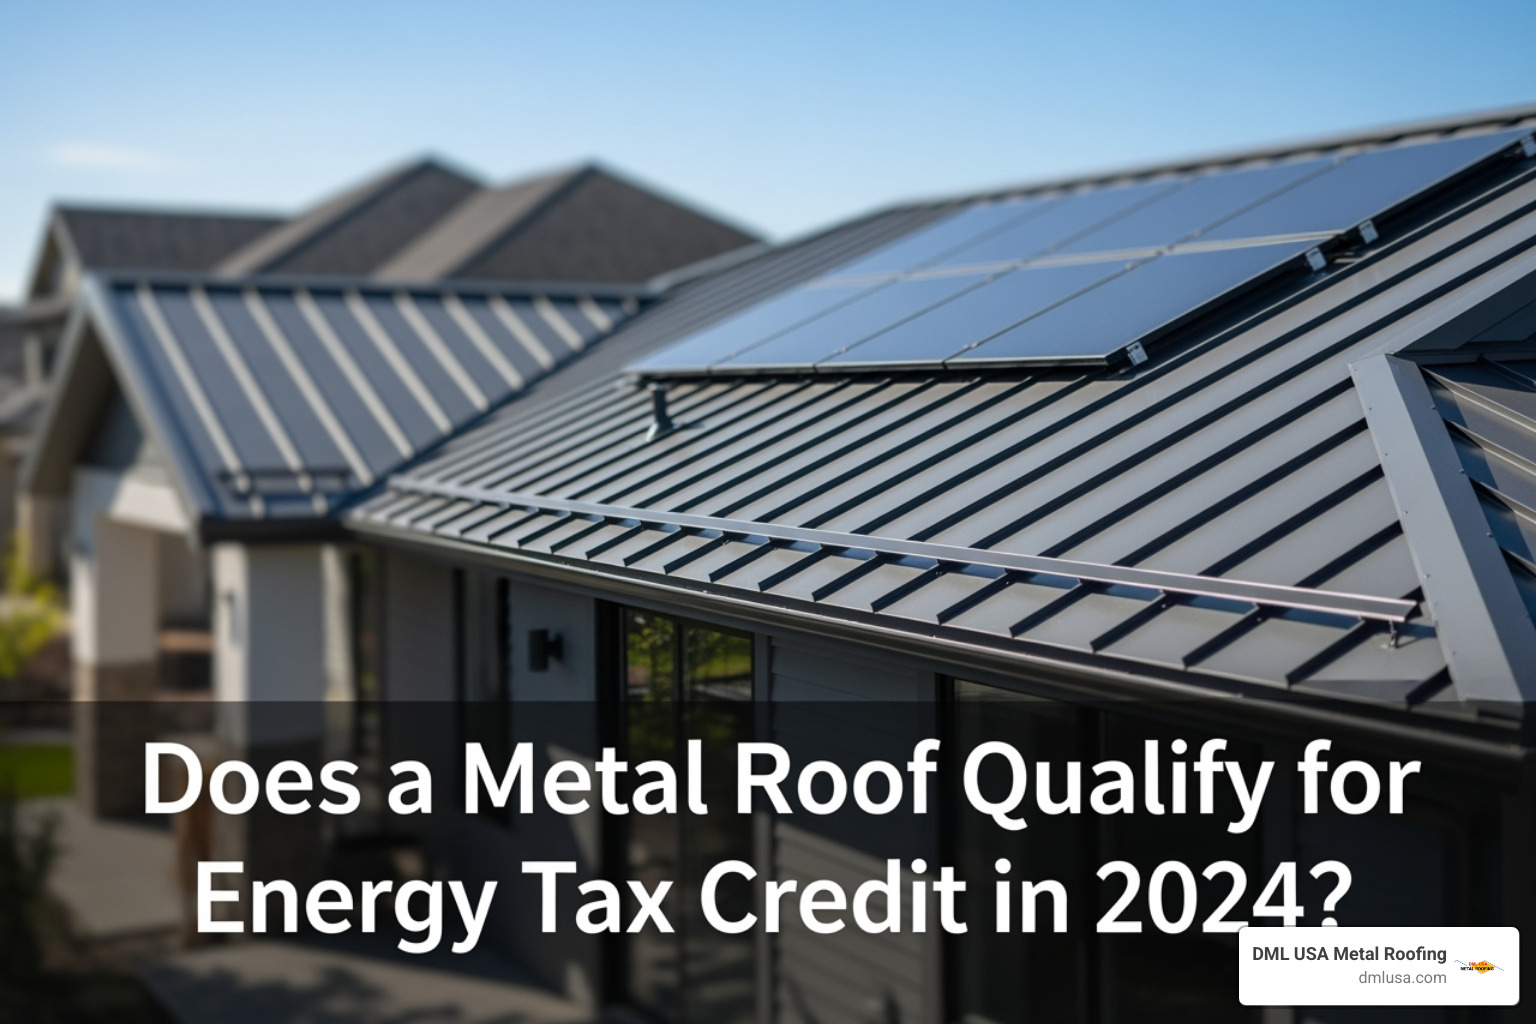
    Metal roofs are highly durable and reflective. To qualify for the 2024 tax credit, a metal roof must have pigmented coatings that meet the Energy Star program requirements for initial solar reflectance and thermal emittance.

    • Why it works: These coatings reflect solar heat away from your home, reducing the load on your air conditioning system.
    • Requirement: You must obtain the manufacturerโ€™s certification statement confirming the product meets Energy Star criteria.

    2. Asphalt Shingles with Cooling Granules

    Not all asphalt shingles are created equal. Standard black shingles absorb heat. However, certain premium asphalt shingles are manufactured with special cooling granules that reflect more sunlight.

    • The Catch: Only specific lines from major manufacturers (such as GAF, CertainTeed, or Owens Corning) carry the necessary Energy Star rating.
    • Verification: Do not assume “cool color” means qualified. Look for the official Energy Star label on the product packaging or spec sheet.

    3. Tile Roofs (Clay and Concrete)

    Similar to metal, clay and concrete tiles can qualify if they are designed to meet the solar reflectance index (SRI) standards set by the EPAโ€™s Energy Star program. These are popular in the Southwest US for their natural thermal mass and reflective properties.

    Products That Do NOT Qualify

    It is equally important to know what is excluded to avoid disappointment:

    • Standard wood shakes or shingles.
    • Basic slate roofing (unless specially coated/certified, which is rare).
    • Standard dark-colored asphalt shingles without reflective technology.
    • Labor costs alone (the credit applies to the material cost, though installation is often bundled in the receipt; check current IRS guidance on bundled pricing).
    Does A New Roof Qualify For Energy Tax Credit 2024

    How Much Can You Save? The Financial Breakdown

    Understanding the potential savings helps justify the upfront cost of premium materials. For the 2024 tax year, the limits are generous compared to previous years.

    Expense CategoryCredit RateAnnual Limit
    Qualified Roofing Materials30% of costUp to $1,200*
    Insulation & Air Sealing30% of costUp to $1,200*
    Total Annual CapN/A$1,200

    *Note: The $1,200 cap is an aggregate limit for all “building envelope” components, including windows, doors, insulation, and roofs. You cannot claim $1,200 for the roof AND another $1,200 for windows in the same year. The total combined credit for these items cannot exceed $1,200.

    Example Calculation

    Letโ€™s say you spend $4,000 on qualified Energy Star metal roofing panels.

    • Calculation: $4,000 x 0.30 = $1,200.
    • Since this hits the annual cap, your maximum credit is $1,200.

    If you spend $2,000 on qualified shingles:

    • Calculation: $2,000 x 0.30 = $600.
    • Your credit is $600. You still have $600 of “room” left in your annual cap for other improvements like attic insulation.

    Step-by-Step Guide to Claiming the Credit

    Claiming the credit is not automatic. You must follow specific procedures during and after installation.

    Step 1: Verify Eligibility Before Purchase

    Do not wait until the invoice is paid. Ask your contractor for the Manufacturerโ€™s Certification Statement. This document proves the specific product batch meets Energy Star requirements. Without this paper trail, the IRS may deny your claim during an audit.

    Step 2: Keep Detailed Records

    Save the following documents in a dedicated folder (digital or physical):

    • The itemized receipt showing the cost of materials separately from labor (if possible).
    • The Manufacturerโ€™s Certification Statement.
    • Proof of payment (credit card statement or cancelled check).
    • Date of installation.

    Step 3: File IRS Form 5695

    When filing your 2024 federal tax return (in early 2025), you must complete IRS Form 5695 (Residential Energy Credits).

    1. Go to Part II of the form (“Energy Efficient Home Improvement Credit”).
    2. Enter the cost of your qualified roofing materials.
    3. Calculate 30% of that cost.
    4. Apply the annual limit ($1,200).
    5. Transfer the final credit amount to your Schedule 3 (Form 1040).

    Step 4: Consult a Tax Professional

    Tax laws are subject to change and individual circumstances vary. If your tax situation is complex, have a CPA review your Form 5695 before submission.

    Common Misconceptions About Roofing Tax Credits

    There is a lot of misinformation online. Letโ€™s clear up the most frequent confusion points.

    Myth 1: “Solar Panels are the same as a Solar Roof.”

    • Fact: No. Solar panels fall under the Residential Clean Energy Credit, which has a separate 30% credit with no annual dollar limit. A standard energy-efficient roof falls under the Home Improvement Credit with the $1,200 cap. Do not mix these up.

    Myth 2: “I can claim the credit for a repair.”

    • Fact: Generally, no. The credit is for new installations or replacements. Patching a few shingles does not qualify. The entire roofing component (or a significant section acting as a new installation) must be replaced with qualified materials.

    Myth 3: “The credit is a refund.”

    • Fact: It is a non-refundable tax credit. This means it can reduce your tax liability to zero, but if the credit is larger than the taxes you owe, you do not get the difference back in cash. However, unused portions generally do not carry over to the next year for this specific credit, so ensure you have enough tax liability to use it.

    FAQ Section

    1. Does a new roof qualify for energy tax credit 2024 if I live in a rental property?

    No. This credit is strictly for primary residences owned by the taxpayer. Rental properties, second homes, and commercial buildings do not qualify for the Residential Energy Efficient Home Improvement Credit.

    2. Can I claim the credit if I installed the roof myself (DIY)?

    Yes, provided you purchase qualified materials that meet Energy Star standards. You must keep the receipts for the materials and the manufacturerโ€™s certification. However, ensure local building codes allow DIY roofing, as improper installation can void warranties and insurance.

    3. What if I already filed my 2023 taxes but forgot to claim a 2023 roof?

    You can file an amended return using Form 1040-X. If your roof was installed in 2023, it falls under the previous year’s rules, which also offered a 30% credit but had different cumulative lifetime limits in prior years. For 2024 installations, stick to the current year’s filing.

    4. Is there an income limit for claiming this credit?

    Unlike some other green energy incentives, the Energy Efficient Home Improvement Credit does not have an income cap. High-income earners are eligible to claim the full credit, provided they have the tax liability to offset.

    5. How long does it take to receive the refund?

    The credit reduces the amount of tax you owe. If you are due a refund, the credit increases that refund amount. Processing times depend on the IRS, typically ranging from 21 days for e-filed returns to several months for paper filings.

    Conclusion

    So, does a new roof qualify for energy tax credit 2024? Yes, but only if you choose the right materials.

    By opting for Energy Star-certified metal roofs, cool asphalt shingles, or reflective tiles, you can recoup up to $1,200 of your investment through federal tax credits. This not only lowers your immediate tax bill but also reduces your long-term energy costs through better heat reflection.

    Donโ€™t leave money on the table. Before you sign that contract with your roofer, ask for the Energy Star Certification for their proposed materials. Itโ€™s a small piece of paper that could save you hundreds of dollars.

    Found this guide helpful? Share it with friends or family who are planning home improvements this year. Helping others save money is always a good deed!

  • Can I File An Insurance Claim For A Leaking Roof?

    Can I File An Insurance Claim For A Leaking Roof?

    Have you noticed a damp spot on your ceiling or heard the dreaded drip-drip-drip during a storm? It is a stressful situation that many homeowners face, often leaving them wondering about the financial implications of repairs. If you are asking yourself, “Can I file an insurance claim for a leaking roof,” the answer is nuanced: it depends entirely on why the roof is leaking.

    Understanding the distinction between sudden accidental damage and long-term wear and tear is crucial. This guide will walk you through the intricacies of homeowners insurance, helping you determine if your leak is covered and how to navigate the claims process effectively.

    Understanding Coverage: Sudden Damage vs. Neglect

    The most critical factor in determining whether your insurance company will cover a roof leak is the cause of the damage. Homeowners insurance is designed to protect against sudden, accidental, and unforeseen events, not maintenance issues.

    The “Sudden and Accidental” Rule

    Insurance policies typically cover damage resulting from specific perils. If your roof leaks because a tree branch fell on it during a storm, or hail punched holes in your shingles, this is considered sudden and accidental. In these scenarios, the answer to “Can I file an insurance claim for a leaking roof” is almost certainly yes.

    Common covered perils include:

    • Windstorms and hurricanes
    • Hail damage
    • Falling objects (like trees)
    • Weight of ice, snow, or sleet
    • Fire or lightning strikes

    The Exclusion: Wear and Tear

    Conversely, if your roof is leaking because the shingles are 20 years old and have curled up, or because flashing has deteriorated over time, this is considered wear and tear. Insurance companies view this as a maintenance responsibility of the homeowner.

    According to general insurance principles, policies exclude damage resulting from neglect, gradual deterioration, or lack of maintenance. If an adjuster determines that the leak existed for months before you noticed it, or that the roof was already at the end of its useful life, your claim will likely be denied.

    Expert Insight: “Insurance is not a maintenance contract. It is a risk transfer mechanism for catastrophic or unexpected events. If you could have prevented the leak by routine inspection, it is generally not covered.”

    Factors That Influence Your Claim Approval

    Even if the cause seems clear-cut, several variables can impact the outcome of your claim. Being aware of these factors can help you prepare a stronger case.

    1. Age of the Roof

    Most insurance companies have strict guidelines regarding roof age.

    • Under 10 years: Usually eligible for full replacement cost coverage.
    • 10โ€“20 years: May be subject to depreciation (Actual Cash Value).
    • Over 20 years: Many insurers may deny coverage entirely or offer only a small percentage of the repair cost, requiring you to upgrade to a new roof regardless of the damage extent.

    2. Type of Policy: RCV vs. ACV

    Check your policy declarations page to see which valuation method applies to your dwelling coverage:

    FeatureReplacement Cost Value (RCV)Actual Cash Value (ACV)
    DefinitionPays to replace/repair with similar materials at current prices.Pays the current value minus depreciation.
    DepreciationNone deducted initially.Deducted based on age and condition.
    Out-of-PocketLower (only deductible).Higher (deductible + depreciation).
    Best ForNewer roofs; comprehensive protection.Older roofs; lower premium costs.

    If you have an ACV policy, even if the claim is approved, the payout might be significantly less than the repair cost because the insurer deducts value for the age of your shingles.

    3. Maintenance Records

    Did you perform regular inspections? Do you have receipts for minor repairs? Providing documentation proves that you maintained the roof properly and that the damage was indeed sudden. This evidence can be the difference between approval and denial.

    Can I File An Insurance Claim For A Leaking Roof

    Step-by-Step Guide: How to File a Claim

    If you believe your leak is covered, follow these steps meticulously to ensure a smooth process.

    Step 1: Mitigate Further Damage

    Your policy requires you to prevent additional damage. This does not mean you need to replace the roof immediately.

    • Place buckets under active drips.
    • Use tarps to cover exposed areas if safe to do so.
    • Move furniture and electronics away from water.
    • Note: Keep receipts for any materials bought for emergency mitigation (tarps, plywood), as these may be reimbursable.

    Step 2: Document Everything

    Before cleaning up, take extensive photos and videos.

    • Capture close-ups of the leak source.
    • Photograph water damage on ceilings, walls, and floors.
    • Take wide shots showing the context of the damage.
    • If possible, safely photograph the exterior damage (missing shingles, fallen branches).

    Step 3: Contact Your Insurance Provider

    Call your agent or the claims department. Be honest but precise.

    • State clearly: “I discovered water intrusion due to [specific event, e.g., last night’s storm].”
    • Avoid saying: “My roof has been leaking for a while.”
    • Ask about your deductible and whether filing a claim will affect your future premiums.

    Step 4: Meet the Adjuster

    An insurance adjuster will visit to assess the damage.

    • Be present during the inspection.
    • Point out all damaged areas, including hidden ones like wet insulation in the attic.
    • Provide your maintenance records and photos.

    Step 5: Review the Estimate

    The adjuster will provide an estimate. Compare it with quotes from licensed roofing contractors. If there is a significant discrepancy, you have the right to negotiate or request a re-inspection.

    When to Hire a Public Adjuster

    If your claim is denied or the payout seems unfairly low, consider hiring a public adjuster. Unlike the insurance companyโ€™s adjuster, a public adjuster works for you. They charge a fee (usually a percentage of the settlement), but they can often secure a higher payout by thoroughly documenting damage and negotiating with the insurer.

    For more detailed information on how insurance contracts work, you can refer to the general principles outlined on Wikipedia.

    FAQ Section

    1. Will my insurance premiums go up after a roof leak claim?

    Yes, it is highly likely. Filing a claim, especially for water damage, can label you as a higher-risk client. Premiums may increase by 10% to 20%, or you might lose eligibility for certain discounts. For minor leaks where repair costs are close to your deductible, it may be wiser to pay out-of-pocket.

    2. Does homeowners insurance cover mold resulting from a roof leak?

    Coverage for mold is limited. Most policies cover mold remediation only if it is a direct result of a covered peril (e.g., sudden storm damage). If the mold resulted from long-term neglect or a slow leak that you ignored, it will likely be excluded. There is often a cap on mold coverage, typically ranging from $1,000 to $10,000.

    3. What if the leak started before I bought the house?

    If you purchased a home warranty or if the previous owner disclosed the issue, standard homeowners insurance will not cover pre-existing conditions. Insurance covers new occurrences. However, if the damage was hidden and undiscoverable during inspection, you might have recourse through your title insurance or legal action against the seller, but not your property insurance.

    4. Can I choose my own roofing contractor?

    Yes, you have the right to choose any licensed and insured contractor. The insurance company cannot force you to use their “preferred vendors.” However, using a preferred vendor might streamline the payment process, as they are familiar with the insurerโ€™s pricing software. Always get three independent quotes to ensure fairness.

    5. What is a “Matching Clause” in roof insurance?

    A matching clause addresses situations where only part of the roof is damaged. If your insurer pays to replace only the damaged section, the new shingles may not match the faded color of the old ones. Some policies include “matching coverage,” paying to replace the entire roof slope for aesthetic consistency. Check your policy for this specific endorsement.

    Conclusion

    So, can I file an insurance claim for a leaking roof? The answer lies in the cause. If the leak is the result of a sudden, accidental event like a storm or falling object, you likely have a valid claim. If it is due to age, neglect, or lack of maintenance, you will probably need to cover the repairs yourself.

    Always prioritize regular roof inspections to catch minor issues before they become major leaks. Not only does this extend the life of your roof, but it also strengthens your position should you ever need to file a claim for unexpected damage.

    If you found this guide helpful, please share it with your friends and family on social media. Helping others understand their insurance rights can save them from significant financial stress during difficult times.

  • Why Is The Roof Of My Mouth Sore? Causes & Fixes

    Why Is The Roof Of My Mouth Sore? Causes & Fixes

    Have you ever taken a bite of hot pizza only to feel a sharp, lingering sting on the top of your mouth? Or perhaps you woke up with an unexplained tenderness that makes eating or drinking uncomfortable? You are not alone. Many people experience this discomfort, often leaving them asking, “Why is the roof of my mouth sore and swollen?”

    Understanding the root cause is the first step toward relief. Whether itโ€™s a minor burn from hot coffee or a sign of an underlying infection, identifying the trigger helps you choose the right treatment. In this guide, we will explore the most common reasons for palate pain, effective home remedies, and clear signs that indicate you need professional medical attention.

    Common Causes: Why Is The Roof Of My Mouth Sore And Swollen?

    The roof of your mouth, medically known as the palate, is sensitive tissue. It consists of the hard palate (the bony front part) and the soft palate (the muscular back part). Because it is exposed to everything we eat, drink, and breathe, it is prone to various irritants.

    Here are the primary reasons you might be experiencing pain and swelling:

    1. Thermal Burns (Pizza Palate)

    This is the most frequent culprit. The tissue on the roof of your mouth is delicate. Consuming food or beverages that are too hotโ€”such as fresh-out-of-the-oven pizza, hot coffee, or soupโ€”can cause first-degree burns.

    • Symptoms: Redness, blistering, peeling skin, and immediate stinging pain.
    • Healing Time: Typically 3โ€“7 days.

    2. Physical Trauma and Abrasion

    Sometimes, the damage is mechanical rather than thermal. Eating hard, crunchy foods like tortilla chips, hard candy, or crusty bread can scratch or puncture the palate. Additionally, aggressive brushing or using a toothbrush with hard bristles can cause micro-abrasions that become inflamed.

    3. Canker Sores (Aphthous Ulcers)

    Canker sores are small, shallow lesions that develop on the soft tissues in your mouth or at the base of your gums. Unlike cold sores, they donโ€™t occur on the surface of your lips and arenโ€™t contagious.

    • Appearance: White or yellow center with a red border.
    • Triggers: Stress, minor injury, acidic foods, or vitamin deficiencies.

    4. Oral Thrush (Candidiasis)

    Oral thrush is a fungal infection caused by Candida albicans. It is more common in infants, the elderly, and individuals with weakened immune systems or those taking antibiotics.

    • Symptoms: Creamy white lesions on the tongue or inner cheeks, sometimes spreading to the roof of the mouth. These lesions may bleed slightly when scraped.

    5. Allergic Reactions

    Food allergies or sensitivities to certain ingredients (like nuts, shellfish, or specific preservatives) can cause localized swelling and soreness. This is often accompanied by itching or a tingling sensation. In severe cases, this can lead to angioedema, a deeper swelling that requires immediate attention.

    6. Sinus Infections

    Your sinuses are located directly above the roof of your mouth. When you have a sinus infection (sinusitis), the pressure and inflammation can radiate downward, causing the roof of your mouth to feel tender, swollen, or achy.

    Immediate Relief: How to Soothe a Sore Palate

    If you are dealing with minor irritation, you can often manage the pain at home. The goal is to reduce inflammation, prevent infection, and promote healing.

    Step-by-Step Home Care Routine

    1. Rinse with Salt Water Mix 1/2 teaspoon of salt into 8 ounces (240 ml) of warm water. Swish gently around your mouth for 30 seconds, then spit it out. Do this 2โ€“3 times a day. Salt water is a natural disinfectant and helps reduce swelling.
    2. Apply Cold Compresses Suck on ice chips or eat cold foods like yogurt, pudding, or ice cream. The cold temperature numbs the nerve endings and reduces blood flow to the area, which minimizes swelling. Avoid acidic flavors like lemon or orange.
    3. Stay Hydrated Drink plenty of cool water. Aim for at least 2 liters per day. Hydration keeps the mucous membranes moist and promotes faster healing. Avoid alcohol and caffeine, as they can dehydrate you and irritate the tissue further.
    4. Use Over-the-Counter Gels Products containing benzocaine (such as Orajel or Anbesol) can provide temporary numbness. Apply a small amount directly to the sore spot using a clean cotton swab. Note: Follow package instructions carefully and do not use for more than 7 days.
    5. Avoid Irritants Until the sore heals, steer clear of:
      • Spicy foods
      • Acidic fruits (tomatoes, citrus)
      • Crunchy or sharp foods (chips, nuts)
      • Very hot beverages
    Why Is The Roof Of My Mouth Sore And Swollen

    When to See a Doctor: Red Flags

    While most cases of a sore roof of the mouth resolve on their own within a week, some symptoms indicate a more serious condition. According to general medical guidelines, you should consult a healthcare provider if you experience:

    SymptomPotential ConcernAction Required
    Sores lasting > 2 weeksOral cancer, chronic infectionSchedule dental/medical exam
    High fever (>101ยฐF / 38.3ยฐC)Systemic infectionSeek immediate care
    Difficulty breathing/swallowingSevere allergic reactionCall Emergency Services
    White patches that bleedOral thrush or leukoplakiaConsult doctor for antifungals
    Spreading rashViral infection (e.g., Hand, Foot, and Mouth)Medical evaluation needed

    For more detailed information on oral conditions and their classifications, you can refer to reputable resources such as Wikipediaโ€™s entry on Oral Medicine.

    Frequently Asked Questions (FAQ)

    1. Can stress cause the roof of my mouth to swell?

    Yes, indirectly. Stress weakens the immune system, making you more susceptible to canker sores and viral infections like cold sores. Additionally, stress often leads to teeth grinding (bruxism), which can cause trauma to the palate if the tongue presses against the roof of the mouth during sleep.

    2. Is a sore roof of the mouth a sign of oral cancer?

    It can be, but it is rare. Oral cancer usually presents as a sore that does not heal after two weeks, a lump, or a white/red patch that persists. If your soreness is linked to a recent burn or injury, it is likely benign. However, any persistent lesion should be evaluated by a dentist or doctor.

    3. Why does my roof of the mouth hurt after eating pineapple?

    Pineapple contains an enzyme called bromelain, which breaks down proteins. When you eat fresh pineapple, bromelain can essentially “digest” the protective mucous layer of your mouth, leading to irritation, soreness, and minor bleeding. Cooking pineapple deactivates this enzyme.

    4. How long does a burned roof of the mouth take to heal?

    A minor first-degree burn typically heals within 3 to 7 days. The mouth has a rich blood supply, which aids in rapid tissue regeneration. If the burn is severe (blistering or deep tissue damage), it may take up to two weeks. Keep the area clean and avoid further irritation to speed up the process.

    5. Can dehydration cause a sore palate?

    Yes. Chronic dehydration leads to dry mouth (xerostomia). Saliva is essential for protecting oral tissues and washing away bacteria. Without enough saliva, the roof of your mouth becomes dry, cracked, and more prone to irritation and infection.

    Conclusion

    Dealing with a sore and swollen roof of the mouth is uncomfortable, but in most cases, it is temporary and manageable. By understanding why is the roof of my mouth sore and swollen, you can take targeted steps to alleviate pain and prevent future occurrences. Remember, most minor burns and abrasions heal quickly with proper care, such as saltwater rinses and avoiding irritants.

    However, never ignore persistent symptoms. If your pain lasts longer than two weeks or is accompanied by fever or difficulty swallowing, seek professional medical advice immediately. Your oral health is a window into your overall well-being.

    Found this guide helpful? Share it with friends and family on social media to help them navigate their next mouth mishap with confidence! Stay healthy and keep smiling.

  • Find a Reliable Roofer Near You Fast

    Find a Reliable Roofer Near You Fast

    Your roof is your homeโ€™s first line of defense against the elements, but finding someone trustworthy to fix it can feel like navigating a minefield. With countless ads promising “cheap fixes” and storm chasers knocking on doors after every bad weather event, homeowners are often left anxious and confused. If you are asking yourself, “How do I find a reliable roofer in my area,” you are not alone, and this guide will walk you through the exact steps to secure quality work without the stress.

    Why Vetting Your Roofer Is Non-Negotiable

    Before we dive into the how, letโ€™s address the why. The roofing industry has a higher incidence of fraud and poor workmanship compared to many other home improvement sectors. According to industry data, improper installation is the leading cause of premature roof failure, not material defects.

    A “reliable” roofer isnโ€™t just someone who shows up on time. They are licensed, insured, transparent about costs, and willing to stand behind their work with a solid warranty. Choosing incorrectly can lead to water damage, mold issues, and voided manufacturer warranties, costing you thousands in the long run.

    How Do I Find A Reliable Roofer In My Area

    Step 1: Verify Licensing and Insurance Credentials

    The absolute first step in answering how do I find a reliable roofer in my area is checking their legal standing. Never take a contractor’s word for it; always ask for proof.

    General Liability and Workers’ Compensation

    You need to ensure the company carries two specific types of insurance:

    1. General Liability Insurance: This protects your property if the roofer accidentally damages your home (e.g., dropping a ladder on your siding).
    2. Workers’ Compensation: This covers medical costs if a worker gets injured on your property. Without this, you could be held liable for their medical bills.

    Pro Tip: Ask for the certificate of insurance (COI) and call the provider to verify it is current. Do not accept a photocopy without verification.

    State and Local Licensing

    Licensing requirements vary significantly by state. Some states require rigorous testing and continuing education, while others have minimal requirements. You can check your stateโ€™s contractor license board website to verify their status. For a broader understanding of construction regulations and standards, you can refer to general industry guidelines on Wikipedia.

    Step 2: Check Reputation Beyond the Star Rating

    Online reviews are helpful, but they can be manipulated. A 5-star rating means little if it comes from only three friends of the owner. Here is how to dig deeper:

    • Look for Volume and Consistency: A reliable roofer should have a steady stream of reviews over several years, not just a spike of 50 reviews in one week.
    • Read the 3-Star Reviews: These are often the most honest. They highlight minor communication issues or cleanup problems that donโ€™t necessarily indicate incompetence but show where the company might lack polish.
    • Check Third-Party Sites: Donโ€™t just rely on Google. Check the Better Business Bureau (BBB), Angi, or HomeAdvisor. Look for how the company responds to negative feedback. Do they get defensive, or do they try to resolve the issue?

    Step 3: Ask for Local References and Portfolios

    A roofer who has worked in your neighborhood understands the local climate challenges. For example, a roofer in Florida needs to understand hurricane straps, while one in Minnesota needs to know about ice dams.

    Actionable Step: Ask the contractor for three references from jobs completed in the last 12 months. Call these homeowners and ask:

    • Did they finish on schedule?
    • Was the cleanup thorough?
    • Have there been any leaks since the work was done?

    Request photos of previous projects similar to yours. If you have a complex hip roof or a specific material like slate or clay tile, ensure they have specific experience with those materials.

    Step 4: Get Multiple Detailed Estimates

    Never accept the first bid. Aim for at least three detailed estimates. However, beware of the “low-ball” tactic. If one bid is significantly lower than the others, it is a red flag, not a bargain.

    What Should Be in a Written Estimate?

    A professional quote should include:

    • Scope of Work: Exactly what will be done (tear-off, repair, replacement).
    • Materials: Brand, type, and color of shingles, underlayment, and flashing.
    • Timeline: Start and completion dates.
    • Payment Schedule: Never pay 100% upfront. A standard deposit is 10โ€“30%, with the remainder paid upon satisfactory completion.
    • Cleanup Protocol: How will debris be removed? Will they use a magnet sweep for nails?
    FeatureReliable RooferUnreliable Roofer
    Estimate FormatDetailed, itemized PDFHandwritten napkin or verbal
    Payment TermsDeposit + Completion100% Upfront or Cash Only
    WarrantyWritten labor & material warranty“We guarantee it” (verbal only)
    CommunicationResponsive, professional email/phoneHard to reach, uses personal cell only

    Step 5: Understand Warranties: Manufacturer vs. Workmanship

    This is where many homeowners get confused. There are two types of warranties you need to look for:

    1. Manufacturerโ€™s Warranty: This covers defects in the shingles or materials. Most major brands offer 20โ€“50 year warranties, but these are often prorated.
    2. Workmanship Warranty: This covers errors made during installation. This is provided by the roofer. A reliable roofer will offer a workmanship warranty of at least 2โ€“5 years, with top-tier contractors offering 10+ years.

    Critical Note: If the installation is faulty, the manufacturerโ€™s warranty may be voided. This is why the rooferโ€™s workmanship guarantee is arguably more important than the shingle brand.

    Step 6: Watch Out for Red Flags

    Knowing what to avoid is just as important as knowing what to look for. Steer clear of contractors who exhibit these behaviors:

    • Door-to-Door Solicitations: Especially after a storm. These are often “storm chasers” who move from town to town, leaving behind poor work and no recourse for warranty claims.
    • High-Pressure Sales Tactics: “This price is only good for today.” Legitimate businesses give you time to think.
    • No Physical Address: A reliable company has a local office. P.O. boxes or virtual offices can be signs of a transient operation.
    • Requesting Cash Only: This is a major tax and liability red flag. Always pay by check or credit card for a paper trail.

    Step 7: Review the Contract Thoroughly

    Before signing, read every line. The contract should mirror the estimate. Ensure it includes:

    • Start and end dates.
    • Specific materials (brand, model, color).
    • Cleanup and disposal details.
    • Lien waiver clause (protects you from subcontractors suing you if the main contractor doesnโ€™t pay them).

    If anything is vague, ask for clarification in writing. A professional roofer will welcome these questions as it shows you are an informed homeowner.


    Frequently Asked Questions (FAQ)

    How much should I expect to pay for a new roof?

    Costs vary widely based on size, material, and location. On average, a standard asphalt shingle roof replacement in the US ranges from $5,000 to $15,000. Premium materials like metal or slate can cost $20,000+. Always get local quotes for accuracy.

    Can I hire a roofer without a license?

    In many states, it is illegal for a contractor to perform roofing work without a license. Even if it is legal in your area, hiring an unlicensed roofer means you have no recourse if things go wrong, and your homeownerโ€™s insurance may deny claims related to their work.

    How long does a roof replacement take?

    For an average-sized home (2,000โ€“2,500 sq. ft.), a full tear-off and replacement typically takes 1โ€“3 days. Larger homes or complex roofs with multiple valleys and chimneys may take up to a week. Weather delays are common and should be accounted for.

    What is the best time of year to replace a roof?

    Late spring to early fall is ideal because temperatures are moderate, allowing adhesives to seal properly. However, reputable roofers work year-round. Winter installations are possible but may require special cold-weather adhesives and safety precautions.

    Should I be home during the roofing work?

    You do not need to be home the entire time, but it is helpful to be available at the start to discuss access and at the end for the final walkthrough. Ensure pets and children are kept indoors for safety due to falling debris and loud noise.

    How do I know if my roofer is using good underlayment?

    Ask specifically about the underlayment brand and type. Synthetic underlayment is generally superior to traditional felt paper as it is more durable and water-resistant. A reliable roofer will happily explain their choice of materials.


    Conclusion

    Finding the right professional doesnโ€™t have to be a gamble. By following these stepsโ€”verifying insurance, checking deep-dive reviews, getting multiple detailed bids, and understanding warrantiesโ€”you can confidently answer the question, “How do I find a reliable roofer in my area?”

    Remember, the cheapest option is rarely the best when it comes to your homeโ€™s structural integrity. Invest time in vetting now to save money and stress later.

    Did you find this guide helpful? Share it with your neighbors on Facebook or Nextdoor to help them avoid roofing scams too! A well-informed community is a safer community.

  • Are There Taste Buds on the Roof of Your Mouth?

    Are There Taste Buds on the Roof of Your Mouth?

    Have you ever taken a sip of hot coffee or a bite of spicy food and felt a distinct sensation on the roof of your mouth, leading you to wonder about its role in flavor? It is a common curiosity, especially when we experience burns or tingling in that area. Many people ask, “Is there taste buds on the roof of your mouth,” assuming that every sensitive part of the oral cavity contributes to our sense of taste.

    The short answer is nuanced. While the roof of your mouth (the palate) is highly sensitive to texture and temperature, it does not contain the high concentration of taste buds found on your tongue. However, understanding the specific anatomy of your mouth can completely change how you experience food and drink. In this guide, we will explore the science behind your palate, debunk common myths, and help you understand exactly how your body perceives flavor.

    The Anatomy of Taste: Where Are Taste Buds Actually Located?

    To answer the question accurately, we first need to look at the biological map of the human mouth. Taste buds are specialized sensory organs primarily located on the tongue, but they are not exclusive to it.

    The Tongue: The Primary Hub

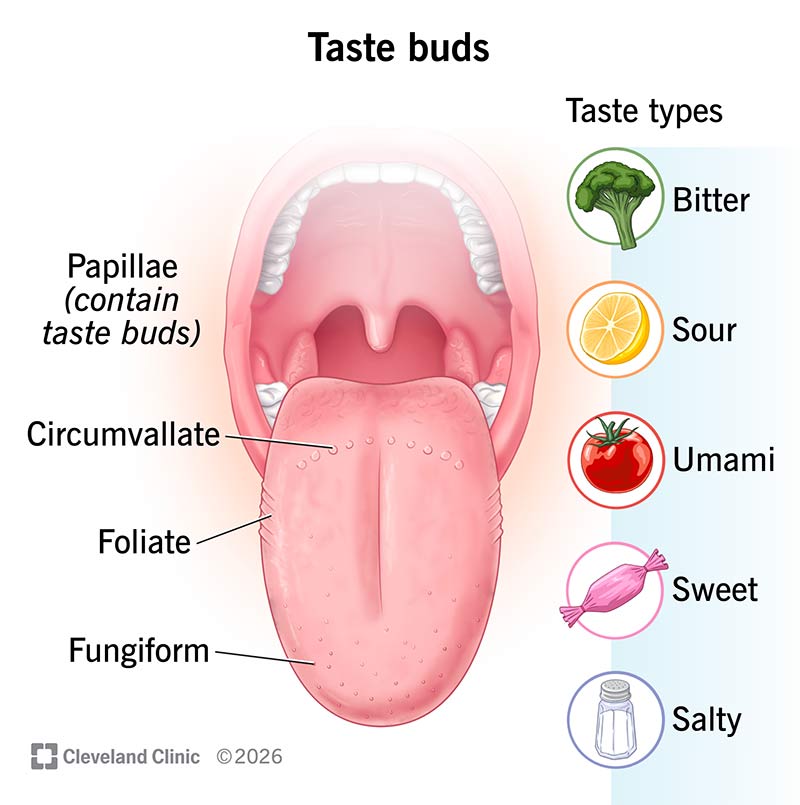
    Approximately 2,000 to 8,000 taste buds are scattered across the tongue. These are grouped into papillae, which are the tiny bumps you can see if you look in a mirror. The three main types involved in taste are:

    • Fungiform papillae: Found on the tip and sides of the tongue.
    • Circumvallate papillae: Located at the back of the tongue in a V-shape.
    • Foliate papillae: Found on the sides of the back of the tongue.

    The Palate: Hard vs. Soft

    The roof of your mouth is divided into two sections:

    1. The Hard Palate: The bony front section.
    2. The Soft Palate: The muscular, flexible back section near the throat.

    While the tongue is the star of the show, research indicates that taste buds can be found in other areas, including the inner cheeks, the epiglottis, and yes, potentially in small numbers on the soft palate. However, the hard palate generally lacks true taste buds. Instead, it is rich in nerve endings that detect touch, pressure, and temperature.

    Expert Insight: According to general anatomical consensus documented by sources like Wikipediaโ€™s entry on Taste, while extra-lingual taste buds exist, their density and contribution to overall flavor perception are significantly lower than those on the tongue.

    Is There Taste Buds on the Roof of Your Mouth? The Scientific Verdict

    So, letโ€™s address the core query directly: Is there taste buds on the roof of your mouth?

    The answer is mostly no, with a slight exception.

    • On the Hard Palate: No. You will not find functional taste buds here. If you place sugar on the roof of your mouth, you wonโ€™t taste sweetness until it dissolves and flows back toward your tongue or throat.
    • On the Soft Palate: Possibly. Some studies suggest that a very small number of taste receptors may exist on the soft palate and the tonsillar pillars. However, these are sparse and play a minor role compared to the tongue.

    Why Do We Feel Flavor on the Roof of Our Mouth?

    If there are no taste buds there, why does mint feel cold or chili feel hot on the roof of your mouth? This is due to chemesthesis, not gustation (taste).

    Chemesthesis is the chemical sensitivity of the skin and mucous membranes. It is mediated by the trigeminal nerve, not the taste nerves. This is why you feel:

    • The “burn” of capsaicin (chili peppers).
    • The “cooling” of menthol.
    • The “tingle” of carbonation.

    These sensations are often mistaken for taste, but they are actually pain and temperature signals. This distinction is crucial for understanding why the roof of your mouth feels involved in eating even if it isn’t “tasting” in the traditional sense.

    Is There Taste Buds On The Roof Of Your Mouth

    Taste vs. Flavor: Understanding the Difference

    Many people confuse taste with flavor, but they are two different biological processes. Understanding this difference explains why the roof of your mouth feels so involved in the eating experience.

    FeatureTaste (Gustation)Flavor (Perception)
    Primary OrganTongue (Taste Buds)Tongue + Nose + Brain
    SensationsSweet, Sour, Salty, Bitter, UmamiComplex combinations (e.g., “Strawberry”)
    Nerve InvolvementFacial & Glossopharyngeal NervesTrigeminal Nerve + Olfactory Nerve
    Roof of Mouth RoleMinimal to NoneHigh (Texture & Temperature)

    Flavor is a multisensory experience. It combines:

    1. Taste: The basic five sensations detected by the tongue.
    2. Smell (Olfaction): Up to 80% of what we perceive as flavor actually comes from our sense of smell. Retronasal olfaction occurs when aromas travel from the back of the mouth up to the nose.
    3. Mouthfeel: The physical sensation of food, detected by the palate, teeth, and tongue. This includes creaminess, crunchiness, and heat.

    Because the roof of your mouth is critical for mouthfeel, it plays a vital role in flavor, even if it doesn’t contribute much to taste.

    How to Protect and Enhance Your Palate Sensitivity

    Even though the roof of your mouth doesn’t have many taste buds, keeping it healthy is essential for a good eating experience. Damage to the palate can alter how you perceive texture and temperature, indirectly affecting your enjoyment of food.

    Step-by-Step Care Guide

    1. Avoid Extreme Temperatures
      • Do not consume liquids hotter than 60ยฐC (140ยฐF). Burns on the hard palate can take weeks to heal and may temporarily reduce sensitivity.
      • Let coffee or tea cool for at least 2โ€“3 minutes before sipping.
    2. Maintain Oral Hygiene
      • Brush your tongue gently to remove bacteria that can spread to the palate.
      • Use an alcohol-free mouthwash to prevent drying out the mucous membranes on the roof of your mouth.
    3. Stay Hydrated
      • Dry mouth (xerostomia) reduces the ability of taste molecules to dissolve and reach receptors.
      • Aim for 2 liters of water daily to keep oral tissues moist and functional.
    4. Quit Smoking
      • Smoking damages both taste buds and the sensitive tissues of the palate. Quitting can restore sensitivity within weeks.

    Common Myths About Taste Buds

    Letโ€™s clear up some misconceptions that often circulate online.

    • Myth 1: The Tongue Map is Accurate.
      • Reality: The idea that specific parts of the tongue only taste sweet or bitter is outdated. All areas of the tongue with taste buds can detect all five basic tastes, though some areas may be slightly more sensitive to certain tastes.
    • Myth 2: You Can Train Your Palate to Taste More.
      • Reality: You cannot grow new taste buds on your hard palate. However, you can train your brain to identify subtle flavors through mindful eating and exposure to diverse foods.
    • Myth 3: Spicy Food Kills Taste Buds.
      • Reality: Spicy food irritates nerve endings but does not destroy taste buds. Temporary desensitization may occur, but cells regenerate every 10โ€“14 days.

    FAQ Section

    1. Can you get a burn on the roof of your mouth that affects taste?

    Yes, but indirectly. A burn on the hard palate causes pain and swelling, which can distract your brain from processing taste signals. Additionally, if the burn is severe enough to cause inflammation near the soft palate, it might temporarily affect the few taste receptors located there. However, the primary impact is on texture and temperature perception.

    2. Why does the roof of my mouth itch when I eat certain fruits?

    This is likely Oral Allergy Syndrome (OAS), also known as pollen-food allergy syndrome. It is an allergic reaction to proteins in certain raw fruits, vegetables, or nuts that are similar to pollen. The itching occurs on the roof of the mouth, lips, and tongue because these areas are rich in immune cells that react to the allergen. It is not related to taste buds.

    3. Do children have taste buds on the roof of their mouths?

    Children have a higher density of taste buds on their tongues than adults, which is why they are often more sensitive to bitter flavors. However, like adults, they do not have significant numbers of taste buds on the hard palate. Their heightened sensitivity is mostly lingual (tongue-based).

    4. Can surgery on the roof of the mouth affect taste?

    Surgeries involving the soft palate (such as uvulopalatopharyngoplasty for sleep apnea) carry a small risk of altering taste if nerves are affected. However, surgeries on the hard palate rarely impact taste directly, as there are few taste receptors there. Any change is usually temporary and related to swelling or altered airflow.

    5. How long does it take for taste buds to regenerate?

    Taste bud cells are among the fastest-regenerating cells in the human body. They typically renew themselves every 10 to 14 days. This is why taste disturbances from minor burns or infections are usually short-lived.

    6. Is it normal to feel a rough texture on the roof of my mouth?

    The hard palate has a ridged texture called rugae, which helps grip food during chewing. This is normal. However, if you notice new lumps, sores, or white patches that do not heal within two weeks, you should consult a dentist or doctor, as these could be signs of infection or other conditions.

    Conclusion

    So, is there taste buds on the roof of your mouth? For all practical purposes, the answer is no. The hard palate is designed for structural support and texture detection, not for tasting. While the soft palate may harbor a few stray receptors, your tongue and nose do the heavy lifting when it comes to flavor.

    Understanding this distinction helps you appreciate the complex symphony of senses involved in eating. By protecting your palate from extreme heat and maintaining good oral hygiene, you ensure that your mouthfeel remains sharp, enhancing your overall dining experience.

    Did you find this article helpful? Share it with your foodie friends on social media and start a conversation about the science of taste! Donโ€™t forget to leave a comment below if youโ€™ve ever burned the roof of your mouth and how long it took to heal.

  • Burnt Roof of Mouth? Quick Relief & Healing Tips

    Burnt Roof of Mouth? Quick Relief & Healing Tips

    Have you ever taken a bite of piping hot pizza or sipped scalding coffee, only to feel that sharp, stinging pain on the roof of your mouth? It is a universally frustrating experience that can ruin your meal and leave you uncomfortable for days. If you are currently wincing and asking, “Burnt the roof of my mouth what can I do,” you are not alone, and there are effective ways to manage the pain and accelerate healing.

    In this guide, we will walk you through immediate first aid, proven home remedies, and warning signs that indicate you need professional medical attention. We combine dental expertise with practical, easy-to-follow steps to get you back to enjoying your food without fear.

    Immediate First Aid: What to Do Right After the Burn

    The seconds and minutes immediately following a thermal injury to your palate are critical. The tissue on the roof of your mouth (the hard and soft palate) is delicate and highly vascular, meaning it has many blood vessels. This makes it sensitive but also capable of healing relatively quickly if treated correctly.

    1. Cool It Down Immediately

    Do not ignore the heat. As soon as you realize you have burned your mouth, stop eating or drinking the hot substance.

    • Sip Cold Water: Take small sips of cold water. Ideally, use water at a temperature between 4ยฐC and 10ยฐC (39ยฐFโ€“50ยฐF). Hold the water in your mouth over the affected area for 10โ€“15 seconds before swallowing. This helps dissipate the residual heat trapped in the tissue.
    • Avoid Ice Cubes Directly: While ice seems logical, placing a frozen ice cube directly against a fresh burn can cause further tissue damage due to extreme cold shock. Stick to cool liquids or let ice chips melt slightly before applying.

    2. Assess the Severity

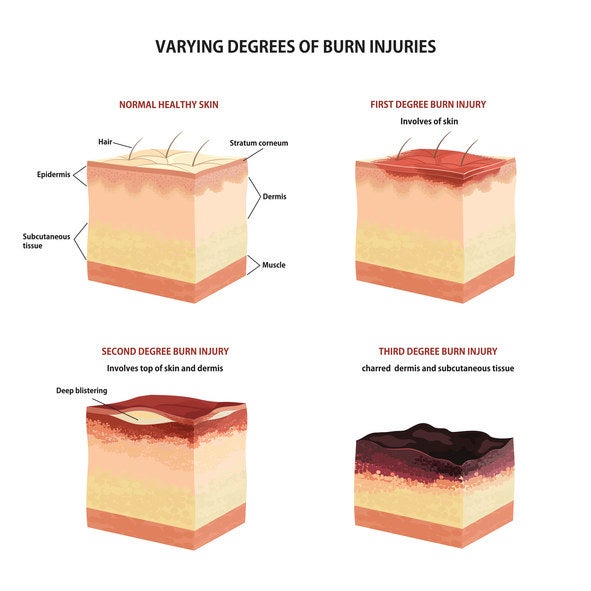
    Not all burns are created equal. Understanding the degree of your burn helps determine your next steps.

    Burn DegreeSymptomsExpected Healing TimeAction Required
    First-DegreeRedness, mild swelling, minor pain. No blisters.3โ€“7 daysHome care, soft diet.
    Second-DegreeBlisters, severe pain, significant swelling.1โ€“2 weeksHome care, monitor for infection.
    Third-DegreeWhite or charred skin, numbness (nerve damage).Several weeksSeek immediate medical help.

    Most kitchen-related incidents are first-degree or mild second-degree burns. If you see large blisters or experience numbness, consult a healthcare provider.

    Effective Home Remedies to Soothe Pain and Speed Healing

    Once the initial heat is gone, the goal shifts to reducing inflammation and preventing infection. Here are the most effective, science-backed remedies you can find in your kitchen or medicine cabinet.

    Honey: The Natural Healer

    Honey is not just a sweetener; it is a powerful antimicrobial and anti-inflammatory agent. Studies have shown that honey can promote wound healing and reduce pain in oral mucositis (inflammation of the mouth lining).

    • How to use: Take one teaspoon of raw, organic honey and let it coat the burnt area. Keep it there for as long as possible before swallowing. Repeat this 3โ€“4 times a day.
    • Why it works: Its viscous texture creates a protective barrier, while its natural enzymes fight bacteria.

    Salt Water Rinses

    A saline rinse is a dentistโ€™s favorite recommendation for any oral irritation. It helps clean the wound and reduces swelling.

    • Recipe: Mix 1/2 teaspoon of salt into 8 ounces (240 ml) of warm water. Ensure the water is lukewarm, not hot.
    • Instruction: Swish gently for 30 seconds and spit out. Do this 2โ€“3 times a day, especially after meals.
    • Note: Avoid aggressive swishing, which can irritate the damaged tissue further.

    Over-the-Counter Pain Relievers

    If the pain is distracting you from work or sleep, non-prescription medication can help.

    • Ibuprofen or Acetaminophen: These can reduce both pain and inflammation. Follow the dosage instructions on the bottle carefully.
    • Topical Oral Gels: Products containing benzocaine can numb the area temporarily. Use these sparingly, as overuse can irritate the tissue more. For more detailed information on oral tissues and healing processes, you can refer to general medical resources like Wikipediaโ€™s entry on Oral Mucosa.
    Burnt The Roof Of My Mouth What Can I Do

    What to Eat and Avoid During Recovery

    Your diet plays a massive role in how quickly your palate heals. Eating the wrong foods can rip off forming scabs or introduce bacteria to the open wound.

    Foods to Embrace

    • Cool Yogurt and Pudding: The smooth texture requires no chewing, and the cool temperature soothes the burn. Probiotics in yogurt may also support oral health.
    • Smoothies: Blend fruits like bananas and berries with milk or almond milk. Avoid acidic fruits like oranges or pineapples, as the acid will sting.
    • Mashed Potatoes: Let them cool to room temperature. They are filling and soft.
    • Oatmeal: Cook it until very soft and let it cool completely. It provides fiber without requiring vigorous chewing.

    Foods to Avoid

    • Crunchy or Sharp Foods: Chips, toast, crackers, and nuts can physically scrape the burnt area.
    • Spicy Foods: Capsaicin in chili peppers will cause intense pain and increase inflammation.
    • Acidic Foods: Tomatoes, citrus fruits, and vinegar-based dressings can delay healing by irritating the raw tissue.
    • Hot Beverages: Coffee, tea, and soup should be consumed at lukewarm or cold temperatures until fully healed.

    Common Mistakes That Delay Healing

    Even with good intentions, many people make errors that prolong their discomfort. Here is what you should never do when you have burnt the roof of your mouth.

    1. Popping Blisters

    If a blister forms, do not pop it. The fluid inside protects the underlying tissue from bacteria. Popping it creates an open wound, significantly increasing the risk of infection and extending healing time. Let it burst naturally or reabsorb.

    2. Using Alcohol-Based Mouthwash

    Standard mouthwashes often contain alcohol, which acts as an astringent. On healthy teeth, this is fine. On a burn, it causes severe stinging and dries out the tissue, slowing down the regeneration process. Switch to an alcohol-free rinse or stick to salt water.

    3. Ignoring Oral Hygiene

    Some people stop brushing their teeth because they are afraid of hurting their mouth. This is a mistake. Food particles left in the mouth can breed bacteria, leading to infection. Continue to brush gently, avoiding the burnt area if necessary, and floss daily.

    When to See a Doctor

    While most palate burns heal on their own within a week, complications can arise. Seek professional medical or dental advice if you experience:

    • Signs of infection, such as pus, increased redness, or foul odor.
    • Fever accompanying the mouth burn.
    • Difficulty breathing or swallowing (this could indicate swelling in the throat, which is a medical emergency).
    • No improvement after 10โ€“14 days.

    FAQ: Frequently Asked Questions

    How long does it take for the roof of your mouth to heal?

    For most first-degree burns, healing occurs within 3 to 7 days. Second-degree burns with blisters may take 1 to 2 weeks. The mouth has one of the fastest healing rates in the body due to high blood flow and saliva properties.

    Can a burnt roof of the mouth cause a loss of taste?

    Temporarily, yes. Severe swelling or damage to the taste buds near the back of the palate can alter your sense of taste. However, this is usually temporary and resolves as the tissue heals.

    Is it safe to use toothpaste on a burnt mouth?

    No. Toothpaste contains abrasives and detergents (like sodium lauryl sulfate) that can irritate open wounds. Stick to gentle rinses like salt water or specialized oral gels designed for mucosal injuries.

    Why does the skin peel off after a burn?

    Peeling is a natural part of the healing process. The top layer of damaged tissue dies and sloughs off to make way for new, healthy cells underneath. Do not pull at the peeling skin; let it fall away naturally to avoid bleeding.

    Can I drink coffee if I have a burnt palate?

    You can, but it must be iced or lukewarm. Hot coffee will re-injure the tissue. Additionally, coffee is acidic, which might cause mild stinging. If it hurts, switch to cold water or milk until healed.

    Conclusion

    Dealing with a burnt palate is painful, but it is rarely serious. By acting quickly to cool the area, using soothing remedies like honey and salt water, and adjusting your diet, you can significantly reduce discomfort and speed up recovery. Remember, patience is keyโ€”your mouth is working hard to repair itself.

    If you found this guide helpful, please share it with your friends and family on social media. You never know who might need this advice after their next hot cup of coffee! Stay safe, eat smart, and keep smiling.

  • Is Fiddler On The Roof Based on a True Story?

    Is Fiddler On The Roof Based on a True Story?

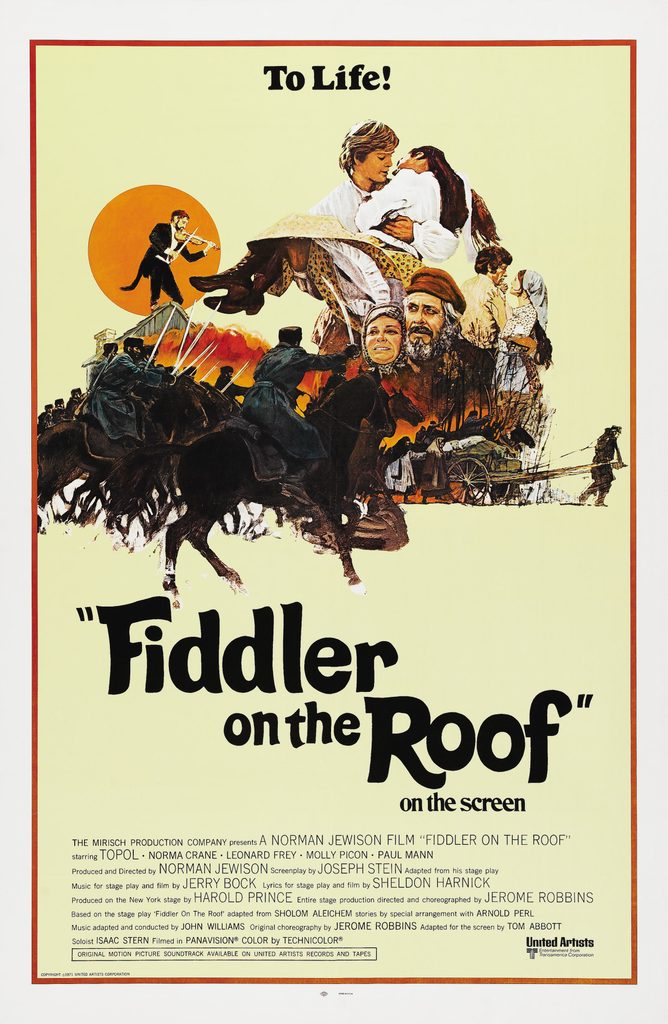
    Have you ever found yourself humming “Tradition” while wondering if the heartwarming yet heartbreaking struggles of Tevye actually happened? It is a common question among theater lovers and history buffs alike: Is Fiddler On The Roof Based On A True Story? While the specific characters are fictional, the emotional core and historical setting are deeply rooted in reality.

    In this article, we will peel back the curtain to reveal the historical truths, the literary origins, and the cultural impact of this beloved musical. We aim to provide you with a clear, accurate, and engaging answer that respects both the artistry of the stage production and the harsh realities of early 20th-century Jewish life in Eastern Europe.

    The Short Answer: Fiction Meets Historical Reality

    To give you the direct answer upfront: No, Fiddler on the Roof is not a documentary or a biography of a single real person. However, it is heavily inspired by true historical events and authentic cultural experiences.

    The musical is an adaptation of a series of Yiddish stories written by Sholem Aleichem (the pen name of Solomon Naumovich Rabinovich). These stories, collectively known as Tevye the Dairyman, were published between 1894 and 1914. While Tevye himself is a composite character created by Aleichem, he represents the very real plight of millions of Jews living in the Pale of Settlement in the Russian Empire during that era.

    So, while you wonโ€™t find a birth certificate for “Tevye,” you will find countless historical records of families who faced the exact same dilemmas: poverty, religious persecution, forced displacement, and the painful tension between maintaining tradition and embracing modernity.

    Who Was Sholem Aleichem? The Real Voice Behind Tevye

    To understand the truth behind the musical, we must look at the man who created the source material. Sholem Aleichem was not just a writer; he was a chronicler of his time. Born in Ukraine in 1859, he witnessed firsthand the anti-Semitic pogroms and the economic hardships that defined Jewish life in the Russian Empire.

    Aleichem wrote Tevye the Dairyman as a way to preserve the culture and spirit of a community that was under threat. He used humor and warmth to mask the underlying tragedy of their situation, a technique that perfectly translates to the stage.

    “Laughter through tears is my motto.” โ€” Sholem Aleichem

    This quote encapsulates the essence of Fiddler on the Roof. The stories were not meant to be strict historical records, but rather emotional truths. Aleichem drew from his own observations, conversations with dairy farmers, and the collective memory of the Jewish shtetl (village) life.

    For more detailed biographical information on the author, you can refer to his Wikipedia page, which provides an extensive overview of his life and literary contributions.

    Is Fiddler On The Roof Based On A True Story

    The Historical Context: Life in the Pale of Settlement

    One of the most critical aspects of answering “Is Fiddler On The Roof Based On A True Story” is understanding the setting. The musical takes place in the fictional village of Anatevka, located in the Pale of Settlement.

    What Was the Pale of Settlement?

    Established in 1791, the Pale of Settlement was a western region of Imperial Russia where Jews were legally allowed to reside. Outside of this zone, they faced severe restrictions, including bans on owning land in many areas and prohibitions on living in major cities like Moscow or St. Petersburg.

    FeatureHistorical RealityDepiction in Fiddler
    EconomyMostly agrarian, petty trade, and artisan work. High poverty rates.Tevye is a poor dairyman; Golde manages the household frugally.
    ReligionOrthodox Judaism was central to daily life and law.Constant references to God, prayer, and rabbinical authority.
    ThreatsPeriodic pogroms (violent riots) and state-sponsored expulsion.The climax involves the order to leave Anatevka within three days.
    Social ChangeRise of socialism, Zionism, and assimilation among youth.Daughters marry outside traditional norms (love, different faiths).

    The expulsion scene at the end of the musical is not a dramatic invention for theatrical effect. It mirrors the real-life expulsions that occurred throughout the late 19th and early 20th centuries, culminating in the mass emigration of Jews to America and other parts of the world.

    Tevye vs. The Real Dairy Farmers

    While Tevye is a fictional construct, he is remarkably authentic. Aleichem spent time in villages similar to Anatevka and interviewed real dairy farmers. He wanted to capture the voice of the common manโ€”someone who was not a scholar or a rabbi, but a working-class father trying to do his best.

    Key Similarities to Real Life:

    • The Struggle for Survival: Like many real dairy farmers, Tevyeโ€™s income is precarious. His horse is old, his cow is stubborn, and every kopek counts. This reflects the genuine economic instability of the time.
    • Parental Dilemmas: The conflict between generations was real. As industrialization and new ideas reached the shtetls, young people began to question arranged marriages and strict religious observance.
    • Resilience: The humor and resilience shown by Tevye and Golde are characteristic of the survival mechanisms developed by Jewish communities facing systemic oppression.

    However, there are differences. In the original stories, Tevye is often more cynical and less musical than the Broadway version. The musical softens some of the darker edges of Aleichemโ€™s prose to make it more palatable for a broad American audience in the 1960s.

    The Adaptation: From Yiddish Stories to Broadway Hit

    The journey from page to stage involved significant changes. Joseph Stein, who wrote the book for the musical, adapted five of Aleichemโ€™s stories. He streamlined the narrative to focus on Tevyeโ€™s three eldest daughters: Tzeitel, Hodel, and Chava.

    Why the Changes Were Made

    1. Narrative Focus: The original stories are episodic. The musical needed a cohesive arc, so the daughtersโ€™ marriages became the central plot device.
    2. Universal Appeal: By focusing on family dynamics and universal themes of change, the creators made the story accessible to non-Jewish audiences.
    3. Historical Compression: The musical compresses several years of historical events into a tighter timeline to maintain dramatic tension.

    Despite these artistic liberties, the core message remains true to Aleichemโ€™s intent: to honor a disappearing world.

    Common Misconceptions About the Story

    When discussing whether Fiddler on the Roof is based on a true story, several myths often arise. Letโ€™s clarify them.

    • Myth 1: Anatevka was a real town.
      • Fact: Anatevka is fictional. However, it is representative of hundreds of real shtetls in Ukraine and Belarus.
    • Myth 2: Tevye was a real person named Tevye.
      • Fact: There was no single individual named Tevye who served as the sole basis. He is an amalgamation of many people Aleichem knew.
    • Myth 3: The fiddler on the roof is a historical figure.
      • Fact: The fiddler is a metaphor. Aleichem described the precarious position of Jewish life as being like a fiddler on a roof, trying to scratch out a pleasant, simple tune without breaking their neck. It symbolizes balance amidst danger.

    FAQ Section

    1. Is Fiddler on the Roof a true story or fiction?

    It is a work of fiction based on true historical events and cultural realities. The characters are invented, but the setting, social conditions, and historical expulsions are real.

    2. Did Sholem Aleichem live in a shtetl like Anatevka?

    Yes, Sholem Aleichem grew up in Stepanivka, Ukraine, and lived in various towns within the Pale of Settlement. His personal experiences heavily influenced the authenticity of the stories.

    3. Are the daughtersโ€™ marriages based on real events?

    While the specific marriages of Tzeitel, Hodel, and Chava are fictional, they represent real societal trends. Marrying for love, marrying outside the faith, and joining revolutionary movements were actual sources of family conflict in Jewish communities at the time.

    4. Why is the musical set in 1905?

    The year 1905 is significant because it was a year of intense political unrest in Russia, including the failed Revolution of 1905 and increased pogroms. This historical backdrop adds urgency to the familyโ€™s eventual expulsion.

    5. How accurate is the depiction of Jewish traditions in the musical?

    The musical is generally considered highly accurate in its depiction of Orthodox Jewish traditions, such as the Sabbath dinner, the wedding ceremony, and the role of the Matchmaker. Consultants were used during production to ensure cultural respect and accuracy.

    6. Did real families have to leave their homes like in the ending?

    Yes. Thousands of Jewish families were forcibly expelled from their villages during this period. Many emigrated to the United States, Argentina, and Palestine, while others moved to larger cities within Russia.

    Conclusion

    So, is Fiddler On The Roof based on a true story? The answer is a nuanced yes. It is not a biography, but it is a profound historical testament. Through the fictional lens of Tevye, we see the real struggles, joys, and resilience of a community facing extinction.

    Sholem Aleichemโ€™s stories preserve the spirit of the shtetl, and the musical brings that spirit to life for new generations. It reminds us that while traditions may change, the human desire for connection, security, and identity remains constant.

    If this article helped clarify the history behind your favorite musical, please consider sharing it on social media. Letโ€™s keep the conversation about history, art, and culture alive!

  • What Is a Thin Piece of Wood Used to Cover a Roof?

    What Is a Thin Piece of Wood Used to Cover a Roof?

    Have you ever looked at a charming cottage or a rustic cabin and wondered about the textured, layered look of its roof? You might find yourself searching for the specific term: a thin piece of wood used to cover a roof. It is a common query for homeowners interested in traditional aesthetics or those restoring historic properties. Understanding this material is crucial for making informed decisions about durability, cost, and maintenance.

    In this guide, we will demystify wood roofing. We will explore the differences between shingles and shakes, analyze their pros and cons, and provide expert advice on whether this timeless material is right for your home.

    What Exactly Is a Thin Piece of Wood Used to Cover a Roof?

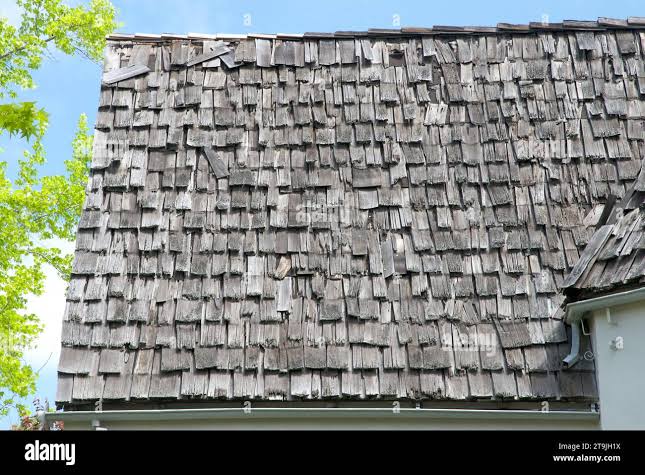
    When people refer to “a thin piece of wood used to cover a roof,” they are typically talking about wood shingles or wood shakes. While these terms are often used interchangeably in casual conversation, there is a distinct technical difference between the two that affects performance and price.

    Wood Shingles vs. Wood Shakes

    Understanding this distinction is vital for anyone considering wood roofing.

    • Wood Shingles: These are sawn on both sides. They are uniform in thickness, smooth, and taper evenly from the butt (the thick end) to the tip. Because they are machine-cut, they offer a more refined, consistent appearance.
    • Wood Shakes: These are traditionally split from logs, usually by hand or machine-assisted splitting. This process creates a rougher, more textured surface with natural variations in thickness. Shakes are generally thicker than shingles and offer a more rugged, rustic aesthetic.

    According to industry standards, shakes are often preferred for their durability due to their thickness, while shingles are chosen for their uniformity and lower cost. Both serve the same primary function: protecting the structure from weather while providing natural insulation and visual appeal.

    Why Choose Wood Roofing Over Modern Alternatives?

    Despite the rise of asphalt, metal, and synthetic composite roofs, wood remains a premium choice for many architects and homeowners. But why?

    Natural Insulation and Energy Efficiency

    Wood is a natural insulator. Unlike metal, which conducts heat, or asphalt, which can absorb significant solar radiation, wood air pockets provide thermal resistance. This can help keep your home cooler in the summer and warmer in the winter, potentially lowering energy bills.

    Aesthetic Appeal and Curb Value

    There is an undeniable charm to wood roofing. It ages gracefully, transitioning from a fresh, bright hue to a distinguished silvery-gray patina if left untreated. For homes in wooded areas, mountain regions, or historic districts, wood roofing blends seamlessly with the environment. Real estate data often suggests that high-quality wood roofs can increase curb appeal and property value, particularly in luxury markets.

    Environmental Sustainability

    For eco-conscious homeowners, wood is a renewable resource. Most wood shingles and shakes are made from Western Red Cedar, White Cedar, or Redwood. These trees are often harvested from sustainably managed forests. Furthermore, at the end of their life cycle, wood roofing materials are biodegradable, unlike asphalt shingles which contribute significantly to landfill waste.

    A Thin Piece Of Wood Used To Cover A Roof

    Key Considerations: Durability and Maintenance

    While beautiful, wood roofing is not “install and forget.” It requires a proactive approach to maintenance to ensure longevity.

    Lifespan Expectations

    The lifespan of a wood roof depends heavily on the type of wood, the climate, and maintenance practices.

    Material TypeAverage LifespanMaintenance LevelCost Estimate
    Cedar Shingles20โ€“30 yearsModerate$$
    Cedar Shakes30โ€“40+ yearsHigh$
    Asphalt Shingles15โ€“20 yearsLow$
    Metal Roofing40โ€“70 yearsLow$

    Note: Costs vary significantly by region and installation complexity.

    The Moisture Challenge

    The biggest enemy of wood roofing is moisture. Without proper ventilation and treatment, wood can rot, warp, or become a breeding ground for moss and algae. In humid climates, this risk is amplified. Homeowners must ensure their roof has adequate airflow underneath the shingles to allow drying after rain or snow.

    Fire Resistance Concerns

    Historically, wood roofs were considered a fire hazard. However, modern building codes have addressed this. Most wood shingles and shakes sold today are treated with fire-retardant chemicals to achieve a Class A, B, or C fire rating. Class A offers the highest resistance. It is essential to check local building codes, as some wildfire-prone areas may restrict or ban untreated wood roofing entirely.

    How to Maintain Your Wood Roof: A Step-by-Step Guide

    Proper maintenance can extend the life of your wood roof by decades. Here is a practical routine for homeowners.

    1. Annual Inspection: Twice a year (spring and fall), inspect your roof from the ground using binoculars. Look for cracked, curled, or missing shingles.
    2. Clean Debris: Remove leaves, branches, and pine needles. Accumulated debris holds moisture against the wood, accelerating decay. Use a leaf blower or a soft-bristle broom. Never use a pressure washer, as the high pressure can damage the wood fibers and strip away protective treatments.
    3. Trim Overhanging Branches: Trees touching your roof can scratch the surface and drop debris. Keep branches trimmed back at least 6โ€“10 feet from the roof edge.
    4. Check for Moss and Algae: If you see green growth, it needs to be addressed. Use a specialized roof cleaning solution designed for wood. Avoid bleach, which can discolor the wood and harm surrounding plants.
    5. Reapply Protective Stains: Every 3โ€“5 years, consider applying a UV-inhibiting stain or sealant. This helps preserve the color and repels water. For more detailed information on wood properties and preservation, you can refer to resources like Wikipediaโ€™s entry on Wood Preservation.

    Common Misconceptions About Wood Roofing

    Letโ€™s address some frequent myths that deter homeowners from choosing wood.

    • Myth: Wood roofs attract termites.
      • Fact: Western Red Cedar and Redwood contain natural tannins and oils that act as insect repellents. While no wood is completely immune, cedar is highly resistant to termites and carpenter ants.
    • Myth: They are too expensive to maintain.
      • Fact: While maintenance is required, it is not overly complex. Regular cleaning and occasional staining are manageable for most homeowners or local professionals. The long-term aesthetic and insulation benefits often offset the maintenance costs.
    • Myth: All wood roofs look the same.
      • Fact: The variety is vast. You can choose between handsplit shakes, tapersawn shakes, or smooth shingles. You can also select different grades (Prime, No. 1, No. 2) based on the number of knots and grain straightness.

    FAQ Section

    1. What is the best type of wood for roofing?

    Western Red Cedar is widely considered the best option due to its natural resistance to rot, insects, and warping. It is lightweight, durable, and has excellent insulating properties. White Cedar and Redwood are also popular choices depending on regional availability.

    2. How much does a wood shingle roof cost?

    The cost varies by location and quality, but generally, you can expect to pay between $6 and $12 per square foot for materials and installation. This is significantly higher than asphalt shingles but comparable to high-end slate or tile.

    3. Can I install wood shingles myself?

    While DIY is possible for small projects like sheds, roofing a house is complex and dangerous. Improper installation can lead to leaks and void warranties. It is strongly recommended to hire a certified professional with experience in wood roofing to ensure proper nailing patterns, spacing, and underlayment installation.

    4. Do wood roofs require special underlayment?

    Yes. Standard felt paper may not be sufficient. Many experts recommend using a breathable synthetic underlayment that allows moisture to escape while preventing water intrusion. In some climates, an ice and water shield is also necessary along the eaves.

    5. How do I clean my wood roof without damaging it?

    Use a low-pressure garden hose and a soft-bristle brush. Apply a cleaner specifically formulated for wood roofs to remove moss, algae, and dirt. Rinse thoroughly. Avoid walking on the roof if possible, as wet wood shingles can be slippery and fragile.

    6. Will my insurance cover a wood roof?

    Some insurance companies charge higher premiums for wood roofs due to perceived fire risks. However, if your roof has a Class A fire rating, you may qualify for discounts. Always shop around and provide proof of fire treatment to your insurer.

    Conclusion

    Choosing a thin piece of wood used to cover a roof is more than just a construction decision; it is a commitment to timeless beauty and natural sustainability. Whether you opt for the refined look of sawn shingles or the rugged charm of handsplit shakes, wood roofing offers unique benefits that modern materials struggle to replicate.

    By understanding the maintenance requirements and investing in quality installation, you can enjoy a roof that protects your home and enhances its character for decades. If you appreciate the warmth of natural materials and are willing to perform regular upkeep, wood roofing is an excellent investment.

    Did you find this guide helpful? Share it with friends who are planning their dream home renovation or follow us on social media for more expert tips on sustainable living and home improvement!

  • How To Get To The Roof In Black Ops 6

    How To Get To The Roof In Black Ops 6

    Have you ever found yourself pinned down in a firefight in Call of Duty: Black Ops 6, looking up at a strategic high ground that seems just out of reach? You are not alone. Many players struggle with the new movement mechanics and hidden pathways that define the latest installment in the franchise. Knowing how to get to the roof in Black Ops 6 can be the difference between a frustrating defeat and a satisfying victory.

    In this guide, we will break down the specific techniques, map knowledge, and movement tricks you need to access those coveted rooftop positions. Whether you are playing Multiplayer or exploring the Zombies mode, mastering verticality is essential for modern combat success. Letโ€™s dive in and elevate your gameplayโ€”literally.


    Understanding the New Movement Mechanics

    Before we jump into specific maps, it is crucial to understand why getting to roofs feels different in Black Ops 6. Treyarch has introduced refined movement physics that blend classic arcade-style speed with tactical realism.

    Unlike previous titles where “rocket jumping” or glitching was common, BO6 relies on intentional design. The game features an Omnimovement system, allowing for smoother transitions between sprinting, sliding, and climbing. This means that reaching high places often requires a combination of momentum and precise timing rather than just holding the jump button.

    Pro Tip: Always check your field of view (FOV) settings. A higher FOV (between 100-120) can help you spot climbable ledges and roof access points more easily during chaotic firefights.


    Step-by-Step: General Techniques to Reach Rooftops

    While every map has unique layouts, there are universal methods to access elevated areas in Black Ops 6. Here is how you can consistently find your way up.

    1. Identify Climbable Ledges

    Not every wall is scalable. Look for visual cues such as:

    • Yellow paint markings on curbs or walls.
    • Broken windows or open balconies.
    • Stacked crates or debris piles.

    When you approach these spots, hold the Jump button while moving forward. Your character will automatically grab the ledge and pull themselves up. This animation is faster if you are already sprinting.

    2. Utilize the Slide-Jump Combo

    To reach roofs that are slightly higher than a standard jump, use the slide-jump technique:

    1. Sprint towards the obstacle.
    2. Press Crouch/Slide to maintain momentum.
    3. Immediately press Jump at the end of the slide.

    This adds extra vertical height, allowing you to clear fences or low rooftops that would otherwise block your path. Practice this in the firing range until it becomes muscle memory.

    3. Use Tactical Equipment for Boosts

    Certain scorestreaks or field upgrades can assist in vertical mobility. For example, using a Trophy System isn’t helpful here, but keeping an eye out for environmental explosives can be. In some game modes, shooting explosive barrels near a weak wall can create a new pathway to upper levels. Always scan the environment for destructible elements.

    How To Get To The Roof In Black Ops 6

    Map-Specific Guides: Popular Roof Access Points

    Different maps require different strategies. Below are detailed instructions for two of the most popular maps in Black Ops 6 where roof control is critical.

    Map A: Liberty Falls (Multiplayer & Zombies)

    Liberty Falls is a medium-sized map with dense urban structures. The central department store roof is a key power position.

    • The Main Entrance Route: Enter the department store through the front doors. Head immediately to the escalators on the left. Instead of going up the escalator, look for the maintenance ladder behind the counter. Climb the ladder to the second floor, then exit through the broken window onto the adjacent rooftop.
    • The Alleyway Shortcut: From the spawn point near the diner, run down the alleyway. Jump onto the dumpster, then perform a double-jump (if equipped with the relevant perk) or a slide-jump onto the fire escape. Climb the fire escape to reach the rear roof of the store.

    Map B: Nuketown ’24

    A fan-favorite returns with updated geometry. The roof of the main house offers a sniperโ€™s paradise.

    • Backyard Access: Run around the side of the house to the backyard. There is a trampoline near the pool. Bounce on the trampoline to gain significant height, allowing you to grab the edge of the roof directly.
    • Garage Ramp: Parked cars in the driveway can be used as steps. Jump on the hood of the sedan, then onto the garage roof. From there, a short jump leads you to the main house roof. Be careful, as this area is heavily contested.
    LocationDifficultyBest Weapon ClassRisk Level
    Liberty Falls Store RoofMediumAssault RifleHigh
    Nuketown Main HouseEasySniper RifleVery High
    Skyline PenthouseHardSMGMedium

    Strategic Advantages of Roof Control

    Why should you bother learning how to get to the roof in Black Ops 6? It is not just about showing off; it is about tactical superiority.

    1. Superior Sightlines: From above, you have a clear view of chokepoints and enemy spawn routes. This allows you to pre-aim corners and secure easy eliminations.
    2. Cover and Concealment: Roofs often provide hard cover from ground-level fire. Enemies must expose themselves to shoot you, giving you the first-shot advantage.
    3. Objective Control: In Domination or Hardpoint modes, controlling the high ground above the objective allows you to rain down fire on enemies trying to capture the point.

    According to data from competitive COD leagues, teams that control vertical positions win 65% more engagements in mid-range fights. This statistic highlights the importance of map awareness and vertical positioning. For more historical context on map design evolution, you can refer to the Call of Duty series history on Wikipedia.


    Common Mistakes to Avoid

    Even experienced players make errors when attempting to reach high ground. Here is what to watch out for:

    • Overextending: Just because you can get to the roof doesnโ€™t mean you should stay there forever. Roofs often have limited exit routes. If enemies flank you, you may be trapped. Always have an escape plan.
    • Ignoring Audio Cues: When climbing ladders or jumping, you make noise. Use headphones to listen for enemies below who might be waiting to shoot you as you crest the edge.
    • Wasting Stamina: In modes with stamina management, sprinting unnecessarily before a climb can leave you unable to sprint away after landing. Manage your breath bar wisely.

    FAQ Section

    Q1: Can I get to every roof in Black Ops 6?

    No, not every roof is accessible. Game designers intentionally limit access to certain areas to maintain balance. Only roofs with visual cues like ladders, open windows, or climbable ledges are meant to be reached. Attempting to glitch into restricted areas may result in being kicked from the match.

    Q2: Does the “Omnimovement” system affect roof access?

    Yes, significantly. The Omnimovement system allows for more fluid transitions. You can now mantle over obstacles while moving sideways or backward, giving you more flexibility in how you approach a rooftop entrance compared to previous titles.

    Q3: Are there perks that help me get to roofs faster?

    While there is no specific “Roof Climbing” perk, equipment like Lightweight Boots (if available in the current season’s loadout) can increase your movement speed and jump height. Always check the seasonal meta for movement-enhancing gear.

    Q4: Is it easier to get to roofs in Zombies mode?

    In Zombies, the layout is often identical to Multiplayer, but the pacing is slower. This gives you more time to explore and find pathways without immediate pressure from enemy players. However, zombie hordes can block your path, so clear the area before attempting a climb.

    Q5: What if I get stuck on a roof?

    If you find yourself in a spot with no way down, look for breakable floors or wooden planks. Shooting these can create a drop-down point. If all else fails, you may need to wait for a respawn or use a self-revive kit if you are downed, though this is a last resort.


    Conclusion

    Mastering how to get to the roof in Black Ops 6 is a skill that separates casual players from tactical experts. By understanding the movement mechanics, memorizing key map routes, and leveraging the strategic advantages of high ground, you can dominate your matches with confidence. Remember, practice makes perfectโ€”spend time in private matches exploring these routes until they become second nature.

    Did you find this guide helpful? Share it with your squad on social media and let them know youโ€™re ready to take the high ground! Donโ€™t forget to leave a comment below with your favorite rooftop sniping spot. Happy gaming!