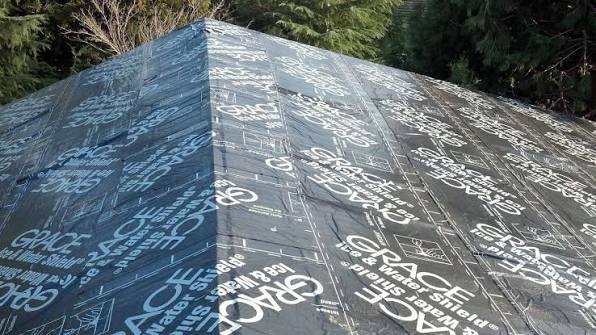
Have you ever worried about ice dams damaging your roof or leaks sneaking into your attic during heavy storms? Many homeowners ask, “Can you put ice and water shield on entire roof“ to achieve maximum peace of mind. While traditional building codes only require it in specific vulnerable areas, covering the whole deck is becoming a popular choice for those seeking superior durability.
In this article, we will break down whether this upgrade is worth the investment, how it compares to standard felt paper, and what professional roofers recommend for long-term home protection.
Is It Code-Compliant to Cover the Whole Roof?
One of the first questions homeowners face is legality and compliance. The short answer is: Yes, you generally can.
Most building codes in the United States, such as the International Residential Code (IRC), mandate ice and water shield in specific high-risk zones. These typically include:
- Eaves (the edge of the roof).
- Valleys (where two roof planes meet).
- Around chimneys, skylights, and vent pipes.
However, codes rarely prohibit using it everywhere. In fact, many modern roofing manufacturers encourage full coverage to validate their extended warranties. If you live in an area with severe weather—whether it’s heavy snow in the North or hurricane-driven rain in the South—going beyond the minimum code requirements is often seen as a smart insurance policy for your home.
Always check with your local building department, but in most US jurisdictions, upgrading your underlayment is perfectly acceptable and often praised by inspectors.
Ice and Water Shield vs. Traditional Felt Paper
To understand why you might want full coverage, you need to know what makes this material different from the black felt paper (tar paper) used for decades.
How Ice and Water Shield Works
Ice and water shield is a self-adhering, rubberized asphalt membrane. Unlike felt, which is merely nailed down, this shield sticks directly to the roof deck. This creates a watertight seal around nail penetrations. When a roofer nails shingles through the shield, the material wraps around the nail shaft, preventing water from seeping in through those tiny holes.
Comparison Table
| Feature | Traditional Felt (#15 or #30) | Ice and Water Shield |
|---|---|---|
| Water Resistance | Water-resistant (can absorb moisture over time) | Waterproof (forms a sealed barrier) |
| Installation | Stapled or nailed loosely | Self-adhering (sticks to deck) |
| Nail Sealing | No (water can enter nail holes) | Yes (self-seals around nails) |
| Cost | Low ($) | High ($) |
| Lifespan | Degrades faster if exposed | Highly durable against elements |
According to industry data, roofs with full synthetic or rubberized underlayment tend to have fewer leak-related insurance claims in the first ten years of installation compared to those with standard felt.
What Are the Benefits of Full-Roof Coverage?
If you are considering this upgrade, here are the primary advantages that justify the higher cost.
1. Superior Leak Protection
The biggest benefit is security. Standard underlayment is designed to shed water, not stop it completely if wind drives rain upward under the shingles. Ice and water shield acts as a secondary roof. If a shingle blows off during a storm, your home remains dry because the shield underneath is waterproof.
2. Extended Shingle Life
By providing a smoother, more uniform surface, ice and water shield can help shingles lay flatter. Additionally, because it seals out moisture from the attic side, it prevents the wood deck from rotting. A dry deck means your shingles last longer because they aren’t buckling due to underlying structural decay.
3. Better Warranty Coverage
Many major shingle manufacturers (such as GAF, Owens Corning, and CertainTeed) offer enhanced warranties if you use their proprietary or approved ice and water shields across the entire roof deck. This can extend your warranty from 10 years to 25 or even lifetime coverage on labor and materials.
What Are the Downsides and Costs?
It is important to be realistic about the trade-offs. While effective, this method is not without its challenges.
Higher Material Costs
Ice and water shield is significantly more expensive than felt or even synthetic underlayment. You can expect to pay 2 to 3 times more for materials alone. For an average 2,000-square-foot roof, this could add several hundred to over a thousand dollars to your total project cost.
Installation Complexity
This material is sticky. Very sticky.
- Heat Sensitivity: In hot summer months, the adhesive can become too soft, making it difficult to handle and potentially causing it to tear when unrolled.
- Cold Weather: In freezing temperatures, the adhesive may not bond properly unless the roof deck is warmed up or a primer is used.
- Labor Intensive: Because it adheres immediately, mistakes are costly. If you lay it crooked, you cannot simply lift and reposition it easily like felt paper. This increases labor time and, consequently, labor costs.
Moisture Trapping Concerns
There is a debate among some builders about vapor permeability. Standard felt allows the roof deck to “breathe” slightly. Ice and water shield is a vapor barrier. If your attic ventilation is poor, moisture from inside your home could get trapped between the insulation and the roof deck, potentially leading to condensation issues. Proper attic ventilation is non-negotiable if you choose full coverage.
Step-by-Step: How Is It Installed?
If you decide to proceed, here is how professionals typically install ice and water shield on the entire roof. Note that this is a job best left to certified roofing contractors due to the complexity.
- Prep the Deck: Ensure the roof deck (plywood or OSB) is clean, dry, and free of protruding nails. Any moisture present must be dried out before application.
- Start at the Eaves: Begin at the bottom edge of the roof. Unroll the first strip along the eave.
- Peel and Stick: Remove the release film from the back of the membrane. Press it firmly onto the deck. Use a hand roller to ensure there are no air bubbles or wrinkles.
- Overlap Correctly: Subsequent rows should overlap the previous row by at least 2 to 4 inches (check manufacturer specs). This ensures water flows over the seam, not under it.
- Seal Penetrations: Cut precise holes for vents and chimneys. Use additional patches of shield or compatible flashing tape to seal around these openings tightly.
- Cap with Shingles: Once the entire deck is covered, proceed with standard shingle installation. The nails will penetrate the shield, which will self-seal around them.
For more detailed technical specifications on roofing materials, you can refer to general construction standards on Wikipedia.
FAQ Section
1. Does ice and water shield expire?
Yes, but usually only if left exposed. If kept in its original packaging and stored in a cool, dry place, it can last for several years. However, once installed, it is designed to last as long as the roof itself. Do not leave it exposed to sunlight for more than 30–90 days (depending on the brand) before covering it with shingles, as UV rays can degrade the adhesive.
2. Can I install it myself?
While technically possible, it is not recommended for DIYers. The material is heavy, sticky, and unforgiving. Improper installation can lead to wrinkles, poor adhesion, and voided warranties. Professional roofers have the tools and experience to handle the material efficiently.
3. Will it make my roof hotter?
No. Ice and water shield is installed under the shingles. It does not affect the solar reflectance of your roof. The temperature of your attic is determined by your ventilation and insulation, not the underlayment type.
4. Is it necessary in warm climates?
Even in warm climates like Florida or Texas, ice and water shield is beneficial. While you won’t have ice dams, you do have wind-driven rain from hurricanes and tropical storms. The waterproofing benefit protects against horizontal rain entry, which is common in severe storms.
5. Can I put it over existing shingles?
No. Ice and water shield must be applied directly to the solid roof deck (wood). It cannot be installed over old shingles or existing underlayment. A complete tear-off is required.
Conclusion
So, can you put ice and water shield on entire roof? Absolutely. And for many homeowners, it is one of the best upgrades they can make.
While it comes with a higher price tag and requires professional installation, the benefits are clear: superior leak protection, extended shingle life, and enhanced warranty coverage. If you plan to stay in your home for a long time, or if you live in an area prone to severe weather, the extra investment pays for itself in peace of mind.
However, ensure your attic ventilation is up to par to prevent moisture trapping, and always hire a licensed, insured roofing contractor to handle the installation.
Found this guide helpful? Share it with your friends on Facebook or Pinterest who are planning their next home improvement project! Protecting your home starts with making informed decisions.
Leave a Reply