Tag: Roofing Underlayment

  • Can You Put Ice And Water Shield On Entire Roof?

    Can You Put Ice And Water Shield On Entire Roof?

    Have you ever worried about ice dams damaging your roof or leaks sneaking into your attic during heavy storms? Many homeowners ask, “Can you put ice and water shield on entire roof“ to achieve maximum peace of mind. While traditional building codes only require it in specific vulnerable areas, covering the whole deck is becoming a popular choice for those seeking superior durability.

    In this article, we will break down whether this upgrade is worth the investment, how it compares to standard felt paper, and what professional roofers recommend for long-term home protection.

    Is It Code-Compliant to Cover the Whole Roof?

    One of the first questions homeowners face is legality and compliance. The short answer is: Yes, you generally can.

    Most building codes in the United States, such as the International Residential Code (IRC), mandate ice and water shield in specific high-risk zones. These typically include:

    • Eaves (the edge of the roof).
    • Valleys (where two roof planes meet).
    • Around chimneys, skylights, and vent pipes.

    However, codes rarely prohibit using it everywhere. In fact, many modern roofing manufacturers encourage full coverage to validate their extended warranties. If you live in an area with severe weather—whether it’s heavy snow in the North or hurricane-driven rain in the South—going beyond the minimum code requirements is often seen as a smart insurance policy for your home.

    Always check with your local building department, but in most US jurisdictions, upgrading your underlayment is perfectly acceptable and often praised by inspectors.

    Ice and Water Shield vs. Traditional Felt Paper

    To understand why you might want full coverage, you need to know what makes this material different from the black felt paper (tar paper) used for decades.

    How Ice and Water Shield Works

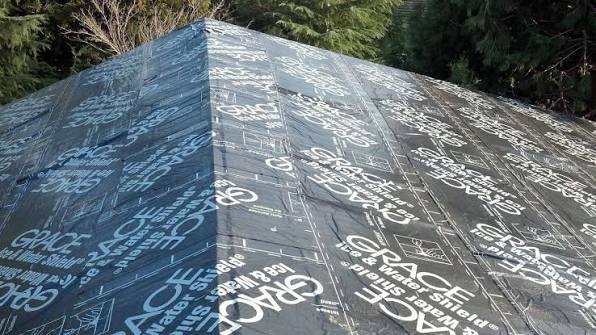
    Ice and water shield is a self-adhering, rubberized asphalt membrane. Unlike felt, which is merely nailed down, this shield sticks directly to the roof deck. This creates a watertight seal around nail penetrations. When a roofer nails shingles through the shield, the material wraps around the nail shaft, preventing water from seeping in through those tiny holes.

    Comparison Table

    FeatureTraditional Felt (#15 or #30)Ice and Water Shield
    Water ResistanceWater-resistant (can absorb moisture over time)Waterproof (forms a sealed barrier)
    InstallationStapled or nailed looselySelf-adhering (sticks to deck)
    Nail SealingNo (water can enter nail holes)Yes (self-seals around nails)
    CostLow ($)High ($)
    LifespanDegrades faster if exposedHighly durable against elements

    According to industry data, roofs with full synthetic or rubberized underlayment tend to have fewer leak-related insurance claims in the first ten years of installation compared to those with standard felt.

    What Are the Benefits of Full-Roof Coverage?

    If you are considering this upgrade, here are the primary advantages that justify the higher cost.

    1. Superior Leak Protection

    The biggest benefit is security. Standard underlayment is designed to shed water, not stop it completely if wind drives rain upward under the shingles. Ice and water shield acts as a secondary roof. If a shingle blows off during a storm, your home remains dry because the shield underneath is waterproof.

    2. Extended Shingle Life

    By providing a smoother, more uniform surface, ice and water shield can help shingles lay flatter. Additionally, because it seals out moisture from the attic side, it prevents the wood deck from rotting. A dry deck means your shingles last longer because they aren’t buckling due to underlying structural decay.

    3. Better Warranty Coverage

    Many major shingle manufacturers (such as GAF, Owens Corning, and CertainTeed) offer enhanced warranties if you use their proprietary or approved ice and water shields across the entire roof deck. This can extend your warranty from 10 years to 25 or even lifetime coverage on labor and materials.
    Can You Put Ice And Water Shield On Entire Roof

    What Are the Downsides and Costs?

    It is important to be realistic about the trade-offs. While effective, this method is not without its challenges.

    Higher Material Costs

    Ice and water shield is significantly more expensive than felt or even synthetic underlayment. You can expect to pay 2 to 3 times more for materials alone. For an average 2,000-square-foot roof, this could add several hundred to over a thousand dollars to your total project cost.

    Installation Complexity

    This material is sticky. Very sticky.

    • Heat Sensitivity: In hot summer months, the adhesive can become too soft, making it difficult to handle and potentially causing it to tear when unrolled.
    • Cold Weather: In freezing temperatures, the adhesive may not bond properly unless the roof deck is warmed up or a primer is used.
    • Labor Intensive: Because it adheres immediately, mistakes are costly. If you lay it crooked, you cannot simply lift and reposition it easily like felt paper. This increases labor time and, consequently, labor costs.

    Moisture Trapping Concerns

    There is a debate among some builders about vapor permeability. Standard felt allows the roof deck to “breathe” slightly. Ice and water shield is a vapor barrier. If your attic ventilation is poor, moisture from inside your home could get trapped between the insulation and the roof deck, potentially leading to condensation issues. Proper attic ventilation is non-negotiable if you choose full coverage.

    Step-by-Step: How Is It Installed?

    If you decide to proceed, here is how professionals typically install ice and water shield on the entire roof. Note that this is a job best left to certified roofing contractors due to the complexity.

    1. Prep the Deck: Ensure the roof deck (plywood or OSB) is clean, dry, and free of protruding nails. Any moisture present must be dried out before application.
    2. Start at the Eaves: Begin at the bottom edge of the roof. Unroll the first strip along the eave.
    3. Peel and Stick: Remove the release film from the back of the membrane. Press it firmly onto the deck. Use a hand roller to ensure there are no air bubbles or wrinkles.
    4. Overlap Correctly: Subsequent rows should overlap the previous row by at least 2 to 4 inches (check manufacturer specs). This ensures water flows over the seam, not under it.
    5. Seal Penetrations: Cut precise holes for vents and chimneys. Use additional patches of shield or compatible flashing tape to seal around these openings tightly.
    6. Cap with Shingles: Once the entire deck is covered, proceed with standard shingle installation. The nails will penetrate the shield, which will self-seal around them.

    For more detailed technical specifications on roofing materials, you can refer to general construction standards on Wikipedia.

    FAQ Section

    1. Does ice and water shield expire?

    Yes, but usually only if left exposed. If kept in its original packaging and stored in a cool, dry place, it can last for several years. However, once installed, it is designed to last as long as the roof itself. Do not leave it exposed to sunlight for more than 30–90 days (depending on the brand) before covering it with shingles, as UV rays can degrade the adhesive.

    2. Can I install it myself?

    While technically possible, it is not recommended for DIYers. The material is heavy, sticky, and unforgiving. Improper installation can lead to wrinkles, poor adhesion, and voided warranties. Professional roofers have the tools and experience to handle the material efficiently.

    3. Will it make my roof hotter?

    No. Ice and water shield is installed under the shingles. It does not affect the solar reflectance of your roof. The temperature of your attic is determined by your ventilation and insulation, not the underlayment type.

    4. Is it necessary in warm climates?

    Even in warm climates like Florida or Texas, ice and water shield is beneficial. While you won’t have ice dams, you do have wind-driven rain from hurricanes and tropical storms. The waterproofing benefit protects against horizontal rain entry, which is common in severe storms.

    5. Can I put it over existing shingles?

    No. Ice and water shield must be applied directly to the solid roof deck (wood). It cannot be installed over old shingles or existing underlayment. A complete tear-off is required.

    Conclusion

    So, can you put ice and water shield on entire roof? Absolutely. And for many homeowners, it is one of the best upgrades they can make.

    While it comes with a higher price tag and requires professional installation, the benefits are clear: superior leak protection, extended shingle life, and enhanced warranty coverage. If you plan to stay in your home for a long time, or if you live in an area prone to severe weather, the extra investment pays for itself in peace of mind.

    However, ensure your attic ventilation is up to par to prevent moisture trapping, and always hire a licensed, insured roofing contractor to handle the installation.

    Found this guide helpful? Share it with your friends on Facebook or Pinterest who are planning their next home improvement project! Protecting your home starts with making informed decisions.
  • Where Does Ice And Water Shield Go On A Roof?

    Where Does Ice And Water Shield Go On A Roof?

    Have you ever woken up to a mysterious water stain on your ceiling after a heavy snowstorm? It is a frustrating and costly surprise that many homeowners in colder climates face, often due to improper roof protection. Understanding exactly where does ice and water shield go on a roof is the first step in preventing these damaging leaks and ensuring your home stays dry and secure during winter.

    Why Proper Placement Matters for Your Roof’s Health

    Before we dive into the specific locations, it is crucial to understand why this material is different from standard roofing felt. Ice and water shield is a self-adhering, rubberized asphalt membrane. Unlike traditional underlayment, which relies on gravity to shed water, this shield bonds directly to the roof deck.

    This bond creates a watertight seal around nails and staples. When ice dams form, they can push melting water back up under your shingles. Without a proper barrier, that water finds its way into your attic. According to building science principles, managing liquid water intrusion is just as critical as managing vapor transmission. You can read more about the general physics of building envelopes on Wikipedia.

    Getting the placement right isn’t just about best practices; in many regions, it is a legal requirement dictated by local building codes.

    The Critical Zones: Exactly Where to Install It

    If you are asking, “Where does ice and water shield go on a roof?” the answer involves three specific zones. While requirements vary by climate zone, these are the universal standards for maximum protection.

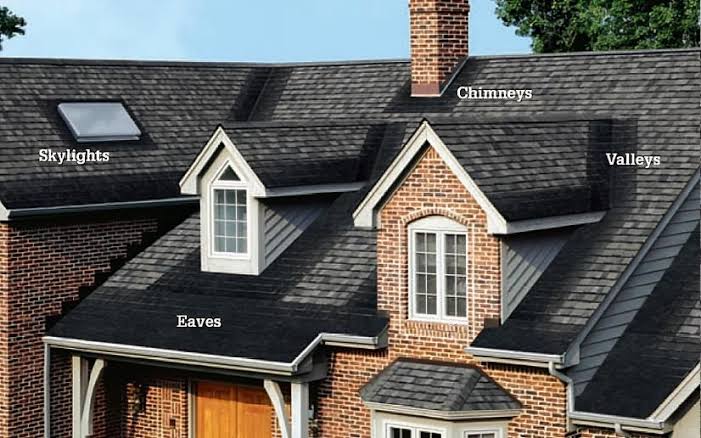
    1. The Eaves (The Most Important Area)

    The eaves are the edge of the roof that overhangs the walls of the house. This is the primary battleground against ice dams.

    • Starting Point: The shield should start at the very edge of the roof deck (the drip edge) or slightly over the fascia board, depending on local code.
    • Vertical Reach: It must extend up the roof slope to a point at least 24 inches inside the exterior wall line of the home.
      • Why? Heat escaping from your attic melts snow on the upper roof. The water runs down until it hits the cold eave, refreezes, and creates a dam. The water backs up behind this dam. If your shield only covers the edge, the water will bypass it. Extending it 24 inches past the interior wall ensures that even significant backup is caught.

    2. Valleys

    Roof valleys are the V-shaped channels where two roof slopes meet. They act as funnels for massive amounts of water runoff.

    • Installation Rule: Apply the shield along the entire length of the valley.
    • Width Requirement: The membrane should be at least 36 inches wide, centered in the valley.
    • Layering: If using multiple strips, overlap them by at least 6 inches. This area experiences high water velocity, so a robust, continuous seal is non-negotiable.

    3. Roof Penetrations and Low Slopes

    Any place where an object pierces the roof is a potential leak source.

    • Penetrations: Use ice and water shield around chimneys, plumbing vents, skylights, and dormer walls. Create a “boot” or collar effect by wrapping the material up the side of the penetration and onto the roof deck.
    • Low-Slope Roofs: If your roof has a pitch of less than 4:12 (meaning it rises 4 inches for every 12 inches of horizontal run), water drains slowly. Many experts recommend covering the entire roof deck with ice and water shield for low-slope applications to prevent wind-driven rain infiltration.
    Where Does Ice And Water Shield Go On A Roof

    Step-by-Step Installation Guide

    Installing this material requires precision. Here is a simplified professional workflow.

    1. Prepare the Surface: Ensure the roof deck (usually plywood or OSB) is clean, dry, and free of debris. Any moisture trapped underneath can cause rot later.
    2. Install Drip Edge: Install metal drip edge along the eaves first. Some codes allow the shield to go over the drip edge; others require it under. Check your local regulations, but generally, placing the shield over the drip edge at the eave provides a better seal against wind-driven rain.
    3. Roll Out the Membrane: Start at the bottom edge. Unroll the ice and water shield horizontally across the eave.
    4. Adhere and Smooth: Peel back the release film gradually. Press the membrane firmly onto the deck. Use a J-roller or a hand roller to ensure there are no air bubbles or wrinkles. Good adhesion is critical.
    5. Overlap Correctly: If you need a second row to reach the 24-inch mark, overlap the upper sheet over the lower sheet by at least 2 to 4 inches. Never overlap the lower sheet over the upper one, as this creates a channel for water to enter.
    6. Seal the Edges: In valleys and around penetrations, use roofing cement or compatible tape to seal the edges if recommended by the manufacturer.

    Ice and Water Shield vs. Traditional Felt: A Comparison

    Many DIYers wonder if they can save money by using standard #15 or #30 asphalt felt everywhere. Here is why that is a risky gamble.

    FeatureIce and Water ShieldTraditional Asphalt Felt
    AdhesionSelf-adhering (sticks to deck)Loose-laid or nailed
    Water ResistanceWatertight seal around nailsWater can wick through nail holes
    Ice Dam ProtectionExcellentPoor to Moderate
    CostHigher ($)Lower ($)
    Best Use CaseEaves, valleys, penetrationsUpper roof field (in moderate climates)

    Key Takeaway: While felt is cheaper, it cannot stop water that has been forced upward by ice pressure. Ice and water shield is an insurance policy for your roof structure.

    Common Mistakes to Avoid

    Even professionals make errors. Here are the most frequent pitfalls:

    • Not Extending Far Enough: Stopping the shield exactly at the wall line is a common error. Always go the extra 24 inches inward.
    • Installing in Cold Weather: The adhesive needs warmth to bond. If it is below 40°F (4°C), the material may not stick properly. Store rolls in a warm place before installation.
    • Wrinkles and Bubbles: A wrinkled shield creates weak points. Take your time to smooth it out.
    • Ignoring Manufacturer Instructions: Different brands have specific temperature ranges and overlap requirements. Always read the label.

    FAQ Section

    1. Do I need ice and water shield on the entire roof?

    In most cases, no. It is typically required only at the eaves, valleys, and penetrations. However, in extreme climate zones (like Northern Canada or Minnesota) or on low-slope roofs, some builders choose to cover the entire deck for maximum peace of mind. Check your local building code for specific mandates.

    2. Can I install ice and water shield over existing shingles?

    No. Ice and water shield must be installed directly onto the roof deck (the wood sheathing). Installing it over old shingles will prevent proper adhesion and void the warranty. It is part of the underlayment layer, not the outer layer.

    3. How long does ice and water shield last?

    The material itself is durable and can last as long as the roof shingles (20–30 years). However, its effectiveness depends on proper installation. If it is not adhered correctly during installation, it may fail prematurely. Once covered by shingles, it is protected from UV rays, which helps it last longer.

    4. What happens if I don’t use ice and water shield?

    Without it, you are at high risk for ice dam damage. Melting water can seep under shingles, soak into the roof deck, rot the wood, damage insulation, and cause mold growth in your attic. The cost of repairing structural rot far exceeds the cost of the shield.

    5. Is ice and water shield the same as peel-and-stick underlayment?

    Essentially, yes. “Ice and water shield” is the functional name describing its purpose, while “peel-and-stick” describes the installation method. Most modern ice and water shields are self-adhering. However, always verify the product specifications to ensure it is rated for ice dam protection.

    Conclusion

    Knowing where does ice and water shield go on a roof is fundamental to protecting your home from the harsh realities of winter weather. By focusing on the eaves (extending 24 inches past the interior wall), valleys, and penetrations, you create a robust defense system against ice dams and wind-driven rain.

    While it may add to the initial cost of your roofing project, the long-term savings in prevented water damage make it an invaluable investment. Don’t cut corners on your roof’s first line of defense.

    Did you find this guide helpful? Share this article with your neighbors or on social media to help others protect their homes this winter season!

  • How to Install a Metal Roof: The Ultimate DIY Guide

    How to Install a Metal Roof: The Ultimate DIY Guide

    Have you ever looked up at your aging shingle roof and wondered if there was a more durable, energy-efficient alternative? Many homeowners feel overwhelmed by the prospect of replacing their roof, fearing high costs and complex procedures. If you are asking, “How do you install a metal roof on a house,” you are not alone; this guide breaks down the process into manageable, safe, and effective steps for the dedicated DIYer.

    Metal roofing has surged in popularity across the United States, not just for its sleek modern aesthetic but for its longevity. While traditional asphalt shingles may last 15–20 years, a properly installed metal roof can protect your home for 40–70 years. However, installation precision is critical. A minor error in flashing or fastening can lead to leaks that compromise your home’s structural integrity. This article provides a comprehensive, expert-backed roadmap to help you navigate this significant home improvement project with confidence.

    Why Choose Metal Over Traditional Shingles?

    Before diving into the tools and techniques, it is essential to understand why metal is worth the investment. According to the Metal Roofing Alliance, metal roofs reflect solar radiant heat, which can reduce cooling costs by 10–25%. Furthermore, they are non-combustible and highly resistant to wind uplift, making them ideal for areas prone to severe weather.

    FeatureAsphalt ShinglesMetal Roofing
    Lifespan15–20 Years40–70+ Years
    MaintenanceModerate to HighLow
    Energy EfficiencyStandardHigh (Reflective)
    WeightHeavyLightweight
    RecyclabilityLow100% Recyclable

    While the upfront cost of metal is higher, the long-term value proposition is undeniable. But achieving this value requires strict adherence to installation protocols.

    What Tools and Materials Do You Need?

    Preparation is half the battle. Attempting to install a metal roof without the right equipment is a recipe for disaster. You will need specific tools designed for metalwork to ensure clean cuts and secure fastening.

    Essential Tools List

    • Electric Shears or Nibblers: For cutting metal panels without damaging the protective coating. Avoid abrasive saws as they create heat that ruins the galvanized layer.
    • Drill/Driver with Clutch: To prevent over-driving screws, which can strip holes and cause leaks.
    • Seam Roller: For locking standing seam panels together.
    • Chalk Line and Tape Measure: For precise alignment.
    • Safety Gear: Harness, non-slip boots, gloves, and eye protection.

    Material Checklist

    • Metal Panels: Choose between standing seam (hidden fasteners) or exposed fastener panels (corrugated or ribbed).
    • Underlayment: A synthetic, breathable underlayment is crucial for moisture management.
    • Closure Strips: Foam strips that fill gaps at ridges and eaves to prevent pest entry and wind noise.
    • Fasteners: Use only manufacturer-recommended screws with neoprene washers. Never mix metal types (e.g., steel screws on aluminum panels) to avoid galvanic corrosion.

    How Do You Prepare the Existing Roof Structure?

    One of the most common questions beginners ask is whether they need to tear off the old roof. In many cases, you can install metal over existing asphalt shingles, provided the local building code allows it and the roof deck is sound. This method saves time and disposal fees.

    However, inspection is non-negotiable. Walk the roof and check for soft spots, rot, or damaged rafters. Any compromised wood must be replaced before proceeding. If you are installing over shingles, ensure they are flat. Curling or missing shingles should be repaired to create a smooth surface.

    According to Wikipedia’s entry on Roofing, proper ventilation is critical when layering roofing materials. Ensure your attic has adequate intake and exhaust ventilation to prevent heat buildup, which can warp metal panels and degrade underlayment.

    How Do You Install A Metal Roof On A House

    Step-by-Step: How Do You Install a Metal Roof on a House?

    Now, let’s get into the core of the process. Follow these steps meticulously to ensure a watertight seal.

    Step 1: Install the Drip Edge and Underlayment

    Start at the eaves (the bottom edge of the roof). Install a metal drip edge along the eaves to direct water away from the fascia board. Next, roll out your synthetic underlayment horizontally, starting from the bottom. Overlap each row by at least 6 inches and secure it with cap nails or staples. This layer acts as your secondary water barrier.

    Step 2: Apply Flashing at Valleys and Penetrations

    Valleys are where two roof slopes meet, channeling significant water volume. Install W-shaped metal valley flashing over the underlayment. Seal the edges with high-quality urethane sealant. Similarly, flash around chimneys, vents, and skylights using step flashing or boot flashings designed for metal roofs. Note: Never rely solely on caulk for waterproofing; mechanical flashing is primary.

    Step 3: Install the First Metal Panel

    This is the most critical step. If the first panel is crooked, every subsequent panel will be too. Start at the bottom corner of the roof, ensuring the panel overhangs the drip edge by about 1–2 inches. Use a chalk line to verify it is perfectly square with the eave. Secure the panel with screws, placing them in the flat area of the panel, not the high ribs, unless specified by the manufacturer.

    Step 4: Overlap and Secure Subsequent Panels

    Install the next panel by overlapping the side lap of the previous one. Most panels have a designated overlap width (usually 1–2 inches). Ensure the ribs align perfectly. Continue this process across the roof, checking alignment every few rows. Cut panels to fit around obstacles using electric shears, deburring any sharp edges afterward.

    Step 5: Install Ridge Caps and Trim

    Once all field panels are installed, finish the roof with ridge caps. These cover the peak of the roof and provide ventilation if you use vented ridge caps. Apply closure strips underneath the ridge cap to block wind-driven rain and pests. Secure the ridge cap with screws spaced evenly along the length. Finally, install gable trim on the sides to give the roof a finished look and protect the edges.

    Common Mistakes to Avoid During Installation

    Even experienced contractors make errors. Here are the top pitfalls to watch out for:

    1. Over-tightening Screws: This compresses the neoprene washer too much, causing it to fail prematurely. Stop drilling when the washer just touches the metal.
    2. Walking on Installed Panels: Metal roofs can dent. Always walk on the screw lines or use distributed weight boards if you must traverse the roof.
    3. Ignoring Thermal Expansion: Metal expands and contracts with temperature changes. Leave slight gaps at end laps and use slotted holes if recommended to allow for movement.
    4. Using Wrong Fasteners: Using standard steel screws on aluminum roofing will cause rapid corrosion. Always match the fastener material to the panel material.

    Frequently Asked Questions (FAQ)

    Can I install a metal roof myself without professional help?

    Yes, but it requires advanced DIY skills, comfort with heights, and strict adherence to safety protocols. If your roof has complex angles, valleys, or turrets, hiring a professional is recommended.

    Do I need a permit to install a metal roof?

    In most US jurisdictions, yes. Roofing is a structural component, and local building codes regulate materials and installation methods. Check with your local building department before starting.

    How long does it take to install a metal roof?

    For a typical 2,000-square-foot home, a professional crew takes 2–3 days. A DIYer should expect 1–2 weeks, depending on experience and helper availability.

    Is metal roofing noisy during rain?

    No. When installed with solid sheathing and proper underlayment, metal roofs are no noisier than asphalt shingles. The insulation and attic space dampen sound significantly.

    What is the best type of metal for residential roofing?

    Galvalume (steel coated with aluminum and zinc) is the most popular due to its balance of cost and durability. Copper and zinc are premium options with unique aesthetics but higher price tags.

    Conclusion

    Learning how do you install a metal roof on a house is a rewarding journey that can significantly enhance your home’s value and resilience. By carefully preparing the structure, using the right tools, and following a meticulous step-by-step process, you can achieve a professional-grade result. Remember, patience and precision are your best friends in this project.

    If you found this guide helpful, please share it on social media to help other homeowners make informed decisions about their roofing projects. Have you installed a metal roof? Share your tips or questions in the comments below!