Adding an outdoor living space is one of the most rewarding home improvement projects you can undertake. It extends your usable square footage, increases property value, and creates a perfect spot for relaxation. However, the structural integrity of this addition depends entirely on one critical factor: the connection point. Knowing how to attach a patio roof to an existing house correctly is vital to prevent water damage, structural failure, and costly repairs down the line.
Many homeowners underestimate the complexity of integrating a new structure with an old one. If done incorrectly, you risk compromising your home’s envelope, leading to leaks that rot framing and ruin interior finishes. This guide will walk you through the essential steps, safety considerations, and best practices to ensure your patio roof is secure, weatherproof, and built to last.
Why Proper Attachment Matters for Structural Integrity
Before picking up a drill, it is crucial to understand why the attachment method is so significant. A patio roof is not just a decorative element; it is a structural load that must be transferred safely to your home’s foundation.
According to general building principles, any addition must handle three types of loads:
- Dead Load: The weight of the structure itself (beams, rafters, roofing material).
- Live Load: Weight from people, furniture, or snow accumulation.
- Wind Load: Uplift and lateral forces from wind.
If the connection to the existing house is weak, these forces can pull the roof away from the wall or cause it to sag. Furthermore, improper sealing at the junction is the number one cause of water intrusion in home additions. By following strict building codes and using high-quality materials, you protect your investment and your family’s safety.
Step 1: Check Local Building Codes and Permits
One of the most common mistakes DIYers make is skipping the permitting process. Building codes vary significantly by region, especially regarding snow loads and wind resistance.
- Contact Your Local Building Department: Ask specifically about requirements for attached structures.
- Determine Setback Requirements: Ensure your patio doesn’t violate property line distances.
- Review HOA Rules: If you live in a community with a Homeowners Association, check their aesthetic guidelines.
Ignoring permits can lead to fines, forced removal of the structure, or issues when selling your home. For a deeper understanding of why building standards exist, you can refer to resources on building code enforcement to see how these regulations protect public safety.
Step 2: Choose the Right Attachment Method
There are two primary ways to attach a patio roof to an existing house. The right choice depends on your home’s construction and aesthetic goals.
Option A: Ledger Board Attachment
This is the most common and cost-effective method. A heavy-duty timber (ledger board) is bolted directly to the house’s rim joist or wall studs.
- Pros: Easier to install, lower cost, allows for adjustable height.
- Cons: Requires precise flashing to prevent leaks; relies on the strength of the existing wall framing.
Option B: Beam-to-Column Support
In this method, the patio roof beams rest on posts near the house, rather than attaching directly to the wall. A small gap is left between the roof and the house, covered by a separate flashing piece.
- Pros: Eliminates the risk of leaking into the house wall; easier to waterproof.
- Cons: Requires more posts, which may obstruct views or foot traffic; slightly higher material cost.
Expert Tip: For most standard wood-frame homes, the ledger board method is preferred for its clean look, provided you use proper flashing techniques.
Step 3: Gather Tools and Materials
Preparation is key to a smooth installation. Here is what you will need:
| Category | Items Needed |
|---|---|
| Tools | Circular saw, impact driver, level (4ft), chalk line, ladder, safety glasses, caulk gun |
| Fasteners | ½-inch galvanized lag screws or through-bolts, structural screws, roofing nails |
| Materials | Pressure-treated lumber (for ledger), LED flashings, butyl rubber tape, silicone sealant, drip edge |
Note: Always use corrosion-resistant fasteners (galvanized or stainless steel) when attaching to pressure-treated wood, as the chemicals in the wood can accelerate rust.
Step 4: Installation Process – Step-by-Step
Follow these steps carefully to ensure a secure and watertight connection.
1. Locate and Mark the Studs
Use a stud finder to locate the wall studs behind your siding. Mark the center of each stud clearly. You must anchor the ledger board into the structural framing, not just the sheathing or siding.
2. Prepare the Wall Surface
Remove the siding where the ledger board will sit. Do not simply screw over the siding, as this creates a gap that traps moisture and leads to rot. Cut the siding cleanly using a circular saw set to the depth of the siding material.
3. Install the Ledger Board
Cut a pressure-treated 2×8 or 2×10 board to length. Apply a bead of exterior-grade polyurethane sealant to the back of the board. Position it against the exposed studs, ensuring it is perfectly level.
Drill pilot holes through the ledger and into the center of each stud. Secure the board using ½-inch lag screws or through-bolts with washers. Tighten securely, but do not overtighten to the point of crushing the wood fibers.
4. Apply Flashing (The Critical Step)
This is where most failures occur. You must create a water-shedding barrier.
- Step A: Apply self-adhering butyl rubber flashing tape over the top edge of the ledger board, extending it up the wall sheathing by at least 6 inches.
- Step B: Install metal Z-flashing or step flashing over the butyl tape. The top leg of the metal should go under the existing siding (or house wrap), and the bottom leg should overlap the top of the ledger.
- Step C: Seal all edges with high-quality silicone or urethane caulk.
5. Attach Rafters or Beams
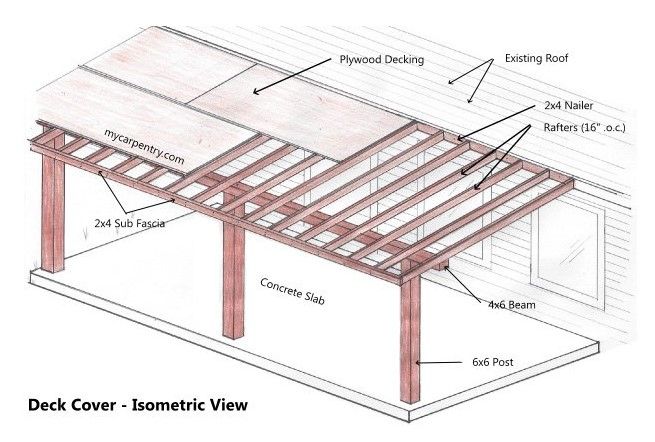
Once the ledger is secure and flashed, you can attach your patio roof rafters. Use hurricane ties or rafter hangers to connect the rafters to the ledger board. Ensure the spacing matches your roofing material requirements (typically 16 or 24 inches on center).
Common Mistakes to Avoid
Even experienced DIYers can stumble on these pitfalls. Avoid them to save time and money.
- Skipping the Drip Edge: Without a drip edge on the ledger, water will run down the face of the board, staining it and potentially seeping into the joint.
- Using Interior Screws: Never use drywall or interior wood screws for structural connections. They lack the shear strength required for roof loads.
- Ignoring Slope: Your patio roof must have a minimum slope (usually 1/4 inch per foot) to allow water to drain away from the house. A flat roof will pool water, leading to leaks and premature material failure.
FAQ: Frequently Asked Questions
1. Can I attach a patio roof to vinyl siding?
No. You must remove the vinyl siding in the area where the ledger board will be attached. Attaching directly to vinyl prevents a tight seal against the house sheathing, creating a pathway for water and pests.
2. What is the minimum slope for a patio roof?
Most building codes require a minimum slope of 1/4 inch per foot for solid roofing materials like shingles or metal. For translucent polycarbonate panels, check the manufacturer’s specifications, as some require a steeper pitch for proper drainage.
3. Do I need a permit for a small patio cover?
In most jurisdictions, yes. Even small structures often require permits if they are attached to the house. Unpermitted work can void your homeowner’s insurance policy in the event of damage. Always check with your local building department first.
4. How far apart should the support posts be?
The spacing depends on the size of the beam and the roof load. Generally, for a standard 12-foot deep patio, posts can be spaced 8 to 10 feet apart. However, you should consult a structural engineer or use a span calculator specific to your lumber grade and local snow load requirements.
5. What is the best roofing material for a DIY patio roof?
Corrugated metal or polycarbonate panels are popular for DIYers because they are lightweight, easy to cut, and require less structural support than heavy clay tiles or asphalt shingles. Metal roofs also shed snow and rain efficiently.
Conclusion
Learning how to attach a patio roof to an existing house is a manageable project for a confident DIYer, provided you prioritize structural safety and waterproofing. By securing a proper ledger board, using high-quality flashing, and adhering to local building codes, you can create a beautiful and durable outdoor space.
Remember, the connection point is the heart of the structure. Take your time with the flashing and anchoring steps, as these are the elements that will determine the longevity of your patio. Once completed, you’ll have a seamless extension of your home that you can enjoy for years to come.
Did you find this guide helpful? Share it with your friends on Facebook or Pinterest who are planning their own outdoor renovations! If you have questions or tips from your own experience, leave a comment below.
Leave a Reply