Category: preventive maintenance

  • How Much Does It Cost To Replace A Commercial Roof?

    How Much Does It Cost To Replace A Commercial Roof?

    Replacing a commercial roof is one of the most significant capital expenditures a business owner or facility manager will face. It is not just about shingles and sealants; it is about protecting your assets, ensuring employee safety, and maintaining operational continuity. If you are currently staring at leaks or aging materials, you are likely asking the critical question: How Much Does It Cost To Replace A Commercial Roof?

    The answer is rarely a single number, but understanding the variables can save you thousands. In this guide, we will break down the current market rates for 2026, explore the factors that drive prices up or down, and help you make an informed decision that aligns with your financial strategy.

    Understanding the Average Cost Range in 2026

    When planning your budget, it is essential to look at industry averages while recognizing that every building is unique. As of late 2026, the cost to replace a commercial roof typically ranges between $5.00 and $12.00 per square foot.

    For a standard 20,000-square-foot warehouse or office building, this translates to a total project cost between $100,000 and $240,000. However, these figures can fluctuate based on material choices, geographic location, and the complexity of the existing structure.

    It is crucial to note that “replacement” differs significantly from “repair.” While minor repairs might cost a few thousand dollars, a full replacement involves stripping the old layers (tear-off), inspecting the deck, and installing a entirely new system. According to recent industry reports, labor costs have stabilized after the post-pandemic spikes, but material costs for high-quality polymers and metals remain elevated due to supply chain adjustments.

    Key Factors That Influence Your Final Bill

    Why does one quote come in at $6 per square foot while another hits $15? Several dynamic factors play a role. Understanding these will help you negotiate better and avoid surprise charges.

    1. Roofing Material Selection

    The type of membrane or material you choose is the biggest cost driver. Here is a quick comparison of popular options:

    • TPO (Thermoplastic Polyolefin): Known for its heat-reflective properties and durability. It is mid-range in price and highly popular for energy efficiency.
    • EPDM (Ethylene Propylene Diene Monomer): A synthetic rubber roofing material. It is generally cheaper upfront but may have higher long-term maintenance costs if not installed correctly.
    • PVC (Polyvinyl Chloride): Excellent for chemical resistance and fire ratings. It tends to be on the higher end of the price spectrum.
    • Modified Bitumen: A multi-layered system often used on flat roofs. It is durable but labor-intensive to install, which can increase labor costs.

    2. Roof Size and Complexity

    Contractors measure commercial roofs in “squares” (100 square feet). The larger the roof, the lower the cost per square foot often becomes due to economies of scale. However, complexity adds cost. A simple, large, rectangular box store is cheaper to roof than a hospital with multiple HVAC units, skylights, parapet walls, and intricate drainage systems.

    3. Tear-Off vs. Overlay

    Do you need to remove the old roof?

    • Tear-Off: Removing existing layers down to the deck. This is more expensive but allows for a thorough inspection of the structural deck and ensures the new warranty is valid.
    • Overlay: Installing new material over the old. This is cheaper and faster but adds weight to the structure and may void manufacturer warranties if the underlying layer is compromised.

    4. Geographic Location and Labor Rates

    Labor costs vary significantly across the United States. Roofing in major metropolitan areas like New York or San Francisco will naturally command higher labor rates than in rural Midwest regions. Additionally, local building codes may require specific wind uplift ratings or insulation values, impacting material costs.
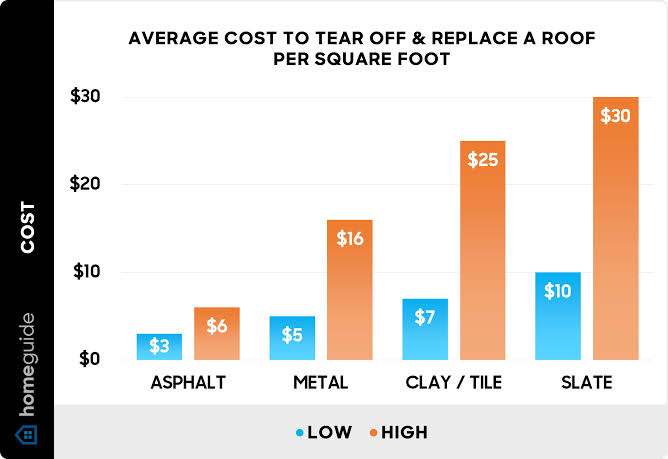
    How Much Does It Cost To Replace A Commercial Roof

    Breakdown of Costs: Materials vs. Labor

    To understand where your money goes, letโ€™s look at a typical cost distribution for a standard TPO roof replacement.

    Cost ComponentPercentage of Total BudgetDescription
    Materials40โ€“50%Membranes, insulation, adhesives, flashings.
    Labor30โ€“40%Skilled crew wages, equipment operation, safety gear.
    Overhead & Profit15โ€“20%Insurance, licensing, contractor margin.
    Permits & Fees5%Local municipal permits and inspections.

    Note: These percentages are estimates. Always request a detailed line-item quote from your contractor.

    Hidden Costs You Might Not Expect

    Beyond the base quote, several ancillary costs can arise. Being aware of them helps prevent budget overruns.

    • Deck Repair: Once the old roof is removed, rotting wood or rusted steel decking may be revealed. Repairing the structural deck is charged separately and can add $1โ€“$3 per square foot depending on severity.
    • HVAC Relocation: If rooftop units obstruct the installation, they may need to be temporarily moved or protected, requiring specialized HVAC technicians.
    • Disposal Fees: Dumping old roofing materials incurs landfill fees, which have risen in many states due to environmental regulations.
    • Insulation Upgrades: Modern energy codes often require higher R-values than older buildings possess. Upgrading insulation during replacement is a smart long-term move but increases initial costs.

    Step-by-Step Guide to Getting an Accurate Quote

    Getting a fair price requires preparation. Follow these steps to ensure you receive comparable and accurate bids.

    1. Gather Existing Documentation: Locate previous roof plans, warranty information, and repair history. This helps contractors understand the building’s history.
    2. Define Your Scope: Decide if you want a full tear-off or an overlay. Clarify if you want to upgrade insulation or add solar-ready infrastructure.
    3. Request Multiple Bids: Aim for at least three detailed quotes from licensed and insured contractors. Ensure they are bidding on the same specifications (same material thickness, same insulation R-value).
    4. Check References and Reviews: Look for contractors with experience in your specific building type. Ask for references from projects completed in the last two years.
    5. Review the Warranty: Understand the difference between a material warranty (from the manufacturer) and a workmanship warranty (from the installer). A strong contractor will offer both.

    For more detailed information on roofing standards and material specifications, you can refer to general construction guidelines available on Wikipedia.

    FAQ: Common Questions About Commercial Roof Replacement

    1. How long does a commercial roof replacement take?

    The timeline depends on the size and complexity of the roof. A small 10,000 sq. ft. roof might take 3โ€“5 days, while a large industrial complex could take 2โ€“4 weeks. Weather delays are common, so always build buffer time into your schedule.

    2. Can I replace my roof in sections?

    Yes, phased replacements are possible and often necessary for businesses that cannot shut down operations. However, this approach may cost slightly more due to repeated mobilization of crews and equipment, and it requires careful planning to ensure water tightness between phases.

    3. Does a new roof increase property value?

    Absolutely. A new commercial roof with a transferable warranty is a significant selling point. It assures potential buyers or tenants that they will not face immediate capital expenditures, thereby increasing the asset’s marketability and value.

    4. What is the lifespan of a commercial roof?

    Most modern commercial roofing systems last between 15 and 30 years. TPO and PVC membranes typically last 20โ€“25 years, while metal roofs can last 30+ years with proper maintenance. Regular inspections and maintenance are key to reaching the maximum lifespan.

    5. Are there tax incentives for replacing a commercial roof?

    In the US, certain energy-efficient roofing upgrades may qualify for tax deductions under Section 179D or other local green building incentives. Specifically, improving insulation or using reflective coatings can contribute to energy savings that qualify for benefits. Consult with a tax professional for specifics related to your project.

    Conclusion

    So, how much does it cost to replace a commercial roof? While the average ranges from $5 to $12 per square foot, your specific cost will depend on materials, structural conditions, and local labor rates. Investing in a high-quality replacement is not just an expense; it is a strategic move that protects your business operations, enhances energy efficiency, and boosts property value.

    Donโ€™t let the sticker shock deter you from necessary maintenance. Instead, use this knowledge to solicit detailed, apples-to-apples quotes from reputable contractors. Remember, the cheapest bid is not always the best value when it comes to the integrity of your building.

    Found this guide helpful? Share it with your facility management team or business partners on LinkedIn or Twitter to help them navigate their next roofing project with confidence!
  • What Is An Ice And Water Shield On A Roof?

    What Is An Ice And Water Shield On A Roof?

    Have you ever woken up to a mysterious water stain on your ceiling after a heavy snowstorm, wondering where the leak came from despite having a “new” roof? It is a frustrating and costly experience that many homeowners in colder climates face, often due to a missing or failed protective layer. Understanding what is an ice and water shield on a roof is the first step toward preventing these damaging leaks and ensuring your home stays dry and secure during harsh winter weather.

    The Critical Role of Ice and Water Shield

    When we talk about roofing, most people think immediately of shingles. Shingles are the visible armor of your home, designed to shed rain and snow. However, shingles alone are not enough to guarantee a watertight seal, especially in areas prone to freezing temperatures. This is where the ice and water shield comes into play.

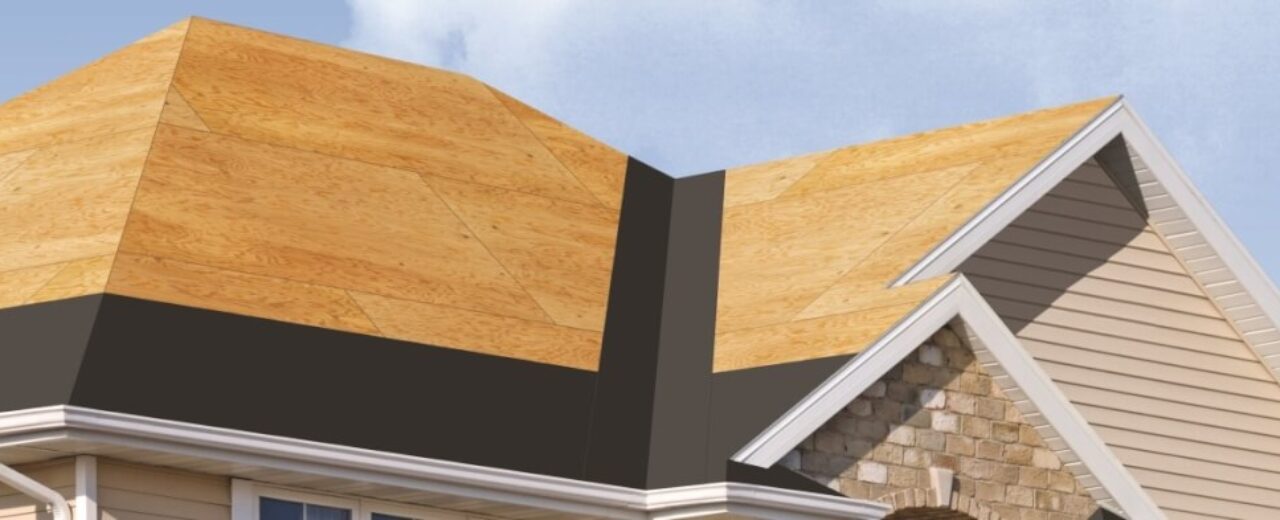
    An ice and water shield is a self-adhering, rubberized asphalt membrane installed directly onto the roof deck (the wooden surface beneath the shingles). Unlike traditional felt underlayment, which is merely nailed down, this shield sticks aggressively to the wood. Its primary purpose is to create an impermeable barrier against water infiltration caused by ice dams and wind-driven rain.

    According to industry standards, this material is essential in specific zones of your roof. While it can be used across the entire roof surface, building codes typically mandate its use in “vulnerable areas.” These include:

    • Eaves (the edge of the roof)
    • Valleys (where two roof slopes meet)
    • Around chimneys and skylights
    • Wall-to-roof intersections

    The logic is simple: if water gets past your shingles, the shield stops it from rotting your wood decking and ruining your insulation.

    Why Do You Need It? Understanding Ice Dams

    To truly appreciate the value of this product, you must understand the enemy: ice dams.

    An ice dam forms when heat escapes from your attic, warming the roof deck. This causes snow on the upper part of the roof to melt. As the water runs down toward the colder eaves (the overhang), it refreezes. Over time, this builds up a ridge of ice.

    Here is the dangerous part: subsequent melting snow has nowhere to go. It backs up behind the ice ridge, seeping under the shingles. Without protection, this water soaks into the roof deck, leading to:

    1. Rotting plywood or OSB sheathing.
    2. Mold growth in the attic.
    3. Damaged drywall and paint inside your home.
    4. Compromised structural integrity over time.

    A standard felt underlayment might slow this process, but it cannot stop it. Felt is porous and relies on gravity to shed water. When water is pushed upward by pressure from an ice dam, felt fails. An ice and water shield, however, seals around nail holes and adheres tightly, blocking that upward-moving water.

    Ice and Water Shield vs. Traditional Felt Underlayment

    Many homeowners ask if they can just use cheaper roofing felt instead. While felt has its place, it is not a substitute for a rubberized membrane in high-risk areas. Letโ€™s look at the differences.

    FeatureIce and Water ShieldTraditional Felt Underlayment
    MaterialRubberized asphalt with polymer modifiersAsphalt-saturated organic or fiberglass mat
    AdhesionSelf-adhering (sticks to deck)Mechanically fastened (nailed/stapled)
    Water ResistanceWaterproof (impermeable)Water-resistant (permeable)
    Nail SealingSeals around nails automaticallyDoes not seal around nails
    Best Use CaseEaves, valleys, penetrationsField of the roof (in mild climates)
    CostHigherLower

    As you can see, the shield offers superior protection. The ability to seal around nails is a game-changer. Every time a roofer nails a shingle, they puncture the underlayment. With felt, those are potential entry points for water. With an ice and water shield, the rubberized material flows around the nail shaft, creating a watertight seal.

    What Is An Ice And Water Shield On A Roof

    Where Should It Be Installed?

    You do not necessarily need to cover your entire roof with ice and water shield, although doing so provides maximum protection. Most building codes in the United States, influenced by the International Residential Code (IRC), require it in specific zones.

    1. The Eaves

    This is the most critical area. Codes typically require the shield to extend from the edge of the roof inward to a point at least 24 inches inside the exterior wall line of the house. This covers the area where ice dams are most likely to form.

    2. Roof Valleys

    Valleys channel massive amounts of water. If debris blocks a valley, water can pool and seep under shingles. Installing the shield here provides a secondary line of defense.

    3. Penetrations

    Any object that pierces the roof plane is a leak risk. This includes:

    • Chimneys
    • Skylights
    • Vent pipes
    • Dormer walls

    For more detailed technical definitions and historical context on roofing materials, you can refer to Wikipediaโ€™s entry on Roofing.

    How Is It Installed? A Step-by-Step Overview

    While you should always hire a licensed professional for roofing work, understanding the process helps you verify that the job is done correctly.

    1. Preparation: The roof deck must be clean, dry, and free of protruding nails. Any old underlayment should be removed.
    2. Temperature Check: Ice and water shields require warmth to adhere properly. Most manufacturers recommend installation when the ambient temperature is above 40ยฐF (4ยฐC). If it is colder, the adhesive may not stick, requiring manual sealing or heating.
    3. Starting at the Eave: The first row is installed along the drip edge. It is crucial to align it straight.
    4. Overlapping: Subsequent rows must overlap the previous one. Typically, a 2-inch to 4-inch overlap is required, but you must check the specific manufacturerโ€™s instructions.
    5. Pressing Down: Once placed, the membrane must be firmly pressed down to ensure full contact with the wood deck. Some roofers use a J-roller for this.
    6. Sealing Edges: In valleys and around penetrations, additional patches or sealants may be applied to ensure no gaps exist.

    Common Myths About Ice and Water Shields

    There is a lot of misinformation in the roofing industry. Letโ€™s clear up a few common myths.

    Myth 1: It prevents ice dams from forming. Fact: No. Ice and water shields do not stop ice dams. They only prevent the water from those dams from entering your home. To prevent ice dams, you need proper attic insulation and ventilation.

    Myth 2: It lasts forever. Fact: While durable, these membranes are part of the roofing system. If you replace your shingles, you should inspect the shield. If it is brittle or damaged, it needs replacement.

    Myth 3: All shields are the same. Fact: There are different grades. Some are designed for steep slopes, while others are for low-slope applications. Some have granulated surfaces for better traction during installation, while others are smooth. Always use the product specified by your shingle manufacturer to maintain warranty coverage.

    FAQ Section

    1. How long does an ice and water shield last?

    Generally, an ice and water shield lasts as long as the shingles above it, typically 20 to 30 years. However, its effectiveness can degrade if exposed to UV light for extended periods before shingles are installed. It should be covered by shingles within a few days of installation.

    2. Can I install it myself?

    While it is physically possible, it is not recommended for DIYers. Roofing is dangerous, and improper installation (such as poor overlapping or installing in cold weather without proper adhesion techniques) can void warranties and lead to leaks. Professional installation ensures the seal is perfect.

    3. Does it make the roof hotter?

    No. The shield is installed beneath the shingles and does not significantly impact the thermal performance of the roof. In fact, by preventing moisture intrusion, it helps maintain the efficiency of your attic insulation.

    4. Is it required by law?

    In many US states with significant snowfall, yes. Building codes based on the IRC mandate its use in eaves and valleys. Even if not legally required in your area, it is a wise investment for any home in a climate that experiences freezing rain or snow.

    5. What happens if I donโ€™t use it?

    Without it, your home is vulnerable to water damage from ice dams and wind-driven rain. This can lead to expensive repairs involving drywall replacement, mold remediation, and structural wood repair. The cost of the shield is a fraction of the cost of repairing water damage.

    Conclusion

    Understanding what is an ice and water shield on a roof is crucial for any homeowner who wants to protect their investment. It is not just an optional upgrade; it is a vital component of a modern roofing system, especially in regions with winter weather. By creating a watertight seal around nails and blocking back-up water from ice dams, it saves you from the headache and expense of interior water damage.

    If you are planning a roof replacement or new construction, insist on high-quality ice and water shield in all vulnerable areas. Your future selfโ€”and your dry ceilingโ€”will thank you.

    Found this guide helpful? Share it with your friends and neighbors on social media to help them protect their homes too!

  • How to Get Rid of Pigeons on Your Roof: A Pro Guide

    How to Get Rid of Pigeons on Your Roof: A Pro Guide

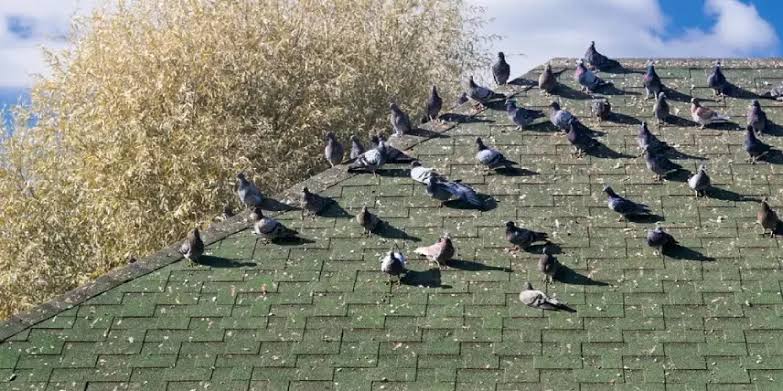
    Dealing with a flock of pigeons roosting on your roof is more than just a nuisance; it is a genuine threat to your propertyโ€™s structural integrity and your familyโ€™s health. The constant cooing, the mess, and the potential for disease can make you feel helpless in your own home. If you are wondering how do you get rid of pigeons on your roof, you are not alone, and there are effective, humane solutions available.

    In this comprehensive guide, we will walk you through proven strategies to deter these persistent birds. We combine expert insights with practical, step-by-step instructions to ensure you can reclaim your roof safely and legally.

    Why Are Pigeons Attracted to Your Roof?

    Before we dive into removal tactics, it is crucial to understand why they are there. Pigeons, often called “rats with wings” by frustrated homeowners, are creatures of habit. They seek three main things: shelter, safety, and food.

    Your roof offers an ideal vantage point. It provides protection from predators like hawks and cats, while also offering flat surfaces or nooks for nesting. According to urban wildlife studies, once a pair of pigeons establishes a nest, they will return to the same spot repeatedly, often bringing more birds with them.

    Understanding this behavior is key. You cannot simply shoo them away once; you must make your roof an unattractive environment for the long term.

    What Are the Most Effective Humane Deterrents?

    When asking how do you get rid of pigeons on your roof, the first rule is to prioritize humane methods. In many parts of the US, harming migratory birds or their active nests can violate federal laws like the Migratory Bird Treaty Act. Therefore, exclusion and deterrents are your best friends.

    1. Physical Barriers: Bird Spikes and Netting

    Physical barriers are widely considered the gold standard in professional pest control. They do not harm the birds but simply make landing impossible.

    • Bird Spikes: These are strips of plastic or stainless steel spikes that attach to ledges, rails, and roof peaks. Pigeons cannot land on them because there is no flat surface.
      • Pros: Highly effective, low maintenance, invisible from the street if installed correctly.
      • Cons: Requires professional installation for complex roofs; initial cost can be higher.
    • Bird Netting: This involves covering large open areas (like under eaves or across courtyards) with durable mesh.
      • Pros: Completely blocks access to specific zones.
      • Cons: Can look unsightly if not tensioned properly; requires regular inspection for tears.

    2. Visual and Auditory Scares

    For smaller infestations, you might try scare tactics. However, pigeons are intelligent and quickly habituate to static objects.

    • Reflective Tape and CDs: These create flashing lights and unpredictable movements that disorient birds.
    • Decoy Predators: Plastic owls or hawks can work temporarily. Pro Tip: Move the decoy every few days, or the pigeons will realize it is fake.
    • Ultrasonic Devices: These emit high-frequency sounds uncomfortable for birds but inaudible to humans. Effectiveness varies greatly depending on the environment and background noise.
    MethodEffectivenessCostMaintenance Level
    Bird SpikesHighMedium-HighLow
    Bird NettingHighMediumMedium
    Visual ScaresLow-MediumLowHigh (must move often)
    UltrasonicVariableMediumLow

    How Do You Clean Pigeon Droppings Safely?

    One of the most dangerous aspects of a pigeon infestation is the waste. Pigeon droppings are acidic and can corrode roofing materials, but more importantly, they carry diseases such as histoplasmosis, cryptococcosis, and psittacosis.

    Never dry-sweep pigeon droppings. This releases harmful spores into the air, which you can then inhale.

    Follow this strict safety protocol for cleanup:

    1. Gear Up: Wear an N95 respirator mask, heavy-duty rubber gloves, and protective eyewear. Disposable coveralls are recommended.
    2. Wet the Area: Generously spray the droppings with a water and disinfectant mixture (a 10% bleach solution works well). Let it soak for 15โ€“20 minutes to suppress dust and kill bacteria.
    3. Scrape Carefully: Use a plastic scraper to lift the waste. Avoid creating dust.
    4. Dispose Properly: Place all waste, including your gloves and mask, into double-sealed plastic bags. Check your local municipal guidelines for hazardous waste disposal.
    5. Sanitize: Wash the area thoroughly with hot water and detergent. For more detailed health guidelines, you can refer to resources from the Centers for Disease Control and Prevention (CDC) regarding environmental hygiene.

    Can DIY Methods Really Work Long-Term?

    Many homeowners ask if homemade remedies are effective. The short answer is: rarely for long-term solutions.

    Common DIY myths include using mothballs, cayenne pepper, or vinegar. While strong smells may deter pigeons initially, rain washes these away quickly, and birds adapt to the scents. Furthermore, some DIY chemicals can damage your roof shingles or void your warranty.

    However, one DIY method has merit: Slope Modification. Pigeons prefer flat surfaces. If you have a flat section of roof where they gather, installing a simple wooden or metal slope (at least 45 degrees) can physically prevent them from standing comfortably. This is a cheap, effective, and permanent structural change.

    How Do You Get Rid Of Pigeons On Your Roof

    When Should You Call a Professional?

    While DIY methods are great for minor issues, there are times when you need expert help. Consider hiring a licensed wildlife control professional if:

    • The infestation is large (more than 5โ€“10 birds).
    • There are active nests with eggs or chicks (legal restrictions apply).
    • You are uncomfortable working at heights.
    • Previous DIY attempts have failed.

    Professionals have access to industrial-grade netting and gel repellents that are not available to consumers. They also carry insurance, protecting you from liability if an accident occurs during removal.

    FAQ Section

    1. Is it illegal to remove pigeons from my roof?

    In the US, feral pigeons are generally not protected under the Migratory Bird Treaty Act. However, native wild pigeons (like band-tailed pigeons in the West) are protected. Always check your state and local wildlife regulations before taking action. Never destroy active nests of protected species.

    2. Will bird spikes hurt the pigeons?

    No. High-quality bird spikes are designed to be humane. They simply deny the birds a place to land or roost. They do not impale or injure the birds. Ensure you buy spikes with rounded tips for maximum safety and durability.

    3. How long does it take to get rid of pigeons?

    It varies. Visual deterrents may show results in a few days but often fail within weeks. Physical barriers like spikes or netting provide immediate and permanent results once installed. Consistency is key; if you stop your deterrent routine, they will return.

    4. Can pigeons damage my roof structure?

    Yes. Their droppings are highly acidic and can eat through metal flashing, wood, and even concrete over time. Additionally, their nests can block gutters, leading to water damage and roof leaks. The weight of large flocks can also stress weaker roof structures.

    5. What is the best natural repellent for pigeons?

    There is no single “best” natural repellent that works permanently. However, keeping your roof clean of food sources is the most effective natural deterrent. Ensure trash cans are sealed and avoid feeding birds anywhere near your property. Some homeowners find success with essential oils like peppermint or eucalyptus, but these require frequent reapplication.

    Conclusion

    Learning how do you get rid of pigeons on your roof is about combining immediate action with long-term prevention. While the sight of pigeons may seem harmless, the health risks and property damage they cause are significant. By starting with humane physical barriers like spikes or netting, maintaining strict hygiene during cleanup, and staying consistent with your deterrents, you can reclaim your home.

    Remember, patience is vital. Pigeons are stubborn, but they are not invincible. Take action today to protect your investment and your peace of mind.

    Did you find this guide helpful? Share it on Facebook or Twitter to help other homeowners tackle their pigeon problems!

  • Is Your Roof Failing? Key Signs It Needs Replacement

    Is Your Roof Failing? Key Signs It Needs Replacement

    Your home is likely your biggest investment, and the roof is its first line of defense against the elements. Ignoring minor issues can lead to catastrophic water damage, mold growth, and skyrocketing repair bills down the line. If you are staring at your ceiling wondering how to tell if a roof needs to be replaced, you are not alone; recognizing the early warning signs is crucial for protecting your property and your wallet.

    In this guide, we will break down the definitive indicators that your roof has reached the end of its lifecycle. We will move beyond simple guesswork and provide you with actionable, professional insights to help you make an informed decision.

    How Old Is Your Roof? Understanding Lifespan Expectations

    The age of your roofing material is the single most significant factor in determining its remaining life. While some homeowners assume roofs last forever, every material has a finite lifespan dictated by weather exposure, installation quality, and maintenance.

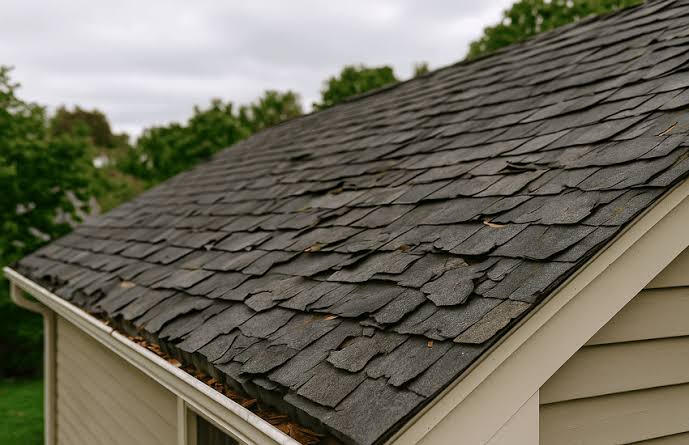
    Most standard asphalt shingle roofsโ€”the most common type in the United Statesโ€”last between 15 to 20 years. If your home was built or reroofed within this window, you should be conducting annual inspections. However, age alone isnโ€™t a death sentence; it is a context clue.

    Roofing MaterialAverage LifespanKey Vulnerability
    Asphalt Shingles15โ€“20 YearsUV Radiation, Wind
    Wood Shakes20โ€“30 YearsMoisture, Rot, Insects
    Metal Roofing40โ€“70 YearsCorrosion (if uncoated)
    Slate/Tile50โ€“100+ YearsWeight, Impact Damage

    If your asphalt roof is approaching the 20-year mark, even if it looks “okay” from the ground, it is likely losing its granular protection. At this stage, proactive replacement is often cheaper than emergency repairs after a storm. For more detailed information on roofing materials and their historical development, you can refer to Wikipediaโ€™s entry on roofing.

    Are Your Shingles Curling, Cracking, or Missing?

    Visual inspection from the ground can reveal a lot. You do not need to climb a ladder to spot major distress signals. Grab a pair of binoculars and look for these specific issues:

    1. Curling Edges

    Shingles may curl upward (cupping) or downward (clawing). This usually indicates that the shingles are drying out and losing their flexibility. Once shingles curl, they are prone to breaking off in high winds, exposing the underlayment to rain.

    2. Cracked Shingles

    Cracks occur due to thermal expansion and contraction. In climates with hot days and cold nights, shingles expand and contract repeatedly. Over time, this stress causes fractures. A cracked shingle cannot effectively shed water, leading to slow, hidden leaks.

    3. Missing Granules

    Asphalt shingles are coated with ceramic granules that protect them from UV rays. If you notice bare spots where the black asphalt base is visible, the shingle is deteriorating. You might also find an accumulation of these granules in your gutters. While some granule loss is normal in the first year, excessive loss in older roofs signals the end is near.

    4. Missing Shingles Entirely

    If you see patches of your roof deck or underlayment, you have an immediate problem. Missing shingles create direct pathways for water to enter your attic. This often requires immediate patching, but if it is widespread, it suggests the adhesive strips have failed, necessitating a full replacement.

    How To Tell If A Roof Needs To Be Replaced

    What Do Dark Streaks and Moss Growth Indicate?

    Aesthetics matter, but dark streaks and moss are more than just ugly; they are structural threats.

    Dark Streaks: These are often caused by Gloeocapsa magma, a type of algae. While algae itself doesnโ€™t eat the shingle, it retains moisture. This constant dampness accelerates the degradation of the roofing material. Furthermore, heavy algae growth can void certain manufacturer warranties.

    Moss Growth: Moss is more dangerous than algae. Its root systems can lift shingles, breaking the seal and allowing wind-driven rain underneath. Moss also holds water against the roof surface for extended periods, which can rot wood decking beneath the shingles.

    If you see significant moss coverage, especially in shaded areas, it is a sign that your roof is retaining too much moisture. Cleaning it might help temporarily, but if the underlying shingles are soft or spongy, replacement is the only safe option.

    Is Your Attic Showing Signs of Water Intrusion?

    Sometimes the roof looks fine from the outside, but the damage is happening internally. Your attic is the best place to diagnose hidden roof failures. Visit your attic during the day and look for:

    • Daylight Through the Roof Boards: If you can see pinpricks of sunlight coming through the roof deck, you have gaps. These gaps allow water, air, and pests to enter.
    • Water Stains or Mold: Look for dark streaks or discolored patches on the underside of the roof deck or on the insulation. Musty smells are also a strong indicator of trapped moisture.
    • Sagging Decking: If the wooden boards between the rafters appear to sag or bow, this indicates long-term water saturation. This is a critical structural issue that requires immediate professional attention.

    Pro Tip: Check your attic after a heavy rainstorm. Use a flashlight to trace any wet spots back to their source. Remember, water travels; the leak inside might not be directly below the hole outside.

    Why Is Your Energy Bill Suddenly Spiking?

    Your roof plays a vital role in your homeโ€™s thermal envelope. As roofs age, their ability to reflect heat and provide insulation diminishes.

    If you notice your HVAC system working harder to maintain temperature, or if your energy bills have increased without a change in usage habits, your roof might be the culprit. Poor ventilation, often associated with aging roofing systems, can cause heat to build up in the attic. This “superheated” attic radiates heat into your living spaces in summer and allows heat to escape in winter.

    Replacing an old roof with modern, energy-efficient materials can significantly improve your homeโ€™s insulation values. Many new shingles come with reflective coatings designed to lower cooling costs by up to 15%.

    When Should You Repair vs. Replace?

    This is the most common question homeowners face. Not every leak requires a full tear-off. Here is a simple framework to help you decide:

    Choose Repair If:

    • The roof is less than 10 years old.
    • Damage is isolated to a small area (e.g., missing shingles from a fallen branch).
    • There is no widespread granule loss or curling.
    • The underlayment and decking are dry and solid.

    Choose Replacement If:

    • The roof is over 15โ€“20 years old.
    • More than 30% of the roof shows signs of wear (curling, cracking, missing shingles).
    • You have multiple leaks in different areas.
    • The shingles are blistering or balding extensively.
    • You plan to sell the home soon (a new roof boosts curb appeal and value).

    Attempting to patch a roof that is globally failing is often a “false economy.” You may spend thousands on repeated repairs over two years, only to replace the roof anyway. A full replacement provides a fresh warranty and peace of mind.

    Frequently Asked Questions (FAQ)

    1. Can I replace just one section of my roof?

    Technically, yes, but it is rarely recommended. Matching the color and texture of old shingles with new ones is difficult due to weathering and manufacturing changes. Furthermore, blending old and new sections can create weak points at the seams. Most professionals advise replacing the entire roof plane for uniformity and warranty validity.

    2. Does homeowners insurance cover roof replacement?

    It depends on the cause of the damage. Insurance typically covers “sudden and accidental” damage, such as from a storm, hail, or falling tree. However, they generally do not cover wear and tear, age-related deterioration, or lack of maintenance. Always review your policy and document damage with photos immediately after a storm.

    3. How long does a roof replacement take?

    For an average-sized single-family home, a professional crew can typically complete a roof replacement in 1 to 3 days. Factors that may extend this timeline include complex roof architecture (multiple valleys, turrets), bad weather, or the discovery of rotted decking that needs repair.

    4. What is the best season to replace a roof?

    Late spring to early fall is ideal because roofing adhesives require warm temperatures to seal properly. However, reputable contractors work year-round. Winter replacements are possible but may take longer due to colder temperatures affecting material flexibility and worker safety. Avoid scheduling during peak hurricane or tornado seasons if possible.

    5. Will a new roof increase my homeโ€™s value?

    Yes. According to real estate experts, a new roof can offer a high return on investment (ROI), often recouping 60โ€“70% of the cost upon sale. More importantly, it removes a major objection from potential buyers, making your home easier to sell.

    Conclusion

    Knowing how to tell if a roof needs to be replaced empowers you to protect your home proactively rather than reactively. By monitoring the age of your roof, inspecting for physical damage like curling or missing shingles, checking your attic for leaks, and watching for spikes in energy costs, you can avoid costly emergencies.

    Remember, a roof is not just a covering; it is a critical system that ensures the safety and comfort of your family. If you suspect your roof is nearing the end of its life, do not wait for a leak to appear. Schedule a professional inspection today.

    Found this guide helpful? Share it with your neighbors on social media to help them protect their homes too!

  • How Do I Get Rid Of Moss On My Roof?

    How Do I Get Rid Of Moss On My Roof?

    Have you noticed unsightly green patches creeping up your shingles? You are not alone; many homeowners struggle with this issue and often ask, “How do I get rid of moss on my roof” before it causes structural damage. In this guide, we will walk you through safe, proven methods to restore your roofโ€™s health without compromising its integrity.

    Why Is Moss Dangerous for Your Roof?

    Before diving into removal techniques, it is crucial to understand why moss is more than just an aesthetic nuisance. Moss acts like a sponge, retaining moisture against your roofing materials long after the rain has stopped. This constant dampness can lead to rot in wooden underlayment, corrosion of metal flashings, and the lifting of shingles, which creates entry points for water leaks.

    According to industry experts, ignoring moss growth can reduce the lifespan of your asphalt shingles by up to 50%. The roots of moss (rhizoids) can penetrate tiny cracks in shingles, widening them over time. By addressing this early, you save thousands in potential repair costs.

    What Causes Moss to Grow on Roofs?

    Understanding the root cause helps prevent future outbreaks. Moss thrives in specific conditions:

    • Shade: Trees or nearby buildings that block sunlight create a cool, damp environment ideal for moss.
    • Moisture: High humidity, frequent rain, or poor drainage contributes to growth.
    • Debris: Leaves and twigs trap moisture and provide organic material for moss to feed on.
    • Climate: Regions with mild, wet winters and cool summers see the most moss activity.

    If your roof faces north or is surrounded by tall trees, you are at higher risk. Regular maintenance is key to breaking this cycle.

    Step-by-Step Guide: How to Remove Moss Safely

    Removing moss requires patience and the right approach. Aggressive scraping or high-pressure washing can damage shingles and void warranties. Follow these steps for a safe cleanup.

    Step 1: Safety First

    Never attempt roof work alone or in wet/windy conditions. Use a sturdy extension ladder with stabilizers. Wear rubber-soled shoes for grip and safety goggles to protect your eyes from debris and cleaning solutions. If your roof is steep (greater than 6/12 pitch), consider hiring a professional.

    Step 2: Dry Brushing

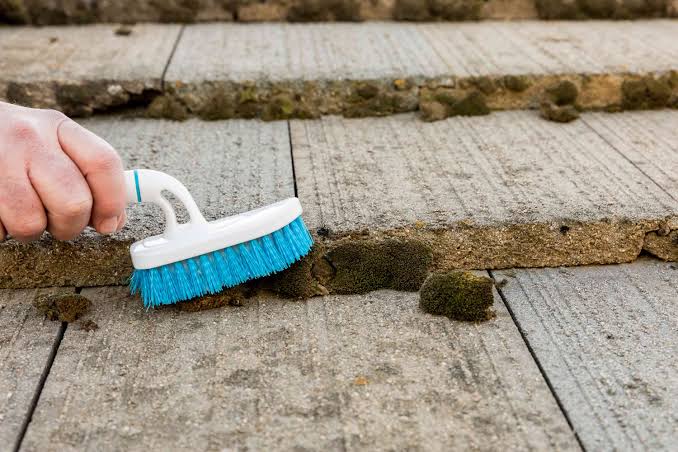
    Start by gently removing loose moss and debris. Use a soft-bristle broom or a leaf blower on a low setting.

    • Do: Sweep downwards from the ridge to the eaves to avoid lifting shingles.
    • Donโ€™t: Use a wire brush or pressure washer, as these can strip the protective granules off asphalt shingles.

    Step 3: Apply a Moss-Killing Solution

    For effective removal, you need a solution that kills the moss at the root. You can use a commercial moss killer or a DIY mixture.

    DIY Recipe:

    • Mix 1 cup of oxygen bleach (sodium percarbonate) with 1 gallon of warm water.
    • Note: Avoid chlorine bleach if possible, as it can harm surrounding plants and corrode metal fixtures. Oxygen bleach is safer and environmentally friendly.

    Apply the solution using a garden sprayer. Ensure thorough coverage but avoid runoff into gutters where possible. Let it sit for 15โ€“20 minutes. Do not let it dry completely before rinsing.

    Step 4: Gentle Rinsing

    Rinse the roof with a garden hose using a gentle spray nozzle. Start from the top and work your way down. This ensures that any remaining moss spores are washed away without forcing water under the shingles.

    Step 5: Clean Gutters

    Moss debris often clogs gutters. After cleaning the roof, remove all debris from your gutters and downspouts to ensure proper water drainage. Clogged gutters can cause water to back up under the shingles, leading to ice dams in winter.

    How Do I Get Rid Of Moss On My Roof

    Chemical vs. Natural Remedies: Which Is Better?

    Choosing the right treatment depends on your environmental concerns and the severity of the infestation. Here is a comparison to help you decide.

    FeatureChemical Moss KillersNatural Remedies (Vinegar/Oxygen Bleach)
    EffectivenessHigh; fast-actingModerate; may require repeated applications
    Cost$20โ€“$50 per bottle$5โ€“$15 for ingredients
    Environmental ImpactCan harm plants/pets if misusedBiodegradable and safer for gardens
    LongevityLasts 6โ€“12 monthsLasts 3โ€“6 months
    Ease of UseReady-to-use sprays availableRequires mixing and preparation

    For most homeowners, oxygen bleach offers the best balance of effectiveness and safety. It kills moss without the harsh fumes of chlorine or the potential plant damage of strong acids.

    How to Prevent Moss from Returning

    Prevention is always cheaper than cure. Once your roof is clean, take these steps to keep moss at bay.

    Install Zinc or Copper Strips

    One of the most effective long-term solutions is installing metal strips near the roof ridge. When it rains, tiny particles of zinc or copper wash down the roof, creating an environment that inhibits moss and algae growth. These strips can last for decades and require zero maintenance.

    Trim Overhanging Branches

    Sunlight is mossโ€™s enemy. Trim tree branches that shade your roof to allow more UV exposure and improve air circulation. This also reduces the amount of leaf litter that accumulates on your shingles.

    Improve Roof Ventilation

    Poor attic ventilation can lead to excess heat and moisture buildup, which encourages moss growth. Ensure your attic has adequate soffit and ridge vents to keep the roof deck dry and cool.

    Regular Inspections

    Schedule bi-annual inspections, ideally in spring and fall. Look for early signs of moss, damaged shingles, or clogged gutters. Early detection makes removal much easier.

    When to Call a Professional

    While DIY methods work for mild cases, some situations require expert intervention:

    • Extensive Growth: If moss covers more than 30% of your roof.
    • Structural Damage: If you notice sagging, missing shingles, or leaks.
    • Steep Roofs: If your roof pitch is too dangerous for safe DIY access.
    • Warranty Concerns: Some roofing manufacturers require professional cleaning to maintain warranty validity.

    Professional roof cleaners use specialized equipment and eco-friendly chemicals that are more potent than store-bought options. They also carry insurance, protecting you from liability in case of accidents.

    Frequently Asked Questions (FAQ)

    1. Can I use a pressure washer to remove moss?

    No, it is generally not recommended. High-pressure water can force water under shingles, damage the sealant strips, and strip away protective granules. This can lead to premature roof failure and void your warranty. Stick to low-pressure rinsing with a garden hose.

    2. Will vinegar kill moss on my roof?

    Yes, white vinegar (acetic acid) can kill moss due to its acidity. However, it may also harm surrounding plants and grass if it runs off the roof. If you use vinegar, dilute it with water (1:1 ratio) and rinse nearby plants thoroughly afterward. It is less effective than oxygen bleach for heavy infestations.

    3. How often should I clean my roof?

    For most homes, cleaning every 2โ€“3 years is sufficient. However, if you live in a shady, damp area or have many overhanging trees, annual inspections and light cleaning may be necessary. Preventive measures like zinc strips can extend this interval significantly.

    4. Is moss removal covered by homeowners insurance?

    Typically, no. Homeowners insurance covers sudden and accidental damage, not gradual wear and tear or maintenance issues. Moss growth is considered a maintenance problem. However, if moss causes a leak that leads to significant interior damage, that secondary damage might be covered. Check your policy for specifics.

    5. What is the best time of year to remove moss?

    The best time is during dry, mild weather, typically in late spring or early fall. Avoid cleaning in extreme heat, as solutions can evaporate too quickly, or in freezing temperatures, which can make surfaces slippery and dangerous. Dry conditions allow the cleaning solution to work effectively without being washed away by rain.

    6. Can I walk on my roof to clean it?

    Walking on your roof can damage shingles, especially if they are old or brittle. If you must walk on it, step on the lower part of the shingle where it is nailed down, not on the exposed edge. Always use proper safety gear. If you are unsure, hire a professional to avoid injury and roof damage.

    Conclusion

    Knowing how do I get rid of moss on my roof is essential for maintaining your homeโ€™s value and structural integrity. By using safe cleaning methods like oxygen bleach, installing preventive zinc strips, and keeping your roof free of debris, you can enjoy a moss-free roof for years to come. Remember, regular maintenance is far less costly than major repairs.

    If you found this guide helpful, please share it with friends and neighbors who might be battling the same green invaders. A clean roof is a happy roof! For more detailed information on roofing materials and their care, you can refer to authoritative resources like Wikipediaโ€™s page on Roofing.

  • How Much Does It Cost To Pressure Wash A Roof?

    How Much Does It Cost To Pressure Wash A Roof?

    Have you noticed dark streaks or green moss creeping up your shingles? Itโ€™s not just an eyesore; it can shorten your roofโ€™s lifespan and lower your homeโ€™s value. If you are wondering how much does it cost to pressure wash a roof, you are in the right place to find clear, actionable answers.

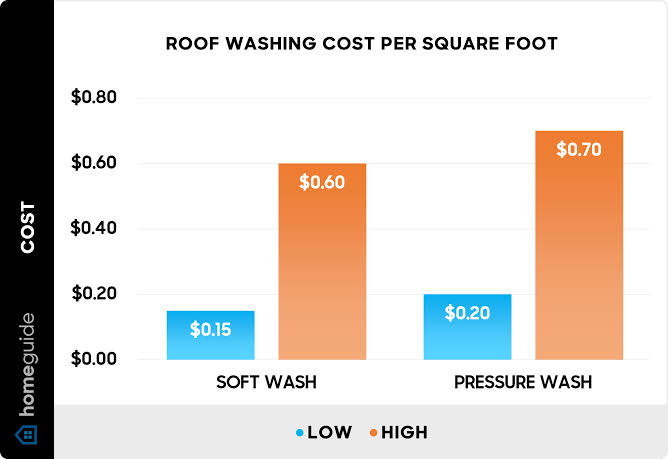
    Many homeowners hesitate because they fear hidden fees or damaging their property. In this guide, we will break down the average costs, explain why “soft washing” is often safer than high-pressure cleaning, and help you decide whether to DIY or hire a pro. Letโ€™s dive in.

    Average Cost to Clean a Roof in 2026

    The short answer? The national average cost to clean a roof in the United States ranges between $350 and $650. However, this price can fluctuate significantly based on several factors.

    For a standard single-story home with a modest roof size (approximately 1,500 to 2,000 square feet), you might pay on the lower end. Conversely, large two-story homes with complex architectural features, steep pitches, or heavy moss infestation can see costs rise to $800 or more.

    Price Breakdown by Roof Size

    To give you a clearer picture, here is a general estimate based on roof square footage:

    Roof Size (Sq. Ft.)Estimated Cost RangeTypical Home Type
    1,000 โ€“ 1,500$250 โ€“ $400Small Ranch / Cottage
    1,500 โ€“ 2,500$350 โ€“ $550Standard Single-Family
    2,500 โ€“ 3,500$500 โ€“ $750Large Family Home
    3,500+$750 โ€“ $1,200+Estate / Multi-Story

    Note: These prices include labor, equipment, and eco-friendly cleaning solutions. Always request a detailed quote from your provider.

    Why โ€œSoft Washingโ€ Is Better Than Pressure Washing

    Before we discuss further costs, it is crucial to address a common misconception. Most roofing manufacturers and insurance companies do not recommend traditional high-pressure washing for asphalt shingles.

    High-pressure water (above 1,500 PSI) can strip away the protective granules on your shingles. These granules shield your roof from UV rays and weather damage. Once they are gone, your roof becomes vulnerable to leaks and premature aging.

    Instead, professionals use a method called Soft Washing. This technique uses low-pressure water combined with specialized biodegradable chemicals to kill algae, moss, and lichen at the root. The solution is allowed to dwell on the surface, breaking down organic matter without physical force.

    According to industry standards, soft washing is the safest method for:

    • Asphalt shingles
    • Wood shakes
    • Clay tiles
    • Slate roofs

    If a contractor insists on blasting your roof with high-pressure water, consider it a red flag. You want preservation, not erosion.

    How Much Does It Cost To Pressure Wash A Roof

    Factors That Influence Roof Cleaning Costs

    When you ask, “How much does it cost to pressure wash a roof?” several variables come into play. Understanding these will help you budget accurately.

    1. Roof Pitch and Accessibility

    A flat or gently sloping roof is easier and safer to clean. Steep roofs require additional safety equipment, such as harnesses and anchor points. This increases labor time and insurance liability for the contractor, which is passed on to you.

    2. Type of Contaminant

    Is it just black streaks (Gloeocapsa magma algae)? Or is it thick, heavy moss? Algae is relatively easy to treat with a standard chemical solution. Heavy moss may require manual removal before treatment, adding labor hours to the job.

    3. Geographic Location

    Labor costs vary by region. Homeowners in major metropolitan areas like New York City or San Francisco will typically pay more than those in rural Midwest towns due to higher operational costs for local businesses.

    4. Condition of the Roof

    If your roof has not been cleaned in over five years, the buildup may be severe. Some companies charge extra for “heavy duty” cleaning jobs that require multiple applications of cleaning solution.

    DIY vs. Hiring a Professional: Which Is Cheaper?

    You might be tempted to rent a pressure washer and save money. Letโ€™s look at the numbers.

    DIY Costs:

    • Pressure Washer Rental: $50โ€“$100 per day
    • Cleaning Solution: $30โ€“$60
    • Safety Gear (Harness, Non-slip shoes): $50โ€“$150
    • Total: ~$130โ€“$310

    Professional Costs:

    • Average Service: $350โ€“$650

    While DIY seems cheaper upfront, consider the risks. Roof work is dangerous. Falls from roofs are a leading cause of home improvement injuries. Furthermore, if you accidentally damage your shingles or void your warranty by using the wrong technique, the repair costs could run into the thousands.

    For most homeowners, hiring a licensed and insured professional is the smarter financial choice in the long run. They bring expertise, proper insurance, and industrial-grade equipment that ensures the job is done safely and effectively.

    Step-by-Step: What to Expect During a Professional Clean

    If you decide to hire a pro, here is what the process usually looks like. Knowing this helps you verify that they are doing the job correctly.

    1. Inspection: The technician inspects the roof for loose shingles, damaged flashing, or weak spots. They should point these out to you before starting.
    2. Preparation: They will cover nearby plants and shrubs with tarps or rinse them thoroughly to protect them from cleaning chemicals. Windows and siding may also be covered.
    3. Application: Using a low-pressure spray system, they apply the cleaning solution evenly across the roof. This is often done from the ground using extended wands to avoid walking on the roof unnecessarily.
    4. Dwell Time: The solution sits for 15โ€“30 minutes. You will see the black streaks begin to fade as the algae dies.
    5. Rinse: A gentle rinse removes the dead organic material and residual chemicals.
    6. Cleanup: The team cleans up any debris in the gutters and rinses off surrounding areas.

    For more information on how algae affects roofing materials, you can refer to this Wikipedia article on Roof Shingles which details the composition and vulnerability of common roofing types.

    Frequently Asked Questions (FAQ)

    1. How often should I have my roof cleaned?

    Most experts recommend cleaning your roof every 2 to 3 years. However, if you live in a humid climate with heavy tree cover, you may need annual maintenance to prevent moss buildup.

    2. Will roof cleaning void my warranty?

    No, but improper cleaning might. Most shingle manufacturers require that cleaning be done according to specific guidelines (usually soft washing). Always check your warranty terms and hire a contractor who follows manufacturer recommendations.

    3. Can I clean my roof myself with a garden hose?

    You can rinse off loose debris, but a garden hose lacks the pressure to remove entrenched algae or moss. Moreover, walking on your roof to reach the hose is risky. It is generally not effective for deep cleaning.

    4. Is roof cleaning tax-deductible?

    Generally, no. Roof cleaning is considered routine maintenance for a personal residence. However, if you use part of your home for business purposes, you may be able to deduct a portion of the cost. Consult a tax professional for advice specific to your situation.

    5. What is the best time of year to clean a roof?

    Spring and early fall are ideal. Avoid cleaning during extreme heat, as the solution can evaporate too quickly, or in freezing temperatures, which can make surfaces slippery and dangerous.

    6. Does homeowners insurance cover roof cleaning?

    No, roof cleaning is considered preventative maintenance, which is the homeowner’s responsibility. Insurance typically covers sudden and accidental damage, not gradual wear and tear or cosmetic issues.

    Conclusion

    So, how much does it cost to pressure wash a roof? While the average falls between $350 and $650, the true value lies in protecting your biggest asset. Regular cleaning extends the life of your roof, improves curb appeal, and can even boost your homeโ€™s energy efficiency by reflecting more sunlight.

    Remember, always opt for soft washing over high-pressure blasting to keep your shingles intact. Whether you choose to DIY or hire a pro, prioritize safety and quality over the lowest price.

    Did you find this guide helpful? Share it with your neighbors on social mediaโ€”especially those who are noticing those unsightly black streaks on their roofs! A clean roof is a happy home.

  • Can You Walk On A Metal Roof Without Denting It?

    Can You Walk On A Metal Roof Without Denting It?

    Walking up onto your roof for a quick inspection or cleaning can feel like a necessary DIY task, but the fear of causing expensive damage often holds homeowners back. Many people worry that a single misstep could ruin the aesthetic and structural integrity of their investment. The burning question on many minds is: can you walk on a metal roof without denting it? The short answer is yes, but it requires specific knowledge, the right technique, and an understanding of your roofโ€™s unique construction.

    In this guide, we will break down exactly how to navigate your metal roof safely. We will cover the science behind metal panel strength, the critical importance of footwear, and step-by-step instructions to ensure you leave no trace behind. Whether you have standing seam panels or exposed fastener sheets, understanding these nuances is key to maintaining your homeโ€™s value.

    Understanding Metal Roof Durability and Panel Types

    Not all metal roofs are created equal. The ability of your roof to withstand foot traffic depends heavily on the type of metal used, the gauge (thickness) of the material, and the profile of the panels.

    Standing Seam vs. Exposed Fastener Panels

    The design of your roof panels plays a massive role in how they handle weight.

    • Standing Seam Roofs: These are generally more durable for walking. The seams are raised above the flat surface, providing structural rigidity. If you step directly on the flat area between the seams, there is a higher risk of oil-canning (a popping sound and slight deformation), but stepping on the seams themselves is usually safe if done carefully.
    • Exposed Fastener (Corrugated) Panels: These are more common in agricultural buildings or older residential homes. They are typically thinner and more prone to denting. Walking on these requires extreme caution, as the screw heads can strip out, and the thin metal can easily buckle under concentrated weight.

    The Importance of Metal Gauge

    In the US market, metal roofing thickness is measured by gauge. The lower the number, the thicker the steel.

    GaugeThickness (Approx.)Durability for Foot TrafficCommon Use
    24 Gauge0.0239 inchesLow โ€“ High Risk of DentingBudget Residential/Agricultural
    26 Gauge0.0179 inchesVery Low โ€“ Avoid WalkingSheds/Outbuildings
    22 Gauge0.0299 inchesModerate โ€“ Careful Steps OnlyStandard Residential
    20 Gauge0.0359 inchesHigh โ€“ Safer for MaintenancePremium Residential/Commercial

    Most residential metal roofs in the United States are 24 or 26 gauge. At this thickness, the metal is designed to shed water and snow, not to support the concentrated pressure of a human foot. Therefore, technique matters more than brute force.

    How to Walk on a Metal Roof Safely

    If you must go up on your roof, following a strict protocol is non-negotiable. Here is how professionals minimize the risk of damage.

    1. Wear the Right Footwear

    This is the most critical factor. Never wear hard-soled shoes, boots with heavy treads, or high heels.

    • Best Choice: Soft-soled rubber shoes, such as canvas sneakers or dedicated roofing shoes. These distribute your weight more evenly and provide grip without acting like a hammer against the metal.
    • Avoid: Work boots with stiff shanks or deep lugs. These concentrate your entire body weight onto small points, significantly increasing the likelihood of creating a dent.

    2. Step on the Screws, Not the Flat Pan

    For exposed fastener roofs, always step directly over the screw lines where the metal is attached to the underlying structure (plywood or purlins). This area has structural support beneath it. Stepping in the middle of the panel span, where there is no support, is a recipe for disaster.

    For standing seam roofs, try to step on the flat areas close to the seams, but avoid putting direct pressure on the seam caps themselves unless necessary, as you might distort the locking mechanism.

    3. Distribute Your Weight

    Keep your knees slightly bent and move slowly. Do not jump, run, or drag your feet. If you need to carry tools, use a backpack to keep your hands free for balance. Consider using a roof ladder or crawl board if you need to spend extended time on the roof. These devices spread your weight across a larger surface area, virtually eliminating the risk of denting.

    Can You Walk On A Metal Roof Without Denting It

    Common Mistakes That Cause Dents

    Even with good intentions, homeowners often make errors that lead to costly repairs. Understanding these pitfalls can save you hundreds of dollars.

    • Dropping Tools: A dropped hammer or wrench from even a low height can puncture or deeply dent thin metal. Always tether your tools.
    • Ignoring Debris: Leaves, branches, and dirt can hide uneven surfaces. Clear the path before walking to ensure stable footing.
    • Walking in Extreme Heat: Metal expands when hot. Walking on a roof in direct midday sun can cause the panels to flex more than usual, making them more susceptible to temporary deformation or “oil-canning.” Early morning or late afternoon is ideal.
    • Using Ladders Incorrectly: Resting a ladder directly on the metal edge can crush the eave. Use a ladder stabilizer or stand-off to protect the roof edge.

    According to general engineering principles regarding sheet metal behavior, localized stress concentrations are the primary cause of permanent deformation. For more detailed information on material properties, you can refer to Wikipediaโ€™s article on Sheet Metal.

    When to Call a Professional

    While minor inspections can be done by homeowners, certain situations require a licensed roofer.

    • Steep Pitch: If your roof pitch is greater than 6:12, it is dangerous to walk on without fall protection gear.
    • Old or Rusty Roofs: Corrosion weakens the metal. What looks solid might crumble underfoot.
    • Warranty Concerns: Some manufacturers void warranties if untrained individuals walk on the roof. Check your warranty documentation first.

    FAQ Section

    1. Will walking on my metal roof void the warranty?

    It depends on the manufacturer. Many warranties allow for occasional maintenance walking if done correctly, but they may exclude damage caused by improper footwear or negligence. Always review your specific warranty terms before climbing up.

    2. Can I remove dents from a metal roof myself?

    Minor oil-canning (popping sounds) often resolves itself with temperature changes. However, physical dents from impact are difficult to repair without professional tools. Attempting to hammer them out can worsen the damage and strip protective coatings, leading to rust.

    3. Is it safer to walk on a wet metal roof?

    No. Wet metal is extremely slippery, especially if there is any algae or moss growth. The risk of slipping and falling far outweighs the risk of denting. Always wait for the roof to be completely dry.

    4. What is the best time of day to walk on a metal roof?

    Early morning is best. The metal is cooler, reducing expansion issues, and dew has usually evaporated, providing better traction than a wet surface but avoiding the intense heat of midday.

    5. Do rubber soles really prevent dents?

    Yes, soft rubber soles help distribute weight more evenly compared to hard plastic or leather soles. While they donโ€™t make the metal stronger, they reduce the point-load pressure that causes immediate indentation.

    Conclusion

    So, can you walk on a metal roof without denting it? Absolutely, provided you respect the materialโ€™s limitations. By wearing soft-soled shoes, stepping on supported areas, and moving with care, you can perform basic inspections without causing harm. Remember, your roof is a significant investment, and treating it with gentleness ensures it lasts for decades.

    If you found this guide helpful, please share it with your friends and neighbors on social media. Helping others protect their homes creates a safer, more informed community. Stay safe, and keep your roof in top shape!

  • How to Get Rid of Pigeons on Your Roof Fast

    How to Get Rid of Pigeons on Your Roof Fast

    There is nothing quite as frustrating as hearing the cooing and scratching of birds above your head when you are trying to relax or sleep. If you are staring at your ceiling wondering, “How do I get rid of pigeons on my roof,” you are not alone; this is one of the most common homeowner complaints in urban and suburban areas across the US. Pigeons are persistent, messy, and can cause significant structural damage if left unchecked, but with the right strategy, you can reclaim your space safely and humanely.

    In this guide, we will break down exactly why pigeons choose your roof, the health risks involved, and the most effective, long-term solutions to keep them away for good. We focus on methods that are not only effective but also compliant with local wildlife laws and ethical standards.


    Why Are Pigeons Choosing My Roof?

    Before diving into removal tactics, it is crucial to understand the intent behind the infestation. Pigeons, often called “rats with wings” by frustrated homeowners, are not random visitors. They are creatures of habit seeking three specific things: shelter, safety, and food.

    Your roof offers an ideal vantage point. It provides protection from predators like hawks and cats, while the eaves, chimneys, and HVAC units offer perfect nesting spots shielded from rain and wind. According to urban wildlife studies, once a pair of pigeons establishes a nest, they are likely to return to the same spot year after year due to their strong homing instinct.

    Furthermore, if your neighborhood has accessible food sourcesโ€”such as open garbage bins, pet food left outside, or bird feeders meant for songbirdsโ€”you are essentially inviting them to stay. Understanding this behavior is the first step in effective prevention.

    The Hidden Dangers of Roof Pigeons

    Many homeowners underestimate the severity of a pigeon problem, viewing it merely as a nuisance. However, the implications go far beyond noise.

    Structural Damage

    Pigeon droppings, known as guano, are highly acidic. Over time, this acidity can corrode roofing materials, including metal flashings, shingles, and even concrete tiles. A buildup of nests can also block gutters, leading to water overflow and potential roof leaks during heavy storms.

    Health Risks

    The primary concern for most residents is health. Pigeon droppings can harbor fungi and bacteria. One of the most notable risks is Histoplasmosis, a respiratory disease caused by inhaling spores from dried droppings. Other potential diseases include Cryptococcosis and Psittacosis.

    For more detailed information on the biological classification and habits of these birds, you can refer to the comprehensive entry on Columbidae (Wikipedia), which highlights their adaptability to urban environments.

    Effective Methods: How Do I Get Rid of Pigeons on My Roof?

    Now, letโ€™s address the core question. There is no single “magic bullet,” but a combination of physical barriers and sensory deterrents yields the best results. Here are the most proven methods, ranked by effectiveness.

    1. Install Physical Barriers (The Gold Standard)

    Physical barriers are the only 100% effective long-term solution. If a pigeon cannot land, it cannot nest.

    • Bird Spikes: These are strips of plastic or stainless steel spikes that make landing uncomfortable. They are ideal for flat surfaces like roof edges, ledges, and chimney tops.
      • Pros: Long-lasting, low maintenance, humane.
      • Cons: Visible aesthetic impact.
    • Bird Netting: For larger areas or gaps under eaves, netting is superior. It physically blocks access to nesting cavities.
      • Installation Tip: Ensure the net is taut. Loose netting can trap birds, which is both inhumane and illegal in many jurisdictions.
    • Slope Modifiers: Installing angled boards (at least 45 degrees) on flat ledges prevents pigeons from finding a stable footing.

    2. Visual and Auditory Deterrents

    If physical installation is too costly or difficult, deterrents can work, though they often require rotation to remain effective as pigeons can habituate to them.

    • Reflective Objects: Old CDs, aluminum foil strips, or specialized reflective tape create disorienting light flashes.
    • Predator Decoys: Plastic owls or hawks can scare pigeons initially. However, you must move these decoys every few days; otherwise, the pigeons will realize they are fake.
    • Ultrasonic Devices: These emit high-frequency sounds unpleasant to birds but inaudible to humans. Effectiveness varies greatly depending on the environment and obstacles.

    3. Chemical Repellents (Use with Caution)

    Gel repellents create a sticky, uncomfortable surface that birds dislike. While effective, they require regular reapplication and can be messy. Always choose non-toxic, biodegradable options to avoid harming other wildlife or pets.

    MethodEffectivenessCostMaintenance LevelBest For
    Bird SpikesHighMediumLowLedges & Flat Roofs
    NettingVery HighHighLowEaves & Large Areas
    Reflective TapeLow-MediumLowHighTemporary Solutions
    Predator DecoysLowLowHighSmall Infestations
    Gel RepellentsMediumMediumHighIrregular Surfaces
    How Do I Get Rid Of Pigeons On My Roof

    Step-by-Step Guide to Cleaning and Prevention

    Once you have installed deterrents, you must clean up the existing mess. Warning: Never dry-sweep pigeon droppings, as this releases harmful spores into the air.

    1. Safety First: Wear an N95 mask, rubber gloves, and protective eyewear.
    2. Wet the Area: Use a garden sprayer to thoroughly wet the droppings with a mixture of water and a disinfectant or enzyme cleaner. This keeps dust down.
    3. Scrape Gently: Use a plastic scraper to remove the waste. Avoid damaging roofing materials.
    4. Disinfect: Apply a bleach solution (1 part bleach to 10 parts water) or a commercial enzymatic cleaner to kill bacteria and remove odors that might attract new birds.
    5. Seal Entry Points: Inspect your roof for gaps around vents or chimneys and seal them with wire mesh or caulk.

    Common Mistakes to Avoid

    • Feeding the Problem: Ensure no one in your household or neighborhood is inadvertently feeding them.
    • Ignoring Baby Birds: During spring and early summer, check for nests with chicks. In the US, it is often illegal to disturb active nests of native species. Wait until the fledglings have left before sealing entry points.
    • Using Mothballs: Some online hacks suggest mothballs. These are toxic to pets and children and are generally ineffective for outdoor use as they dissipate quickly.

    FAQ Section

    Q1: Is it legal to remove pigeons from my roof?

    In the United States, rock pigeons (the common city pigeon) are generally not protected under the Migratory Bird Treaty Act. However, local ordinances vary significantly. Always check with your local wildlife agency before using lethal methods. Humane deterrents are always the safest legal route.

    Q2: Will vinegar keep pigeons away?

    Vinegar has a strong smell that pigeons dislike, but it evaporates quickly outdoors. It may work as a very short-term deterrent on small surfaces, but it is not a viable long-term solution for a roof infestation.

    Q3: How long does it take to see results after installing spikes?

    Results are usually immediate. Pigeons will attempt to land, find the surface uncomfortable, and leave. However, if they have already nested, they may linger for a few days trying to protect their young before finally abandoning the site.

    Q4: Can pigeons damage my solar panels?

    Yes. Pigeons often nest under solar panels because they provide shade and shelter. Their droppings can reduce the efficiency of the panels by blocking sunlight, and their nesting material can interfere with wiring. Installing mesh barriers specifically designed for solar arrays is highly recommended.

    Q5: What is the best time of year to pigeon-proof my roof?

    The best time is late winter or early spring, before the breeding season begins. This prevents them from establishing nests in the first place. If you act in summer, you risk disturbing active nests, which complicates the removal process.

    Conclusion

    Dealing with a pigeon infestation requires patience and a strategic approach. By understanding how do I get rid of pigeons on my roof through a combination of exclusion techniques like spikes and netting, along with proper sanitation, you can protect your homeโ€™s integrity and your familyโ€™s health. Remember, consistency is key; once the pigeons are gone, maintain your deterrents to prevent their return.

    If you found this guide helpful, please share it on social media to help friends and neighbors tackle their own bird problems. A pigeon-free roof is a peaceful roof!

  • Fix Small Roof Leak in Cumming, GA

    Fix Small Roof Leak in Cumming, GA

    Dealing with a dripping ceiling during a Georgia thunderstorm is every homeownerโ€™s nightmare. The stress of water damage, mold growth, and structural decay can feel overwhelming, especially when you are unsure where to start. If you are searching for how to fix a small roof leak in Cumming Ga, you have come to the right place to find practical, safe, and effective solutions tailored to our local climate.

    Cumming, located in Forsyth County, experiences unique weather patterns that can be harsh on roofing systems. From the intense summer heat that bakes asphalt shingles to the sudden, heavy downpours common in the Southeast, your roof is under constant stress. A small leak might seem minor, but ignoring it can lead to costly repairs down the line. This guide will walk you through identifying the source, executing a temporary fix, and knowing when to call in the professionals.

    Why Do Roofs Leak in Cumming, GA?

    Before jumping into the repair process, it is crucial to understand why the leak is happening. In Cumming, the primary culprits are often environmental factors combined with age.

    The Impact of Local Weather

    Forsyth County sees an average of 50 inches of rain annually. When this rain combines with high humidity, it creates a perfect storm for roof degradation. Thermal expansion and contraction caused by hot days and cooler nights can cause shingles to crack or lift over time. Once the protective granule layer is compromised, water finds its way underneath.

    Common Vulnerability Points

    Most small leaks do not originate from the middle of a shingle field. Instead, they occur at penetration points or transitions. According to general roofing data, nearly 90% of roof leaks occur around flashings, vents, chimneys, and valleys. In older homes in Cumming, particularly those built in the 1990s or early 2000s, the original flashing materials may have corroded or separated due to age.

    Safety First: Preparing for Roof Repair

    Attempting to fix a roof leak can be dangerous. Before you climb a ladder, please prioritize your safety.

    • Check the Weather: Never attempt roof repairs during rain, wind, or when the roof is wet. Slippery shingles are a major hazard. Wait for a dry, calm day.
    • Use Proper Gear: Wear rubber-soled shoes for better traction. Use a sturdy extension ladder secured at the base. If possible, have a spotter hold the ladder.
    • Fall Protection: For steep roofs, consider using a harness anchored to a secure point. If you are uncomfortable with heights, do not proceed. Call a professional instead.
    How To Fix A Small Roof Leak In Cumming Ga

    Step-by-Step: How to Fix a Small Roof Leak

    If the leak is small and accessible, you can often perform a temporary patch to stop the water intrusion until a permanent repair can be made. Here is a detailed tutorial.

    Step 1: Locate the Source

    Finding the exact entry point is the hardest part. Water travels along rafters before dripping, so the wet spot on your ceiling is rarely directly below the hole.

    1. Go into your attic during daylight hours.
    2. Look for stains, mold, or light coming through the roof deck.
    3. If you cannot see it, have someone hose down the roof while you watch from the attic (only if safe and dry inside).
    4. Mark the area on the exterior roof corresponding to the interior stain.

    Step 2: Clean the Area

    Once you have identified the suspect area on the roof, you must prepare the surface. Adhesives will not stick to dirt, moss, or loose granules.

    • Use a stiff brush to sweep away debris.
    • If there is moss or algae (common in shaded areas of Cumming homes), scrub it gently with a mixture of water and mild detergent.
    • Allow the area to dry completely. Moisture trapped under a patch will cause further rot.

    Step 3: Apply Roofing Cement or Patch

    For small cracks or holes around vent pipes or shingles, roofing cement is your best friend.

    1. Lift the Shingle: If the leak is under a shingle, carefully lift the edge using a flat bar. Do not tear it.
    2. Apply Cement: Using a putty knife, apply a generous layer of plastic roof cement under the shingle and over the crack or hole.
    3. Press Down: Firmly press the shingle back into place. Wipe away any excess cement that squeezes out.
    4. Seal Edges: If the shingle is cracked, apply a bead of cement along the crack and cover it with a small piece of matching shingle material if available.

    Step 4: Inspect Flashings

    If the leak is near a chimney or vent, check the metal flashing. If the caulk is cracked, scrape it out and reapply a high-quality, UV-resistant roofing sealant. Ensure the metal is tightly secured against the roof surface.

    Temporary vs. Permanent Fixes: What You Need to Know

    It is vital to distinguish between a “band-aid” solution and a true repair. Many DIY methods are temporary measures to prevent immediate water damage.

    FeatureTemporary DIY PatchProfessional Permanent Repair
    CostLow ($20โ€“$50 for materials)Higher ($300โ€“$800+ depending on scope)
    Longevity6 months โ€“ 2 years10โ€“20+ years
    WarrantyNoneOften includes labor and material warranty
    Best ForEmergency stops, minor cracksStructural issues, widespread wear
    RiskHigh if done incorrectlyLow (insured professionals)

    Note: In Cummingโ€™s humid climate, temporary patches may degrade faster due to UV exposure and thermal cycling. Always plan for a professional inspection within six months of a DIY patch.

    When to Call a Professional Roofer in Cumming

    While DIY fixes are empowering, some situations require expert intervention. You should contact a licensed roofing contractor in Forsyth County if:

    1. The Leak is Large: If water is pouring in or the ceiling is sagging, evacuate the area and call for help immediately.
    2. Multiple Leaks: This indicates systemic failure of the roofing system, likely requiring a replacement rather than a repair.
    3. Steep Pitch: If your roof has a steep slope, the risk of falling is too high for untrained individuals.
    4. Warranty Concerns: If your roof is relatively new, DIY repairs might void the manufacturerโ€™s warranty. Check your documentation first.

    For more information on roofing standards and materials, you can refer to Wikipediaโ€™s article on Roofing to understand the technical components involved in residential roofing systems.

    FAQ: Common Questions About Roof Leaks in Cumming

    1. How much does it cost to fix a small roof leak in Cumming, GA?

    The cost varies based on the severity and location. A minor repair involving resealing flashing or replacing a few shingles typically ranges from $350 to $650. However, if the leak has caused internal drywall damage or mold, the total cost will be higher. Always get at least three quotes from local, insured contractors.

    2. Can I use silicone caulk to fix a roof leak?

    Standard silicone caulk is not recommended for roof repairs. It lacks the flexibility and UV resistance needed for roofing applications. Instead, use specialized roofing cement or polyurethane sealant designed specifically for exterior roofing use. These products expand and contract with temperature changes without cracking.

    3. Will homeowners insurance cover a small roof leak?

    Insurance typically covers leaks caused by sudden and accidental events, such as a storm blowing off shingles. However, they usually deny claims for leaks resulting from wear and tear, lack of maintenance, or age. Since Cumming experiences significant weather variability, documenting the cause of the leak with photos is essential for any claim.

    4. How long can I wait to fix a small leak?

    You should fix it immediately. Even a small drip can lead to mold growth within 24โ€“48 hours in Georgiaโ€™s humid climate. Mold remediation is far more expensive than a simple roof patch. Additionally, water can rot wooden rafters, compromising the structural integrity of your home.

    5. What are the signs of a hidden roof leak?

    Look for:

    • Brown or yellow water stains on ceilings or walls.
    • A musty odor in the attic or upper floors.
    • Peeling paint or bubbling wallpaper.
    • Damp insulation in the attic.
    • Increased energy bills (due to wet insulation losing effectiveness).

    Conclusion

    Learning how to fix a small roof leak in Cumming Ga is a valuable skill that can save you money and protect your homeโ€™s value. By acting quickly, prioritizing safety, and using the right materials, you can mitigate damage from our regionโ€™s unpredictable weather. Remember, while DIY patches are excellent for immediate relief, they are not a substitute for professional maintenance.

    Regular inspections, especially after severe storms, are key to longevity. If you found this guide helpful, please share it with your neighbors in Forsyth County on social media. Helping others protect their homes strengthens our entire community. Stay dry and stay safe!

  • Tarp Roof Without Nails: The Safe Guide

    Tarp Roof Without Nails: The Safe Guide

    Discovering a leak in your roof during a storm is every homeownerโ€™s nightmare. The stress of water damaging your ceilings and belongings can be overwhelming, especially when you donโ€™t have immediate access to professional roofing services or the right tools. You need a solution that is fast, effective, and wonโ€™t cause further damage to your shingles. This guide will show you exactly how to put a tarp on a roof without nails, ensuring your home stays dry while you wait for permanent repairs.

    We understand the urgency. Water intrusion can lead to mold growth within 24โ€“48 hours, according to the EPA. Therefore, acting quickly with the right technique is crucial. By avoiding nails, you prevent creating new holes in your roof, which could complicate future repairs. Letโ€™s dive into the safest, most reliable methods to secure your roof temporarily.

    Why Avoid Nails When Tarping a Roof?

    Before we get into the “how,” it is essential to understand the “why.” Many homeowners instinctively reach for a hammer and nails because it seems like the most secure option. However, this approach carries significant risks.

    The Risk of Additional Damage

    Every nail you drive into your roof creates a new potential entry point for water. If the tarp shifts due to wind, these nail holes can widen, leading to more severe leaks than the original problem. Furthermore, removing nails later often leaves behind gaps that require immediate sealing with roofing cement.

    Insurance and Warranty Concerns

    Some homeowner insurance policies and roofing manufacturer warranties may be voided if improper temporary repairs cause additional damage. Using non-penetrating methods is generally viewed as a responsible, low-risk mitigation strategy by adjusters.

    Essential Tools and Materials

    To successfully learn how to put a tarp on a roof without nails, you need the right gear. Do not attempt this with flimsy materials. Here is what you need:

    • Heavy-Duty Polyethylene Tarp: Look for a tarp with a thickness of at least 6 mils. It should be large enough to cover the damaged area plus an extra 3โ€“4 feet on all sides.
    • Rope or Bungee Cords: Use UV-resistant polypropylene rope (at least ยฝ inch thick) or heavy-duty bungee cords with hooks.
    • Sandbags or Weight Bags: These are crucial for holding the tarp down without penetration. You can buy pre-filled sandbags or fill durable bags with sand or gravel.
    • Ladder: A sturdy, extension ladder with slip-resistant feet.
    • Safety Gear: Non-slip rubber-soled shoes, gloves, and a safety harness if the roof pitch is steep.
    • Roofing Cement (Optional): For sealing the edges of the tarp if you choose a hybrid method, though we will focus on non-penetrating methods here.
    How To Put A Tarp On A Roof Without Nails

    Step-by-Step Guide: How To Put A Tarp On A Roof Without Nails

    Follow these steps carefully. Safety is your top priority. If the roof is wet, icy, or the wind is exceeding 20 mph, wait for conditions to improve or call a professional.

    Step 1: Assess the Damage and Measure

    From the ground or a safe position on the ladder, identify the source of the leak. Measure the area to determine the size of the tarp needed. Remember, the tarp must extend well beyond the damaged spot. For example, if the hole is 2×2 feet, use a tarp that covers at least 6×6 feet around that point.

    Step 2: Prepare the Surface

    Clear any debris, such as branches or loose shingles, from the area where the tarp will sit. A clean surface ensures the tarp lies flat and reduces the risk of punctures from underneath. Note: Do not walk directly on damaged areas.

    Step 3: Position the Tarp

    Unfold the tarp on the ground first to remove wrinkles. Then, carefully pull it up onto the roof. Start from the ridge (top) and work your way down. This orientation helps water shed off the tarp rather than pooling under it. Ensure the tarp extends over the ridge if the damage is near the top, or at least 4 feet up-slope from the leak.

    Step 4: Secure with Sandbags (The Key Step)

    This is the core of learning how to put a tarp on a roof without nails. Place sandbags along the edges of the tarp.

    • Top Edge: Place sandbags every 2โ€“3 feet along the top edge.
    • Side Edges: Place sandbags along the sides, ensuring they are heavy enough to withstand wind uplift.
    • Bottom Edge: Leave the bottom edge slightly loose or lightly weighted to allow water to flow out, preventing pooling.

    According to structural engineering principles, distributed weight is more effective than single-point anchoring for flexible membranes like tarps. The friction between the sandbags, the tarp, and the roof shingles holds the system in place.

    Step 5: Use Ropes for Extra Security

    If wind is a concern, tie ropes around the sandbags and anchor them to sturdy parts of the house, such as chimney bases (if safe) or heavy vent pipes. Do not tie ropes to gutters, as they can easily rip off under tension. Create a “cross-hatch” pattern over the tarp with ropes if the area is large, placing additional sandbags at the intersections.

    Comparing Securing Methods

    To help you decide the best approach, here is a comparison of common temporary securing methods.

    MethodDamage RiskWind ResistanceEase of InstallationCost
    Nails/StrapsHigh (New holes)HighModerateLow
    Sandbags OnlyNoneModerateEasyLow
    Rope + SandbagsNoneHighModerateLow
    Adhesive TapeLow (Residue)LowVery EasyModerate

    Table 1: Comparison of Temporary Roof Tarping Methods

    As shown, combining ropes with sandbags offers the best balance of safety and effectiveness without causing damage. For more information on roofing materials and their properties, you can refer to Wikipediaโ€™s page on Roofing.

    Common Mistakes to Avoid

    Even with the right tools, errors can compromise the repair.

    1. Using a Tarp That Is Too Small: A small tarp may stop the direct leak but allows water to seep under the edges via capillary action. Always go bigger.
    2. Ignoring Wind Direction: Install the tarp so that the prevailing wind blows over the tarp, not under it. If the wind gets under the edge, it will act like a sail and tear the tarp away.
    3. Walking on Wet Roofs: Asphalt shingles become extremely slippery when wet. Use a ladder to position the tarp from the edge whenever possible.
    4. Leaving Pools of Water: Ensure the tarp has a slight slope. Standing water adds weight and can eventually breach the tarp material.

    FAQ Section

    Q1: How long can a tarp stay on a roof without nails?

    A tarp secured with sandbags and ropes is a temporary solution. It should ideally remain in place for no more than 30โ€“90 days. Prolonged exposure to UV rays can degrade the tarp, and weather conditions may shift the weights. Schedule permanent repairs as soon as possible.

    Q2: Can I use bricks instead of sandbags?

    While bricks are heavy, they are not recommended. Bricks have hard, sharp edges that can crack shingles or puncture the tarp. Sandbags conform to the roofโ€™s shape and distribute weight evenly, making them a safer choice.

    Q3: What if my roof is too steep to walk on?

    If your roof pitch is greater than 6:12 (steep), do not attempt to walk on it. Instead, use a long pole to push the tarp into position from a ladder. Anchor the ropes from the ground or eaves if possible. If this is not feasible, hire a professional roofer immediately.

    Q4: Will this method work in heavy snow?

    Snow adds significant weight. While sandbags provide good friction, heavy snow accumulation can slide the tarp. In snowy climates, it is better to clear snow from the affected area first (safely) before applying the tarp. Monitor the tarp regularly during snowfall.

    Q5: Can I use duct tape to seal the edges?

    Duct tape is not designed for long-term outdoor exposure on roofs. It loses adhesion in cold weather and leaves a messy residue. If you need to seal edges, use specialized roofing tape or flashing cement, but remember that the primary security should come from weights and ropes, not adhesives.

    Conclusion

    Learning how to put a tarp on a roof without nails is a valuable skill for any homeowner. It allows you to protect your property from water damage without risking further harm to your roof structure. By using heavy-duty tarps, sandbags, and ropes, you create a secure, non-penetrating barrier that withstands moderate weather conditions.

    Remember, this is a temporary fix. Prioritize your safety, assess the situation calmly, and act quickly. Once the immediate threat is managed, contact a licensed roofing professional to assess the damage and perform permanent repairs.

    Did you find this guide helpful? Share it with your friends and family on social media to help them prepare for unexpected home emergencies. Stay safe and keep your home dry!