Category: homeowner roofing guide

  • Why Are AC Units on Roofs in Las Vegas?

    Why Are AC Units on Roofs in Las Vegas?

    Have you ever driven through the sprawling suburbs of Nevada and noticed something peculiar? Instead of the familiar humming boxes tucked away in backyards, you see massive units perched precariously on top of homes and businesses. It’s a striking visual that defines the skyline here. If you’ve found yourself asking why are air conditioners on the roof in Las Vegas, you aren’t alone; it is one of the most common questions for newcomers to the Silver State.

    The short answer is a combination of extreme heat management, space optimization, and specific architectural trends. But to truly understand this phenomenon, we need to dig deeper into the engineering logic that keeps Las Vegas cool when temperatures soar above 110°F (43°C).

    The Space-Saving Advantage in Dense Urban Planning

    One of the primary drivers for rooftop installations is simply real estate. In many parts of Las Vegas, particularly in newer master-planned communities like Summerlin or Henderson, lot sizes can be surprisingly compact relative to the square footage of the house.

    Maximizing Yard Utility

    In traditional climates, an outdoor condenser unit sits on a concrete slab in the backyard. However, in Las Vegas:

    • Backyards are premium spaces: Residents want to use their limited outdoor area for pools, patios, and entertainment zones, not industrial machinery.
    • Side yards are narrow: Many modern homes have zero-lot-line designs, leaving no room on the sides for equipment.

    By moving the HVAC system to the roof, homeowners reclaim every inch of ground-level space. This is especially crucial for commercial buildings on the Strip, where every square foot of ground space is valuable for retail or pedestrian traffic.

    Combating the Extreme Desert Heat

    You might think placing an AC unit in the direct sun is counterintuitive. After all, doesn’t heat make ACs work harder? Yes, but the engineering solution lies in airflow and heat dissipation, which are often more efficient at higher elevations.

    Better Air Circulation

    Ground-level units often struggle with “short-cycling” or recirculating their own hot exhaust air if they are boxed in by fences, shrubs, or walls. On the roof:

    1. Unobstructed Airflow: There are no fences or dense landscaping to block air intake.
    2. Wind Assistance: Even slight breezes at roof level help dissipate the heat generated by the condenser coils more effectively than stagnant air at ground level.

    Thermal Separation

    While the roof surface gets hot, the unit itself is elevated. This separation prevents the ground-radiated heat (from asphalt or concrete) from compounding the thermal load on the machine. Modern rooftop units (RTUs) are also built with higher-grade insulation and materials designed to withstand direct UV exposure, unlike some residential split-system condensers.

    Architectural Trends: The Rise of Flat Roofs

    If you look closely, you’ll notice that rooftop ACs are predominantly found on homes with flat or low-slope roofs. This is a distinct architectural style in the Southwest, influenced by:

    • Mid-Century Modernism: A style popularized in Las Vegas during its boom years.
    • Pueblo Revival: Drawing inspiration from traditional adobe structures.
    • Commercial Practicality: Flat roofs are cheaper to build and easier to maintain for large structures.

    Sloped, shingled roofs (common in the Midwest or East Coast) make rooftop installation difficult and prone to leaks. Flat roofs, typically made of torch-down asphalt or foam coating, provide a stable, waterproof platform perfect for heavy HVAC equipment.

    Note: Not all Las Vegas homes have rooftop ACs. Traditional pitched-roof neighborhoods still use ground-mounted split systems. The rooftop trend is specific to flat-roof architecture.

    Why Are Air Conditioners On The Roof In Las Vegas

    Maintenance and Accessibility: A Double-Edged Sword

    From an technician’s perspective, rooftop units offer unique advantages and challenges. Understanding this helps explain why builders continue to choose this method.

    Pros for Technicians

    • No Obstacles: Techs don’t need to navigate around backyard dogs, kids’ toys, or intricate landscaping.
    • Centralized Location: For large commercial buildings, having all units on the roof allows for easier centralized monitoring and maintenance routes.

    Cons for Homeowners

    • Leak Risks: The biggest concern is water intrusion. Every penetration in the roof is a potential leak point. Proper flashing and sealant are critical.
    • Service Difficulty: Technicians require ladders or lifts, which can increase service call costs slightly compared to walking out the back door.

    To mitigate leak risks, reputable HVAC companies in Las Vegas follow strict protocols. They use reinforced curbs and high-quality elastomeric coatings to ensure the roof remains watertight around the unit base.

    Energy Efficiency and Noise Reduction

    Beyond space and heat, there are comfort factors involved.

    Quieter Operations

    An AC compressor is noisy. When placed on the ground near a patio, it can disrupt outdoor conversations. On the roof:

    • Distance: The sound is further away from living areas.
    • Directionality: Noise is directed upward and outward, rather than into a fenced backyard enclosure.

    Efficiency Ratings

    Modern rooftop packaged units often come with high SEER (Seasonal Energy Efficiency Ratio) ratings. Because they are self-contained systems, they eliminate the energy loss associated with long refrigerant lines that run from a ground condenser to an attic air handler. Shorter duct runs from the roof down into the home can sometimes improve overall system efficiency, provided the ductwork is well-insulated against the attic heat.

    Comparison: Rooftop vs. Ground-Mounted AC in Las Vegas

    FeatureRooftop Unit (RTU)Ground-Mounted Split System
    Space UsageSaves yard spaceUses backyard/side yard
    Heat ExposureDirect sun, but better airflowShaded options available
    Noise LevelQuiet at ground levelAudible in backyard
    Maintenance AccessRequires ladder/roof accessEasy ground access
    Leak RiskHigher (roof penetration)None (ground slab)
    Best ForFlat roofs, small lotsPitched roofs, large lots

    External Authority Reference

    For those interested in the broader history of air conditioning technology and its impact on urban development, you can explore detailed historical context on Wikipedia’s page on Air Conditioning. This resource provides insight into how HVAC evolution has shaped modern architecture, including the shift toward integrated rooftop systems in commercial and residential sectors.

    FAQ Section

    1. Do rooftop ACs break down faster in Las Vegas heat?

    Not necessarily. While they are exposed to more sun, they are engineered for it. Most rooftop units have heavy-duty compressors and coils designed for commercial use. With regular maintenance—such as cleaning coils twice a year—they can last just as long as ground units, typically 15–20 years.

    2. Can I install a rooftop AC on my existing pitched roof?

    It is highly discouraged. Installing a heavy unit on a shingled, sloped roof requires significant structural reinforcement and creates a high risk of leaks. It is generally only feasible on flat or very low-slope roofs with proper waterproofing membranes.

    3. Is it more expensive to repair a rooftop AC?

    It can be slightly more expensive. The labor cost may be higher because technicians need to set up ladders or safety harnesses. Additionally, if the unit needs replacement, crane services might be required to lift the new unit onto the roof, adding to the installation cost.

    4. How do I prevent leaks around my rooftop AC unit?

    Regular inspections are key. Ensure your HVAC provider checks the “curb” (the frame the unit sits on) and the flashing annually. Look for cracks in the sealant or pooling water around the base. Applying a fresh coat of elastomeric roof coating every few years can also seal minor gaps.

    5. Why don’t I see rooftop ACs in older Las Vegas neighborhoods?

    Older neighborhoods (built before the 1990s) often feature pitched tile or shingle roofs, which are incompatible with rooftop units. These homes typically use traditional split systems with ground-mounted condensers. The rooftop trend coincided with the rise of flat-roofed, mid-century modern, and contemporary architectural styles in newer developments.

    Conclusion

    So, why are air conditioners on the roof in Las Vegas? It’s a smart adaptation to a unique environment. By moving these essential machines upstairs, residents gain valuable backyard space, reduce noise pollution, and leverage better airflow for cooling efficiency. While it requires diligent maintenance to prevent leaks, the trade-off is a cooler home and a more usable outdoor living area.

    If you’re considering a home in Las Vegas or just curious about the skyline, now you know the logic behind the view. It’s not just an aesthetic choice; it’s a functional necessity born from the desert climate.

    Found this article helpful? Share it with your friends who are planning a move to Vegas or those who are just curious about desert architecture! Let’s keep the conversation going on social media.
  • Roof Replacement Cost Guide 2026

    Roof Replacement Cost Guide 2026

    Replacing a roof is one of the most significant home improvement investments you will ever make. It protects your family, enhances curb appeal, and secures your property’s value, yet the price tag often comes as a shock. If you are currently stressing over budgets and quotes, you are not alone; understanding how much does it cost to have a roof replaced is the first step toward making a confident, financially sound decision.

    In this comprehensive guide, we will break down the real costs associated with roofing projects in 2026, helping you navigate contractor quotes without getting overwhelmed.

    What Is the Average Cost to Replace a Roof in 2026?

    The short answer is that most homeowners in the United States spend between $8,500 and $14,500 for a standard asphalt shingle roof replacement on a typical 2,000-square-foot home. However, “average” can be misleading because roofing costs are highly variable.

    Several macro-economic factors have influenced pricing in 2026. While supply chain disruptions from previous years have stabilized, labor shortages in the skilled trades continue to keep installation prices steady or slightly elevated. Additionally, regional weather patterns have increased insurance premiums and material demand in storm-prone areas.

    To give you a clearer picture, here is a breakdown by home size:

    Home Size (Sq. Ft.)Roofing Area (Sq. Ft.)Estimated Cost Range (Asphalt)
    Small (1,000 sq. ft.)~1,700 sq. ft.$4,500 – $7,500
    Medium (2,000 sq. ft.)~3,400 sq. ft.$8,500 – $14,500
    Large (3,000+ sq. ft.)~5,100+ sq. ft.$13,000 – $22,000+

    Note: These figures include materials and labor but exclude structural repairs or premium upgrades.

    How Do Different Roofing Materials Affect Price?

    The material you choose is the single biggest driver of cost. While asphalt shingles remain the most popular choice due to their affordability, other materials offer different benefits at different price points.

    1. Asphalt Shingles

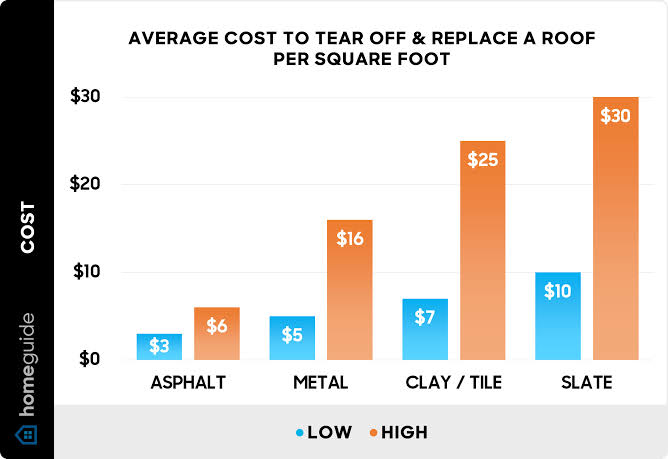
    • Cost: $4.00 – $8.00 per square foot installed.
    • Pros: Affordable, widely available, easy to repair.
    • Cons: Shorter lifespan (15–25 years), susceptible to wind damage.

    2. Metal Roofing (Steel or Aluminum)

    • Cost: $9.00 – $16.00 per square foot installed.
    • Pros: Lasts 40–70 years, energy-efficient, fire-resistant.
    • Cons: Higher upfront cost, can be noisy during rain if not insulated properly.

    3. Clay or Concrete Tiles

    • Cost: $10.00 – $25.00 per square foot installed.
    • Pros: Extremely durable, excellent for hot climates, distinct aesthetic.
    • Cons: Very heavy (may require structural reinforcement), fragile if walked on.

    4. Slate Roofing

    • Cost: $20.00 – $40.00+ per square foot installed.
    • Pros: Can last over 100 years, natural beauty, high prestige.
    • Cons: Extremely expensive, requires specialized installers, very heavy.

    When evaluating these options, consider the lifecycle cost. A metal roof costs twice as much as asphalt initially but lasts three times longer, potentially saving you money in the long run.

    What Hidden Costs Should You Expect?

    Many homeowners focus solely on the price per square foot of shingles, but the final invoice often includes several “hidden” line items. Being aware of these will prevent budget blowouts.

    Tear-Off and Disposal Fees

    You cannot install a new roof over an old one indefinitely. Most local building codes allow only two layers. Removing the old roof (tear-off) and disposing of the debris adds $1,000 to $3,000 to your project. This fee covers labor, dumpster rental, and landfill tipping fees.

    Structural Repairs

    Once the old shingles are removed, contractors may find rotten decking (the wood beneath the shingles). Replacing rotted plywood typically costs $75 to $150 per sheet. If your roof has significant water damage, this cost can rise quickly.

    Ventilation and Flashing

    Upgrading roof vents and replacing flashing (metal strips around chimneys and valleys) is crucial for preventing leaks. Modern building codes often require better ventilation than older homes had. Budget an extra $500 to $1,500 for these essential components.

    Permit Fees

    Most municipalities require a permit for roof replacement. These fees vary wildly by location but generally range from $150 to $1,000. Always ask your contractor if permits are included in their quote.

    How Much Does It Cost To Have A Roof Replaced

    Does Roof Complexity Increase the Cost?

    Yes, significantly. A simple gable roof (a classic triangle shape) is the cheapest to replace because it is safe and easy for workers to access. However, many modern homes feature complex designs that drive up labor hours and material waste.

    Factors that increase complexity include:

    • Steep Pitch: Roofs with a steep slope require special safety equipment and slow down the installation process.
    • Multiple Levels: Multi-story homes require more time for setup and material hoisting.
    • Obstacles: Chimneys, skylights, solar panels, and dormers require intricate flashing work.
    • Valleys: Internal corners where two roof planes meet are prone to leaks and require careful waterproofing.

    Expect to pay a 10% to 30% premium for complex roofs compared to simple designs.

    How to Choose the Right Roofing Contractor

    Selecting the right professional is just as important as choosing the right material. A low bid might seem attractive, but it often signals corner-cutting on materials or insurance coverage.

    1. Check Licensing and Insurance: Ensure the contractor has general liability and workers’ compensation insurance. This protects you if a worker is injured on your property.
    2. Read Local Reviews: Look for reviews on third-party sites like Google or BBB. Pay attention to comments about cleanup and communication.
    3. Get Multiple Quotes: Aim for at least three detailed estimates. Compare them line-by-line, not just the bottom line.
    4. Ask About Warranties: A reputable roofer should offer both a manufacturer’s warranty on materials and a workmanship warranty on their labor (typically 2–10 years).

    For more information on building standards and safety regulations, you can refer to Wikipedia’s article on Roofing to understand the broader context of industry practices.

    FAQ Section

    How long does a roof replacement take?

    For an average-sized home with a simple design, a professional crew can complete the job in 1 to 3 days. Complex roofs or larger homes may take up to a week. Weather delays can also extend this timeline.

    Should I replace my roof or repair it?

    If your roof is less than 10 years old and the damage is localized (e.g., a few missing shingles from a storm), repair is usually sufficient. However, if the roof is nearing the end of its lifespan (20+ years for asphalt) or has widespread leaking, replacement is more cost-effective in the long run.

    Does homeowners insurance cover roof replacement?

    Insurance typically covers roof replacement if the damage is caused by a sudden, accidental event like a hailstorm, wind, or falling tree. It generally does not cover wear and tear, age-related deterioration, or lack of maintenance. Check your policy for specific exclusions.

    What is the best time of year to replace a roof?

    Late spring through early fall is the peak season, meaning prices may be higher and schedules tighter. However, roofing can be done in colder months as long as temperatures are above freezing (shingles need warmth to seal properly). Scheduling in the off-season (late winter) might yield better pricing.

    Can I stay in my house during roof replacement?

    Yes, you can stay in your house, but expect significant noise and vibration. If you have sensitive pets, small children, or work from home, you might consider staying elsewhere for the 1–3 days of active construction. Dust and debris will also be present, so keep windows closed.

    Conclusion

    Understanding how much does it cost to have a roof replaced empowers you to negotiate better and avoid unpleasant surprises. While the national average hovers between $8,500 and $14,500, your specific cost will depend on material choices, roof complexity, and local labor rates.

    Remember, a roof is not just an expense; it is a critical component of your home’s integrity. Investing in quality materials and a reputable contractor pays dividends in peace of mind and longevity.

    Did you find this guide helpful? Share it with friends or family who are facing similar home improvement decisions on social media!

  • Metal Roof Pros & Cons: The Ultimate Guide

    Metal Roof Pros & Cons: The Ultimate Guide

    Are you standing in your driveway, looking up at your aging shingles, and wondering if it’s time for a change? You are not alone. Thousands of homeowners across the United States are considering switching to metal, but the decision isn’t always black and white. Understanding what are the pros and cons of a metal roof is crucial before you sign a contract, as this investment impacts your home’s value, comfort, and long-term maintenance for decades.

    In this guide, we will cut through the marketing hype and provide a balanced, expert-backed look at metal roofing. Whether you live in the snowy peaks of Colorado or the humid heat of Florida, this analysis will help you determine if metal is the right shield for your castle.

    Why Is Everyone Talking About Metal Roofing?

    Metal roofing has evolved significantly from the corrugated tin sheds of the past. Today, it represents some of the most advanced building technology available, offering styles that mimic slate, tile, and wood shakes. According to the Metal Roofing Alliance, the market share for residential metal roofing has grown steadily, driven by homeowners seeking longevity and sustainability.

    However, popularity doesn’t always equal perfection. To make an informed choice, we need to dissect the advantages and disadvantages with precision.

    The Major Pros of Installing a Metal Roof

    When weighing what are the pros and cons of a metal roof, the benefits often center on longevity and resilience. Here is why many experts recommend making the switch.

    1. Unmatched Longevity and Durability

    The most compelling argument for metal is its lifespan. While traditional asphalt shingles typically last 15–20 years, a properly installed metal roof can last 40 to 70 years. Some copper and zinc roofs can even last over 100 years.

    • Weather Resistance: Metal roofs are rated for wind speeds up to 140 mph, making them ideal for hurricane-prone areas like the Gulf Coast.
    • Fire Safety: They carry a Class A fire rating, the highest possible, which can sometimes lead to lower homeowners insurance premiums.
    • Impact Resistance: High-quality steel or aluminum panels resist hail damage better than brittle asphalt shingles.

    2. Energy Efficiency and Sustainability

    Metal roofs reflect solar radiant heat rather than absorbing it. This can reduce cooling costs by 10–25%, according to studies cited by the Department of Energy. Furthermore, most metal roofing contains 25–95% recycled content and is 100% recyclable at the end of its life, unlike asphalt shingles which contribute significantly to landfill waste.

    3. Low Maintenance Requirements

    Once installed, metal roofs require minimal upkeep. There is no need for periodic sealing or treating. Occasional inspections for loose fasteners and cleaning gutters are usually sufficient. Unlike wood shakes, they do not rot, crack, or attract termites.

    The Significant Cons of Metal Roofing

    Despite the advantages, there are valid reasons why some homeowners hesitate. Let’s look at the downsides objectively.

    1. Higher Upfront Cost

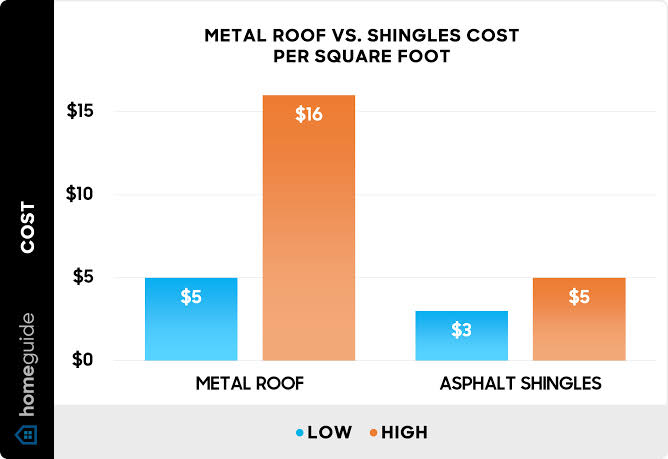
    The initial investment is the biggest barrier. Metal roofing costs between $8 and $16 per square foot installed, compared to $3–$5 for asphalt shingles. For a typical 2,000-square-foot home, this means paying $16,000–$32,000 upfront versus $6,000–$10,000 for shingles.

    • Note: While expensive initially, the “cost per year” of ownership is often lower due to the extended lifespan.

    2. Noise Concerns (The Myth vs. Reality)

    A common fear is that rain or hail will sound like a drum solo inside your house. This is largely a myth for modern installations. When metal roofing is installed over solid sheathing and proper insulation, it is no louder than other roofing materials. However, if installed over open purlins (common in barns or patios), noise can be an issue. Always ensure your contractor uses solid decking for residential homes.

    3. Expansion and Contraction Issues

    Metal expands and contracts with temperature changes. If the installer does not use the correct fasteners or allows insufficient room for movement, the screws can back out over time, leading to leaks. This highlights the importance of hiring a specialized contractor rather than a general roofer.

    4. Denting Potential

    While durable, thinner gauges of metal (like 29-gauge) can dent from large hail or falling branches. Opting for a thicker gauge (24 or 26-gauge) or stone-coated steel can mitigate this risk, but it adds to the cost.

    What Are The Pros And Cons Of A Metal Roof

    Quick Comparison: Metal vs. Asphalt Shingles

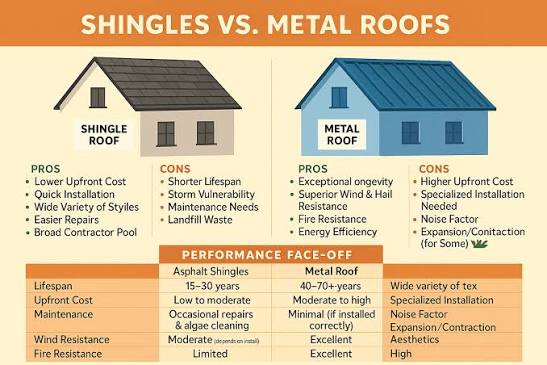
    To visualize what are the pros and cons of a metal roof against the standard alternative, refer to the table below:

    FeatureMetal RoofingAsphalt Shingles
    Lifespan40–70+ Years15–20 Years
    Upfront CostHigh ($8–$16/sq ft)Low ($3–$5/sq ft)
    MaintenanceVery LowModerate
    Energy EfficiencyHigh (Reflective)Low (Absorbs Heat)
    Recyclability100% RecyclableMostly Landfill Waste
    Installation DifficultyComplex (Needs Pros)DIY Friendly

    For more detailed technical specifications on material properties, you can review resources on Wikipedia.

    Key Factors to Consider Before Buying

    If you are leaning toward metal, keep these three critical factors in mind to avoid buyer’s remorse.

    1. Choose the Right Material

    Not all metal is created equal.

    • Steel: The most common, affordable, and strong. Usually coated with Galvalume or Galfan to prevent rust.
    • Aluminum: Lightweight and naturally rust-resistant, making it perfect for coastal homes near saltwater.
    • Copper/Zinc: Premium options with beautiful patinas but extremely high costs.

    2. Find a Certified Installer

    Because metal requires precise detailing around chimneys, vents, and valleys, installation errors are the leading cause of leaks. Look for installers certified by manufacturers like standing-seam specialists. Ask for references and photos of previous jobs.

    3. Check Local HOA Rules

    Some Homeowners Associations restrict metal roofing due to aesthetic preferences. Ensure your chosen style (e.g., stone-coated steel that looks like tile) complies with local covenants before purchasing.

    Frequently Asked Questions (FAQ)

    1. Does a metal roof interfere with Wi-Fi or cell signals?

    Generally, no. While metal blocks radio waves, your router and devices are inside the house, and the signal comes from outside towers. The roof acts as a shield, but signals enter through windows and walls. Most users report no noticeable difference in connectivity.

    2. Can I walk on a metal roof?

    Yes, but with caution. You should wear soft-soled shoes and walk on the flat parts of the panel, avoiding the ribs where fasteners are located. Walking on the ribs can damage the sealant. It is always safer to hire a professional for inspections.

    3. Will a metal roof increase my home’s resale value?

    Yes. According to Remodeling Magazine’s Cost vs. Value Report, metal roofing has a high return on investment (ROI), often recouping 60–85% of its cost upon sale. Buyers appreciate the “new roof” guarantee that lasts for decades.

    4. How long does installation take?

    For an average-sized home, a professional crew can complete a metal roof installation in 2 to 5 days. This is comparable to or slightly faster than asphalt shingle installation, depending on the complexity of the roofline.

    5. Is metal roofing good for solar panels?

    Absolutely. Metal roofs are excellent for solar integration. Clamps can attach solar racking directly to the seams without drilling holes into the roof, preserving the warranty and waterproof integrity.

    Conclusion

    Deciding what are the pros and cons of a metal roof ultimately comes down to your budget, location, and long-term plans. If you plan to stay in your home for 20+ years, the durability, energy savings, and low maintenance of metal make it a superior financial choice despite the higher upfront cost. However, if you are on a tight budget or plan to move soon, asphalt may still be the pragmatic option.

    Metal roofing is not just a trend; it is a shift toward sustainable, resilient home building. By understanding both the strengths and limitations, you can choose a roof that protects your family and enhances your property value.

    Found this guide helpful? Share it with friends who are renovating their homes on Facebook or Pinterest, and leave a comment below about your roofing experiences!

  • How to Install a Ridge Vent on an Existing Roof

    How to Install a Ridge Vent on an Existing Roof

    Is your attic trapping heat like a sauna, causing your air conditioner to work overtime? Poor ventilation can lead to premature shingle damage, ice dams in winter, and skyrocketing energy bills. If you are looking for a cost-effective solution, learning how to install a ridge vent on an existing roof is one of the best upgrades you can make to your home’s efficiency and longevity.

    Many homeowners assume that adding proper ventilation requires a complete roof tear-off. However, with the right tools and careful planning, you can retrofit a high-performance ridge vent system without replacing your entire roof. This guide will walk you through the process, ensuring you achieve professional-grade results while adhering to safety standards and building codes.

    Why Upgrade Your Roof Ventilation?

    Before we dive into the tools and steps, it is crucial to understand why this project matters. Proper attic ventilation is not just about comfort; it is about protecting your investment.

    According to the U.S. Department of Energy, adequate ventilation helps maintain a cool attic in summer and a dry attic in winter. Without it, moisture buildup can rot roof decking, while excessive heat can bake asphalt shingles from the underside, reducing their lifespan by up to 50%.

    A ridge vent works in tandem with soffit vents (intake) to create a continuous flow of air. Hot air rises and escapes through the ridge, pulling fresh, cooler air in from the eaves. This natural convection cycle is the most efficient way to regulate attic temperature.

    Tools and Materials You Will Need

    Preparation is half the battle. Having the right equipment ready before you climb the ladder will save time and ensure safety.

    Essential Tools

    • Circular Saw: With a depth-adjustable blade.
    • Chalk Line: For marking straight cut lines.
    • Hammer and Pry Bar: To remove existing ridge cap shingles.
    • Roofing Nailer or Hammer: For securing the vent.
    • Utility Knife: For trimming shingles and underlayment.
    • Caulking Gun: For applying roofing cement.
    • Safety Gear: Non-slip shoes, harness, gloves, and eye protection.

    Materials

    • Ridge Vent Roll: Choose a high-quality, weather-resistant vent (shingle-over type is easiest for DIY).
    • Roofing Nails: 1-1/4 inch galvanized or stainless steel nails.
    • Roofing Cement: High-quality sealant for end caps and overlaps.
    • Replacement Shingles: To match your existing roof color and style.

    Safety Note: Always check the weather forecast. Never work on a wet, icy, or windy roof. If your roof pitch is steep (greater than 6/12), consider hiring a professional.

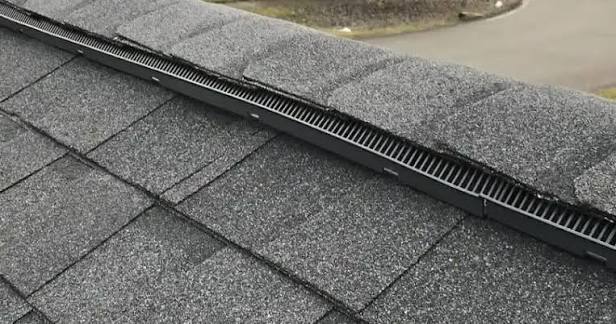
    How To Install A Ridge Vent On An Existing Roof

    Step-by-Step Guide: How to Install a Ridge Vent on an Existing Roof

    Follow these detailed steps to ensure a watertight and effective installation.

    Step 1: Remove the Existing Ridge Cap Shingles

    Start at one end of the roof ridge. Use your pry bar to carefully lift and remove the existing ridge cap shingles. Work your way across the entire length of the ridge where the vent will be installed.

    • Tip: Save any usable shingles if they match your current roof, but typically, you will need new ones for a seamless finish.
    • Clean Up: Remove all old nails and debris from the ridge area. A clean surface is vital for proper adhesion.

    Step 2: Mark the Cut Lines

    You need to cut an opening along the peak of the roof to allow air to escape. The width of this cut depends on the specific ridge vent product you purchased, but it is typically 2 inches wide.

    1. Measure 1 inch out from the center of the ridge on both sides.
    2. Snap a chalk line along these measurements to create two parallel lines running the length of the ridge.
    3. Ensure the lines stop about 6–12 inches from the gable ends to maintain structural integrity and allow for end-capping.

    Step 3: Cut the Roof Decking

    Set your circular saw blade depth to exactly the thickness of your roof sheathing (usually 1/2 inch or 5/8 inch). Do not cut deeper, as you risk damaging the rafters or trusses underneath.

    Carefully cut along the chalk lines. It is helpful to have a helper vacuum the dust or blow it away to keep the line visible. Once cut, remove the strip of wood between the lines. You should now see the open attic space below.

    Step 4: Prepare the Opening

    Inspect the opening for any protruding nails or rough edges. Smooth them out. If there is existing roofing underlayment, trim it back neatly so it does not interfere with the vent installation.

    For added protection against wind-driven rain, some professionals recommend installing a baffle or filter material inside the attic opening, though most modern ridge vents come with integrated filters.

    Step 5: Install the Ridge Vent

    Unroll the ridge vent material along the peak. Most DIY-friendly vents are flexible and come in long rolls.

    1. Start at one end: Align the vent centrally over the cut opening.
    2. Nail it down: Using roofing nails, secure the vent flange to the roof deck. Place nails every 6–8 inches along both sides of the vent.
      • Critical: Do not nail through the center mesh or filter area, as this will block airflow.
    3. Overlap sections: If using multiple rolls, overlap the ends by at least 2 inches and seal the joint with roofing cement to prevent leaks.

    Step 6: Seal the Ends

    The ends of the ridge vent are vulnerable points. Apply a generous bead of roofing cement under the end flaps of the vent. Fold the flaps down and nail them securely. This prevents wind from lifting the vent and water from seeping in.

    Step 7: Re-Shingle Over the Vent

    Now, cover the ridge vent with new shingles to blend it with the rest of the roof.

    1. Start at the end opposite the prevailing wind direction.
    2. Cut standard three-tab shingles into individual tabs or use pre-cut ridge cap shingles.
    3. Lay the first shingle flat over the vent end. Nail it according to manufacturer instructions (usually 4 nails per shingle).
    4. Continue laying shingles up the ridge, overlapping each subsequent shingle by about 5 inches.
    5. Ensure nails are driven firmly but not so deep that they puncture the vent’s internal structure.

    Ridge Vent vs. Other Ventilation Methods

    Is a ridge vent the right choice for you? Let’s compare it to other common options.

    FeatureRidge VentBox VentsTurbine Vents
    AestheticsExcellent (Hidden)VisibleVisible
    MaintenanceLowLowMedium (Moving parts)
    AirflowContinuous & EvenSpot VentilationWind-Dependent
    Installation DifficultyModerateEasyModerate
    NoiseSilentSilentCan hum in wind

    As noted by building science experts, continuous ridge ventilation provides more uniform airflow than spot vents, reducing the risk of “dead air” pockets in the attic. For more technical details on building envelope science, you can refer to resources like Wikipedia’s entry on Roof Ventilation.

    Common Mistakes to Avoid

    Even experienced DIYers can stumble. Here are pitfalls to watch out for:

    • Cutting Too Deep: Damaging rafters compromises roof structure. Always measure blade depth twice.
    • Insufficient Intake: A ridge vent only works if there is enough air coming in. Ensure your soffit vents are not blocked by insulation.
    • Over-Nailing: Driving too many nails or placing them incorrectly can create leak paths. Follow the manufacturer’s nailing pattern strictly.
    • Ignoring Local Codes: Some municipalities have specific requirements for net free vent area (NFVA). Check your local building codes before starting.

    FAQ Section

    1. Can I install a ridge vent if I don’t have soffit vents?

    Technically, yes, but it is not recommended. Ridge vents rely on the “stack effect,” which requires intake air from the eaves. Without soffit vents, the ridge vent may pull air from other unintended gaps, potentially bringing moist air into the attic. It is best to install soffit vents simultaneously.

    2. How much does it cost to install a ridge vent professionally?

    Professional installation typically ranges from $500 to $1,500, depending on roof size and complexity. DIY installation can reduce this cost significantly, primarily covering materials ($100–$300).

    3. Will installing a ridge vent cause leaks?

    If installed correctly, no. The key is proper sealing of the cut edges and correct shingling over the vent. Using high-quality roofing cement and following the manufacturer’s overlap guidelines ensures a watertight seal.

    4. How long does a ridge vent last?

    Most high-quality ridge vents are made from durable plastics or metals designed to last as long as the roof itself—typically 20 to 30 years. However, the shingles covering it will need replacement during normal roof maintenance.

    5. Do I need a permit to install a ridge vent?

    In many jurisdictions, modifying the roof structure requires a permit. Since you are cutting into the roof deck, it is wise to check with your local building department. Failure to obtain a permit could affect your home insurance or resale value.

    Conclusion

    Learning how to install a ridge vent on an existing roof

    is a powerful skill that can enhance your home’s energy efficiency, protect your roof structure, and improve indoor comfort. By following this step-by-step guide, you can achieve a professional-looking result that stands the test of time.

    Remember, safety is paramount. Take your time, double-check your measurements, and ensure your attic has adequate intake ventilation to maximize the benefits of your new ridge vent.

    Did you find this guide helpful? Share it with your friends on Facebook or Pinterest who might be considering similar home improvements. If you have questions or want to share your own DIY success story, leave a comment below!

  • Can You Get A Tax Credit For A New Roof?

    Can You Get A Tax Credit For A New Roof?

    Replacing a roof is one of the most significant home improvement investments you will ever make. It is not just about aesthetics; it is about protecting your family and your asset from the elements. However, the high cost often leaves homeowners searching for financial relief, leading many to ask: Can you get a tax credit for a new roof?

    The short answer is yes, but with important caveats. You generally cannot claim a tax credit for a standard roof replacement using traditional asphalt shingles. However, if you install specific energy-efficient roofing materials, such as solar-integrated tiles or cool roofs that meet strict federal standards, you may qualify for substantial tax incentives. This guide will walk you through exactly what qualifies, how much you can save, and the steps to claim it in 2026.

    Understanding the Difference: Tax Credit vs. Tax Deduction

    Before diving into the specifics, it is crucial to understand the financial mechanism at play. Many homeowners confuse tax deductions with tax credits, but they impact your wallet very differently.

    • Tax Deduction: Reduces your taxable income. If you are in the 24% tax bracket, a $1,000 deduction saves you $240.
    • Tax Credit: Reduces your tax bill dollar-for-dollar. A $1,000 credit saves you exactly $1,000.

    For roofing, we are primarily discussing the Energy Efficient Home Improvement Credit (formerly known as the Nonbusiness Energy Property Credit). This is a direct reduction of your tax liability, making it far more valuable than a simple deduction. According to the Internal Revenue Service, these credits are designed to encourage homeowners to upgrade to technologies that reduce energy consumption and greenhouse gas emissions.

    What Roofing Materials Qualify for the 2026 Tax Credit?

    Not every new roof is eligible. The IRS has specific criteria regarding energy efficiency. In 2026, the focus remains heavily on materials that actively contribute to reducing your home’s energy footprint.

    1. Solar Roof Tiles and Shingles

    If your new roof incorporates photovoltaic (PV) cells, it likely falls under the Residential Clean Energy Credit. This includes products like Tesla Solar Roof or GAF Energy solar shingles. These systems generate electricity, directly offsetting your utility bills.

    2. Cool Roofs (Reflective Roofing)

    “Cool roofs” are designed to reflect more sunlight and absorb less heat than a standard roof. To qualify, the material must meet the ENERGY STAR® program requirements. This typically includes:

    • Specific metal roofing with reflective pigments.
    • Certain tile and slate products treated with reflective coatings.
    • Modified bitumen membranes for flat roofs.

    Note: Standard asphalt shingles, even high-quality architectural ones, rarely meet the stringent reflectivity and emittance standards required for this specific credit unless they are part of a broader ENERGY STAR-certified system.

    3. Insulation and Ventilation Upgrades

    While not the “roof” itself, upgrading the insulation and ventilation in your attic during a roof replacement is often bundled into the same project. High-performance attic insulation and proper ventilation systems can qualify for separate credits under the home envelope improvements category.

    How Much Money Can You Save?

    The amount you can claim depends on the type of installation and the current tax laws effective in 2026. Under the Inflation Reduction Act provisions, which continue to influence 2026 tax filings, the credits are structured as follows:

    Improvement TypeCredit PercentageMaximum Annual Credit
    Solar Electric Property (Solar Roof)30% of costNo annual cap (subject to phase-out after 2032)
    Energy-Efficient Roofing (Cool Roof)10% of costUp to $500 per year
    Attic Insulation/Ventilation10% of costIncluded in the $500 total limit

    Key Takeaway: If you install a full solar roof system costing $20,000, you could potentially claim a $6,000 tax credit. For a standard ENERGY STAR-rated metal cool roof costing $15,000, the credit would be capped at $500.

    Can You Get A Tax Credit For A New Roof

    Step-by-Step Guide to Claiming Your Roof Tax Credit

    Claiming your credit requires careful documentation. Follow these steps to ensure you do not miss out on your savings.

    Step 1: Verify Product Eligibility

    Before purchasing, ask your contractor for the Manufacturer’s Certification Statement. This document confirms that the specific product meets the IRS and ENERGY STAR requirements. Do not rely on verbal assurances; get it in writing.

    Step 2: Keep Detailed Records

    Save all receipts, invoices, and proof of payment. The invoice should clearly separate the cost of the roofing materials from labor if possible, although the credit usually applies to the total installed cost for energy property.

    Step 3: File IRS Form 5695

    When filing your 2026 federal tax return, you must complete Form 5695 (Residential Energy Credits).

    • Part I is for the Residential Clean Energy Credit (Solar).
    • Part II is for the Energy Efficient Home Improvement Credit (Cool roofs, insulation, etc.).

    Step 4: Transfer the Credit to Form 1040

    Once you calculate the credit on Form 5695, transfer the final amount to your Schedule 3 (Form 1040), line 1. This reduces your total tax liability.

    Step 5: Retain Documentation

    Keep all records for at least three years from the date you file your return. The IRS may request proof of eligibility during an audit.

    Common Mistakes to Avoid

    Even with the best intentions, homeowners often make errors that lead to rejected claims.

    • Assuming All “Green” Roofs Qualify: Just because a roof is marketed as “eco-friendly” does not mean it meets the specific IRS technical standards. Always check for the ENERGY STAR label.
    • Missing the Installation Date: The credit is based on when the installation was completed, not when you ordered the materials. Ensure your completion date falls within the 2026 tax year.
    • Ignoring State-Level Incentives: While this article focuses on federal credits, many states offer additional rebates. Failing to stack these benefits means leaving money on the table.

    FAQ Section

    1. Can I get a tax credit for a standard asphalt shingle roof?

    Generally, no. Standard asphalt shingles do not meet the energy efficiency requirements for the federal tax credit. However, if you add qualifying attic insulation or ventilation during the replacement, you may claim credits for those specific components.

    2. Does the roof tax credit apply to rental properties?

    No. The Energy Efficient Home Improvement Credit and the Residential Clean Energy Credit are specifically for primary residences. Rental properties and second homes do not qualify for these personal-use credits, though business-related depreciation rules may apply.

    3. What if my tax liability is lower than the credit amount?

    For the Residential Clean Energy Credit (solar), the credit is refundable in certain contexts or can be carried forward, but for the Energy Efficient Home Improvement Credit (cool roofs), it is non-refundable. This means it can reduce your tax bill to zero, but you will not receive a refund for the excess amount. However, unused portions of the clean energy credit may have different carryover rules depending on current legislation.

    4. Do I need to itemize my deductions to claim this credit?

    No. Tax credits are available regardless of whether you take the standard deduction or itemize your deductions. This makes them accessible to a wider range of taxpayers.

    5. How long does the processing take?

    Filing Form 5695 does not typically delay your refund unless the IRS selects your return for further review. Ensure all numbers match your supporting documents to avoid delays.

    Conclusion

    So, can you get a tax credit for a new roof? Yes, provided you choose the right materials. By opting for solar-integrated roofing or ENERGY STAR-certified cool roofs, you can significantly offset the cost of your investment through federal tax credits. In 2026, these incentives remain a powerful tool for homeowners looking to upgrade their homes while saving money.

    Remember, the key is verification. Always confirm that your chosen materials meet IRS standards and keep meticulous records. Don’t let the complexity of tax forms deter you; the potential savings are well worth the effort.

    If you found this guide helpful, please share it with friends or family who are planning home improvements. Helping others navigate these tax benefits can make a real difference in their financial planning!

  • Red Roof Inn Johnson City Broyles Drive: Budget Stay Guide

    Red Roof Inn Johnson City Broyles Drive: Budget Stay Guide

    Finding the right accommodation in Johnson City can feel overwhelming, especially when you are balancing budget constraints with the need for comfort and convenience. Whether you are visiting family at East Tennessee State University (ETSU), attending a medical appointment at the nearby VA Medical Center, or just passing through on I-26, you need a reliable place to rest without breaking the bank. This is where Red Roof Inn Johnson City Broyles Drive Johnson City Tn often emerges as a top contender for travelers seeking value and accessibility.

    In this comprehensive guide, we will dive deep into what makes this specific location a popular choice. We will cover everything from room amenities and local attractions to practical booking tips, ensuring your stay is smooth, affordable, and stress-free. Let’s explore why this hotel might be the perfect fit for your next trip to the Tri-Cities area.

    Why Choose Red Roof Inn on Broyles Drive?

    When searching for lodging in Johnson City, location is paramount. The Red Roof Inn located on Broyles Drive sits in a strategic position that serves both leisure and business travelers effectively. Unlike some budget hotels tucked away in obscure corners, this property offers easy access to major highways while remaining close to essential services.

    Strategic Location and Accessibility

    The primary advantage of this location is its proximity to key landmarks. It is situated just minutes away from:

    • East Tennessee State University (ETSU): Ideal for parents visiting students or prospective students touring the campus.
    • Johnson City VA Medical Center: A crucial benefit for veterans and their families who have appointments or long-term stays.
    • Downtown Johnson City: Only a short drive away, giving you access to the historic district, restaurants, and nightlife.

    For those driving, being near I-26 and US-19E means you can get in and out of the city quickly, avoiding unnecessary traffic congestion during peak hours. This accessibility reduces travel stress, allowing you to focus on the purpose of your visit.

    Affordability Without Compromising Basics

    One of the core promises of the Red Roof brand is providing “nice rooms at low prices.” In an economic climate where hospitality costs have risen significantly across the United States, finding a clean, safe place to sleep under $100 per night (depending on the season) is increasingly rare. This hotel maintains that value proposition, making it an excellent option for:

    • Road trippers needing a quick overnight stop.
    • Families on a tight vacation budget.
    • Business travelers with strict per-diem limits.

    What Amenities Can You Expect?

    Understanding what is included in your stay helps manage expectations and ensures you pack appropriately. While this is a budget-friendly option, it does not skimp on the essentials required for a comfortable night’s sleep.

    Room Features and Comfort

    Most rooms at the Johnson City Broyles Drive location are designed with functionality in mind. You can typically expect:

    • Free Wi-Fi: Essential for remote workers and staying connected with family. Note: Speeds may vary, so it is best suited for browsing and email rather than heavy 4K streaming.
    • Flat-screen TVs: With cable channels to unwind after a long day.
    • Climate Control: Individual air conditioning and heating units allow you to set the temperature to your preference.
    • Work Desks: Small but functional spaces for checking emails or planning your next day.

    It is important to note that as part of the brand’s evolution, many Red Roof Inns have updated their bedding to include higher-quality linens and pillows, enhancing the overall sleep experience.

    Pet-Friendly Policy: A Major Plus

    One of the standout features of Red Roof Inn is its pet-friendly policy. Unlike many competitors that charge hefty fees or restrict pet sizes, Red Roof Inn generally allows one well-behaved pet per room at no extra charge.

    Pro Tip: Always call the front desk ahead of time to confirm current pet policies, as rules can change based on management or seasonal demand. If you are traveling with a furry friend, this policy can save you significant money compared to other hotels that charge $50–$100 per night for pets.

    On-Site Services

    While you won’t find a full-service spa or gourmet restaurant, the hotel provides necessary conveniences:

    • 24-Hour Front Desk: Helpful for late check-ins or early departures.
    • Vending Machines: For snacks and drinks if you miss dinner hours.
    • Laundry Facilities: Available for guests staying multiple nights, which is a huge benefit for long-term travelers or families.
    Red Roof Inn Johnson City Broyles Drive Johnson City Tn

    Nearby Attractions and Dining

    Staying at Red Roof Inn Johnson City Broyles Drive Johnson City Tn puts you within a 10-15 minute drive of some of the region’s best attractions. Here is how you can make the most of your location:

    AttractionDistance from HotelBest For
    ETSU Campus~2 milesSports events, university visits
    Tweetsie Railroad~15 milesFamily fun, historical train rides
    Downtown Johnson City~3 milesDining, live bluegrass music, shopping
    Bristol Motor Speedway~20 milesNASCAR fans, racing events
    Appalachian Mountain Brewery~5 milesLocal craft beer enthusiasts

    For dining, the immediate area around Broyles Drive has several fast-food and casual dining options, including Cracker Barrel and various local eateries. However, venturing into downtown Johnson City offers a richer culinary experience, featuring Southern comfort food and international cuisines.

    How to Secure the Best Rate

    Booking smartly can make a significant difference in your total travel cost. Here are actionable steps to ensure you get the best deal at this location.

    1. Book Directly: While third-party sites like Expedia or Booking.com are convenient, booking directly through the Red Roof Inn website often yields the lowest rates and provides more flexibility for cancellations.
    2. Join the RediRewards Program: This loyalty program is free to join. Members often receive exclusive discounts, faster check-in, and points toward future stays. Even for a one-night stay, it takes only a minute to sign up.
    3. Check for Special Rates: Look for discounts if you qualify as:
      • AAA Member
      • Senior Citizen (AARP)
      • Military or Government Employee
      • Corporate Partner
    4. Timing Matters: Prices in Johnson City fluctuate based on university events (like ETSU football games or graduation) and local festivals. Try to avoid booking during these high-demand weekends if possible, or book well in advance.

    Comparison: Red Roof Inn vs. Competitors

    To help you decide if this is the right choice, let’s compare it briefly with typical alternatives in the same price bracket.

    • Vs. Motel 6: Red Roof Inn often has newer renovations and a slightly more modern aesthetic. The pet policy is also generally more lenient.
    • Vs. Super 8: Red Roof Inn tends to have better consistency in cleanliness standards due to recent brand-wide improvement initiatives.
    • Vs. Hampton Inn: Hampton Inn offers free breakfast and pools, which Red Roof Inn does not. However, Hampton Inn is usually 30-50% more expensive. If you don’t need breakfast or a pool, the savings at Red Roof Inn are substantial.

    For more context on the hospitality industry’s shift towards budget-conscious travel, you can read about general tourism trends on Wikipedia.

    FAQ Section

    1. Is breakfast included at Red Roof Inn Johnson City Broyles Drive?

    No, traditional hot breakfast is not included. However, there are numerous affordable dining options within a mile of the hotel. Some locations may offer coffee in the lobby, but it is best to plan for breakfast elsewhere or bring your own supplies.

    2. Is the hotel safe for solo travelers?

    The hotel is located in a commercial area with good lighting and visibility. As with any budget accommodation, it is advisable to keep your doors locked and use common sense. The 24-hour front desk adds a layer of security, and staff are generally attentive to guest safety.

    3. Can I get a refund if my plans change?

    Cancellation policies vary depending on the rate type you book. “Flexible” rates usually allow cancellation up to 24 hours before check-in without penalty. “Non-refundable” rates are cheaper but cannot be changed. Always review the specific terms during booking.

    4. Are there rooms with two queen beds available?

    Yes, the hotel offers various room configurations, including rooms with two queen beds, which are ideal for families or groups of friends. These rooms tend to book up faster, so early reservation is recommended.

    5. Is there parking available?

    Yes, free on-site parking is available for guests. There is ample space for standard vehicles, and the lot is well-lit. If you have an RV or large truck, it is best to call ahead to ensure space availability.

    6. How far is the hotel from the Tri-Cities Airport (TRI)?

    The Tri-Cities Regional Airport is approximately 15-20 minutes away via I-26. This makes the hotel a convenient layover spot for flyers arriving late or departing early.

    Conclusion

    Choosing Red Roof Inn Johnson City Broyles Drive Johnson City Tn is a smart move for travelers who prioritize value, location, and pet-friendly accommodations. While it may not offer luxury amenities like a pool or spa, it delivers on the fundamentals: a clean bed, reliable Wi-Fi, and a convenient base for exploring Johnson City.

    By following the tips outlined in this guide—such as joining the loyalty program and booking in advance—you can maximize your savings and enjoy a hassle-free stay. Whether you are here for a Bucs game, a medical visit, or a road trip break, this hotel provides the practical comfort you need.

    Did you find this guide helpful? Share it with your friends and family on social media who might be planning a trip to Tennessee! Your share could help someone else find the perfect budget-friendly stay. Safe travels!

  • Roof Safety: When Personnel Are Working On The Roof

    Roof Safety: When Personnel Are Working On The Roof

    Falling from heights remains one of the leading causes of fatal injuries in the construction and maintenance industries. It is a terrifying reality that no employer wants to face, yet the risks are ever-present when personnel are working on the roof or upper stories. Understanding how to mitigate these dangers is not just about following rules; it is about ensuring every worker returns home safely to their family at the end of the day.

    In this comprehensive guide, we will break down the essential safety measures, legal requirements, and best practices for high-altitude work. Whether you are a site manager, a safety officer, or a business owner, this article provides the actionable insights you need to create a secure working environment.

    Why Is Fall Protection Critical at Heights?

    Gravity is unforgiving. In the United States, the Occupational Safety and Health Administration (OSHA) consistently lists falls as the number one cause of death in construction, often referred to as part of the “Fatal Four.”

    According to recent Bureau of Labor Statistics (BLS) data, hundreds of workers die annually from falls to a lower level. These incidents are not just statistics; they represent lost lives, devastated families, and significant financial liabilities for businesses.

    When workers are elevated, even a minor slip can have catastrophic consequences. The height does not need to be extreme to cause severe injury. A fall from just six feet can result in permanent disability or death. Therefore, implementing robust fall protection systems is not optional—it is a moral and legal imperative.

    What Are the OSHA Requirements for Roof Work?

    Compliance with federal regulations is the baseline for safety. OSHA has specific standards depending on the industry (General Industry vs. Construction). For most roofing tasks, 29 CFR 1926 Subpart M applies.

    Key Thresholds

    • Construction Industry: Fall protection is required at 6 feet or more above a lower level.
    • General Industry: Fall protection is typically required at 4 feet or more.

    Acceptable Systems

    OSHA mandates that employers must provide one of the following systems when personnel are working on the roof or upper stories:

    1. Guardrail Systems: Physical barriers that prevent workers from reaching the edge.
    2. Safety Net Systems: Installed below the work area to catch falling workers.
    3. Personal Fall Arrest Systems (PFAS): Harnesses and lanyards that stop a fall after it occurs.

    It is crucial to note that “warning lines” alone are often insufficient for steep-slope roofs or work near the edge without additional protection. Always consult the specific OSHA standard relevant to your job type. For a deeper understanding of regulatory history and global standards, you can refer to Wikipedia’s page on Occupational Safety and Health.

    When Personnel Are Working On The Roof Or Upper Stories

    How to Choose the Right Fall Protection System

    Not all roofs are the same, and neither are the safety solutions. Choosing the right system depends on the roof’s slope, material, and duration of work.

    Comparison of Common Systems

    System TypeBest ForProsCons
    GuardrailsLong-term projects, flat roofsPassive protection; no training needed for useExpensive to install; obstructive
    PFAS (Harness)Short-term repairs, steep slopesPortable; flexible movementRequires training; rescue plan needed
    Safety NetsSteel erection, large open areasCatches multiple workers; low impactDifficult to install; requires clearance
    Ladder SafetyAccess pointsSimple; cost-effectiveOnly protects during ascent/descent

    Expert Insight

    John Smith, a certified safety professional with over 15 years in industrial hygiene, states, “The best fall protection is the one that workers will actually use. If a harness is uncomfortable or restricts movement too much, workers may bypass it. Ergonomics matter as much as engineering.”

    Step-by-Step Guide to Implementing Safety Protocols

    Implementing safety is a process, not a one-time event. Follow these steps to ensure compliance and safety when personnel are working on the roof or upper stories.

    Step 1: Conduct a Hazard Assessment

    Before any work begins, walk the site. Identify:

    • Skylights (which must be guarded or covered).
    • Weak roof surfaces.
    • Electrical hazards nearby.
    • Weather conditions (wind, rain, ice).

    Step 2: Select and Inspect Equipment

    Choose the appropriate PPE. Before each use, inspect harnesses for:

    • Frayed webbing.
    • Cracked D-rings.
    • Broken stitches.
    • Note: If any defect is found, remove the equipment from service immediately.

    Step 3: Train Your Team

    Training is mandatory. Workers must know:

    • How to don a harness correctly.
    • Where the anchor points are.
    • The maximum arresting force limits.

    Step 4: Establish a Rescue Plan

    This is often overlooked. If a worker falls and is suspended in a harness, they can suffer from suspension trauma within minutes. You must have a plan to retrieve them quickly.

    • Keep rescue kits on-site.
    • Ensure at least two people are trained in rescue procedures.

    Step 5: Monitor and Enforce

    Safety is an ongoing culture. Supervisors must actively monitor compliance. Correct unsafe behaviors immediately and positively reinforce safe practices.

    What Are the Common Hazards Beyond Falling?

    While falls are the primary concern, other hazards exist when personnel are working on the roof or upper stories.

    1. Falling Objects

    Tools or materials dropped from a height can kill or injure people below.

    • Solution: Use tool lanyards and establish exclusion zones below the work area.

    2. Weather Conditions

    Wind can destabilize workers on high edges. Rain makes surfaces slippery.

    • Solution: Monitor weather forecasts. Halt work if wind speeds exceed safe limits (typically 20-25 mph for ladder work, but varies by task).

    3. Electrical Hazards

    Roofs often have HVAC units, solar panels, or nearby power lines.

    • Solution: Maintain safe distances from power lines (at least 10 feet) and de-energize circuits when possible.

    How to Handle Emergency Situations

    Despite best efforts, accidents can happen. Being prepared reduces the severity of the outcome.

    • Stay Calm: Panic leads to poor decisions.
    • Assess the Victim: Check for consciousness and breathing. Do not move them unless there is immediate danger (e.g., fire).
    • Call Emergency Services: Provide exact location details.
    • Execute Rescue Plan: If the worker is suspended, use the pre-planned method to lower them safely. Avoid cutting the harness line unless absolutely necessary, as this can cause further injury.

    FAQ Section

    1. Do I need fall protection for short-duration tasks?

    Yes. OSHA does not provide an exemption for short-duration tasks. If you are working at heights above the threshold (6 feet for construction), you must have protection, regardless of how long the task takes.

    2. Can I use a ladder instead of a harness?

    Ladders are for access, not for working positions. If you are working from a ladder, it must be secured. However, if you are moving across a roof, a ladder is not sufficient protection. You need a PFAS or guardrail system.

    3. What is suspension trauma?

    Suspension trauma, also known as orthostatic intolerance, occurs when a fallen worker hangs in a harness. Blood pools in the legs, reducing blood flow to the brain. It can be fatal within 10–30 minutes. This is why a rescue plan is critical.

    4. Who is responsible for providing safety equipment?

    The employer is legally responsible for providing, maintaining, and paying for all necessary personal protective equipment (PPE). Employees cannot be charged for required safety gear.

    5. How often should fall protection equipment be inspected?

    Equipment should be inspected by the user before each use. Additionally, a competent person should perform a formal inspection at least annually, or more frequently if recommended by the manufacturer.

    6. Are skylights considered a fall hazard?

    Absolutely. Skylights are fragile and can break under weight. They must be protected with guards, screens, or covers capable of supporting twice the weight of an employee.

    Conclusion

    Ensuring safety when personnel are working on the roof or upper stories is a complex but achievable goal. It requires a combination of the right equipment, thorough training, and a strong safety culture. By adhering to OSHA guidelines and prioritizing the well-being of your team, you protect not only your workforce but also the integrity of your business.

    Remember, safety is not a box to check; it is a value to live by. Take the time to assess your site, train your team, and implement robust fall protection systems today.

    Did you find this guide helpful? Share it with your colleagues and network on LinkedIn or Twitter to help spread awareness about roof safety. Let’s work together to make every workplace safer.

  • Shingle Roof Cost Per Sq Ft: 2026 Price Guide

    Shingle Roof Cost Per Sq Ft: 2026 Price Guide

    Replacing a roof is one of the most significant home improvement investments you will ever make. It protects your family, enhances curb appeal, and significantly impacts your property’s resale value. However, staring at a blank checkbook can be stressful if you don’t know what to expect. If you are asking, “How Much Does A Shingle Roof Cost Per Square Foot,” you are in the right place to find clear, actionable answers.

    In this guide, we will break down the current market rates for 2026, explain the hidden factors that influence pricing, and help you avoid common budgeting pitfalls. Whether you are dealing with storm damage or simply upgrading an aging home, understanding these costs empowers you to negotiate better with contractors.

    Understanding the Basics: What Is a “Square” in Roofing?

    Before we dive into the dollar amounts, it is crucial to understand how roofing professionals measure area. In the construction industry, contractors do not typically quote by the individual square foot of your home’s footprint. Instead, they use a unit called a “roofing square.”

    One roofing square equals 100 square feet of roof area.

    This distinction is vital because your roof’s surface area is almost always larger than your home’s floor plan due to pitch, overhangs, and complex angles. When you see a price quoted as “$5.00 per square foot,” it usually refers to the actual surface area of the roof, not the ground floor. Always clarify this with your contractor to ensure you are comparing apples to apples.

    Current Average Costs for Shingle Roofs in 2026

    So, what is the bottom line? As of late 2026, the cost to install a new asphalt shingle roof varies based on quality and location. However, national averages provide a solid baseline for budgeting.

    Breakdown by Material Type

    Asphalt shingles remain the most popular choice in the United States due to their balance of affordability and durability. Here is the typical cost range per square foot (installed):

    Shingle TypeCost Per Sq. Ft. (Installed)LifespanBest For
    3-Tab Asphalt$4.50 – $6.5015–20 YearsBudget-conscious homeowners
    Architectural$6.50 – $9.5025–30 YearsMost residential homes
    Premium/Luxury$9.50 – $14.00+30–50 YearsHigh-end aesthetics & durability

    Note: These prices include materials, labor, underlayment, and basic disposal fees.

    While 3-tab shingles are the cheapest option, architectural shingles (also known as dimensional shingles) have become the industry standard. They offer better wind resistance, a more textured look, and longer warranties, making them the best value for most US homeowners.

    Key Factors That Influence Your Final Bill

    If you receive two quotes that differ by thousands of dollars, it is rarely due to arbitrary pricing. Several specific variables drive the final cost. Understanding these will help you interpret your estimates accurately.

    1. Roof Pitch and Complexity

    A simple, low-pitch gable roof is the easiest and cheapest to install. However, if your home has multiple valleys, dormers, chimneys, or a steep pitch, labor costs increase significantly. Steep roofs require special safety equipment and more time to navigate, which drives up the labor portion of the bill.

    2. Geographic Location

    Labor rates and material availability vary wildly across the US. For instance, roofing in urban areas like New York City or San Francisco will naturally cost more due to higher operational costs and union labor standards compared to rural areas in the Midwest. Additionally, regions prone to hurricanes may require impact-resistant shingles, which carry a premium price tag.

    3. Removal of Old Roofing

    Does your quote include “tear-off”? Removing old shingles is labor-intensive and generates significant waste disposal fees. Most contractors charge between $1.00 and $2.50 per square foot just for removal and disposal. While some codes allow installing new shingles over old ones (overlay), this is generally discouraged as it hides potential deck damage and voids many manufacturer warranties.

    4. Underlayment and Deck Repair

    The shingles are only the visible part of the system. The water-resistant barrier underneath (underlayment) is critical. Synthetic underlayment costs more than traditional felt but offers superior protection. Furthermore, once the old roof is off, contractors may find rotten plywood decking. Replacing decking typically costs $75–$100 per sheet of plywood, an unexpected expense that should be accounted for in your contingency fund.

    How Much Does A Shingle Roof Cost Per Square Foot

    Labor vs. Materials: Where Does the Money Go?

    A common misconception is that the shingles themselves are the most expensive part of the job. In reality, labor often accounts for 60% to 70% of the total project cost.

    According to industry data, the material cost for standard architectural shingles might only be $2.50–$4.00 per square foot. The rest covers:

    • Skilled labor wages
    • Insurance and licensing
    • Waste disposal dumpsters
    • Equipment (cranes, nail guns, safety harnesses)
    • Contractor overhead and profit margin

    This is why hiring the cheapest bidder can be risky. Low bids often indicate cut corners on safety, insurance, or the quality of the underlayment and flashing materials.

    Step-by-Step: How to Estimate Your Roof Cost

    Want to get a rough idea before calling contractors? Follow these steps to create a preliminary budget.

    1. Measure Your Home’s Footprint: Measure the length and width of your home’s exterior walls. Multiply these to get the ground area.
    2. Adjust for Pitch: Use a pitch multiplier. For a moderate pitch (6/12), multiply your ground area by 1.12. For steeper roofs, the multiplier increases.
      • Example: A 2,000 sq. ft. home with a moderate pitch has roughly 2,240 sq. ft. of roof area.
    3. Convert to Squares: Divide the total roof area by 100.
      • 2,240 / 100 = 22.4 squares.
    4. Apply Average Cost: Multiply the number of squares by the average cost per square foot for your chosen shingle type.
      • 22.4 squares x 100 sq. ft. x $7.50 (avg mid-range) = ~$16,800.

    Remember, this is a rough estimate. Always add a 10–15% contingency for unexpected repairs or waste factors.

    Why Quality Installation Matters More Than Shingle Brand

    You can buy the most expensive luxury shingles on the market, but if they are installed incorrectly, they will fail prematurely. Proper installation involves correct nailing patterns, adequate ventilation, and precise flashing around penetrations like vents and chimneys.

    For a deeper understanding of roofing materials and their historical development, you can refer to general construction resources such as Wikipedia’s entry on Roofing. This external source provides context on how modern asphalt shingles evolved from earlier organic materials, highlighting why today’s fiberglass-based mats offer superior fire resistance and durability.

    Investing in a certified installer who follows manufacturer specifications ensures your warranty remains valid. Many major manufacturers now offer enhanced warranties that cover both materials and labor, but only if installed by their certified partners.

    Frequently Asked Questions (FAQ)

    1. Can I save money by installing shingles myself?

    While DIY projects can save on labor, roofing is dangerous and technically complex. Mistakes in flashing or ventilation can lead to leaks that cause thousands of dollars in interior damage. Most manufacturers also void warranties if the roof is not installed by a certified professional. For most homeowners, the risk outweighs the savings.

    2. How long does a shingle roof replacement take?

    For an average-sized single-family home (20–30 squares), a professional crew can typically complete the job in 1 to 3 days. Weather conditions and the complexity of the roof design are the primary factors that can extend this timeline.

    3. Is it cheaper to repair or replace my roof?

    If less than 30% of your roof is damaged and it is under 15 years old, repairs may be cost-effective. However, if your roof is nearing the end of its lifespan or has widespread granule loss, replacement is more economical in the long run. Constant repairs add up quickly and do not address underlying deck issues.

    4. Do insurance companies cover roof replacement?

    Homeowners insurance typically covers roof replacement if the damage is caused by a sudden, covered peril such as hail, windstorms, or falling trees. They generally do not cover wear and tear or age-related deterioration. Check your policy’s “Actual Cash Value” vs. “Replacement Cost Value” clauses, as this significantly affects your payout.

    5. What is the best time of year to replace a roof?

    Late spring through early fall is the peak season, meaning prices may be higher due to demand. However, scheduling in the shoulder seasons (late fall or early spring) can sometimes yield better pricing and faster scheduling, provided the weather permits safe installation. Avoid winter installations in cold climates, as shingles become brittle and sealants may not adhere properly.

    Conclusion

    Knowing how much does a shingle roof cost per square foot is the first step toward a successful home improvement project. In 2026, you can expect to pay between $4.50 and $9.50 per square foot for a quality architectural shingle roof, depending on your location and roof complexity.

    Remember, the lowest bid is not always the best value. Prioritize contractors with strong local reputations, proper insurance, and manufacturer certifications. A well-installed roof provides peace of mind and protects your biggest asset for decades to come.

    Found this guide helpful? Share it with friends or neighbors who are planning their own home upgrades on social media! Let’s help everyone make informed decisions about their homes.

  • How Many Square Feet In One Square Of Roofing Shingles?

    How Many Square Feet In One Square Of Roofing Shingles?

    Have you ever stared at a roofing estimate and felt completely lost because the contractor kept talking about “squares” instead of just giving you the total area? You are not alone; this industry-specific terminology trips up countless homeowners who are trying to budget for a new roof or verify a quote. Understanding how many square feet in one square of roofing shingles is the single most important step to ensuring you aren’t overpaying for materials or labor.

    In this guide, we will break down the math, explain why this unit of measurement exists, and show you how to calculate your needs like a pro. By the end, you’ll feel confident discussing your project with any contractor.

    The Golden Rule: 1 Square Equals 100 Square Feet

    Let’s get straight to the answer that brought you here. In the roofing industry, one “square” is equal to 100 square feet of roof area.

    It is crucial to distinguish this from a square foot, which is a standard unit of area measuring 12 inches by 12 inches. A roofing “square” is a bulk unit used to simplify the ordering of large quantities of materials.

    Why Do Roofers Use “Squares”?

    You might wonder why we don’t just stick to square feet. The reason is practicality and historical convention. Roofs are large surfaces. Saying a roof is “25 squares” is much easier to communicate and write on an invoice than saying it is “2,500 square feet.” It reduces the chance of transcription errors when ordering bundles of shingles, underlayment, and nails.

    According to industry standards, this measurement applies regardless of the type of shingle you choose—whether it is asphalt, architectural, or luxury laminate. The coverage area remains the constant variable, even if the weight or thickness of the material changes.

    Calculating Your Roof’s Square Footage

    Now that you know the conversion rate, how do you apply it to your specific home? Most houses are not perfect rectangles, so calculating the exact area requires a bit of geometry. Here is a step-by-step approach to determining how many squares you need.

    Step 1: Measure Each Plane

    If you have a simple gable roof, you likely have two rectangular planes. If you have a hip roof or multiple gables, you will have several triangles and trapezoids.

    • For Rectangles: Multiply length by width.
    • For Triangles: Multiply base by height, then divide by two.

    Step 2: Sum the Areas

    Add up the square footage of every individual plane on your roof. Let’s say you have three sections:

    1. Main section: 1,200 sq. ft.
    2. Garage extension: 400 sq. ft.
    3. Dormer: 100 sq. ft.

    Total Area: 1,700 sq. ft.

    Step 3: Convert to Squares

    Divide your total square footage by 100. 1,700 sq. ft./100=17 squares1,700 sq. ft./100=17 squares

    So, your roof is 17 squares. This is the number you will use when talking to suppliers.

    How Many Square Feet In One Square Of Roofing Shingles

    From Squares to Bundles: The Material Math

    Knowing your roof is 17 squares is great, but you can’t buy “17 squares” off the shelf. You buy shingles in bundles. This is where many DIYers make costly mistakes.

    Standard Asphalt Shingles

    For most standard 3-tab or architectural asphalt shingles, it typically takes 3 bundles to cover 1 square (100 sq. ft.).

    Therefore, the formula is: Number of Squares×3=Total Bundles NeededNumber of Squares×3=Total Bundles Needed

    Using our previous example: 17 squares×3 bundles/square=51 bundles17 squares×3 bundles/square=51 bundles

    Heavyweight and Luxury Shingles

    Be careful here. Not all shingles follow the 3-bundle rule.

    • Heavyweight Architectural Shingles: These are thicker and heavier. Some brands require 4 or 5 bundles per square to achieve the same coverage because each bundle covers less area due to the increased thickness.
    • Luxury/Designer Shingles: These may have unique dimensions or installation patterns that alter the bundle-to-square ratio.

    Pro Tip: Always check the label on the specific shingle bundle you intend to buy. It will explicitly state the coverage per bundle. Never assume it is 3 bundles per square without verifying.

    The Critical Factor: Waste and Overage

    If you order exactly 51 bundles for a 17-square roof, you will likely run out of materials before the job is done. Why? Because roofs are not perfect canvases, and shingles must be cut to fit edges, valleys, and around vents.

    How Much Waste Should You Add?

    Industry experts recommend adding a waste factor to your total square count.

    Roof ComplexityRecommended Waste FactorExample Calculation (for 17 Squares)
    Simple Gable10%17+1.7=18.717+1.7=18.7 (Round up to 19 squares)
    Moderate (Hips/Valleys)15%17+2.55=19.5517+2.55=19.55 (Round up to 20 squares)
    Complex (Turrets/Dormers)20-25%17+3.4=20.417+3.4=20.4 (Round up to 21 squares)

    Why is waste necessary?

    1. Cutting Losses: Shingles cut for hips and valleys cannot always be reused.
    2. Starter Strips: You need extra material for the eaves and rakes.
    3. Mistakes: Accidental damage during installation happens.
    4. Future Repairs: Having leftover shingles ensures color matching for future repairs.

    For more detailed information on roofing materials and their properties, you can refer to Wikipedia’s entry on Roofing, which provides a broad overview of global standards and material types.

    Cost Implications: Why Accuracy Matters

    Understanding how many square feet in one square of roofing shingles directly impacts your wallet. Roofing costs are usually quoted per square.

    If a contractor quotes you $400 per square for installation and materials:

    • 17 Squares: $6,800
    • 19 Squares (with waste): $7,600

    If you underestimate your square footage by failing to account for waste or complex geometry, you could face unexpected “change orders” mid-project. Conversely, if you overestimate significantly, you might pay for materials you don’t need, although most suppliers allow returns for unopened bundles.

    Hidden Costs to Consider

    • Underlayment: Also sold by the roll, but calculated based on square footage. One roll typically covers 4 squares (400 sq. ft.), but check the manufacturer specs.
    • Nails: A general rule of thumb is 4 pounds of roofing nails per square for standard asphalt shingles.
    • Ice and Water Shield: Required in valleys and eaves in colder climates, priced separately.

    Frequently Asked Questions (FAQ)

    1. Does a “square” of roofing mean the same thing for metal roofs?

    Yes, the term “square” always equals 100 square feet, regardless of the material. However, metal roofing is often sold by linear feet or panels rather than bundles, so the purchasing process differs even though the area measurement remains the same.

    2. How do I measure my roof if I can’t climb on it?

    You can use satellite imagery tools like Google Earth or specialized apps like RoofSnap or EagleView. These tools allow you to trace the perimeter of your roof from aerial photos to get a fairly accurate square footage estimate. For insurance claims or precise contracts, a professional drone measurement is recommended.

    3. What is the difference between 3-tab and architectural shingles in terms of coverage?

    There is no difference in coverage area per square. Both cover 100 square feet per square. The difference lies in the number of bundles required. 3-tab shingles usually take 3 bundles per square, while architectural shingles may take 3, 4, or 5 bundles per square depending on their thickness and brand.

    4. Can I reuse old shingles for patches?

    While possible, it is not recommended for large areas. Old shingles become brittle and lose their adhesive strip effectiveness. Furthermore, finding an exact color match for aged shingles is difficult. It is better to keep a few leftover bundles from your original installation for future repairs.

    5. How much does one square of shingles weigh?

    This varies significantly. Standard 3-tab shingles weigh approximately 200–250 lbs per square. Architectural shingles can weigh 300–400 lbs per square. Heavyweight designer shingles can exceed 500 lbs per square. This is important for structural integrity checks, especially if you are adding a second layer of shingles.

    Conclusion

    Mastering the concept of how many square feet in one square of roofing shingles empowers you to take control of your home improvement projects. Remember, 1 square = 100 square feet, and for standard asphalt shingles, you will typically need 3 bundles per square.

    Don’t forget to add a waste factor of 10–15% to your calculations to avoid running short on materials. By understanding these basics, you can communicate effectively with contractors, verify estimates, and ensure your roof is installed correctly without budget surprises.

    Found this guide helpful? Share it with your neighbors or friends who are planning their next home renovation on social media! Knowledge is power, especially when it comes to protecting your home.

  • Roofing License Guide: Start Your Business Right

    Roofing License Guide: Start Your Business Right

    Starting a roofing business is an exciting venture that promises financial independence and the pride of building tangible value for your community. However, navigating the bureaucratic maze of legal requirements can feel overwhelming before you even hammer your first nail. If you are asking yourself, “What license do you need to start a roofing company,” you are not alone; this is the most critical first step to ensuring your business survives its first year.

    In the United States, there is no single “national” roofing license. Instead, regulations vary wildly from state to state, and sometimes even from city to city. This guide will break down exactly what you need to know to operate legally, avoid hefty fines, and build trust with your clients.

    Why Licensing Matters More Than You Think

    Many new entrepreneurs view licensing as just another hoop to jump through. In reality, it is your primary shield against liability and your strongest marketing tool.

    According to recent industry data, unlicensed contractors face significantly higher risks of litigation and bankruptcy. A proper license signals to homeowners that you are vetted, insured, and committed to professional standards. Without it, you may be barred from pulling necessary building permits, which means any major repair or replacement job you touch could be deemed illegal work.

    Furthermore, most reputable suppliers will not sell materials to unlicensed entities, and insurance carriers often refuse coverage. Simply put, licensing is the foundation of credibility.

    Does Every State Require a Roofing License?

    The short answer is: almost everywhere, but the type of license differs.

    In some states, roofing falls under a specialized trade license. In others, it is bundled under a General Contractor license. A few states have no state-level requirement, leaving regulation entirely to local municipalities.

    The Three Tiers of Regulation

    1. State-Level Licensing: States like Florida, Texas, and California require strict state-issued licenses. These often involve rigorous exams, proof of experience, and financial stability checks.
    2. Local/Municipal Licensing: In states like New York or Illinois, the state may not issue a specific roofing license, but cities like Chicago or New York City have their own stringent home improvement contractor licenses.
    3. Registration Only: Some states only require you to register your business entity and carry insurance, without passing a trade exam.

    To understand the historical context of construction regulation in the US, you can refer to this overview on Wikipedia, which details how contractor laws evolved to protect consumers from substandard work.

    What License Do You Need To Start A Roofing Company

    Common Requirements Across the Board

    While specific rules change depending on your zip code, several core requirements remain consistent across most jurisdictions. Preparing these documents early will speed up your application process.

    1. Proof of Experience

    Most licensing boards want to ensure you know what you are doing. Typically, you must provide:

    • 2–5 years of verifiable experience in roofing.
    • Letters of recommendation from previous employers or licensed contractors.
    • Documentation of completed projects (photos, invoices, or contracts).

    2. Passing a Trade Exam

    You will likely need to pass two exams:

    • Business and Law Exam: Covers contract law, lien rights, payroll taxes, and safety regulations.
    • Trade Knowledge Exam: Tests your understanding of roofing materials, installation techniques, ventilation, and local building codes.

    3. Financial Stability

    Licensing boards want to know you won’t go bankrupt mid-job. You may need to submit:

    • A credit report.
    • Proof of net worth (often ranging from $10,000 to $50,000 depending on the state).
    • A surety bond.

    4. Insurance Coverage

    This is non-negotiable. You generally need:

    • General Liability Insurance: Protects against property damage or injury claims.
    • Workers’ Compensation: Required if you have employees.

    Step-by-Step Guide to Getting Licensed

    If you are ready to take the plunge, follow this logical roadmap to secure your credentials.

    Step 1: Determine Your Jurisdiction

    Do not assume your state’s rules apply to your city. Contact your local County Clerk or State Construction Industry Licensing Board. Ask specifically: “Is roofing a separate trade license, or does it fall under general contracting?”

    Step 2: Register Your Business Entity

    Before applying for a license, you must have a legal business structure.

    • Choose between an LLC (Limited Liability Company) or Corporation. An LLC is often recommended for small roofing businesses due to its liability protection and tax flexibility.
    • Obtain your EIN (Employer Identification Number) from the IRS.

    Step 3: Gather Documentation

    Collect your proof of experience, financial statements, and insurance certificates. If you lack personal experience, consider hiring a qualifying agent—a licensed individual who meets the experience requirements and acts as the technical expert for your company.

    Step 4: Study and Take Exams

    Enroll in a prep course. Many community colleges and private organizations offer courses specifically for contractor licensing exams. Do not underestimate the Business and Law portion; many skilled roofers fail because they overlook the legal aspects of running a business.

    Step 5: Submit Application and Pay Fees

    Application fees vary widely, from $100 in some rural counties to over $500 in major states. Processing times can take anywhere from 2 weeks to 3 months. Plan your launch date accordingly.

    Step 6: Secure Your Surety Bond

    A surety bond is not insurance; it is a guarantee that you will comply with laws. If you violate regulations, a claim can be made against your bond. Costs typically range from 1% to 5% of the bond amount annually, depending on your credit score.

    State-Specific Examples: A Quick Comparison

    To illustrate the variance, here is how three major states handle roofing licenses:

    StateLicense TypeKey RequirementExam Required?
    FloridaCertified Roofing Contractor4 years experience + financial stabilityYes (State Level)
    TexasNo State LicenseLocal city registration (e.g., Houston, Dallas)Varies by City
    CaliforniaC-39 Roofing Contractor$15,000 Contractor Bond + ExperienceYes (Law & Trade)

    Note: Always verify current requirements with your local licensing board, as laws change frequently.

    Common Mistakes to Avoid

    Even with the best intentions, new owners make costly errors. Here are the top pitfalls:

    • Working Under Someone Else’s License: This is illegal in most states and puts both parties at risk of losing their licenses and facing fines.
    • Ignoring Renewal Dates: Licenses expire annually or biennially. Missing a renewal can result in late fees or automatic cancellation.
    • Underestimating Insurance Needs: Standard liability may not cover high-altitude work risks. Ensure your policy explicitly covers roofing operations.

    FAQ Section

    1. Can I start a roofing company without a license?

    In very few jurisdictions, you can perform minor repairs without a license. However, for full replacements or new installations, operating without a license is illegal in most of the US. It exposes you to massive fines, inability to sue for non-payment, and potential criminal charges.

    2. How much does a roofing license cost?

    Costs vary significantly. Expect to pay between $200 and $1,000 for application and exam fees. Additionally, you must budget for insurance ($1,000–$5,000/year) and surety bonds ($500–$2,000/year).

    3. Do I need a general contractor license to do roofing?

    It depends on the state. In some places, a specialized roofing license is sufficient. In others, you must hold a General Contractor license to pull permits for structural work. Check your local building department’s requirements.

    4. How long does it take to get a roofing license?

    From preparation to issuance, it typically takes 3 to 6 months. This includes study time, exam scheduling, and background check processing. Start this process well before you plan to bid on your first job.

    5. What happens if I work without a license?

    Penalties include cease-and-desist orders, heavy fines (often thousands of dollars), and being barred from obtaining a license in the future. You may also be unable to enforce contracts, meaning clients can refuse to pay you legally.

    Conclusion

    Understanding what license do you need to start a roofing company is the difference between a fleeting side hustle and a sustainable, reputable business. While the process requires time, money, and effort, the payoff is immense: legal protection, customer trust, and access to better jobs.

    Don’t let the paperwork discourage you. View it as your first investment in your brand’s integrity. Once licensed, you join the ranks of professionals who build the shelters that keep families safe.

    Ready to take the next step? Share this guide with your fellow aspiring contractors on LinkedIn or Facebook, and let’s build a community of compliant, successful roofing professionals!