Transporting your kayak can feel daunting, especially if you are worried about damaging your vehicle or losing your expensive gear on the highway. You want peace of mind knowing your vessel is secure, but conflicting advice online often leads to confusion and anxiety. Finding the best way to strap a kayak to a roof rack is essential for both safety and the longevity of your equipment.
In this comprehensive guide, we will walk you through the exact methods used by professionals and seasoned paddlers. We will cover everything from choosing the right straps to tightening them with precision, ensuring your next adventure starts before you even hit the water.
Why Proper Strapping Techniques Matter
Before diving into the “how-to,” it is crucial to understand the “why.” Improperly secured kayaks are not just an inconvenience; they are a significant road hazard. According to data from the National Highway Traffic Safety Administration (NHTSA), unsecured loads contribute to thousands of accidents annually in the United States.
When a kayak shifts during transit, it creates uneven wind resistance, which can destabilize your vehicle at high speeds. More importantly, excessive movement can crack the hull of your kayak or scratch your car’s paint. By mastering the correct strapping technique, you protect your investment and ensure the safety of everyone on the road.
Choosing the Right Equipment for the Job
Not all straps are created equal. Using the wrong gear is the most common mistake beginners make. Here is what you need:
1. Cam Buckle Straps vs. Ratchet Straps
- Cam Buckle Straps: These are the gold standard for kayaking. They allow you to tighten the strap manually without the risk of over-tightening. Over-tightening can warp the shape of your kayak, especially plastic rotomolded ones.
- Ratchet Straps: Avoid these unless absolutely necessary. The mechanical advantage of a ratchet makes it very easy to crush your kayak’s hull. If you must use them, exercise extreme caution.
2. Quality Matters
Look for straps made from UV-resistant polyester. Cheap nylon straps stretch when wet or under tension, which can loosen your load mid-drive. Aim for straps with a breaking strength of at least 1,500 lbs, though you will never apply that much force.
3. Bow and Stern Lines
Straps hold the kayak down, but bow and stern lines prevent it from sliding forward or backward. These are non-negotiable for highway driving.
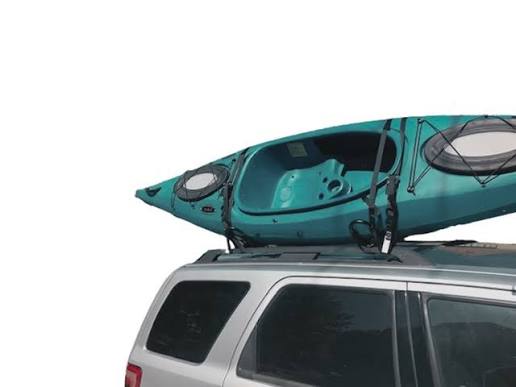
Step-by-Step Guide: The Best Way To Strap A Kayak To A Roof Rack
Follow these precise steps to ensure a secure fit. This method works for most single-person kayaks on crossbar roof racks.
Step 1: Positioning the Kayak
Place the kayak upside down (hull up) on the roof rack. This position is more aerodynamic and prevents water from pooling in the cockpit. Center the kayak so that the weight is evenly distributed between the front and rear crossbars.
- Tip: If you have a partner, lift together using your legs, not your back. If alone, use a loading assist tool or slide the kayak up from the rear bumper carefully.
Step 2: Attaching the Main Straps
Take your cam buckle straps. Thread the strap through the cam buckle and place the buckle on the side of the kayak, away from the door frame, to avoid scratching your car when opening doors.
- Loop the strap over the crossbar and under the kayak hull.
- Bring the strap back up over the other side of the crossbar.
- Feed the end through the cam buckle.
Crucial Detail: Ensure the strap passes under the crossbar, not just resting on top. This prevents the kayak from sliding sideways.
Step 3: Tightening Correctly
Pull the loose end of the strap to remove slack. Then, press down on the cam lever to lock it.
- The “Hand-Tight” Rule: The strap should be tight enough that you cannot twist it more than a quarter turn with your fingers. It should not be drum-tight. If you see the kayak hull deforming or indenting, you have gone too far. Loosen it slightly.
Step 4: Securing Bow and Stern Lines
Attach one end of the bow line to the handle or secure point on the front of the kayak. Attach the other end to a sturdy anchor point on your vehicle’s front bumper or tow hook. Repeat this process for the stern (rear) of the kayak.
- Note: Do not attach these to plastic trim pieces or weak parts of the bumper. Use metal anchor points only. These lines should have slight tension but not pull the kayak down aggressively.
Common Mistakes to Avoid
Even experienced paddlers can slip up. Here are the most frequent errors:
| Mistake | Consequence | Solution |
|---|---|---|
| Over-tightening | Cracked hull, warped shape | Use cam buckles; stop when snug. |
| Ignoring Wind Direction | Increased drag, noise | Place kayak hull-up for aerodynamics. |
| No Bow/Stern Lines | Kayak slides off during braking | Always use front and rear tie-downs. |
| Straps Touching Paint | Scratches and swirl marks | Place a towel under strap contact points. |
Understanding Wind Resistance and Aerodynamics
Did you know that a poorly strapped kayak can increase your fuel consumption by up to 15%? Aerodynamics play a huge role in transport efficiency. When you strap a kayak hull-up, you create a smoother surface that cuts through the air.
If you must transport a kayak right-side up (cockpit up), ensure all hatches are closed tightly. However, this position catches more wind and can cause the kayak to act like a sail, putting immense stress on your straps. For the best way to strap a kayak to a roof rack, always prioritize the hull-up orientation unless specific rack designs dictate otherwise.
For more detailed information on vehicle aerodynamics and load impact, you can refer to general physics principles outlined on Wikipedia.
Maintenance Checks During Your Trip
Security is not a “set it and forget it” task. Vibrations from the road can loosen straps over time.
- First Stop: After driving for 15–20 minutes, pull over safely. Check all straps. It is normal for them to settle and loosen slightly. Retighten if necessary.
- Regular Intervals: Check your straps every time you stop for gas or restrooms.
- Post-Trip Inspection: Inspect your straps for fraying or wear after each use. Replace them if you see any signs of damage.
FAQ Section
1. Can I use bungee cords instead of straps?
No. Bungee cords stretch and bounce, which means they cannot provide the consistent tension needed to keep a heavy kayak secure. They are suitable for light accessories like paddle holders but never for securing the main vessel.
2. How many straps do I need for one kayak?
You need a minimum of two main straps (one for each crossbar) and two additional lines for the bow and stern. Total: four attachment points. For longer kayaks (over 14 feet), consider adding a third crossbar or extra support.
3. Is it safe to leave my kayak on the roof overnight?
While possible, it is not recommended. Overnight dew can make straps slippery, and temperature changes can affect tension. Additionally, it poses a theft risk. If you must, use a cable lock through the kayak and around the rack for security.
4. What if my car doesn’t have roof rack crossbars?
You can use soft rack systems (foam blocks with straps) that sit directly on the roof. However, these are less stable and suitable only for short distances and low speeds. For regular transport, installing proper crossbars is the safest investment.
5. How do I prevent the straps from flapping in the wind?
Excess strap length creates noise and drag. Once tightened, roll up the excess strap and secure it with a rubber band or velcro tie. Some high-end straps come with built-in keepers for this purpose.
Conclusion
Mastering the best way to strap a kayak to a roof rack is a skill that pays off in safety, equipment longevity, and peace of mind. By using the right equipment—specifically cam buckle straps—and following the hand-tight rule, you can transport your kayak confidently across any distance. Remember to always use bow and stern lines, check your tension after the first few miles, and prioritize aerodynamics.
Your next adventure awaits, and now you’re ready to hit the road as safely as you hit the water. If you found this guide helpful, please share it with your fellow paddlers on social media. Safe travels and happy paddling!
Leave a Reply