Have you ever stared at your home’s silhouette, wondering just how much material you’d need for a replacement or repair? It is a common dilemma for homeowners, as guessing wrong can lead to wasted money on excess materials or dangerous delays due to shortages. Knowing how do you measure the square footage of a roof is the critical first step in any roofing project, ensuring you budget correctly and hire contractors with confidence.
Why Accurate Roof Measurement Matters
Before we dive into the tape measures and calculators, it is vital to understand why precision is non-negotiable. Roofing materials are not cheap. Asphalt shingles, metal panels, and clay tiles are typically sold by the “square,” a roofing term equal to 100 square feet.
If you underestimate your roof’s size by even 10%, you might face mid-project price hikes for additional materials. Overestimating leads to waste, which is both financially inefficient and environmentally unfriendly. Furthermore, accurate measurements provide leverage when negotiating with contractors. If you know your roof’s approximate size, you can spot inflated quotes immediately.
According to industry standards, a precise measurement also helps in calculating the correct load-bearing requirements for your home’s structure, especially if you are switching from lightweight asphalt to heavier slate or tile.
Ground-Level Measurement: The Safer Alternative
Climbing onto a roof can be dangerous, especially for those without proper safety gear or experience. Fortunately, you can get a remarkably accurate estimate from the ground. This method relies on geometry and basic observations of your home’s footprint.
Step 1: Measure Your Home’s Footprint
Start by measuring the length and width of your house from the ground. If your home is a simple rectangle, this is straightforward. Multiply the length by the width to get the base area.
- Example: A house that is 40 feet long and 30 feet wide has a footprint of 1,200 square feet.
Step 2: Account for Overhangs
Roofs rarely end exactly at the exterior walls. Most roofs have eaves or overhangs that extend beyond the siding. Add approximately 1–2 feet to each side of your length and width measurements to account for this.
Step 3: Determine the Roof Pitch
This is where many DIYers make mistakes. A flat roof has the same square footage as its footprint. However, most US homes have sloped roofs. The steeper the pitch, the more surface area there is.
You can estimate the pitch by looking at the gable end of your house or using a level and tape measure in the attic. Pitch is expressed as a ratio, such as 4/12, meaning the roof rises 4 inches for every 12 inches of horizontal run.
Step 4: Apply the Pitch Multiplier
Once you have the pitch, use a multiplier to adjust your base area. Here is a quick reference table for common pitches:
| Roof Pitch | Multiplier | Complexity Level |
|---|---|---|
| 3/12 | 1.03 | Low |
| 4/12 | 1.06 | Low-Medium |
| 6/12 | 1.12 | Medium |
| 8/12 | 1.20 | High |
| 12/12 | 1.42 | Very High |
Calculation Example: If your adjusted footprint is 1,250 sq ft and your pitch is 6/12: 1,250 sq ft×1.12=1,400 sq ft
This method provides a solid estimate for simple roof structures. For complex roofs with multiple valleys, dormers, and turrets, this method may understate the actual area.
On-Roof Measurement: The Precise Method
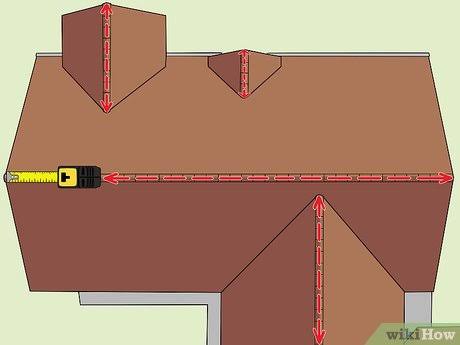
If you are comfortable working at heights and have the necessary safety equipment—such as a harness, non-slip shoes, and a stable ladder—you can measure the roof directly. This method yields the highest accuracy.
Safety Warning: Never walk on a wet, icy, or moss-covered roof. Always have a spotter on the ground.
Step 1: Break Down the Roof into Planes
Visualize your roof as a collection of simple geometric shapes, primarily rectangles and triangles. Ignore the small details like vents for now; focus on the large planes.
Step 2: Measure Each Plane
Use a long tape measure (at least 25–50 feet).
- Measure the Length: Run the tape along the ridge or the eave.
- Measure the Width: Run the tape from the eave to the ridge (the slope distance, not the horizontal run).
Repeat this for every distinct section of the roof.
Step 3: Calculate Individual Areas
For rectangular sections, multiply length by width. For triangular sections (like gables), use the formula: Area=2Base×Height
Sum up the areas of all sections to get the total square footage.
Step 4: Add Waste Factor
Even with precise measurements, you will lose material to cuts and overlaps. Industry experts recommend adding a waste factor:
- Simple Roofs: Add 10%
- Complex Roofs: Add 15–20%
If your calculated area is 1,400 sq ft, adding 10% waste brings you to 1,540 sq ft. Since roofing is sold in squares (100 sq ft), you would order 16 squares.
Understanding Complex Roof Features
Not all roofs are simple gables. Modern architecture and historic homes often feature complex elements that drastically change the surface area.
Dormers and Valleys
A dormer is a window structure that projects vertically from a sloping roof. While it adds living space, it adds significant roofing surface area. You must measure the sides and top of the dormer separately and add them to your total.
Valleys, where two roof slopes meet, require extra attention. They often need wider metal flashing and careful shingle weaving, which increases material usage. When measuring, ensure you capture the full width of the valley area.
Chimneys and Skylights
While these features subtract from the shingled area, the amount is usually negligible compared to the waste generated by cutting around them. It is generally safer to ignore their subtraction and let the waste factor cover the loss. However, you will need specific flashing materials for these penetrations, which should be quoted separately.
Digital Tools and Satellite Technology
In the modern era, you don’t always need a ladder. Several digital tools can help you answer how do you measure the square footage of a roof with high precision.
Satellite Imagery Services
Companies like Google Earth allow you to trace roof lines manually. While free, this method requires you to know the exact scale and can be tricky with tree cover.
Professional Roofing Software
Contractors often use software such as EagleView or Hover. These platforms use aerial imagery and AI to generate 3D models of your roof. They can detect pitch, obstacles, and square footage with near-perfect accuracy. Some of these services offer reports for a fee, which can be worth the cost if you are planning a major renovation and want an unbiased third-party measurement.
For a deeper understanding of how building dimensions are standardized, you can refer to general construction principles outlined on Wikipedia.
Common Mistakes to Avoid
Even with the best intentions, errors happen. Here are the most frequent pitfalls:
- Ignoring the Pitch: Treating a steep roof as flat is the number one cause of material shortage. Always apply the multiplier.
- Measuring Only the Floor Plan: Your interior square footage is irrelevant to your roof size. A two-story house has the same roof footprint as a one-story house of the same width and length, but the roof area depends on the pitch, not the number of floors.
- Forgetting Waste: Buying exactly the calculated amount leaves no room for error. Broken shingles and mis-cuts are inevitable.
- Misidentifying Squares: Remember, 1 roofing square = 100 sq ft, not a 10×10 foot physical square on the roof. It is a unit of area, not shape.
FAQ Section
1. What is the difference between roof square footage and home square footage?
Home square footage refers to the livable interior space, measured from the exterior walls on the ground floor. Roof square footage is the total surface area of the roofing material, which includes slopes, overhangs, and multiple levels. The roof area is almost always larger than the home’s footprint due to pitch and overhangs.
2. How many squares of shingles do I need for a 2,000 sq ft roof?
First, clarify if 2,000 sq ft is the footprint or the actual roof area. If it is the actual sloped area, divide by 100. You need 20 squares. However, always add 10–15% for waste. So, for a 2,000 sq ft roof, you should buy 22–23 squares of shingles.
3. Can I measure my roof from the inside?
Yes, partially. You can measure the attic floor to get the footprint dimensions. You can also measure the rise and run of the rafters to determine the pitch. However, you cannot measure overhangs or complex external features like dormers from the inside, so this method should be combined with exterior observations.
4. Does the type of shingle affect the measurement?
No, the square footage remains the same regardless of material. However, different materials have different coverage per bundle. Asphalt shingles typically cover 33.3 sq ft per bundle (3 bundles per square), while metal panels vary by profile. Always check the manufacturer’s specifications for coverage rates.
5. Is it better to hire a professional for measurement?
If your roof is simple (low pitch, few valleys), DIY measurement is feasible. For steep, multi-level, or historic roofs, hiring a professional is recommended. They have the safety gear, experience, and insurance to handle the job. Plus, their measurements are often required for warranty validation.
Conclusion
Learning how do you measure the square footage of a roof empowers you to take control of your home maintenance projects. Whether you choose the ground-level estimation method or the precise on-roof approach, the key is consistency and accounting for pitch and waste. By avoiding common mistakes and utilizing the right tools, you can ensure your roofing project stays on budget and on schedule.
Accurate measurement is the foundation of a durable roof. Don’t let guesswork compromise your home’s protection. If you found this guide helpful, please share it with friends or family who might be planning their own roofing upgrades. Knowledge is the best tool in your DIY toolkit!
Leave a Reply