Have you ever woken up to a nasty surprise: a wet ceiling or stained walls after a heavy winter storm? It is a homeowner’s nightmare, often caused by ice dams forcing water under your shingles. Understanding exactly where does ice and water barrier go on a roof is the single most effective step you can take to prevent this costly damage and keep your home dry.
Why Placement Matters More Than You Think
Many homeowners assume that roofing underlayment is a one-size-fits-all solution. However, ice and water shield is a specialized product designed for high-risk areas. Unlike standard felt paper, this self-adhering membrane creates a watertight seal around nails and overlaps.
If placed incorrectly, it fails to perform its primary duty: stopping water intrusion. According to building science principles, water doesn’t just fall down; it moves laterally and upward due to capillary action and wind pressure. Therefore, strategic placement is not just a recommendation—it is a necessity for structural integrity.
The Critical Zones: Exactly Where It Goes
To answer the core question directly, the ice and water barrier must be installed in specific “vulnerable zones” of your roof system. These are areas where water is most likely to back up or accumulate.
1. The Eaves (The Most Important Area)
The eaves are the lower edge of the roof that overhangs the walls. This is the number one spot for ice dam formation.
- Why here? Heat escaping from your attic melts snow on the upper roof. The water runs down until it hits the cold eaves, where it refreezes. This ice buildup blocks subsequent meltwater, forcing it under the shingles.
- Placement Rule: The barrier should start at the very edge of the roof deck (flush with the fascia) and extend up the roof slope.
2. Roof Valleys
Valleys are where two roof planes meet, forming a V-shape. They channel a massive volume of water and debris.
- Why here? Debris like leaves and pine needles often accumulates in valleys, slowing water drainage. During freezing temps, this trapped moisture turns to ice, creating a dam effect even without snow accumulation on the rest of the roof.
- Placement Rule: The barrier should run the entire length of the valley, extending at least 12 inches beyond the centerline on both sides.
3. Around Roof Penetrations
Any object that pierces the roof deck is a potential leak point.
- Includes: Chimneys, skylights, vent pipes, and dormer walls.
- Placement Rule: Use individual patches or strips of ice and water shield around the base of these structures before installing flashing. This creates a secondary layer of defense if the primary flashing fails.
4. Rakes and Edges (Optional but Recommended)
While not always required by code, extending the barrier to the rake edges (the sloped sides of the roof) provides extra protection against wind-driven rain.
How Far Up Should It Extend? The Code Requirements
One of the most common questions we receive is about the vertical distance. You cannot simply guess this measurement.
In the United States, the International Residential Code (IRC) sets the standard. Most local building codes adopt the IRC with minor modifications.
| Climate Zone | Minimum Extension Requirement |
|---|---|
| Cold Climates | At least 24 inches inside the exterior wall line |
| Moderate Climates | Often 12–24 inches, depending on local amendments |
| High Snow Load Areas | May require full coverage or extended width |
Key Takeaway: Measure from the inside face of your exterior wall, not just the edge of the roof. If your roof has a wide overhang, you need to account for that distance. For example, if you have a 2-foot overhang and the code requires 24 inches inside the wall, your barrier needs to cover the entire overhang plus 2 feet up the roof deck.
Expert Insight: According to data from the Insurance Institute for Business & Home Safety, proper installation of ice and water shields can reduce the risk of interior water damage by up to 90% in regions prone to freeze-thaw cycles.
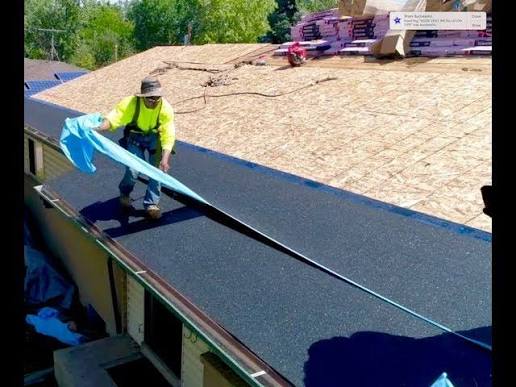
Step-by-Step Installation Guide
If you are a DIY enthusiast or want to verify your contractor’s work, follow these concrete steps. Precision is key.
- Prepare the Deck: Ensure the roof deck is clean, dry, and free of protruding nails. Sweep away all dust and debris.
- Check Temperature: Ice and water barriers adhere best when the temperature is between 40°F and 80°F (4°C–27°C). If it is colder, use a propane torch to gently warm the adhesive side (do not burn it) or store the rolls in a warm room before installation.
- Start at the Edge: Align the bottom edge of the membrane with the roof edge. Do not let it hang over the drip edge yet; it should sit flat on the deck.
- Roll and Press: Unroll the first strip. Use a J-roller or a hand roller to apply firm pressure. Focus on the edges and the center. Do not skip this step. Poor adhesion leads to wind uplift.
- Overlap Correctly:
- Side Laps: Overlap adjacent sheets by at least 2 inches.
- End Laps: Overlap the ends of rolls by at least 6 inches.
- Seal the Edges: Some manufacturers recommend applying roofing cement along the top edge of the barrier where it meets the next layer of underlayment to prevent wind-driven rain from getting underneath.
Ice and Water Shield vs. Traditional Felt: A Comparison
Why not just use cheaper asphalt-saturated felt? Here is a quick breakdown.
- Adhesion: Ice and water shield sticks to the deck; felt lies loose.
- Self-Sealing: The shield seals around nail holes; felt does not.
- Water Resistance: The shield is impermeable; felt is water-resistant but can wick moisture over time.
- Cost: Shield is 2–3x more expensive per square foot.
Verdict: Use felt for the main field of the roof in mild climates. Use ice and water shield for the critical zones mentioned above, regardless of climate. In severe cold zones, many experts now recommend covering the entire roof deck with ice and water shield for maximum peace of mind.
Common Mistakes to Avoid
Even professionals make errors. Watch out for these pitfalls:
- Installing Over Wet Wood: Never install the barrier on damp plywood. Trapped moisture will rot the deck from the inside out.
- Ignoring Manufacturer Instructions: Each brand has specific temperature and overlap requirements. Read the label.
- Wrapping Over the Drip Edge Incorrectly: There is debate on whether to go over or under the metal drip edge. Most modern guidelines suggest placing the barrier over the drip edge at the eaves to ensure water flows into the gutter, but check your local code.
- Leaving Gaps: Any gap between sheets is a failure point. Ensure tight overlaps.
Frequently Asked Questions (FAQ)
1. Can I install ice and water barrier in the rain?
No. The surface must be completely dry for the adhesive to bond properly. Installing it on wet wood will trap moisture and void the warranty.
2. Does ice and water shield replace flashing?
No. It is a secondary line of defense. You must still install proper metal flashing around chimneys, vents, and valleys. The shield works with the flashing, not instead of it.
3. How long does ice and water barrier last?
It is designed to last as long as the roof itself, typically 20–30 years. However, if exposed to UV light (because shingles blew off), it can degrade within months. Always cover it with shingles promptly.
4. Is it required by law?
In most northern US states and Canadian provinces, yes. Building codes mandate its use in eaves and valleys. Check with your local building department for specific requirements in your area.
5. Can I put it over existing shingles?
No. It must be installed directly onto the roof deck (plywood or OSB). Installing it over old shingles will create an uneven surface, leading to premature shingle failure and poor adhesion.
6. What is the difference between synthetic underlayment and ice and water shield?
Synthetic underlayment is tough and slip-resistant but is not self-adhering or self-sealing. Ice and water shield is a rubberized asphalt membrane that sticks to the deck and seals around nails. They serve different purposes.
Conclusion
Knowing where does ice and water barrier go on a roof is essential for protecting your biggest investment. By focusing on the eaves, valleys, and penetrations, you create a robust defense against ice dams and wind-driven rain. Remember, the goal is not just to meet code, but to ensure your home remains dry and safe for decades.
Don’t wait for the next storm to test your roof’s resilience. If you are planning a roof replacement or repair, insist on high-quality ice and water shield in the critical zones.
Found this guide helpful? Share it with your neighbors on Facebook or Pinterest to help them protect their homes too! A dry home is a happy home.
Leave a Reply