Blog

  • Fix Mobile Home Roof Leaks Fast

    Fix Mobile Home Roof Leaks Fast

    Water stains on your ceiling are more than just an eyesore; they are a warning sign that your sanctuary is compromised. For mobile homeowners, ignoring even a small drip can lead to costly structural damage and mold issues within days. If you are wondering how to repair a roof leak on a mobile home, you have come to the right place for a clear, actionable solution.

    Mobile homes, also known as manufactured houses, have unique roofing systems that differ significantly from traditional stick-built houses. Their roofs are often flatter, making them prone to pooling water, and the materials used—typically metal or rubberized coatings—require specific care. This guide will walk you through identifying the source of the leak, choosing the right materials, and executing a durable repair that stands up to the elements.

    Why Do Mobile Home Roofs Leak More Often?

    Before diving into the repair process, it is crucial to understand why these leaks happen. Mobile home roofs are designed to be lightweight, which sometimes means they lack the robust drainage slopes found in conventional housing. According to industry data, thermal expansion and contraction play a massive role in roof degradation. As the temperature fluctuates between day and night, the metal panels or rubber membranes expand and shrink. Over time, this movement weakens sealants and loosens fasteners.

    Furthermore, many mobile homes are situated in areas prone to high winds or heavy snow loads. The vibration from wind can gradually back out screws, creating tiny entry points for water. Understanding these mechanics helps you not only fix the current leak but also prevent future ones. It is not just about patching a hole; it is about reinforcing the integrity of your home’s shield against weather.

    How to Identify the Source of the Leak

    Finding the exact spot where water enters is often the most challenging part of the repair. Water is tricky; it can travel along beams or insulation before dripping onto your ceiling. Therefore, the stain on your ceiling is rarely directly below the leak on the roof.

    Step 1: Interior Inspection

    Start inside your home. Look for discoloration, bubbling paint, or soft spots on the ceiling. Use a flashlight to trace the moisture trail upward toward the attic or crawl space above the ceiling. If you have access to the roof cavity, look for wet insulation or dark streaks on the wooden trusses.

    Step 2: Exterior Examination

    Once you have a general idea of the area, climb onto the roof. Safety first: Ensure the roof is dry and use a sturdy ladder with a spotter. Look for common failure points:

    • Loose or missing screws: These are the most common culprits.
    • Cracked sealant: Check around vents, skylights, and air conditioning units.
    • Ponding water: Areas where water sits for more than 48 hours can degrade the roofing material faster.
    • Rust spots: On metal roofs, look for orange-brown discoloration.

    For a more precise detection method, some professionals use a garden hose to simulate rain while a partner watches inside for drips. Start low on the roof and work your way up, section by section, to isolate the entry point.

    What Materials Do You Need for a Durable Repair?

    Using the wrong materials can void warranties or cause further damage. For mobile homes, flexibility is key. You need products that can move with the house without cracking.

    Material TypeBest ForProsCons
    Elastomeric CoatingLarge areas, flat roofsReflects heat, flexible, long-lastingHigher upfront cost, requires clean surface
    Roofing Cement & MeshSmall holes, seamsCheap, easy to applyCan become brittle over time
    Butyl TapeScrew heads, seamsExcellent adhesion, waterproofHarder to remove if mistakes are made
    Self-Adhering PatchEmergency fixesQuick applicationNot a permanent solution for large tears

    For most DIYers, a combination of butyl tape for screw heads and an elastomeric roof coating for broader protection offers the best balance of cost and longevity. Always check the manufacturer’s specifications to ensure compatibility with your existing roof material (metal, EPDM rubber, or TPO).
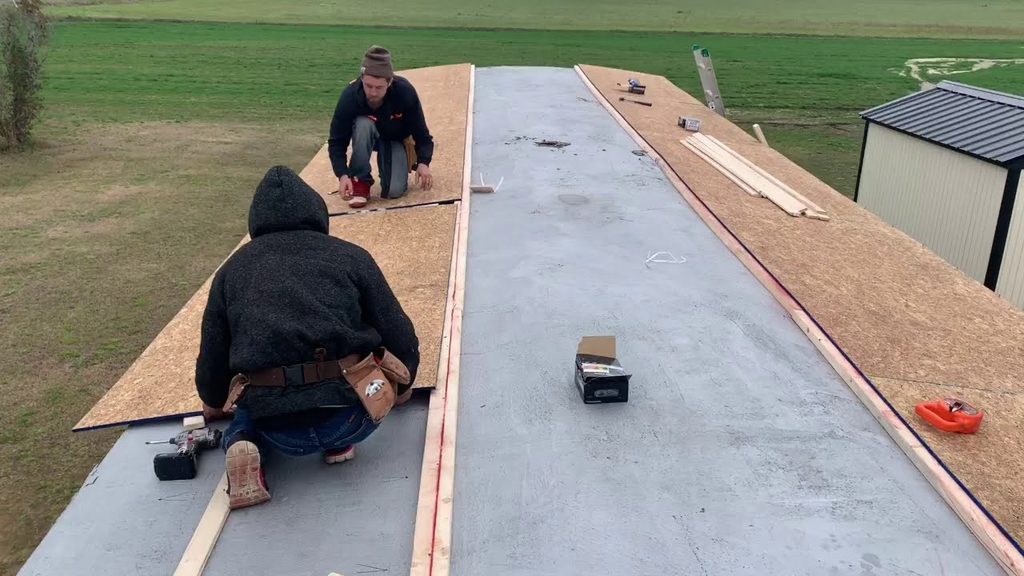
    How To Repair A Roof Leak On A Mobile Home

    Step-by-Step Guide: How to Repair a Roof Leak on a Mobile Home

    Now, let’s get to work. Follow these steps carefully to ensure a watertight seal.

    Step 1: Clean the Area Thoroughly

    You cannot seal dirt. Use a stiff brush to remove debris, leaves, and loose rust. Then, wash the area with a mixture of mild detergent and water. Rinse thoroughly and let it dry completely. Moisture trapped under a patch will lead to mold and failure. For metal roofs, use a wire brush to remove any flaking rust until you reach solid metal.

    Step 2: Tighten or Replace Fasteners

    Check all screws in the vicinity of the leak. If they are loose, tighten them using a drill with a rubber-washer head screw. Do not overtighten, as this can strip the hole or crack the washer. If a screw is rusted through, remove it and replace it with a new, longer screw designed for metal roofing. Apply a dab of roofing cement under the washer before driving it in for extra security.

    Step 3: Apply Sealant to Seams and Vents

    Inspect the seams where roof panels overlap. If the old caulking is cracked or peeling, scrape it out. Apply a high-quality, UV-resistant polyurethane sealant. Smooth it out with a putty knife to ensure there are no air bubbles. Pay special attention to penetrations like vent pipes and AC units. These are high-vibration areas where seals fail frequently.

    Step 4: Patch Holes and Cracks

    For small holes or cracks, apply a layer of roofing cement. Embed a piece of fiberglass mesh into the wet cement, then cover it with another layer of cement. This creates a reinforced patch that can withstand thermal movement. For larger damages on metal roofs, you may need to cut a piece of matching metal, shape it to fit, and secure it with screws and sealant.

    Step 5: Coat the Entire Roof (Optional but Recommended)

    If your roof is older, consider applying a full coat of elastomeric roof coating. This liquid-applied membrane bridges small cracks and reflects sunlight, reducing the thermal stress on your roof. Use a roller for large areas and a brush for edges. Apply two thin coats rather than one thick coat for better adhesion and drying.

    When Should You Call a Professional?

    While many leaks are DIY-friendly, some situations require expert intervention. If you notice sagging rooflines, extensive rot in the wooden structure, or if the leak persists after your repair attempts, it is time to call a pro. Additionally, if your roof is steep or you are uncomfortable working at heights, do not risk injury.

    According to the Federal Housing Administration, maintaining the structural integrity of manufactured housing is critical for safety and resale value. Professional roofers have the tools to assess hidden damage that might not be visible from the surface.

    Frequently Asked Questions

    How much does it cost to repair a mobile home roof?

    The cost varies widely based on the extent of the damage. A simple DIY patch using sealant and tape may cost under $50. However, hiring a professional to reseal seams or replace sections can range from $300 to $1,500. A full roof replacement typically costs between $3,000 and $8,000 depending on size and materials.

    Can I use regular tar paper for my mobile home roof?

    No, traditional tar paper is not recommended for mobile homes. It lacks the flexibility needed to handle the thermal expansion and contraction of lightweight structures. It can crack and peel quickly, leading to more leaks. Always use materials specifically designed for metal or rubber mobile home roofs.

    How often should I inspect my mobile home roof?

    You should inspect your roof at least twice a year: once in the spring to check for winter damage and once in the fall to prepare for winter storms. Additionally, perform a quick visual check after any severe weather event, such as hail or high winds.

    Is it better to patch or replace the roof?

    If the roof is less than 15 years old and the damage is localized, patching is cost-effective. However, if the roof is older, has multiple leaks, or shows signs of widespread rust or deterioration, replacement is the better long-term investment. Frequent patches can add weight and mask underlying structural issues.

    What is the best sealant for mobile home roofs?

    Polyurethane-based sealants and butyl rubber tapes are generally considered the best options. They remain flexible in extreme temperatures and adhere well to metal and rubber surfaces. Avoid silicone-based sealants for large areas, as they can be difficult to paint over and may not adhere well to certain roofing coatings.

    Conclusion

    Learning how to repair a roof leak on a mobile home empowers you to protect your investment and maintain a safe, dry living environment. By understanding the unique needs of manufactured housing roofs—such as the importance of flexibility and regular maintenance—you can tackle minor repairs with confidence. Remember, the key to longevity is not just the repair itself, but the prevention of future issues through regular inspections and proper material selection.

    Don’t wait for a small drip to become a major disaster. Gather your tools, follow these steps, and secure your home against the elements. If you found this guide helpful, please share it with fellow mobile home owners on social media. Together, we can help everyone keep their homes safe and sound.

  • New Roof Insurance Savings: What to Expect

    New Roof Insurance Savings: What to Expect

    Replacing a roof is one of the most significant investments a homeowner can make. It is not just about protecting your family from the elements; it is also a strategic financial move that can lower your ongoing housing costs. Many homeowners are surprised to learn that how much does a new roof save on homeowners insurance can vary significantly, often resulting in substantial annual premium reductions.

    If you are staring at an aging roof or dealing with recent storm damage, understanding the insurance implications is crucial. This guide will walk you through the potential savings, the factors that influence them, and how to maximize your return on investment when upgrading your home’s primary defense system.

    Why Do Insurance Companies Offer Discounts for New Roofs?

    To understand the savings, you must first understand the insurer’s perspective. Insurance companies operate on risk assessment. An old roof is a liability; a new roof is an asset.

    Reducing the Risk of Claims

    Older roofs are prone to leaks, wind damage, and structural failure. According to industry data, roof-related claims are among the most frequent and expensive payouts for insurers. By installing a new roof, you drastically reduce the likelihood of filing a claim. Insurers pass these reduced risk costs back to you in the form of lower premiums.

    Enhancing Home Durability

    Modern roofing materials are engineered to withstand extreme weather conditions better than those used decades ago. Whether it is impact-resistant shingles or fire-retardant tiles, new materials offer superior protection. This durability translates directly into financial savings for both the insurer and the homeowner.

    How Much Does a New Roof Save on Homeowners Insurance?

    The million-dollar question—or rather, the thousand-dollar question—is the specific amount you can expect to save. While there is no single fixed number, industry standards provide a clear range.

    Typical Discount Percentages

    Most insurance carriers offer discounts ranging from 10% to 20% on your homeowners insurance premium for a new roof. In some cases, if you install high-impact resistant materials in hurricane-prone areas, this discount can go up to 30%.

    Calculating Your Potential Savings

    Let’s look at a concrete example. If your annual homeowners insurance premium is $2,500:

    • A 10% discount saves you $250 per year.
    • A 20% discount saves you $500 per year.
    • Over a 10-year period, a 20% discount could save you $5,000, which helps offset the initial cost of the roof replacement.

    Note: These figures are estimates. Your actual savings depend on your location, insurance carrier, and the specific materials used.

    Factors That Influence Your Insurance Discount

    Not all new roofs are created equal in the eyes of an insurance adjuster. Several key factors determine the size of your discount.

    1. Age of the Roof

    Most insurers require the roof to be less than 10–15 years old to qualify for the “new roof” discount. Some companies may offer smaller discounts for roofs up to 20 years old, provided they are in excellent condition.

    2. Type of Roofing Material

    The material you choose plays a pivotal role. Here is a comparison of common materials and their typical insurance impact:

    Material TypeDurabilityInsurance ImpactEstimated Discount Potential
    Asphalt ShinglesModerateStandard10–15%
    Metal RoofingHighHigh (Wind/Fire Resistant)15–25%
    Clay/Concrete TilesVery HighHigh (Fire Resistant)15–20%
    SlateExtremely HighPremium20–30%
    Impact-Resistant ShinglesHighVery High (Hail/Wind)20–35%

    3. Location and Weather Risks

    If you live in an area prone to hurricanes, hail, or wildfires, insurers place a higher value on impact-resistant and fire-rated materials. For more context on how different regions assess risk, you can refer to general climate data on Wikipedia.

    4. Insurance Carrier Policies

    Each insurance company has its own underwriting guidelines. Some carriers are more generous with roofing discounts than others. It is essential to shop around and ask specific questions about their roofing credits.

    How Much Does A New Roof Save On Homeowners Insurance

    Steps to Claim Your New Roof Insurance Discount

    Getting the discount isn’t automatic. You need to proactively inform your insurer and provide proof of the upgrade. Follow these steps to ensure you receive your savings.

    Step 1: Hire a Licensed Contractor

    Ensure your roofing contractor is licensed, bonded, and insured. Unlicensed work may void your warranty and disqualify you from insurance discounts. Keep all contracts and receipts.

    Step 2: Obtain Necessary Permits

    Most local jurisdictions require permits for roof replacements. Having official permits proves that the work was done to code, which insurers love to see.

    Step 3: Document the Installation

    Take photos of the installation process, especially the underlayment and flashing details. Once completed, take high-quality photos of the finished roof from multiple angles.

    Step 4: Request a Roof Certification

    Many roofing companies offer a certification letter stating the date of installation, materials used, and expected lifespan. This document is gold for insurance agents.

    Step 5: Contact Your Insurance Agent

    Do not wait for your renewal notice. Call your agent immediately after the roof is installed. Provide them with:

    • The invoice showing the date of completion.
    • The manufacturer’s warranty information.
    • Photos of the new roof.
    • Any inspection reports or certifications.

    Step 6: Verify the Adjustment

    Ask for a written confirmation of the new premium rate. Check your next bill to ensure the discount has been applied correctly.

    Common Mistakes Homeowners Make

    Avoid these pitfalls to ensure you maximize your savings.

    • Assuming It’s Automatic: Insurers won’t know you have a new roof unless you tell them. Silence means no discount.
    • Choosing Cheap Materials: Opting for the lowest bid might save money upfront but could result in lower insurance discounts and higher long-term maintenance costs.
    • Ignoring Local Codes: Failing to pull permits can lead to fines and insurance issues later. Always follow local building codes.

    FAQ Section

    Q1: Will a new roof always lower my insurance premium?

    A: In most cases, yes. However, if your overall risk profile increases due to other factors (like adding a swimming pool or having a prior claim history), the base rate might rise, but the roof discount should still apply to the calculation.

    Q2: Do I need to replace the entire roof to get the discount?

    A: Generally, yes. Most insurers require a full replacement to qualify for the maximum “new roof” discount. Minor repairs or partial replacements may not trigger the same level of savings, though they might help maintain your current rate.

    Q3: How long does the discount last?

    A: The discount typically lasts as long as the roof is considered “new” by the insurer, usually 10–15 years. After that, the discount may decrease or disappear until the roof is replaced again.

    Q4: Can I switch insurance companies to get a better roof discount?

    A: Absolutely. If your current insurer offers a low discount, shopping around is wise. New customers often receive competitive rates, and some companies specialize in discounts for updated homes.

    Q5: Does the color of the roof affect insurance savings?

    A: Indirectly. Lighter-colored roofs can reflect heat, potentially reducing energy costs and wear on the structure, but insurance discounts are primarily based on material durability and impact resistance rather than color.

    Q6: What if my roof is damaged by a storm before I replace it?

    A: File a claim for the damage. If the insurance company pays for the replacement, you will still benefit from having a new roof afterward, which will lower your future premiums. Ensure the contractor uses materials that qualify for discounts.

    Conclusion

    Investing in a new roof is about more than just curb appeal; it is a smart financial strategy that enhances your home’s safety and value. By understanding how much does a new roof save on homeowners insurance, you can make informed decisions that protect your budget for years to come. With potential savings of 10–30% on your annual premiums, the return on investment is clear.

    Remember to document every step of the process, choose high-quality materials, and communicate proactively with your insurance provider. Your future self—and your wallet—will thank you.

    Found this guide helpful? Share it with your friends on social media who are considering a home upgrade!

  • Stalker 2: Should I Kill The Zombie On The Roof?

    Stalker 2: Should I Kill The Zombie On The Roof?

    If you have just stepped into the desolate, radioactive beauty of the Zone in S.T.A.L.K.E.R. 2: Heart of Chornobyl, you are likely feeling a mix of awe and terror. The atmosphere is thick with tension, and every shadow seems to hide a threat. One of the first puzzling encounters many players face involves a seemingly trapped enemy high above them, leading to the burning question: Stalker 2 should I kill the zombie on the roof?

    This guide will help you make the right decision based on your playstyle, resource needs, and moral compass within the game’s unforgiving world.

    Understanding the Encounter: Who Is on the Roof?

    Before you pull the trigger, it is crucial to understand what you are looking at. In the early zones of Stalker 2, particularly around the starting areas like the Lesser Zone or near the first major checkpoints, you will often spot mutated creatures or hostile stalkers perched on inaccessible ledges or rooftops.

    The “zombie” referred to here is typically a Mutant (often a Snork or a low-level Mutated Human) or a hostile NPC who has taken a strategic high-ground position. Unlike previous titles in the series, Stalker 2 features advanced AI and physics. These enemies are not just decorative; they are active threats that can spot you, throw grenades, or call for backup.

    However, the term “zombie” in the S.T.A.L.K.E.R. universe usually refers to humans whose minds have been broken by the C-Consciousness or severe psychic trauma. They are tragic figures, shuffling aimlessly until provoked. Distinguishing between a mindless mutant and a tragic human zombie is key to making an informed choice.

    Why You Might Want to Kill the Zombie on the Roof

    There are several pragmatic reasons why eliminating this threat immediately might be the best course of action for a new Stalker.

    1. Immediate Threat Neutralization

    Even if the enemy seems stuck, Stalker 2’s AI is designed to find paths. If you linger too long in the area, that “stuck” zombie may find a way down, flank you, or alert other nearby enemies. By removing them, you secure the perimeter.

    2. Loot and Resources

    In the harsh economy of the Zone, every bullet and bandage counts. Enemies on rooftops often carry:

    • Ammunition: Rare early-game calibers.
    • Medical Supplies: Bandages or antirad drugs.
    • Artifacts: Occasionally, high-value artifacts spawn on elevated positions where mutants nest.

    If you have a sniper rifle or a high-accuracy pistol, taking the shot yields immediate material rewards without risking close-quarters combat.

    3. Experience Points (XP)

    Every kill grants XP, which helps you level up your skills faster. Early in the game, skill points are vital for unlocking basic survival traits like increased carry weight or better recoil control.

    Stalker 2 Should I Kill The Zombie On The Roof

    Reasons to Leave the Zombie Alone

    Conversely, there are strong arguments for ignoring the figure on the roof. This approach aligns with a stealthier, more role-play-heavy experience.

    1. Conservation of Ammo

    Ammo is scarce in Stalker 2. Missing a shot at a distant, small target can waste precious resources. If you are low on supplies, it is better to conserve your bullets for enemies that are actively engaging you in close range.

    2. Stealth and Noise Discipline

    Firing a weapon creates noise. In Stalker 2, sound travels realistically. A single gunshot can attract packs of blind dogs, fractic pigs, or even heavier mutants from the surrounding woods. If you are trying to sneak through an area, taking a shot might do more harm than good.

    3. Moral and Role-Playing Considerations

    If the entity is a human “zombie” (a mind-controlled stalker), killing them carries a psychological weight. While the game does not always have a strict “karma” meter visible in the UI, your actions define your character’s journey. Some players prefer to only kill in self-defense, viewing these zombies as victims rather than monsters.

    Strategic Comparison: To Kill or Not to Kill?

    To help you decide, here is a quick breakdown of the pros and cons based on different player archetypes.

    FactorKill the ZombieIgnore the Zombie
    Resource GainHigh (Loot + XP)None
    Risk LevelMedium (Noise/Alert)Low (Passive)
    Ammo CostHigh (Potential miss)Zero
    StealthBrokenMaintained
    Best ForCombat-focused playersStealth/Roleplayers

    How to Safely Eliminate the Target

    If you decide that the answer to “Stalker 2 should I kill the zombie on the roof” is yes, you must do it efficiently. Here is a step-by-step tactical guide:

    1. Assess Your Weapon: Do not use a shotgun or an automatic rifle unless you are very close. Equip a pistol with high accuracy or a sniper rifle if available.
    2. Check Your Surroundings: Ensure no other enemies are watching you. Use your binoculars to scan the area.
    3. Aim for the Head: Headshots deal significantly more damage and often result in instant kills for weaker mutants. This saves ammo and reduces the chance of the enemy screaming before dying.
    4. Wait for Stillness: Wait until the zombie stops moving. Moving targets are harder to hit and may dodge your bullet due to the game’s physics engine.
    5. Retrieve the Loot: Once confirmed dead, look for a path up. Often, there are crates, ladders, or broken walls nearby that allow you to climb to the roof safely.

    For more context on the lore behind these mind-controlled individuals, you can read about the C-Consciousness on Wikipedia, which explains the psychic phenomena affecting humans in the Zone.

    Frequently Asked Questions (FAQ)

    1. Does killing the zombie on the roof affect the main story?

    No, killing random mutants or minor hostile NPCs on rooftops generally does not impact the main storyline quests. It is considered a side activity or environmental interaction. However, killing specific named characters will have consequences.

    2. What if I can’t reach the roof to get the loot?

    If you cannot find a climbing path, the loot is likely not intended for you at that moment. Stalker 2 encourages exploration. Return later with better gear or after discovering a new route. Do not waste excessive time trying to glitch onto the roof.

    3. Will the zombie eventually come down if I ignore it?

    In most cases, no. Many rooftop enemies are placed as static guards or ambient threats. They may patrol a small area but rarely descend unless you enter their specific aggro radius or trigger an alarm.

    4. Is there a reward for sparing zombies?

    There is no direct in-game currency reward for sparing zombies. However, maintaining a low profile can help you avoid large-scale confrontations, saving you money on repairs and medical supplies in the long run.

    5. Can I use grenades to kill the zombie on the roof?

    Yes, but it is inefficient. Grenades are valuable tools for clearing rooms or dealing with groups. Using one on a single target is overkill and wastes resources. Only use explosives if the zombie is surrounded by other enemies.

    6. What is the best weapon for long-range shots early in the game?

    The PM Pistol or any variant of the Makarov is reliable for early-game precision. If you find a Hunting Rifle, it is superior for rooftop engagements due to its scope and damage output.

    Conclusion

    So, Stalker 2 should I kill the zombie on the roof? The answer depends on your current situation. If you are low on ammo and trying to remain undetected, let it be. If you need the XP, loot, or simply want to clear the area for safety, take the shot.

    S.T.A.L.K.E.R. 2: Heart of Chornobyl is a game that rewards adaptability. There is no single “correct” way to play, only the way that keeps you alive. Whether you choose the path of the silent observer or the ruthless hunter, ensure every bullet counts.

    Did this guide help you make your decision? Share your own rooftop encounter stories on social media using #Stalker2Guide and let us know if you chose mercy or lead!

  • How Much Does It Cost To Power Wash A Roof?

    How Much Does It Cost To Power Wash A Roof?

    Have you noticed dark streaks or green patches creeping up your shingles? It’s not just an eyesore; it’s a sign that algae, moss, and debris are compromising your roof’s integrity. Many homeowners ask, “How much does it cost to power wash a roof,” only to discover that the answer involves more than just a simple price tag—it requires understanding the right method to avoid costly damage.

    In this guide, we will break down the current market rates for 2026, explain why “soft washing” is often safer than high-pressure cleaning, and help you decide whether to hire a pro or tackle it yourself.

    Understanding the Average Cost in 2026

    When budgeting for exterior home maintenance, knowing the baseline numbers is crucial. As of late 2026, the national average cost to professionally clean a roof ranges between $350 and $600. However, this figure can fluctuate significantly based on your location, the size of your home, and the severity of the buildup.

    For smaller roofs (under 1,500 square feet), you might pay as little as $250. Conversely, large, multi-story homes with complex architectural features can see bills upwards of $800 to $1,200.

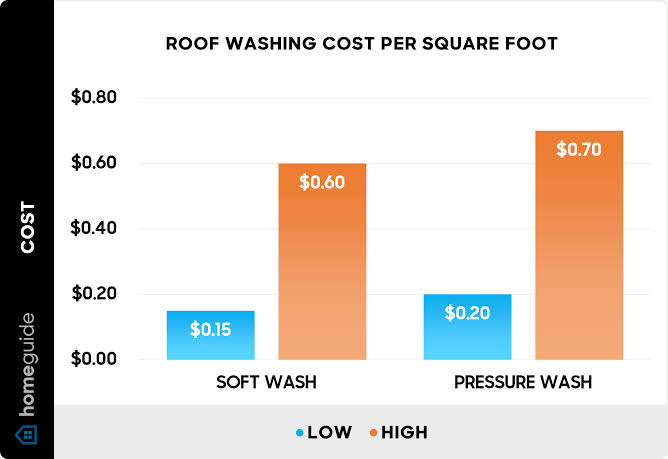
    It is important to note that most professionals do not charge by the hour for this service. Instead, they use a per-square-foot pricing model, which typically ranges from $0.20 to $0.60 per square foot. This transparency helps homeowners estimate costs more accurately before signing a contract.

    Key Factors Influencing Price

    Several variables determine where your specific quote will fall within that range:

    • Roof Material: Asphalt shingles are the most common and generally cheaper to clean. Tile, slate, or metal roofs require specialized care and often cost more.
    • Pitch and Accessibility: A steep roof requires safety harnesses, scaffolding, and more labor time, increasing the price.
    • Level of Contamination: Light dusting is easy to remove. Heavy moss growth or years of neglected algae require pre-treatment chemicals and multiple passes.
    • Geographic Location: Labor costs in urban areas like New York or San Francisco are higher than in rural Midwest regions.

    Why “Soft Washing” Is Often Better Than Power Washing

    Before you hire someone, it is vital to clarify terminology. While many people search for “power washing,” most reputable roofing experts recommend soft washing for residential roofs.

    Power washing uses high-pressure water (often 1,500–3,000 PSI) to blast away dirt. On a roof, this pressure can:

    1. Lift shingle granules, shortening the roof’s lifespan.
    2. Force water under the shingles, causing leaks.
    3. Void manufacturer warranties.

    Soft washing, on the other hand, uses low pressure (below 500 PSI) combined with biodegradable cleaning solutions (usually sodium hypochlorite and surfactants). The chemical solution kills the organic growth at the root, allowing it to wash away gently with rain or low-pressure rinsing.

    According to industry standards, soft washing is the preferred method for asphalt shingles because it preserves the structural integrity of the roofing material while effectively eliminating Gloeocapsa magma (the black algae responsible for those ugly streaks).

    Breakdown by Roof Type

    Different materials react differently to cleaning agents and pressure. Here is a quick comparison to help you understand potential cost variations.

    Roof MaterialEstimated Cost RangeRecommended MethodNotes
    Asphalt Shingles$350 – $600Soft WashMost common; sensitive to high pressure.
    Concrete/Clay Tile$400 – $750Soft Wash/Low PressureTiles are durable but can crack if walked on improperly.
    Metal Roof$300 – $550Soft WashProne to scratching; avoid abrasive tools.
    Slate$500 – $900+Gentle Soft WashFragile and expensive; requires highly skilled technicians.
    Wood Shake$450 – $700Specialized TreatmentRequires anti-fungal treatments to prevent rot.
    How Much Does It Cost To Power Wash A Roof

    DIY vs. Hiring a Professional: Is It Worth It?

    You might be tempted to rent a pressure washer and save money. However, roof cleaning is one of the most dangerous DIY home improvement projects.

    The Risks of DIY

    • Safety Hazards: Falls from ladders or roofs are a leading cause of home injury. Professionals carry liability insurance and workers’ compensation; you do not.
    • Damage Liability: If you accidentally crack a tile or strip granules from your shingles, you will pay for repairs out of pocket. A professional mistake is covered by their insurance.
    • Chemical Handling: The cleaners used to kill moss and algae are potent. Improper mixing or runoff can damage your landscaping, siding, or even local waterways.

    When to Hire a Pro

    If your roof is two stories high, has a steep pitch, or shows signs of significant moss buildup, hire a professional. The peace of mind and warranty protection are worth the extra cost. For single-story homes with mild discoloration, a careful DIY approach using a garden sprayer and soft-bristle brush might suffice, but proceed with extreme caution.

    Step-by-Step: What to Expect During a Professional Clean

    Understanding the process helps you verify that the job is being done correctly. Here is what a standard professional service looks like:

    1. Inspection: The technician inspects the roof for loose shingles, damaged flashing, or structural weaknesses. They should point these out to you before starting.
    2. Preparation: They will wet down surrounding plants and cover sensitive landscaping to protect them from cleaning solutions.
    3. Application: A biodegradable algaecide is applied evenly across the roof surface. This is allowed to dwell for 15–20 minutes to penetrate the organic growth.
    4. Rinsing: Using low-pressure water, the technician rinses the roof from the top down. This ensures dirty water doesn’t get trapped under upper shingles.
    5. Cleanup: Gutters are cleared of any dislodged debris, and the surrounding area is rinsed to neutralize any chemical residue.

    For more detailed information on roofing materials and their maintenance requirements, you can refer to Wikipedia’s article on Roofing.

    Frequently Asked Questions (FAQ)

    1. How often should I power wash my roof?

    Most experts recommend cleaning your roof every 2 to 3 years. However, if you live in a humid climate with heavy tree cover, you may need annual maintenance to prevent moss buildup.

    2. Does roof cleaning void my warranty?

    Not if done correctly. In fact, many manufacturers require regular maintenance to keep the warranty valid. However, using high-pressure washing on asphalt shingles often does void warranties. Always check your specific warranty terms and hire a certified soft-washing provider.

    3. Can I power wash my roof myself?

    While technically possible, it is not recommended for most homeowners. The risk of personal injury and property damage is high. If you must do it yourself, use a garden hose with a spray nozzle and a long-handled brush, never a high-pressure washer.

    4. How long does it take to clean a roof?

    For an average-sized home (2,000 sq. ft.), the process typically takes 2 to 4 hours. This includes setup, application, dwelling time for the chemicals, and cleanup.

    5. Will the black streaks come back?

    Yes, eventually. Algae spores are airborne. However, proper cleaning removes the current colony, and some professionals offer zinc-strip installations or preventative treatments that can delay regrowth for several years.

    Conclusion

    So, how much does it cost to power wash a roof? While the average falls between $350 and $600, the true value lies in protecting your home’s biggest asset. Regular cleaning prevents premature aging, improves curb appeal, and can even lower your energy bills by reflecting sunlight more effectively.

    Remember, the cheapest option isn’t always the best. Prioritize companies that use soft washing techniques and carry proper insurance. Your roof protects everything underneath it—treat it with care.

    Found this guide helpful? Share it with your neighbors on Facebook or Pinterest to help them keep their homes looking their best!

  • How to Hang Christmas Lights on a Metal Roof Safely

    How to Hang Christmas Lights on a Metal Roof Safely

    Hanging holiday decorations can transform your home into a winter wonderland, but metal roofs present a unique challenge that many homeowners dread. Drilling holes is strictly off-limits as it voids warranties and causes leaks, leaving many to ask: how do you put Christmas lights on a metal roof without causing expensive damage? This guide provides safe, professional-approved methods to secure your lights while keeping your roof intact and your insurance premium low.

    Why Metal Roofs Require Special Care

    Before we dive into the “how-to,” it is crucial to understand the “why.” Metal roofing systems are engineered for durability and water shedding, not for puncture. According to industry standards, even a small nail hole can compromise the protective coating of the metal, leading to rust and eventual leakage.

    Unlike asphalt shingles, where you might get away with a well-placed nail under a tab, metal panels offer no such forgiveness. Furthermore, metal expands and contracts with temperature changes. A rigid attachment method can cause stress fractures in the panel or pull the fastener loose during high winds. Therefore, the goal is non-penetrating attachment.

    The Best Tools for the Job: Magnetic Clips vs. Adhesives

    When figuring out how do you put Christmas lights on a metal roof, your choice of hardware is the most critical decision. There are two primary contenders: magnetic clips and heavy-duty adhesives.

    1. Magnetic Light Clips (The Gold Standard)

    For most standing seam or corrugated metal roofs, magnetic clips are the superior choice. They rely on strong neodymium magnets to clamp onto the metal surface.

    • Pros: Zero damage, easy to remove, reusable, holds firmly in wind.
    • Cons: Only works on ferrous metals (steel/iron), not aluminum or copper.

    2. Heavy-Duty Adhesive Hooks

    If your roof is made of aluminum, copper, or zinc, magnets will not work. In this case, you must use outdoor-rated adhesive hooks.

    • Pros: Works on all metal types, invisible once installed.
    • Cons: Can leave residue, may fail in extreme heat/cold, difficult to reposition.
    FeatureMagnetic ClipsAdhesive Hooks
    Damage RiskNoneLow (Residue possible)
    ReusabilityHighLow
    Wind ResistanceHighModerate
    Metal CompatibilitySteel/Iron OnlyAll Metals
    How Do You Put Christmas Lights On A Metal Roof

    Step-by-Step Guide: How Do You Put Christmas Lights On A Metal Roof

    Follow these precise steps to ensure a professional-looking display that stays up all season.

    Step 1: Check Your Roof Material

    First, determine if your roof is magnetic. Take a simple fridge magnet to a discreet spot on your roof (or use a ladder to test a lower section). If it sticks firmly, you can use magnetic clips. If it slides off, you have an aluminum or copper roof and must use adhesives.

    Step 2: Measure and Plan

    Measure the linear footage of the roofline where you intend to hang lights. Add 10% extra to account for corners and mistakes. Decide on your pattern. For metal roofs, outlining the eaves (the edge of the roof) is the safest and most visually appealing option. Avoid draping lights over the peak unless you have specific ridge-clipping tools.

    Step 3: Clean the Surface

    Whether using magnets or adhesives, cleanliness is key. Dust, pollen, and oxidation reduce holding power.

    • For Magnets: Wipe the area with a dry cloth to remove debris.
    • For Adhesives: Clean the area with isopropyl alcohol and let it dry completely. This ensures the adhesive bonds directly to the metal, not to dirt.

    Step 4: Install the Clips

    • Magnetic Method: Slide the light bulb into the clip first. Then, snap the magnetic base onto the metal panel. Place clips every 12–18 inches. For heavier LED strands, every 12 inches is recommended to prevent sagging.
    • Adhesive Method: Peel the backing off the hook. Press firmly against the clean metal surface for 30 seconds. Wait at least one hour before hanging any weight on them to allow the adhesive to cure.

    Step 5: Hang the Lights

    Start at the power source and work your way outward. Gently press each bulb into the installed clips. Ensure the wire is not pulled taut; leave a slight slack between clips to accommodate thermal expansion of the metal roof.

    Step 6: Secure the Power Cord

    Use a separate magnetic or adhesive cord holder to secure the main power line running down the side of the house. This prevents wind from tugging on the connection point at the roof edge.

    Safety First: Ladder and Electrical Precautions

    According to the Consumer Product Safety Commission, thousands of people are treated in emergency rooms annually for falls related to holiday decorating. When learning how do you put Christmas lights on a metal roof, safety must precede aesthetics.

    1. Use a Spotter: Never work on a ladder alone. Have someone hold the base.
    2. Check the Weather: Do not attempt installation if the roof is wet, icy, or windy. Metal roofs become incredibly slippery when wet.
    3. GFCI Protection: Ensure your outdoor outlet is protected by a Ground Fault Circuit Interrupter (GFCI). This cuts power instantly if moisture causes a short circuit.
    4. LED Only: Use only LED lights. They emit minimal heat, reducing the risk of melting adhesive or damaging roof coatings, and they draw less power, lowering fire risk.

    Common Mistakes to Avoid

    Even with the right tools, errors can happen. Here are the most frequent pitfalls:

    • Using Nails or Staples: Never pierce the metal. It voids warranties and creates leak paths.
    • Ignoring Thermal Expansion: Metal roofs expand in the sun and contract at night. If your light wires are pulled tight, they can snap or pull clips off. Always leave slack.
    • Overloading Circuits: Check the wattage of your light strands. Do not daisy-chain more than three strands together unless the manufacturer explicitly states it is safe.
    • Leaving Lights Up Year-Round: UV exposure degrades plastic clips and wire insulation. Remove lights within a month after the holidays to extend their lifespan.

    FAQ Section

    Can I use magnetic clips on an aluminum metal roof?

    No. Aluminum is non-ferrous, meaning it is not magnetic. Magnetic clips will not stick. For aluminum roofs, you must use high-quality, outdoor-rated adhesive hooks or clips that clamp onto the edge of the panel without piercing it.

    Will magnetic clips scratch my roof?

    High-quality magnetic clips are designed with rubber or plastic coatings to protect the finish. However, if dirt or grit gets trapped between the magnet and the roof, it could cause minor scratching. Always clean the roof surface before installation to mitigate this risk.

    How long do adhesive light hooks last on a metal roof?

    Outdoor-rated adhesive hooks typically last one to two seasons. Extreme temperature fluctuations can weaken the adhesive bond over time. It is best to replace them annually rather than risking your lights falling mid-season.

    Is it safe to walk on a metal roof to hang lights?

    Generally, no. Metal roofs can be slippery, especially if there is any dew, frost, or slope. It is safer to use an extension pole or work from a sturdy ladder positioned at the eaves. If you must go on the roof, wear soft-soled shoes and use a safety harness.

    What type of lights are best for metal roofs?

    LED lights are the best choice. They are lightweight, which puts less stress on clips and adhesives. They also run cool, preventing any potential heat damage to the roof’s protective coating or the adhesive backing of hooks.

    Can I install lights on a standing seam roof?

    Yes, standing seam roofs are actually ideal for magnetic clips. The raised seams provide a perfect surface for magnets to grip securely. Ensure you place the clips on the flat pan or the seam itself, depending on the clip design, to ensure a tight fit.

    Conclusion

    Learning how do you put Christmas lights on a metal roof doesn’t have to be a stressful ordeal. By choosing the right non-penetrating tools—magnetic clips for steel roofs and adhesives for aluminum—you can achieve a stunning display without compromising your roof’s integrity. Remember to prioritize safety, plan your layout carefully, and use LED lights for efficiency and longevity.

    Your home deserves to shine this holiday season, and your roof deserves to stay leak-free. If you found this guide helpful, please share it with your neighbors on social media to help them decorate safely too! Happy holidays!

  • Better To Live On The Corner Of A Roof Meaning

    Better To Live On The Corner Of A Roof Meaning

    Have you ever felt so drained by the people around you that being alone seemed like a luxury? You are not alone in feeling this way. Many people search for the “Better To Live On The Corner Of A Roof Meaning“ to understand an ancient piece of wisdom that perfectly describes the pain of living with conflict versus the peace of isolation.

    This phrase comes from the Bible, specifically Proverbs 25:24. It paints a vivid picture: it is better to live in a tiny, exposed space on a roof than to share a large, comfortable house with a quarrelsome wife or husband. But what does this really mean for your modern life? Is it advocating for loneliness? Or is it a warning about emotional toxicity?

    In this guide, we will break down the historical context, the psychological implications, and how you can apply this timeless advice to your relationships today.

    What Is the Literal Origin of This Phrase?

    To truly grasp the meaning, we must look at the source. The phrase originates from the Book of Proverbs in the Old Testament. Proverbs is a collection of moral instructions and wise sayings, traditionally attributed to King Solomon.

    The specific verse, Proverbs 25:24 (and its parallel in Proverbs 21:9), states:

    “It is better to live on a corner of the roof than share a house with a quarrelsome wife.”

    The Architectural Context

    In ancient Near Eastern architecture, roofs were flat and accessible. They were often used for drying crops, sleeping during hot nights, or private prayer. However, living on the “corner of the roof” meant:

    • Exposure to Elements: No protection from rain, wind, or extreme sun.
    • Lack of Privacy: You were visible to neighbors.
    • Discomfort: It was hard, uneven, and unsafe compared to a furnished room inside.

    Despite these harsh conditions, the writer argues that this physical discomfort is preferable to the mental and emotional torment of constant domestic conflict. This hyperbole emphasizes the severity of a toxic home environment.

    For more historical context on ancient Hebrew housing structures, you can refer to Wikipedia’s article on Ancient Israelite and Judean houses.

    Why Is Solitude Preferred Over Conflict?

    The core message here isn’t about hating marriage or family. It is about the destructive power of chronic strife. When we analyze the “Better To Live On The Corner Of A Roof Meaning,” we find a profound psychological truth: Peace is more valuable than comfort.

    The Cost of Constant Tension

    Living in a state of high alert triggers the body’s stress response. According to health studies, chronic exposure to interpersonal conflict can lead to:

    1. Elevated cortisol levels.
    2. Increased risk of heart disease.
    3. Anxiety and depression.

    When your home—supposedly your sanctuary—becomes a battlefield, your nervous system never gets to rest. The “roof” represents solitude, which allows the mind to reset. While lonely, it is safe from verbal attacks, criticism, and unpredictability.

    Quality Over Quantity of Space

    You could have a mansion, but if the atmosphere is hostile, it feels like a prison. Conversely, a small, quiet space can feel like a palace if it offers peace. This proverb teaches us that the emotional climate of a home matters more than its square footage or luxury amenities.

    How Does This Apply to Modern Relationships?

    While the original text mentions a “quarrelsome wife,” modern interpretations apply this wisdom to any toxic relationship dynamic. This includes spouses, roommates, family members, or even business partners.

    Identifying a “Quarrelsome” Dynamic

    Not every argument makes a relationship toxic. Healthy couples disagree. However, a “quarrelsome” dynamic is characterized by:

    • Contempt: Rolling eyes, mocking, or name-calling.
    • Defensiveness: Refusing to take responsibility.
    • Stonewalling: Shutting down communication entirely.
    • Criticism: Attacking character rather than behavior.

    If you find yourself walking on eggshells in your own home, you might relate to the desire to escape to the “roof.”

    The Gender-Neutral Lesson

    Today, we understand that men can be quarrelsome too. The principle remains the same: It is better to be alone than to be abused. Whether you are dealing with a nagging partner, a volatile roommate, or a critical parent, the wisdom holds true. Your mental health is worth more than social appearances or shared assets.

    Better To Live On The Corner Of A Roof Meaning

    Practical Steps to Find Peace Without Moving to the Roof

    You don’t need to literally sleep outside to apply this wisdom. Here are actionable steps to restore peace in your living situation.

    1. Establish Boundaries

    Clear boundaries reduce conflict. Define what behavior is unacceptable.

    • Example: “I will not engage in conversations where voices are raised. If you start shouting, I will leave the room until we can speak calmly.”

    2. Create Physical Safe Spaces

    Designate a area in your home as a “conflict-free zone.” This could be a bedroom, a study, or even a cozy corner.

    • Use noise-canceling headphones.
    • Keep this space clutter-free and calming.

    3. Seek Professional Mediation

    If the conflict is deep-seated, consider therapy. A neutral third party can help translate feelings and reduce misunderstandings.

    • Look for licensed marriage and family therapists (LMFT).
    • Consider cognitive behavioral therapy (CBT) for anger management.

    4. Evaluate the Relationship

    Sometimes, the “roof” is a temporary retreat; other times, it’s a sign that the relationship is unsustainable. Ask yourself:

    • Do I feel drained or energized after interacting with this person?
    • Is there mutual respect?
    • Are efforts to change one-sided?

    Comparison: Comfort with Conflict vs. Solitude with Peace

    To visualize the trade-off described in the proverb, consider this comparison:

    FeatureLiving in Luxury with ConflictLiving Simply in Solitude
    Physical ComfortHigh (Soft beds, AC, good food)Low (Exposure, basic amenities)
    Mental StateAnxious, stressed, on edgeCalm, reflective, peaceful
    Health ImpactNegative (High blood pressure, insomnia)Neutral/Positive (Lower stress)
    Social PerceptionAppears successful to outsidersMay appear lonely or odd
    Long-term OutcomeBurnout, resentment, health issuesSelf-discovery, emotional stability

    As the table shows, the external appearance of success means little if the internal reality is suffering. This is the crux of the “Better To Live On The Corner Of A Roof Meaning.”

    FAQ Section

    1. Does this proverb mean I should get divorced?

    Not necessarily. It is a hyperbolic statement emphasizing the pain of conflict. It serves as a wake-up call to address issues. However, if abuse is present, separation may be the healthiest option. Always consult a professional counselor before making major life decisions.

    2. Is it better to be alone than in a bad relationship?

    Yes, according to this wisdom. Chronic negativity erodes self-esteem and mental health. Solitude allows for healing and self-reflection, whereas a toxic relationship often prevents growth.

    3. What does “corner of the roof” symbolize today?

    Today, it symbolizes any place of solitude and simplicity. It could be a small apartment, a quiet cabin, or simply setting strict boundaries to protect your peace. It represents choosing mental well-being over material comfort.

    4. Can this apply to friendships or roommates?

    Absolutely. Any close living arrangement requires mutual respect. If a roommate or friend creates a hostile environment, distancing yourself (your version of the “roof”) is a valid self-preservation strategy.

    5. Is loneliness the same as being alone?

    No. Loneliness is a painful feeling of isolation. Being alone is a physical state. The proverb advocates for chosen solitude to escape pain, not forced isolation. Many people find joy and peace in being alone.

    6. How can I fix a quarrelsome home without leaving?

    Start with communication. Use “I” statements instead of “You” accusations. Seek counseling together. Establish house rules for arguments (e.g., no yelling, no name-calling). Change starts with one person refusing to participate in the cycle of conflict.

    Conclusion

    The “Better To Live On The Corner Of A Roof Meaning“ is a powerful reminder that our environment shapes our soul. While we all desire comfort and companionship, these things lose their value when accompanied by constant strife.

    Whether you are dealing with a difficult partner, a chaotic household, or just the noise of modern life, remember that peace is priceless. Sometimes, stepping back—metaphorically or literally—is the bravest thing you can do for your mental health.

    Don’t let fear of being alone keep you in a place where you are not respected. Choose peace. Choose dignity. Choose your well-being.

    Did this article resonate with you? Share it with a friend who might need this reminder today. Let’s spread the wisdom of choosing peace over pretense.

  • How Much Is A 12 Ft Sheet Of Metal Roofing?

    How Much Is A 12 Ft Sheet Of Metal Roofing?

    Are you planning a roof replacement or a new build and feeling overwhelmed by the fluctuating prices of construction materials? You are not alone; many homeowners struggle to budget accurately when facing complex pricing structures. Understanding exactly how much is a 12 ft sheet of metal roofing is the first step toward taking control of your project’s finances and avoiding unexpected costs.

    In this guide, we will break down the current market rates, explain the variables that affect pricing, and help you determine if metal roofing is the right investment for your home.

    What Is the Average Cost of a 12 Ft Metal Roofing Sheet?

    When asking how much is a 12 ft sheet of metal roofing, it is crucial to understand that there is no single fixed price. The cost varies significantly based on the type of metal, the gauge (thickness), and the finish. However, we can look at average market data for late 2026 to give you a realistic baseline.

    For a standard 12-foot long panel, which typically covers about 3 feet in width (depending on the profile), you are looking at a range rather than a flat fee.

    Price Breakdown by Material Type

    Material TypeEstimated Cost per 12ft SheetBest For
    Galvanized Steel$45 – $75Budget-conscious projects, barns, sheds
    Galvalume Steel$55 – $85Residential roofs, high corrosion resistance
    Aluminum$70 – $110Coastal areas, salt-air environments
    Copper/Zinc$250 – $400+Historic homes, luxury aesthetics

    Note: Prices above are for materials only and do not include fasteners, underlayment, or labor.

    Most residential homeowners opt for Galvalume steel because it offers the best balance between durability and cost. A 12-foot sheet of 29-gauge Galvalume might cost around $60, while a heavier 26-gauge panel could run closer to $85. Remember, a lower gauge number means thicker, stronger metal.

    Why Do Prices Vary So Much for Metal Panels?

    If you have visited three different supply stores and received three different quotes, you might be confused. Several key factors drive the price differences in the metal roofing industry.

    1. Gauge and Thickness

    The thickness of the metal is measured in gauges. Common residential gauges are 29, 26, and 24.

    • 29-Gauge: Thinner, lighter, and cheaper. Prone to denting from hail or heavy branches.
    • 26-Gauge: The industry standard for homes. Stronger and holds up better to weather.
    • 24-Gauge: Premium thickness. Used in areas with severe weather conditions.

    A 12-foot sheet in 24-gauge will cost significantly more than the same length in 29-gauge due to the increased amount of raw material used.

    2. Protective Coatings and Paint Systems

    Bare metal rusts. To prevent this, manufacturers apply coatings.

    • Unpainted/Galvanized: Cheapest option, industrial look.
    • PVDF (Kynar 500): High-end paint finish that resists fading and chalking for decades. This adds $10–$20 per sheet but extends the lifespan significantly.

    3. Profile Style

    The shape of the panel affects manufacturing complexity.

    • Corrugated: Simple wavy pattern, generally cheaper.
    • R-Panel/Agri-Panel: Standard ribbed style, moderate price.
    • Standing Seam: Hidden fasteners, premium look, highest cost due to engineering and installation complexity.
    How Much Is A 12 Ft Sheet Of Metal Roofing

    How to Calculate Total Material Needs for Your Roof

    Knowing the unit price is helpful, but calculating the total project cost requires precision. Buying too little leads to delays; buying too much wastes money.

    Step-by-Step Calculation Guide

    1. Measure Your Roof Area: Calculate the square footage of each roof plane. Length × Width = Square Footage.
    2. Add Waste Factor: Metal roofing requires cutting. Add 10% for simple gable roofs and 15–20% for complex hips and valleys.
    3. Determine Coverage Width: Most 12-foot sheets have a coverage width of 36 inches (3 feet), even if the actual panel is wider. Check your specific product specs.
    4. Calculate Sheets Needed:
      • Total Square Footage ÷ 3 (coverage width) = Linear Feet needed.
      • Linear Feet ÷ 12 (length of sheet) = Number of Sheets.

    Pro Tip: Always round up to the nearest whole sheet. You cannot buy half a panel from most suppliers.

    For more detailed technical standards on metal roofing installations, you can refer to general construction guidelines available on Wikipedia.

    Installation Costs: DIY vs. Professional Hiring

    One of the biggest questions homeowners face is whether to install the 12-foot sheets themselves or hire a pro. While the material cost for how much is a 12 ft sheet of metal roofing is straightforward, labor changes the equation entirely.

    DIY Installation

    • Pros: Saves 50–60% of total project cost.
    • Cons: High risk of leaks if installed incorrectly. Requires specialized tools (nibblers, seamers, drill drivers).
    • Safety: Working on a roof is dangerous. Falls are a leading cause of home improvement injuries.

    Professional Installation

    • Cost: Typically ranges from $8 to $15 per square foot installed.
    • Benefits: Warranty protection, proper flashing details, and speed.
    • Value: A professionally installed metal roof can increase home resale value by up to 6%.

    If you choose to DIY, ensure you use the correct screws with neoprene washers. Over-driving these screws can crush the washer, leading to immediate leaks. Under-driving them leaves gaps. It requires a delicate touch and practice.

    Long-Term Value: Is Metal Roofing Worth the Upfront Cost?

    When analyzing how much is a 12 ft sheet of metal roofing, look beyond the initial price tag. Consider the lifecycle cost.

    • Lifespan: Asphalt shingles last 15–20 years. Metal roofs last 40–70 years.
    • Maintenance: Metal requires minimal maintenance. Occasional cleaning and inspection of sealants are usually sufficient.
    • Energy Efficiency: Reflective metal roofs can reduce cooling costs by 10–25% in hot climates.

    While a 12-foot sheet of asphalt shingle equivalent might cost less initially, you will replace it two or three times before your metal roof needs attention. This makes metal a superior long-term financial decision.

    Frequently Asked Questions (FAQ)

    1. Can I cut a 12 ft metal roofing sheet to size?

    Yes, you can cut metal roofing sheets. Use electric shears or a nibbler tool for clean cuts. Avoid using abrasive saws (like angle grinders) as the heat damages the protective coating, leading to rust along the cut edge.

    2. What is the weight of a 12 ft metal roofing sheet?

    Weight depends on the gauge. A 12-foot, 3-foot wide sheet of 29-gauge steel weighs approximately 40–50 lbs. A 26-gauge sheet weighs roughly 60–70 lbs. Aluminum is lighter, weighing about 30–40 lbs for the same dimensions.

    3. Do I need special permits for metal roofing?

    In most US jurisdictions, replacing a roof requires a building permit. Check with your local county or city building department. Some HOAs also have restrictions on metal roof colors and profiles.

    4. How long does it take to install a 12 ft sheet?

    For an experienced professional, installing a single 12-foot sheet takes about 5–10 minutes, including alignment and fastening. For a DIYer, expect 15–20 minutes per sheet as you learn the rhythm.

    5. What is the best screw for metal roofing?

    Use self-tapping hex-head screws with EPDM rubber washers. These are designed to penetrate the metal and create a watertight seal. Ensure the screw length is appropriate for penetrating both the panel and the purlin or deck below.

    Conclusion

    Understanding how much is a 12 ft sheet of metal roofing involves more than just checking a price tag. It requires evaluating the gauge, material type, and long-term benefits. While the upfront cost of $50–$100 per sheet may seem higher than traditional shingles, the durability, energy efficiency, and longevity of metal make it a wise investment for any US homeowner.

    By carefully calculating your needs and choosing the right material for your climate, you can secure a roof that protects your home for decades. If you found this guide helpful, please share it with friends or family who are considering a roof upgrade. Your network will thank you for saving them from costly mistakes!

  • How Many Square Feet Are In A Square Of Roofing?

    How Many Square Feet Are In A Square Of Roofing?

    Planning a roof replacement or repair can feel overwhelming, especially when contractors start throwing around industry jargon that doesn’t quite make sense to the average homeowner. You might find yourself staring at a quote and wondering, “How many square feet are in a square of roofing?” It is a simple question with a critical answer that directly impacts your budget and material orders.

    Understanding this basic unit of measurement is the first step toward taking control of your home improvement project. In this guide, we will break down the math, explain why this unit exists, and show you how to calculate your needs accurately so you never overpay or under-order again.


    What Is a “Square” in Roofing Terminology?

    If you have never worked in construction, the term “square” can be misleading. In everyday language, a square is a geometric shape. However, in the roofing industry, it is a specific unit of area used to simplify calculations for large surfaces.

    A roofing square is equal to 100 square feet.

    This means that if your roof has an area of 2,500 square feet, it is considered a 25-square roof. This standardization helps contractors, suppliers, and manufacturers communicate efficiently. Instead of saying, “I need enough shingles to cover 1,850 square feet,” a pro will simply say, “I need materials for 18.5 squares.”

    Why Do Roofers Use Squares?

    The primary reason is simplicity and speed. Roofs are large, and dealing with thousands of individual square feet can lead to calculation errors during quick estimates. By grouping every 100 square feet into one “square,” the numbers become more manageable.

    • Easier Material Ordering: Shingles and underlayment are often sold by the square or in bundles that equate to a fraction of a square.
    • Standardized Pricing: Most contractors quote prices per square (e.g., $350 per square), making it easier for homeowners to compare bids.
    • Reduced Error: It minimizes the risk of misplacing zeros when calculating large areas.

    How to Calculate Your Roof’s Square Footage

    Before you can determine how many squares you need, you must accurately measure your roof’s total square footage. While it might seem tempting to just use your home’s floor plan, this method is often inaccurate because roofs extend beyond the walls (overhangs) and have complex pitches.

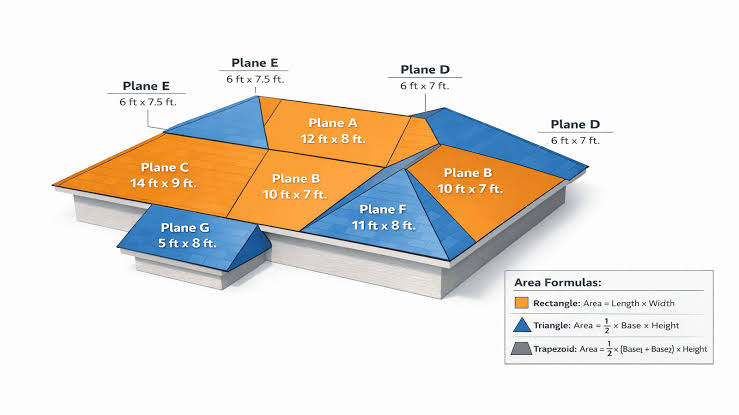
    Step 1: Measure Each Plane

    Break your roof down into individual rectangular planes. For each section:

    1. Measure the length from ridge to eave (or edge to edge).
    2. Measure the width along the eave.
    3. Multiply length by width to get the area of that plane.

    Example: If one section is 40 feet long and 20 feet wide, the area is 800 square feet.

    Step 2: Account for Overhangs

    Do not forget the eaves and rakes. Measure any overhanging sections separately and add them to your total. Even a small 6-inch overhang can add significant square footage across the perimeter of a large home.

    Step 3: Sum the Areas

    Add the square footage of all planes together to get your total gross square footage.

    Step 4: Convert to Squares

    Divide your total square footage by 100.

    Formula: Total Square Feet ÷ 100 = Number of Squares

    Example: 2,400 sq ft ÷ 100 = 24 Squares.

    How Many Square Feet Are In A Square Of Roofing

    The Critical Factor: Roof Pitch and Waste

    Knowing the flat footprint of your roof is not enough. The steepness of your roof, known as the pitch, dramatically affects the actual surface area. A steep roof has more surface area than a flat roof covering the same floor space.

    Understanding Roof Pitch

    Roof pitch is expressed as a ratio of vertical rise to horizontal run (e.g., 6/12). This means for every 12 inches you go horizontally, the roof rises 6 inches vertically.

    To get the true surface area, you must apply a pitch multiplier. You can find these multipliers in standard roofing charts or use the Pythagorean theorem.

    Roof PitchMultiplierImpact on Area
    4/121.054+5.4%
    6/121.118+11.8%
    8/121.202+20.2%
    12/121.414+41.4%

    Note: For detailed mathematical definitions of geometric slopes, you can refer to general resources on Wikipedia.

    Calculating Waste Factor

    You cannot buy exactly the amount of material needed for the exact square footage. Cutting shingles to fit valleys, hips, and ridges creates waste. Additionally, mistakes happen.

    • Simple Gable Roof: Add 10% waste factor.
    • Complex Roof (Multiple Valleys/Hips): Add 15–20% waste factor.

    Final Calculation Example:

    1. Flat Area: 2,000 sq ft (20 Squares)
    2. Pitch Adjustment (6/12 pitch): 2,000 x 1.118 = 2,236 sq ft
    3. Waste Factor (15%): 2,236 x 1.15 = 2,571 sq ft
    4. Total Squares Needed: 2,571 ÷ 100 = 25.71 Squares (Round up to 26 Squares)

    Materials Per Square: What Do You Actually Buy?

    Once you know your square count, you need to translate that into bundles of shingles or rolls of underlayment. This varies by material type, but here are the industry standards for asphalt shingles, the most common roofing material in the US.

    Asphalt Shingles

    • Bundles per Square: Typically 3 bundles make 1 square.
    • Shingles per Bundle: Usually contains 20–26 shingles, depending on the brand and style.
    • Weight: A square of asphalt shingles weighs between 200 to 350 pounds.

    Other Materials

    • Wood Shakes: Often require 4 bundles per square due to thicker spacing.
    • Metal Roofing: Sold by linear feet or panels, not typically by the “square” in the same way, though coverage is still calculated in square feet.
    • Slate/Tile: Much heavier and often requires specialized structural support. Coverage varies significantly by tile size.

    Pro Tip: Always check the manufacturer’s specifications on the bundle wrapper. Some architectural or premium shingles may require 4 or even 5 bundles to cover one square due to their thickness and exposure requirements.


    Common Mistakes When Estimating Roof Squares

    Even with the right formula, homeowners and DIYers often stumble. Here are the most frequent errors to avoid:

    1. Ignoring the Chimneys and Vents: While small, these penetrations require flashing and extra cutting. While they don’t add much area, they increase labor and waste.
    2. Using Floor Plan Square Footage: Your home’s living area is not your roof area. A two-story house with a 2,000 sq ft footprint might only have a 1,000 sq ft roof if it’s a simple gable, or much more if it’s complex. Never assume 1:1 correlation.
    3. Forgetting Dormers: Dormers add significant surface area. Measure each dormer face separately and add it to the total.
    4. Rounding Down: Always round up when ordering materials. Running short mid-project means delaying work while waiting for a new delivery, which risks weather exposure to the open roof deck.

    FAQ Section

    Q1: Does a square of roofing always equal 100 square feet?

    A: Yes. In the US roofing industry, a “square” is universally defined as 100 square feet. This standard applies regardless of the roofing material (asphalt, metal, tile, etc.).

    Q2: How many bundles of shingles do I need for one square?

    A: For standard 3-tab asphalt shingles, you typically need 3 bundles to cover one square (100 sq ft). For thicker architectural shingles, check the label, as some may require 4 bundles per square.

    Q3: Can I measure my roof from the ground?

    A: You can get a rough estimate using ground measurements and photos, but it is not accurate for ordering materials. Factors like pitch, overhangs, and complex angles are hard to judge from the ground. For precise quotes, professionals use laser measures or drone technology.

    Q4: Why do contractors charge per square instead of per square foot?

    A: Charging per square simplifies the billing process. It allows for quicker mental math during negotiations and aligns with how materials are packaged and shipped. It also helps buffer minor measurement discrepancies without renegotiating every single foot.

    Q5: How much does a square of roofing cost?

    A: Costs vary widely based on material and location. As of recent trends, asphalt shingles might range from $350 to $550 per square installed, while metal or slate can exceed $1,000 per square. Always get multiple local quotes for accurate pricing.

    Q6: Is there a difference between a “square” and a “bundle”?

    A: Yes. A square is a unit of area (100 sq ft). A bundle is a physical package of shingles. It usually takes 3 bundles to make one square, but this depends on the shingle type.


    Conclusion

    Understanding how many square feet are in a square of roofing is fundamental to any successful roofing project. Remember, one square equals 100 square feet. By accurately measuring your roof’s planes, adjusting for pitch, and adding a waste factor, you can order the right amount of material and avoid costly delays.

    Whether you are hiring a professional or tackling a small shed roof yourself, this knowledge empowers you to speak the same language as contractors and verify quotes with confidence. Don’t let measurement errors eat into your budget.

    Found this guide helpful? Share it with friends or family who are planning home improvements, and bookmark it for your next renovation project! Accurate measurements save money—start calculating today.

  • Roof Moss Removal Cost: 2026 Price Guide

    Roof Moss Removal Cost: 2026 Price Guide

    Have you noticed green, fuzzy patches creeping up your shingles? It’s not just an eyesore; moss can trap moisture against your roof, leading to premature decay and costly leaks. If you are wondering how much does it cost to remove moss from roof, you are in the right place to find clear, actionable answers.

    In this guide, we will break down the current market rates for 2026, compare professional services against DIY methods, and provide expert tips to keep your roof clean and healthy for years to come.

    Average Cost of Professional Moss Removal

    When hiring a professional, the price tag varies based on location, roof size, and the severity of the infestation. Generally, homeowners in the US can expect to pay between $350 and $600 for a standard single-story home. For larger, two-story homes with complex rooflines, costs can range from $600 to $1,200.

    Several factors influence these quotes:

    • Roof Square Footage: Most contractors charge per “square” (100 square feet). Expect to pay $0.20 to $0.60 per square foot.
    • Roof Pitch and Accessibility: Steeper roofs require more safety equipment and labor time, increasing the cost by 20–30%.
    • Type of Cleaning Method: Chemical treatments are cheaper than manual removal or soft washing.
    • Geographic Location: Labor rates in urban areas like Seattle or Portland (where moss is prevalent) may be higher due to demand.

    Cost Breakdown by Method

    MethodAverage CostBest For
    Chemical Treatment$350 – $500Light moss, preventative care
    Soft Washing$400 – $700Moderate growth, delicate shingles
    Manual Removal$500 – $900Heavy infestation, immediate results
    Full Roof Replacement$5,000+Severe structural damage

    Note: Prices are estimates for 2026 and may vary by contractor.

    Why Is Removing Moss Important?

    Many homeowners ignore moss until it becomes a major problem. However, moss acts like a sponge, holding water against your roofing materials. Over time, this constant moisture can cause shingles to curl, crack, or rot. In colder climates, trapped water freezes and expands, leading to ice dams and further structural damage.

    According to roofing experts, ignoring moss can reduce the lifespan of your asphalt shingles by up to 50%. By addressing the issue early, you protect your investment and avoid the high cost of premature roof replacement. For more detailed information on how biological growth affects building materials, you can refer to resources on biological weathering to understand the scientific basis of this degradation.

    DIY vs. Professional Removal: Which Is Better?

    Deciding whether to tackle the job yourself or hire a pro depends on your budget, physical ability, and comfort level with heights.

    DIY Moss Removal

    Cost: $50 – $150 (for chemicals, sprayers, and safety gear).

    Pros:

    • Significant cost savings.
    • You control the timing of the project.
    • Satisfying to complete yourself.

    Cons:

    • Safety Risk: Working on a roof is dangerous. Falls are a leading cause of home injury.
    • Potential Damage: Using a pressure washer incorrectly can strip granules from shingles, voiding warranties.
    • Time-Consuming: It requires careful application and waiting periods.

    Professional Moss Removal

    Cost: $350 – $1,200.

    Pros:

    • Expertise: Pros know which chemicals are safe for your specific roof type.
    • Safety: They have insurance, proper harnesses, and experience.
    • Warranty: Many offer guarantees on their work.
    • Efficiency: The job is done quickly and thoroughly.

    Cons:

    • Higher upfront cost.
    • Need to schedule around their availability.

    Verdict: If your roof is single-story and the moss is light, DIY might be feasible. For steep roofs, heavy growth, or two-story homes, hiring a professional is strongly recommended for safety and effectiveness.

    How Much Does It Cost To Remove Moss From Roof

    Step-by-Step Guide to Safe DIY Moss Removal

    If you decide to handle this task yourself, follow these steps to ensure safety and effectiveness. Always prioritize safety over speed.

    1. Safety First: Wear non-slip shoes, use a sturdy ladder with stabilizers, and consider using a safety harness. Never work on a wet or windy day.
    2. Clear Debris: Use a leaf blower or soft-bristle broom to remove leaves, twigs, and loose dirt from the roof surface. This allows the treatment to reach the moss directly.
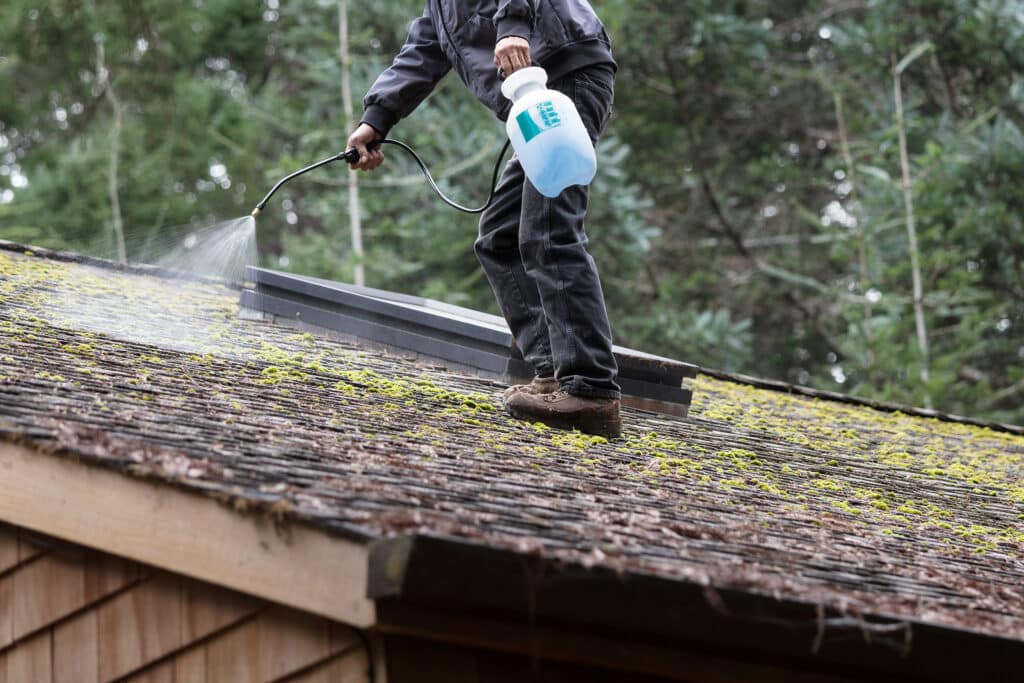
    3. Apply Moss Killer: Mix a zinc-based moss killer or a diluted bleach solution (1 part bleach to 4 parts water) in a pump sprayer. Avoid using pressure washers, as the high pressure can damage shingle granules.
    4. Let It Sit: Allow the solution to sit for 15–20 minutes. Do not let it dry completely. The moss should start to turn brown or yellow.
    5. Gentle Scrubbing: Use a soft-bristle brush to gently loosen the dead moss. Work from the top of the roof downward to avoid pushing debris under shingles.
    6. Rinse Carefully: Use a garden hose with a gentle spray nozzle to rinse off the dead moss and chemical residue. Ensure gutters are clear so water flows freely.

    Pro Tip: Apply moss killers in the spring or fall when temperatures are between 50°F and 70°F for best results. Avoid applying before heavy rain, which can wash away the treatment before it works.

    How to Prevent Moss from Returning

    Removing moss is only half the battle. Prevention is key to maintaining a clean roof and minimizing future costs.

    • Install Zinc or Copper Strips: These metal strips release ions when it rains, creating an environment where moss cannot grow. Place them near the roof ridge.
    • Trim Overhanging Branches: Moss thrives in shade and dampness. Trimming trees allows more sunlight and airflow, keeping the roof drier.
    • Clean Gutters Regularly: Clogged gutters cause water to back up onto the roof deck, creating ideal conditions for moss. Clean them at least twice a year.
    • Use Preventative Sprays: Apply a moss-inhibiting spray annually, especially in humid climates. Look for products containing zinc sulfate or copper sulfate.

    Frequently Asked Questions (FAQ)

    1. Does homeowners insurance cover moss removal?

    Generally, no. Homeowners insurance typically covers sudden and accidental damage, not gradual wear and tear or maintenance issues like moss growth. However, if moss causes significant damage that leads to a leak, the resulting water damage might be covered, depending on your policy. Always check with your insurer.

    2. Can I use a pressure washer to remove moss?

    It is not recommended. High-pressure water can strip the protective granules from asphalt shingles, leading to premature aging and voiding warranties. Instead, opt for “soft washing,” which uses low pressure and specialized cleaning solutions.

    3. How often should I clean moss off my roof?

    In damp, shady climates like the Pacific Northwest, you may need to treat your roof every 1–2 years. In drier regions, every 3–5 years may suffice. Regular inspections after storm seasons are advisable.

    4. Is bleach safe for removing moss?

    Diluted bleach can be effective, but it can also harm surrounding plants, discolor shingles, and corrode metal fixtures like gutters and flashing. Zinc-based or oxygen-based cleaners are safer alternatives for both your roof and the environment.

    5. What is the best time of year to remove moss?

    The best times are spring and early fall. Temperatures are moderate, allowing chemicals to work effectively without evaporating too quickly or freezing. Avoid summer heat, which can stress the roof materials, and winter, when surfaces are slippery and dangerous.

    Conclusion

    Understanding how much does it cost to remove moss from roof helps you budget effectively and protect your home’s value. While DIY methods can save money, professional services offer safety, efficiency, and long-term protection. Whether you choose to tackle it yourself or hire an expert, regular maintenance and preventative measures like zinc strips and tree trimming will keep your roof moss-free for years.

    Don’t let moss compromise your home’s integrity. Take action today, and share this guide with friends and neighbors who might be facing the same green challenge!

  • Roof Capacity: Promaster EV Cargo Van Guide

    Roof Capacity: Promaster EV Cargo Van Guide

    If you are transitioning your delivery fleet to electric or simply upgrading your personal workhorse, knowing the structural limits of your vehicle is critical. Many business owners find themselves asking, “What Is The Roof Capacity Of Promaster Ev Cargo Van“ before installing essential equipment like solar panels, ladders, or HVAC units. Understanding this limit ensures you maintain vehicle safety, warranty validity, and optimal battery efficiency.

    The shift to electric vehicles (EVs) brings unique considerations regarding weight distribution and aerodynamics. Unlike traditional gas vans, every pound added to the roof of an EV can subtly impact range and handling. In this guide, we will break down the exact specifications, safety margins, and best practices for maximizing your Ram ProMaster EV’s utility without compromising its integrity.

    Understanding the Official Roof Load Limits

    When discussing roof capacity, it is vital to distinguish between static and dynamic load ratings. Most manufacturers provide two different numbers, and confusing them can lead to catastrophic structural failure.

    Dynamic vs. Static Load: What’s the Difference?

    • Dynamic Load: This is the weight the roof can support while the vehicle is in motion. For most high-roof cargo vans, including the Ram ProMaster series, this limit is typically conservative to account for wind resistance, braking forces, and cornering G-forces.
    • Static Load: This refers to the weight the roof can hold when the vehicle is parked on level ground. This number is significantly higher because there are no kinetic forces acting against the structure.

    For the Ram ProMaster (both gasoline and upcoming EV variants based on the STLA Frame platform), the general industry standard for dynamic roof loading is approximately 150 to 200 pounds (68–90 kg) distributed evenly across the roof ribs. However, because the EV variant may have slight structural reinforcements to accommodate battery packaging and different weight distributions, relying on older gas-model data can be risky.

    Expert Note: Always consult the specific Owner’s Manual for your model year. As of late 2025 and early 2026, Ram has emphasized that the high-strength steel roof structure remains consistent with previous generations, but the total vehicle payload is more strictly monitored in EVs due to battery weight.

    The Impact of the “High Roof” Configuration

    The ProMaster is famous for its high-roof option, which provides nearly 6 feet of interior standing height. While excellent for ergonomics, a higher center of gravity means that roof loads affect stability more than they would on a low-roof van.

    If you are carrying heavy items on the roof of a High Roof ProMaster EV:

    1. Wind Drag Increases: This reduces your electric range.
    2. Handling Changes: The vehicle may feel “top-heavy” during sharp turns.
    3. Structural Stress: The vertical pillars endure more torque during sudden stops.

    Therefore, staying well below the maximum dynamic limit is not just about preventing roof collapse; it is about maintaining safe driving dynamics.

    How Roof Weight Affects EV Range and Performance

    One of the most common questions we receive from fleet managers is how roof racks and cargo impact the efficiency of an electric van. The answer lies in physics: aerodynamics and mass.

    Aerodynamic Drag Coefficient

    Electric vans are designed with smooth lines to minimize air resistance. Adding a roof rack, even an empty one, disrupts this airflow. According to studies on commercial EVs, a poorly designed or loaded roof rack can increase energy consumption by 10% to 25% at highway speeds.

    Item on RoofEstimated Range Impact (Highway)Notes
    Empty Aero Rack-5% to -8%Minimal disruption if streamlined.
    Loaded Ladder Rack-10% to -15%Significant drag due to irregular shape.
    Solar Panel Array-2% to -5%Flat profile helps maintain aerodynamics.
    Heavy Cargo Box-15% to -20%High drag and added weight.

    Battery Efficiency and Weight

    The Ram ProMaster EV utilizes a large lithium-ion battery pack, which already constitutes a significant portion of the vehicle’s curb weight. Adding weight to the roof raises the center of gravity, forcing the suspension and electronic stability control systems to work harder.

    While the motor torque is instant and powerful, the energy required to accelerate that extra mass comes directly from your battery reserve. If you are calculating routes for last-mile delivery, every 100 pounds added to the roof could reduce your daily operational range by several miles, depending on terrain and driving style.

    What Is The Roof Capacity Of Promaster Ev Cargo Van

    Best Practices for Installing Roof Racks on the ProMaster EV

    To safely utilize your roof capacity, proper installation is non-negotiable. The ProMaster’s roof has specific reinforcement points, usually aligned with the internal structural ribs.

    Step-by-Step Installation Guide

    1. Locate the Reinforcement Ribs: Use a stud finder or tap the roof gently to hear the solid sound of the metal ribs. Do not drill or clamp into the thin sheet metal between ribs.
    2. Choose the Right Mounting System: Opt for clamp-on racks that grip the rain gutters or door frames if you want to avoid drilling. If drilling is necessary for heavy-duty use, ensure you use stainless steel bolts and marine-grade sealant to prevent rust—a critical concern for fleet longevity.
    3. Distribute Weight Evenly: Never place all heavy items on one side. Balance the load left-to-right and front-to-back.
    4. Torque Specifications: Follow the manufacturer’s torque settings strictly. Over-tightening can warp the roof panel; under-tightening can lead to rattling and eventual fatigue failure.

    For detailed structural diagrams and engineering standards regarding vehicle roof loads, you can refer to general automotive safety resources such as the National Highway Traffic Safety Administration (NHTSA) or technical overviews found on Wikipedia’s Automotive Design page for broader context on vehicle structural integrity.

    Common Roof Loads: What Can You Actually Carry?

    Let’s break down typical items contractors and delivery drivers put on their roofs to see if they fit within the safe capacity.

    • Ladders: A standard 24-foot extension ladder weighs about 60–70 lbs. Two ladders would approach the 150-lb dynamic limit. Verdict: Safe, but monitor speed.
    • Solar Panels: A typical 100W monocrystalline panel weighs around 15–20 lbs. A set of four panels plus mounting hardware might weigh 100 lbs. Verdict: Very Safe and recommended for off-grid charging.
    • HVAC Units: Small rooftop AC units for camper conversions can weigh 50–80 lbs. Verdict: Safe for static use, caution advised for dynamic driving.
    • Storage Boxes: Large plastic cargo boxes can weigh 40 lbs empty and 100+ lbs when full. Verdict: Use only for lightweight items like insulation or empty containers.

    FAQ Section

    1. What is the exact dynamic roof capacity of the 2026 Ram ProMaster EV?

    While Ram officially cites a general limit of 150–200 lbs for dynamic loads across the ProMaster line, the EV model’s specific owner’s manual should be your final authority. The structural roof ribs are similar to the gas model, but the increased curb weight of the EV means you should aim for the lower end of that spectrum (150 lbs) to preserve handling safety.

    2. Can I install a solar panel array on my ProMaster EV roof?

    Yes, absolutely. Solar panels are one of the best uses for roof space because they are flat (low aerodynamic drag) and relatively lightweight. A typical setup of 400–600 watts of solar panels will likely stay under the 100-lb mark, well within safe limits. This can also help trickle-charge auxiliary systems, preserving your main drive battery.

    3. Does adding a roof rack void the warranty on my electric van?

    Generally, no, provided the installation does not damage the vehicle’s structure or electrical components. However, if you drill into the roof improperly and cause water leaks that damage the high-voltage battery or interior electronics, those specific repairs may not be covered. Always use professional installers for drilled mounts.

    4. How does wind affect a loaded roof on an electric van?

    Wind resistance increases exponentially with speed. At 65 mph, the drag from a loaded roof rack can require significantly more power to overcome than at 35 mph. For EVs, this means a disproportionate drop in range. Try to keep highway speeds moderate when carrying heavy roof loads to maximize efficiency.

    5. Is it safer to carry weight inside the van or on the roof?

    It is almost always safer and more efficient to carry weight inside the van, low to the floor. This keeps the center of gravity low, improving handling and reducing rollover risk. It also maintains the vehicle’s aerodynamic profile, preserving your electric range. Only use the roof for items that do not fit inside or require external access.

    6. Are there specific roof rack brands recommended for the ProMaster EV?

    Brands like Thule, Yakima, and VanTech offer models specifically engineered for the Ram ProMaster’s rib spacing. Look for racks labeled as “high-load” or “commercial grade.” Avoid universal fit racks that rely solely on friction clamps without reinforcing the contact points, as they may slip or damage the paint seal.

    Conclusion

    Knowing what is the roof capacity of Promaster EV cargo van is essential for any professional looking to optimize their mobile workspace. While the general guideline hovers around 150 to 200 pounds for dynamic loads, the key to success lies in smart distribution, aerodynamic awareness, and strict adherence to safety margins.

    By keeping your roof load light and balanced, you protect your vehicle’s structural integrity, maintain better handling, and preserve your precious electric range. Remember, the roof is a valuable asset, but it should be used strategically—not as a dumping ground for heavy equipment.

    Found this guide helpful? Share it with your fellow fleet managers or contractor friends on social media to help them drive safer and smarter! Don’t forget to bookmark this page for future reference as you outfit your new electric workhorse.