Blog

  • Spot Roof Hail Damage Fast: A Homeowner’s Guide

    Spot Roof Hail Damage Fast: A Homeowner’s Guide

    Have you just weathered a nasty storm, and now you’re staring up at your shingles with a knot in your stomach? It is completely normal to feel anxious about potential structural issues after severe weather, but panic won’t help your home. Understanding how do you know if your roof has hail damage is the first step toward protecting your investment and ensuring your family stays safe and dry.

    In this guide, we will walk you through exactly what to look for, how to inspect your property safely, and when it is time to bring in the professionals. Let’s turn that uncertainty into actionable knowledge.

    Why Early Detection of Hail Damage Matters

    Hailstorms are becoming increasingly frequent and severe across many parts of the United States. According to recent climate data, billion-dollar hail events are no longer rare occurrences. When ice chunks strike your roof, they don’t just make noise; they compromise the integrity of your roofing materials.

    Ignoring these signs can lead to:

    • Water Intrusion: Even small cracks can allow moisture to seep into your attic, leading to mold and rot.
    • Reduced Lifespan: A roof that should last 20 years might fail in 10 if hail damage is left untreated.
    • Insurance Complications: Most insurance policies require timely reporting of storm damage. Waiting too long can result in denied claims.

    Knowing the specific indicators of hail impact allows you to act quickly, preserving both your home’s value and your peace of mind.

    What Does Hail Damage Look Like on Different Roof Types?

    Not all roofs react to hail the same way. The material you have plays a significant role in how damage manifests. Here is a breakdown of what to expect based on common roofing materials.

    Asphalt Shingles

    Asphalt shingles are the most common roofing material in the US, and they are quite vulnerable to hail. Look for:

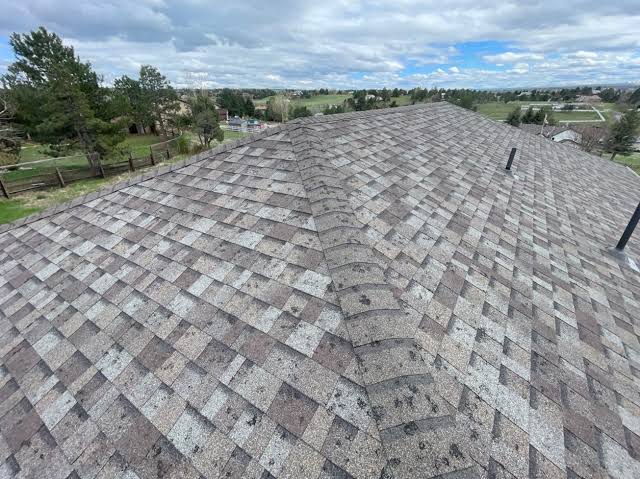
    • Black Bruises: These are dark spots where the granules have been knocked off, exposing the asphalt underneath.
    • Shiny Spots: If you see areas that look unusually shiny or smooth, the protective granule layer has likely been stripped away.
    • Cracked Shingles: Hail can cause fractures that run along the shingle, which may not be visible from the ground.

    Metal Roofs

    Metal roofs are durable, but they are not invincible. Hail damage on metal usually appears as:

    • Dents: Circular depressions that match the size of the hailstones.
    • Paint Chipping: Impact points may chip away the protective coating, leading to rust over time.

    Wood Shakes and Tiles

    • Wood: Look for splits, orange-brown discoloration (fresh wood exposure), or impact marks with sharp edges.
    • Clay/Concrete Tiles: These may crack or shatter entirely. Listen for loose pieces rattling in the gutters after a storm.

    Pro Tip: Always compare the damage on your roof to other objects around your property. If your air conditioner unit, window screens, or mailbox show dents, your roof likely sustained impact as well.
    How Do You Know If Your Roof Has Hail Damage

    Step-by-Step: How to Inspect Your Roof Safely

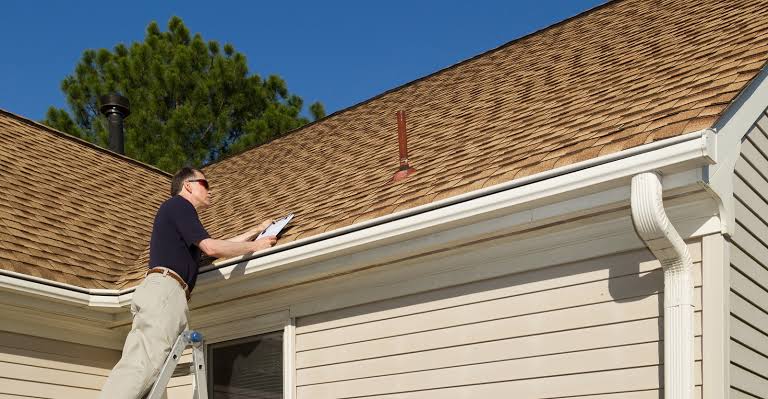
    You do not need to climb onto your roof to identify most hail damage. In fact, walking on a damaged roof can cause further harm and void warranties. Follow this safe, ground-level inspection routine.

    1. Check Your Gutters and Downspouts

    Start by looking at your gutter system. Hail knocks granules off asphalt shingles, and these granules wash into the gutters.

    • What to look for: An accumulation of sand-like granules. While some granule loss is normal over time, a sudden surge after a storm is a red flag.
    • Action: Clean out a section of the gutter. If you find a thick layer of granules mixed with debris, note it as evidence.

    2. Inspect Ground-Level Fixtures

    Look at items that sit at the same elevation as your roof or slightly lower.

    • Vents and Pipes: Check plastic vent caps or pipe flashings for cracks or dents.
    • Soft Metal: Aluminum flashing around chimneys or valleys is soft and easily dented. Dents here suggest significant hail impact.

    3. Use Binoculars for a Closer Look

    Stand at various corners of your house and use binoculars to scan the roof surface.

    • Pattern Recognition: Hail damage is often random but widespread. Look for clusters of dark spots or missing granules.
    • Lighting: Inspect during the early morning or late afternoon when the sun is low. This creates shadows that highlight dents and irregularities.

    4. Document Everything

    Take clear, high-resolution photos of any suspected damage. Include close-ups and wide shots that show the location on the roof. Date-stamp these images for your insurance records.

    Hail Damage vs. Normal Wear and Tear

    One of the biggest challenges homeowners face is distinguishing between age-related wear and storm damage. Here is a quick comparison to help you tell the difference.

    FeatureHail DamageNormal Wear & Tear
    PatternRandom, scattered impactsUniform, consistent aging
    Granule LossSharp, distinct bare spotsGradual thinning over large areas
    Shingle ConditionCracks with sharp edgesCurling, blistering, or softening
    Surrounding ItemsDents on AC units, cars, etc.No corresponding damage elsewhere
    TimingAppears immediately after a stormDevelops slowly over years

    If you are unsure, remember that hail damage is typically accompanied by collateral damage to other property features. If your car is fine and the trees are untouched, it might just be an old roof.

    When to Call a Professional Roofer

    While DIY inspections are great for initial assessments, they have limits. You should contact a licensed roofing contractor if:

    • You see visible cracks or missing shingles.
    • You notice water stains on your ceiling or walls inside the home.
    • The storm involved hail larger than 1 inch in diameter (quarter-sized or bigger).
    • You are planning to file an insurance claim.

    A professional roofer can perform a thorough inspection using safety harnesses and provide a detailed report. This documentation is crucial for insurance adjusters. For more information on how roofing materials are tested for durability, you can refer to general standards on Wikipedia.

    Navigating the Insurance Claim Process

    If you confirm damage, the next step is dealing with insurance. Here is how to streamline the process:

    1. Review Your Policy: Check your deductible and coverage limits. Understand if you have “Actual Cash Value” or “Replacement Cost” coverage.
    2. File Promptly: Most insurers have a deadline for filing storm claims, often within one year of the event.
    3. Get Multiple Estimates: Obtain at least two quotes from reputable local roofers. Do not automatically accept the insurance adjuster’s first offer if it seems low.
    4. Keep Records: Save all receipts, photos, and correspondence.

    Note: Be wary of “storm chasers”—contractors who descend on a neighborhood after a storm offering cheap repairs. Always verify licenses and check reviews before signing a contract.

    FAQ: Common Questions About Roof Hail Damage

    1. Can hail damage cause leaks immediately?

    Not always. Sometimes the damage is cosmetic initially, but the compromised shingles degrade faster under UV exposure, leading to leaks months or even years later. However, severe hail can puncture shingles, causing immediate leaks.

    2. How big does hail need to be to damage a roof?

    Generally, hail needs to be at least 1 inch in diameter (the size of a quarter) to cause significant functional damage to standard asphalt shingles. Smaller hail can cause cosmetic bruising, but larger stones are required to crack or break shingles.

    3. Will my insurance cover hail damage?

    Most standard homeowners insurance policies cover hail damage. However, coverage depends on your specific policy terms, deductible, and whether the damage is deemed “cosmetic” or “functional.” Some policies exclude cosmetic damage entirely.

    4. How long do I have to file a claim for hail damage?

    This varies by insurer and state, but typically you have one to two years from the date of the storm. It is best to file as soon as possible while evidence is fresh and contractors are available.

    5. Can I repair hail damage myself?

    Minor cosmetic issues might seem fixable, but roof repair is dangerous and complex. Improper repairs can void warranties and lead to leaks. It is highly recommended to hire a professional for any structural or waterproofing repairs.

    Conclusion

    Knowing how do you know if your roof has hail damage empowers you to take control of your home maintenance. By recognizing the signs—such as black bruises, granule loss, and dented fixtures—you can prevent minor issues from becoming major headaches. Remember, early detection saves money, extends your roof’s life, and simplifies the insurance process.

    Don’t wait for a leak to appear. If you suspect your roof took a hit during the last storm, perform a safe ground-level inspection today. If you found this guide helpful, please share it with your neighbors on social media. Staying informed together helps our entire community stay safe and secure.
  • Tactical Ventilation Roof Crew: Minimum Staffing Guide

    Tactical Ventilation Roof Crew: Minimum Staffing Guide

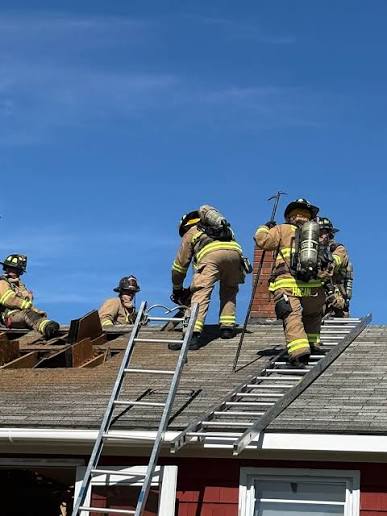
    Every second counts when fighting a structure fire, but rushing into complex operations without adequate manpower is a recipe for disaster. Many fire departments struggle with staffing shortages, yet the dangers of vertical ventilation demand strict adherence to safety protocols. If you are planning your next drill or updating your standard operating guidelines (SOGs), you need to know exactly tactical ventilation roof crew members should have a minimum of four qualified personnel to ensure both operational success and firefighter survival.

    This guide breaks down the “why” and “how” behind this critical staffing requirement, helping you build a safer, more effective team on the fireground.

    Why Four Personnel? The Safety Imperative

    When we discuss vertical ventilation, we are talking about one of the most hazardous tasks in firefighting. It involves working at heights, dealing with compromised structural integrity, and operating in close proximity to extreme heat and smoke. But why is the magic number four?

    The primary reason is the Two-In/Two-Out rule, mandated by OSHA and supported by NFPA 1500. This regulation requires that at least two firefighters enter the hazardous area while two remain outside for rescue if needed. However, on the roof, the dynamics are slightly different but equally strict.

    The Breakdown of Roles

    A minimum crew of four allows for specific role allocation that prevents task saturation and ensures accountability:

    1. The Officer (Team Leader): Oversees the operation, communicates with Incident Command (IC), and assesses structural stability.
    2. The Saw Operator: Cuts the ventilation hole. This is a high-focus task requiring full attention to the saw and the roof surface.
    3. The Hook/Iron Man: Opens the cut, checks for fire extension, and assists with debris removal.
    4. The Safety/Backup Firefighter: Monitors conditions, manages the ladder placement, and serves as the immediate rescue resource if a member falls through or gets trapped.

    If you drop below four members, someone has to double up on roles. For example, the officer might have to help cut, leaving no one dedicated to monitoring changing fire conditions or structural integrity. This division of attention can lead to fatal errors.

    People Also Ask: Common Questions About Roof Crew Staffing

    To deepen our understanding, let’s look at specific questions often asked by fire service professionals and students.

    What Happens If You Only Have Three Members?

    Operating with three members is a significant risk mitigation failure. In this scenario, you typically lose the dedicated safety/backup role. If one firefighter encounters trouble—such as falling through a weakened roof section—the remaining two must attempt a rescue while still managing the ventilation task. This splits their focus and reduces the effectiveness of the rescue attempt.

    Furthermore, without a fourth person, there is no one to properly secure and foot the ladder at the base while two are working on the roof. An unsecured ladder is a leading cause of falls and injuries in the fire service.

    Does Building Type Change the Minimum Requirement?

    While four is the minimum for standard residential structures, larger commercial buildings or those with complex roof systems may require more. According to general fireground tactics, large flat roofs or truss-system roofs present higher collapse risks.

    Building TypeRecommended Minimum CrewKey Risk Factor
    Single-Family Residential4 PersonnelStandard pitch, wood framing
    Multi-Family/Row House4-6 PersonnelShared attics, rapid fire spread
    Commercial Flat Roof6+ PersonnelLarge surface area, heavy loads
    Truss Construction6+ PersonnelEarly collapse potential

    Note: Always consult your local SOGs and incident commander assessments.

    How Does Experience Level Affect Crew Size?

    Experience cannot replace manpower, but it influences efficiency. A crew of four veterans may complete the task faster than four rookies. However, the minimum staffing remains four regardless of experience. In fact, inexperienced crews may benefit from having a fifth member—a senior instructor or chief officer—to provide real-time guidance.

    Relying on skill to compensate for low staffing is a dangerous gamble. Fatigue sets in quickly during forced entry and cutting operations. Having four people allows for rotation and rest, maintaining high performance throughout the operation.

    Tactical Ventilation Roof Crew Members Should Have A Minimum Of:

    Step-by-Step: Executing Vertical Ventilation with a Full Crew

    Let’s walk through how a four-person crew operates efficiently. This process highlights why each member is essential.

    Step 1: Size-Up and Ladder Placement

    The Officer conducts a 360-degree size-up if possible, identifying the fire location and roof type. They direct the Safety Firefighter to place the primary ladder. The ladder must extend at least 3-5 rungs above the roofline for safe transition. The Safety Firefighter stays at the base to foot the ladder, ensuring it doesn’t slip.

    Step 2: Ascending and Assessment

    The Saw Operator and Hook Man ascend the ladder. The Officer may follow or remain on the ground to communicate with IC, depending on department protocol. Once on the roof, the team moves away from the ladder to avoid overloading one section. They assess the roof for sponginess, indicating structural compromise.

    Step 3: Cutting the Hole

    The Saw Operator begins cutting the inspection hole or the main ventilation hole. The Hook Man stands ready with a pike pole or halligan bar. The Officer monitors smoke color and volume, directing the cut location for maximum efficiency. The Safety Firefighter maintains communication from the ground, watching for changes in building stability.

    Step 4: Opening and Clearing

    Once the cut is complete, the Hook Man opens the roof deck. They check for fire extension in the attic space. The Saw Operator assists in clearing debris. This teamwork ensures the hole is opened quickly, releasing heat and smoke before the fire can mushroom back down.

    Step 5: Egress and Accountability

    After the task is complete, the crew exits via the ladder. The Safety Firefighter continues to foot the ladder until all members are safely on the ground. The Officer reports “Ventilation Complete” to Incident Command.

    The Role of Technology and Equipment

    Modern firefighting isn’t just about manpower; it’s about using the right tools. A well-equipped crew can work faster and safer. Ensure your roof crew has:

    • Chain Saws or Circular Saws: Properly maintained and fueled.
    • Personal Protective Equipment (PPE): Full turnout gear, SCBA, and helmets.
    • Thermal Imaging Cameras (TIC): To identify hot spots and fire location before cutting.
    • Roof Hooks and Halligans: For opening cuts and probing the roof.

    For more detailed information on standard firefighting operations and safety guidelines, you can refer to resources like Wikipedia’s page on Firefighting which provides a broad overview of historical and modern tactics.

    FAQ Section

    Q1: Can a two-person team perform roof ventilation?

    A: No. A two-person team violates the Two-In/Two-Out principle and lacks the necessary support for ladder security, tool handling, and emergency rescue. It is strictly prohibited in most professional fire departments.

    Q2: What if the roof is flat versus pitched?

    A: The minimum staffing of four remains the same. However, flat roofs may require additional personnel if the surface area is large or if there are heavy HVAC units that need to be navigated. The core team of four handles the actual cutting and opening.

    Q3: How long does vertical ventilation take with four people?

    A: With a trained four-person crew, an inspection cut and main ventilation hole can typically be completed in 3–5 minutes. Delays usually occur due to poor ladder placement, equipment failure, or lack of coordination.

    Q4: What is the biggest risk to roof crews?

    A: Structural collapse is the primary risk. Other significant risks include falls from height, lacerations from saws, and being overcome by sudden vent-induced flashovers. Proper staffing mitigates these risks by ensuring constant situational awareness.

    Q5: Do volunteer departments follow the same minimums?

    A: Yes. While volunteer departments may face staffing challenges, the safety standards regarding vertical ventilation do not change. If four members are not available, alternative ventilation methods (such as horizontal ventilation via windows) should be considered instead of risking lives on the roof.

    Conclusion

    Understanding that tactical ventilation roof crew members should have a minimum of four personnel is not just about following rules—it’s about saving lives. This staffing level ensures that every critical role, from cutting to safety monitoring, is covered without compromising firefighter well-being.

    By adhering to this standard, you protect your team from unnecessary risks and ensure that ventilation efforts effectively support fire suppression operations. Remember, a well-staffed crew is a confident crew.

    Share this guide with your fellow firefighters and training officers to promote safer fireground operations!

  • Metal Roof Cost Per Sq Ft: 2026 Guide

    Metal Roof Cost Per Sq Ft: 2026 Guide

    Are you staring at your aging shingles and wondering if switching to metal is worth the investment? You are not alone; many homeowners struggle to pin down accurate numbers because prices fluctuate based on materials and labor. Understanding how much does a metal roof cost per sq ft is the first step toward making a smart, long-term financial decision for your home.

    Breaking Down the Average Cost Per Square Foot

    When planning a roofing project, clarity is key. In 2026, the national average for installing a metal roof typically ranges between $9 and $14 per square foot for standard residential projects. However, this number is not static. It acts more like a baseline that shifts depending on several critical variables.

    For a basic corrugated steel panel installation, you might find prices dipping as low as $7 per square foot. Conversely, high-end standing seam copper roofs can soar past $25 per square foot.

    It is crucial to distinguish between “material cost” and “installed cost.” While the metal panels themselves might only cost $3–$5 per square foot, the labor, underlayment, flashings, and removal of the old roof significantly impact the final bill. Most contractors quote by the “square,” which equals 100 square feet. Therefore, a 2,000-square-foot roof is actually 20 squares. Keeping this unit conversion in mind will help you avoid confusion when comparing bids.

    What Factors Influence Metal Roofing Prices?

    Why does one neighbor pay $10,000 while another pays $25,000 for a similar-sized home? The disparity usually comes down to four main factors.

    1. Material Type

    Not all metal is created equal. The type of metal you choose is the single biggest driver of cost.

    • Galvanized Steel: The most affordable option. It is durable but requires a protective coating to prevent rust.
    • Aluminum: Ideal for coastal areas due to its natural resistance to salt corrosion. It is moderately priced.
    • Zinc: A premium material that self-heals minor scratches over time. It is expensive but lasts incredibly long.
    • Copper: The luxury choice. It develops a beautiful patina but comes with a hefty price tag.

    2. Roof Complexity

    A simple gable roof is cheap to cover. A roof with multiple valleys, dormers, chimneys, and steep pitches requires more labor, more waste (cutting scraps), and specialized safety equipment. Expect to pay a premium for complex architectural designs.

    3. Geographic Location

    Labor rates vary wildly across the United States. Installing a roof in rural Midwest may cost significantly less than in urban centers like New York or San Francisco due to higher overhead and union labor standards. Additionally, local building codes regarding wind uplift or snow loads may require heavier-gauge metal or additional fasteners, increasing material costs.

    4. Removal of Old Roofing

    If your contractor needs to tear off two layers of old asphalt shingles before installing the metal, you will incur disposal fees and extra labor hours. Some metal roofs can be installed over existing shingles, which saves money, but this depends on local codes and the condition of the current deck.

    How Much Does A Metal Roof Cost Per Sq Ft

    Material Comparison: Steel vs. Aluminum vs. Copper

    To help you visualize the differences, here is a breakdown of common materials. This table assumes professional installation including labor and materials.

    MaterialAvg. Cost Per Sq. Ft.LifespanBest For
    Corrugated Steel$7 – $1030–45 YearsBudget-conscious homeowners, barns, sheds
    Standing Seam Steel$10 – $1440–60 YearsModern homes, snowy climates
    Aluminum$12 – $1840–50 YearsCoastal regions, humid areas
    Zinc$18 – $2260–80 YearsHistoric restorations, eco-friendly builds
    Copper$22 – $30+70–100+ YearsLuxury estates, architectural landmarks

    Note: Prices are estimates for 2026 and may vary by region.

    Hidden Costs You Might Overlook

    When asking how much does a metal roof cost per sq ft, many homeowners forget the ancillary expenses. These “hidden” costs can add 10–15% to your total budget if not planned for.

    • Underlayment: High-quality synthetic underlayment is essential for moisture protection. Do not skimp here.
    • Trim and Flashings: The edges, ridges, and penetrations (like vent pipes) require custom flashing. Poor flashing is the leading cause of leaks, so ensure your quote includes premium trim work.
    • Insulation Upgrades: Metal roofs conduct heat differently than asphalt. You may need to upgrade your attic insulation to maintain energy efficiency.
    • Permits: Local municipalities often charge permit fees based on the project’s valuation.

    For a deeper understanding of metal properties and their industrial applications, you can refer to general metallurgical data on Wikipedia. While this source is technical, it highlights why certain alloys are chosen for durability in construction.

    Is a Metal Roof Worth the Investment?

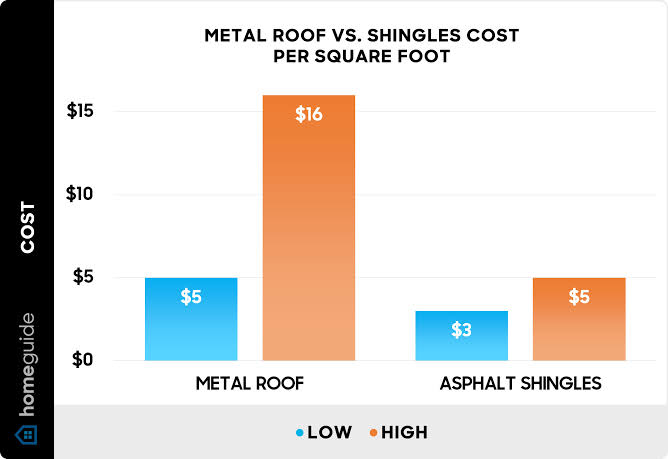
    The upfront cost is higher than asphalt shingles, which typically cost $3–$5 per square foot installed. However, the long-term value proposition of metal is compelling.

    Longevity and Durability

    A quality metal roof lasts two to three times longer than asphalt. While you might replace shingles every 15–20 years, a metal roof can last 50 years or more. This means you avoid the hassle and cost of two full roof replacements during the lifespan of one metal roof.

    Energy Efficiency

    Metal roofs reflect solar radiant heat, which can reduce cooling costs by 10–25%. Many modern metal roofs come with cool-roof pigments that meet Energy Star standards. In hot US states like Texas or Florida, this energy savings can partially offset the higher initial installation cost over time.

    Resale Value

    According to various real estate studies, a metal roof can increase your home’s resale value. Buyers appreciate the low maintenance and durability. It is often seen as a premium upgrade, similar to a renovated kitchen or new hardwood floors.

    How to Get Accurate Quotes

    Do not rely on online calculators alone. They provide estimates, not facts. To get a true sense of how much does a metal roof cost per sq ft for your specific home, follow these steps:

    1. Measure Your Roof: Use satellite imagery tools or hire a measurer to get the exact square footage. Include waste factor (usually 10–15%).
    2. Get Three Bids: Contact licensed, insured local contractors. Ensure they specialize in metal, not just general roofing.
    3. Check References: Ask for photos of previous jobs and speak to past clients about their experience.
    4. Review the Warranty: Look for both a manufacturer’s warranty on the paint/finish and a workmanship warranty from the installer. A 20-year paint warranty is standard for good quality steel.

    FAQ Section

    Q: Can I install a metal roof over my existing shingles?

    A: Yes, in many cases, you can. This is called a “retrofit” installation. It saves on disposal costs and labor. However, you must ensure the existing roof deck is solid and free of rot. Local building codes may limit the number of layers allowed, so always check with your contractor first.

    Q: Does metal roofing make noise when it rains?

    A: This is a common myth. When installed correctly with solid sheathing and proper underlayment, a metal roof is no louder than an asphalt shingle roof during rain. In fact, many homeowners find the sound soothing. The noise issue primarily occurs in barns or structures without insulation or ceiling drywall.

    Q: How often do I need to maintain a metal roof?

    A: Metal roofs are very low maintenance. You should inspect them annually for loose fasteners or debris accumulation in valleys. Cleaning gutters and rinsing the roof with water to remove pollen or dirt every few years is usually sufficient. Avoid pressure washing, which can damage the protective coating.

    Q: Will a metal roof affect my home insurance premiums?

    A: Often, yes, in a good way. Many insurance companies offer discounts (typically 5–15%) for metal roofs because they are fire-resistant and withstand high winds better than asphalt. Check with your provider for specific discounts available in your area.

    Q: What is the difference between exposed fastener and hidden fastener systems?

    A: Exposed fastener systems (like corrugated panels) have screws visible on the surface. They are cheaper but require periodic checking as screws can loosen or seals can degrade. Hidden fastener systems (like standing seam) conceal the clips under the panels. They are more expensive, look cleaner, and generally last longer with less maintenance.

    Conclusion

    Deciding on a new roof is a major financial commitment. By now, you should have a clearer picture of how much does a metal roof cost per sq ft and what drives those prices. While the initial investment is higher than traditional shingles, the durability, energy savings, and aesthetic appeal offer significant long-term benefits.

    Remember, the cheapest bid is not always the best. Prioritize quality installation and reputable materials to ensure your roof protects your home for decades. If you found this guide helpful, please share it with friends or family who are considering a home upgrade. Your network might thank you for saving them from costly roofing mistakes!

  • Insurance First or Roofer? The Right Order

    Insurance First or Roofer? The Right Order

    Storms are unpredictable, and discovering damage to your roof can be an immediate source of stress and anxiety for any homeowner. You want the problem fixed quickly, but you also want to ensure you aren’t paying out of pocket for something your policy should cover. This dilemma often leads to the critical question: Do I contact insurance first or contact a roofing company? Getting this order wrong can lead to claim denials, delayed repairs, or unnecessary out-of-pocket expenses. In this guide, we will walk you through the optimal strategy to protect your home and your wallet.

    Why the Order of Operations Matters

    Many homeowners assume that calling their insurance provider is the automatic first step. While communication with your insurer is vital, contacting them before having a professional assessment can sometimes put you at a disadvantage. Insurance adjusters are trained to minimize payouts, while roofing contractors are trained to identify all visible and hidden damage.

    If you call your insurance company first without a professional opinion, you might inadvertently describe the damage incorrectly or miss critical details that justify a full replacement rather than a minor repair. Conversely, if you hire a roofer before notifying your insurer, you risk starting work that hasn’t been approved, potentially voiding coverage.

    The goal is to strike a balance: gather evidence, understand the scope, and then navigate the claims process with confidence.

    Do I Contact Insurance First Or Contact A Roofing Company

    Step 1: Ensure Safety and Document the Damage

    Before making any calls, your priority is safety. If there is active leaking, place buckets under the drips and move valuables away from water damage. Do not climb onto the roof yourself, especially if it is wet or steep.

    Once safe, document everything from the ground. Use your smartphone to take high-resolution photos and videos of:

    • Missing or curled shingles.
    • Dents in gutters or downspouts.
    • Granule accumulation in gutters (a sign of hail damage).
    • Interior water stains on ceilings or walls.

    This documentation serves as your initial evidence. It prevents the “he-said-she-said” scenario later in the claims process. According to the Insurance Information Institute, maintaining a detailed home inventory and photographic evidence significantly speeds up the claims process and reduces disputes.

    Step 2: Contact a Reputable Roofing Company for an Inspection

    Here is where the answer to “Do I contact insurance first or contact a roofing company” becomes clear: Contact a roofing company first for a free inspection.

    A licensed roofing contractor can provide an unbiased assessment of the damage. They will determine if the damage is cosmetic, repairable, or severe enough to warrant a full replacement. More importantly, they can tell you if the damage is likely covered by insurance (e.g., storm/hail/wind) or if it is due to wear and tear (which is typically not covered).

    What to Look for in a Roofer

    • Local Reputation: Choose a company with strong local reviews. Avoid “storm chasers” who appear only after disasters.
    • Licensing and Insurance: Ensure they are fully licensed and carry liability insurance.
    • Experience with Claims: Ask if they have experience working with insurance adjusters. A roofer who understands the language of insurance policies can be invaluable.

    During the inspection, ask the roofer to provide a detailed written estimate. This document should break down labor, materials, and code upgrades. This estimate is not a commitment to hire them yet; it is a tool for your insurance negotiation.

    Step 3: File Your Insurance Claim

    Armed with the roofer’s inspection report and your own photos, now is the time to contact your insurance company. When you file the claim, be factual and concise. State that you suspect storm damage and have had a preliminary inspection by a professional.

    Provide the date of the loss and a brief description. Do not speculate on the cost or the extent of the damage beyond what you know. Let the adjuster do their job, but be prepared to advocate for yourself using the data provided by your roofer.

    Understanding the Deductible

    Remember, you will be responsible for your deductible. If the repair cost is close to or less than your deductible, it may not make financial sense to file a claim. Your roofer can help you run these numbers. Filing small claims can also lead to higher premiums or even non-renewal of your policy, so use this step wisely.

    Comparison: DIY Assessment vs. Professional Inspection

    To help you understand why skipping the professional inspection is risky, consider this comparison:

    FeatureDIY/Homeowner AssessmentProfessional Roofer Inspection
    AccuracyLow. Misses hidden structural issues.High. Identifies underlying deck damage.
    Insurance KnowledgeNone. May misclassify damage type.High. Knows what insurers look for.
    Cost EstimateGuesswork. Often inaccurate.Detailed line-item estimate.
    Negotiation PowerWeak. Easy for adjusters to lowball.Strong. Contractor can meet adjuster.
    Safety RiskHigh. Climbing ladders is dangerous.Zero. Professionals have safety gear.

    Step 4: The Adjuster’s Visit and Negotiation

    After you file the claim, the insurance company will send an adjuster to inspect the property. It is highly recommended that your roofing contractor be present during this inspection.

    Why? Because adjusters are generalists, while roofers are specialists. An adjuster might see a few missing shingles and approve a repair. However, your roofer might point out that the hail impact has compromised the seal strips on the entire roof, necessitating a replacement to prevent future leaks.

    Having your contractor present allows for real-time discussion. They can point out specific damage codes and explain the technical necessity of certain repairs. This collaborative approach often results in a more accurate settlement offer.

    Common Mistakes to Avoid

    1. Signing Over Benefits: Never sign a “Direction to Pay” or assignment of benefits form until you have read it carefully and trust the contractor implicitly. Some unscrupulous companies use these to take control of your claim entirely.
    2. Waiting Too Long: Most insurance policies have a statute of limitations for filing claims, often ranging from one to two years. However, delaying can allow water damage to worsen, leading to mold or structural rot, which insurers may argue was caused by negligence.
    3. Accepting the First Offer Blindly: The initial check from the insurance company is often for the “Actual Cash Value” (ACV), which includes depreciation. You are usually entitled to the “Replacement Cost Value” (RCV) once the work is completed. Understand the difference between these two terms.

    FAQ Section

    Q1: Can I choose my own roofing company, or does insurance assign one?

    You have the right to choose your own roofing contractor. Insurance companies may recommend vendors from their network, but you are not obligated to use them. Choosing your own trusted local roofer often ensures better quality control and advocacy during the claims process.

    Q2: Will filing a roof claim increase my insurance premium?

    It depends on your carrier and state regulations. Generally, if the damage was caused by a natural disaster (like a hurricane or hail storm) that affected many homes in your area, your premium may not increase. However, frequent claims or claims for preventable maintenance issues can lead to higher rates or non-renewal. Always ask your agent about the potential impact before filing.

    Q3: What if the insurance adjuster denies my claim?

    If your claim is denied, do not panic. Request a detailed explanation in writing. Often, denials happen because the adjuster attributed the damage to “wear and tear” rather than a specific storm event. You can appeal the decision by providing additional evidence, such as dated weather reports from the National Weather Service and a second opinion from your roofing contractor.

    Q4: How long does the roof insurance claim process take?

    The timeline varies based on the severity of the storm and the volume of claims in your area. Typically, it takes 1–2 weeks for an adjuster to visit, and another 1–2 weeks for the final settlement approval. Once approved, roofing repairs can take anywhere from a few days to several weeks depending on material availability.

    Q5: Should I pay the roofer upfront?

    Reputable roofing companies typically do not require full payment upfront. A common structure is a deposit for materials (often equal to your deductible or a percentage of the total) upon signing the contract, with the remainder paid upon completion and final inspection. Be wary of contractors demanding 100% payment before starting work.

    Conclusion

    Navigating roof damage is stressful, but knowing the correct sequence of actions empowers you. To answer the question, “Do I contact insurance first or contact a roofing company,” the best practice is to contact a reputable roofing company for an inspection first, then file your insurance claim with their professional estimate in hand.

    This approach ensures you have accurate data, professional advocacy during the adjuster’s visit, and a clearer understanding of your financial responsibility. By following these steps, you protect your home’s integrity and ensure a fair settlement.

    If you found this guide helpful, please share it with your neighbors or on social media. Storms don’t discriminate, and sharing knowledge helps our entire community recover faster and smarter.

  • Do I Need A Permit To Replace My Roof Myself?

    Do I Need A Permit To Replace My Roof Myself?

    Replacing your roof is one of the most significant home improvement projects you can undertake. It protects your family from the elements and significantly boosts your property value. However, many homeowners hesitate, asking the critical question: “Do I need a permit to replace my roof myself?” The answer is rarely a simple yes or no, as it depends on local laws, the extent of the work, and safety regulations.

    Navigating building codes can feel overwhelming, but understanding the rules is crucial to avoiding fines, insurance issues, and future resale problems. This guide will walk you through everything you need to know about permits for DIY roof replacement, ensuring you stay compliant and safe.

    Why Most Jurisdictions Require a Roofing Permit

    Before you buy a single shingle, you must understand why permits exist. They are not just bureaucratic red tape; they are designed to ensure public safety and structural integrity.

    In the United States, building codes are generally adopted at the state level but enforced locally by city or county building departments. According to general building standards, any structural alteration or major repair to a home’s envelope typically requires oversight.

    The Role of Local Building Codes

    While federal laws do not dictate residential roofing permits, local municipalities do. Most cities and counties require a permit if you are:

    • Removing existing roofing materials down to the deck.
    • Replacing more than 25% of the roof’s surface area.
    • Repairing structural components like rafters or trusses.

    If you live in an area prone to hurricanes, heavy snow, or wildfires, these regulations are often stricter. For instance, Florida and California have rigorous wind-uplift and fire-resistance standards that must be met during installation.

    Expert Insight: Ignoring permit requirements can void your homeowner’s insurance policy. If a storm damages your new DIY roof and the insurer discovers it was installed without a required permit, they may deny your claim.

    When Can You Skip the Permit?

    There are rare exceptions where a permit might not be necessary, but these are limited. Generally, you might avoid a permit if:

    1. Minor Repairs: You are only fixing a few damaged shingles (usually less than 100 square feet).
    2. Like-for-Like Replacement: Some rural jurisdictions allow minor repairs without permits if the material type and weight remain exactly the same.
    3. Temporary Covers: Installing a tarp for emergency leak protection does not require a permit.

    However, complete roof replacements almost always require a permit. Even if you are doing the labor yourself, the local building department needs to verify that the materials used meet current code standards for fire rating, wind resistance, and weight load.

    For a broader understanding of how building regulations evolve, you can refer to resources like Wikipedia’s page on Building Codes, which outlines the historical and legal framework behind these safety standards.

    Do I Need A Permit To Replace My Roof Myself

    Risks of DIY Roofing Without a Permit

    Skipping the permit process might seem like a way to save time and money, but the long-term risks far outweigh the initial convenience. Here is a breakdown of what could go wrong:

    Risk FactorConsequence
    Fines and PenaltiesLocal authorities can issue fines ranging from $100 to several thousand dollars. You may also be forced to pay double the original permit fee.
    Work StoppageInspectors can issue a “stop-work” order, halting your project until compliance is achieved. This leaves your home exposed to weather.
    Insurance DenialAs mentioned, insurers may refuse to cover damage related to unpermitted work. Some may even cancel your policy entirely.
    Resale IssuesDuring a home sale, unpermitted work can fail inspection, forcing you to lower the price or pay for retroactive permitting and inspections.
    Safety HazardsWithout inspection, improper installation (e.g., poor flashing or inadequate ventilation) can lead to leaks, mold, and structural rot.

    Step-by-Step: How to Get a Roofing Permit for DIY Work

    If you decide to proceed with replacing your roof yourself, following the correct permitting process is essential. Here is a practical guide to navigating the system.

    1. Contact Your Local Building Department

    Start by visiting your city or county’s official website. Look for the “Building Permits” or “Planning Department” section. If information is scarce, call them directly. Ask specifically: “Do I need a permit for a full roof replacement on a single-family home?”

    2. Prepare Your Documentation

    You will likely need to submit:

    • Proof of Ownership: A deed or tax bill.
    • Project Details: Square footage of the roof, type of material (asphalt, metal, tile), and estimated cost.
    • Manufacturer Specifications: Data sheets showing the wind rating and fire class of your chosen shingles.
    • Site Plan: A simple sketch showing the roof dimensions and access points.

    3. Pay the Fee

    Permit fees vary widely. In small towns, it might be $50–$100. In larger cities, it could range from $200 to $500 or more, often calculated based on the project’s valuation.

    4. Schedule Inspections

    This is the most critical part. Most jurisdictions require at least two inspections:

    • Dry-In Inspection: After the underlayment and flashing are installed but before shingles are applied. This ensures water barriers are correct.
    • Final Inspection: After the roof is complete. The inspector checks for proper nailing patterns, ventilation, and cleanup.

    Note: Do not cover up the underlayment or finish the job until the dry-in inspection is passed. Failing an inspection can mean tearing off completed work.

    People Also Ask: Common Questions About DIY Roofing Permits

    To help clarify further, here are answers to specific questions homeowners frequently ask.

    Does hiring a contractor change the permit requirement?

    No, the need for a permit remains the same. However, licensed contractors usually handle the permitting process themselves. They include the permit cost in their bid and pull the permit under their license. When you DIY, you become the responsible party for pulling the permit and scheduling inspections.

    What happens if I sell my house with an unpermitted roof?

    Buyers’ inspectors often check for permits. If none are found, the buyer may request a retroactive permit. This involves opening up parts of the roof for inspection, which can be costly and messy. In worst-case scenarios, the sale can fall through, or you may face legal liability for nondisclosure.

    Can I get a permit after the work is done?

    Some jurisdictions allow “retroactive permits,” but this is risky. You may be required to remove sections of the roof to prove proper installation beneath the shingles. Additionally, fines are typically higher for retroactive applications. It is always better to get the permit before starting.

    Are there different rules for historic homes?

    Yes. If your home is in a historic district, you may need approval from a Historic Preservation Commission in addition to a building permit. They may restrict the type of materials you can use (e.g., requiring slate or wood shakes instead of asphalt) to maintain architectural integrity.

    Final Thoughts: Is DIY Roofing Worth the Hassle?

    Replacing your roof yourself can save thousands in labor costs, but it comes with significant responsibility. The question “Do I need a permit to replace my roof myself?” should always be answered with a cautious “Yes, probably.”

    By securing the proper permit, you ensure that your work meets safety standards, protect your insurance coverage, and safeguard your home’s future value. While the process adds a layer of administrative work, it provides peace of mind that your biggest investment is protected.

    If you are confident in your skills and willing to navigate the local bureaucracy, DIY roofing is achievable. Just remember: measure twice, permit first, and nail carefully.

    Found this guide helpful? Share it with friends who are considering home improvements, or post it on social media to help others avoid costly permitting mistakes!

  • How To Identify Cedar Shake On A Roof From Attic

    How To Identify Cedar Shake On A Roof From Attic

    Have you ever looked up into your attic and wondered exactly what is protecting your home from the elements above? Identifying the roofing material without climbing onto the roof can be tricky, but it is essential for proper maintenance and insurance purposes. If you are trying to figure out how to identify cedar shake on a roof from attic, this guide will walk you through the specific visual and sensory clues you need to look for.

    Cedar shake roofs are prized for their natural beauty and durability, but they require different care than asphalt shingles or metal roofing. Knowing what you have allows you to spot leaks early, manage ventilation needs, and plan for eventual replacement. Let’s dive into the attic and solve this mystery together.

    Why Identifying Your Roof Material Matters

    Before we grab our flashlights, it is important to understand why this identification process is critical. Many homeowners assume their roof is asphalt because it is the most common material in the United States. However, cedar shakes offer unique insulation properties and aesthetic value that affect your home’s energy efficiency and resale value.

    According to industry data, wood roofing can last 30 to 50 years if properly maintained, significantly longer than standard asphalt shingles. Misidentifying your roof could lead to using the wrong cleaning chemicals or ignoring specific ventilation requirements that prevent mold growth. By confirming your roof type from the safety of your attic, you save time, money, and potential safety risks associated with climbing ladders.

    Visual Clues: What Does Cedar Look Like from Below?

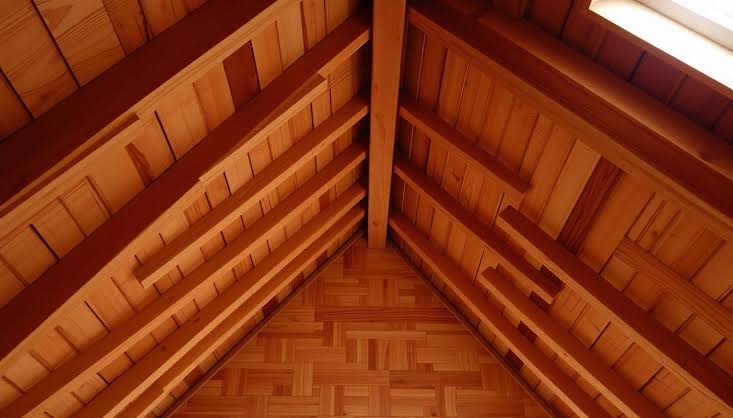
    The most reliable way to determine if you have cedar shakes is by observing the underside of the roof deck. When you enter your attic, turn off any bright overhead lights if possible and use a focused flashlight. This helps highlight textures and gaps that ambient light might wash out.

    1. Check for Irregular Gaps and Light Penetration

    Unlike asphalt shingles, which are installed over a solid sheathing (usually plywood or OSB), cedar shakes are often installed over spaced sheathing boards.

    • Look for gaps: If you see daylight filtering through narrow, consistent gaps between wooden boards, this is a strong indicator of a wood shake roof. These gaps allow the wood to breathe and dry out after rain.
    • Board spacing: The boards underneath are typically 1×4 or 1×6 inch lumber, spaced anywhere from 1/2 inch to several inches apart, depending on the length of the shake.

    2. Examine the Texture and Grain

    If your attic has solid sheathing (plywood) instead of spaced boards, do not rule out cedar yet. Some modern installations use solid decking with an underlayment. In this case, look for:

    • Nail patterns: Cedar shakes are hand-nailed. Look for rows of nails that may appear slightly irregular compared to the precise, machine-gun pattern of asphalt shingles.
    • Wood grain visibility: If the sheathing is thin or if there are areas where the underlayment is damaged, you might see the rough, textured backside of the shakes themselves. Cedar backs are often sawn or split, showing a distinct woody texture rather than the smooth, granular surface of asphalt.

    3. Color and Aging Signs

    Fresh cedar is a warm, reddish-brown. However, from the attic, you are looking at the underside.

    • Untreated wood: The underside usually remains lighter than the top, often a pale tan or cream color.
    • Weathering: If the roof is older, you might see dark stains or water marks. Cedar is prone to holding moisture if ventilation is poor, so look for dark streaks running along the rafters or sheathing.

    The Smell Test: A Unique Identifier

    One of the most underrated methods for how to identify cedar shake on a roof from attic is using your sense of smell. This is particularly effective in warmer weather or after a rainstorm.

    Cedar contains natural oils, such as thujaplicins, which give it a distinct, aromatic scent. When the roof heats up during the day or gets wet, these oils are released.

    • Enter the attic on a hot day: If you detect a faint, woody, slightly sweet aroma that resembles a pencil sharpener or a sauna, it is likely cedar.
    • Compare with other materials: Asphalt shingles emit a tar-like, petroleum smell when hot. Metal roofs are odorless. Clay tiles have an earthy, dusty smell. If the air smells like fresh lumber or pine forest, you are likely dealing with cedar.

    Pro Tip: If you cannot smell anything, try rubbing a small, inconspicuous area of exposed wood (if visible) with your finger. The friction generates heat and may release the scent.

    How To Identify Cedar Shake On A Roof From Attic

    Structural Indicators: Rafters and Ventilation

    The structure of your attic can provide secondary clues about your roofing material. Cedar shake roofs are heavier than asphalt but lighter than clay tile or slate. However, the installation requirements differ significantly.

    Ventilation Requirements

    Cedar roofs require superior ventilation to prevent rot and mold.

    • Soffit and Ridge Vents: Check if your attic has extensive soffit vents and a continuous ridge vent. While all roofs benefit from this, cedar roofs depend on it. If you see large, prominent ventilation systems that seem excessive for a standard home, it might be designed for a wood roof.
    • Airflow: Place your hand near the eaves. You should feel a steady flow of air moving upward. Poor airflow in a cedar roof attic often leads to visible mold on the underside of the sheathing.

    Weight and Support

    While difficult to judge visually, you can look for signs of structural reinforcement.

    • Heavier Rafters: In older homes with original cedar roofs, rafters may be larger (e.g., 2×8 or 2×10) compared to the 2x6s often used for lighter asphalt roofs. This is not a definitive rule, but it can support other evidence.

    Comparison: Cedar Shake vs. Asphalt Shingles from the Attic

    To help you distinguish between the two most common roofing types, refer to the table below.

    FeatureCedar Shake RoofAsphalt Shingle Roof
    Underside ViewOften shows spaced boards with light gapsSolid plywood/OSB sheathing, no light gaps
    SmellWoody, aromatic, natural oil scentTar-like, petroleum, or no scent
    Nail PatternIrregular, hand-driven nailsUniform, machine-driven nail lines
    VentilationCritical; often has extensive ventingStandard ventilation suffices
    Moisture SignsProne to dark water stains/mold if wetLess prone to visible underside staining

    Step-by-Step Guide to Confirmation

    If you are still unsure, follow this systematic approach to confirm your findings.

    1. Safety First: Wear a N95 mask, gloves, and sturdy shoes. Attics can contain insulation fibers, dust, and sharp nails. Ensure you have a stable footing on the joists, not the drywall ceiling.
    2. Timing: Choose a sunny day around midday. The heat will help activate the scent of the cedar and make light gaps more visible.
    3. Locate the Eaves: Start at the edge of the roof where it meets the exterior wall. This is often where the roof structure is most visible.
    4. Inspect the Sheathing: Look up. Do you see solid wood panels or individual boards with gaps? Gaps suggest cedar.
    5. Check for Underlayment: If you see black felt paper (tar paper) stapled to spaced boards, it is almost certainly cedar or wood shingles. Asphalt shingles are nailed directly to solid sheathing.
    6. Sniff the Air: Take a deep breath. Does it smell like wood or tar?
    7. Consult External Resources: For more detailed technical specifications on wood roofing standards, you can refer to the Cedar Shake & Shingle Bureau or general construction guidelines on Wikipedia.

    FAQ Section

    1. Can I identify cedar shakes if my attic has insulation covering the roof deck?

    It is more challenging but not impossible. Look for areas where insulation is thin or missing, such as near eaves, vents, or plumbing stacks. You may also be able to gently move insulation aside in a non-critical area to peek at the sheathing. Always wear protective gear when handling insulation.

    2. What if I see plywood but still suspect cedar?

    Some modern building codes require solid sheathing even for cedar roofs, especially in high-wind or fire-prone areas. In this case, rely on the smell test and the nail pattern. Also, check the exterior from the ground using binoculars. Cedar shakes have a thick, textured, and irregular appearance that is distinct from the flat, uniform look of asphalt.

    3. Is it dangerous to go into the attic to check my roof?

    Attics can pose risks such as falls through the ceiling, exposure to mold, or contact with electrical wiring. If you are uncomfortable or if your attic is inaccessible, consider hiring a professional roofer or home inspector. They can identify the material safely and provide a detailed report.

    4. How old does a cedar roof need to be to lose its smell?

    Cedar retains its aromatic oils for many years, but the scent may fade after 10–15 years, especially if the roof has been treated with sealants or fire retardants. If the roof is very old and odorless, rely on visual cues like spaced sheathing and nail patterns.

    5. Why do I see white powder on the wood in my attic?

    White powder could be efflorescence (mineral deposits from moisture) or mold spores. Cedar is susceptible to mold if ventilation is poor. If you see this, it confirms you have a wood product, but it also indicates a moisture problem that needs immediate attention to prevent structural damage.

    6. Can I use this method to identify wood shingles vs. cedar shakes?

    From the attic, it is difficult to distinguish between wood shingles (machine-cut, uniform thickness) and wood shakes (hand-split, tapered). Both are installed similarly with spaced sheathing. To differentiate them, you would need to inspect the roof from the exterior. Shakes are thicker and more rustic, while shingles are smoother and thinner.

    Conclusion

    Learning how to identify cedar shake on a roof from attic is a valuable skill for any homeowner. By combining visual inspection of sheathing gaps, analyzing nail patterns, and using the unique scent of cedar, you can confidently determine your roofing material without climbing a ladder. Remember, cedar roofs are an investment in natural beauty and longevity, but they demand proper ventilation and maintenance.

    If you discover you have cedar shakes, take pride in your home’s character! Share this guide with friends or neighbors who might be curious about their own roofs. Knowledge is the first step toward better home care. Have you identified your roof type? Let us know in the comments or share your experience on social media!

  • How Many Layers Are on Your Roof?

    How Many Layers Are on Your Roof?

    Have you ever looked up at your home and wondered what exactly is protecting your family from the elements? It is a common concern for homeowners, especially when planning renovations or noticing minor leaks. Knowing how many layers of materials does your roof currently have is not just a trivia question; it is a critical factor in determining your next steps for repair, replacement, and overall home safety.

    In this guide, we will walk you through everything you need to know about roof layers, building codes, and why this specific detail matters more than you might think.

    Why Does the Number of Roof Layers Matter?

    You might be thinking, “If one layer protects my home, wouldn’t two be even better?” This is a common misconception. While it may seem like extra padding, multiple layers of roofing material can actually cause significant structural and financial issues.

    Structural Weight Concerns

    Every roofing material has a weight. Asphalt shingles, for example, weigh approximately 2 to 4 pounds per square foot. When you add a second or third layer, you are doubling or tripling that load. Most residential roofs are engineered to support a specific dead load (the weight of the structure itself) plus a live load (snow, rain, workers). Exceeding this limit can lead to sagging rafters, cracked drywall inside your home, or in extreme cases, structural failure.

    Heat Trapping and Energy Efficiency

    Multiple layers trap heat. In the summer, this can cause your attic temperature to skyrocket, forcing your HVAC system to work harder. This leads to higher energy bills and can prematurely age your roofing materials from the inside out due to excessive thermal cycling.

    The “Masking” Effect

    New shingles installed over old ones often conform to the uneven surface of the underlying layer. If the bottom layer has curled, missing, or damaged shingles, the new layer will mirror these imperfections. This prevents proper sealing and makes the new roof look wavy or unprofessional shortly after installation.

    How to Determine Your Current Roof Layers

    Unless you have detailed records from previous renovations, figuring out how many layers of materials does your roof currently have requires a bit of detective work. Here are three reliable methods to find out.

    1. Check Your Home Inspection Report

    If you bought your home recently, your pre-purchase home inspection report is the best place to start. Inspectors often note the number of shingle layers visible at the edges, in the attic, or around vent pipes. Look for sections labeled “Roofing” or “Exterior.”

    2. Visual Inspection from the Ground

    Grab a pair of binoculars and walk around your house. Look closely at the edge of the roof (the rake edge) or around chimneys and vent stacks. You may be able to see the distinct thickness of the shingle layers. A single layer of asphalt shingle is relatively thin, while two layers will appear noticeably thicker and may have a “step-down” appearance where the layers meet.

    3. Professional Roof Inspection

    The most accurate method is hiring a licensed roofing contractor. They can safely access the roof and lift a corner of a shingle near a vent or edge to count the layers directly. This is highly recommended if you are considering selling your home or applying for insurance claims.

    What Do Building Codes Say About Multiple Layers?

    Regulations vary by location, but most jurisdictions in the United States follow guidelines similar to the International Residential Code (IRC). Understanding these rules is vital before you decide to overlay new shingles.

    Jurisdiction TypeTypical RuleException
    Most US StatesMax 2 layers of asphalt shinglesNone generally allowed for 3rd layer
    High Wind ZonesOften require tear-off to deckTo ensure proper nailing adhesion
    Heavy Snow AreasStrict weight limits enforcedMay prohibit 2 layers entirely

    According to general building standards, you are typically allowed to have no more than two layers of asphalt shingles. If your roof already has two layers, you must tear off all existing materials down to the roof deck before installing new shingles. Ignoring this can result in failed inspections, voided warranties, and difficulties when selling your property.

    For more detailed information on building standards, you can refer to the International Code Council or general construction principles outlined on Wikipedia.

    How Many Layers Of Materials Does Your Roof Currently Have

    Tear-Off vs. Overlay: Making the Right Choice

    When it is time for a new roof, you have two options: a tear-off (removing old materials) or an overlay (installing over existing materials). Here is a comparison to help you decide.

    Advantages of a Full Tear-Off

    • Inspection of Decking: Removing old shingles allows the roofer to inspect the wood decking for rot, mold, or water damage. Fixing these issues early prevents costly interior repairs later.
    • Better Warranty Coverage: Most major shingle manufacturers (like GAF, Owens Corning, and CertainTeed) offer stronger warranties when their products are installed on a clean deck.
    • Improved Curb Appeal: A fresh start ensures a flat, uniform surface that looks professional and increases home value.
    • Proper Ventilation: It allows for the installation of modern ice and water shields and proper underlayment, which are crucial for longevity.

    Advantages of an Overlay

    • Lower Initial Cost: You save on labor costs associated with hauling away debris and removing old nails.
    • Faster Installation: Without the tear-off process, the job can be completed in half the time.
    • Less Mess: There is significantly less debris and dust generated during the project.

    The Verdict

    While an overlay is cheaper upfront, a tear-off is almost always the better long-term investment. It addresses hidden problems and ensures your new roof lasts its full expected lifespan (typically 20–30 years for asphalt shingles).

    Step-by-Step: What Happens During a Roof Replacement?

    If you determine that you have too many layers or damaged decking, here is what a professional replacement process looks like.

    1. Setup and Protection: The crew will cover your landscaping, windows, and AC units with tarps to protect them from falling debris.
    2. Removal of Old Materials: Workers will strip off the existing shingles, underlayment, and flashing. All nails are removed or hammered flat.
    3. Deck Inspection: The exposed wood deck is inspected for soft spots, rot, or damage. Any compromised boards are replaced.
    4. Installation of Underlayment: A water-resistant barrier (ice and water shield) is installed along the eaves and valleys, followed by synthetic underlayment over the rest of the deck.
    5. Flashing Installation: New metal flashing is installed around chimneys, vents, and walls to prevent water intrusion.
    6. Shingle Installation: New shingles are nailed down according to manufacturer specifications, starting from the bottom edge and working up.
    7. Cleanup: The site is thoroughly cleaned using magnetic rollers to pick up stray nails, and all debris is hauled away.

    FAQ: Common Questions About Roof Layers

    1. Can I put a third layer of shingles on my roof?

    No. In nearly all US jurisdictions, building codes prohibit installing a third layer of asphalt shingles. The weight and inability to properly nail through three layers make it unsafe and non-compliant.

    2. Does having two layers void my homeowner’s insurance?

    Not necessarily, but it can complicate claims. Some insurers may deny coverage for water damage if they determine that improper installation over multiple layers contributed to the leak. Always disclose the number of layers to your insurance provider.

    3. How much does it cost to tear off an old roof?

    The cost varies by region and roof size, but expect to pay between $1,000 and $3,000 for tear-off and disposal fees on an average-sized home. This is usually included in the total quote for a new roof installation.

    4. Will a roof overlay affect my home’s resale value?

    Yes, potentially negatively. Home inspectors will note multiple layers, and savvy buyers may request a price reduction to account for the eventual need for a full tear-off. A single-layer roof is more attractive to buyers.

    5. How can I tell if my roof has only one layer without climbing up?

    Look at the vent pipes protruding from the roof. If the flashing collar around the pipe sits flush with the shingles, it is likely a single layer. If there is a visible “step” or gap between the shingles and the flashing, there may be multiple layers.

    6. Is it cheaper to overlay shingles?

    Yes, initially. You save on labor and disposal fees. However, because the lifespan of the new shingles may be reduced due to heat trapping and uneven surfaces, the cost-per-year of protection may actually be higher.

    Conclusion

    Knowing how many layers of materials does your roof currently have is essential for making informed decisions about your home’s maintenance. While adding a second layer might seem like a quick fix, it often leads to higher long-term costs, potential code violations, and structural risks.

    If you suspect your roof has multiple layers, schedule a professional inspection today. It is better to address these issues proactively than to deal with unexpected leaks or structural damage later.

    Found this guide helpful? Share it with your neighbors on Facebook or Twitter to help them protect their homes too! Don’t forget to bookmark this page for future reference as you plan your home improvement projects.

  • Small Lump on Roof of Mouth: Why It Comes and Goes

    Small Lump on Roof of Mouth: Why It Comes and Goes

    Have you ever run your tongue over the roof of your mouth and felt a strange, raised bump? It can be alarming, especially if it seems to appear out of nowhere, linger for a few days, and then vanish completely. If you are dealing with a small lump on roof of mouth that comes and goes, you are not alone, and in most cases, it is not a cause for panic.

    Understanding why these transient lumps occur can help ease your anxiety and guide you toward the right care. In this guide, we will explore the most common benign causes, effective home remedies, and clear signs indicating when professional medical attention is necessary.

    What Causes a Small Lump on Roof of Mouth That Comes and Goes?

    When a lump appears and disappears, it usually points to a temporary irritation or a blocked gland rather than a permanent structural change. The roof of your mouth, known medically as the palate, is sensitive to heat, texture, and bacteria. Here are the primary culprits behind these fleeting bumps.

    1. Canker Sores (Aphthous Ulcers)

    Canker sores are small, shallow lesions that develop on the soft tissues in your mouth or at the base of your gums. Unlike cold sores, they don’t occur on the surface of your lips and aren’t contagious.

    • Appearance: They often start as a tingling sensation before forming a white or yellow center with a red border.
    • Why they come and go: Stress, minor injury from brushing, or acidic foods can trigger them. They typically heal on their own within one to two weeks.
    • Key Trigger: High stress levels or nutritional deficiencies (like Vitamin B12, zinc, folate, or iron).

    2. Mucoceles (Mucus Cysts)

    A mucocele is a fluid-filled swelling that occurs when a salivary gland gets blocked or damaged. While more common on the lower lip, they can appear on the roof of the mouth.

    • Mechanism: When you accidentally bite your palate or burn it with hot food, the duct leading from the salivary gland can rupture. Saliva leaks into the surrounding tissue, creating a blister-like lump.
    • Transient Nature: These lumps often burst on their own, drain, and heal, only to potentially return if the gland remains damaged.

    3. Thermal Burns (Pizza Palate)

    This is one of the most common reasons for a temporary lump. Eating food that is too hot—like melted cheese or hot coffee—can burn the delicate tissue of the hard palate.

    • Symptoms: The burned area may swell, form a blister, or feel rough and raised.
    • Healing: The mouth heals incredibly fast. A thermal burn usually resolves within 3–7 days as the skin regenerates.

    4. Allergic Reactions

    Mild allergic reactions to certain foods, toothpaste ingredients (such as sodium lauryl sulfate), or mouthwashes can cause localized swelling or hives on the palate.

    • Pattern: The lump appears shortly after exposure to the allergen and subsides once the substance is cleared from your system.

    Is It Serious? Differentiating Benign vs. Concerning Lumps

    Most lumps that “come and go” are benign. However, it is crucial to distinguish between harmless irritations and conditions that require medical intervention.

    FeatureBenign Lump (e.g., Canker Sore, Burn)Concerning Lump (Requires Doctor)
    DurationHeals within 2 weeksPersists longer than 2–3 weeks
    Pain LevelOften painful or tenderMay be painless initially
    TextureSoft, fluid-filled, or shallow ulcerHard, fixed, or irregular edges
    ChangeGets smaller over timeGrows larger or bleeds easily
    ColorWhite, yellow, or redWhite/red patch that doesn’t wipe off

    If you notice a lump that is hard, painless, and does not resolve after two weeks, it is essential to consult a dentist or oral surgeon. While rare, persistent lumps can be signs of oral cancer or other systemic issues. For more detailed information on oral conditions, you can refer to general medical resources like Wikipedia’s entry on Oral Medicine.

    Small Lump On Roof Of Mouth That Comes And Goes

    How to Treat a Small Lump on Roof of Mouth at Home

    If your lump is caused by a minor burn, canker sore, or irritation, you can manage it effectively at home. The goal is to reduce inflammation, prevent infection, and promote healing.

    Step-by-Step Home Care Routine

    1. Salt Water Rinse
      • Mix 1/2 teaspoon of salt into 8 ounces (240 ml) of warm water.
      • Swish gently around your mouth for 30 seconds.
      • Spit it out. Do this 2–3 times a day.
      • Why it works: Salt water is a natural disinfectant and helps reduce swelling.
    2. Avoid Irritants
      • Stop eating spicy, acidic (citrus, tomato), or crunchy foods (chips, nuts) that can scratch the lump.
      • Avoid very hot beverages until the area heals.
    3. Apply Honey or Aloe Vera
      • Dab a small amount of raw honey or pure aloe vera gel directly onto the lump.
      • Leave it for 10–15 minutes before rinsing.
      • Why it works: Both have anti-inflammatory and antimicrobial properties.
    4. Over-the-Counter Gels
      • Use oral gels containing benzocaine for pain relief if the lump is tender.
      • Follow the package instructions carefully.

    When Should You See a Doctor?

    While home remedies are effective for minor issues, certain symptoms warrant professional evaluation. Do not ignore the following red flags:

    • Persistence: The lump has been present for more than 14 days without improvement.
    • Growth: The lump is getting larger or spreading to other areas.
    • Bleeding: The lump bleeds spontaneously or when touched lightly.
    • Difficulty Swallowing: You experience pain or obstruction when swallowing.
    • Systemic Symptoms: You have a fever, swollen lymph nodes in your neck, or unexplained weight loss.

    A dentist can perform a visual exam and, if necessary, a biopsy to rule out serious conditions. Early detection is key for any oral health issue.

    FAQ: Common Questions About Mouth Lumps

    1. Can stress cause a lump on the roof of my mouth?

    Yes, indirectly. Stress weakens your immune system, making you more susceptible to canker sores and viral outbreaks like cold sores. Additionally, stress often leads to teeth grinding or accidental biting, which can traumatize the palate and cause swelling.

    2. Is a lump on the roof of the mouth contagious?

    It depends on the cause. Canker sores and thermal burns are not contagious. However, if the lump is a cold sore (caused by the herpes simplex virus) or a viral infection like hand, foot, and mouth disease, it can be spread to others through direct contact or sharing utensils.

    3. How long does it take for a burned roof of the mouth to heal?

    Minor thermal burns usually heal within 3 to 7 days. The mouth has a rich blood supply, which accelerates tissue regeneration. If the burn is severe (blistering heavily), it may take up to two weeks.

    4. Can allergies cause bumps on the palate?

    Yes. Oral allergy syndrome or contact stomatitis can cause swelling, redness, or small bumps on the roof of the mouth. This is often a reaction to specific fruits, nuts, or dental products. Identifying and avoiding the trigger is the best treatment.

    5. Should I pop a blister on the roof of my mouth?

    No. Popping a blister increases the risk of infection and delays healing. Let it burst naturally or absorb on its own. If it is a mucocele, popping it may provide temporary relief, but it is likely to refill unless the underlying gland issue is resolved by a professional.

    Conclusion

    Dealing with a small lump on roof of mouth that comes and goes is a common experience that is rarely serious. In most cases, these lumps are the result of minor trauma, such as thermal burns from hot food, canker sores triggered by stress, or blocked salivary glands. By maintaining good oral hygiene, avoiding irritants, and using simple home remedies like salt water rinses, you can speed up the healing process.

    However, always listen to your body. If a lump persists for more than two weeks, grows in size, or is accompanied by other concerning symptoms, seek professional advice from a dentist or healthcare provider. Your oral health is a window into your overall well-being, so never hesitate to get checked out for peace of mind.

    Found this guide helpful? Share it with friends and family on social media to help them understand their oral health better!

  • What Is This Lump On The Roof Of My Mouth?

    What Is This Lump On The Roof Of My Mouth?

    Finding a strange bump in your mouth can be alarming. You might run your tongue over the roof of your mouth and feel something that wasn’t there yesterday. It raises immediate questions about your health and safety. If you are asking, “What is this lump on the roof of my mouth,” you are not alone. Many people experience this issue, and while it often looks scary, the cause is usually benign and temporary.

    In this guide, we will explore the most common reasons for these lumps, how to treat them at home, and clear signs that indicate you need professional medical attention. We aim to provide accurate, empathetic, and actionable advice to help you find relief and peace of mind.

    Common Causes of Lumps on the Roof of the Mouth

    The roof of your mouth, known medically as the palate, is divided into two sections: the hard palate (front) and the soft palate (back). Lumps can appear on either section due to various factors. Understanding the root cause is the first step toward effective treatment.

    1. Canker Sores (Aphthous Ulcers)

    Canker sores are small, shallow lesions that develop on the soft tissues in your mouth or at the base of your gums. Unlike cold sores, they don’t occur on the surface of your lips and aren’t contagious.

    • Appearance: White or yellow center with a red border.
    • Sensation: Painful, especially when eating spicy or acidic foods.
    • Duration: Typically heal within one to two weeks without scarring.

    According to dental health statistics, up to 20% of the general population suffers from recurrent canker sores. Stress, minor injury to the inside of your mouth, or food sensitivities often trigger them.

    2. Mucocele (Mucus Cyst)

    A mucocele is a fluid-filled swelling that occurs when a salivary gland becomes blocked or damaged. These are very common on the roof of the mouth and inside the cheeks.

    • Appearance: Clear, bluish, or pinkish dome-shaped bump.
    • Sensation: Usually painless but can feel uncomfortable if large.
    • Cause: Often results from accidentally biting your cheek or palate.

    Most mucoceles rupture and heal on their own. However, if they persist, a dentist may need to remove them surgically.

    3. Torus Palatinus

    This is a bony growth on the hard palate. It is a genetic trait and is completely harmless.

    • Appearance: Hard, immovable lump in the center of the roof of the mouth.
    • Sensation: Painless and grows very slowly over years.
    • Prevalence: Affects approximately 20-30% of the population.

    If you have had this lump for a long time and it hasn’t changed shape or caused pain, it is likely a torus palatinus. No treatment is necessary unless it interferes with denture fitting.

    4. Oral Thrush (Candidiasis)

    Oral thrush is a fungal infection caused by an overgrowth of Candida alb yeast. It is more common in infants, the elderly, and individuals with weakened immune systems.

    • Appearance: Creamy white lesions that can be wiped away, sometimes leaving a red, raw area.
    • Sensation: Cotton-like feeling in the mouth, loss of taste, or cracking at the corners of the mouth.

    Antifungal medications prescribed by a doctor typically clear up the infection within a few days.

    5. Burn from Hot Food

    We have all done it—taken a bite of pizza or coffee that was just too hot. Thermal burns can cause blistering on the sensitive tissue of the palate.

    • Appearance: Reddened area or a fluid-filled blister.
    • Sensation: Stinging pain and tenderness.
    • Healing: The mouth heals quickly; most burns resolve within 3–7 days.

    When Should You Worry? Red Flags to Watch For

    While most lumps are harmless, some symptoms require immediate professional evaluation. Use this checklist to assess your situation:

    SymptomPotential ConcernAction Required
    Lump persists > 2 weeksChronic issue or tumorSee a dentist/doctor
    Rapid growthAggressive pathologyImmediate consultation
    Bleeding without causeVascular issue or cancerUrgent medical review
    Difficulty swallowing/breathingAirway obstructionEmergency care
    Numbness in face/mouthNerve involvementSpecialist referral

    If you notice any of these red flags, do not wait. Early detection is crucial for effective treatment of serious conditions like oral cancer. For more detailed information on oral health conditions, you can refer to reputable sources such as Wikipedia’s page on Oral Cancer to understand the broader context of oral pathologies.

    What Is This Lump On The Roof Of My Mouth

    How to Treat a Lump on the Roof of Your Mouth at Home

    If your lump is minor and likely caused by a burn, canker sore, or mild irritation, you can manage it with simple home remedies. Here is a step-by-step approach to promote healing:

    1. Salt Water Rinse: Mix 1 teaspoon of salt in 8 ounces of warm water. Swish gently for 30 seconds, then spit out. Repeat 2–3 times daily. This reduces inflammation and keeps the area clean.
    2. Avoid Irritants: Stay away from spicy, acidic, or crunchy foods that can aggravate the lump. Opt for soft, cool foods like yogurt, applesauce, or smoothies.
    3. Maintain Oral Hygiene: Brush gently with a soft-bristled toothbrush. Use an alcohol-free mouthwash to avoid stinging.
    4. Apply Honey: Manuka honey has natural antibacterial properties. Dab a small amount directly on the lump (if it’s an ulcer) to speed up healing.
    5. Stay Hydrated: Drink plenty of water to keep your mouth moist and support overall tissue repair. Aim for at least 2 liters of water per day.

    Note: Do not attempt to pop or drain any lump yourself. This can introduce bacteria and lead to serious infection.

    Professional Treatment Options

    If home remedies do not work, or if the lump is diagnosed as a specific condition, your healthcare provider may recommend the following treatments:

    • Prescription Medication: For oral thrush, antifungal lozenges or liquids are standard. For severe canker sores, topical corticosteroids may be prescribed.
    • Minor Surgery: Persistent mucoceles or large torus palatinus that interfere with eating may require surgical removal. This is typically a quick outpatient procedure.
    • Biopsy: If a lump looks suspicious, a dentist or oral surgeon will take a small tissue sample for laboratory analysis. This is the only way to definitively rule out cancer.

    FAQ Section

    1. Can stress cause lumps on the roof of my mouth?

    Yes, indirectly. Stress weakens the immune system, making you more susceptible to canker sores and oral thrush. Additionally, stress can lead to habits like cheek biting, which may cause mucoceles.

    2. Is a lump on the roof of my mouth always cancer?

    No. The vast majority of lumps are benign, such as canker sores, mucoceles, or torus palatinus. Oral cancer is rare compared to these common conditions. However, any lump that persists for more than two weeks should be checked by a professional.

    3. How long does it take for a burn blister on the palate to heal?

    Minor thermal burns usually heal within 3 to 7 days. The mouth has a rich blood supply, which promotes rapid healing. Avoid hot foods during this period to prevent re-injury.

    4. Can allergies cause lumps in the mouth?

    Yes. Allergic reactions to certain foods, dental materials, or oral hygiene products can cause swelling or hives in the mouth. This is often accompanied by itching or tingling. If you suspect an allergy, identify and avoid the trigger.

    5. What is the difference between a canker sore and a cold sore?

    Canker sores occur inside the mouth and are not contagious. Cold sores (caused by the herpes simplex virus) usually appear on the lips or outside the mouth and are highly contagious. You cannot get a cold sore on the roof of your mouth, but you can get a canker sore there.

    Conclusion

    Discovering a lump on the roof of your mouth can be unsettling, but remember that most causes are minor and temporary. Whether it’s a simple burn from hot pizza, a stressful canker sore, or a harmless bony growth like torus palatinus, understanding the cause helps you take the right steps.

    Key Takeaways:

    • Most lumps heal on their own within two weeks.
    • Maintain good oral hygiene and use salt water rinses for relief.
    • Monitor for red flags like persistent growth, bleeding, or difficulty swallowing.
    • Consult a dentist if the lump does not improve after 14 days.

    Your oral health is a window into your overall well-being. Don’t ignore persistent changes. If you found this guide helpful, please share it with friends and family who might benefit from this information. Stay informed, stay healthy, and keep smiling!

  • What Is The Car Part Between Door And Roof Called?

    What Is The Car Part Between Door And Roof Called?

    Have you ever stood next to your vehicle, pointed at the vertical support separating the front and rear windows, and struggled to find the right word for it? You are not alone; many drivers know their engines but get stuck on basic body terminology. If you have been asking yourself, “What is the car part between door and roof called,” the answer is the B-pillar.

    Understanding this component is more than just trivia. It is essential for communicating with mechanics, understanding crash safety ratings, and appreciating the engineering that keeps you safe on the road. In this guide, we will break down exactly what the B-pillar is, why it matters, and how it differs from other structural parts of your car.

    Defining the B-Pillar: More Than Just a Post

    The vertical structure located between the front and rear doors (or between the front door and the rear quarter panel in two-door cars) is technically known as the B-pillar.

    In automotive anatomy, pillars are labeled alphabetically from front to back:

    • A-Pillar: Supports the windshield and connects to the front fenders.
    • B-Pillar: The central support between the front and rear side windows.
    • C-Pillar: Supports the rear window and connects to the rear fenders.
    • D-Pillar: Found only on larger vehicles like SUVs and station wagons, supporting the very back of the vehicle.

    The B-pillar is arguably the most critical structural element in the side profile of a modern sedan or SUV. It serves as the anchor point for the front door’s rear hinge and the rear door’s front hinge. Without it, the roof would lack central support, and the doors would have no rigid frame to latch against securely.

    Why the Name “B-Pillar”?

    The naming convention is straightforward. Engineers needed a standardized way to refer to these vertical supports across different vehicle models. Since the A-pillar is at the front, the next logical letter is B. This standardization helps manufacturers, repair shops, and insurance adjusters communicate clearly about damage and repairs.

    The Critical Role of the B-Pillar in Safety

    When you ask, “What is the car part between door and roof called,” you are actually identifying one of the most important safety features in your vehicle. The B-pillar is not just a cosmetic frame for your windows; it is a primary load-bearing structure designed to protect occupants during collisions.

    Side-Impact Protection

    In a side-impact collision (often called a T-bone accident), the B-pillar is the first line of defense. It is engineered to absorb and distribute kinetic energy away from the passengers. Modern B-pillars are often reinforced with ultra-high-strength steel (UHSS) or even boron steel, which is significantly stronger than traditional mild steel.

    According to data from the Insurance Institute for Highway Safety (IIHS), the strength of the B-pillar directly correlates with survival rates in side-impact crashes. A weak B-pillar can intrude into the cabin, causing severe injury to the torso and head.

    Roof Crush Resistance

    The B-pillar also plays a vital role in preventing roof collapse during rollover accidents. It works in tandem with the A and C pillars to create a “safety cage” around the passenger compartment. This structural integrity ensures that even if the vehicle flips, there is enough space to protect the occupants’ heads.

    Expert Insight: “The B-pillar is the backbone of the passenger cell’s lateral stiffness. Its design balances the need for visibility with the non-negotiable requirement for crashworthiness.” — Automotive Structural Engineer, Society of Automotive Engineers (SAE).

    What Is The Car Part Between Door And Roof Called

    B-Pillar vs. Other Pillars: A Quick Comparison

    To fully understand the B-pillar, it helps to see how it compares to its neighbors. Here is a breakdown of the differences in function and location.

    FeatureA-PillarB-PillarC-Pillar
    LocationFront, framing the windshieldMiddle, between front/rear doorsRear, framing the back window
    Primary FunctionWindshield support, airbag housingDoor hinge support, side-impact protectionRear window support, trunk/hatch structure
    Visibility ImpactHigh (can create blind spots)Medium (divides side view)Low (rear quarter view)
    Common IssuesRust at base, windshield leaksLatch alignment issues, rust in seamsWater leakage, trim rattling

    Common Issues and Maintenance Tips for Your B-Pillar

    While the B-pillar is built to be durable, it is not immune to wear and tear. Knowing what to look for can save you from costly repairs down the line.

    1. Rust and Corrosion

    Because the B-pillar is often covered by interior trim and exterior moldings, moisture can sometimes get trapped inside. This is especially common in older vehicles or in regions with heavy road salt usage.

    • Check: Look for bubbling paint near the door hinges or musty smells inside the cabin.
    • Prevention: Keep drainage channels clear and wash your car regularly, paying attention to door jambs.

    2. Door Alignment Problems

    If your front or rear door starts to sag, doesn’t latch properly, or makes a clunking noise when closing, the issue might stem from the B-pillar hinges or the pillar itself shifting slightly due to stress.

    • Solution: Have a professional inspect the hinge pins and the pillar structure. Do not attempt to force a misaligned door, as this can damage the striker plate on the B-pillar.

    3. Trim and Seal Degradation

    The rubber weatherstripping that runs along the B-pillar ensures your car remains watertight and quiet. Over time, UV exposure and temperature changes can cause this rubber to crack or harden.

    • Fix: Replace worn weatherstripping to prevent wind noise and water leaks. This is a relatively inexpensive DIY fix for most car owners.

    How to Identify the B-Pillar on Different Vehicle Types

    Not all cars look the same, and the visibility of the B-pillar can vary depending on the body style.

    • Sedans and SUVs: The B-pillar is usually prominent and painted black or body-colored. It is clearly visible between the front and rear doors.
    • Hardtop Coupes: Some sporty coupes feature a “pillarless” design when the windows are rolled down, but they still have a structural B-pillar integrated into the door frame or roofline for safety.
    • Convertibles: Traditional convertibles often lack a fixed B-pillar to allow for an open-air experience. Instead, they use reinforced door frames and deployable roll bars to compensate for the missing structural support. For more details on convertible safety structures, you can refer to Wikipedia’s article on automobile safety.

    Frequently Asked Questions (FAQ)

    1. Can I remove the B-pillar from my car?

    No. The B-pillar is a critical structural component. Removing it would compromise the vehicle’s integrity, making it unsafe to drive. It is illegal in most jurisdictions to modify structural safety elements without professional engineering certification.

    2. Why is my B-pillar making a squeaking noise?

    Squeaking usually comes from the rubber weatherstripping rubbing against the glass or the door frame. Applying a silicone-based lubricant to the rubber seals often resolves this issue. If the noise persists, check for loose interior trim panels.

    3. Does the B-pillar contain side airbags?

    In many modern vehicles, yes. Side-curtain airbags are often housed in the roof rail above the B-pillar, while side-impact airbags may be mounted within the B-pillar itself or the seat. Always consult your owner’s manual for specific airbag locations.

    4. How much does it cost to repair a damaged B-pillar?

    Repair costs vary widely depending on the extent of the damage. Minor dent repair might cost $200–$500, while structural replacement due to a collision can range from $1,500 to $3,000 or more, as it involves welding and realigning the frame.

    5. What is the difference between a B-pillar and a door post?

    They are essentially the same thing. “Door post” is a colloquial term, while “B-pillar” is the technical industry standard. Both refer to the vertical support between the front and rear doors.

    6. Do electric vehicles (EVs) have B-pillars?

    Yes, EVs have B-pillars. In fact, because EV batteries are located in the floor, the upper structure (including the B-pillar) must be extremely rigid to protect occupants from side impacts and to maintain the integrity of the high-voltage system casing.

    Conclusion

    So, the next time someone asks, “What is the car part between door and roof called,” you can confidently answer: The B-pillar.

    This unassuming vertical post is a marvel of modern engineering, balancing aesthetics, functionality, and, most importantly, safety. From anchoring your doors to protecting you in a side-impact collision, the B-pillar works silently every time you drive. Understanding its role helps you appreciate your vehicle’s design and maintain it better.

    Did you find this guide helpful? Share this article with your fellow car enthusiasts on social media to help them master their automotive anatomy!