Tag: DIY Roofing Guide

  • How Many Square Feet In A Bundle Of Roof Shingles?

    How Many Square Feet In A Bundle Of Roof Shingles?

    Planning a roofing project can feel overwhelming, especially when you are standing in the aisle of a home improvement store trying to decipher cryptic packaging labels. You might be staring at a stack of asphalt shingles, wondering exactly how many square feet in a bundle of roof shingles you are actually buying. Getting this number wrong can lead to costly delays if you run short, or wasted money if you overbuy significantly.

    In this guide, we will break down the math simply and clearly. Whether you are a seasoned DIYer or a first-time homeowner looking to understand contractor quotes, knowing the precise coverage of a shingle bundle is the foundation of a successful roofing job. Let’s dive into the numbers so you can buy with confidence.

    The Standard Answer: 33.3 Square Feet Per Bundle

    If you are purchasing standard three-tab or architectural asphalt shingles in the United States, there is a golden rule you need to memorize: One bundle covers approximately 33.3 square feet.

    However, it is crucial to understand that shingles are not sold by the square foot directly; they are sold by the “bundle,” and bundled into a larger unit called a “square.”

    Understanding the “Roofing Square”

    In the roofing industry, terminology differs from general construction. A “square” does not mean a 10×10 foot area in casual conversation; it is a specific unit of measurement equal to 100 square feet.

    Because one roofing square equals 100 square feet, and one bundle covers roughly 33.3 square feet, it takes three bundles to make one roofing square.

    • 1 Bundle ≈ 33.3 sq. ft.
    • 3 Bundles = 1 Roofing Square (100 sq. ft.)

    This 3-to-1 ratio is the industry standard for most asphalt shingles. However, relying solely on averages can be risky. Let’s look at why variations exist.

    Why Do Some Bundles Cover Different Amounts?

    While 33.3 square feet is the norm, it is not universal. Several factors can change the coverage per bundle, and ignoring them is a common mistake for beginners.

    1. Shingle Type and Weight

    Heavier, premium architectural shingles often have different dimensions than basic three-tab shingles. Some high-end laminated shingles may require four or five bundles to cover a single roofing square (100 sq. ft.). This means each bundle would only cover 20 to 25 square feet. Always check the specific product data sheet before calculating.

    2. Manufacturer Specifications

    Different manufacturers (such as GAF, Owens Corning, or CertainTeed) may have slight variations in shingle cut and overlap requirements. While the total coverage per square remains 100 sq. ft., the number of shingles per bundle might vary, affecting the square footage per individual bundle.

    3. Exposure Rate

    The “exposure” is the part of the shingle that is visible after installation. Most shingles are designed with a standard 5-inch exposure. If a contractor installs shingles with a different exposure rate (which is rare but possible for aesthetic reasons), the coverage per bundle changes drastically.

    Pro Tip: Never assume. Always look for the “Coverage per Bundle” label on the wrapper or the manufacturer’s website. If it says “3 bundles per square,” you are safe with the 33.3 sq. ft. rule. If it says “4 bundles per square,” each bundle covers only 25 sq. ft.
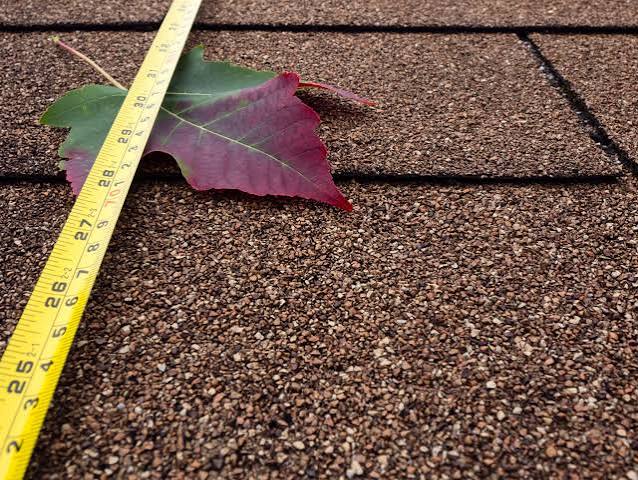
    How Many Square Feet In A Bundle Of Roof Shingles

    How to Calculate the Exact Number of Bundles You Need

    Knowing how many square feet in a bundle of roof shingles is only half the battle. The next step is applying that knowledge to your specific roof. Here is a step-by-step guide to ensuring you order the right amount.

    Step 1: Measure Your Roof’s Footprint

    Measure the length and width of each section of your house from the ground. Multiply these numbers to get the square footage of each plane.

    • Example: A section that is 20 feet wide and 40 feet long = 800 square feet.

    Step 2: Account for Roof Pitch

    A flat measurement is not enough because roofs are sloped. A steeper roof has more surface area than its footprint suggests. You must apply a pitch multiplier.

    • Low Pitch (4/12): Multiply footprint by 1.05
    • Medium Pitch (6/12): Multiply footprint by 1.15
    • Steep Pitch (9/12+): Multiply footprint by 1.25 or higher

    For accurate pitch multipliers, you can refer to standard construction geometry resources, such as the detailed explanations found on Wikipedia’s Roof page, which outlines various structural designs and their implications.

    Step 3: Calculate Total Square Footage

    Add up the adjusted square footage of all roof planes. Let’s say your total adjusted area is 2,400 square feet.

    Step 4: Convert to Squares and Bundles

    Divide your total square footage by 100 to get the number of “squares.”

    • 2,400 sq. ft. / 100 = 24 Squares

    Multiply the number of squares by 3 (assuming standard shingles).

    • 24 Squares x 3 Bundles = 72 Bundles

    Step 5: Add Waste Factor

    You cannot use every scrap of shingle. Cutting around vents, chimneys, and valleys creates waste.

    • Simple Roof (Gable): Add 10% waste.
    • Complex Roof (Hips, Valleys, Dormers): Add 15–20% waste.

    Using a 10% waste factor for our example:

    • 72 Bundles x 1.10 = 79.2 Bundles

    Always round up. You should order 80 bundles.

    Comparison: Standard vs. Premium Shingles

    To help you visualize the differences, here is a quick comparison table. Note how the “Square Feet per Bundle” changes based on the product tier.

    FeatureStandard 3-Tab ShinglesArchitectural/LaminatedPremium Designer
    Bundles per Square33 to 44 to 5
    Sq. Ft. per Bundle~33.3 sq. ft.~25–33.3 sq. ft.~20–25 sq. ft.
    Weight per Bundle~50–60 lbs~65–80 lbs~80+ lbs
    Best ForBudget projects, rentalsMost residential homesLuxury aesthetics

    Common Mistakes to Avoid

    Even with the right math, errors happen. Here are the most frequent pitfalls:

    1. Ignoring Starter Strips: You need special starter shingles for the eaves and rakes. These are often sold separately or in specific bundles. Do not count these as part of your field shingle coverage.
    2. Forgetting Ridge Caps: The peak of your roof requires ridge cap shingles. These are usually calculated differently (by linear foot) and do not follow the standard bundle coverage rule.
    3. Underestimating Complexity: If your roof has many valleys, dormers, or skylights, your waste factor will be higher. A 10% waste factor is insufficient for a complex Victorian-style roof; aim for 15–20%.

    FAQ Section

    Q1: Can I return unused bundles of shingles?

    Most major home improvement stores in the US allow returns of unopened, undamaged bundles within a specific timeframe (usually 90 days). However, policies vary by location. Keep your receipt and try to buy slightly more than you think you need, as returning extras is easier than running out mid-project.

    Q2: Does the color of the shingle affect how many square feet are in a bundle?

    No, the color does not change the physical dimensions or coverage. However, darker shingles may absorb more heat, which can impact longevity, but the how many square feet in a bundle of roof shingles remains consistent regardless of color within the same product line.

    Q3: How much does a bundle of shingles weigh?

    A standard bundle of asphalt shingles typically weighs between 50 and 80 pounds. Heavier architectural shingles are on the higher end of this spectrum. This is important to consider if you are carrying them up a ladder yourself.

    Q4: What is the difference between a “square” and a “bundle”?

    A “square” is a unit of measurement equal to 100 square feet of roof area. A “bundle” is the physical package the shingles come in. For standard shingles, it takes three bundles to equal one square.

    Q5: Do metal roofs use bundles?

    No, metal roofing is typically sold by the panel or by the square foot, not in bundles like asphalt shingles. The calculation method for metal roofing is entirely different and involves linear feet and panel width.

    Q6: How do I measure my roof if I can’t climb on it?

    You can use satellite imagery tools like Google Earth to measure the footprint of your home. Alternatively, many roofing supply companies offer free drone measurements or online calculators where you input your address, and they provide an estimate based on local tax records and satellite data.

    Conclusion

    Understanding how many square feet in a bundle of roof shingles is the first step toward a stress-free roofing project. Remember the magic number: 33.3 square feet for standard bundles, which means three bundles per roofing square.

    By accurately measuring your roof, accounting for pitch, and adding a proper waste factor, you can avoid the headache of mid-project supply runs. Always double-check the manufacturer’s specifications for the specific product you choose, as premium shingles may have different coverage rates.

    Did you find this guide helpful? Share it with your fellow DIYers on social media to help them tackle their roofing projects with confidence!
  • How to Figure Out How Many Square a Roof Is

    How to Figure Out How Many Square a Roof Is

    Have you ever stared at your house, wondering just how much material you actually need for a new roof? It is a common source of anxiety for homeowners, as guessing wrong can lead to wasted money or dangerous delays. Learning how to figure out how many square a roof is empowers you to budget accurately and communicate effectively with contractors.

    In the roofing industry, precision is not just about numbers; it is about structural integrity and financial safety. This guide will walk you through the process with clarity, ensuring you understand every step from measuring pitch to calculating waste factors.

    What Is a “Square” in Roofing Terms?

    Before we grab the tape measure, we must clarify the terminology. In everyday language, a “square” might mean a 10×10 foot area. However, in professional roofing, a square is a specific unit of measurement equal to 100 square feet.

    This distinction is critical. If a contractor tells you your roof is 20 squares, they do not mean 20 square feet. They mean 2,000 square feet of roofing surface.

    Why Do Roofers Use Squares?

    Using squares simplifies the ordering process. Most roofing materials, such as asphalt shingles, are packaged and priced per square. For example:

    • One bundle of standard 3-tab asphalt shingles typically covers 33.3 square feet.
    • Therefore, you need three bundles to cover one roofing square (100 sq ft).

    Understanding this baseline prevents you from under-ordering materials, which can result in color mismatches if you have to buy a second batch later.

    Step-by-Step: How to Measure Your Roof’s Footprint

    The most accurate way to determine your roof size is to measure the footprint of your home and then adjust for the slope. You do not necessarily need to climb onto the roof, which can be dangerous. Instead, you can measure from the ground.

    Step 1: Measure the Length and Width

    Walk around your house with a long tape measure or a laser distance measurer.

    1. Measure the length of each side of your house.
    2. Measure the width of each side.
    3. Include any overhangs (eaves) that extend beyond the exterior walls. A typical overhang is between 12 to 24 inches.

    Example: If your house is 40 feet long and 30 feet wide, your base footprint is: 40 ft×30 ft=1,200 sq ft40 ft×30 ft=1,200 sq ft

    Step 2: Account for Complex Shapes

    Most homes are not perfect rectangles. You may have garages, dormers, or wings attached to the main structure.

    • Break your home down into simple geometric shapes (rectangles, triangles).
    • Calculate the area of each section separately.
    • Add them together to get the total flat footprint.

    Pro Tip: If you have a hip roof (slopes on all four sides), the calculation becomes more complex. In such cases, measuring individual planes from the ground using trigonometry or using satellite imagery tools is often more reliable.

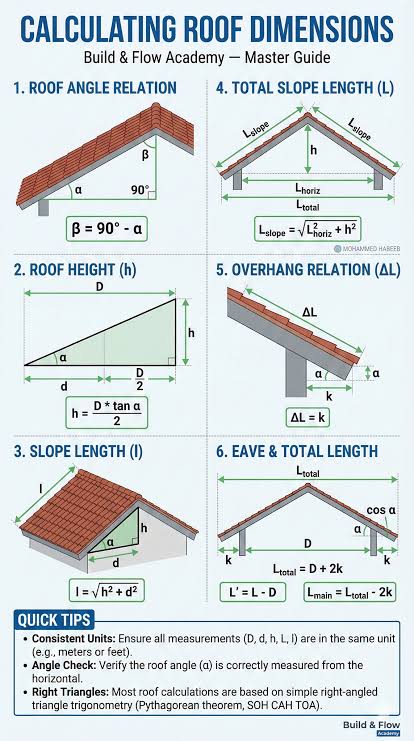
    How To Figure Out How Many Square A Roof Is

    Adjusting for Roof Pitch: The Critical Factor

    A flat roof is easy to calculate because the surface area equals the footprint. However, most US homes have sloped roofs. The steeper the roof, the more surface area it has compared to its footprint. This is where the pitch comes in.

    Understanding Roof Pitch

    Roof pitch is expressed as a ratio of vertical rise to horizontal run (e.g., 6/12). This means for every 12 inches you go horizontally, the roof rises 6 inches vertically.

    To find your pitch:

    1. Go into your attic.
    2. Place a level against the bottom of a rafter.
    3. Measure 12 inches along the level.
    4. Measure the vertical distance from the 12-inch mark on the level to the rafter. This number is your rise.

    Using the Pitch Multiplier

    Once you know your pitch, you apply a multiplier to your footprint area. Here is a quick reference table for common pitches:

    Roof PitchMultiplierDescription
    4/121.054Low Slope
    6/121.118Medium Slope
    8/121.202Standard Slope
    10/121.302Steep Slope
    12/121.414Very Steep

    Calculation Example:

    • Footprint: 1,200 sq ft
    • Pitch: 6/12 (Multiplier: 1.118)
    • Total Surface Area: 1,200×1.118=1,341.6 sq ft1,200×1.118=1,341.6 sq ft

    To convert this to squares: 1,341.6÷100=13.42 squares1,341.6÷100=13.42 squares

    For more detailed mathematical explanations of roof geometry, you can refer to general principles of geometry on Wikipedia.

    Calculating Waste and Ordering Materials

    You never order exactly the amount of surface area you calculated. Roofing requires cutting shingles to fit valleys, hips, and ridges, which creates waste. Additionally, mistakes happen during installation.

    The Waste Factor Rule

    • Simple Gable Roof: Add 10% waste.
    • Complex Roof (Hips, Valleys, Dormers): Add 15–20% waste.

    Continuing our Example:

    • Base Squares: 13.42
    • Waste (15%): 13.42×0.15=2.0113.42×0.15=2.01 squares
    • Total Needed: 13.42+2.01=15.4313.42+2.01=15.43 squares

    Since you cannot buy partial squares easily, you would round up to 16 squares.

    Material Breakdown for 16 Squares

    If you are using standard asphalt shingles:

    • Shingles: 16 squares ×× 3 bundles/square = 48 bundles.
    • Underlayment: Typically sold in rolls covering 4 squares. You need 16÷4=16÷4= 4 rolls.
    • Nails: Approximately 1 pound of nails per square. You need 16 lbs of roofing nails.

    Common Mistakes to Avoid When Measuring

    Even experienced DIYers make errors. Here are the most frequent pitfalls:

    1. Ignoring Overhangs: Failing to include the eaves can underestimate your area by 5–10%. Always measure from the outer edge of the fascia board.
    2. Misidentifying Pitch: Guessing the pitch instead of measuring it. A 6/12 pitch looks significantly different from an 8/12 pitch, and the cost difference is substantial.
    3. Forgetting Chimneys and Skylights: While these subtract from the total area, the flashing and detailing around them require extra material and labor. It is often safer to ignore their subtraction and let the waste factor cover the complexity.
    4. Unit Confusion: Mixing up meters and feet if using digital tools. Ensure your calculator is set to imperial units for US-based projects.

    FAQ: Frequently Asked Questions

    1. Can I use Google Earth to measure my roof?

    Yes, satellite imagery tools like Google Earth or specialized roofing software (like EagleView) can provide highly accurate measurements. These tools use photogrammetry to calculate pitch and area. However, for small DIY projects, manual measurement is often free and sufficiently accurate if done carefully.

    2. Does the type of shingle change how many squares I need?

    No, a “square” is always 100 square feet of coverage. However, different materials have different packaging. Asphalt shingles usually come in 3-bundle squares, while metal roofing or slate may have different coverage per unit. Always check the manufacturer’s specifications for coverage per package.

    3. How do I measure a roof with multiple levels?

    Treat each level as a separate rectangle. Measure the footprint of the first floor, then the second floor, and any additional structures like porches. Calculate the area for each section based on its specific pitch, then sum them all up. Do not assume the entire house has the same pitch.

    4. What if my roof is too steep to measure safely?

    Safety is paramount. If your roof is steep (over 6/12 pitch) or high, do not climb it. Use the attic method to determine pitch and measure the exterior walls from the ground. Alternatively, hire a professional roofer for a measurement-only quote, which is often free or low-cost.

    5. Why do contractors sometimes give different square footage estimates?

    Discrepancies often arise from how waste is calculated or whether overhangs are included. Some contractors may also use different methods for measuring complex valleys. Always ask for a breakdown of their calculation: footprint, pitch multiplier, and waste percentage.

    Conclusion

    Knowing how to figure out how many square a roof is is a valuable skill that puts you in control of your home improvement project. By measuring your footprint, determining your pitch, and applying the correct waste factor, you can avoid costly overages or stressful shortages.

    Remember, accuracy in the planning phase saves time and money in the execution phase. Whether you are hiring a pro or tackling a small repair yourself, these calculations form the foundation of a successful roofing job.

    Did you find this guide helpful? Share it with your neighbors or on social media to help others navigate their roofing projects with confidence!

  • How To Put A Metal Roof On A Mobile Home

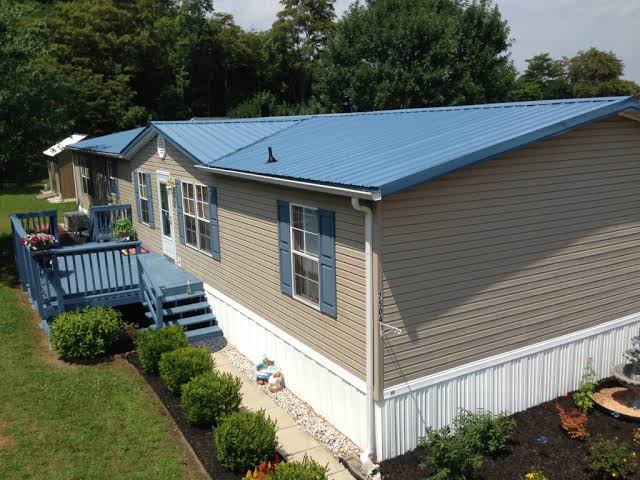
    How To Put A Metal Roof On A Mobile Home

    Is your mobile home’s current roof leaking, sagging, or simply showing its age? You are not alone; many homeowners face the stress of deteriorating roofs that threaten the integrity of their living space. Learning how to put a metal roof on a mobile home can seem daunting, but with the right preparation and guidance, it is a manageable project that offers long-term durability and energy efficiency. This guide will walk you through the process with empathy and clarity, ensuring you feel confident in every step.


    Why Choose Metal for Your Mobile Home?

    Before diving into the tools and nails, it is crucial to understand why metal is often the superior choice for manufactured housing. Unlike traditional asphalt shingles, which can crack under the slight flexing of a mobile home structure, metal roofing panels are lightweight yet incredibly resilient.

    According to industry data, metal roofs can last 40 to 70 years, significantly outlasting asphalt shingles which typically need replacement every 15–20 years. For mobile homes, which often have lighter structural framing, the weight reduction is also a critical safety factor. Metal roofing weighs approximately 1.5 pounds per square foot, compared to 2.5–3.5 pounds for asphalt shingles. This reduces the load on your home’s trusses, minimizing the risk of structural strain.

    Furthermore, metal reflects solar radiant heat, which can reduce cooling costs by 10–25%. For mobile home owners looking to improve energy efficiency without replacing windows or insulation, this is a significant benefit.


    Essential Tools and Materials Checklist

    Preparation is half the battle. Having everything ready before you climb the ladder ensures safety and efficiency. Do not start this project if you are missing key components.

    Tools Required:

    • Drill/Impact Driver: With screwdriver bits specifically designed for roofing screws.
    • Tin Snips or Electric Shears: For cutting metal panels to size.
    • Chalk Line: To ensure straight lines for panel alignment.
    • Measuring Tape: At least 25 feet long.
    • Safety Gear: Non-slip boots, gloves, safety glasses, and a harness if the pitch is steep.
    • Ladder: Sturdy and extended properly beyond the roof edge.

    Materials Needed:

    • Metal Panels: Corrugated or R-panel styles are common. Ensure they are rated for residential use.
    • Underlayment: Synthetic roofing underlayment is preferred over felt for better moisture protection.
    • Roofing Screws: Self-tapping screws with rubber washers (neoprene) to prevent leaks. Note: Use screws specifically labeled for metal roofing.
    • Trim and Flashing: Ridge caps, drip edges, and gable trim.
    • Sealant: High-quality polyurethane roof sealant for extra waterproofing at seams.
    How To Put A Metal Roof On A Mobile Home

    Step 1: Assessing and Preparing the Existing Roof

    You cannot install a new roof over a compromised structure. The first step in learning how to put a metal roof on a mobile home is a thorough inspection.

    Walk the roof carefully. Look for soft spots, rot, or significant water damage in the existing decking. If the underlying wood is spongy, it must be replaced. Mobile homes often use thin plywood or OSB (Oriented Strand Board); if more than 15% of the deck is damaged, consider a full tear-off. However, if the existing roof is sound, you can often install metal directly over it, saving time and disposal costs.

    Critical Check: Ensure the existing roof is clean. Remove any loose shingles, moss, or debris. A smooth surface is vital for the metal panels to lay flat. If there are protruding vents or pipes, note their locations as you will need to flash around them later.


    Step 2: Installing the Underlayment

    The underlayment acts as a secondary barrier against water infiltration. Even though metal is waterproof, condensation can form underneath, and wind-driven rain can penetrate screw holes if not properly sealed.

    1. Roll Out the Underlayment: Start at the bottom edge of the roof (the eave). Roll the synthetic underlayment horizontally across the roof.
    2. Overlap Correctly: Each subsequent row should overlap the previous one by at least 6 inches. This ensures water flows down and off the roof, not under the layers.
    3. Secure It: Use roofing nails or staples to secure the underlayment. Place fasteners every 12–18 inches along the edges and in the field. Avoid creating wrinkles; a smooth underlayment prevents bumps in your metal panels.

    For more detailed information on roofing materials and their properties, you can refer to Wikipedia’s entry on Roofing.


    Step 3: Measuring and Cutting Metal Panels

    Accuracy here prevents headaches later. Measure the length of your roof from the ridge to the eave. Add 1–2 inches to this measurement to allow for an overhang at the eave. This overhang helps direct water away from the fascia and into the gutters.

    Cutting Tips:

    • Use electric shears for long cuts to maintain the protective coating of the metal.
    • If using tin snips, cut slowly to avoid jagged edges.
    • Always wear gloves when handling cut metal, as edges are extremely sharp.
    • Clean any metal shavings immediately. Leftover shavings can rust and stain your new roof within weeks.

    Step 4: Installing the First Panel

    The first panel sets the tone for the entire roof. If it is crooked, every subsequent panel will be crooked.

    1. Start at the Corner: Begin at the bottom corner of the roof, opposite the prevailing wind direction if possible.
    2. Align Carefully: Ensure the panel overhangs the eave by the predetermined amount (usually 1–1.5 inches). Use a chalk line to mark a straight vertical line up the roof to guide your placement.
    3. Square It: Check that the panel is square with the edge of the roof. Use the Pythagorean theorem (measure diagonals) if necessary to ensure perfect alignment.

    Step 5: Fastening the Panels

    This is where many DIYers make mistakes. Over-driving or under-driving screws can lead to leaks.

    • Screw Placement: Drive screws through the flat part of the panel, not the high ribs, unless the manufacturer specifies otherwise. Screwing into the rib can cause the metal to distort.
    • Tightness: Tighten the screw until the rubber washer is compressed and just begins to bulge slightly. Do not overtighten. If the washer is squashed flat or the metal dimples deeply, you have gone too far, which compromises the seal.
    • Spacing: Typically, place screws every 12–24 inches along the purlins (roof supports). Consult your specific panel’s installation guide for exact spacing.

    Step 6: Overlapping and Subsequent Panels

    Most metal panels have a designated “overlap” side. Slide the next panel’s edge under or over the previous panel’s edge, depending on the profile design.

    • Use Sealant Tape: For added security, apply butyl tape or sealant along the overlap seam before laying the next panel. This creates a watertight bond between sheets.
    • Check Alignment: After every third panel, step back and check your lines. Adjust slightly if needed before continuing.

    Step 7: Installing Trim and Flashing

    The edges and peaks are the most vulnerable areas for leaks. Proper flashing is non-negotiable.

    • Drip Edge: Install at the eaves before the panels if not already done. If installing over existing shingles, ensure the metal panels extend over the drip edge.
    • Ridge Cap: Once all panels are installed, cover the peak with a ridge cap. Secure it with screws on both sides, ensuring it overlaps correctly with the wind direction.
    • Vents and Pipes: Use rubber boot flashings for plumbing vents. Cut the metal panel to fit around the vent, slide the boot over, and seal the base with polyurethane sealant.

    Pros and Cons of Metal Roofing on Mobile Homes

    FeatureMetal RoofingAsphalt Shingles
    Lifespan40–70 Years15–20 Years
    WeightLightweight (1.5 lbs/sq ft)Heavier (2.5–3.5 lbs/sq ft)
    CostHigher upfront costLower upfront cost
    MaintenanceLowModerate to High
    Energy EfficiencyHigh (Reflective)Low (Absorbs Heat)
    NoiseCan be noisy during rainQuiet

    Note: Noise can be mitigated with proper insulation and solid decking.


    FAQ Section

    Q1: Can I install a metal roof over my existing shingles? Yes, in most cases, you can install metal roofing over one layer of existing asphalt shingles. This saves on disposal fees and labor. However, ensure the existing roof is structurally sound and free of major leaks. Check local building codes, as some areas restrict multiple layers.

    Q2: Do I need a permit to replace my mobile home roof? Regulations vary by county and state. Most jurisdictions require a permit for roofing replacements, especially if you are changing the material type. Contact your local building department before starting. Failure to obtain a permit can affect your home insurance and resale value.

    Q3: Will a metal roof void my mobile home warranty? If your home is new, check with the manufacturer. Generally, adding a approved roofing system does not void warranties, but improper installation might. Using certified installers or following strict DIY guidelines is essential.

    Q4: How do I prevent condensation under the metal roof? Condensation occurs when warm, moist air from inside the home meets the cold metal surface. To prevent this, ensure you have adequate attic ventilation (soffit and ridge vents) and use a breathable synthetic underlayment. In colder climates, consider adding a vapor barrier.

    Q5: What is the biggest mistake people make when installing metal roofs? The most common mistake is overtightening the screws, which damages the rubber washers and leads to leaks. Another frequent error is failing to square the first panel, resulting in a misaligned roof that looks unprofessional and may leak at the edges.


    Conclusion

    Learning how to put a metal roof on a mobile home is a rewarding project that enhances your home’s value, durability, and energy efficiency. By following these steps—preparing the surface, installing quality underlayment, aligning panels precisely, and sealing flashes correctly—you can achieve a professional-grade result. Remember, patience and attention to detail are your best tools.

    If you found this guide helpful, please share it with fellow mobile home owners on social media. Your experience could help someone else protect their home from the elements! Stay safe, and enjoy your new, durable roof.