Tag: Christmas Light Clips

  • How to Attach Christmas Lights to a Metal Roof

    How to Attach Christmas Lights to a Metal Roof

    Hanging holiday decorations on a metal roof can feel like walking a tightrope between festive cheer and potential property damage. Many homeowners worry about puncturing their expensive roofing material or dealing with slippery surfaces during winter installations. If you are wondering how do you attach Christmas lights to a metal roof without causing leaks or voiding your warranty, you are in the right place. This guide provides safe, professional-approved methods to secure your lights effectively while keeping your roof intact.


    Why Metal Roofs Require Special Care

    Metal roofs are durable and long-lasting, but they present unique challenges for holiday decorators. Unlike asphalt shingles, which have texture and gaps that allow for easy clipping, metal panels are smooth, slick, and often coated with delicate finishes.

    Drilling holes or using adhesive tapes incorrectly can compromise the protective coating, leading to rust or water infiltration. According to industry standards, maintaining the integrity of the metal panel’s seal is crucial for the longevity of the roof. Therefore, the method you choose must be non-invasive and secure enough to withstand wind and snow loads.

    The Best Tools for the Job: Choosing the Right Clips

    The secret to a successful installation lies in selecting the correct hardware. Standard plastic clips designed for gutters or shingles often fail on metal roofs because they cannot grip the smooth surface or the specific profile of standing seam panels.

    1. Standing Seam Clips

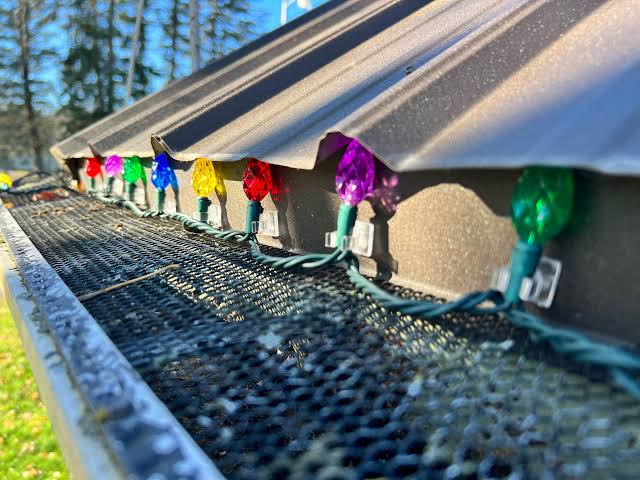
    If you have a standing seam metal roof (where panels connect via raised vertical legs), specialized standing seam clips are your best option. These clips slide under the seam cap without penetrating the metal. They hold the wire securely and are invisible from the ground once installed.

    2. Magnetic Hooks and Clips

    For flat metal sections or corrugated profiles, heavy-duty magnetic hooks offer a versatile solution. Ensure you use magnets with rubber coatings to prevent scratching the paint finish. These are excellent for temporary setups but may shift in high winds if not paired with additional securing methods.

    3. Adhesive-Backed Clips (Use with Caution)

    Some manufacturers offer UV-resistant, adhesive-backed clips specifically rated for metal surfaces. While convenient, these should only be used if the roof surface is thoroughly cleaned and dried. Note that removal can sometimes leave residue or damage older paint finishes.

    Clip TypeBest ForDurabilityRisk of Damage
    Standing Seam ClipsRaised seam panelsHighNone
    Magnetic HooksFlat/Corrugated metalMediumLow (if coated)
    Adhesive ClipsSmooth surfacesLow-MediumModerate
    Gutter ClipsMetal gutters onlyHighNone
    How Do You Attach Christmas Lights To A Metal Roof

    Step-by-Step Guide: How to Install Lights Safely

    Follow these detailed steps to ensure your installation is both beautiful and safe. Always prioritize personal safety over aesthetic perfection.

    Step 1: Inspect and Clean the Surface

    Before handling any lights, inspect your roof for loose panels or sharp edges. Use a soft brush to remove debris, dirt, or oxidation from the area where you plan to attach the clips. A clean surface ensures better adhesion for magnetic or adhesive options.

    Step 2: Plan Your Layout

    Measure the length of your roofline and calculate the total footage of lights needed. It is recommended to buy 10–15% more than you think you need to account for corners and mistakes. Map out where your power source is located to avoid using excessive extension cords, which can be tripping hazards.

    Step 3: Install the Clips First

    Do not try to attach lights and clips simultaneously. Install all the clips along the roofline first.

    • For Standing Seams: Slide the clip under the seam cap at intervals of 12–18 inches. Ensure it snaps firmly into place.
    • For Magnetic Hooks: Place them evenly along the edge, ensuring they are aligned straight.

    Step 4: Attach the Lights

    Once the clips are secure, snap the light strand into each clip. Start from the power source and work your way outward. Avoid pulling the wire taut; leave a slight slack to accommodate thermal expansion and contraction of the metal roof during temperature changes.

    Step 5: Secure the Power Cord

    Use weatherproof cable ties or additional clips to secure the main power cord along the roof edge. This prevents wind from whipping the cord around, which could dislodge your lights or damage the roof coating.

    Critical Safety Precautions

    Working on a metal roof during winter poses significant risks. Slips and falls are common due to ice, frost, or even morning dew on the smooth metal surface.

    • Use Proper Footwear: Wear shoes with rubber soles that provide maximum grip. Avoid boots with hard plastic or worn-out treads.
    • Check the Weather: Never attempt installation if rain, snow, or high winds are forecasted. Wet metal is extremely slippery.
    • Use a Harness: If your roof has a steep pitch, use a safety harness anchored to a secure point. Do not rely solely on ladders.
    • Electrical Safety: Ensure all lights are rated for outdoor use (look for the UL label). Use GFCI-protected outlets to prevent electrical shocks.

    For more information on electrical safety standards, you can refer to the National Electrical Code overview on Wikipedia.

    Common Mistakes to Avoid

    Even experienced DIYers make errors when dealing with metal roofs. Here are the most frequent pitfalls:

    1. Using Screws or Nails: Never penetrate the metal panel to hang lights. This creates immediate leak points and voids most manufacturer warranties.
    2. Ignoring Thermal Expansion: Metal expands and contracts with temperature changes. If your lights are pulled too tight, the wires can break or pull the clips off during cold snaps.
    3. Overloading Circuits: Calculate the amperage of your light strands. Overloading a circuit can trip breakers or cause fire hazards. LED lights are recommended as they consume significantly less power.
    4. Leaving Lights Up Too Long: Prolonged exposure to sun and weather can degrade the plastic clips and wire insulation. Remove your lights within a few weeks after the holidays.

    FAQ Section

    Q1: Will magnetic clips scratch my metal roof?

    Standard bare magnets can scratch the paint or coating if they slide. However, high-quality magnetic hooks designed for automotive or roofing use come with rubber or felt coatings. These protect the finish while providing strong hold. Always test a small, inconspicuous area first.

    Q2: Can I use adhesive tape to stick lights directly to the roof?

    It is not recommended. Most household tapes lose adhesion in cold temperatures and leave difficult-to-remove residue. Furthermore, removing the tape can peel off the paint or protective coating of the metal roof. Always use purpose-built clips.

    Q3: How far apart should I place the clips?

    For standard mini-lights or LED strands, place clips every 12 to 18 inches. If you are using heavier rope lights or larger bulbs, reduce the distance to 6–10 inches to prevent sagging. Consistent spacing ensures a professional, neat appearance.

    Q4: Is it safe to walk on a metal roof in winter?

    Walking on a metal roof in winter is hazardous due to potential ice and slick surfaces. If possible, install lights from a sturdy ladder using an extension pole or hook tool. If you must go on the roof, ensure it is dry, wear non-slip footwear, and use fall protection gear.

    Q5: What type of lights are best for metal roofs?

    LED lights are the best choice. They generate less heat, reducing the risk of melting plastic clips or damaging the roof coating. They are also lighter, putting less stress on the attachment points, and are more energy-efficient.

    Q6: Will installing clips void my roof warranty?

    Non-penetrating clips, such as standing seam clips or magnetic hooks, generally do not void warranties because they do not alter the structure or integrity of the roof. However, drilling holes or using harsh adhesives likely will. Always check your specific manufacturer’s warranty guidelines before proceeding.

    Conclusion

    Learning how do you attach Christmas lights to a metal roof is all about choosing the right tools and prioritizing safety. By using non-invasive methods like standing seam clips or coated magnetic hooks, you can create a stunning holiday display without compromising your roof’s integrity. Remember to plan your layout, respect the weather conditions, and never penetrate the metal surface.

    Your home deserves to shine this holiday season, but not at the expense of your roof’s longevity. Take your time, use the right equipment, and enjoy the festive glow. If you found this guide helpful, please share it with your friends and neighbors on social media to help them decorate safely too!
  • Hang Christmas Lights on Metal Roof Safely

    Hang Christmas Lights on Metal Roof Safely

    Hanging holiday decorations can feel like a daunting task, especially when your home features a sleek, modern, or industrial-style metal roof. You want that festive glow, but the fear of slipping, damaging the expensive roofing material, or voiding your warranty holds you back. If you are wondering how do you hang Christmas lights on a metal roof, you are not alone; many homeowners struggle to find a balance between aesthetic appeal and structural integrity.

    The good news is that with the right tools and techniques, you can achieve a breathtaking display without drilling a single hole or risking a dangerous fall. This guide will walk you through safe, effective, and professional methods to light up your home this season.

    Why Standard Methods Fail on Metal Roofs

    Before diving into the solutions, it is crucial to understand why traditional hanging methods often fail on metal surfaces. Unlike asphalt shingles, which have texture and granules that provide grip, metal roofs are smooth, slick, and often coated with delicate finishes.

    Using standard adhesive hooks or nails can lead to two major issues:

    1. Surface Damage: Scratches or punctures can compromise the protective coating, leading to rust and leaks over time.
    2. Safety Hazards: Adhesives often fail in cold temperatures, causing lights to fall and creating tripping hazards or electrical shorts.

    According to industry experts, maintaining the integrity of the roof’s sealant is paramount. A small puncture can lead to significant water intrusion during winter snow melts. Therefore, the goal is non-invasive attachment.

    The Best Tools for the Job: Choosing the Right Clips

    The secret to successfully learning how do you hang Christmas lights on a metal roof lies entirely in the hardware you choose. Not all clips are created equal, and using the wrong type can result in disappointment mid-season.

    1. Magnetic Light Clips

    For standing seam metal roofs, magnetic clips are arguably the best invention in holiday decorating. These clips feature strong neodymium magnets that clamp onto the vertical seams of the roof.

    • Pros: No adhesive residue, extremely secure, reusable, and zero risk of puncturing the roof.
    • Cons: Only works on ferrous metal roofs (steel). They will not stick to aluminum or copper roofs.

    2. Gutter Clips with Extended Reach

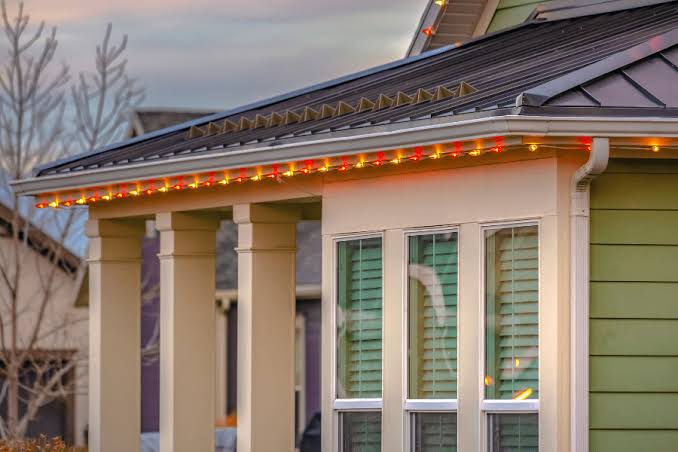
    If your metal roof has gutters, you can bypass the roof surface entirely. Specialized gutter clips hook onto the lip of the gutter and hold the light string securely.

    • Pros: Keeps weight off the roof panels, easy to install from a ladder.
    • Cons: Requires accessible gutters; may not work with certain gutter guard systems.

    3. Adhesive-Backed Clips (Use with Caution)

    If you have an aluminum or copper roof where magnets won’t work, high-quality, weather-resistant adhesive clips are an option. However, you must choose clips specifically designed for outdoor use and smooth surfaces.

    • Pros: Works on any material.
    • Cons: Risk of residue; may fail in extreme cold if not applied correctly.
    Clip TypeBest ForDurabilityRisk Level
    Magnetic ClipsSteel Standing SeamHighLow
    Gutter ClipsHomes with GuttersMedium-HighLow
    Adhesive ClipsAluminum/CopperMediumMedium
    How Do You Hang Christmas Lights On A Metal Roof

    Step-by-Step Guide: How to Install Lights Safely

    Now that you have selected your hardware, let’s break down the process. Safety is the priority, so please read these steps carefully before climbing any ladders.

    Step 1: Plan Your Layout

    Measure the perimeter of your roof where you intend to hang the lights. Calculate the total length needed. It is always better to buy 10% more than you think you need to account for corners and mistakes. Sketch a simple diagram to visualize where power sources will be located.

    Step 2: Clean the Surface

    If you are using adhesive clips or even magnetic ones, cleanliness is key. Wipe down the area with a mild soap solution and let it dry completely. Dust and debris reduce the holding power of both magnets and adhesives. For more information on metal roof maintenance, you can refer to general guidelines on Metal Roofing to understand the material properties better.

    Step 3: Test Your Lights

    Before installing anything, plug in your light strands to ensure every bulb works. It is frustrating to install an entire row only to discover a broken filament later. Replace any faulty bulbs now.

    Step 4: Install the Clips

    • For Magnetic Clips: Simply snap them onto the standing seam every 12–18 inches. Ensure they are aligned straight for a professional look.
    • For Adhesive Clips: Peel the backing and press firmly for 30 seconds. Allow the adhesive to cure for 24 hours before hanging heavy lights if possible, although many modern brands offer instant-hold technology.

    Step 5: Attach the Lights

    Clip the lights into place. Do not pull the wire taut; leave a slight slack to allow for expansion and contraction due to temperature changes. Tight wires are more prone to breaking in freezing weather.

    Step 6: Secure the Power Source

    Ensure your extension cords and plugs are rated for outdoor use. Use a weatherproof cover for any outlets exposed to the elements. Never run cords across walkways where they can be tripped over.

    Critical Safety Precautions

    Working on a roof, especially a slippery metal one, presents unique dangers. Here are essential safety tips to keep in mind:

    • Never Walk on a Wet or Icy Roof: Metal becomes incredibly slick when wet or frozen. One misstep can lead to a serious injury.
    • Use a Spotter: Always have someone else present when you are on a ladder or roof. They can stabilize the ladder and call for help if needed.
    • Check the Weather Forecast: Do not attempt installation if rain, snow, or high winds are predicted. Wait for a calm, dry day.
    • Use Proper Footwear: Wear shoes with rubber soles that provide maximum grip. Avoid leather-soled boots.

    Common Mistakes to Avoid

    Even with the best intentions, homeowners often make errors that compromise their display or their roof.

    1. Using Staples or Nails: Never puncture a metal roof. This voids warranties and creates leak paths.
    2. Overloading Circuits: Check the amperage rating of your lights and extension cords. Overloading can cause fires.
    3. Ignoring Manufacturer Instructions: Each clip brand has specific weight limits and installation guidelines. Follow them strictly.

    FAQ Section

    Can I use magnetic clips on an aluminum metal roof?

    No, standard magnetic clips will not work on aluminum because it is non-ferrous. For aluminum roofs, you should use adhesive-backed clips designed for smooth surfaces or gutter clips if available.

    Will adhesive clips damage my roof’s finish?

    High-quality, outdoor-rated adhesive clips are designed to be removed without leaving residue. However, low-quality adhesives may leave a sticky mess or peel off paint. Always test a small, inconspicuous area first.

    How far apart should I place the clips?

    For a neat and secure appearance, place clips every 12 to 18 inches. This spacing prevents the light strand from sagging while ensuring enough support against wind.

    Is it safe to hang lights on a steep metal roof?

    It is generally not recommended to climb onto a steep metal roof due to slip hazards. Instead, use long-reach tools, gutter clips installed from a ladder, or hire a professional installer who has the proper safety harnesses and equipment.

    How do I remove the lights without damaging the roof?

    Gently unclip the lights from the holders. If using adhesive clips, warm the adhesive slightly with a hairdryer on a low setting to soften it before peeling it off slowly. Clean any residual adhesive with a mild solvent recommended by the clip manufacturer.

    Conclusion

    Learning how do you hang Christmas lights on a metal roof doesn’t have to be a stressful experience. By choosing the right clips—whether magnetic for steel or adhesive for aluminum—and following strict safety protocols, you can create a magical holiday atmosphere without compromising your home’s integrity.

    Remember, the key is preparation. Measure twice, buy the right hardware, and prioritize safety over speed. Your beautiful, damage-free display will be the envy of the neighborhood.

    If you found this guide helpful, please share it with your friends and family on social media to help them light up their holidays safely too! Happy decorating!