Blog

  • Can You Put Solar Panels On A Flat Roof UK?

    Can You Put Solar Panels On A Flat Roof UK?

    Living in the United Kingdom offers unique architectural challenges, especially when it comes to maximizing renewable energy potential. Many homeowners with modern builds or extensions face a common dilemma: can you put solar panels on a flat roof UK? The short answer is a resounding yes, but the method differs significantly from traditional pitched roof installations.

    If you are worried that your property’s design limits your ability to go green, rest assured. With the right technology and installation approach, flat roofs can be highly efficient platforms for solar energy generation. This guide will walk you through everything you need to know, from mounting systems to local regulations, ensuring you make an informed decision for your home.

    Why Flat Roofs Are Viable for Solar in the UK

    For years, there was a misconception that flat roofs were unsuitable for solar power. However, advancements in mounting technology have changed the landscape. In fact, flat roofs offer distinct advantages that pitched roofs do not.

    Unlike sloped roofs, which are fixed at a specific angle determined by the builder, flat roofs allow for optimal orientation. You can adjust the tilt and direction of your panels to capture the maximum amount of sunlight throughout the year. In the UK, where the sun’s path is lower in the sky during winter, this flexibility is crucial for maintaining consistent energy production.

    According to recent data from the Department for Energy Security and Net Zero, residential solar adoption has surged, with flat-roofed properties contributing significantly to this growth. The key lies not in if you can install them, but how you install them.

    How Are Solar Panels Mounted on Flat Roofs?

    The most critical aspect of installing solar on a flat roof is the mounting system. You cannot simply screw panels directly into the surface as you might with a tiled roof. Instead, specialized frameworks are used to hold the panels at an optimal angle.

    1. Ballasted Mounting Systems

    This is the most popular method for commercial and residential flat roofs in the UK. These systems use weight (ballast) to keep the structure in place rather than penetrating the roof membrane.

    • How it works: Concrete blocks or gravel trays are placed on the roof to weigh down the aluminum frame holding the panels.
    • Benefit: No drilling means no risk of leaks, preserving your roof’s warranty.
    • Consideration: Your roof must be structurally sound enough to support the extra weight.

    2. Penetrating Mounts

    In some cases, particularly with smaller domestic roofs where weight is a concern, installers may use penetrating mounts.

    • How it works: The frame is bolted directly into the roof’s structural beams.
    • Benefit: Lighter overall load on the roof.
    • Risk: Requires expert waterproofing around the penetration points to prevent leaks.

    3. Adhesive Bonding

    A newer, less common method involves using high-strength industrial adhesives to bond frames to the roof surface. This is typically reserved for specific roofing materials like EPDM rubber and requires professional assessment.
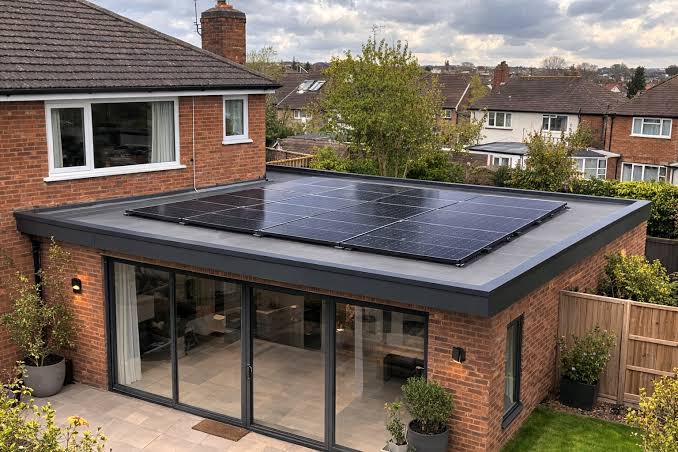
    Can You Put Solar Panels On A Flat Roof Uk

    What Is the Best Angle for Solar Panels on a Flat Roof?

    Angle is everything when it comes to efficiency. For a flat roof, you aren’t stuck with the roof’s angle; you create your own.

    In the UK, the ideal tilt angle for solar panels is generally between 30 and 40 degrees. This angle ensures that:

    1. Rainwater runs off easily, keeping the panels clean (self-cleaning effect).
    2. The panels capture the maximum solar irradiance throughout the year.

    However, spacing is vital. If you tilt panels too steeply, they cast long shadows on the rows behind them, reducing overall output. A professional installer will calculate the “pitch” and “row spacing” to ensure no panel shades another during peak sunlight hours.

    Pro Tip: Avoid laying panels completely flat (0 degrees). While it looks sleek, dust and debris accumulate quickly, and rain does not wash them away efficiently, leading to a significant drop in performance over time.

    Do You Need Planning Permission for Solar Panels on a Flat Roof?

    One of the most frequent questions UK homeowners ask is about bureaucracy. Under current Permitted Development Rights, most domestic solar installations do not require full planning permission. However, there are strict conditions for flat roofs:

    • Height Restriction: The panels must not protrude more than 200mm above the highest part of the roof (excluding the chimney).
    • Visibility: If your property is in a conservation area or a World Heritage Site, you may need to consult your local planning authority.
    • Listed Buildings: If your home is a listed building, you will almost certainly need Listed Building Consent.

    It is always wise to check with your local council before proceeding. While many installations fall under permitted development, rules can vary slightly by locality. For detailed national guidelines, you can refer to the UK Government’s Planning Portal or general resources on Solar Energy to understand the broader context of renewable infrastructure.

    Cost vs. Benefit: Is It Worth It?

    Installing solar on a flat roof can be slightly more expensive than a standard pitched roof due to the cost of the mounting framework. However, the long-term benefits often outweigh the initial outlay.

    FeaturePitched Roof SolarFlat Roof Solar
    Installation ComplexityLower (standard rails)Higher (custom framing)
    OptimizationFixed angleFully adjustable angle
    Maintenance AccessDifficult (requires scaffolding)Easy (walkable surface)
    AestheticsBlends with rooflineVisible structure
    Average Cost (4kW)£5,000 – £7,000£6,000 – £8,500

    Note: Prices are estimates based on 2026 market rates and can vary based on panel quality and roof condition.

    Despite the higher upfront cost, the ability to optimize the angle means flat roof systems can sometimes generate 5-10% more energy annually than a poorly oriented pitched roof. Additionally, maintenance is easier and cheaper since technicians can safely walk on the roof without expensive scaffolding.

    Step-by-Step Installation Process

    If you decide to proceed, here is what the typical installation journey looks like:

    1. Structural Survey: An engineer assesses your roof’s load-bearing capacity. This is non-negotiable for ballasted systems.
    2. Design & Simulation: Installers use software to model sun paths and shadow analysis, determining the optimal tilt and layout.
    3. Roof Preparation: The roof surface is cleaned and inspected for any existing damage. Any repairs are made before installation begins.
    4. Framework Installation: The aluminum racking system is assembled. If using ballast, weights are positioned precisely according to the design.
    5. Panel Mounting: Solar panels are secured to the frames and wired together.
    6. Inverter Connection: The DC electricity from the panels is converted to AC via an inverter (usually mounted on a wall nearby).
    7. Testing & Commissioning: The system is tested for safety and efficiency before being handed over to you.

    Frequently Asked Questions (FAQ)

    1. Will solar panels damage my flat roof?

    No, not if installed correctly. Ballasted systems do not penetrate the roof, eliminating leak risks. Even penetrating systems, when installed by certified professionals with proper flashing and sealants, are safe and often come with workmanship warranties.

    2. How long do solar panels last on a flat roof?

    High-quality solar panels typically come with a 25-30 year performance warranty. The mounting structures are usually made of aluminum or stainless steel, designed to withstand UK weather conditions for decades.

    3. Can I install solar panels myself on a flat roof?

    While DIY kits exist, it is strongly discouraged. Incorrect weighting can collapse a roof, and improper electrical wiring poses fire risks. Furthermore, you need MCS (Microgeneration Certification Scheme) certification to qualify for smart export guarantees (SEG) payments.

    4. Do flat roof solar panels work in cloudy UK weather?

    Yes. Modern photovoltaic panels are designed to generate electricity even in diffuse light. While they produce less energy on cloudy days compared to sunny ones, they still contribute to your household’s power needs.

    5. What maintenance is required?

    Flat roof solar systems require minimal maintenance. You should inspect them twice a year for debris buildup. Because they are tilted, rain usually keeps them clean. Ensure the area around the ballast remains clear of leaves or moss.

    Conclusion

    So, can you put solar panels on a flat roof UK? Absolutely. Not only is it possible, but it can also be a highly efficient way to harness renewable energy. By utilizing ballasted mounting systems and optimizing the tilt angle, you can overcome the limitations of a flat surface and enjoy significant savings on your energy bills.

    The key to success lies in professional installation and a thorough structural assessment. Don’t let the shape of your roof deter you from joining the green energy revolution. With the right setup, your flat roof can become a powerful asset for your home and the environment.

    If you found this guide helpful, please share it with friends or neighbors who might be considering solar power. Together, we can make the UK a greener place, one roof at a time!
  • Can You Live In House While Roof Is Being Replaced?

    Can You Live In House While Roof Is Being Replaced?

    Roof replacement is one of the most invasive home improvement projects a homeowner can undertake. It involves heavy machinery, constant hammering, and workers moving across your property from dawn until dusk. Naturally, many homeowners ask themselves: Can you live in house while roof is being replaced?

    The short answer is yes, technically you can stay, but it requires significant preparation and mental resilience. While it saves you the cost of a hotel, the disruption to your daily routine is substantial. This guide will walk you through exactly what to expect, how to prepare, and whether staying put is the right choice for your family.

    What to Expect: Noise, Dust, and Disruption

    Before making your decision, you must understand the reality of the work environment. A roof replacement is not a quiet, clean process.

    The Noise Factor

    The sound of a roofing crew at work is intense. You will hear:

    • Tearing off old shingles: This sounds like loud crunching and tearing.
    • Hammering and nailing: Pneumatic nail guns fire hundreds of times per hour.
    • Debris falling: Shingles and nails hitting the ground or dump trailers create sharp, sudden noises.

    According to occupational safety standards, construction noise often exceeds 85 decibels, which is comparable to a lawnmower or a busy city street. If you work from home, have infants, or are sensitive to noise, this can be overwhelming.

    Dust and Debris

    Even with protective measures, dust is inevitable. As old shingles are ripped up, granules and dirt fall into gutters and onto the ground. Wind can carry fine particulate matter into open windows or attic vents.

    Pro Tip: Close all windows and seal any gaps in your attic access points before the crew arrives. This minimizes the amount of dust entering your living space.

    Safety Concerns: Is It Safe to Stay Inside?

    Safety is the primary concern when deciding whether to vacate your home. Generally, professional roofing contractors follow strict safety protocols, but risks remain.

    Falling Objects

    The most significant danger is falling debris. While crews use tarps and chutes to direct waste into dumpsters, small nails, shingle fragments, and tools can occasionally slip.

    • Keep vehicles moved: Park your cars away from the drop zone.
    • Avoid the perimeter: Do not let children or pets play in the yard near the house.

    Structural Integrity

    Your home’s structure remains intact during a roof replacement. The roof deck (the wooden layer under the shingles) is exposed only in small sections at a time. Contractors typically replace one “square” (10×10 feet) or less before covering it again. Therefore, the risk of water intrusion or structural collapse is minimal if you hire a reputable company.

    For more information on building safety standards, you can refer to general guidelines provided by Wikipedia.

    Can You Live In House While Roof Is Being Replaced

    Pros and Cons of Staying Home During Reroofing

    To help you decide, here is a breakdown of the advantages and disadvantages of staying in your home versus leaving.

    FeatureStaying HomeLeaving (Hotel/Relatives)
    CostFree (no accommodation costs)High (hotel bills, meals out)
    ConvenienceAccess to your kitchen, bed, and clothesInconvenient packing/unpacking
    Noise LevelHigh disturbance; hard to concentratePeaceful and quiet
    SupervisionYou can monitor the crew’s progressNo direct oversight
    StressHigh due to chaos and dirtLow; you return to a finished job
    Pet SafetyPets may be stressed by noise/strangersPets need boarding or care elsewhere

    When You Should Definitely Leave

    Consider temporary relocation if:

    1. You have newborns or elderly family members who need quiet.
    2. You work from home and require a quiet environment for calls.
    3. You have pets that are anxious around strangers or loud noises.
    4. The weather forecast predicts heavy rain, which increases the risk of leaks during the transition period.

    How to Prepare Your Home If You Decide to Stay

    If you choose to stay, preparation is key to minimizing stress. Follow these steps to protect your home and sanity.

    Step 1: Clear the Perimeter

    Move all outdoor furniture, grills, potted plants, and vehicles at least 20 feet away from the house. This prevents damage from falling debris and gives the crew space to work safely.

    Step 2: Protect Your Interior

    • Cover Attic Items: Dust will settle in your attic. Cover stored boxes with plastic sheets.
    • Secure Wall Art: Vibrations from hammering can cause pictures to fall. Take down fragile items on upper-floor walls.
    • Close Windows: Keep windows shut to prevent dust and noise from entering. Use air conditioning if necessary.

    Step 3: Plan for Power Outages

    Occasionally, workers may accidentally disconnect power lines or trip breakers. Charge your phones and laptops the night before. Have flashlights ready.

    Step 4: Communicate with the Crew

    Establish a clear line of communication with the foreman. Ask them:

    • What time will they start and finish each day?
    • Where will they place the dumpster?
    • Who is the point of contact for emergencies?

    FAQ: Common Questions About Living Through a Roof Replacement

    1. How long does a typical roof replacement take?

    Most residential roof replacements take 1 to 3 days, depending on the size of the roof, the material used, and the weather. Larger homes or complex roofs with multiple valleys may take up to a week.

    2. Will my Wi-Fi be affected?

    Wi-Fi signals themselves are not affected, but if your router is in the attic or near the roofline, vibrations could dislodge cables. Additionally, if power flickers, your router will reboot. It is wise to move your router to a central, lower-level location during the project.

    3. Can I stay in the house if it rains?

    If it rains lightly, the crew will pause work and cover exposed sections with tarps. You can stay inside, but be prepared for potential minor leaks if the tarping is not perfect. In case of heavy storms, it is safer to leave if possible, as water intrusion risk increases.

    4. What should I do with my pets?

    Pets are often terrified of the noise and the presence of strangers. It is highly recommended to board them or keep them in a quiet, interior room far from the work area. Ensure they have water and comfort items. Never let pets outside unsupervised during the work hours.

    5. Will the contractors need access to my electricity or water?

    Most roofing crews bring their own generators and water. However, some may ask to use an outdoor outlet for compressors. Clarify this during the initial estimate phase so you are not caught off guard.

    6. How do I handle mail and deliveries?

    Inform delivery services (Amazon, UPS, FedEx) to pause deliveries or redirect packages to a locker. Mail carriers may still deliver, but ensure your mailbox is accessible and not blocked by the dumpster or crew trucks.

    Conclusion

    So, can you live in house while roof is being replaced? Yes, you can, but it is not for everyone. If you value cost savings and don’t mind noise and dust, staying home is feasible with proper preparation. However, if you prioritize peace, quiet, and convenience, investing in a few nights at a hotel might be worth the expense.

    Regardless of your choice, hiring a licensed, insured, and reputable roofing contractor is the most critical step. They will ensure the job is done safely and efficiently, minimizing the impact on your life.

    Did you find this guide helpful? Share it with friends or family who are planning a home renovation! Let us know in the comments if you chose to stay or leave during your roof replacement.

  • Can I Put Salt On My Roof To Melt Ice? The Truth

    Can I Put Salt On My Roof To Melt Ice? The Truth

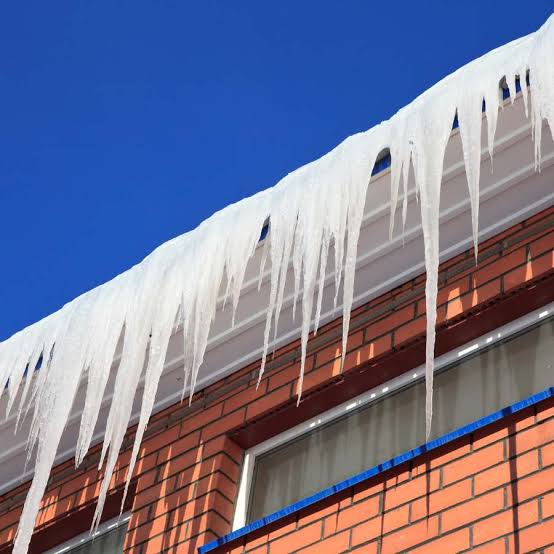
    Have you ever stared up at a menacing icicle hanging from your gutter, worrying about the potential water damage it could cause inside your home? It is a stressful situation that many homeowners in colder climates face every winter, leading them to search for quick fixes. You might be asking yourself, “Can I put salt on my roof to melt ice“ without causing further harm to your property?

    The short answer is no, and doing so can lead to expensive repairs down the line. While salt is effective on driveways, it is notoriously harsh on roofing materials. In this guide, we will explore why using salt is a risky gamble, discuss the science behind the damage, and provide you with safer, professional-approved methods to keep your roof ice-free this winter.

    Why Using Salt on Your Roof Is a Bad Idea

    When winter strikes, the instinct to reach for the bag of rock salt or sodium chloride is strong. It works wonders on concrete sidewalks, so logic suggests it should work on your roof, right? Unfortunately, roofing systems are complex assemblies of materials that react very differently to chemicals than pavement does.

    The Chemical Reaction with Roofing Materials

    Most modern roofs use asphalt shingles, which are composed of a fiberglass mat coated with asphalt and ceramic granules. Salt is hygroscopic, meaning it attracts moisture. When you spread salt on your roof, it doesn’t just melt the ice; it creates a brine solution that can seep under the shingles.

    This brine accelerates the corrosion of metal components. Your roof isn’t just shingles; it includes nails, flashing, drip edges, and gutters, most of which are made of aluminum, steel, or copper. Saltwater is highly corrosive to these metals. According to general chemical principles outlined on Wikipedia, chloride ions are particularly aggressive in breaking down the protective oxide layers on metals, leading to rapid rust and structural failure.

    Damage to Asphalt Shingles

    Beyond metal corrosion, salt can degrade the asphalt itself. The granules on your shingles protect them from UV rays and physical wear. Salt crystals are abrasive. When walked on or blown by wind, they can dislodge these protective granules. Once the granules are gone, the asphalt underneath is exposed to the sun, causing it to dry out, crack, and curl prematurely. This significantly shortens the lifespan of your roof, potentially forcing a replacement years earlier than expected.

    Harm to Your Landscape and Foundation

    What goes down must go somewhere. When the salt melts the ice on your roof, that salty runoff flows into your gutters and downspouts, eventually pooling around your home’s foundation. High concentrations of salt in the soil can kill grass, shrubs, and trees near your house. It can also alter the soil chemistry, making it difficult for plants to absorb water and nutrients, leading to brown, dead patches in your spring garden.

    Safer Alternatives to Salt for Ice Melting

    If salt is off the table, what can you use? Fortunately, there are several effective alternatives that are gentler on your roof while still tackling the ice problem.

    Calcium Chloride: The Professional Choice

    Calcium chloride is widely regarded as the safest chemical option for roofs. Unlike rock salt (sodium chloride), calcium chloride generates heat as it dissolves, which helps melt ice faster even in extremely low temperatures (down to -25°F).

    • Pros: Works at lower temperatures, less corrosive to metals, safer for vegetation in moderate amounts.
    • Cons: More expensive than rock salt, can still be slippery if not used correctly.

    To use it safely, look for calcium chloride pellets specifically labeled for roof use. Avoid pouring it directly onto dry shingles if possible; instead, apply it strategically to ice dams or heavy buildup areas.

    Magnesium Chloride: The Eco-Friendly Option

    Magnesium chloride is another excellent alternative. It is less corrosive than both sodium and calcium chloride, making it the best choice if you are worried about your metal gutters or nearby garden beds.

    • Pros: Least corrosive option, environmentally friendly, effective down to 0°F.
    • Cons: Less effective in extreme cold compared to calcium chloride, higher cost.

    Potassium Chloride: A Gentle Alternative

    Often used as a fertilizer, potassium chloride can also melt ice. It is generally safe for plants and less damaging to concrete and metals. However, it is less effective at melting ice quickly and is typically more expensive, making it a better choice for preventive measures rather than emergency ice removal.

    Can I Put Salt On My Roof To Melt Ice

    Comparison: Salt vs. Safe Alternatives

    To help you make an informed decision, here is a quick comparison of common de-icing agents:

    FeatureRock Salt (Sodium Chloride)Calcium ChlorideMagnesium Chloride
    EffectivenessHigh (above 15°F)Very High (down to -25°F)Moderate (down to 0°F)
    CorrosivenessVery HighModerateLow
    Shingle SafetyPoorGoodExcellent
    Plant SafetyPoorModerateGood
    CostLowHighHighest

    How to Safely Remove Ice from Your Roof

    Chemicals are only part of the solution. Physical removal and prevention are often more effective and safer for your home’s structure. Here is a step-by-step approach to managing roof ice without climbing up there with a hammer.

    Step 1: Use a Roof Rake

    A roof rake is a long-handled tool designed to pull snow off the edge of your roof from the ground. By removing the snow before it turns into ice, you prevent ice dams from forming in the first place.

    1. Stand firmly on the ground, away from the drip line.
    2. Gently pull the snow down from the edge of the roof.
    3. Do not scrape the shingles aggressively, as this can remove granules.
    4. Leave a thin layer of snow to avoid damaging the shingles.

    Step 2: Install Heat Cables

    For chronic ice dam problems, heat cables (also known as roof de-icing cables) are a long-term solution. These electric cables zigzag along the roof edge and inside the gutters.

    • Installation: They should be installed in a pattern that creates channels for water to flow off the roof.
    • Operation: Turn them on when snow is falling or when temperatures hover around freezing.
    • Benefit: They prevent ice buildup entirely, eliminating the need for chemical melting.

    Step 3: Improve Attic Insulation and Ventilation

    Ice dams form because heat escapes from your attic, melting the snow on the upper part of the roof. The water runs down to the colder eaves and refreezes. Fixing the root cause is the most effective strategy.

    • Insulation: Ensure your attic floor has adequate insulation (R-value 38 or higher is recommended in many US climates).
    • Ventilation: Install soffit and ridge vents to allow cold air to circulate under the roof deck, keeping the roof surface cold.

    FAQ Section

    Can I use table salt on my roof?

    No, table salt is essentially refined sodium chloride. It poses the same risks as rock salt, including corrosion of metal fixtures and damage to asphalt shingles. It is also more expensive and less effective due to its finer grain size.

    Will vinegar melt ice on my roof?

    While vinegar (acetic acid) can lower the freezing point of water, it is not practical for large-scale ice removal. It would require massive quantities to be effective, and the acidity could potentially damage certain roofing materials or surrounding paint. It is not recommended as a primary de-icing method.

    How do I get rid of ice dams without damaging my roof?

    The safest way is prevention. Use a roof rake to remove snow from the eaves. If an ice dam has already formed, use calcium chloride pellets placed in nylon stockings laid across the dam. This allows the chemical to melt a channel through the ice without direct contact with the shingles. Never chip away at ice dams with sharp tools.

    Is it safe to pour hot water on my roof?

    Pouring hot water on a frozen roof is dangerous and ineffective. The water will likely refreeze almost immediately, creating even more ice. Additionally, the thermal shock from hot water hitting freezing cold shingles can cause them to crack or break.

    What is the best time to treat roof ice?

    Prevention is key. Treat your roof before a major storm hits by ensuring gutters are clean and installing heat cables if necessary. If you must use chemicals, apply them early in the ice formation process. Waiting until thick, hard ice dams have formed makes removal much more difficult and risky.

    Conclusion

    So, can I put salt on my roof to melt ice? Technically yes, but practically, you absolutely should not. The potential cost of repairing corroded gutters, damaged shingles, and ruined landscaping far outweighs the convenience of using cheap rock salt.

    Instead, opt for safer alternatives like calcium chloride or magnesium chloride, and focus on preventive measures like roof raking and improving attic ventilation. Your roof is one of the most significant investments in your home; treating it with care ensures it protects you for decades to come.

    If you found this guide helpful, please share it with your neighbors on social media. Winter safety is a community effort, and spreading the word about safe ice removal practices can help everyone protect their homes this season. Stay warm and stay safe!

  • Can I Get A Tax Credit For A New Roof?

    Can I Get A Tax Credit For A New Roof?

    Replacing a roof is one of the most significant home maintenance expenses a homeowner can face. It is a necessary investment to protect your family and property, but the high cost often leads to financial stress. Many homeowners naturally ask, “Can I get a tax credit for a new roof?” to help offset these substantial expenses.

    The short answer is: It depends entirely on the type of roof you install.

    While a standard asphalt shingle replacement generally does not qualify for federal tax credits, installing an energy-efficient roofing system or a solar-integrated roof can unlock significant savings. In this guide, we will break down exactly what qualifies, how the current laws work in 2026, and how you can maximize your return on investment while improving your home’s energy efficiency.

    Understanding the Difference: Tax Credit vs. Tax Deduction

    Before diving into the specific requirements, it is crucial to understand the financial mechanism at play. Many people confuse tax deductions with tax credits, but they impact your wallet differently.

    • Tax Deduction: This lowers your taxable income. If you are in the 22% tax bracket, a $1,000 deduction saves you $220.
    • Tax Credit: This reduces your tax bill dollar-for-dollar. A $1,000 credit saves you exactly $1,000.

    For roofing, we are primarily discussing the Residential Clean Energy Credit, which is a tax credit. This makes it far more valuable than a standard deduction. However, eligibility is strict. The Internal Revenue Service (IRS) does not offer credits for routine maintenance or aesthetic upgrades. The improvement must contribute to the energy efficiency of the home or generate clean energy.

    Does a Standard Roof Replacement Qualify?

    If you are simply replacing old, damaged shingles with new standard asphalt shingles because of storm damage or wear and tear, the answer is likely no. Routine repairs and replacements that do not improve the energy efficiency of the home are considered personal expenses.

    However, there is a nuance. If your roof was damaged by a federally declared disaster, you might be eligible for a Casualty Loss Deduction. This is not a tax credit, but it can still provide some financial relief if your unreimbursed losses exceed 10% of your adjusted gross income (AGI). This is a complex area of tax law, and documentation is key. You must prove the damage was sudden and unexpected, not due to long-term neglect.

    The Residential Clean Energy Credit: Your Path to Savings

    The primary avenue for receiving a tax break on a new roof in 2026 is through the Residential Clean Energy Credit (formerly known as the Investment Tax Credit or ITC). This credit was expanded and extended under the Inflation Reduction Act.

    As of 2026, this credit allows homeowners to claim 30% of the cost of qualifying clean energy property installed on their primary residence. There is no cap on the credit amount for solar electric property, which includes solar roofs.

    What Qualifies as a “Clean Energy” Roof?

    To qualify, the roofing material must meet specific criteria set by the Department of Energy and the IRS. Generally, this falls into two categories:

    1. Solar Electric Property: This includes traditional solar panels mounted on your roof and solar shingles (like Tesla Solar Roof or GAF Energy). These systems generate electricity for your home.
    2. Energy-Efficient Building Envelope Components: While less common for a full roof replacement, certain reflective roofing materials that meet specific Energy Star standards may qualify under broader energy efficiency provisions, though these rules change frequently. Currently, the strongest case for a tax credit is for solar-integrated roofing.

    According to Wikipedia, U.S. energy policy has increasingly shifted toward incentivizing decentralized renewable energy generation, making solar roofing a politically and financially supported upgrade.

    Can I Get A Tax Credit For A New Roof

    Step-by-Step Guide to Claiming Your Roof Tax Credit

    If you have determined that your new roof qualifies—specifically if it involves solar technology—follow these steps to ensure you claim the credit correctly. Missing a step could result in a delayed refund or an audit.

    Step 1: Verify Product Eligibility

    Not all solar roofs are created equal. Ensure the manufacturer provides a Manufacturer Certification Statement. This document confirms that the product meets the federal efficiency standards required for the tax credit. Keep this document safe; you may need to present it during an audit.

    Step 2: Hire a Certified Installer

    The installation must be performed by a qualified professional. The system must be placed in service (meaning it is ready and able to generate electricity) within the tax year you are claiming the credit. For 2026, the system must be operational by December 31, 2026.

    Step 3: Gather Your Documentation

    Collect all invoices and receipts. The total cost basis for the credit includes:

    • The cost of the roofing materials (solar shingles/panels).
    • Labor costs for assembly and original installation.
    • Piping or wiring costs.
    • Sales taxes on eligible expenses.

    Note: Do not include costs for structural upgrades to your roof deck unless they are strictly necessary to support the solar equipment.

    Step 4: File IRS Form 5695

    When filing your 2026 federal tax return, you must complete IRS Form 5695 (Residential Energy Credits). You will calculate the credit here and then transfer the amount to your Schedule 3 (Form 1040).

    Expense TypeIncluded in Credit?Notes
    Solar Shingles/PanelsYesMust meet federal standards
    Installation LaborYesMust be part of the initial install
    Roof Deck RepairNoConsidered structural repair
    Battery StorageYesIf charged solely by the solar roof
    Permits & FeesYesDirectly related to installation

    People Also Ask: Common Questions About Roof Tax Credits

    1. Can I claim the tax credit if I lease my solar roof?

    No. If you enter into a lease agreement or a Power Purchase Agreement (PPA), you do not own the system. Therefore, you cannot claim the tax credit. The leasing company owns the equipment and claims the incentive. To get the credit, you must purchase the system outright or finance it through a loan where you retain ownership.

    2. Is there an income limit for the Residential Clean Energy Credit?

    Currently, there is no income limit for claiming the Residential Clean Energy Credit. Whether you earn $50,000 or $500,000, you are eligible for the 30% credit, provided you have enough tax liability to use it. However, the credit is non-refundable. This means it can reduce your tax bill to zero, but you will not receive a refund for any excess credit amount. Unused credits can sometimes be carried forward to future tax years.

    3. Does a “Cool Roof” with reflective granules qualify?

    Standard “cool roofs” that simply reflect sunlight to lower attic temperatures typically do not qualify for the federal Residential Clean Energy Credit unless they are part of a solar energy system. Some local state or utility rebates may exist for cool roofs, so check with your local energy provider, but do not expect a federal tax credit for reflective shingles alone in 2026.

    4. What if I move before I use the full credit?

    Since the credit is attached to the taxpayer and not the home, you keep the credit even if you sell the house. However, because it is non-refundable, you must have sufficient tax liability in the year of installation to utilize it. If you sell the home shortly after installation, ensure you have filed your taxes correctly for that year to capture the benefit.

    5. Can I combine this with other rebates?

    Yes. You can often stack federal tax credits with state rebates, local utility incentives, and manufacturer discounts. However, be careful: some state rebates may reduce the “cost basis” of your system for federal tax purposes. Always consult with a tax professional to calculate the optimal combination of incentives.

    Maximizing Your Investment Beyond Taxes

    While the tax credit is a powerful tool, it shouldn’t be the only factor in your decision. An energy-efficient roof offers long-term benefits that go beyond tax season:

    • Lower Utility Bills: Solar roofs can significantly reduce or eliminate your monthly electricity bill. Over 20 years, these savings often outweigh the initial installation cost.
    • Increased Home Value: Homes with solar installations and energy-efficient features tend to sell faster and at higher premiums. Buyers are increasingly aware of energy costs.
    • Durability: Many solar shingles are designed to be more durable than traditional asphalt, offering better resistance to hail and wind.

    Conclusion

    So, can you get a tax credit for a new roof? Yes, but only if you choose the right type of roofing. Standard shingles won’t cut it, but investing in a solar-integrated roof or qualifying clean energy system can unlock a 30% federal tax credit in 2026.

    This incentive makes now an excellent time to consider upgrading your home’s energy infrastructure. By reducing your reliance on the grid and lowering your tax burden, you create a win-win scenario for your finances and the environment.

    Don’t let the complexity of tax codes deter you. With proper documentation and the right products, you can turn a necessary home repair into a smart financial investment.

    Found this guide helpful? Share it with your neighbors or on social media to help others navigate the world of home improvement tax incentives!

  • Can a Tooth Grow on the Roof of Your Mouth?

    Can a Tooth Grow on the Roof of Your Mouth?

    Have you ever felt a strange, hard bump on the roof of your mouth and wondered if it could possibly be a tooth? It is a startling sensation that often leads to immediate concern and confusion. You are not alone in asking, “Can a tooth grow on the roof of your mouth?” While it sounds like something out of a medical mystery novel, the answer is more nuanced than a simple yes or no.

    In most cases, what feels like a tooth is actually a benign bone growth or a cyst. However, in rare instances, teeth can indeed erupt in abnormal positions due to developmental issues. Understanding the difference between a harmless bony protrusion and a misplaced tooth is crucial for your oral health and peace of mind. This guide will walk you through the possibilities, helping you identify what might be happening in your mouth and when to seek professional care.

    What Does It Mean If a Tooth Grows on the Roof of Your Mouth?

    When patients ask if a tooth can grow on the roof of their mouth, they are usually describing one of two distinct scenarios: an ectopic eruption or a bony exostosis.

    An ectopic tooth is a real tooth that has developed in the wrong place. Instead of emerging from the gum line where it belongs, it pushes through the palate (the roof of the mouth). This is relatively rare but documented in dental literature. On the other hand, a bony growth is not a tooth at all, but rather an overgrowth of bone tissue that feels hard and smooth, mimicking the sensation of a tooth root or crown.

    According to data from the National Institutes of Health (NIH), developmental dental anomalies affect approximately 1% to 3% of the population. While most of these involve missing teeth or extra teeth (supernumerary) in the normal arch, palatal eruptions are less common but significant enough to warrant attention.

    The Difference Between a Real Tooth and a Bone Spur

    It is vital to distinguish between actual dental tissue and bone structures. Here is a quick comparison to help you understand what you might be feeling:

    FeatureEctopic Tooth (Supernumerary)Palatal Torus (Bone Growth)
    CompositionEnamel, dentin, pulp (real tooth structure)Compact bone tissue
    SensationMay be sensitive to hot/cold; sharp edgesUsually painless; smooth or lobed surface
    Growth RateGrows until fully formed, then stopsGrows very slowly over years
    AppearanceLooks like a small, white toothLooks like pink gum-covered bone
    PrevalenceRareCommon (affects ~20-30% of people)

    Common Causes of Abnormal Palatal Growths

    If you have discovered a hard lump on your palate, several factors could be at play. Understanding the root cause helps in determining the appropriate treatment.

    1. Supernumerary Teeth (Mesiodens)

    The most common type of extra tooth is called a mesiodens. These typically appear between the two upper front teeth but can sometimes erupt higher up on the palate. They are often congenital, meaning you are born with the potential for them to develop. Genetics play a significant role here; if your parents had extra teeth, you are more likely to have them too.

    2. Palatal Torus (Torus Palatinus)

    This is the most frequent reason people think they have a tooth on the roof of their mouth. A torus palatinus is a benign bony growth located in the midline of the hard palate. It is not a disease, nor is it cancerous. It is simply an exostosis—an overgrowth of bone. While the exact cause is unknown, it is believed to be a combination of genetic predisposition and environmental factors such as clenching or grinding teeth (bruxism).

    3. Impacted Canines

    Sometimes, the permanent canine teeth fail to erupt in their proper position. Due to lack of space or obstruction, they may get stuck (impacted) and begin to push against the palate. While the tooth itself may not fully “grow out” onto the roof, the bulge it creates under the gum tissue can feel exactly like a hard lump or a tooth trying to emerge.

    4. Odontomas

    An odontoma is a benign tumor made of dental tissue. It is essentially a “tooth-like” structure that grows in an disorganized mass. While technically a tumor, it is non-cancerous and slow-growing. Odontomas can prevent normal teeth from erupting and may create hard masses in the jaw or palate. For more detailed medical definitions of dental tumors, you can refer to Wikipedia’s entry on Odontoma.

    Can A Tooth Grow On The Roof Of Your Mouth

    Symptoms to Watch For

    Not all palatal anomalies present the same way. Some are silent, while others cause significant discomfort. Being aware of these symptoms can help you decide whether to schedule a dental appointment immediately.

    • Visible Bulge: A noticeable white or pink bump on the roof of the mouth.
    • Pain or Discomfort: Irritation when eating hard or crunchy foods.
    • Speech Issues: Difficulty pronouncing certain sounds if the growth is large.
    • Orthodontic Problems: Crowding or shifting of adjacent teeth.
    • Sinus Pressure: In rare cases, high palatal eruptions can affect sinus drainage.

    If you experience sudden pain, swelling, or bleeding from the area, it is crucial to see a dentist or oral surgeon promptly. These could be signs of infection or trauma to the tissue covering the growth.

    Diagnosis: How Dentists Identify Palatal Teeth

    You cannot diagnose this condition accurately at home. A professional evaluation is necessary to determine the nature of the growth. Here is what you can expect during a dental visit:

    1. Clinical Examination: The dentist will visually inspect and palpate (feel) the area to assess the hardness, size, and location of the growth.
    2. X-Rays (Radiographs): Standard periapical or panoramic X-rays help visualize the roots and structure beneath the gum line.
    3. Cone Beam CT Scan: For complex cases, a 3D CT scan provides a detailed view of the bone structure and the exact position of any ectopic teeth. This is essential for surgical planning if removal is needed.

    Treatment Options: Do You Need Surgery?

    Treatment depends entirely on the diagnosis. Not every lump on the roof of the mouth requires intervention.

    When No Treatment Is Needed

    If the growth is identified as a palatal torus and it is not causing pain, interfering with speech, or preventing the fit of dentures, no treatment is necessary. It is a harmless anatomical variation. Many people live their entire lives with a torus without ever needing it removed.

    When Removal Is Recommended

    Surgical intervention is typically considered in the following scenarios:

    • Supernumerary Teeth: If an extra tooth is causing crowding, damaging adjacent roots, or preventing normal teeth from erupting, extraction is usually recommended. This is often done by an oral surgeon.
    • Large Torus: If the bony growth becomes so large that it interferes with eating, speaking, or the fitting of prosthetic devices, a procedure called a torlectomy may be performed. This involves shaving down the excess bone.
    • Odontomas: These are generally removed surgically to allow for the proper eruption of permanent teeth and to prevent future complications.

    The Recovery Process

    If you undergo surgery to remove an ectopic tooth or reduce a torus, recovery is typically straightforward.

    • Days 1–3: Expect some swelling and mild discomfort. Use ice packs and prescribed pain medication.
    • Week 1: Stick to soft foods (yogurt, mashed potatoes, smoothies). Avoid hot temperatures and spicy foods.
    • Weeks 2–4: The gum tissue heals, and stitches (if used) dissolve or are removed. Full bone healing takes several months, but you can return to normal activities within a week.

    FAQ Section

    1. Can a baby tooth grow on the roof of the mouth?

    It is extremely rare for a primary (baby) tooth to erupt on the palate. However, supernumerary primary teeth can occur. If you notice a hard bump on a child’s palate, it is more likely to be a developmental cyst or early sign of a permanent tooth issue. Always consult a pediatric dentist.

    2. Is a tooth on the roof of the mouth dangerous?

    In most cases, no. Whether it is a benign bone growth (torus) or a supernumerary tooth, it is rarely life-threatening. However, it can lead to secondary issues like gum disease, cavities in adjacent teeth, or orthodontic problems if left untreated.

    3. Can braces fix a tooth growing on the roof of the mouth?

    Braces alone cannot move a tooth that is severely ectopic or impacted in the bone. Often, surgical exposure and extraction are required first. Once the obstacle is removed, braces can be used to align the remaining teeth properly.

    4. Why does my palatal bump hurt when I eat pizza?

    If you have a torus palatinus, the thin layer of gum tissue covering the bone can easily be irritated or burned by hot, sharp, or hard foods like pizza crust. This is mechanical irritation, not necessarily an infection. Using wax or adjusting your diet can help manage this.

    5. Can stress cause a tooth to grow on the roof of my mouth?

    Stress does not cause teeth to grow. However, stress can lead to bruxism (teeth grinding), which may stimulate bone growth in some individuals, potentially enlarging an existing torus. Stress also weakens the immune system, making you more susceptible to oral infections that might cause swelling.

    Conclusion

    So, can a tooth grow on the roof of your mouth? The answer is yes, but it is rare. More commonly, what you are feeling is a benign bony growth known as a palatal torus. Both conditions are manageable, and neither should cause panic.

    The key takeaway is to avoid self-diagnosis. What feels like a tooth could be a harmless bone spur, or it could be an impacted canine needing orthodontic attention. By scheduling a check-up with your dentist, you can get a clear diagnosis through X-rays and professional examination.

    If you found this article helpful, please share it with friends or family who might be experiencing similar oral health mysteries. Knowledge is the first step toward a healthier, happier smile!

  • Best Roofing Financing in Gainesville, GA

    Best Roofing Financing in Gainesville, GA

    Storm damage and age-related wear are inevitable for homeowners in Hall County, but the sudden financial burden of a new roof can be overwhelming. You need a reliable shelter, not a debt trap, which is why finding the Best Consumer Financing Options For Roofing Services In Gainesville Georgia is crucial for your peace of mind. This guide breaks down the most effective ways to fund your roof repair or replacement without breaking the bank.

    Why Financing Your Roof in Gainesville Makes Sense

    Gainesville, Georgia, experiences a unique climate pattern that can be tough on roofing materials. From the humid summers that promote moss and algae growth to the occasional severe thunderstorms and hail common in the Southeast, roofs here have a shorter lifespan than in milder climates. According to local industry estimates, the average cost of a full roof replacement in the Gainesville area ranges from $8,000 to $15,000, depending on the size of the home and materials used.

    For many families, paying this amount upfront is not feasible. However, delaying repairs can lead to structural damage, mold issues, and higher energy bills due to poor insulation. Financing allows you to address the problem immediately while spreading the cost over time. By choosing the right financial product, you can protect your home’s value and maintain your cash flow for other essential expenses.

    What Are the Top Financing Methods for Homeowners?

    When searching for funding, you will generally encounter three primary categories: contractor-offered financing, traditional personal loans, and home equity products. Each has distinct advantages and drawbacks depending on your credit score and financial goals.

    1. Contractor-Offered Financing

    Many reputable roofing companies in Gainesville partner with third-party lenders like GreenSky, Synchrony, or Alpha Finance. These programs are designed specifically for home improvements.

    • Pros: Quick approval (often within minutes), promotional periods with 0% interest if paid off within 6–12 months, and streamlined paperwork handled by the roofer.
    • Cons: High interest rates (often 20%+) after the promotional period ends; penalties for late payments can be severe.

    2. Personal Loans

    Unsecured personal loans from banks, credit unions, or online lenders are a popular choice because they do not require your home as collateral.

    • Pros: Fixed interest rates, fixed monthly payments, and no risk of foreclosure. Funds are deposited directly into your bank account, giving you flexibility.
    • Cons: Interest rates depend heavily on your credit score. If your credit is below 700, rates may be prohibitively high.

    3. Home Equity Loans and HELOCs

    A Home Equity Line of Credit (HELOC) or a home equity loan uses your home’s value as collateral. Given the rising property values in Gainesville, many homeowners have significant equity available.

    • Pros: Typically offers the lowest interest rates among all options; interest may be tax-deductible if used for home improvements (consult a tax professional).
    • Cons: Your home is at risk if you default; the approval process is slower and involves closing costs and appraisals.
    Best Consumer Financing Options For Roofing Services In Gainesville Georgia

    How Do Credit Scores Impact Your Roofing Loan Rates?

    Your credit score is the single most important factor determining the cost of your financing. Lenders view roofing projects as moderate-to-high risk because they are large-ticket items. Here is a general breakdown of how credit tiers affect your options in Georgia:

    Credit Score RangeLikely Interest Rate (APR)Best Financing Option
    750+ (Excellent)6% – 10%Personal Loans or HELOCs
    700–749 (Good)10% – 15%Personal Loans or Contractor Promo
    650–699 (Fair)15% – 25%Contractor Financing (Careful!)
    Below 650 (Poor)25%+ or DenialSecured Loans or Savings

    Note: Rates are illustrative and subject to market changes. Always check current rates with lenders.

    If you have a lower credit score, avoid long-term contractor financing with high APRs. Instead, consider a smaller personal loan from a local credit union in Hall County, which may offer more personalized underwriting criteria than national banks.

    Should You Use Insurance or Financing for Storm Damage?

    Before applying for any loan, determine if your roof damage is covered by insurance. Gainesville is prone to wind and hail storms, which are typically covered under standard homeowners insurance policies.

    1. Inspect First: Hire a licensed roofing inspector to document damage. Take photos from multiple angles.
    2. File a Claim: Contact your insurance provider. Be aware that filing a claim may increase your premiums, so calculate if the repair cost exceeds your deductible plus potential premium hikes.
    3. Finance the Deductible: If insurance covers the bulk of the replacement, you only need to finance the deductible (e.g., $1,000–$2,500). A small personal loan or a credit card with a 0% introductory APR is ideal for this smaller amount.

    According to Wikipedia, understanding the specifics of your policy’s “actual cash value” versus “replacement cost value” is critical. Most modern policies in Georgia offer replacement cost, which pays for a new roof rather than depreciated value, making insurance the primary funding source before turning to consumer financing.

    Step-by-Step Guide to Securing Roof Financing

    Follow these steps to ensure you get the best deal without compromising your financial health.

    1. Get Three Quotes: Never accept the first bid. Obtain detailed estimates from three licensed Gainesville roofers. Ensure each quote includes material specifications, labor, and cleanup.
    2. Check Your Credit Report: Pull your free credit report from AnnualCreditReport.com. Dispute any errors that could lower your score.
    3. Pre-Qualify Online: Use online tools from major lenders to pre-qualify. This performs a “soft pull” on your credit, which does not affect your score, allowing you to compare rates safely.
    4. Read the Fine Print: Look for hidden fees, prepayment penalties, and variable rate clauses. If using contractor financing, confirm exactly when the 0% interest period ends.
    5. Finalize the Contract: Once you select your lender and roofer, sign the financing agreement and the roofing contract. Ensure the start date for payments aligns with the completion of the work.

    Local Considerations for Gainesville Residents

    Living in Gainesville offers specific advantages and challenges. The city has various local credit unions, such as the Georgia United Credit Union, which often provide competitive home improvement loans to members. Additionally, some local roofing contractors may offer seasonal discounts during the slower winter months, reducing the total amount you need to finance.

    Be wary of “storm chasers”—out-of-state contractors who appear after severe weather events offering cheap deals. They often lack proper licensing in Georgia and may disappear before honoring warranties. Always verify that your roofer is licensed with the Georgia State Licensing Board and carries adequate liability insurance.

    FAQ Section

    1. Can I get financing for a roof with bad credit?

    Yes, but options are limited. You may qualify for secured loans or contractor-specific financing programs that are more lenient. However, expect higher interest rates. It is advisable to improve your credit score slightly before applying or seek a co-signer.

    2. Is interest on a roofing loan tax-deductible?

    Generally, interest on personal loans is not tax-deductible. However, if you use a Home Equity Loan or HELOC specifically for home improvements that add value to your property, the interest may be deductible under IRS rules. Always consult a certified tax advisor for your specific situation.

    3. How long does it take to get approved for roofing financing?

    Contractor-offered financing can be approved in as little as 15 minutes. Personal loans from online lenders typically take 1–3 business days. Home equity loans and HELOCs take longer, usually 2–6 weeks, due to appraisal and underwriting requirements.

    4. What is the minimum credit score needed for 0% financing?

    Most 0% promotional offers from contractor partners require a good to excellent credit score, typically 680 or higher. Some programs may accept scores down to 640, but the terms may be less favorable, such as a shorter repayment window.

    5. Should I pay off my roofing loan early?

    Yes, if there are no prepayment penalties. Paying off a high-interest personal loan or contractor financing early saves you significant money in interest charges. Always check your loan agreement for any fees associated with early payoff.

    Conclusion

    Finding the Best Consumer Financing Options For Roofing Services In Gainesville Georgia requires balancing speed, cost, and security. While contractor financing offers convenience, personal loans and HELOCs often provide better long-term value for those with good credit. Always prioritize licensed local professionals and read every clause of your financing agreement.

    By taking the time to compare options, you can secure a durable roof that protects your family and your investment. If you found this guide helpful, please share it with your neighbors in Gainesville on social media to help them make informed decisions about their home maintenance.

  • How Many Square Feet In A Bundle Of Roof Shingles?

    How Many Square Feet In A Bundle Of Roof Shingles?

    Planning a roofing project can feel overwhelming, especially when you are standing in the aisle of a home improvement store trying to decipher cryptic packaging labels. You might be staring at a stack of asphalt shingles, wondering exactly how many square feet in a bundle of roof shingles you are actually buying. Getting this number wrong can lead to costly delays if you run short, or wasted money if you overbuy significantly.

    In this guide, we will break down the math simply and clearly. Whether you are a seasoned DIYer or a first-time homeowner looking to understand contractor quotes, knowing the precise coverage of a shingle bundle is the foundation of a successful roofing job. Let’s dive into the numbers so you can buy with confidence.

    The Standard Answer: 33.3 Square Feet Per Bundle

    If you are purchasing standard three-tab or architectural asphalt shingles in the United States, there is a golden rule you need to memorize: One bundle covers approximately 33.3 square feet.

    However, it is crucial to understand that shingles are not sold by the square foot directly; they are sold by the “bundle,” and bundled into a larger unit called a “square.”

    Understanding the “Roofing Square”

    In the roofing industry, terminology differs from general construction. A “square” does not mean a 10×10 foot area in casual conversation; it is a specific unit of measurement equal to 100 square feet.

    Because one roofing square equals 100 square feet, and one bundle covers roughly 33.3 square feet, it takes three bundles to make one roofing square.

    • 1 Bundle ≈ 33.3 sq. ft.
    • 3 Bundles = 1 Roofing Square (100 sq. ft.)

    This 3-to-1 ratio is the industry standard for most asphalt shingles. However, relying solely on averages can be risky. Let’s look at why variations exist.

    Why Do Some Bundles Cover Different Amounts?

    While 33.3 square feet is the norm, it is not universal. Several factors can change the coverage per bundle, and ignoring them is a common mistake for beginners.

    1. Shingle Type and Weight

    Heavier, premium architectural shingles often have different dimensions than basic three-tab shingles. Some high-end laminated shingles may require four or five bundles to cover a single roofing square (100 sq. ft.). This means each bundle would only cover 20 to 25 square feet. Always check the specific product data sheet before calculating.

    2. Manufacturer Specifications

    Different manufacturers (such as GAF, Owens Corning, or CertainTeed) may have slight variations in shingle cut and overlap requirements. While the total coverage per square remains 100 sq. ft., the number of shingles per bundle might vary, affecting the square footage per individual bundle.

    3. Exposure Rate

    The “exposure” is the part of the shingle that is visible after installation. Most shingles are designed with a standard 5-inch exposure. If a contractor installs shingles with a different exposure rate (which is rare but possible for aesthetic reasons), the coverage per bundle changes drastically.

    Pro Tip: Never assume. Always look for the “Coverage per Bundle” label on the wrapper or the manufacturer’s website. If it says “3 bundles per square,” you are safe with the 33.3 sq. ft. rule. If it says “4 bundles per square,” each bundle covers only 25 sq. ft.

    How Many Square Feet In A Bundle Of Roof Shingles

    How to Calculate the Exact Number of Bundles You Need

    Knowing how many square feet in a bundle of roof shingles is only half the battle. The next step is applying that knowledge to your specific roof. Here is a step-by-step guide to ensuring you order the right amount.

    Step 1: Measure Your Roof’s Footprint

    Measure the length and width of each section of your house from the ground. Multiply these numbers to get the square footage of each plane.

    • Example: A section that is 20 feet wide and 40 feet long = 800 square feet.

    Step 2: Account for Roof Pitch

    A flat measurement is not enough because roofs are sloped. A steeper roof has more surface area than its footprint suggests. You must apply a pitch multiplier.

    • Low Pitch (4/12): Multiply footprint by 1.05
    • Medium Pitch (6/12): Multiply footprint by 1.15
    • Steep Pitch (9/12+): Multiply footprint by 1.25 or higher

    For accurate pitch multipliers, you can refer to standard construction geometry resources, such as the detailed explanations found on Wikipedia’s Roof page, which outlines various structural designs and their implications.

    Step 3: Calculate Total Square Footage

    Add up the adjusted square footage of all roof planes. Let’s say your total adjusted area is 2,400 square feet.

    Step 4: Convert to Squares and Bundles

    Divide your total square footage by 100 to get the number of “squares.”

    • 2,400 sq. ft. / 100 = 24 Squares

    Multiply the number of squares by 3 (assuming standard shingles).

    • 24 Squares x 3 Bundles = 72 Bundles

    Step 5: Add Waste Factor

    You cannot use every scrap of shingle. Cutting around vents, chimneys, and valleys creates waste.

    • Simple Roof (Gable): Add 10% waste.
    • Complex Roof (Hips, Valleys, Dormers): Add 15–20% waste.

    Using a 10% waste factor for our example:

    • 72 Bundles x 1.10 = 79.2 Bundles

    Always round up. You should order 80 bundles.

    Comparison: Standard vs. Premium Shingles

    To help you visualize the differences, here is a quick comparison table. Note how the “Square Feet per Bundle” changes based on the product tier.

    FeatureStandard 3-Tab ShinglesArchitectural/LaminatedPremium Designer
    Bundles per Square33 to 44 to 5
    Sq. Ft. per Bundle~33.3 sq. ft.~25–33.3 sq. ft.~20–25 sq. ft.
    Weight per Bundle~50–60 lbs~65–80 lbs~80+ lbs
    Best ForBudget projects, rentalsMost residential homesLuxury aesthetics

    Common Mistakes to Avoid

    Even with the right math, errors happen. Here are the most frequent pitfalls:

    1. Ignoring Starter Strips: You need special starter shingles for the eaves and rakes. These are often sold separately or in specific bundles. Do not count these as part of your field shingle coverage.
    2. Forgetting Ridge Caps: The peak of your roof requires ridge cap shingles. These are usually calculated differently (by linear foot) and do not follow the standard bundle coverage rule.
    3. Underestimating Complexity: If your roof has many valleys, dormers, or skylights, your waste factor will be higher. A 10% waste factor is insufficient for a complex Victorian-style roof; aim for 15–20%.

    FAQ Section

    Q1: Can I return unused bundles of shingles?

    Most major home improvement stores in the US allow returns of unopened, undamaged bundles within a specific timeframe (usually 90 days). However, policies vary by location. Keep your receipt and try to buy slightly more than you think you need, as returning extras is easier than running out mid-project.

    Q2: Does the color of the shingle affect how many square feet are in a bundle?

    No, the color does not change the physical dimensions or coverage. However, darker shingles may absorb more heat, which can impact longevity, but the how many square feet in a bundle of roof shingles remains consistent regardless of color within the same product line.

    Q3: How much does a bundle of shingles weigh?

    A standard bundle of asphalt shingles typically weighs between 50 and 80 pounds. Heavier architectural shingles are on the higher end of this spectrum. This is important to consider if you are carrying them up a ladder yourself.

    Q4: What is the difference between a “square” and a “bundle”?

    A “square” is a unit of measurement equal to 100 square feet of roof area. A “bundle” is the physical package the shingles come in. For standard shingles, it takes three bundles to equal one square.

    Q5: Do metal roofs use bundles?

    No, metal roofing is typically sold by the panel or by the square foot, not in bundles like asphalt shingles. The calculation method for metal roofing is entirely different and involves linear feet and panel width.

    Q6: How do I measure my roof if I can’t climb on it?

    You can use satellite imagery tools like Google Earth to measure the footprint of your home. Alternatively, many roofing supply companies offer free drone measurements or online calculators where you input your address, and they provide an estimate based on local tax records and satellite data.

    Conclusion

    Understanding how many square feet in a bundle of roof shingles is the first step toward a stress-free roofing project. Remember the magic number: 33.3 square feet for standard bundles, which means three bundles per roofing square.

    By accurately measuring your roof, accounting for pitch, and adding a proper waste factor, you can avoid the headache of mid-project supply runs. Always double-check the manufacturer’s specifications for the specific product you choose, as premium shingles may have different coverage rates.

    Did you find this guide helpful? Share it with your fellow DIYers on social media to help them tackle their roofing projects with confidence!

  • Metal Roof vs Shingles: Cost Breakdown

    Metal Roof vs Shingles: Cost Breakdown

    Choosing a new roof is one of the most significant financial decisions a homeowner can make. It protects your biggest asset, influences your curb appeal, and impacts your energy bills for decades. If you are currently weighing your options, you are likely asking yourself: What Is The Cost Of A Metal Roof Vs Shingles?

    The answer isn’t just about the upfront price tag; it’s about value over time. While asphalt shingles are cheaper initially, metal roofing offers superior longevity. In this guide, we will dissect the true costs, hidden expenses, and long-term benefits of both materials to help you make an informed decision that fits your budget and your home’s needs.

    Understanding the Upfront Installation Costs

    When homeowners first start shopping for roofs, the sticker shock of metal roofing is often the first hurdle. To understand what is the cost of a metal roof vs shingles, we must look at the national averages for material and labor combined.

    Asphalt Shingles: The Budget-Friendly Entry Point

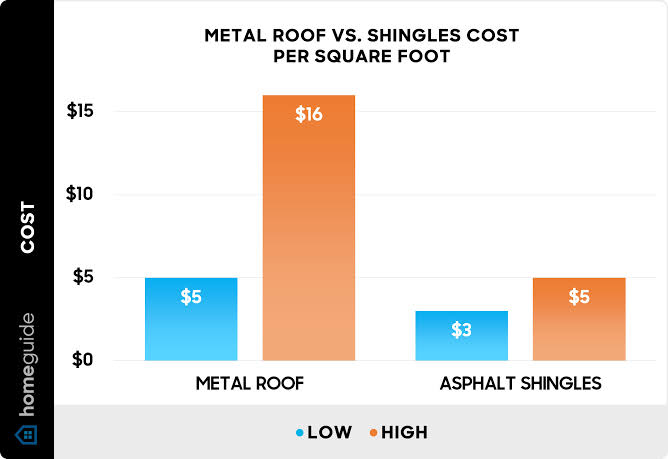
    Asphalt shingles remain the most popular roofing material in the United States, primarily due to their affordability. According to recent industry data from 2025-2026, the average cost to install an asphalt shingle roof ranges from $3.50 to $5.50 per square foot.

    For a standard 2,000-square-foot home, you are looking at a total investment between $7,000 and $11,000. This lower barrier to entry makes shingles accessible for first-time homebuyers or those working with strict immediate budgets. The installation process is straightforward, and nearly every roofing contractor in the US is trained to install them efficiently, which keeps labor costs competitive.

    Metal Roofing: The Premium Investment

    Metal roofing, which includes materials like steel, aluminum, copper, and zinc, commands a higher initial price. The average cost for a standing seam metal roof typically falls between $9.00 and $14.00 per square foot. For corrugated metal panels, the price might be slightly lower, ranging from $7.00 to $10.00 per square foot.

    For that same 2,000-square-foot home, a metal roof could cost anywhere from $14,000 to $28,000. Why the disparity? Metal requires specialized tools, skilled laborers who understand thermal expansion and contraction, and higher-quality underlayment systems. However, this premium price buys you a product that is fundamentally different in durability and performance.

    FeatureAsphalt ShinglesMetal Roofing
    Avg. Cost per Sq. Ft.$3.50 – $5.50$9.00 – $14.00
    Total Avg. Cost (2k sq ft)$7,000 – $11,000$14,000 – $28,000
    Installation Time1–2 Days3–5 Days
    Labor ComplexityLowHigh

    Longevity and Lifecycle Value Analysis

    While the upfront cost is important, the true question of what is the cost of a metal roof vs shingles is best answered by looking at the lifespan of the materials. This is where the concept of “cost per year” becomes crucial.

    The Lifespan Gap

    Standard 3-tab asphalt shingles typically last 15 to 20 years. Even high-end architectural shingles, which offer better aesthetics and wind resistance, usually max out at 25 to 30 years. In contrast, a properly installed metal roof can last 40 to 70 years, with some copper roofs lasting over 100 years.

    This means that if you choose asphalt shingles, you will likely need to replace your roof two or three times during the lifespan of a single metal roof. When you factor in the cost of two full replacements of shingles (plus inflation and potential disposal fees), the price gap narrows significantly.

    Maintenance and Repair Costs

    Asphalt shingles are susceptible to curling, cracking, and losing granules over time, especially in areas with high UV exposure or frequent freeze-thaw cycles. You may find yourself replacing individual shingles after severe storms.

    Metal roofs, however, are incredibly resilient. They resist fire, mildew, insects, and rot. While they can dent from large hail, they rarely leak if installed correctly. The maintenance cost for metal is negligible compared to shingles, which may require periodic cleaning of moss or algae growth in humid climates.

    What Is The Cost Of A Metal Roof Vs Shingles

    Energy Efficiency and Environmental Impact

    Another critical factor in the total cost of ownership is energy efficiency. Your roof plays a massive role in your home’s thermal regulation.

    Reflectivity and Cooling Savings

    Traditional asphalt shingles absorb a significant amount of solar heat, which can raise your attic temperature and force your air conditioning system to work harder. Modern “cool roof” shingles have improved, but they still lag behind metal.

    Metal roofs reflect solar radiant heat rather than absorbing it. This can reduce cooling costs by 10% to 25%, according to the U.S. Department of Energy. Over a 20-year period, these savings can amount to thousands of dollars, effectively offsetting part of the higher initial cost of metal.

    Sustainability Considerations

    From an environmental perspective, metal is the clear winner. Most metal roofing contains 25% to 95% recycled content and is 100% recyclable at the end of its life. Asphalt shingles, on the other hand, contribute millions of tons of waste to landfills annually. While some shingles are recycled into pavement, the infrastructure for this is not as widespread or efficient as metal recycling.

    Resale Value and Return on Investment (ROI)

    Does a metal roof add value to your home? Absolutely. Real estate experts consistently note that curb appeal and structural integrity are top priorities for buyers.

    The Premium Appeal

    A metal roof is often viewed as a luxury feature. It signals to potential buyers that the home has been well-maintained and that they won’t need to worry about roof replacement for decades. Studies suggest that a metal roof can increase a home’s resale value by 1% to 6%, depending on the market.

    In contrast, while new shingles are necessary for selling a home, they rarely command a premium price unless they are high-end architectural styles. Buyers expect shingles; they desire metal. If you plan to sell your home within the next 5–10 years, a metal roof can be a powerful marketing tool that helps your property stand out in a crowded market.

    Which Option Is Right for Your Climate?

    Your geographic location plays a pivotal role in determining which material offers the best value.

    • Hot Climates (South/Southwest US): Metal roofs excel here due to their reflective properties. The energy savings on AC bills are maximized, making the ROI faster.
    • Cold Climates (North/Northeast US): Metal sheds snow easily, preventing ice dams that can damage shingle roofs. However, proper insulation is required to prevent condensation issues.
    • Coastal Areas: Salt air can corrode certain metals. Aluminum is preferred over steel in coastal zones because it does not rust. Asphalt shingles can suffer from salt spray degradation and high wind uplift.

    FAQ Section

    1. Is it more expensive to insure a home with a metal roof?

    Generally, no. In fact, many insurance companies offer discounts of 5% to 15% on homeowners insurance premiums for metal roofs. This is because metal is highly resistant to fire, wind, and hail, reducing the likelihood of costly claims. Always check with your specific provider, but this discount can help offset the annual cost of the roof.

    2. Can I install a metal roof over existing shingles?

    Yes, in many cases, you can install a metal roof directly over existing asphalt shingles. This is known as a “retrofit” or “overlay.” It saves on disposal costs and labor time associated with tearing off the old roof. However, you must ensure the roof deck is structurally sound enough to support the additional weight, although metal is surprisingly lightweight. Always consult local building codes and a professional roofer before proceeding.

    3. Do metal roofs make noise when it rains?

    This is a common myth. Modern metal roofs are installed with solid sheathing and high-quality underlayment, which acts as a sound buffer. When properly installed, a metal roof is no louder than an asphalt shingle roof during rain or hail. In fact, many homeowners find the sound of rain on a metal roof to be soothing rather than disruptive.

    4. How does warranty coverage compare between the two?

    Asphalt shingle warranties typically range from 20 to 30 years, but they are often prorated, meaning the coverage decreases over time. Metal roof warranties are more robust, often offering 30 to 50-year non-prorated warranties on paint finishes and structural integrity. This long-term protection adds significant peace of mind and value.

    5. Will a metal roof interfere with my cell phone or Wi-Fi signal?

    No. A residential metal roof does not block Wi-Fi or cell phone signals. These signals operate at frequencies that can penetrate metal roofing, especially since most homes have windows and non-metallic walls that allow signal entry. Any minor attenuation is negligible and unlikely to affect daily usage.

    Conclusion

    So, what is the cost of a metal roof vs shingles? If you look only at today’s invoice, asphalt shingles are the clear winner, costing roughly half as much as metal. However, if you view your roof as a long-term investment, metal roofing often proves to be the more economical choice.

    When you factor in the doubled lifespan, reduced maintenance, energy savings, insurance discounts, and increased resale value, metal roofing offers a superior return on investment. Asphalt shingles are a practical choice for those with tight immediate budgets or short-term ownership plans. But for those planning to stay in their home for decades, metal provides unmatched durability and peace of mind.

    Did this breakdown help clarify your roofing dilemma? Share this article with friends or family who are also considering a roof replacement, and let us know in the comments which material you’re leaning toward!

  • New Roof Cost Per Sq Ft: 2026 Guide

    New Roof Cost Per Sq Ft: 2026 Guide

    Have you noticed a few missing shingles after the last storm, or perhaps your energy bills are creeping up due to poor insulation? It is a stressful realization, but knowing how much should a new roof cost per square foot is the first step toward regaining peace of mind and protecting your biggest investment. In this guide, we will break down the numbers clearly so you can plan your budget with confidence.

    Understanding the Basics: What Does “Per Square Foot” Really Mean?

    Before we dive into the dollar signs, it is crucial to clarify a common industry misconception. When contractors talk about roofing costs, they often use the term “square,” which equals 100 square feet. However, most homeowners think in terms of actual square footage.

    For the purpose of this guide, we will stick to the cost per single square foot to make comparisons easier for you. The national average for a new roof in 2026 typically ranges between $4.50 and $9.00 per square foot, depending heavily on materials and location. This price includes both labor and materials.

    Why such a wide range? A basic asphalt shingle roof will sit at the lower end, while premium slate or copper roofing will push toward the higher end. Understanding this baseline helps you spot quotes that are either too good to be true or unnecessarily inflated.

    How Material Choice Impacts Your Bottom Line

    The single biggest factor influencing your final bill is the material you choose. Each option offers different benefits regarding longevity, aesthetics, and energy efficiency.

    Asphalt Shingles: The Budget-Friendly Standard

    Asphalt shingles remain the most popular choice in the United States, covering over 80% of homes. They are affordable, easy to install, and widely available.

    • Cost: $4.50 – $6.50 per sq. ft.
    • Lifespan: 15–30 years.
    • Best For: Homeowners looking for a balance of cost and reliability.

    Metal Roofing: The Long-Term Investment

    Metal roofs are gaining massive popularity due to their durability and eco-friendly nature. While the upfront cost is higher, the lifespan often exceeds 50 years.

    • Cost: $7.00 – $12.00 per sq. ft.
    • Lifespan: 40–70 years.
    • Best For: Those planning to stay in their home long-term or living in areas prone to severe weather.

    Tile and Slate: The Premium Aesthetic

    If you own a historic home or want a distinct Mediterranean look, clay tile or natural slate is the way to go. These materials are heavy and require reinforced roof structures.

    • Cost: $10.00 – $20.00+ per sq. ft.
    • Lifespan: 50–100+ years.
    • Best For: High-end properties where curb appeal is paramount.
    MaterialAvg. Cost Per Sq. Ft.LifespanMaintenance Level
    Asphalt Shingles$4.50 – $6.5015-30 YearsLow
    Metal (Steel/Aluminum)$7.00 – $12.0040-70 YearsVery Low
    Clay/Concrete Tile$10.00 – $18.0050+ YearsMedium
    Natural Slate$15.00 – $25.0075-100+ YearsLow
    How Much Should A New Roof Cost Per Square Foot

    Labor and Complexity: Why Installation Isn’t One-Size-Fits-All

    You might wonder why two neighbors with similar-sized homes receive vastly different quotes. The answer often lies in labor complexity.

    Roofing is dangerous, skilled work. In 2026, labor shortages in the construction industry have kept wages competitive, meaning labor can account for 40% to 60% of your total project cost.

    Factors That Increase Labor Costs:

    1. Roof Pitch: Steeper roofs require more safety equipment, slower work pace, and specialized skills. A steep pitch can increase costs by 20–30%.
    2. Number of Layers: If you have multiple layers of old shingles that need to be torn off, expect to pay extra for disposal fees and additional labor hours.
    3. Obstacles: Chimneys, skylights, vent pipes, and complex valleys require careful flashing and sealing, which takes time and precision.
    4. Accessibility: If your home is surrounded by tight spaces, large trees, or difficult terrain, contractors may charge more for the logistical challenge.

    Geographic Location and Market Trends

    Where you live plays a significant role in determining how much should a new roof cost per square foot. Material availability and local demand fluctuate wildly across the US.

    For instance, roofing in hurricane-prone states like Florida or Texas often requires impact-resistant materials and stricter building code compliance, which drives up prices. Conversely, in the Midwest, standard asphalt shingles are more common and generally cheaper due to high competition among contractors.

    Additionally, urban areas tend to have higher labor rates compared to rural regions. Always get at least three local quotes to understand the specific market rate in your zip code. For broader context on regional construction trends, you can refer to data from the U.S. Census Bureau or general economic indicators found on Wikipedia.

    Hidden Costs You Might Not Expect

    When budgeting, it is easy to focus solely on the shingles. However, several “hidden” costs can surprise you if you are not prepared.

    • Permits: Most municipalities require a permit for roof replacement. Fees vary from $100 to $500 depending on your city.
    • Decking Repair: Once the old roof is removed, contractors may find rotted wood decking. Replacing plywood sheathing typically costs $2.50 to $4.00 per square foot extra.
    • Ventilation Upgrades: Proper airflow is critical for roof longevity. Adding ridge vents or soffit vents might add $300–$600 to the bill but is highly recommended.
    • Dumpster Fees: Disposing of old roofing materials is not free. Expect a dumpster rental fee of $300–$600 included in your quote.

    Step-by-Step: How to Get an Accurate Quote

    To ensure you are paying a fair price, follow these steps when hiring a roofer:

    1. Measure Your Roof Area: Use online satellite tools or measure your home’s footprint. Multiply length by width, then add 10–15% for waste and pitch.
    2. Choose Your Material: Decide on asphalt, metal, or tile before calling contractors. This allows them to give you a firm number rather than a vague estimate.
    3. Request Detailed Breakdowns: Ask for a line-item quote. It should separate materials, labor, disposal, and permits.
    4. Check Credentials: Ensure the contractor is licensed, insured, and has positive reviews on platforms like BBB or Angi.
    5. Compare Warranties: Look for both manufacturer warranties (on materials) and workmanship warranties (on labor). A 10-year workmanship warranty is a good standard.

    FAQ Section

    1. Is it cheaper to overlay a new roof on top of the old one?

    It can be slightly cheaper initially because you save on tear-off and disposal costs. However, most building codes only allow one overlay. It also hides potential deck damage and voids many manufacturer warranties. We recommend a full tear-off for long-term value.

    2. How does roof pitch affect the cost per square foot?

    A steeper pitch increases difficulty and risk. Contractors may charge a “steep slope premium,” which can add 10% to 30% to the labor cost. Flat or low-slope roofs are generally cheaper to install but may require different materials like EPDM rubber.

    3. Should I replace my roof myself to save money?

    While DIY seems appealing, roofing is one of the most dangerous home improvement projects. Mistakes in installation can lead to leaks, structural damage, and voided warranties. Unless you are a trained professional, the risks far outweigh the savings.

    4. Does the season affect roofing prices?

    Yes. Late fall and winter are typically “off-seasons” for roofers in many parts of the US. You might secure a discount of 5–10% during these months, provided the weather permits safe installation. Spring and summer are peak seasons with higher demand and prices.

    5. What is the average lifespan of a $5 per square foot roof?

    A roof costing around $5 per square foot is likely a standard 3-tab asphalt shingle roof. You can expect this to last between 15 and 20 years, depending on ventilation and weather conditions. Architectural shingles, which cost slightly more, can last 25–30 years.

    Conclusion

    Determining how much should a new roof cost per square foot is not just about finding the lowest number; it is about finding the right value for your home’s specific needs. In 2026, expect to pay between $4.50 and $9.00 per square foot for a quality installation, with variations based on material, location, and complexity.

    By understanding the breakdown of labor, materials, and hidden costs, you can negotiate better and avoid unpleasant surprises. Remember, a roof is a long-term shield for your family. Invest wisely, choose reputable contractors, and prioritize quality over the absolute cheapest bid.

    Found this guide helpful? Share it with your friends on social media who might be facing similar home renovation decisions!

  • Metal Roof Over Shingles: Yes or No?

    Metal Roof Over Shingles: Yes or No?

    Have you ever looked up at your aging asphalt shingle roof and wondered if it’s time for an upgrade? Many homeowners are drawn to the durability and aesthetic appeal of metal roofing, but the installation process raises a critical question: Should You Remove Old Shingles Before Installing A Metal Roof? It is not just a matter of preference; it involves structural integrity, warranty validity, and long-term performance.

    Making the wrong choice here can lead to costly repairs down the line. In this guide, we will explore the technical realities, building codes, and expert recommendations to help you make an informed decision that protects your home and your investment.

    The Case for Removing Old Shingles

    While installing a new roof over an existing one (often called a “roof-over”) might seem like a quick money-saver, most professional roofers and manufacturers strongly recommend a complete tear-off. Here is why starting with a clean deck is often the superior choice.

    1. Inspecting the Roof Deck for Damage

    When you leave old shingles in place, you are essentially blind to the condition of the wood decking beneath. Asphalt shingles can hide rot, water damage, or soft spots caused by years of leakage.

    If you install metal panels over compromised decking, the screws may not hold securely. This can lead to panel loosening during high winds. By removing the old layers, you gain the opportunity to:

    • Replace rotted plywood or OSB sheathing.
    • Reinforce weak rafters.
    • Ensure a flat, solid surface for the new metal panels.

    2. Weight Load Considerations

    A common misconception is that metal roofs are always lighter than shingles. While true per square foot, adding a second layer adds significant cumulative weight.

    • Asphalt Shingles: Approx. 2–3 lbs per square foot.
    • Metal Roofing: Approx. 1–1.5 lbs per square foot.
    • Combined Load: If you keep the shingles, your roof structure must support both.

    Older homes, particularly those built before 1980, may not have been engineered to handle double the roofing load. According to general engineering principles found in resources like Wikipedia’s entry on Roofing, structural failure due to excessive dead load is a rare but serious risk when multiple layers accumulate without proper assessment.

    3. Warranty Validity

    This is a crucial point often overlooked by DIY enthusiasts. Most major metal roofing manufacturers will void their warranty if their product is installed over more than one layer of existing roofing. They require a solid, single-layer substrate to guarantee the performance of their fasteners and panels. If you plan to stay in your home for decades, protecting your warranty is essential.

    When Is It Acceptable to Keep Old Shingles?

    There are specific scenarios where leaving the old shingles might be permissible, though it is rarely the best option.

    • Single Layer Only: Most local building codes allow a maximum of two layers of roofing material. If you already have two layers, you must tear them off. If you have only one layer, a roof-over might be code-compliant.
    • Budget Constraints: Removing shingles is labor-intensive and increases disposal fees. Keeping them can save 15–20% on initial installation costs.
    • Time Sensitivity: A tear-off exposes your home to the elements. If rain is forecasted and you cannot get the metal installed immediately, keeping the old layer provides temporary weather protection during the transition.

    However, even in these cases, you must address the uneven surface issue.

    Should You Remove Old Shingles Before Installing A Metal Roof

    The Hidden Risks of “Roof-Over” Installations

    Installing metal directly over shingles introduces several technical challenges that can compromise the lifespan of your new roof.

    Uneven Surface and Oil Canning

    Asphalt shingles are not perfectly flat. They have tabs, granules, and overlaps. When you screw metal panels over this uneven texture, the metal may not sit flush. This can lead to:

    • Oil Canning: A visual waviness in the metal panels caused by stress from uneven fastening.
    • Loose Fasteners: Screws driven into the high points of shingles may back out over time as the shingles compress or degrade.

    Trapped Moisture and Ventilation Issues

    One of the biggest enemies of a roof is trapped moisture. Old shingles may retain dampness. If you seal them under a metal roof without proper ventilation, you create a greenhouse effect.

    • Heat builds up under the metal.
    • Moisture evaporates from the old shingles but has nowhere to go.
    • This leads to condensation on the underside of the metal panels, causing rust and rotting the deck from the inside out.

    To mitigate this, you must install a high-quality synthetic underlayment and ensure adequate attic ventilation. However, this is a band-aid solution compared to starting with a dry, clean deck.

    Difficulty in Future Repairs

    Imagine you have a leak ten years from now. If the metal is installed over shingles, locating the source of the leak becomes a detective game. You cannot easily inspect the deck or flashings without removing the metal panels first. With a tear-off, any future issues are easier to diagnose because the system is transparent and accessible.

    Step-by-Step: The Proper Installation Process

    If you decide to proceed with a metal roof, here is the industry-standard approach for a durable installation. Note that this assumes a full tear-off, which is highly recommended.

    1. Tear Off Existing Material: Remove all old shingles, nails, and flashing. Dispose of debris according to local regulations.
    2. Inspect and Repair Decking: Walk the roof deck. Replace any soft, rotted, or damaged plywood. Secure any loose boards with ring-shank nails.
    3. Install Drip Edge: Attach metal drip edge along the eaves and rakes to direct water away from the fascia.
    4. Apply Underlayment: Roll out a high-quality synthetic underlayment (not just felt paper). Overlap seams by at least 6 inches and tape them if required by the manufacturer. This acts as your secondary water barrier.
    5. Install Flashing: Put in step flashing around chimneys, valleys, and walls before the main panels go up.
    6. Mount Metal Panels: Start at the eave. Use screws with neoprene washers designed for metal roofing. Do not overtighten, as this can distort the washer and cause leaks.
    7. Add Ridge Cap: Install the ridge cap last to seal the peak of the roof.

    Comparison: Tear-Off vs. Roof-Over

    To help you visualize the trade-offs, here is a quick comparison table.

    FeatureFull Tear-OffRoof-Over (Keep Shingles)
    CostHigher (labor + disposal)Lower (saves labor/disposal)
    Deck InspectionFull visibility and repairBlind installation
    WarrantyUsually validOften voided or limited
    LifespanMaximizes metal roof lifeMay reduce longevity
    Surface QualityFlat, secure baseUneven, potential for noise
    Weight LoadStandard loadIncreased structural load

    Frequently Asked Questions (FAQ)

    1. Will a metal roof be noisy if installed over shingles?

    Yes, it can be. Without a solid deck connection, rain and hail can create more drumming noise. However, using a solid sheathing base (after tear-off) and proper insulation significantly reduces sound transmission.

    2. Can I install metal roofing over two layers of shingles?

    In most jurisdictions, no. Building codes typically prohibit more than two layers of roofing material. If you already have two layers, you must remove them all before installing metal.

    3. Does keeping old shingles affect the R-value (insulation)?

    Marginally. Asphalt shingles offer negligible insulation value. The primary thermal benefit comes from the air gap and reflective properties of the metal, not the old shingles underneath.

    4. How much does it cost to remove old shingles?

    Costs vary by region and roof size, but expect to pay between $1.00 and $3.00 per square foot for tear-off and disposal. While this adds to the upfront cost, it prevents expensive structural repairs later.

    5. What type of underlayment should I use?

    Always use a synthetic underlayment rather than traditional asphalt felt. Synthetic options are more tear-resistant, breathable, and provide better slip resistance for installers.

    6. Will my homeowner’s insurance cover a roof-over?

    Some insurers may increase premiums or deny coverage for roof-overs due to the increased risk of hidden damage and fire spread. Always check with your provider before proceeding.

    Conclusion

    So, should you remove old shingles before installing a metal roof? In the vast majority of cases, yes.

    While keeping the old shingles might save you money upfront, it introduces risks regarding structural integrity, warranty coverage, and moisture management. A full tear-off allows you to inspect and repair the roof deck, ensuring a flat, solid foundation for your new metal roof. This approach maximizes the lifespan of your investment and keeps your home safe from hidden decay.

    Think of your roof as the shield of your home. You wouldn’t patch a hole in a shield with another weak layer; you would replace it properly. The same logic applies here.

    Did you find this guide helpful? Share it with friends who are considering a roofing upgrade, or leave a comment below with your own roofing questions!