Tag: roof rack safety

  • How Much Weight Can a Car Roof Hold?

    How Much Weight Can a Car Roof Hold?

    Have you ever stared at a massive rooftop tent or a stack of luggage, wondering if your sedan’s roof will buckle under the pressure? It is a common concern for adventurers and families alike who want to maximize their storage space without compromising safety. Understanding exactly how much weight can the roof of a car hold is critical not just for protecting your vehicle’s structural integrity, but for ensuring the safety of everyone on the road.

    In this guide, we will break down the complex engineering behind roof loads, differentiate between static and dynamic weights, and provide you with actionable steps to load your car safely. Let’s dive into the facts so you can hit the road with confidence.

    Understanding Dynamic vs. Static Weight Limits

    To answer the question of capacity, we must first distinguish between two types of weight: dynamic and static. This is the most common point of confusion for car owners.

    What Is Dynamic Weight?

    Dynamic weight refers to the load your car roof carries while the vehicle is in motion. When you are driving, the roof experiences wind resistance, vibrations, bumps, and sudden braking forces. These factors multiply the stress on the roof rails and the car’s frame.

    • Typical Limit: For most modern passenger cars (sedans, hatchbacks, and small SUVs), the dynamic weight limit usually ranges between 100 to 165 pounds (45 to 75 kg).
    • Why It Matters: Exceeding this limit while driving can alter your center of gravity, leading to poor handling, increased rollover risk, and potential damage to the roof structure.

    What Is Static Weight?

    Static weight is the amount of weight the roof can support when the car is parked on level ground. Since there are no G-forces from acceleration or wind drag, the roof can handle significantly more weight.

    • Typical Limit: Most roofs can support 3 to 4 times their dynamic limit. This often means a capacity of 300 to 600 pounds (136 to 272 kg) or more.
    • Use Case: This is the metric that matters if you are using a rooftop tent for camping while parked. However, you must ensure the weight is evenly distributed.

    Expert Insight: Always check your owner’s manual first. Manufacturers test these limits specifically for your model. If the manual is missing, look for a sticker inside the driver’s door jamb or consult the manufacturer’s website.

    Factors That Influence Your Car’s Roof Capacity

    Not all cars are created equal. Several engineering factors determine the specific limit for your vehicle.

    1. Vehicle Type and Structure

    • Sedans: Typically have lower limits because their roofs are designed for aerodynamics rather than heavy loads. They often lack robust factory-installed rails.
    • SUVs and Trucks: These vehicles usually have stronger frames and higher limits. Many come with integrated crossbars designed for heavier cargo like kayaks or lumber.
    • Unibody vs. Body-on-Frame: Vehicles with body-on-frame construction (like many trucks) generally offer higher tolerance for roof loads compared to unibody cars.

    2. The Roof Rack System

    The strength of your roof is only as good as the rack system attached to it.

    • Factory Rails: Often rated for lower weights.
    • Aftermarket Racks: High-quality aftermarket systems (from brands like Thule or Yakima) are engineered to distribute weight more effectively across the car’s strongest points (the pillars).

    3. Age and Condition of the Vehicle

    Rust, previous accidents, or worn-out seals can weaken the roof’s structural integrity. An older car may not hold the same weight as it did when it rolled off the assembly line.

    How to Calculate Safe Load Distribution

    Knowing the number is one thing; applying it correctly is another. Improper distribution can cause localized stress points that dent or crack the roof.

    Step-by-Step Loading Guide

    1. Check the Manual: Locate the maximum dynamic weight limit. Let’s assume it is 150 lbs.
    2. Weigh Your Gear: Do not guess. Use a bathroom scale to weigh your cargo boxes, bikes, or tents.
    3. Subtract Rack Weight: Remember, the weight of the roof rack itself counts toward the limit. If your rack weighs 20 lbs, you only have 130 lbs left for cargo.
    4. Center the Load: Place the heaviest items in the center of the roof, directly between the front and rear crossbars. This minimizes leverage on the mounting points.
    5. Secure Tightly: Use high-quality straps. Loose items shift during driving, creating unpredictable dynamic forces.
    Cargo TypeEstimated WeightSafety Tip
    Rooftop Tent100–180 lbsEnsure static limit supports it; never drive with occupants inside.
    Kayak30–60 lbsUse foam blocks to protect the hull and roof paint.
    Ski Box10–20 lbs (empty)Distribute skis evenly to avoid lateral imbalance.
    Luggage Bag30–50 lbsKeep low-profile bags to reduce wind drag.
    How Much Weight Can The Roof Of A Car Hold

    Risks of Overloading Your Car Roof

    Ignoring weight limits can lead to severe consequences. Here is what happens when you exceed the recommended capacity:

    • Structural Damage: The roof panels can dent, crack, or even collapse inward, damaging the headliner and interior components.
    • Compromised Handling: A high center of gravity makes the car top-heavy. In emergency maneuvers or high winds, this significantly increases the risk of a rollover accident.
    • Reduced Fuel Efficiency: Extra weight and poor aerodynamics from bulky loads force the engine to work harder, burning more fuel.
    • Voided Warranty: If damage occurs due to overloading, your insurance or manufacturer warranty may deny the claim.

    For more detailed engineering standards regarding vehicle safety and load distributions, you can refer to general automotive safety guidelines on Wikipedia.

    Frequently Asked Questions (FAQ)

    1. Can I put a rooftop tent on any car?

    No, not every car is suitable. You must check if your car’s static weight limit exceeds the weight of the tent plus the occupants sleeping in it. Small sedans often cannot support the combined weight of a heavy tent and two adults. Always verify with your vehicle’s manual.

    2. Does the weight of the roof rack count toward the limit?

    Yes. The dynamic weight limit includes everything on the roof: the crossbars, the cargo box, the bikes, and the straps. If your limit is 150 lbs and your rack weighs 30 lbs, you only have 120 lbs left for gear.

    3. How does speed affect roof load safety?

    Higher speeds increase wind resistance and vibration. Even if you are within the weight limit, driving at highway speeds (70+ mph) with a large, flat surface area (like a mattress or poorly secured box) can create lift forces that strain the mounts. Drive cautiously and consider removing loads if not necessary.

    4. What is the safest way to secure heavy items?

    Use ratchet straps or high-tension cam buckles rather than bungee cords. Bungee cords stretch and loosen over time. Ensure straps are anchored to the crossbars, not just the side rails, and tighten them until there is no slack. Check them after the first 10 miles of driving.

    5. Can rain or snow add significant weight?

    Yes. Wet snow is heavy. A layer of wet snow on a large rooftop box can add dozens of pounds unexpectedly. Always clear off snow and ice from your roof load before driving to maintain aerodynamic efficiency and stay within weight limits.

    Conclusion

    Understanding how much weight can the roof of a car hold is essential for safe and efficient travel. While most cars can handle between 100 to 165 pounds of dynamic weight, the key lies in proper distribution, securing your load, and respecting the difference between moving and parked capacities.

    By following the guidelines above—checking your manual, weighing your gear, and centering your load—you can enjoy the convenience of extra storage without risking your vehicle or your safety.

    Did you find this guide helpful? Share it with your fellow road-trippers on social media to help them load up safely for their next adventure! Safe travels!
  • Can I Go Through A Carwash With A Roof Rack?

    Can I Go Through A Carwash With A Roof Rack?

    We have all been there. You are rushing to get your vehicle clean after a muddy weekend adventure, but that bulky roof rack is staring back at you, raising a critical question: Can I go through a carwash with a roof rack? It is a common dilemma for outdoor enthusiasts, parents with cargo carriers, and daily commuters alike. The short answer is yes, but with significant caveats depending on the type of car wash and the specific design of your rack.

    Choosing the wrong method can lead to scratched paint, bent crossbars, or even catastrophic damage to your cargo. In this guide, we will break down exactly how to clean your vehicle safely without compromising the integrity of your roof rack system. We will explore the differences between touchless and brush-based systems, provide step-by-step cleaning instructions, and answer the most pressing questions from vehicle owners across the US.


    Is It Safe to Use an Automatic Brush Car Wash?

    The biggest risk when asking, “Can I go through a carwash with a roof rack?” lies in the type of machinery used. Traditional automatic car washes often use large rotating brushes or cloth strips to scrub the vehicle. While efficient for bare cars, these mechanisms are notoriously hazardous for roof racks.

    The Danger of Rotating Brushes

    Rotating brushes operate with high torque. If a brush catches on a crossbar, a bike mount, or the edge of a cargo box, it can exert immense pressure. This can result in:

    • Structural Damage: Bent aluminum crossbars or cracked plastic fairings.
    • Paint Scratches: The friction can strip clear coats around the mounting points.
    • Dislodged Cargo: In worst-case scenarios, the force can loosen clamps, leading to items falling off mid-wash.

    According to industry standards, most roof rack manufacturers explicitly void warranties if damage occurs due to automated mechanical washing systems. Therefore, if your only option is an automatic wash, you must ensure it is a “touchless” facility.

    Touchless Car Washes: A Safer Alternative

    Touchless car washes use high-pressure water jets and strong detergents rather than physical contact. These are generally safe for roof racks because there are no moving parts to snag on your equipment. However, even with touchless systems, you should verify that the water pressure is not excessively concentrated on specific mounting points, which could potentially loosen seals over time.


    Hand Washing: The Gold Standard for Roof Racks

    If you want to guarantee the longevity of your roof rack and your vehicle’s paint, hand washing is the superior method. It allows you to control the pressure, the cleaning agents, and the attention given to complex shapes like bike trays or ski mounts.

    Step-by-Step Guide to Hand Washing with a Roof Rack

    Follow this precise protocol to ensure a thorough and safe clean:

    1. Preparation and Cooling Ensure your vehicle has been parked in the shade for at least 30 minutes. Washing a hot surface can cause soap to dry too quickly, leaving residues. Park on a flat, level surface.
    2. Initial Rinse Use a garden hose with a standard nozzle. Do not use a pressure washer on its highest setting directly against rubber seals or plastic clamps. Rinse the entire vehicle, starting from the top down, to remove loose dirt and debris.
    3. Mixing the Solution Fill a bucket with 2 liters of water at a temperature of 22–28°C (72–82°F). Add two capfuls of pH-neutral car wash soap. Avoid household dish detergents, as they can strip wax and degrade rubber seals on your roof rack.
    4. Washing the Rack First Using a soft microfiber mitt, gently wash the roof rack components first. Pay special attention to the joints where the crossbars meet the feet. Dirt tends to accumulate here and can act as an abrasive if left unchecked.
      • Tip: Use a soft-bristled toothbrush to clean tight crevices in bike mounts or lock mechanisms.
    5. Washing the Vehicle Body Proceed to wash the rest of the car using the two-bucket method (one for soapy water, one for rinsing the mitt) to prevent dragging dirt across the paint.
    6. Final Rinse and Dry Rinse thoroughly from top to bottom. Dry the vehicle using a clean, plush microfiber towel. Ensure you dry under the crossbars and around the feet to prevent water spots and corrosion.
    Can I Go Through A Carwash With A Roof Rack

    Specific Considerations for Different Rack Types

    Not all roof racks are created equal. The material and design dictate how you should approach cleaning.

    Rack TypeMaterial SensitivityCleaning Recommendation
    Aluminum CrossbarsModerateSafe for touchless washes. Hand wash to prevent oxidation spots.
    Steel CrossbarsHigh (Rust Risk)Inspect for chips in powder coating. Hand wash recommended.
    Plastic/Cargo BoxesLowGenerally durable, but hinges need lubrication after washing.
    Bike/Ski MountsHigh (Mechanical)Hand wash only. Grease and road grime build up in moving parts.

    For more detailed information on the materials used in automotive accessories, you can refer to general engineering principles found on Wikipedia’s page on Aluminum Alloys, which highlights why certain alloys are chosen for their corrosion resistance and strength-to-weight ratio.


    Maintenance Tips Post-Wash

    Cleaning is only half the battle. Proper maintenance after a wash ensures your rack remains secure and functional.

    • Lubricate Moving Parts: If you have bike trays or ski carriers, apply a silicone-based lubricant to hinges and locks after washing. Water can wash away existing grease, leading to stiffness or rust.
    • Check Torque Settings: Vibrations from driving and the pressure from washing can occasionally loosen bolts. Once a month, check the tightness of your crossbar clamps and foot packs. Refer to your manufacturer’s manual for specific torque specifications (usually measured in Newton-meters or foot-pounds).
    • Inspect Rubber Seals: Look for cracks or brittleness in the rubber pads that sit between the rack and your car’s roof. Replace them if they show signs of wear to prevent leaks and paint damage.

    FAQ Section

    1. Will a touchless car wash damage my roof rack?

    Generally, no. Touchless car washes use high-pressure water and chemicals without physical contact. However, ensure that the detergents used are compatible with your rack’s materials. Some industrial-strength cleaners may be harsh on plastic components or rubber seals over time.

    2. Can I leave my roof rack on during winter?

    Yes, but it requires extra care. Salt and road grime can accelerate corrosion. If you live in an area with heavy snowfall, consider removing the rack if it is not in use. If you keep it on, rinse it frequently to remove salt buildup.

    3. How often should I clean my roof rack?

    You should rinse your roof rack every time you wash your car. A deep clean with soap and lubrication should be performed at least once every three months, or immediately after exposure to saltwater, mud, or heavy pollen.

    4. Is it safe to drive through a car wash with a cargo box attached?

    If the car wash is touchless, yes. If it uses brushes, absolutely not. Cargo boxes often have wider profiles and plastic shells that can easily crack or shatter under the pressure of rotating brushes. Always opt for hand washing or touchless systems when a cargo box is mounted.

    5. What should I do if my roof rack starts making noise after a wash?

    Noise usually indicates a loose component or trapped water. Check all bolts and clamps for tightness. If the noise persists, it may be wind turbulence caused by a misaligned fairing. Ensure all aerodynamic covers are properly seated.


    Conclusion

    So, can you go through a carwash with a roof rack? Yes, but caution is paramount. Avoid traditional brush-based automatic car washes at all costs to prevent structural damage and cosmetic scratches. Instead, opt for touchless automatic systems or, ideally, invest the time in a thorough hand wash.

    By following the steps outlined above, you not only keep your vehicle looking pristine but also extend the lifespan of your roof rack investment. Regular maintenance, proper lubrication, and careful cleaning habits will ensure your gear is ready for your next adventure, whether it is a mountain biking trip or a family road trip.

    Did you find this guide helpful? Share it with your fellow outdoor enthusiasts on social media to help them protect their vehicles too! Stay safe and happy travels.

  • How to Strap a Paddle Board to a Roof Rack

    How to Strap a Paddle Board to a Roof Rack

    Have you ever stared at your shiny new stand-up paddleboard (SUP), wondering how on earth you’re going to get it to the lake without scratching your car or losing your board on the highway? You are not alone. Transporting bulky water sports gear can be intimidating for beginners, but learning how to strap a paddle board to a roof rack is a crucial skill that ensures both your safety and the longevity of your equipment.

    In this comprehensive guide, we will walk you through the exact steps professionals use to secure SUPs. We will cover everything from choosing the right straps to avoiding common mistakes that lead to costly damage. By the end of this article, you will feel confident loading your board like a pro.

    Why Proper Strapping Matters for Your SUP

    Before we dive into the “how,” let’s address the “why.” A paddle board is essentially a large sail when placed on a roof. Even at moderate speeds, wind resistance creates significant lift and drag forces. If your board is not secured correctly, these forces can shift the board, loosen straps, or even cause the board to fly off entirely.

    According to transportation safety data, improperly loaded cargo is a leading cause of road hazards. Beyond safety, improper strapping can warp your board’s core or crack its fiberglass shell due to uneven pressure points. Taking five extra minutes to secure your load properly saves you hundreds, if not thousands, of dollars in repairs.

    What Equipment Do You Need?

    You do not need expensive, specialized gear to transport your SUP safely. However, using the right tools makes the process easier and more secure. Here is what you should have in your trunk:

    • Cam Buckle Straps: These are superior to ratchet straps for SUPs. Ratchet straps can easily overtighten and crush the foam core of inflatable or soft-top boards. Cam buckles allow for tight, controlled tension.
    • Roof Rack Crossbars: Ensure your vehicle has crossbars installed. If you have a bare roof, you will need a temporary soft-rack system.
    • Padding or Towels: If your crossbars are metal or hard plastic, use neoprene pads or old towels to protect the board’s bottom from scratches.
    • Leash or Lock Cable (Optional): For added security against theft when parked.
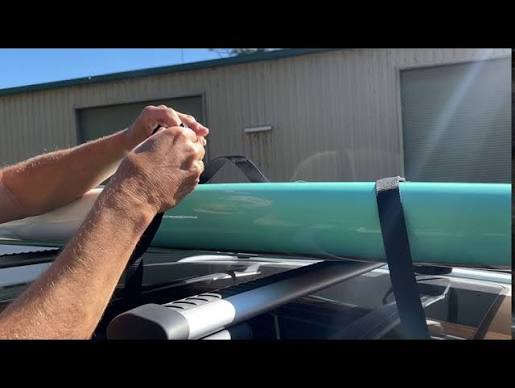
    How To Strap A Paddle Board To A Roof Rack

    Step-by-Step: How to Strap a Paddle Board to a Roof Rack

    Follow these precise steps to ensure a bulletproof setup. We recommend having a friend help you lift the board, though it is possible to do it alone with care.

    Step 1: Position the Board Correctly

    Place your paddle board on the roof rack with the fin box facing down. This is critical. The fin box is usually recessed, providing a natural channel for the strap to sit in, which prevents the board from sliding side-to-side. If your board has a removable fin, take it off to avoid breakage.

    Ensure the board is centered on the crossbars. The nose (front) and tail (back) should overhang equally. For most standard cars, the board will extend beyond the windshield and rear window. This is normal, but ensure it does not obstruct your view or hit any sensors.

    Step 2: Prepare the Straps

    Take two cam buckle straps. Thread the loose end of the strap through the cam buckle mechanism before placing it on the board. It is much harder to do this once the board is in place.

    Lay the straps over the board so that they align with your crossbars. One strap should go over the front crossbar, and the other over the rear crossbar. Ensure the buckles are positioned on the side of the car where you can easily access them.

    Step 3: Secure the Straps Under the Car

    Reach under the car and pull the loose ends of the straps through. Do not throw the straps over the board yet. Instead, bring the ends up to the top of the roof rack.

    Tip: If you have a tall SUV or truck, you may need a step stool. Never climb on your car’s door frame or mirrors.

    Thread the strap ends through the cam buckles. Make sure the webbing is flat and not twisted. Twisted straps reduce holding power and can wear out faster.

    Step 4: Tighten with Precision

    Pull the loose end of the strap to remove slack. Then, engage the cam buckle lever. Pull firmly until the strap is tight.

    How tight is too tight? You want the strap to be snug enough that you cannot slide your hand easily between the strap and the board, but not so tight that it compresses the board’s surface significantly. If you see the board dimpling deeply under the strap, you have overtightened it. This is especially important for inflatable SUPs.

    A good rule of thumb: The board should not move more than an inch when you push it sideways.

    Step 5: Secure the Loose Ends

    Loose strap ends flapping in the wind create noise and can distract other drivers. Use the elastic keepers on the straps to bundle the excess webbing. If your straps do not have keepers, tie a simple knot or use a rubber band to hold the excess material together.

    Common Mistakes to Avoid

    Even experienced paddlers make errors. Here are the most frequent issues and how to fix them:

    MistakeConsequenceSolution
    Using Ratchet StrapsCrushed foam core; warped boardAlways use cam buckle straps or dedicated SUP ties.
    Strapping Over the FinBroken fin; damaged fin boxRemove the fin or strap around the fin box channel.
    Ignoring Wind DirectionBoard lifts at high speedsPlace the nose facing forward. Check straps after 10 miles.
    No PaddingScratches on board bottomUse neoprene pads or towels under the contact points.

    Understanding Wind Resistance and Aerodynamics

    When you drive with a SUP on your roof, you are altering the aerodynamics of your vehicle. The board acts as a wing. According to principles of fluid dynamics, air moving over the curved top of the board creates lower pressure, which can generate lift.

    This is why positioning matters. If the board is angled incorrectly, it can catch the wind like a sail, putting immense stress on your roof rack and straps. For more detailed information on aerodynamic forces, you can refer to general physics resources such as Wikipedia’s article on Aerodynamics.

    To mitigate this:

    1. Keep speeds moderate (under 70 mph is ideal).
    2. Ensure the board is perfectly parallel to the direction of travel.
    3. Check your straps after the first 15–20 minutes of driving, as vibrations often loosen initial knots.

    FAQ Section

    1. Can I transport my paddle board without a roof rack?

    Yes, you can use a “soft rack” system. These are heavy-duty straps with foam blocks that sit directly on your car’s roof. They pass through the car doors and tighten inside the cabin. While convenient, they are generally less secure than hard crossbars and are not recommended for highway speeds above 65 mph.

    2. Should I transport my SUP upside down or right side up?

    Always transport your SUP upside down (deck pad facing down, fin box facing up). Wait, correction: In the previous steps, we mentioned fin box down. Let’s clarify.

    • Hard Boards: Usually transported bottom up (fin box facing up) if using a cradle rack. However, if using flat crossbars, many prefer deck down (fin box facing down) to protect the delicate deck pad and use the fin box channel for strap stability. Check your specific board manufacturer’s recommendation. Most modern racks suggest deck down to protect the finish.
    • Inflatable Boards: Deck down is preferred to protect the valve and deck pad texture.

    (Note: Always prioritize the manufacturer’s specific advice for your board model.)

    3. How many straps do I need?

    You need a minimum of two straps, one for each crossbar. If your board is exceptionally long (over 12 feet) or if you only have one crossbar, you should use additional straps or a specialized long-board kit to prevent flexing and bouncing.

    4. Is it safe to leave my paddle board on the roof overnight?

    It is not recommended. Besides the risk of theft, temperature changes can affect the board. Direct sunlight can heat up the air inside an inflatable board, potentially causing it to burst if over-inflated. Hardboards can also warp if exposed to extreme heat while strapped down tightly. Always unload your board when not in use.

    5. What if my car doesn’t have roof rails?

    If your car has a smooth roof, you must use a soft rack system or install aftermarket crossbars that clamp onto the door frames. Never attempt to strap a board directly to a bare metal roof without padding, as this will damage both your car’s paint and the board.

    Conclusion

    Learning how to strap a paddle board to a roof rack is a simple yet vital skill for any paddler. By using the right equipment—specifically cam buckle straps—and following the correct positioning techniques, you can transport your gear safely and efficiently. Remember to check your straps regularly, respect wind conditions, and always prioritize the protection of your board’s structure.

    Now that you are equipped with this knowledge, you are ready to hit the water with peace of mind. Did you find this guide helpful? Share it with your paddling buddies on social media to help them transport their gear safely too! Happy paddling!

  • Can You Go Through A Carwash With A Roof Rack?

    Can You Go Through A Carwash With A Roof Rack?

    Have you ever stood at the entrance of an automated car wash, staring at those spinning brushes, while wondering if your expensive roof rack will survive the ordeal? It is a common dilemma for outdoor enthusiasts and daily commuters alike. The short answer to can you go through a carwash with a roof rack is: it depends heavily on the type of car wash and the specific design of your rack.

    Making the wrong choice here can lead to scratched paint, bent crossbars, or even a detached cargo box flying off in the tunnel. In this guide, we will break down exactly what is safe, what is risky, and how to prepare your vehicle for a clean without compromising your gear. Let’s dive into the details so you can drive away with confidence.

    Understanding the Risks: Why Car Washes and Roof Racks Clash

    Before we look at the “how,” we need to understand the “why.” Automated car washes are designed for standard vehicle profiles. They use sensors, brushes, and high-pressure jets that assume a certain height and shape. When you add a roof rack, you change the aerodynamics and physical dimensions of your car.

    The primary risks include:

    • Physical Impact: Touchless washes are generally safe, but friction washes (with brushes) can catch on crossbars or cargo boxes.
    • Sensor Confusion: Some older car wash systems may not detect the added height of a roof box, leading to collisions with overhead machinery.
    • Water Intrusion: High-pressure jets can force water into the mounting points of your rack, potentially causing rust or loosening the clamps over time.

    According to general automotive maintenance standards, any aftermarket addition alters the vehicle’s original specifications. For more context on vehicle modifications and safety standards, you can refer to Wikipedia’s article on automotive accessories.

    Type of Car Wash: Which One Is Safe for Your Roof Rack?

    Not all car washes are created equal. Here is a breakdown of the most common types and their compatibility with roof racks.

    1. Touchless Automatic Car Washes (Safe)

    This is the gold standard for vehicles with roof racks. Touchless washes use high-pressure water and specialized detergents to clean the car without any physical contact.

    • Why it’s safe: There are no brushes or cloth strips to snag on your rack.
    • Precaution: Ensure your rack is tightly secured. While there is no physical contact, the high-pressure water can still be intense.

    2. Soft-Cloth Automatic Car Washes (Risky)

    These use large, rotating cloth strips. While softer than bristles, they can still wrap around protruding parts of a roof rack.

    • The Risk: If your roof rack has loose straps, bike wheels, or irregular shapes, the cloth can get tangled. This can damage the cloth, the rack, or your car’s paint.
    • Verdict: Avoid unless you have a completely flush, low-profile rack with no accessories attached.

    3. Brush Automatic Car Washes (Avoid)

    These use stiff bristles to scrub the car. They are aggressive and known for causing swirl marks on paint.

    • The Risk: High probability of scratching your roof rack’s finish or bending thin crossbars. The bristles can also get caught in the gaps between the rack and the roof.
    • Verdict: Do not use. The potential for damage outweighs the convenience.

    4. Self-Service Bay (Safe with Caution)

    If you prefer control, a self-service bay is a great option.

    • Why it’s safe: You control the pressure and angle of the spray.
    • Precaution: Avoid spraying directly into the locking mechanisms or mounting feet for extended periods.
    Can You Go Through A Carwash With A Roof Rack

    Step-by-Step Guide: How to Prep Your Car for the Wash

    If you decide to go through a touchless car wash or use a self-service bay, preparation is key. Follow these steps to ensure a smooth experience.

    1. Inspect the Mounting Points: Before entering the wash, check that all bolts, clamps, and locks are tight. Use a torque wrench if necessary, following the manufacturer’s specifications (usually between 5–10 Nm for most consumer racks).
    2. Remove Loose Accessories: Take off any bike trays, ski carriers, or cargo bags if possible. These items often have moving parts or straps that can flap violently in high winds or water jets.
    3. Check Height Clearance: Measure the total height of your vehicle with the rack installed. Compare this to the clearance sign at the car wash entrance. Most standard tunnels have a clearance of 7–8 feet (2.1–2.4 meters), but always verify.
    4. Fold Down Antennas: If your car has a whip antenna or radio mast, fold it down to prevent it from snapping against the rack or the wash equipment.
    5. Close All Windows and Sunroofs: This seems obvious, but double-check. Water pressure can force water into slightly open seals.

    Roof Rack Materials: What Can Handle the Heat?

    Different materials react differently to car wash chemicals and heat. Here is a quick comparison:

    MaterialDurability in Car WashNotes
    AluminumHighResistant to rust, but can oxidize if coated poorly. Safe for touchless washes.
    SteelMediumProne to rust if the powder coating is chipped. Inspect for scratches after washing.
    Plastic/CompositeHighGenerally safe, but avoid high-heat wax cycles which might warp thin plastic components.
    Wood (Rare)LowNot recommended for automatic washes. Water absorption can cause warping or rot.

    Note: Always consult your specific roof rack manual. Brands like Thule, Yakima, and Rhino-Rack have specific care instructions.

    Expert Tips for Maintaining Your Roof Rack Post-Wash

    Cleaning is only half the battle. Proper aftercare ensures longevity.

    • Dry Thoroughly: Water spots can be difficult to remove from matte black racks. Use a microfiber towel to dry the rack manually after the wash cycle.
    • Lubricate Locks: Car wash detergents can strip away natural oils. Apply a small amount of silicone-based lubricant to the keyholes and locking mechanisms every few months.
    • Inspect for Damage: Look for any new scratches or loose fittings. Catching a loose bolt early can prevent a catastrophic failure on the highway.

    FAQ Section

    1. Can I leave my bike on the rack during a car wash?

    No. Never leave bikes, skis, or kayaks on the rack during an automatic car wash. The wind resistance and water pressure can dislodge them, causing severe damage to your vehicle, the car wash equipment, and other cars. Always remove all cargo.

    2. Will a car wash void my roof rack warranty?

    Generally, no. Using a touchless car wash will not void your warranty. However, if you use a brush wash and it causes physical damage (bent bars, scratched coating), the manufacturer may deny a warranty claim for that specific damage. Always check your warranty terms.

    3. How often should I wash my roof rack?

    It is recommended to wash your roof rack every time you wash your car, especially if you live in an area with road salt, pollen, or bird droppings. Accumulated debris can corrode the mounting points over time.

    4. Is hand washing better for roof racks?

    Yes, hand washing is the safest method. It allows you to gently clean around the complex shapes of the rack without the risk of high-pressure water forcing its way into seals or brushes snagging on components. Use a soft sponge and mild soap.

    5. What if my roof rack is making noise after the car wash?

    Noise usually indicates a loose fit or water trapped in the channels. Check all tightening bolts first. If they are secure, dry the rack thoroughly. If the noise persists, it may be due to wind turbulence caused by the rack’s position, which is unrelated to the wash.

    Conclusion

    So, can you go through a carwash with a roof rack? Yes, but with caveats. Stick to touchless automatic car washes or self-service bays to minimize risk. Avoid brush and soft-cloth tunnels unless you are willing to gamble with your gear. By removing accessories, checking your height clearance, and performing regular maintenance, you can keep both your car and your roof rack in pristine condition.

    Remember, a little extra caution goes a long way in protecting your investment. If you found this guide helpful, please share it with your fellow adventurers on social media. Safe travels and happy cleaning!