Water dripping from your ceiling is one of the most stressful sights for any homeowner or property manager. It signals immediate damage, potential mold growth, and costly repairs if left unchecked. If you are staring at a wet spot and wondering how to find a roof leak on a flat roof, you are not alone; flat roofs are notorious for hiding the source of water intrusion due to their unique drainage dynamics.
Unlike sloped roofs where gravity quickly directs water away, flat roofs allow water to pool, making the entry point difficult to trace. However, with a systematic approach and the right tools, you can identify the culprit before it causes structural harm. This guide will walk you through professional inspection techniques, safety protocols, and common failure points specific to flat roofing systems.
Why Is Finding Leaks on Flat Roofs So Difficult?
Before diving into the detection process, it is crucial to understand why flat roofs behave differently than pitched roofs. In the roofing industry, we often say that “water finds its own level,” but on a flat roof, water also finds every tiny imperfection in the membrane.
According to data from the National Roofing Contractors Association (NRCA), improper installation and lack of maintenance account for over 60% of premature roof failures. On a flat roof, a leak occurring at point A might manifest as a stain at point B, several feet away. This phenomenon, known as “water migration,” happens because water travels along insulation boards, decking, or vapor barriers before dripping through the ceiling drywall.
Understanding this migration is key. You are not just looking for a hole; you are looking for the path the water took. For more detailed information on roofing materials and their properties, you can refer to the comprehensive overview on Wikipedia’s Roofing page.
Step 1: Prioritize Safety and Preparation
Never compromise safety for the sake of curiosity. Flat roofs can be slippery, especially when wet or covered in debris. Before you climb up, ensure you have the proper gear:
- Non-slip footwear: Rubber-soled shoes with good traction.
- Safety harness: If the roof is more than one story high, a fall protection system is mandatory.
- Clear weather: Never inspect a roof during rain, high winds, or immediately after a storm when surfaces are slick.
- Helper: Always have someone on the ground who knows you are on the roof.
Once safe, clear the roof of any loose debris like leaves, branches, or trash. Debris can hold moisture against the membrane, accelerating wear and masking the actual leak source.
Step 2: Visual Inspection of Common Failure Points
Most leaks originate from specific weak points rather than the middle of an open field. Start your inspection by examining these high-risk areas:
1. Flashing and Penetrations
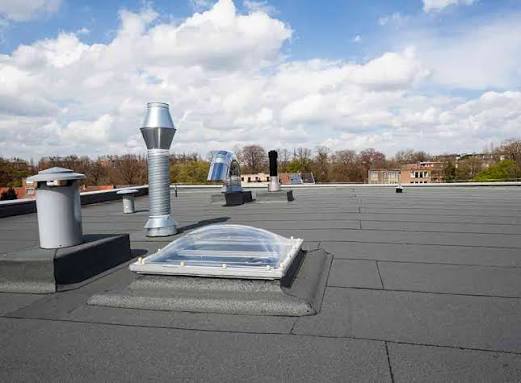
Flashing is the metal or rubber material used to seal joints around protrusions. Check around:
- HVAC units
- Vent pipes
- Skylights
- Chimneys
Look for cracks, rust, or separated seams in the flashing. If the sealant looks brittle or cracked, water is likely entering there.
2. Roof Drains and Scuppers
Clogged drains cause water to pool, increasing the hydrostatic pressure on the membrane. Ensure all drains are free of debris. Look for signs of standing water (ponding) that remains more than 48 hours after rainfall. Ponding water accelerates membrane degradation and is a primary cause of leaks.
3. Membrane Seams and Blisters
Walk the perimeter and the field of the roof. Look for:
- Blisters: Bubble-like formations indicating trapped air or moisture beneath the membrane.
- Alligatoring: A pattern of cracks resembling alligator skin, common in older asphalt-based roofs.
- Open Seams: Areas where the roofing plies have separated.
Step 3: The Water Hose Test (Controlled Testing)
If visual inspection doesn’t reveal the source, you may need to perform a controlled water test. This method requires two people: one on the roof with a hose and one inside the building watching the ceiling.
Procedure:
- Isolate Sections: Divide the roof into manageable sections (e.g., 10×10 feet).
- Start Low: Begin testing the area closest to the interior leak, not the highest point. Water flows down, so the source is often lower than you think.
- Apply Water Slowly: Use a garden hose to gently soak the section for 5–10 minutes. Do not use high pressure, which can force water into intact seams and create false positives.
- Wait and Observe: The person inside should watch for drips. If no leak appears, move to the next section uphill.
- Mark the Spot: Once the leak reproduces, mark the exact area on the roof with chalk or tape.
Note: This process can take several hours. Patience is essential.
Step 4: Advanced Detection Methods
For complex leaks or large commercial buildings, professional tools may be necessary. While DIYers can rent some of these, others require certified technicians.
| Method | How It Works | Best For |
|---|---|---|
| Infrared Thermography | Detects temperature differences; wet insulation retains heat differently than dry insulation. | Locating hidden moisture under the membrane. |
| Electronic Leak Detection | Uses electrical current to find breaches in the membrane. | Single-ply membranes (EPDM, TPO). |
| Dye Testing | Fluorescent dye is added to water; UV light reveals the path. | Tracing complex water migration paths. |
Infrared cameras are particularly effective because they can “see” wet insulation that is not yet visible on the surface. Wet spots appear as dark or light anomalies depending on the time of day and ambient temperature.
Common Causes of Flat Roof Leaks
Understanding why leaks happen helps prevent future issues. Here are the top offenders:
- Poor Installation: Improperly adhered seams or insufficient flashing height.
- Material Aging: UV exposure breaks down chemical bonds in roofing materials over time.
- Foot Traffic: Excessive walking on the roof can puncture membranes or dislodge gravel.
- Vegetation: Roots from weeds or trees can penetrate the roofing layers.
FAQ Section
Q1: Can I patch a flat roof leak myself?
A: Small punctures or minor seam separations can often be patched with roofing cement or a patch kit designed for your specific membrane type (EPDM, TPO, etc.). However, if the leak is near flashing or involves large areas of blistering, professional repair is recommended to ensure a watertight seal.
Q2: How long does it take to find a leak on a flat roof?
A: A simple visual inspection might take 30–60 minutes. If a water hose test is required, it can take several hours or even a full day, depending on the roof’s size and the complexity of the water migration.
Q3: Why is my ceiling leaking when it hasn’t rained recently?
A: This could be due to condensation from poor attic ventilation, a burst pipe, or residual water from a previous storm that was trapped in the insulation and is slowly releasing. It is crucial to rule out plumbing issues before assuming it is a roof leak.
Q4: What is the lifespan of a typical flat roof?
A: Most modern flat roofs last between 15 to 30 years, depending on the material. EPDM and TPO roofs tend to last longer (20–30 years), while built-up roofing (BUR) may require more frequent maintenance. Regular inspections can extend this lifespan significantly.
Q5: Should I walk on my flat roof?
A: Only when necessary and with proper safety precautions. Frequent foot traffic can damage the membrane. If you must access the roof, wear soft-soled shoes and avoid dragging equipment across the surface.
Q6: How much does professional leak detection cost?
A: Costs vary by region and roof size, but professional leak detection typically ranges from $300 to $1,000. This fee often includes a detailed report and thermal imaging, which can save thousands in unnecessary tear-off costs.
Conclusion
Learning how to find a roof leak on a flat roof is a valuable skill that can save you significant money and stress. By prioritizing safety, conducting thorough visual inspections, and using systematic testing methods like the hose test, you can pinpoint the source of water intrusion with confidence. Remember, early detection is key to preventing extensive structural damage and mold growth.
If the leak proves elusive or the repair seems beyond your comfort level, do not hesitate to call a licensed roofing professional. Their expertise and specialized tools can provide a definitive solution.
Did you find this guide helpful? Share it with your friends on social media to help them protect their homes too!