Tag: Home Improvement Tips

  • Metal Roof Over Shingles: Yes or No?

    Metal Roof Over Shingles: Yes or No?

    Have you ever looked up at your aging asphalt shingle roof and wondered if it’s time for an upgrade? Many homeowners are drawn to the durability and aesthetic appeal of metal roofing, but the installation process raises a critical question: Should You Remove Old Shingles Before Installing A Metal Roof? It is not just a matter of preference; it involves structural integrity, warranty validity, and long-term performance.

    Making the wrong choice here can lead to costly repairs down the line. In this guide, we will explore the technical realities, building codes, and expert recommendations to help you make an informed decision that protects your home and your investment.

    The Case for Removing Old Shingles

    While installing a new roof over an existing one (often called a “roof-over”) might seem like a quick money-saver, most professional roofers and manufacturers strongly recommend a complete tear-off. Here is why starting with a clean deck is often the superior choice.

    1. Inspecting the Roof Deck for Damage

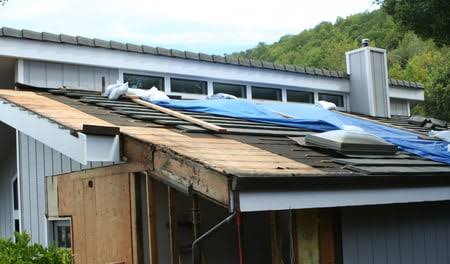
    When you leave old shingles in place, you are essentially blind to the condition of the wood decking beneath. Asphalt shingles can hide rot, water damage, or soft spots caused by years of leakage.

    If you install metal panels over compromised decking, the screws may not hold securely. This can lead to panel loosening during high winds. By removing the old layers, you gain the opportunity to:

    • Replace rotted plywood or OSB sheathing.
    • Reinforce weak rafters.
    • Ensure a flat, solid surface for the new metal panels.

    2. Weight Load Considerations

    A common misconception is that metal roofs are always lighter than shingles. While true per square foot, adding a second layer adds significant cumulative weight.

    • Asphalt Shingles: Approx. 2–3 lbs per square foot.
    • Metal Roofing: Approx. 1–1.5 lbs per square foot.
    • Combined Load: If you keep the shingles, your roof structure must support both.

    Older homes, particularly those built before 1980, may not have been engineered to handle double the roofing load. According to general engineering principles found in resources like Wikipedia’s entry on Roofing, structural failure due to excessive dead load is a rare but serious risk when multiple layers accumulate without proper assessment.

    3. Warranty Validity

    This is a crucial point often overlooked by DIY enthusiasts. Most major metal roofing manufacturers will void their warranty if their product is installed over more than one layer of existing roofing. They require a solid, single-layer substrate to guarantee the performance of their fasteners and panels. If you plan to stay in your home for decades, protecting your warranty is essential.

    When Is It Acceptable to Keep Old Shingles?

    There are specific scenarios where leaving the old shingles might be permissible, though it is rarely the best option.

    • Single Layer Only: Most local building codes allow a maximum of two layers of roofing material. If you already have two layers, you must tear them off. If you have only one layer, a roof-over might be code-compliant.
    • Budget Constraints: Removing shingles is labor-intensive and increases disposal fees. Keeping them can save 15–20% on initial installation costs.
    • Time Sensitivity: A tear-off exposes your home to the elements. If rain is forecasted and you cannot get the metal installed immediately, keeping the old layer provides temporary weather protection during the transition.

    However, even in these cases, you must address the uneven surface issue.
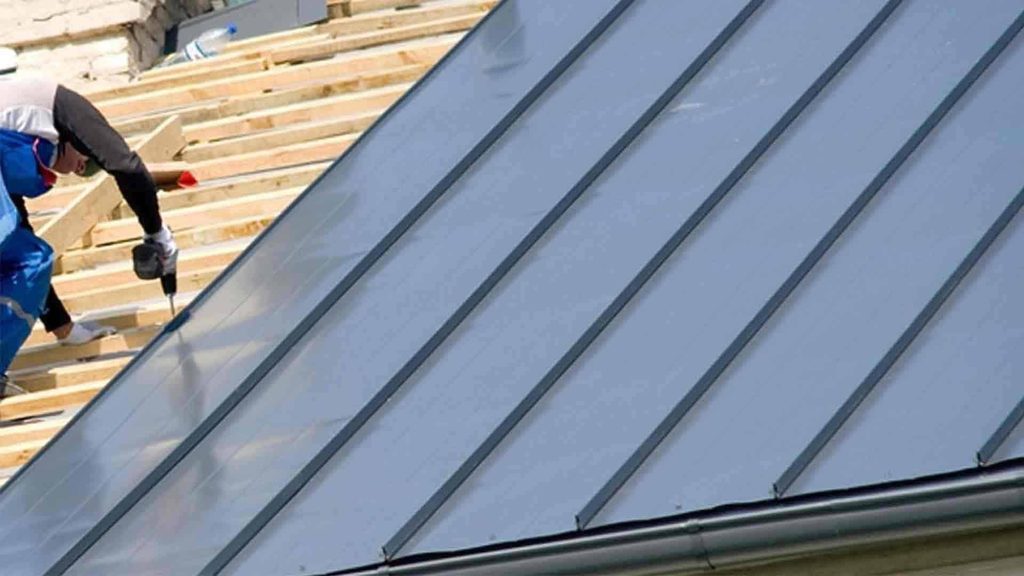
    Should You Remove Old Shingles Before Installing A Metal Roof

    The Hidden Risks of “Roof-Over” Installations

    Installing metal directly over shingles introduces several technical challenges that can compromise the lifespan of your new roof.

    Uneven Surface and Oil Canning

    Asphalt shingles are not perfectly flat. They have tabs, granules, and overlaps. When you screw metal panels over this uneven texture, the metal may not sit flush. This can lead to:

    • Oil Canning: A visual waviness in the metal panels caused by stress from uneven fastening.
    • Loose Fasteners: Screws driven into the high points of shingles may back out over time as the shingles compress or degrade.

    Trapped Moisture and Ventilation Issues

    One of the biggest enemies of a roof is trapped moisture. Old shingles may retain dampness. If you seal them under a metal roof without proper ventilation, you create a greenhouse effect.

    • Heat builds up under the metal.
    • Moisture evaporates from the old shingles but has nowhere to go.
    • This leads to condensation on the underside of the metal panels, causing rust and rotting the deck from the inside out.

    To mitigate this, you must install a high-quality synthetic underlayment and ensure adequate attic ventilation. However, this is a band-aid solution compared to starting with a dry, clean deck.

    Difficulty in Future Repairs

    Imagine you have a leak ten years from now. If the metal is installed over shingles, locating the source of the leak becomes a detective game. You cannot easily inspect the deck or flashings without removing the metal panels first. With a tear-off, any future issues are easier to diagnose because the system is transparent and accessible.

    Step-by-Step: The Proper Installation Process

    If you decide to proceed with a metal roof, here is the industry-standard approach for a durable installation. Note that this assumes a full tear-off, which is highly recommended.

    1. Tear Off Existing Material: Remove all old shingles, nails, and flashing. Dispose of debris according to local regulations.
    2. Inspect and Repair Decking: Walk the roof deck. Replace any soft, rotted, or damaged plywood. Secure any loose boards with ring-shank nails.
    3. Install Drip Edge: Attach metal drip edge along the eaves and rakes to direct water away from the fascia.
    4. Apply Underlayment: Roll out a high-quality synthetic underlayment (not just felt paper). Overlap seams by at least 6 inches and tape them if required by the manufacturer. This acts as your secondary water barrier.
    5. Install Flashing: Put in step flashing around chimneys, valleys, and walls before the main panels go up.
    6. Mount Metal Panels: Start at the eave. Use screws with neoprene washers designed for metal roofing. Do not overtighten, as this can distort the washer and cause leaks.
    7. Add Ridge Cap: Install the ridge cap last to seal the peak of the roof.

    Comparison: Tear-Off vs. Roof-Over

    To help you visualize the trade-offs, here is a quick comparison table.

    FeatureFull Tear-OffRoof-Over (Keep Shingles)
    CostHigher (labor + disposal)Lower (saves labor/disposal)
    Deck InspectionFull visibility and repairBlind installation
    WarrantyUsually validOften voided or limited
    LifespanMaximizes metal roof lifeMay reduce longevity
    Surface QualityFlat, secure baseUneven, potential for noise
    Weight LoadStandard loadIncreased structural load

    Frequently Asked Questions (FAQ)

    1. Will a metal roof be noisy if installed over shingles?

    Yes, it can be. Without a solid deck connection, rain and hail can create more drumming noise. However, using a solid sheathing base (after tear-off) and proper insulation significantly reduces sound transmission.

    2. Can I install metal roofing over two layers of shingles?

    In most jurisdictions, no. Building codes typically prohibit more than two layers of roofing material. If you already have two layers, you must remove them all before installing metal.

    3. Does keeping old shingles affect the R-value (insulation)?

    Marginally. Asphalt shingles offer negligible insulation value. The primary thermal benefit comes from the air gap and reflective properties of the metal, not the old shingles underneath.

    4. How much does it cost to remove old shingles?

    Costs vary by region and roof size, but expect to pay between $1.00 and $3.00 per square foot for tear-off and disposal. While this adds to the upfront cost, it prevents expensive structural repairs later.

    5. What type of underlayment should I use?

    Always use a synthetic underlayment rather than traditional asphalt felt. Synthetic options are more tear-resistant, breathable, and provide better slip resistance for installers.

    6. Will my homeowner’s insurance cover a roof-over?

    Some insurers may increase premiums or deny coverage for roof-overs due to the increased risk of hidden damage and fire spread. Always check with your provider before proceeding.

    Conclusion

    So, should you remove old shingles before installing a metal roof? In the vast majority of cases, yes.

    While keeping the old shingles might save you money upfront, it introduces risks regarding structural integrity, warranty coverage, and moisture management. A full tear-off allows you to inspect and repair the roof deck, ensuring a flat, solid foundation for your new metal roof. This approach maximizes the lifespan of your investment and keeps your home safe from hidden decay.

    Think of your roof as the shield of your home. You wouldn’t patch a hole in a shield with another weak layer; you would replace it properly. The same logic applies here.

    Did you find this guide helpful? Share it with friends who are considering a roofing upgrade, or leave a comment below with your own roofing questions!
  • Metal Over Shingles: The Ultimate Guide

    Metal Over Shingles: The Ultimate Guide

    Have you ever looked up at your aging asphalt shingle roof and wondered if there was a faster, less messy way to replace it? Many homeowners face this dilemma, fearing the high cost and disruption of a full tear-off. You are likely asking yourself: Can you put a metal roof over an existing roof? The short answer is yes, but it requires careful planning and adherence to strict building codes to ensure longevity and safety.

    In this comprehensive guide, we will walk you through everything you need to know about installing metal roofing over shingles. We will cover the structural requirements, cost benefits, potential pitfalls, and step-by-step considerations to help you make an informed decision for your home.

    Is It Structurally Safe to Install Metal Over Shingles?

    Before diving into the aesthetics or cost savings, we must address the most critical factor: structural integrity. Your home’s framing was designed to hold a specific weight load. Adding a new layer of roofing material adds weight, even if metal is lighter than many other materials.

    Understanding the Weight Load

    Asphalt shingles typically weigh between 2.5 to 4 pounds per square foot. Standing seam metal roofs, by comparison, weigh only 1 to 1.5 pounds per square foot. This means that in many cases, replacing heavy shingles with light metal actually reduces the overall load on your roof structure. However, if you are leaving the old shingles in place, you are adding that 1–1.5 lbs/sq ft on top of the existing 3 lbs/sq ft.

    For most modern homes built after 1970, the framing can easily support this additional weight. However, older homes, particularly those with historical timber framing or previous water damage, may not be as robust.

    Expert Tip: Always hire a licensed structural engineer or a certified roofing contractor to inspect your attic and rafters before proceeding. They can determine if your roof deck can handle the combined load of two roofing systems.

    The Condition of the Existing Deck

    The “deck” is the wooden surface (usually plywood or OSB) that holds your shingles. If your current roof has soft spots, rot, or significant water damage, you cannot simply cover it up. Trapping moisture under a new metal roof will accelerate decay and lead to catastrophic failure within a few years. Any compromised sections of the deck must be replaced before installation begins.

    What Are the Benefits of Roofing Over Existing Shingles?

    Why do so many contractors and homeowners choose this method? The advantages go beyond just convenience. Here is a breakdown of why this approach is gaining popularity across the United States.

    1. Significant Cost Savings

    The most immediate benefit is financial. A full roof tear-off involves labor-intensive removal, dumpster rentals, and disposal fees. By skipping the tear-off, you can save between $1,000 and $2,500 depending on the size of your home and local landfill fees. Additionally, the installation process is faster, which reduces labor costs.

    2. Enhanced Insulation and Energy Efficiency

    Leaving the existing shingle layer in place creates an additional thermal barrier. This extra layer can improve your home’s R-value (resistance to heat flow), helping to keep your house cooler in summer and warmer in winter. When combined with proper ventilation strategies, this can lead to noticeable reductions in energy bills.

    3. Reduced Noise and Weather Protection

    During the installation process, your home remains protected from the elements. Since the old roof stays in place, there is no risk of rain leaking into your attic while workers are stripping the old material. Furthermore, the solid base of the old shingles can help dampen the sound of rain or hail hitting the metal panels, addressing a common concern among homeowners.

    4. Environmental Friendliness

    Roofing waste is a major contributor to landfills. According to the EPA, construction and demolition debris accounts for a significant portion of total waste generated in the US. By avoiding a tear-off, you keep tons of asphalt shingles out of the landfill, making this a more sustainable choice for eco-conscious homeowners.

    What Are the Risks and Drawbacks to Consider?

    While the benefits are appealing, it is not all smooth sailing. There are specific risks associated with “roof-over” installations that you must understand to avoid costly mistakes.

    FeatureTear-Off ReplacementRoof-Over Installation
    CostHigher (Labor + Disposal)Lower (No Disposal Fees)
    InspectionFull deck visibilityLimited visibility
    WarrantyOften longer/full coverageMay be voided or limited
    LongevityMaximum potential lifespanSlightly reduced due to heat trap
    Future RepairsEasier to diagnose leaksHarder to locate leak source

    Voided Manufacturer Warranties

    This is a critical point often overlooked. Many metal roofing manufacturers will void their warranty if their product is installed over more than one layer of existing roofing. Always read the fine print of your chosen metal brand. Some may allow it if specific underlayment and ventilation protocols are followed, while others strictly prohibit it.

    Trapped Moisture and Heat

    If the existing shingles are curled or uneven, they can create air pockets. Without proper ventilation, heat and moisture can get trapped between the two layers. This “greenhouse effect” can cause the wood deck to rot from the inside out, even if the metal roof looks perfect from the outside. Proper airflow is non-negotiable.

    Difficulty in Future Inspections

    If you develop a leak five years down the road, identifying the source becomes much harder. Water can travel laterally between the shingles and the metal before dripping into your attic. This makes repairs more complex and potentially more expensive in the long run.

    Can You Put A Metal Roof Over An Existing Roof

    How Is the Installation Process Different?

    Installing metal over shingles is not the same as installing it on a bare deck. The process requires specific techniques to ensure a flat, secure, and ventilated finish.

    Step 1: Preparation and Repair

    First, remove any loose shingles, protruding nails, or vent pipes that are no longer needed. Secure any loose shingles with roofing cement. Ensure the roof surface is as flat as possible.

    Step 2: Installing Furring Strips (Battens)

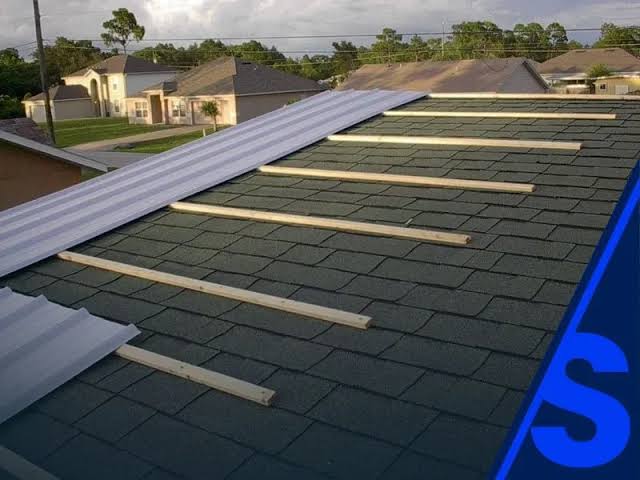
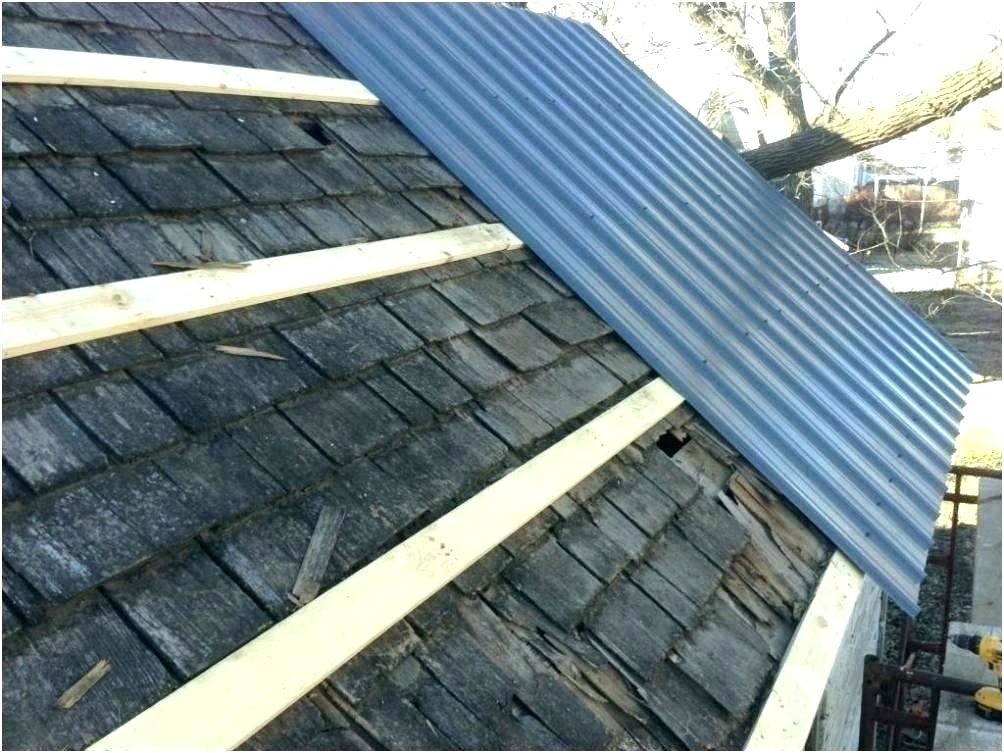
    You should never screw metal panels directly into old shingles. Instead, install horizontal or vertical furring strips (also known as battens). These are usually 1×4 or 2×4 wooden strips spaced 24 inches apart.

    • Why? Battens create a level surface over the uneven shingles.
    • Ventilation: They create an air channel between the old roof and the new metal, allowing heat and moisture to escape. This is crucial for preventing condensation buildup.

    Step 3: Adding Underlayment

    A high-quality synthetic underlayment should be installed over the battens or directly over the shingles (depending on the batten system used). This acts as a secondary water barrier. For more details on roofing materials and standards, you can refer to general construction guidelines on Wikipedia.

    Step 4: Panel Installation

    The metal panels are then screwed into the battens, not the deck. Use screws with rubber washers designed for metal roofing to prevent leaks. Ensure that the screws are driven straight and not over-tightened, which can damage the washer.

    Frequently Asked Questions (FAQ)

    1. Can I put a metal roof over two layers of shingles?

    Generally, no. Most building codes in the US limit roofing to two layers total. If you already have two layers of shingles, you must tear them off before installing metal. Even if code allows it, the unevenness and weight make it highly inadvisable.

    2. Will my homeowner’s insurance cover a roof-over installation?

    Most insurance companies accept metal roofs installed over shingles, provided the installation meets local building codes and manufacturer specifications. However, some insurers may offer lower premiums for a full tear-off because it eliminates the risk of hidden deck damage. Always check with your provider.

    3. Does installing metal over shingles affect resale value?

    Yes, positively. Metal roofs are known for their durability (40–70 years) and energy efficiency. As long as the installation is professional and disclosed properly, it can increase your home’s curb appeal and market value. Buyers appreciate the low maintenance aspect.

    4. How long does a metal roof last when installed over shingles?

    A properly installed metal roof can last 40 to 70 years. However, the underlying shingles will eventually degrade. While the metal protects them from rain, heat buildup can shorten the life of the organic materials beneath. The metal itself will remain intact, but the system’s overall performance relies on the initial condition of the shingles.

    5. Do I need a permit to install a metal roof over my existing roof?

    Yes, in almost all jurisdictions in the US, you need a building permit for re-roofing. The inspector will check the structural load and ensure the installation meets fire and wind resistance codes. Skipping permits can lead to fines and issues when selling your home.

    Conclusion

    So, can you put a metal roof over an existing roof? Absolutely. It is a viable, cost-effective, and environmentally friendly option for many homeowners. By saving on disposal costs and gaining an extra layer of insulation, you can upgrade your home’s protection without breaking the bank.

    However, success depends on execution. You must ensure your roof structure is sound, use furring strips for ventilation, and choose a metal manufacturer that supports this installation method. Never cut corners on inspection or preparation.

    If you are considering this upgrade, take the time to get multiple quotes from certified metal roofing specialists. Ask them specifically about their experience with roof-over installations and request references.

    Found this guide helpful? Share it with your friends on Facebook or Pinterest who might be contemplating their own roofing projects. Knowledge is power when it comes to protecting your biggest investment—your home!

  • How Long Does A Metal Roof Last On A House?

    How Long Does A Metal Roof Last On A House?

    Are you tired of replacing shingles every decade or worrying about storm damage tearing your roof apart? You are not alone; many homeowners are seeking a more permanent solution to protect their biggest investment. If you have been asking yourself, “how long does a metal roof last on a house,” the answer is likely much longer than you expect, offering peace of mind for generations.

    Unlike traditional asphalt shingles that degrade under UV rays and temperature fluctuations, modern metal roofing systems are engineered for extreme longevity. In this comprehensive guide, we will break down exactly what determines the lifespan of your roof, compare different metal types, and provide actionable maintenance tips to ensure your roof lasts as long as possible.

    The Short Answer: 40 to 70 Years

    When homeowners ask about the longevity of metal roofing, the general consensus among industry experts is impressive. On average, a properly installed metal roof will last between 40 and 70 years.

    To put this in perspective, the average lifespan of an asphalt shingle roof is only 12 to 20 years. This means that while you might replace an asphalt roof three or four times over the life of your home, a metal roof could potentially last the entire lifetime of the structure itself.

    However, “metal” is a broad category. The specific material you choose plays a massive role in these numbers. Let’s dive deeper into the specifics.

    Factors That Influence Metal Roof Longevity

    While the 40-70 year range is standard, several variables can push your roof toward the lower or higher end of that spectrum. Understanding these factors helps you make an informed purchasing decision.

    1. Type of Metal Material

    Not all metals are created equal. Here is a breakdown of the most common materials and their expected lifespans:

    • Galvanized Steel (G-90): The most affordable option. With proper coating, it lasts 40–60 years. It is strong but prone to rust if the coating is scratched.
    • Aluminum: Excellent for coastal areas due to its natural resistance to salt corrosion. Expect a lifespan of 50+ years.
    • Copper: The gold standard for longevity. Copper roofs can last 100+ years, often outliving the building they cover. They develop a protective patina over time.
    • Zinc: Similar to copper, zinc is self-healing and can last 80–100 years. It is expensive but requires minimal maintenance.

    2. Quality of Installation

    This is arguably the most critical factor. A high-quality metal panel installed poorly will fail prematurely. Issues such as improper fastening, lack of expansion joints, or incorrect flashing can lead to leaks and wind uplift damage. Always hire a contractor who specializes in metal roofing, not just general roofing.

    3. Local Climate and Environment

    Your geographic location dictates the wear and tear your roof endures.

    • Coastal Areas: Salt spray accelerates corrosion. Aluminum or stainless steel is recommended here.
    • Heavy Snow Regions: Metal sheds snow well, but ice dams can form at the eaves if insulation is poor.
    • High Heat/UV Areas: Reflective coatings help prevent thermal expansion and contraction, which can loosen fasteners over time.

    4. Maintenance Practices

    While metal roofs are low-maintenance, they are not no-maintenance. Regular inspections and clearing debris can extend the life of your roof significantly.

    How Long Does A Metal Roof Last On A House

    Metal Roof vs. Asphalt Shingles: A Comparison

    To help you visualize the value proposition, let’s look at a direct comparison between metal roofing and traditional asphalt shingles.

    FeatureMetal RoofAsphalt Shingles
    Average Lifespan40–70+ Years12–20 Years
    Initial CostHigher ($8–$14 per sq. ft.)Lower ($3–$5 per sq. ft.)
    MaintenanceLowModerate to High
    Weather ResistanceExcellent (Wind, Fire, Hail)Moderate (Prone to wind/hail damage)
    Energy EfficiencyHigh (Reflects solar heat)Low (Absorbs heat)
    Recyclability100% RecyclableMostly Landfill Waste

    Note: Prices are estimates and vary by region and material type.

    Common Myths About Metal Roofs

    Before you commit, let’s address some frequent misconceptions that might be holding you back.

    Myth 1: Metal roofs are noisy during rain. Fact: Modern metal roofs are installed with solid sheathing and insulation. When installed correctly, they are no louder than any other roof type. In fact, many homeowners find the sound of rain on a metal roof soothing.

    Myth 2: They attract lightning. Fact: Metal does not attract lightning; it simply conducts it. If lightning strikes, a metal roof safely disperses the energy across the surface, reducing the risk of fire compared to combustible materials like wood shakes. For more scientific context on conductivity and materials, you can refer to general physics principles outlined on Wikipedia.

    Myth 3: They dent easily. Fact: While hail can dent thin, low-grade metal, most residential metal roofs use 24-gauge or thicker steel, or durable aluminum. These materials are rated to withstand significant impact without compromising structural integrity.

    Step-by-Step Maintenance Guide

    To maximize the lifespan of your metal roof, follow this simple maintenance routine. You don’t need to be a professional to do most of these tasks.

    1. Bi-Annual Inspections: Check your roof twice a year, ideally in spring and fall. Look for loose fasteners, scratches, or accumulated debris.
    2. Clear Debris: Remove leaves, branches, and pine needles. Trapped moisture under debris can lead to corrosion or mold growth on the underlying structure.
    3. Clean Gutters: Ensure gutters are free-flowing. Clogged gutters cause water to back up under the roof panels, leading to leaks.
    4. Wash Gently: If your roof looks dirty, wash it with a garden hose and a soft-bristle brush. Use a mild detergent mixed with water. Avoid pressure washers, as high pressure can damage the protective coating and force water under the panels.
    5. Touch Up Scratches: If you notice any scratches exposing the bare metal, apply a touch-up paint matched to your roof’s color immediately to prevent rust.

    Frequently Asked Questions (FAQ)

    1. Is a metal roof worth the extra cost?

    Yes, for most homeowners. While the upfront cost is higher, the long-term savings on replacement costs, energy bills, and insurance premiums often make it more cost-effective over 20–30 years. Additionally, it increases home resale value.

    2. Can I walk on my metal roof?

    You should avoid walking on a metal roof unless absolutely necessary. If you must, wear soft-soled shoes and step only on the flat areas where the screws are located (the “flat” part of the panel), not on the ribs. Walking on the ribs can cause them to bend or crack.

    3. Does a metal roof void my homeowner’s insurance?

    No, quite the opposite. Many insurance companies offer discounts (often 5–15%) for metal roofs because they are highly resistant to fire, wind, and hail. Always check with your specific provider for details.

    4. How often should I repaint a metal roof?

    Most modern metal roofs come with Kynar 500 or similar high-quality paint finishes that are warranted for 20–40 years against fading and chalking. You typically do not need to repaint unless the finish is physically damaged or after several decades of exposure.

    5. Will a metal roof interfere with my cell phone signal?

    Generally, no. While metal can block radio waves, modern homes have windows and other openings that allow signals to pass through. If you have a dedicated antenna inside, it might be affected, but for most smartphone users, there is no noticeable difference.

    Conclusion

    So, how long does a metal roof last on a house? With proper installation and minimal maintenance, you can expect 40 to 70 years of reliable protection. For premium materials like copper or zinc, that number can stretch beyond a century.

    Investing in a metal roof is not just about buying a new roof; it’s about buying peace of mind. You eliminate the hassle of frequent replacements, reduce your carbon footprint, and potentially lower your energy bills. It is a smart, sustainable choice for the modern homeowner.

    If you found this guide helpful, please share it with friends or family who are considering a roof replacement. Knowledge is power, and helping others make informed decisions is always a good deed!

  • How Many Square Feet Are In A Square Of Roofing?

    How Many Square Feet Are In A Square Of Roofing?

    Planning a roof replacement or repair can feel overwhelming, especially when contractors start throwing around industry jargon that doesn’t quite make sense to the average homeowner. You might find yourself staring at a quote and wondering, “How many square feet are in a square of roofing?” It is a simple question with a critical answer that directly impacts your budget and material orders.

    Understanding this basic unit of measurement is the first step toward taking control of your home improvement project. In this guide, we will break down the math, explain why this unit exists, and show you how to calculate your needs accurately so you never overpay or under-order again.


    What Is a “Square” in Roofing Terminology?

    If you have never worked in construction, the term “square” can be misleading. In everyday language, a square is a geometric shape. However, in the roofing industry, it is a specific unit of area used to simplify calculations for large surfaces.

    A roofing square is equal to 100 square feet.

    This means that if your roof has an area of 2,500 square feet, it is considered a 25-square roof. This standardization helps contractors, suppliers, and manufacturers communicate efficiently. Instead of saying, “I need enough shingles to cover 1,850 square feet,” a pro will simply say, “I need materials for 18.5 squares.”

    Why Do Roofers Use Squares?

    The primary reason is simplicity and speed. Roofs are large, and dealing with thousands of individual square feet can lead to calculation errors during quick estimates. By grouping every 100 square feet into one “square,” the numbers become more manageable.

    • Easier Material Ordering: Shingles and underlayment are often sold by the square or in bundles that equate to a fraction of a square.
    • Standardized Pricing: Most contractors quote prices per square (e.g., $350 per square), making it easier for homeowners to compare bids.
    • Reduced Error: It minimizes the risk of misplacing zeros when calculating large areas.

    How to Calculate Your Roof’s Square Footage

    Before you can determine how many squares you need, you must accurately measure your roof’s total square footage. While it might seem tempting to just use your home’s floor plan, this method is often inaccurate because roofs extend beyond the walls (overhangs) and have complex pitches.

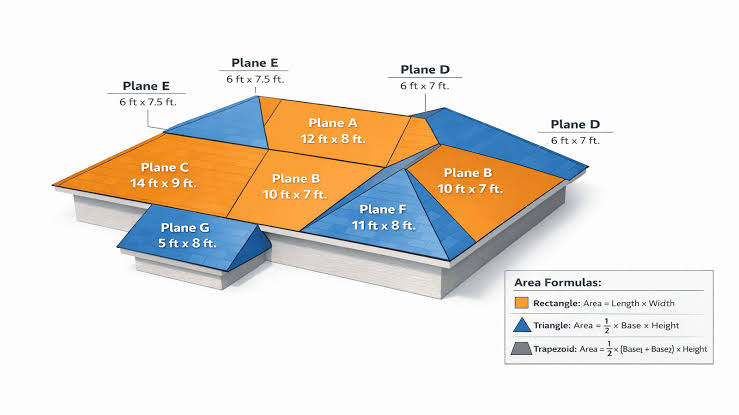
    Step 1: Measure Each Plane

    Break your roof down into individual rectangular planes. For each section:

    1. Measure the length from ridge to eave (or edge to edge).
    2. Measure the width along the eave.
    3. Multiply length by width to get the area of that plane.

    Example: If one section is 40 feet long and 20 feet wide, the area is 800 square feet.

    Step 2: Account for Overhangs

    Do not forget the eaves and rakes. Measure any overhanging sections separately and add them to your total. Even a small 6-inch overhang can add significant square footage across the perimeter of a large home.

    Step 3: Sum the Areas

    Add the square footage of all planes together to get your total gross square footage.

    Step 4: Convert to Squares

    Divide your total square footage by 100.

    Formula: Total Square Feet ÷ 100 = Number of Squares

    Example: 2,400 sq ft ÷ 100 = 24 Squares.

    How Many Square Feet Are In A Square Of Roofing

    The Critical Factor: Roof Pitch and Waste

    Knowing the flat footprint of your roof is not enough. The steepness of your roof, known as the pitch, dramatically affects the actual surface area. A steep roof has more surface area than a flat roof covering the same floor space.

    Understanding Roof Pitch

    Roof pitch is expressed as a ratio of vertical rise to horizontal run (e.g., 6/12). This means for every 12 inches you go horizontally, the roof rises 6 inches vertically.

    To get the true surface area, you must apply a pitch multiplier. You can find these multipliers in standard roofing charts or use the Pythagorean theorem.

    Roof PitchMultiplierImpact on Area
    4/121.054+5.4%
    6/121.118+11.8%
    8/121.202+20.2%
    12/121.414+41.4%

    Note: For detailed mathematical definitions of geometric slopes, you can refer to general resources on Wikipedia.

    Calculating Waste Factor

    You cannot buy exactly the amount of material needed for the exact square footage. Cutting shingles to fit valleys, hips, and ridges creates waste. Additionally, mistakes happen.

    • Simple Gable Roof: Add 10% waste factor.
    • Complex Roof (Multiple Valleys/Hips): Add 15–20% waste factor.

    Final Calculation Example:

    1. Flat Area: 2,000 sq ft (20 Squares)
    2. Pitch Adjustment (6/12 pitch): 2,000 x 1.118 = 2,236 sq ft
    3. Waste Factor (15%): 2,236 x 1.15 = 2,571 sq ft
    4. Total Squares Needed: 2,571 ÷ 100 = 25.71 Squares (Round up to 26 Squares)

    Materials Per Square: What Do You Actually Buy?

    Once you know your square count, you need to translate that into bundles of shingles or rolls of underlayment. This varies by material type, but here are the industry standards for asphalt shingles, the most common roofing material in the US.

    Asphalt Shingles

    • Bundles per Square: Typically 3 bundles make 1 square.
    • Shingles per Bundle: Usually contains 20–26 shingles, depending on the brand and style.
    • Weight: A square of asphalt shingles weighs between 200 to 350 pounds.

    Other Materials

    • Wood Shakes: Often require 4 bundles per square due to thicker spacing.
    • Metal Roofing: Sold by linear feet or panels, not typically by the “square” in the same way, though coverage is still calculated in square feet.
    • Slate/Tile: Much heavier and often requires specialized structural support. Coverage varies significantly by tile size.

    Pro Tip: Always check the manufacturer’s specifications on the bundle wrapper. Some architectural or premium shingles may require 4 or even 5 bundles to cover one square due to their thickness and exposure requirements.


    Common Mistakes When Estimating Roof Squares

    Even with the right formula, homeowners and DIYers often stumble. Here are the most frequent errors to avoid:

    1. Ignoring the Chimneys and Vents: While small, these penetrations require flashing and extra cutting. While they don’t add much area, they increase labor and waste.
    2. Using Floor Plan Square Footage: Your home’s living area is not your roof area. A two-story house with a 2,000 sq ft footprint might only have a 1,000 sq ft roof if it’s a simple gable, or much more if it’s complex. Never assume 1:1 correlation.
    3. Forgetting Dormers: Dormers add significant surface area. Measure each dormer face separately and add it to the total.
    4. Rounding Down: Always round up when ordering materials. Running short mid-project means delaying work while waiting for a new delivery, which risks weather exposure to the open roof deck.

    FAQ Section

    Q1: Does a square of roofing always equal 100 square feet?

    A: Yes. In the US roofing industry, a “square” is universally defined as 100 square feet. This standard applies regardless of the roofing material (asphalt, metal, tile, etc.).

    Q2: How many bundles of shingles do I need for one square?

    A: For standard 3-tab asphalt shingles, you typically need 3 bundles to cover one square (100 sq ft). For thicker architectural shingles, check the label, as some may require 4 bundles per square.

    Q3: Can I measure my roof from the ground?

    A: You can get a rough estimate using ground measurements and photos, but it is not accurate for ordering materials. Factors like pitch, overhangs, and complex angles are hard to judge from the ground. For precise quotes, professionals use laser measures or drone technology.

    Q4: Why do contractors charge per square instead of per square foot?

    A: Charging per square simplifies the billing process. It allows for quicker mental math during negotiations and aligns with how materials are packaged and shipped. It also helps buffer minor measurement discrepancies without renegotiating every single foot.

    Q5: How much does a square of roofing cost?

    A: Costs vary widely based on material and location. As of recent trends, asphalt shingles might range from $350 to $550 per square installed, while metal or slate can exceed $1,000 per square. Always get multiple local quotes for accurate pricing.

    Q6: Is there a difference between a “square” and a “bundle”?

    A: Yes. A square is a unit of area (100 sq ft). A bundle is a physical package of shingles. It usually takes 3 bundles to make one square, but this depends on the shingle type.


    Conclusion

    Understanding how many square feet are in a square of roofing is fundamental to any successful roofing project. Remember, one square equals 100 square feet. By accurately measuring your roof’s planes, adjusting for pitch, and adding a waste factor, you can order the right amount of material and avoid costly delays.

    Whether you are hiring a professional or tackling a small shed roof yourself, this knowledge empowers you to speak the same language as contractors and verify quotes with confidence. Don’t let measurement errors eat into your budget.

    Found this guide helpful? Share it with friends or family who are planning home improvements, and bookmark it for your next renovation project! Accurate measurements save money—start calculating today.

  • Can You Put A Metal Roof Over A Metal Roof?

    Can You Put A Metal Roof Over A Metal Roof?

    Have you noticed your existing metal roof showing signs of wear, such as fading paint or minor leaks, and are you dreading the high cost and mess of a full tear-off? Many homeowners in the US face this dilemma, asking themselves, “Can you put a metal roof over a metal roof?” The short answer is yes, but it requires careful planning and adherence to specific structural guidelines to ensure longevity and safety.

    In this comprehensive guide, we will explore the feasibility, benefits, and potential pitfalls of installing a new metal roof over an existing one. We’ll break down the technical requirements so you can make an informed decision that protects your home and your wallet.

    Is It Structurally Safe to Install Metal Over Metal?

    Before picking up a hammer, the most critical question is whether your home’s frame can handle the extra weight. While metal roofing is significantly lighter than traditional asphalt shingles or clay tiles, adding a second layer does increase the load on your roof trusses and walls.

    Generally, a standard standing seam metal roof weighs between 1 to 1.5 pounds per square foot. If you are installing over an existing metal roof, you are adding roughly another pound per square foot. For most modern homes built after the 1970s, this additional load is negligible. However, older homes or those with compromised structural integrity may not support the dual layers.

    Key Structural Considerations:

    • Load Capacity: Consult a structural engineer if your home is older than 40 years.
    • Snow Load: If you live in areas like Minnesota or Maine, consider the cumulative weight of two roof layers plus heavy snowfall.
    • Local Codes: Always check with your local building department. Some municipalities strictly prohibit double-layer roofing regardless of material.

    According to general construction principles outlined by resources like Wikipedia’s entry on Roofing, proper load distribution is essential for any overlay project to prevent long-term structural fatigue.

    What Are the Benefits of a Metal-over-Metal Installation?

    Choosing to install a new metal roof over an old one isn’t just about laziness; it offers several tangible advantages for homeowners looking to maximize value.

    1. Significant Cost Savings

    The most immediate benefit is financial. A full tear-off involves labor costs for removing the old roof, dumpster fees for disposal, and potential repairs to the decking exposed during removal. By skipping the tear-off, you can save 20% to 30% on total project costs.

    2. Enhanced Insulation and Energy Efficiency

    An additional layer of metal, combined with the air gap created by battens or strapping, acts as a thermal break. This can improve your home’s energy efficiency by reducing heat transfer. In hot US climates like Arizona or Texas, this can lead to noticeable reductions in cooling bills.

    3. Environmental Friendliness

    Roofing waste is a major contributor to landfills. By leaving the old roof in place, you keep tons of steel or aluminum out of the waste stream. This “green” approach appeals to eco-conscious homeowners and aligns with sustainable building practices.

    4. Reduced Installation Time

    Without the days spent stripping the old roof, the installation process is faster. This means your home is exposed to the elements for a shorter period, reducing the risk of water damage during unexpected rainstorms.

    Can You Put A Metal Roof Over A Metal Roof

    What Are the Risks and Drawbacks to Consider?

    While the benefits are appealing, ignoring the risks can lead to costly failures. It is crucial to weigh these downsides carefully.

    FeatureProsCons
    CostLower labor and disposal fees.May require expensive furring strips to level the surface.
    DurabilityDouble protection against elements.Trapped moisture can cause hidden corrosion.
    AestheticsFresh look without structural change.Existing wrinkles or dents may telegraph through the new roof.
    MaintenanceEasier initial install.Harder to inspect the lower roof for leaks later.

    The Moisture Trap Danger

    The biggest technical risk is trapping moisture between the two metal layers. If the existing roof has minor leaks or condensation issues, sealing it under a new roof can accelerate corrosion. Metal roofs need to “breathe.” Without proper ventilation strategies, such as using vertical battens, you risk creating a greenhouse effect that rots any underlying wood decking and rusts the old metal.

    Warranty Voidance

    Many manufacturers of new metal roofing panels will void their warranty if installed over an existing roof. They cannot guarantee the performance of their product if the substrate (the old roof) is uneven or unstable. Always read the fine print or choose a manufacturer that explicitly allows overlays.

    How to Properly Install a Metal Roof Over an Existing One

    If you decide to proceed, proper preparation is non-negotiable. Here is a step-by-step approach to ensuring a successful installation.

    Step 1: Inspect and Repair the Existing Roof

    Walk the roof thoroughly. Look for loose fasteners, severe corrosion, or active leaks.

    • Action: Replace any rotten wood decking visible from the attic.
    • Action: Tighten all loose screws on the existing metal roof.
    • Action: Seal any minor gaps with high-quality urethane sealant.

    Step 2: Install Furring Strips (Battens)

    Never install new metal directly flat against old metal. You must create an air gap.

    • Material: Use 1×4 or 2×4 pressure-treated wood battens or metal z-clips.
    • Spacing: Install battens vertically, spaced 24 inches on center (or according to the new panel’s specifications).
    • Purpose: This creates a ventilation channel that allows moisture to escape and prevents the new roof from conforming to the imperfections of the old one.

    Step 3: Add Underlayment (Optional but Recommended)

    While not always required for metal-over-metal, adding a synthetic underlayment over the battens provides an extra layer of protection against wind-driven rain and condensation. Ensure it is breathable to maintain airflow.

    Step 4: Install the New Metal Panels

    Follow the manufacturer’s instructions precisely.

    • Fastening: Use long enough screws to penetrate through the new panel, the batten, the old metal, and into the roof deck. Standard screws will not be long enough. You typically need screws that are at least 1.5 to 2 inches longer than usual.
    • Alignment: Ensure panels are straight to avoid aesthetic issues.

    Frequently Asked Questions (FAQ)

    1. Will putting a metal roof over metal void my homeowner’s insurance?

    Not necessarily, but it depends on your provider. Some insurers view overlays as higher risk due to potential hidden damage. It is vital to disclose the installation method to your insurance agent beforehand to ensure you remain covered.

    2. Can I install metal over metal if the old roof is leaking?

    No. You must fix all active leaks before installing the new roof. Installing a new roof over a leaking one simply traps the water, leading to rapid rot of the roof deck and structural damage. The existing roof must be watertight and structurally sound.

    3. Does the color of the old roof matter?

    The color itself doesn’t affect structural integrity, but a dark old roof can absorb more heat. However, since you are installing battens and a new reflective metal layer, the impact of the old color on your home’s interior temperature will be minimal.

    4. How long does a metal-over-metal roof last?

    If installed correctly with proper ventilation, the new metal roof should last just as long as if it were installed on bare decking—typically 40 to 70 years. The lifespan depends more on the quality of the new metal (gauge and coating) than the presence of the old roof.

    5. Do I need a permit for this type of installation?

    Yes, in most US jurisdictions, replacing a roof requires a building permit, even if you are not tearing off the old material. The permit process ensures that the added weight and installation methods meet local safety codes.

    Conclusion

    So, can you put a metal roof over a metal roof? Yes, you can, and it can be a smart, cost-effective solution for many homeowners. By saving on disposal costs and installation time, you get a durable, energy-efficient upgrade without the hassle of a full tear-off.

    However, success hinges on three factors: structural integrity, moisture management, and proper fastening. Never skip the inspection phase, and always use battens to create a ventilated air gap. If you are unsure about the condition of your current roof, consult a professional roofing contractor who specializes in metal installations.

    Did you find this guide helpful? Share it with your friends on Facebook or Pinterest who might be considering a roof upgrade! Let’s help more homeowners make smarter, safer choices for their properties.

  • How to Add a Porch Roof to an Existing Roof

    How to Add a Porch Roof to an Existing Roof

    Adding extra living space to your home doesn’t always require a massive renovation. Often, homeowners simply want a sheltered area to enjoy their morning coffee or protect their front door from the elements. However, integrating a new structure with your current home can feel daunting. If you are wondering how to add a porch roof to an existing roof, you are not alone. This project requires precision, but with the right guidance, it is entirely achievable.

    In this guide, we will walk you through the process, ensuring your new porch is safe, weatherproof, and aesthetically pleasing. We will focus on practical steps that prioritize structural integrity and long-term durability.

    Is It Possible to Attach a New Roof to an Old One?

    Before picking up a hammer, you must understand the structural implications. The short answer is yes, but it depends on your existing roof’s condition and local building codes.

    When you attach a new roof to an existing one, you are creating what builders call a “valley.” This is where two roof slopes meet. Valleys are critical because they channel large volumes of water. If not sealed correctly, they are the number one cause of leaks in home additions.

    According to general construction principles, your existing roof must be in good shape. If your current shingles are curling or the decking is soft, you need to repair the main roof first. You cannot build a stable addition on a failing foundation.

    Pro Tip: Always check with your local building department. Most jurisdictions require a permit for structural changes. Ignoring this can lead to fines or issues when selling your home.

    What Are the Best Design Options for a Porch Roof?

    Choosing the right style affects both cost and complexity. Here are the three most common designs for attaching a porch roof:

    1. The Shed Roof (Single Slope)

    This is the easiest design for DIYers. It slopes in one direction, away from the house.

    • Pros: Simple framing, easier drainage, lower cost.
    • Cons: May look less traditional on certain architectural styles.

    2. The Gable Roof

    This creates a triangular peak. It often matches the main house’s roofline.

    • Pros: Aesthetically pleasing, excellent ventilation potential.
    • Cons: Complex framing, requires precise cutting of rafters.

    3. The Hip Roof

    All sides slope downwards to the walls.

    • Pros: Very stable in high winds, elegant appearance.
    • Cons: Most difficult to frame, higher material waste.

    For most beginners asking how to add a porch roof to an existing roof, the shed roof is the recommended starting point due to its simplicity.

    Essential Tools and Materials Checklist

    Preparation is half the battle. Gathering everything beforehand prevents mid-project delays.

    Tools Needed:

    • Circular saw and miter saw
    • Drill/driver with assorted bits
    • Level (4-foot minimum)
    • Chalk line
    • Ladder and safety harness
    • Caulking gun

    Materials Needed:

    • Pressure-treated lumber (2x6s or 2x8s for rafters)
    • Ledger board (same width as rafters)
    • Roofing shingles (match existing if possible)
    • Ice and water shield (for the valley)
    • Step flashing and valley metal
    • Structural screws or lag bolts
    • Drip edge
    How To Add A Porch Roof To An Existing Roof

    Step-by-Step Guide: How to Build the Frame

    Follow these steps carefully. Safety is paramount; always use proper fall protection when working on roofs.

    Step 1: Install the Ledger Board

    The ledger board attaches directly to your house’s wall and supports the inner ends of the porch rafters.

    1. Determine the height of your porch roof. It should slope down at least 1/4 inch per foot for proper drainage.
    2. Mark a level line on the house wall where the top of the ledger will sit.
    3. Cut a piece of pressure-treated lumber to length.
    4. Secure the ledger to the house studs using lag bolts or structural screws. Do not just nail it. You need deep penetration into the framing studs for safety.

    Step 2: Set the Outer Beam

    You need support on the outer edge of the porch.

    1. Install vertical posts (4×4 or 6×6) on concrete footings. Check your local code for footing depth—usually below the frost line.
    2. Place a horizontal beam across the tops of these posts.
    3. Ensure this beam is perfectly level and parallel to the ledger board.

    Step 3: Install the Rafters

    Rafters bridge the gap between the ledger board and the outer beam.

    1. Cut your rafters to size. Remember to account for the overhang (usually 6–12 inches).
    2. Space them 16 inches or 24 inches on center, matching your existing roof spacing if possible.
    3. Use joist hangers to attach rafters to the ledger board and the outer beam. This provides a strong mechanical connection.

    How to Flash the Connection Properly

    This is the most critical technical step. Poor flashing leads to water damage inside your walls.

    1. Remove Shingles: Carefully remove the shingles on the existing roof where the new porch roof will tie in. Expose about 12–18 inches of the roof deck.
    2. Install Ice and Water Shield: Apply a self-adhering waterproof membrane over the exposed deck and up the wall slightly. This acts as a secondary barrier against water.
    3. Install Valley Metal: Place a W-shaped metal valley liner over the joint where the two roofs meet. This channels water away efficiently.
    4. Step Flashing: As you lay new shingles on the porch roof, interweave them with step flashing pieces that tuck under the existing shingles of the main house. This ensures water flows over the flashing, not under it.

    For more detailed information on roofing materials and standards, you can refer to Wikipedia’s article on Roofing.

    Choosing the Right Roofing Material

    Should you match your existing roof? Ideally, yes. Consistency looks better and maintains home value.

    MaterialDurabilityCostDifficulty to Install
    Asphalt Shingles15–30 YearsLowEasy
    Metal Roofing40–70 YearsMedium-HighModerate
    Clay Tiles50+ YearsHighHard

    If you cannot find an exact match for your asphalt shingles, choose a complementary color. Avoid clashing tones that make the addition look like an afterthought.

    Common Mistakes to Avoid

    Even experienced DIYers make errors. Here is what to watch out for:

    • Insufficient Slope: If the roof is too flat, water will pool. Always maintain a minimum slope of 1:12 (1 inch drop per 12 inches of run).
    • Ignoring Ventilation: Trapped heat can damage shingles and increase energy bills. Consider adding soffit vents or a ridge vent if the design allows.
    • Weak Connections: Never rely solely on nails for structural connections. Use approved metal connectors and structural screws.
    • Skipping Permits: This cannot be stressed enough. Unpermitted work can void your homeowner’s insurance.

    FAQ Section

    Do I need a permit to add a porch roof?

    In most US municipalities, yes. Any structural alteration to your home’s envelope typically requires a building permit. Check with your local planning department before starting.

    Can I tie a new roof into old shingles?

    No. You must remove the existing shingles in the connection area to install proper flashing and ice/water shield. Tying directly into old shingles guarantees leaks.

    How much does it cost to add a porch roof?

    Costs vary widely by size and material. A small, simple shed-style porch roof might cost $1,500–$3,000 in materials. Hiring a professional can double or triple this cost.

    What is the best slope for a porch roof?

    A slope of 3:12 to 4:12 is ideal for asphalt shingles. It provides good drainage while remaining easy to walk on during maintenance.

    Can I do this project alone?

    While possible, it is highly recommended to have at least one helper. Handling long lumber and aligning rafters is difficult and dangerous for a single person.

    Conclusion

    Learning how to add a porch roof to an existing roof is a rewarding project that enhances your home’s functionality and curb appeal. By focusing on proper flashing, solid structural connections, and correct slope, you can build a durable extension that lasts for decades.

    Remember, patience is key. Take your time with the flashing details, as this is where most failures occur. If you feel unsure about any structural aspect, consult a professional engineer or contractor.

    Did you find this guide helpful? Share it with your friends on social media who might be planning their own home improvements! Happy building!

  • Is It Ok To Put A Metal Roof Over Shingles?

    Is It Ok To Put A Metal Roof Over Shingles?

    Have you been staring at your aging asphalt shingles, dreading the mess, cost, and hassle of a full tear-off? You are not alone; many homeowners look for shortcuts that save time without compromising quality. The burning question on everyone’s mind is: Is it ok to put a metal roof over shingles? The short answer is yes, but with significant caveats that can make or break your investment.

    In this comprehensive guide, we will dive deep into the structural, financial, and practical implications of installing metal roofing directly over existing shingles. We will help you decide if this method is right for your home, ensuring you avoid costly mistakes while maximizing the lifespan of your new roof.

    Why Consider Installing Metal Over Shingles?

    Before we get into the technical “how-to,” let’s address the “why.” For many US homeowners, the primary driver is convenience. Removing old asphalt shingles is a labor-intensive process that generates massive amounts of waste. By leaving the old layer in place, you skip the demolition phase entirely.

    However, it is not just about laziness. There are legitimate benefits to this approach, provided your home is a good candidate. Let’s explore the advantages and disadvantages to give you a balanced view.

    The Pros: Speed and Savings

    • Cost Efficiency: You save money on labor costs associated with tear-off and dumpster fees for debris disposal. According to industry estimates, skipping the tear-off can reduce total project costs by 10–15%.
    • Time-Saving: Without the removal process, installation can be completed in half the time. This means less exposure to the elements for your home’s interior.
    • Added Insulation: The existing shingle layer acts as an additional thermal barrier, potentially improving your home’s energy efficiency slightly.
    • Less Mess: No nails flying everywhere, no dust clouds, and no heavy dumpsters blocking your driveway for weeks.

    The Cons: Hidden Risks

    • Trapped Moisture: If there is any existing water damage or rot, covering it up traps the problem. This can lead to accelerated decay of the roof deck.
    • Weight Load: While metal is light, adding it to existing shingles adds weight. Most modern homes can handle this, but older structures might need an engineering assessment.
    • Voided Warranties: Some metal roofing manufacturers will void their warranty if installed over more than one layer of existing roofing. Always check the fine print.
    • Aesthetic Issues: If the old shingles are curled or uneven, the new metal roof may not lie flat, leading to visible waves or “oil-canning” effects.

    Critical Pre-Installation Checks

    You cannot simply screw metal panels onto old shingles and hope for the best. Proper preparation is vital. Before you hire a contractor or start a DIY project, you must verify three key conditions.

    1. Structural Integrity Assessment

    Your roof deck (the wood beneath the shingles) must be solid. If the previous roof had leaks, the plywood or OSB sheathing might be soft or rotted.

    • Action Step: Walk the attic space. Look for dark stains, sagging beams, or daylight coming through cracks.
    • Rule of Thumb: If more than 10% of the deck shows signs of rot, a full tear-off is recommended to replace the damaged wood.

    2. Local Building Codes

    Building codes vary significantly across the United States. Some municipalities strictly prohibit more than two layers of roofing material.

    • Check First: Contact your local building department. Ignoring code can result in fines or issues when selling your home later.
    • Reference: For general standards on roofing materials and safety, you can refer to guidelines outlined by organizations like the International Code Council or basic material properties found on Wikipedia.

    3. Condition of Existing Shingles

    The existing shingles must be relatively flat. If they are severely curled, buckled, or missing in large patches, they do not provide a stable base.

    • Fix It First: Replace any missing shingles and nail down any lifted edges before installing the metal underlayment.
    Is It Ok To Put A Metal Roof Over Shingles

    Step-by-Step Installation Overview

    If you have cleared the checks above, here is how the process generally works. Note that this is a simplified overview; professional installation is highly recommended for warranty purposes.

    1. Prepare the Surface: Clean the roof of moss, debris, and loose granules. Secure any loose shingles with roofing nails.
    2. Install Furring Strips (Battens): This is crucial. You should never install metal panels directly against asphalt shingles. Install horizontal or vertical wooden furring strips (usually 1x4s) over the shingles. This creates an air gap that allows moisture to escape and prevents heat buildup.
    3. Apply Underlayment: Place a high-quality synthetic underlayment over the battens or directly over the shingles (depending on the specific system used). This acts as a secondary water barrier.
    4. Install Metal Panels: Start from the eave and work your way up. Use screws with rubber washers designed specifically for metal roofing. Ensure screws penetrate into the roof deck, not just the shingles.
    5. Flashings and Trim: Pay extra attention to valleys, chimneys, and vents. Proper flashing is where most leaks occur in overlay jobs.

    Metal Roof vs. Tear-Off: A Comparison

    To help you visualize the trade-offs, here is a quick comparison table.

    FeatureMetal Over ShinglesFull Tear-Off & Replace
    CostLower (Save on labor/disposal)Higher
    TimeFast (1-3 days)Slow (3-7 days)
    InspectionCannot inspect deck fullyFull deck inspection possible
    WarrantyMay be limitedFull manufacturer warranty
    LongevityGood (if prep is done right)Excellent (best practice)

    People Also Ask: Common Questions Answered

    Does putting metal over shingles void the warranty?

    It depends on the manufacturer. Many top-tier metal roofing brands require a clean deck for their premium warranties. However, some offer specific “retrofit” warranties for overlay installations. Always read the warranty documentation before purchasing materials.

    Will the extra weight damage my house?

    In most cases, no. Asphalt shingles weigh about 2–3 pounds per square foot, while standing seam metal roofs weigh about 1–1.5 pounds per square foot. Even combined, the load is typically well within the design limits of standard residential framing. However, if you live in an area with heavy snow loads, consult a structural engineer.

    Can I do this myself (DIY)?

    While technically possible, it is not recommended for beginners. Metal roofing requires precise cutting, flashing details, and understanding of thermal expansion. A mistake in flashing can lead to leaks that are difficult to trace because the water is trapped between two layers.

    How long will a metal roof last over shingles?

    A properly installed metal roof can last 40–70 years. However, if moisture is trapped underneath due to poor ventilation or existing leaks, the lifespan could be reduced. Ensuring proper airflow via furring strips is key to maximizing longevity.

    What type of metal roof is best for overlays?

    Standing seam metal roofs are generally preferred over corrugated or exposed-fastener panels for overlays. They are more durable, handle thermal expansion better, and have fewer penetration points where leaks can occur.

    Expert Insight: The Importance of Ventilation

    One of the biggest myths is that metal roofs “breathe.” They do not. Asphalt shingles also do not breathe. When you combine them, you create a sandwich that can trap heat and moisture.

    According to roofing experts, the single most important factor in a successful overlay is ventilation. By using furring strips (battens), you create a channel for air to flow from the eave to the ridge. This airflow prevents condensation from forming on the underside of the metal panels, which could otherwise drip onto your shingles and cause rot.

    Pro Tip: If your current attic ventilation is poor, fix it before installing the new roof. Add ridge vents or soffit vents to ensure your attic stays dry and cool.

    Conclusion

    So, is it ok to put a metal roof over shingles? Yes, it is a viable, cost-effective option for many homeowners, provided the existing roof is in decent condition and local codes allow it. It offers speed, savings, and added insulation. However, it requires meticulous preparation, particularly regarding ventilation and flashing, to avoid trapping moisture.

    If your current shingles are flat, dry, and securely attached, an overlay can be a smart move. But if you suspect hidden rot or major structural issues, bite the bullet and pay for the tear-off. Your future self will thank you for the peace of mind.

    Found this guide helpful? Share it with your neighbors who might be considering a roof upgrade! Don’t forget to bookmark this page for future reference as you plan your home improvement projects.

  • Metal Over Shingles: The Ultimate Guide

    Metal Over Shingles: The Ultimate Guide

    Are you staring at your aging asphalt shingle roof, dreading the messy, expensive process of tearing it off? You are not alone. Many homeowners in the US face this dilemma every year, looking for a solution that saves time, money, and hassle. The burning question on everyone’s mind is: Can you put a metal roof on top of shingles?

    The short answer is yes, in most cases, you absolutely can. However, it is not a simple “slap it on and forget it” situation. There are structural, legal, and technical factors you must consider before hiring a contractor or starting a DIY project. In this guide, we will break down everything you need to know about installing metal roofing over existing shingles, ensuring you make an informed decision that protects your biggest investment—your home.

    Is It Structurally Safe to Add Metal Over Shingles?

    Before you buy materials, you must address the weight load. One of the biggest myths about metal roofing is that it is heavy. In reality, modern standing seam metal roofs or metal shingles are significantly lighter than traditional asphalt shingles, clay tiles, or slate.

    Weight Comparison

    • Asphalt Shingles: Approx. 2–3.5 lbs per square foot.
    • Metal Roofing: Approx. 1–1.5 lbs per square foot.

    When you install metal over shingles, you are adding the weight of the metal panels plus the fastening system (battens or strapping). While this is generally less than the weight of a new layer of heavy architectural shingles, your roof deck must still be sound.

    Critical Check: If your current roof has multiple layers of shingles (some older homes have 2 or 3 layers), the combined weight might exceed the design load of your roof trusses. Always consult a structural engineer or a licensed roofing contractor to inspect your attic and framing if you suspect your roof is old or has been re-roofed before.

    What Do Local Building Codes Say?

    Just because it can be done physically doesn’t mean it is legal in your area. Building codes vary significantly by state, county, and even municipality in the US.

    Most jurisdictions follow the International Residential Code (IRC), which typically allows for two layers of roofing material. However, some strict areas prohibit any overlay to ensure inspectors can verify the condition of the roof deck.

    Pro Tip: Never assume. Call your local building department or check their website. Ignoring code requirements can lead to fines, forced removal of the new roof, and issues when selling your home.

    For a deeper understanding of building standards and safety regulations, you can refer to general construction guidelines on Wikipedia.

    Can You Put A Metal Roof On Top Of Shingles

    Pros and Cons of Installing Metal Over Shingles

    To help you decide, let’s look at the clear advantages and disadvantages of this method.

    The Advantages

    1. Cost Savings: You save on labor and disposal fees. Tearing off old shingles is labor-intensive and requires paying for dumpster rentals and landfill fees. By skipping this step, you can reduce the total project cost by 15–25%.
    2. Less Mess and Noise: Tear-offs create massive amounts of dust, debris, and noise. Installing over shingles keeps your yard clean and reduces disturbance to your neighbors.
    3. Added Insulation: The existing shingle layer acts as an additional thermal barrier, potentially improving your home’s energy efficiency slightly.
    4. Protection During Installation: Your home remains protected from rain during the installation process since the old roof stays intact until the new one is fully secured.

    The Disadvantages

    1. Hidden Damage: You cannot inspect the wood decking for rot, mold, or water damage. If there is underlying decay, covering it up will only worsen the problem over time.
    2. Voided Warranties: Some metal roofing manufacturers may void their warranty if installed over existing shingles. Always read the fine print.
    3. Aesthetic Issues: If the old shingles are curled or uneven, the new metal roof may not lie perfectly flat, leading to visible waviness or “telegraphing.”
    4. Ventilation Challenges: Proper airflow is crucial for metal roofs to prevent condensation. Adding a layer over shingles can complicate ventilation if not done correctly.

    Step-by-Step Installation Overview

    If you decide to proceed, here is how professionals typically approach the installation. Note that this is a complex job; improper installation can lead to leaks and wind damage.

    Step 1: Inspection and Preparation

    Walk the roof and secure any loose shingles. Replace any visibly damaged flashing around chimneys and vents. Ensure the roof surface is as flat as possible.

    Step 2: Install Furring Strips (Battens)

    Do not screw metal panels directly into the shingles. You must create a flat, ventilated surface.

    • Use 1×4 or 2×4 wooden furring strips (battens).
    • Attach them vertically through the shingles and into the roof rafters/trusses using long screws.
    • Space them according to the metal panel manufacturer’s specifications (usually 24 inches on center).

    Step 3: Add Drip Edge and Flashing

    Install new drip edges along the eaves and rakes. This ensures water flows away from the fascia board. Update all pipe boots and valley flashings.

    Step 4: Install the Metal Panels

    Start from the bottom corner and work your way up and across.

    • Use screws with rubber washers designed for metal roofing.
    • Follow the specific overlap instructions for your panel type (standing seam vs. corrugated).
    • Ensure screws are driven straight—not too tight (which crushes the washer) and not too loose.

    Step 5: Ridge Cap and Final Inspection

    Install the ridge cap to seal the peak of the roof. Conduct a final inspection to ensure all fasteners are secure and no gaps exist.

    Cost Comparison: Tear-Off vs. Overlay

    Understanding the financial impact is key. Here is a simplified breakdown for an average 2,000 sq. ft. home.

    ItemTear-Off & ReplaceMetal Over Shingles
    Labor (Removal)$1,000 – $2,000$0
    Disposal Fees$300 – $600$0
    Deck RepairVariable (High Risk)$0 (Hidden Risk)
    Material CostSameSame + Battens
    Installation LaborStandardSlightly Faster
    Total Estimated SavingsN/A$1,500 – $3,000

    Note: Prices vary by region and material quality.

    Frequently Asked Questions (FAQ)

    1. Will putting metal over shingles void my homeowner’s insurance?

    Generally, no. Most insurance companies care more about the age and condition of the roof rather than the installation method. However, you should notify your insurer after the upgrade, as metal roofs often qualify for discounts due to their durability and fire resistance.

    2. Can I install metal roofing over two layers of shingles?

    It is risky. Most building codes allow only two layers total. If you already have two layers of shingles, you likely cannot add a third layer (the metal). You would need to tear off at least one layer. Always check local codes.

    3. Does metal roofing cause interference with Wi-Fi or cell signals?

    This is a common concern. While metal can block signals, most modern homes have routers inside the house, and cell towers are powerful enough to penetrate roofs. If you have a weak signal, a simple Wi-Fi extender or a cellular repeater can solve the issue. It is rarely a dealbreaker.

    4. How long does a metal roof last compared to shingles?

    Asphalt shingles typically last 15–25 years. A properly installed metal roof can last 40–70 years. Even if installed over shingles, the metal itself will outlast the shingles beneath it, providing decades of protection.

    5. What type of metal roofing is best for overlaying?

    Standing seam metal roofs are often preferred for overlays because they are lightweight and have concealed fasteners, reducing the risk of leaks. Corrugated metal is also popular but requires careful sealing of exposed fasteners.

    Conclusion

    So, can you put a metal roof on top of shingles? Yes, you can, and for many homeowners, it is a smart, cost-effective choice. It saves money on disposal, reduces installation time, and adds a durable, long-lasting layer of protection to your home.

    However, it is not without risks. You must ensure your roof structure is sound, your local codes permit it, and you hire a qualified installer who understands the nuances of overlay installations. If your current shingles are severely damaged or curled, a tear-off might be the safer route despite the higher cost.

    Take the time to get multiple quotes, ask about warranties, and inspect your attic for any signs of existing leaks. Your roof is your home’s first line of defense against the elements—make sure it’s built to last.

    Found this guide helpful? Share it with your friends on Facebook or Pinterest who are considering a roof upgrade! Don’t forget to leave a comment below if you have more questions about metal roofing.