Have you ever looked at your home’s angled roofline and imagined a stunning outdoor oasis perched above the rest? It is a dream many homeowners share, but the reality of how to build a rooftop deck on a sloped roof is far more complex than standard patio construction. You are likely worried about structural integrity, water drainage, and whether your current roof can even support the weight.
You are not alone in these concerns. Transforming a sloped surface into a usable flat space requires precise engineering and careful planning. This guide will walk you through the critical steps, safety considerations, and material choices needed to turn that architectural challenge into your new favorite retreat.
Is It Structurally Possible to Build on a Slope?
Before you buy a single board or bolt, you must answer the most critical question: Can your house hold it? A sloped roof is designed to shed water and snow, not to support the live load of people, furniture, and planters.
According to general building standards, a typical residential roof is designed to handle a “dead load” (the weight of the roof itself) and a “live load” (snow or maintenance workers), usually around 20 to 40 pounds per square foot (psf). However, a deck often requires a capacity of 60 to 100 psf or more, depending on local codes and intended use.
Expert Insight: “Attempting to build a deck directly on rafters without reinforcing the underlying structure is a recipe for catastrophic failure. Always consult a licensed structural engineer before breaking ground.”
You will likely need to install new support beams that transfer the deck’s weight directly to the home’s load-bearing walls or foundation, bypassing the existing roof framing entirely. This is non-negotiable for safety.
What Are the Key Challenges of Sloped Roof Decks?
Building on a slope introduces unique hurdles that flat roofs do not face. Understanding these early will save you time, money, and potential headaches.
1. Creating a Level Surface
The most obvious issue is gravity. To have a usable deck, you must create a level platform on an angled surface. This requires a framework of varying heights, known as “sleepers” or “pedestals,” to compensate for the pitch.
2. Waterproofing and Drainage
Water is the enemy of any roof structure. When you build a deck over a roof, you trap moisture between the decking and the roofing membrane. If water pools here, it can lead to rot, mold, and leaks into your living space below.
3. Wind Uplift
Rooftop decks are exposed to higher wind speeds than ground-level patios. On a sloped roof, wind can get underneath the deck structure, creating uplift forces that can tear the deck away if not properly anchored.
| Challenge | Risk Factor | Mitigation Strategy |
|---|---|---|
| Structural Load | High | Reinforce framing; consult an engineer. |
| Water Trapping | High | Use elevated pedestal systems; ensure proper slope away from the house. |
| Wind Uplift | Medium-High | Use mechanical fasteners; avoid loose-laid pavers. |
| Access | Medium | Plan for safe stairways or ladder access points. |
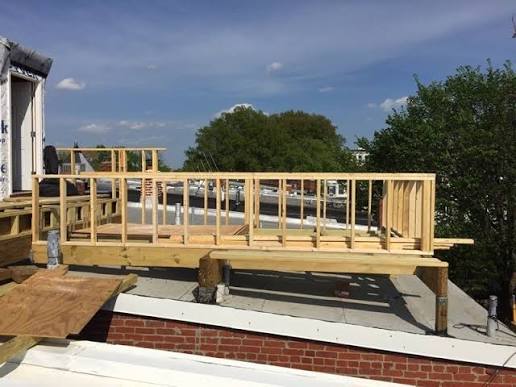
How Do You Prepare the Existing Roof Structure?
Preparation is 80% of the job. You cannot simply lay wood over shingles. Here is the step-by-step preparation process:
- Inspect the Roof Membrane: Ensure the existing roof is in excellent condition. If you have asphalt shingles, they may need to be replaced with a more durable, seamless membrane like EPDM or TPO, which are better suited for covering under decks.
- Install a Protective Layer: Place a root barrier and a heavy-duty waterproof membrane over the existing roof. This layer protects the roof from punctures caused by the deck framework.
- Check for Ventilation: Your roof needs to breathe. Ensure that soffit and ridge vents are not blocked by your new deck structure. Poor ventilation can lead to heat buildup and moisture accumulation.
For more detailed information on roofing materials and their properties, you can refer to this comprehensive resource on Roofing materials.
What Materials Are Best for Rooftop Decks?
Choosing the right materials is crucial for longevity and weight management. You want materials that are durable, lightweight, and slip-resistant.
Composite Decking
Composite boards are made from a mix of wood fibers and plastic. They are heavier than wood but require zero maintenance. They do not rot, splinter, or fade easily.
- Pros: Low maintenance, long lifespan, consistent color.
- Cons: Higher upfront cost, can get hot in direct sun.
Pressure-Treated Wood
This is the most common choice for DIYers due to its affordability.
- Pros: Cheap, easy to cut and install, widely available.
- Cons: Requires annual sealing/staining, prone to warping and cracking over time.
Aluminum Decking
Aluminum is becoming increasingly popular for rooftop applications.
- Pros: Extremely lightweight, fire-resistant, reflects heat, completely waterproof.
- Cons: Expensive, can be noisy when rain hits it, industrial aesthetic.
Recommendation: For a sloped roof where weight is a concern, aluminum or lightweight composite systems are often the best choice. Avoid heavy natural stone or concrete pavers unless your structural engineer explicitly approves the load capacity.
Step-by-Step: Building the Framework
Once you have your permits and engineering plans, here is how you physically build the structure. Note that this is a generalized overview; always follow your specific engineered drawings.
Step 1: Install the Primary Beams
Install heavy-duty steel or laminated wood beams that run perpendicular to the roof slope. These beams must be anchored to the home’s structural frame, not just the roof sheathing. Use galvanized steel brackets and bolts for maximum strength.
Step 2: Create the Leveling System
This is the trickiest part. You need to build a grid of joists that sit on top of the primary beams. Because the roof is sloped, the height of the supports under each joist will vary.
- Use adjustable steel pedestals or custom-cut wooden blocks.
- Use a laser level to ensure the top of every joist is perfectly flat.
- Maintain a slight slope (1/4 inch per foot) away from the house on the deck surface itself to encourage water runoff.
Step 3: Add Cross-Bracing
To prevent racking (side-to-side movement) and handle wind uplift, install diagonal cross-bracing between the joists. This stiffens the entire framework.
Step 4: Install the Decking
Lay your chosen decking material perpendicular to the joists.
- Leave a 1/8-inch gap between boards for drainage and expansion.
- Use hidden fasteners for a cleaner look and to reduce tripping hazards.
- Ensure all screws are stainless steel or coated to prevent rust stains.
Step 5: Install Railings and Safety Features
Railings are mandatory for any deck more than 30 inches off the ground. On a rooftop, wind loads are higher, so railing posts must be bolted directly into the structural framing, not just the deck boards.
Frequently Asked Questions (FAQ)
1. Do I need a permit to build a rooftop deck?
Yes, almost certainly. Rooftop decks involve structural changes and safety hazards. Most municipalities require a building permit, and some may require zoning approval if the deck is visible from the street or neighbors. Check with your local building department first.
2. How much does it cost to build a rooftop deck on a sloped roof?
Costs vary widely based on size and materials, but expect to pay significantly more than a ground-level deck. Due to the need for structural reinforcement and specialized labor, costs can range from $50 to $100+ per square foot. A small 10×10 deck could easily cost $15,000 to $25,000.
3. Can I build a rooftop deck myself (DIY)?
While you can handle the decking installation, the structural framing and engineering should not be a DIY project. Incorrectly calculated loads can lead to roof collapse. Hire a professional for the structural work, and then you can tackle the cosmetic decking installation if you are experienced.
4. How do I handle snow removal on a rooftop deck?
Snow adds significant weight. Design your deck with easy access for removal. Avoid using metal shovels that can damage the decking; use plastic shovels or a roof rake. Ensure your drainage system is clear so melting snow can escape quickly.
5. What is the best way to waterproof under the deck?
The best method is a “hot-mopped” asphalt membrane or a single-ply EPDM rubber membrane. These create a seamless barrier that is less likely to leak than sheet-based products. Always have a professional roofer install this layer before the deck framework goes up.
Conclusion
Learning how to build a rooftop deck on a sloped roof is a journey that balances ambition with engineering precision. While the challenges of weight, water, and wind are real, they are not insurmountable. With proper structural reinforcement, high-quality waterproofing, and the right materials, you can create a breathtaking outdoor space that adds significant value and enjoyment to your home.
Remember, safety is paramount. Never skip the structural assessment. Once your deck is built, take a moment to enjoy the view—you earned it!
Did you find this guide helpful? Share it with your friends on social media who are dreaming of their own rooftop oasis!