Transporting your kayak can feel daunting, especially if you are worried about it shifting or falling off during highway drives. You want to protect your expensive gear and ensure the safety of other drivers on the road. This guide will show you exactly how to tie down a kayak on a roof rack with confidence, using proven techniques that prioritize stability and ease.
Why Properly Securing Your Kayak Matters
Before we dive into the knots and straps, it is crucial to understand the stakes. A loose kayak is not just an inconvenience; it is a severe hazard. According to traffic safety data, unsecured loads contribute to thousands of accidents annually in the United States. Beyond safety, improper tying can warp your kayak’s hull or crack its shell due to wind resistance and vibration.
By mastering the art of securing your vessel, you extend the lifespan of your equipment and drive with peace of mind. Whether you own a lightweight recreational kayak or a heavy-duty touring model, the principles of tension and balance remain the same.
What Equipment Do You Need?
You do not need professional rigging gear to secure a kayak effectively. However, using the right tools makes the process faster and safer. Here is a checklist of essentials:
- Roof Rack System: Ensure your crossbars are spaced appropriately for your vehicle.
- Cam Straps or Ratchet Straps: We recommend high-quality cam straps with a minimum breaking strength of 1,500 lbs. Avoid bungee cords as primary hold-downs; they stretch too much.
- Kayak Stackers or Cradles: These help keep the kayak upright and stable.
- Bow and Stern Lines: Essential for preventing forward and backward movement.
- Pool Noodles or Foam Blocks: Useful if you do not have dedicated cradles, providing cushioning between the kayak and the rack.
Pro Tip: Always inspect your straps for fraying or UV damage before every trip. Sun exposure weakens nylon over time.
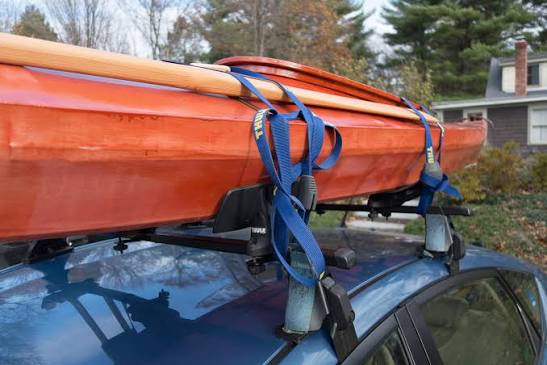
Step-by-Step Guide: How To Tie Down A Kayak On A Roof Rack
Follow these precise steps to ensure your kayak is locked in tight. We will break this down into manageable phases.
Step 1: Positioning the Kayak
Place the kayak upside down on the roof rack. This position lowers the center of gravity and protects the cockpit from wind uplift. If you have two kayaks, place them side-by-side with a small gap (about 2–3 inches) between them to prevent rubbing.
Ensure the kayak is centered left-to-right on the crossbars. An uneven load can cause your vehicle to handle poorly, especially in windy conditions.
Step 2: Securing the Hull to the Crossbars
This is the most critical part of learning how to tie down a kayak on a roof rack.
- Thread your strap under the crossbar.
- Bring the strap up and over the kayak hull.
- Pass the strap back under the crossbar on the other side.
- Tighten the strap until it is snug. You should be able to slide a flat hand under the strap, but not a fist.
Important: Do not overtighten. Excessive pressure can deform the plastic or fiberglass hull. If you hear creaking sounds from the kayak, loosen the straps slightly.
Step 3: Adding Bow and Stern Lines
Straps alone are not enough. Wind can lift the front or back of the kayak, creating leverage that might snap your main straps.
- Bow Line: Attach one end to the bow handle of the kayak and the other to a secure anchor point on your vehicle’s front bumper or frame.
- Stern Line: Repeat the process at the rear, attaching to the rear bumper or tow hitch.
These lines should have slight tension. They act as insurance policies against sudden stops or strong gusts.
Step 4: The Final Shake Test
Once everything is tied, give the kayak a firm shake. It should not move more than an inch in any direction. If it shifts, re-tighten the main straps. Check that no loose strap ends are flapping in the wind, as these can distract other drivers or get caught in wheels.
Common Mistakes to Avoid
Even experienced paddlers make errors. Here are the most frequent pitfalls:
| Mistake | Consequence | Solution |
|---|---|---|
| Using Bungee Cords Only | High risk of snapping under tension | Use nylon cam straps for main hold-downs |
| Over-tightening Straps | Hull deformation or cracks | Tighten until snug, not crushed |
| Ignoring Bow/Stern Lines | Kayak lifts off at high speeds | Always use auxiliary lines |
| Poor Strap Routing | Straps slip off crossbars | Ensure straps loop under the bar securely |
Understanding Wind Resistance and Aerodynamics
Did you know that a kayak acts like a sail when placed on a roof? According to Wikipedia’s entry on drag coefficient, objects with large surface areas facing the wind create significant drag. This increases fuel consumption and puts stress on your rack system.
To minimize this:
- Keep speeds below 65 mph when possible.
- Avoid sudden lane changes.
- Be extra cautious in crosswinds.
If you frequently transport kayaks, consider investing in aerodynamic fairings or enclosed roof boxes designed for water sports. These reduce wind noise and improve gas mileage.
FAQ Section
1. Can I tie down a kayak without a roof rack?
Technically, yes, but it is not recommended for long distances. You can use foam blocks placed directly on the roof and run straps through the car doors. However, this method risks damaging your car’s paint and roof structure. For regular transport, install a proper roof rack system.
2. How tight should the straps be?
The straps should be tight enough that the kayak does not shift, but loose enough that you do not distort the hull. A good rule of thumb is the “hand test”: you should be able to slide your flat hand under the strap with some resistance, but not easily pull it up.
3. Is it better to transport a kayak upside down or right side up?
Upside down is generally safer for hard-shell kayaks. It protects the cockpit from rain and debris and provides a flatter surface for the straps to grip. However, inflatable kayaks should always be transported right side up to avoid puncturing the valves or seams.
4. Do I need special straps for sea kayaks vs. river kayaks?
No, the type of strap does not change based on the kayak style. However, sea kayaks are often longer and heavier, so you may need longer straps and additional support points. Ensure your roof rack is rated for the total weight of your specific kayak.
5. How often should I check the straps during a trip?
Check your straps after the first 15 minutes of driving, as vibrations can cause initial settling. After that, check them every time you stop for fuel or rest breaks. This habit takes only seconds and can prevent disasters.
Conclusion
Learning how to tie down a kayak on a roof rack is a fundamental skill for any outdoor enthusiast. By following the steps outlined above—positioning correctly, using quality straps, and adding bow and stern lines—you ensure a safe journey for both you and your gear. Remember, safety is not just about avoiding accidents; it is about respecting the equipment that brings you joy.
Don’t let fear of transport keep you from the water. With practice, securing your kayak will become second nature. Share this guide with your paddling buddies on social media to help them stay safe on the road too! Happy paddling!