Tag: Roof Inspection

  • Negotiate a New Roof When Buying a Home

    Negotiate a New Roof When Buying a Home

    Buying a house is one of the most significant financial decisions you will ever make, but discovering an aging or damaged roof during the process can quickly turn excitement into anxiety. You are not alone in this dilemma; many buyers face the daunting question of how to negotiate a new roof when buying a home without losing the deal or breaking the bank. This guide will walk you through strategic steps to handle this situation with confidence, ensuring you get a fair deal while securing your future investment.

    Why the Roof Matters More Than You Think

    The roof is often referred to as the “fifth wall” of a house, yet it is frequently overlooked until problems arise. A compromised roof doesn’t just mean leaks; it can lead to mold growth, structural damage, and significantly higher insurance premiums.

    According to recent data from the National Association of Realtors (NAR), home inspections reveal issues in nearly 80% of transactions, with roofing being among the top five concerns. Understanding the severity of the issue is the first step in effective negotiation.

    The Cost of Ignoring the Issue

    If you proceed without addressing a faulty roof, you risk:

    • Immediate Repair Costs: Average roof replacement costs in the US range from $5,000 to $15,000, depending on materials and size.
    • Insurance Hurdles: Many insurers refuse to cover homes with roofs older than 20 years.
    • Resale Value Drop: A known roof issue can lower your home’s market value by 5–10%.

    Step 1: Get a Professional Roof Inspection

    Before you even start negotiating, you need hard data. A general home inspector might note “shingles are curling,” but they are not roofing specialists.

    Hire a licensed roofing contractor to perform a detailed inspection. Ask for a written report that includes:

    1. Estimated remaining lifespan of the current roof.
    2. Photos of specific damage (missing shingles, rusted flashing, soft spots).
    3. A detailed quote for repair vs. full replacement.

    This documentation is your leverage. Without it, your request for concessions may seem arbitrary to the seller.

    Step 2: Determine Your Negotiation Strategy

    Once you have the inspection report, you need to decide what you want. There are three primary ways to handle a roof issue during negotiations.

    Option A: Request a Price Reduction

    Asking for a lower purchase price is often the cleanest method. You reduce the mortgage amount and potentially lower long-term interest costs. However, remember that you will need cash on hand immediately after closing to fix the roof.

    Option B: Ask for Seller Credits (Closing Costs)

    This is often the most popular choice for buyers who are short on cash. You ask the seller to provide a credit at closing, which can be used toward closing costs or prepaid items. This frees up your cash reserves to pay the roofer directly after you take ownership.

    Option C: Require Repairs Before Closing

    You can ask the seller to fix the roof before the sale finalizes. While this sounds ideal, it comes with risks:

    • The seller may choose the cheapest contractor.
    • Workmanship may be poor.
    • It can delay the closing date.

    Expert Tip: Most real estate agents recommend Option B. It gives you control over the quality of the work and the choice of contractor.

    How To Negotiate A New Roof When Buying A Home

    Comparison: Negotiation Methods

    MethodProsConsBest For
    Price ReductionLowers loan amount; simple transaction.Requires cash on hand post-closing.Buyers with extra savings.
    Seller CreditFrees up cash for repairs; easy to process.May not cover full cost if underestimated.Buyers tight on liquid cash.
    Seller RepairNo immediate out-of-pocket expense.Risk of poor quality; delays closing.Minor repairs only.

    How to Present Your Case to the Seller

    Negotiation is not about demanding; it is about problem-solving. Approach the conversation with empathy but firmness.

    1. Share the Evidence: Provide the professional inspection report and the contractor’s quote. Transparency builds trust.
    2. Be Reasonable: If the roof has 5 years of life left, do not ask for a full replacement. Ask for a repair credit based on the remaining depreciation.
    3. Use the “Walk-Away” Power: If the seller refuses to budge on a major safety issue, be prepared to walk away. Often, the fear of losing a qualified buyer motivates sellers to compromise.

    “In my 10 years of experience, I’ve found that sellers are more willing to offer credits when presented with a specific, third-party estimate rather than a vague request for ‘roof help.’” — Senior Real Estate Analyst.

    For more context on property standards and consumer rights, you can refer to general housing guidelines on Wikipedia.

    Common Pitfalls to Avoid

    • Lowballing the Estimate: Do not guess the cost. If the roofer says $12,000, ask for $12,000. Underestimating leaves you paying the difference.
    • Ignoring Local Market Conditions: In a hot seller’s market, you may need to accept a smaller credit. In a buyer’s market, you have more leverage to demand full coverage.
    • Focusing Only on Shingles: Ensure the inspection covers gutters, flashing, vents, and the underlying decking. These hidden components can be costly to fix.

    FAQ Section

    1. Can I back out of the contract if the roof is bad?

    Yes, most purchase agreements include an inspection contingency. If the inspection reveals significant defects and you cannot reach an agreement with the seller on repairs or credits, you can typically cancel the contract and retrieve your earnest money deposit. Always check your specific contract terms.

    2. What if the seller refuses to replace the roof?

    If the seller refuses a full replacement, negotiate for a substantial credit. You can then use that money to patch the roof now and plan for a full replacement in a few years. Alternatively, you can ask for a warranty transfer if the existing roof is relatively new.

    3. Does homeowners insurance cover roof replacement?

    Generally, no. Insurance covers sudden, accidental damage (like a storm or fallen tree). It does not cover wear and tear, age, or lack of maintenance. This is why negotiating the cost during the purchase is critical.

    4. How old is too old for a roof?

    Most asphalt shingle roofs last 15–25 years. If the roof is over 20 years old, even if it looks fine, it is near the end of its life. Use this as leverage to negotiate a replacement credit, as you will likely need to replace it soon anyway.

    5. Should I get multiple quotes?

    Absolutely. Get at least two or three quotes from licensed local roofers. This ensures the price you are asking for is accurate and defensible during negotiations. Sellers are more likely to agree if they see consistent pricing from multiple professionals.

    Conclusion

    Learning how to negotiate a new roof when buying a home is a crucial skill that can save you thousands of dollars and prevent future headaches. By relying on professional inspections, choosing the right negotiation strategy (preferably seller credits), and maintaining clear communication, you can turn a potential deal-breaker into a manageable part of the buying process.

    Remember, knowledge is your best leverage. Don’t rush the inspection phase, and don’t be afraid to ask for what you need to feel secure in your new home.

    Found this guide helpful? Share it with friends or family who are currently house hunting! Let’s help everyone buy with confidence. 🏠🔨
  • How Many Layers Are on Your Roof?

    How Many Layers Are on Your Roof?

    Have you ever looked up at your home and wondered what exactly is protecting your family from the elements? It is a common concern for homeowners, especially when planning renovations or noticing minor leaks. Knowing how many layers of materials does your roof currently have is not just a trivia question; it is a critical factor in determining your next steps for repair, replacement, and overall home safety.

    In this guide, we will walk you through everything you need to know about roof layers, building codes, and why this specific detail matters more than you might think.

    Why Does the Number of Roof Layers Matter?

    You might be thinking, “If one layer protects my home, wouldn’t two be even better?” This is a common misconception. While it may seem like extra padding, multiple layers of roofing material can actually cause significant structural and financial issues.

    Structural Weight Concerns

    Every roofing material has a weight. Asphalt shingles, for example, weigh approximately 2 to 4 pounds per square foot. When you add a second or third layer, you are doubling or tripling that load. Most residential roofs are engineered to support a specific dead load (the weight of the structure itself) plus a live load (snow, rain, workers). Exceeding this limit can lead to sagging rafters, cracked drywall inside your home, or in extreme cases, structural failure.

    Heat Trapping and Energy Efficiency

    Multiple layers trap heat. In the summer, this can cause your attic temperature to skyrocket, forcing your HVAC system to work harder. This leads to higher energy bills and can prematurely age your roofing materials from the inside out due to excessive thermal cycling.

    The “Masking” Effect

    New shingles installed over old ones often conform to the uneven surface of the underlying layer. If the bottom layer has curled, missing, or damaged shingles, the new layer will mirror these imperfections. This prevents proper sealing and makes the new roof look wavy or unprofessional shortly after installation.

    How to Determine Your Current Roof Layers

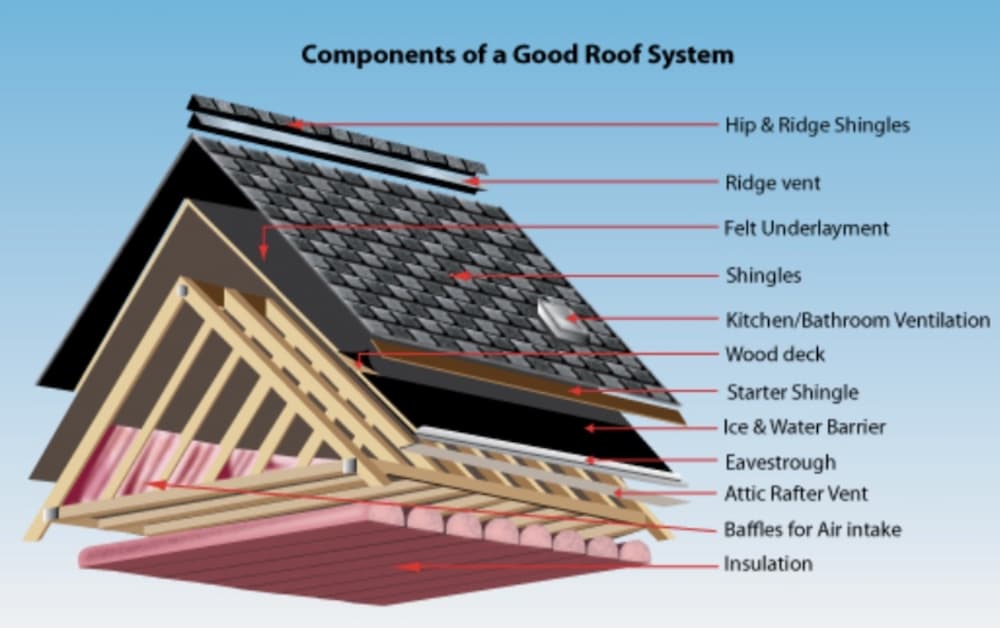
    Unless you have detailed records from previous renovations, figuring out how many layers of materials does your roof currently have requires a bit of detective work. Here are three reliable methods to find out.

    1. Check Your Home Inspection Report

    If you bought your home recently, your pre-purchase home inspection report is the best place to start. Inspectors often note the number of shingle layers visible at the edges, in the attic, or around vent pipes. Look for sections labeled “Roofing” or “Exterior.”

    2. Visual Inspection from the Ground

    Grab a pair of binoculars and walk around your house. Look closely at the edge of the roof (the rake edge) or around chimneys and vent stacks. You may be able to see the distinct thickness of the shingle layers. A single layer of asphalt shingle is relatively thin, while two layers will appear noticeably thicker and may have a “step-down” appearance where the layers meet.

    3. Professional Roof Inspection

    The most accurate method is hiring a licensed roofing contractor. They can safely access the roof and lift a corner of a shingle near a vent or edge to count the layers directly. This is highly recommended if you are considering selling your home or applying for insurance claims.

    What Do Building Codes Say About Multiple Layers?

    Regulations vary by location, but most jurisdictions in the United States follow guidelines similar to the International Residential Code (IRC). Understanding these rules is vital before you decide to overlay new shingles.

    Jurisdiction TypeTypical RuleException
    Most US StatesMax 2 layers of asphalt shinglesNone generally allowed for 3rd layer
    High Wind ZonesOften require tear-off to deckTo ensure proper nailing adhesion
    Heavy Snow AreasStrict weight limits enforcedMay prohibit 2 layers entirely

    According to general building standards, you are typically allowed to have no more than two layers of asphalt shingles. If your roof already has two layers, you must tear off all existing materials down to the roof deck before installing new shingles. Ignoring this can result in failed inspections, voided warranties, and difficulties when selling your property.

    For more detailed information on building standards, you can refer to the International Code Council or general construction principles outlined on Wikipedia.

    How Many Layers Of Materials Does Your Roof Currently Have

    Tear-Off vs. Overlay: Making the Right Choice

    When it is time for a new roof, you have two options: a tear-off (removing old materials) or an overlay (installing over existing materials). Here is a comparison to help you decide.

    Advantages of a Full Tear-Off

    • Inspection of Decking: Removing old shingles allows the roofer to inspect the wood decking for rot, mold, or water damage. Fixing these issues early prevents costly interior repairs later.
    • Better Warranty Coverage: Most major shingle manufacturers (like GAF, Owens Corning, and CertainTeed) offer stronger warranties when their products are installed on a clean deck.
    • Improved Curb Appeal: A fresh start ensures a flat, uniform surface that looks professional and increases home value.
    • Proper Ventilation: It allows for the installation of modern ice and water shields and proper underlayment, which are crucial for longevity.

    Advantages of an Overlay

    • Lower Initial Cost: You save on labor costs associated with hauling away debris and removing old nails.
    • Faster Installation: Without the tear-off process, the job can be completed in half the time.
    • Less Mess: There is significantly less debris and dust generated during the project.

    The Verdict

    While an overlay is cheaper upfront, a tear-off is almost always the better long-term investment. It addresses hidden problems and ensures your new roof lasts its full expected lifespan (typically 20–30 years for asphalt shingles).

    Step-by-Step: What Happens During a Roof Replacement?

    If you determine that you have too many layers or damaged decking, here is what a professional replacement process looks like.

    1. Setup and Protection: The crew will cover your landscaping, windows, and AC units with tarps to protect them from falling debris.
    2. Removal of Old Materials: Workers will strip off the existing shingles, underlayment, and flashing. All nails are removed or hammered flat.
    3. Deck Inspection: The exposed wood deck is inspected for soft spots, rot, or damage. Any compromised boards are replaced.
    4. Installation of Underlayment: A water-resistant barrier (ice and water shield) is installed along the eaves and valleys, followed by synthetic underlayment over the rest of the deck.
    5. Flashing Installation: New metal flashing is installed around chimneys, vents, and walls to prevent water intrusion.
    6. Shingle Installation: New shingles are nailed down according to manufacturer specifications, starting from the bottom edge and working up.
    7. Cleanup: The site is thoroughly cleaned using magnetic rollers to pick up stray nails, and all debris is hauled away.

    FAQ: Common Questions About Roof Layers

    1. Can I put a third layer of shingles on my roof?

    No. In nearly all US jurisdictions, building codes prohibit installing a third layer of asphalt shingles. The weight and inability to properly nail through three layers make it unsafe and non-compliant.

    2. Does having two layers void my homeowner’s insurance?

    Not necessarily, but it can complicate claims. Some insurers may deny coverage for water damage if they determine that improper installation over multiple layers contributed to the leak. Always disclose the number of layers to your insurance provider.

    3. How much does it cost to tear off an old roof?

    The cost varies by region and roof size, but expect to pay between $1,000 and $3,000 for tear-off and disposal fees on an average-sized home. This is usually included in the total quote for a new roof installation.

    4. Will a roof overlay affect my home’s resale value?

    Yes, potentially negatively. Home inspectors will note multiple layers, and savvy buyers may request a price reduction to account for the eventual need for a full tear-off. A single-layer roof is more attractive to buyers.

    5. How can I tell if my roof has only one layer without climbing up?

    Look at the vent pipes protruding from the roof. If the flashing collar around the pipe sits flush with the shingles, it is likely a single layer. If there is a visible “step” or gap between the shingles and the flashing, there may be multiple layers.

    6. Is it cheaper to overlay shingles?

    Yes, initially. You save on labor and disposal fees. However, because the lifespan of the new shingles may be reduced due to heat trapping and uneven surfaces, the cost-per-year of protection may actually be higher.

    Conclusion

    Knowing how many layers of materials does your roof currently have is essential for making informed decisions about your home’s maintenance. While adding a second layer might seem like a quick fix, it often leads to higher long-term costs, potential code violations, and structural risks.

    If you suspect your roof has multiple layers, schedule a professional inspection today. It is better to address these issues proactively than to deal with unexpected leaks or structural damage later.

    Found this guide helpful? Share it with your neighbors on Facebook or Twitter to help them protect their homes too! Don’t forget to bookmark this page for future reference as you plan your home improvement projects.