Adding a covered porch is one of the most rewarding home improvement projects you can undertake. It extends your living space, boosts curb appeal, and provides a sheltered spot to enjoy the outdoors. However, the most critical—and often intimidating—part of this project is connecting the new structure to your home. If done incorrectly, it can lead to disastrous leaks and structural damage.
Many homeowners hesitate at this stage, wondering if they need to hire a professional or if they can handle it themselves. The good news is that with the right preparation and understanding of building science, you can master this task. This guide will walk you through exactly how to tie a porch roof into an existing roof securely, ensuring a watertight seal that lasts for decades.
Why Proper Integration Matters for Your Home’s Integrity
Before we pick up a hammer, it is vital to understand why the connection point is so sensitive. Your existing roof is designed to shed water efficiently. When you interrupt that system with a new roof line, you create a potential entry point for moisture.
According to the Insurance Institute for Business & Home Safety, water intrusion is the leading cause of residential insurance claims in the United States. A poorly tied-in roof doesn’t just leak; it can rot rafters, damage insulation, and promote mold growth inside your walls. Therefore, the goal isn’t just aesthetic alignment; it is structural continuity and hydrological integrity.
Assessing Your Existing Roof Structure
You cannot build a secure connection without knowing what you are connecting to. Every house is different, and assuming your roof structure is standard can lead to costly mistakes.
Identifying Rafters vs. Trusses
The first step is to determine if your existing roof uses stick-framed rafters or engineered trusses.
- Stick-Framed Rafters: These are individual beams cut on-site. They are easier to work with because you can typically cut into the sheathing and attach directly to the rafter tails or add a ledger board.
- Engineered Trusses: These are pre-fabricated triangular units. Warning: You generally cannot cut or notch trusses without compromising their structural integrity. If you have trusses, you must consult a structural engineer. You will likely need to build a standalone porch roof that sits below the existing eaves rather than tying directly into the slope.
Checking Local Building Codes
Building codes vary by municipality, especially regarding snow loads and wind uplift. In the US, most jurisdictions follow the International Residential Code (IRC). Always check with your local building department before starting. You may need a permit, and an inspector will likely want to see the flashing details before the final roofing material is installed.
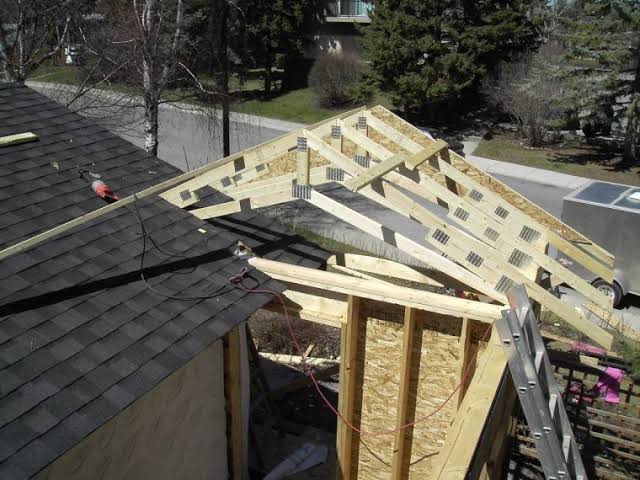
Step-by-Step Guide: How to Tie a Porch Roof Into an Existing Roof
This tutorial assumes you are attaching a sloped porch roof to a side wall of your house, integrating it under the existing shingles. This is known as a “shed roof” or “lean-to” style connection.
Step 1: Prepare the Connection Point
Start by removing the shingles and underlayment from the area where the new roof will meet the house. You need to expose the roof deck (sheathing) and the underlying rafters.
- Remove shingles approximately 2–3 feet up from the planned connection line.
- Carefully pry up nails to avoid damaging reusable shingles if you plan to reuse them (though new shingles are recommended).
- Clean the exposed wood deck of any debris or old adhesive.
Step 2: Install the Ledger Board
The ledger board is the horizontal beam that supports the inner edge of your porch roof rafters. It bears the weight of the new structure.
- Material Selection: Use pressure-treated lumber (minimum 2×8 or 2×10, depending on span) to resist rot.
- Positioning: Level the board against the house wall. It should be positioned so that the top of the porch rafters will sit slightly below the existing roof plane to allow for proper drainage.
- Fastening: Bolt the ledger board directly into the house’s rim joist or wall studs using lag screws or through-bolts. Do not rely solely on nails. For brick or stucco homes, you will need masonry anchors. Ensure there is a slight gap (1/4 inch) between the ledger and the siding to allow for drainage behind the flashing.
Step 3: Frame the Porch Roof
Install your porch rafters perpendicular to the ledger board, extending out to the outer support posts.
- Slope: Ensure a minimum slope of 1/4 inch per foot (preferably 1/2 inch per foot) to ensure water runs off quickly.
- Spacing: Match the spacing of your existing roof rafters (usually 16 or 24 inches on center) if possible, as this simplifies the sheathing process.
- Hangers: Use heavy-duty metal joist hangers to connect the rafters to the ledger board. This provides superior strength compared to toe-nailing.
Step 4: Sheathing and Underlayment
Once the frame is complete, cover it with plywood or OSB sheathing.
- Leave a 1/8-inch gap between sheets for expansion.
- Apply a high-quality synthetic roof underlayment. Synthetic underlayment is preferred over felt paper because it is more resistant to tearing and moisture absorption during the construction phase.
Step 5: The Critical Flashing Process
This is the most important step in learning how to tie a porch roof into an existing roof. Flashing directs water away from the joint.
- Step Flashing: Install L-shaped metal step flashing along the wall intersection. Each piece should slide under the existing shingles above and overlap the shingle below.
- Ice and Water Shield: For extra protection, apply a self-adhering ice and water shield membrane over the joint area, extending at least 12 inches up the existing roof and 12 inches down the new porch roof. This creates a rubberized, watertight barrier.
- Counter Flashing: If your house has siding, install counter flashing over the step flashing to direct water away from the wall.
For a deeper understanding of flashing materials and standards, you can refer to general construction principles outlined on Wikipedia’s Roof Flashing page.
Step 6: Re-shingling and Finishing
Now, integrate the new roofing material with the old.
- Start shingling the porch roof from the bottom up.
- When you reach the junction with the existing roof, weave the new shingles under the existing ones if possible, or use a closed-cut valley method.
- Apply roofing cement sparingly under the edges where the old and new shingles meet.
- Install drip edge flashing on the outer edges of the porch roof to direct water into the gutters.
Common Mistakes to Avoid
Even experienced DIYers can stumble here. Here is a comparison of right vs. wrong approaches:
| Feature | The Right Way | The Wrong Way |
|---|---|---|
| Flashing | Layered step flashing + Ice/Water shield | Caulk only or single piece of metal |
| Ledger Attachment | Bolted into structural framing | Nailed into siding or trim |
| Slope | Minimum 1/4″ per foot | Flat or insufficient pitch |
| Ventilation | Soffit vents aligned with existing flow | Blocked eaves causing heat buildup |
FAQ: Common Questions About Tying in Roof Structures
1. Can I tie a porch roof into an existing roof without removing shingles?
No. Attempting to flash over existing shingles is a recipe for leaks. You must remove shingles to install proper step flashing and ice/water shield underneath the existing layers. Water travels uphill via capillary action; surface-level caulking will eventually fail.
2. Do I need a permit to build a porch roof?
In most US jurisdictions, yes. Any structural alteration to your home’s envelope typically requires a building permit. This ensures your design meets local snow load and wind resistance codes. Skipping this can void your homeowner’s insurance and cause issues when selling your home.
3. What is the best material for the ledger board?
Always use pressure-treated lumber for any wood in contact with or near exterior walls. Cedar or redwood are naturally resistant to rot but are more expensive. Pressure-treated pine is the standard, cost-effective choice for structural framing in the US.
4. How do I handle siding when installing the ledger board?
You should not sandwich the siding between the ledger and the house. Ideally, remove the siding strip where the ledger will go. Install the ledger against the sheathing/studs, then install flashing over the top edge of the ledger before replacing the siding or installing trim. This prevents water from getting trapped behind the ledger.
5. What if my existing roof has trusses?
If your home uses engineered trusses, do not cut them. Instead, build a “standalone” porch roof. This means the porch roof structure is supported entirely by its own posts and beams, and the roofline sits below the existing eaves. You will still need to flash the wall connection, but you won’t be structurally tying into the truss system.
Conclusion
Learning how to tie a porch roof into an existing roof is a blend of carpentry skill and understanding water management. By focusing on a solid ledger board attachment, maintaining proper slope, and, most importantly, installing rigorous flashing, you can create a seamless and durable addition to your home.
Remember, patience is key. Rushing the flashing process is the number one cause of future leaks. Take your time, double-check your levels, and don’t hesitate to consult a professional if your roof structure involves complex trusses.
Did you find this guide helpful? Share it with your fellow DIY enthusiasts on social media or save it for your next weekend project! If you have questions about specific roofing materials, feel free to leave a comment below.