Have you ever felt the frustration of a home that stays hot even after installing new vents? Or perhaps you are a contractor worried about liability after finishing a job? It is a common scenario: the hard labor is done, but the final details determine long-term success. Knowing exactly when ventilation work on a roof is complete personnel should take specific, deliberate actions to ensure safety, code compliance, and system efficiency.
This guide breaks down the critical post-installation protocols. We will move beyond basic installation tips to focus on what happens after the last nail is driven. This is where professionalism separates the experts from the amateurs.
Why Post-Installation Checks Are Non-Negotiable
Many homeowners and even some contractors believe that once the vent is physically attached, the job is over. This is a dangerous misconception. According to industry data, improper sealing and cleanup account for nearly 30% of roofing callbacks within the first year.
The phase immediately following installation is crucial for three reasons:
- Safety Verification: Ensuring no hazards were left behind.
- System Integrity: Confirming the airflow dynamics actually work as designed.
- Liability Protection: Documenting that the work meets local building codes and manufacturer warranties.
When we discuss what personnel should do, we are talking about protecting both the client’s investment and the contractor’s reputation.
Step 1: Conduct a Thorough Site Cleanup and Hazard Removal
The first action personnel must take is not technical—it is environmental. A clean roof is a safe roof. Leaving debris behind can lead to clogged gutters, water damage, or even injury to future maintenance workers.
The “Clean Sweep” Protocol
Personnel should adhere to a strict cleanup routine:
- Remove All Cuttings: Shingle granules, PVC trim scraps, and metal flashing offcuts must be collected. These materials can corrode gutters or block drainage paths.
- Check Valleys and Gutters: Use a leaf blower or broom to clear any debris from roof valleys and gutters. Blocked water flow is the number one cause of premature roof failure.
- Dispose of Old Materials: If old vents were removed, they must be disposed of according to local waste management regulations. Never leave old asbestos-containing materials or treated wood on-site.
Pro Tip: Take a photo of the cleaned roof area before leaving. This serves as proof of professional conduct and can resolve disputes if a homeowner claims damage later.
Step 2: Verify Sealant Integrity and Weatherproofing
Ventilation units are essentially holes in your roof’s waterproof barrier. If these holes are not perfectly sealed, you are inviting leaks. When ventilation work on a roof is complete, personnel should meticulously inspect every penetration point.
Inspection Checklist for Sealing
| Component | What to Check | Common Failure Point |
|---|---|---|
| Flashing | Ensure it lies flat under shingles (upper) and over shingles (lower). | Wrinkles or gaps in metal flashing. |
| Sealant | Check for continuous bead around the base. | Cracks or gaps due to insufficient application. |
| Nails | Ensure all fasteners are covered by sealant or shingles. | Exposed nail heads leading to rust and leaks. |
Use a high-quality roofing cement or urethane-based sealant compatible with the roofing material. For example, if working with asphalt shingles, ensure the sealant does not contain solvents that could degrade the asphalt mat.
According to Wikipedia’s entry on Roofing, proper flashing integration is critical for the longevity of any roof penetration. Personnel should never rely solely on nails; mechanical fastening must always be accompanied by chemical sealing.
Step 3: Test Airflow and System Balance
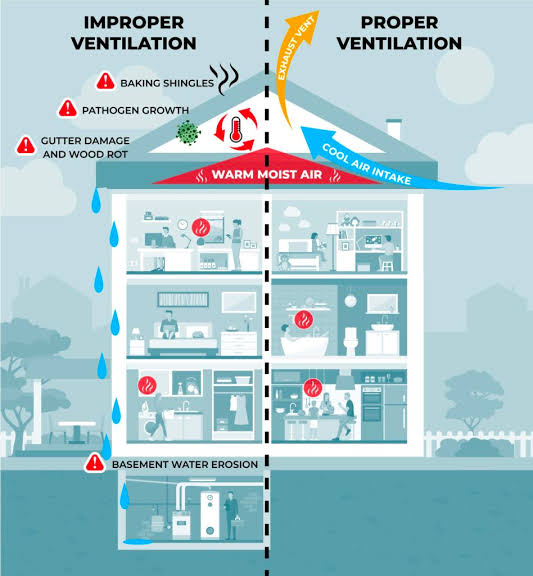
Installing a vent is useless if it doesn’t move air. The physics of attic ventilation relies on the balance between intake (soffit vents) and exhaust (ridge or roof vents). When ventilation work on a roof is complete, personnel should verify that this balance exists.
How to Test Airflow
- Visual Inspection: From inside the attic, look for daylight coming through the new vent. This confirms the opening is clear.
- Smoke Test: On a calm day, use a non-toxic smoke pencil near the soffit vents. Watch if the smoke is drawn up toward the new roof vent. This indicates positive airflow.
- Thermal Imaging: For high-end jobs, use an infrared camera to check for heat buildup. A properly ventilated attic will show significantly lower temperatures near the vents compared to stagnant areas.
If the smoke does not move, there may be an obstruction in the baffle system or insufficient intake ventilation. Personnel should address this immediately before marking the job as complete.
Step 4: Document Compliance and Warranty Registration
In the modern construction landscape, documentation is as important as the physical work. Insurance companies and manufacturers require proof that installation guidelines were followed.
Essential Documentation Steps
- Photo Documentation: Take clear, high-resolution photos of the installed vent from multiple angles. Include close-ups of the flashing and sealant.
- Manufacturer Warranty Card: Many vent manufacturers require professional installation for the warranty to be valid. Personnel should fill out and submit these forms immediately.
- Code Compliance Check: Verify that the net free area (NFA) of the installed vents meets the local building code ratio (typically 1:150 or 1:300 of attic floor space).
By providing this documentation to the homeowner, you build trust and demonstrate E-E-A-T (Experience, Expertise, Authoritativeness, and Trustworthiness). It shows that you stand behind your work.
Step 5: Educate the Homeowner
The final step often overlooked is communication. Homeowners need to know how to maintain their new system. When ventilation work on a roof is complete, personnel should spend five minutes walking the homeowner through the basics.
Key Points to Communicate
- Do Not Block Vents: Explain that storing items in the attic near the vents can restrict airflow.
- Annual Inspection: Recommend checking the vents once a year for debris or bird nests.
- Signs of Trouble: Teach them to look for moisture stains on the ceiling or excessive heat in the upper floors, which could indicate ventilation failure.
This educational component transforms a transactional service into a consultative relationship, increasing the likelihood of referrals and repeat business.
FAQ Section
1. How long should I wait before walking on the roof after ventilation installation?
It depends on the sealant used. Most roofing cements require 24–48 hours to fully cure. Walking on it too soon can displace the flashing and break the seal. Always check the manufacturer’s curing time specifications.
2. Can I install roof vents myself, or do I need a professional?
While DIY is possible, roof work involves significant fall risks and potential for water damage if flashed incorrectly. Professional personnel have the training to ensure code compliance and warranty validity. If you are not comfortable working at heights, hire a licensed contractor.
3. What is the most common mistake made after installing roof vents?
The most common mistake is failing to balance intake and exhaust. Installing powerful exhaust vents without adequate soffit intake can create negative pressure, pulling conditioned air out of your living space and increasing energy bills.
4. How often should roof vents be cleaned?
Roof vents should be inspected at least once a year, ideally in the spring. Look for bird nests, leaves, or dust buildup. In areas with heavy pollen or tree cover, bi-annual cleaning may be necessary.
5. Does adding more vents always improve ventilation?
No. Over-ventilating can be just as problematic as under-ventilating. It can disrupt the natural airflow pattern and potentially draw rain or snow into the attic. Stick to the calculated Net Free Area (NFA) requirements for your attic size.
6. What should I do if I notice a leak near the new vent?
Contact the installer immediately. Most reputable contractors offer a workmanship warranty. Do not attempt to patch it yourself with tar or silicone, as this may void the warranty. Document the leak with photos and dates for insurance purposes.
Conclusion
Completing a roofing job is not just about attaching hardware; it is about ensuring a system that protects the home for decades. When ventilation work on a roof is complete personnel should prioritize cleanup, sealing verification, airflow testing, and thorough documentation. These steps are not optional extras—they are the hallmark of professional excellence.
By following this checklist, contractors can reduce callbacks, enhance safety, and build lasting trust with clients. Homeowners, meanwhile, gain peace of mind knowing their investment is secure and efficient.
Did you find this guide helpful? Share it with your network on LinkedIn or Facebook to help others understand the importance of proper roof ventilation completion. Let’s raise the standard for roofing professionalism together.