Tag: Mobile Home Roof Repair

  • How To Fix A Leaky Roof On A Mobile Home

    How To Fix A Leaky Roof On A Mobile Home

    Water dripping from your ceiling is more than just an annoyance; it is a ticking time bomb for mold, structural rot, and costly repairs. If you are staring at a wet spot and wondering how to fix a leaky roof on a mobile home, you are not alone. This guide provides clear, actionable steps to seal leaks effectively, helping you restore peace of mind and dryness to your living space without breaking the bank.

    Why Do Mobile Home Roofs Leak?

    Before grabbing a toolbox, it is crucial to understand why the leak is happening. Mobile homes (also known as manufactured homes) have unique roofing systems compared to traditional stick-built houses. They often feature low-pitch roofs made of metal or asphalt shingles, which are susceptible to specific types of wear and tear.

    The primary culprit is usually the failure of sealants around protrusions. Vents, skylights, and air conditioning units create breaks in the roofing membrane. Over time, exposure to UV rays, extreme temperature fluctuations, and wind causes these sealants to crack, shrink, or peel away. According to industry data, nearly 80% of roof leaks originate not from the main field of the roof, but from these flashings and penetrations.

    Additionally, mobile homes can shift slightly over time due to foundation settling. This movement can stress the roof seams, particularly in older models with rubberized or TPO (Thermoplastic Olefin) membranes, leading to micro-tears that eventually become significant leaks.

    Tools and Materials You Will Need

    To successfully repair your roof, you need the right equipment. Using inferior materials may save money upfront but will lead to recurring leaks. Here is a checklist of essentials:

    • Safety Gear: Non-slip shoes, safety harness (if the pitch is steep), and sturdy gloves.
    • Cleaning Supplies: A stiff-bristle brush, mild detergent, and a garden hose.
    • Repair Materials:
      • High-quality roofing cement or elastomeric sealant (specifically designed for mobile homes/RVs).
      • Roofing tape or patch fabric (fiberglass mesh).
      • Replacement shingles or metal panels (if physical damage exists).
    • Tools: Putty knife, caulk gun, utility knife, and a ladder.

    Pro Tip: Always choose a sealant that remains flexible after curing. Mobile homes expand and contract with temperature changes; rigid sealants will crack within months.
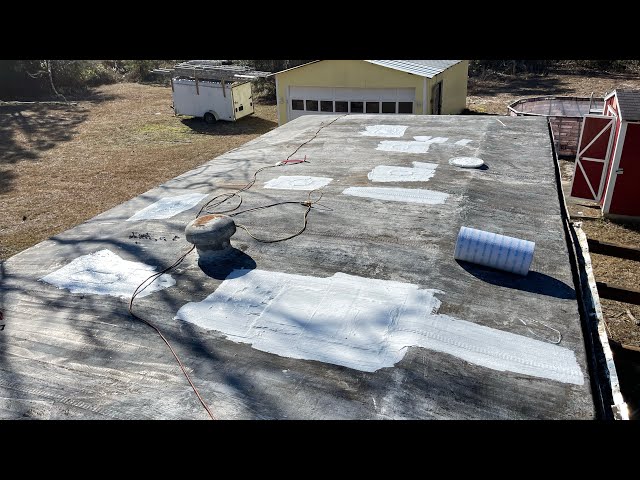
    How To Fix A Leaky Roof On A Mobile Home

    Step-by-Step Guide: How To Fix A Leaky Roof On A Mobile Home

    Fixing a leak requires methodical preparation. Rushing this process often results in trapping moisture under the patch, which accelerates rot. Follow these precise steps for a lasting repair.

    Step 1: Locate the Source of the Leak

    Water travels. The drip inside your home may be several feet away from the actual entry point on the roof. Go into your attic or crawl space (if accessible) during a rainstorm or have someone spray water on the roof while you inspect from below. Look for water stains, dark spots, or damp insulation. Mark the area directly above the interior leak on the exterior roof.

    Step 2: Clean the Area Thoroughly

    Adhesion is the key to any waterproof repair. Dirt, moss, algae, and old, flaking sealant must be removed.

    1. Sweep the area around the leak with a stiff brush.
    2. Wash the surface with a mixture of water and mild detergent.
    3. Rinse thoroughly and allow it to dry completely. This is critical. Applying sealant to a damp surface will cause it to fail. Wait at least 24 hours after cleaning if it has rained recently.

    Step 3: Prepare the Surface

    If there is old caulking or cracked tar, scrape it away using a putty knife. For metal roofs, lightly sand the area around the leak to create a “tooth” for the new sealant to grip. If you are repairing a rubber (EPDM) roof, use a specialized primer recommended by the manufacturer to ensure chemical bonding.

    Step 4: Apply the Patch or Sealant

    For small cracks or holes around vents:

    1. Load your caulk gun with high-grade elastomeric sealant.
    2. Apply a generous bead of sealant over the crack, extending at least 2 inches beyond the damage on all sides.
    3. Smooth it out with a putty knife dipped in soapy water to prevent sticking.

    For larger tears or holes:

    1. Cut a piece of roofing patch fabric or fiberglass mesh slightly larger than the damaged area.
    2. Apply a layer of roofing cement to the roof surface.
    3. Press the patch firmly into the wet cement.
    4. Apply another thick layer of cement over the top of the patch, feathering the edges to blend with the surrounding roof. This creates a watertight “sandwich.”

    Step 5: Inspect and Maintain

    Once the repair is complete, monitor it during the next few rainstorms. Check the interior ceiling for any new signs of moisture. Regular maintenance, such as clearing debris from roof valleys and re-applying sealant every 2–3 years, can extend the life of your mobile home roof significantly.

    Common Mistakes to Avoid

    Even experienced DIYers can make errors when dealing with mobile home roofing. Here are the most frequent pitfalls:

    MistakeConsequenceSolution
    Ignoring Vent BootsWater enters through cracked rubber boots around plumbing vents.Replace rubber boots entirely rather than just sealing cracks.
    Using Silicone CaulkSilicone does not adhere well to many roofing materials and cannot be painted over.Use polyurethane or elastomeric roofing sealants instead.
    Patch Over Wet WoodTraps moisture, leading to rapid rot and mold growth.Ensure the substrate is bone-dry before applying any patch.
    Walking on Weak SpotsCan puncture the roof further, especially on older aluminum skins.Distribute weight using plywood boards or walk only on supported rafters.

    When to Call a Professional

    While many leaks are manageable DIY projects, some situations require expert intervention. If the leak is widespread, if the roof deck feels soft or spongy when walked on, or if the structural integrity of the trusses is compromised, do not attempt a repair yourself.

    According to general construction guidelines, significant water damage can affect the electrical systems within the walls of a mobile home, posing a fire hazard. For complex issues, refer to resources like Wikipedia’s article on Roofing to understand the broader technical standards and material classifications used in the industry.

    FAQ Section

    1. Can I use regular house roof shingles on a mobile home?

    It depends on the pitch. Most mobile homes have low-slope roofs (less than 3:12 pitch). Standard asphalt shingles require a steeper pitch to shed water effectively. Using them on a low-slope roof can lead to water backing up under the shingles. Instead, use modified bitumen, EPDM rubber, or metal roofing systems designed for low slopes.

    2. How much does it cost to fix a mobile home roof?

    A minor DIY patch job using sealant and tape typically costs between $50 and $150. However, a full roof replacement can range from $3,000 to $8,000 depending on the size of the home and materials used. Hiring a professional for a localized repair usually averages $300–$600.

    3. What is the best sealant for a mobile home roof?

    Elastomeric liquid roof coatings or polyurethane-based sealants are widely considered the best options. They remain flexible in extreme temperatures, adhere well to metal and rubber, and provide UV protection. Brands like Dicor or Eternabond are popular choices in the mobile home community.

    4. How often should I inspect my mobile home roof?

    You should perform a visual inspection at least twice a year: once in the spring after winter storms and once in the fall before heavy rains or snow. Additionally, check the roof after any severe weather event, such as hail or high winds.

    5. Is it better to patch or replace the roof?

    If the roof is less than 10 years old and the damage is isolated to a small area (like a vent boot), patching is cost-effective. However, if the roof is over 15 years old, shows signs of widespread oxidation (chalky residue), or has multiple leaks, a full replacement is often more economical in the long run.

    Conclusion

    Learning how to fix a leaky roof on a mobile home empowers you to protect your biggest asset. By identifying the source early, using the right flexible materials, and following a thorough cleaning and application process, you can stop leaks in their tracks. Remember, consistency is key—regular inspections prevent small cracks from becoming catastrophic failures.

    Did this guide help you dry out your home? Share this article with fellow mobile home owners on social media to help them save money and avoid water damage. Stay dry and safe!
  • Fix Mobile Home Roof Leaks Fast

    Fix Mobile Home Roof Leaks Fast

    Water stains on your ceiling are more than just an eyesore; they are a warning sign that your sanctuary is compromised. For mobile homeowners, ignoring even a small drip can lead to costly structural damage and mold issues within days. If you are wondering how to repair a roof leak on a mobile home, you have come to the right place for a clear, actionable solution.

    Mobile homes, also known as manufactured houses, have unique roofing systems that differ significantly from traditional stick-built houses. Their roofs are often flatter, making them prone to pooling water, and the materials used—typically metal or rubberized coatings—require specific care. This guide will walk you through identifying the source of the leak, choosing the right materials, and executing a durable repair that stands up to the elements.

    Why Do Mobile Home Roofs Leak More Often?

    Before diving into the repair process, it is crucial to understand why these leaks happen. Mobile home roofs are designed to be lightweight, which sometimes means they lack the robust drainage slopes found in conventional housing. According to industry data, thermal expansion and contraction play a massive role in roof degradation. As the temperature fluctuates between day and night, the metal panels or rubber membranes expand and shrink. Over time, this movement weakens sealants and loosens fasteners.

    Furthermore, many mobile homes are situated in areas prone to high winds or heavy snow loads. The vibration from wind can gradually back out screws, creating tiny entry points for water. Understanding these mechanics helps you not only fix the current leak but also prevent future ones. It is not just about patching a hole; it is about reinforcing the integrity of your home’s shield against weather.

    How to Identify the Source of the Leak

    Finding the exact spot where water enters is often the most challenging part of the repair. Water is tricky; it can travel along beams or insulation before dripping onto your ceiling. Therefore, the stain on your ceiling is rarely directly below the leak on the roof.

    Step 1: Interior Inspection

    Start inside your home. Look for discoloration, bubbling paint, or soft spots on the ceiling. Use a flashlight to trace the moisture trail upward toward the attic or crawl space above the ceiling. If you have access to the roof cavity, look for wet insulation or dark streaks on the wooden trusses.

    Step 2: Exterior Examination

    Once you have a general idea of the area, climb onto the roof. Safety first: Ensure the roof is dry and use a sturdy ladder with a spotter. Look for common failure points:

    • Loose or missing screws: These are the most common culprits.
    • Cracked sealant: Check around vents, skylights, and air conditioning units.
    • Ponding water: Areas where water sits for more than 48 hours can degrade the roofing material faster.
    • Rust spots: On metal roofs, look for orange-brown discoloration.

    For a more precise detection method, some professionals use a garden hose to simulate rain while a partner watches inside for drips. Start low on the roof and work your way up, section by section, to isolate the entry point.

    What Materials Do You Need for a Durable Repair?

    Using the wrong materials can void warranties or cause further damage. For mobile homes, flexibility is key. You need products that can move with the house without cracking.

    Material TypeBest ForProsCons
    Elastomeric CoatingLarge areas, flat roofsReflects heat, flexible, long-lastingHigher upfront cost, requires clean surface
    Roofing Cement & MeshSmall holes, seamsCheap, easy to applyCan become brittle over time
    Butyl TapeScrew heads, seamsExcellent adhesion, waterproofHarder to remove if mistakes are made
    Self-Adhering PatchEmergency fixesQuick applicationNot a permanent solution for large tears

    For most DIYers, a combination of butyl tape for screw heads and an elastomeric roof coating for broader protection offers the best balance of cost and longevity. Always check the manufacturer’s specifications to ensure compatibility with your existing roof material (metal, EPDM rubber, or TPO).

    How To Repair A Roof Leak On A Mobile Home

    Step-by-Step Guide: How to Repair a Roof Leak on a Mobile Home

    Now, let’s get to work. Follow these steps carefully to ensure a watertight seal.

    Step 1: Clean the Area Thoroughly

    You cannot seal dirt. Use a stiff brush to remove debris, leaves, and loose rust. Then, wash the area with a mixture of mild detergent and water. Rinse thoroughly and let it dry completely. Moisture trapped under a patch will lead to mold and failure. For metal roofs, use a wire brush to remove any flaking rust until you reach solid metal.

    Step 2: Tighten or Replace Fasteners

    Check all screws in the vicinity of the leak. If they are loose, tighten them using a drill with a rubber-washer head screw. Do not overtighten, as this can strip the hole or crack the washer. If a screw is rusted through, remove it and replace it with a new, longer screw designed for metal roofing. Apply a dab of roofing cement under the washer before driving it in for extra security.

    Step 3: Apply Sealant to Seams and Vents

    Inspect the seams where roof panels overlap. If the old caulking is cracked or peeling, scrape it out. Apply a high-quality, UV-resistant polyurethane sealant. Smooth it out with a putty knife to ensure there are no air bubbles. Pay special attention to penetrations like vent pipes and AC units. These are high-vibration areas where seals fail frequently.

    Step 4: Patch Holes and Cracks

    For small holes or cracks, apply a layer of roofing cement. Embed a piece of fiberglass mesh into the wet cement, then cover it with another layer of cement. This creates a reinforced patch that can withstand thermal movement. For larger damages on metal roofs, you may need to cut a piece of matching metal, shape it to fit, and secure it with screws and sealant.

    Step 5: Coat the Entire Roof (Optional but Recommended)

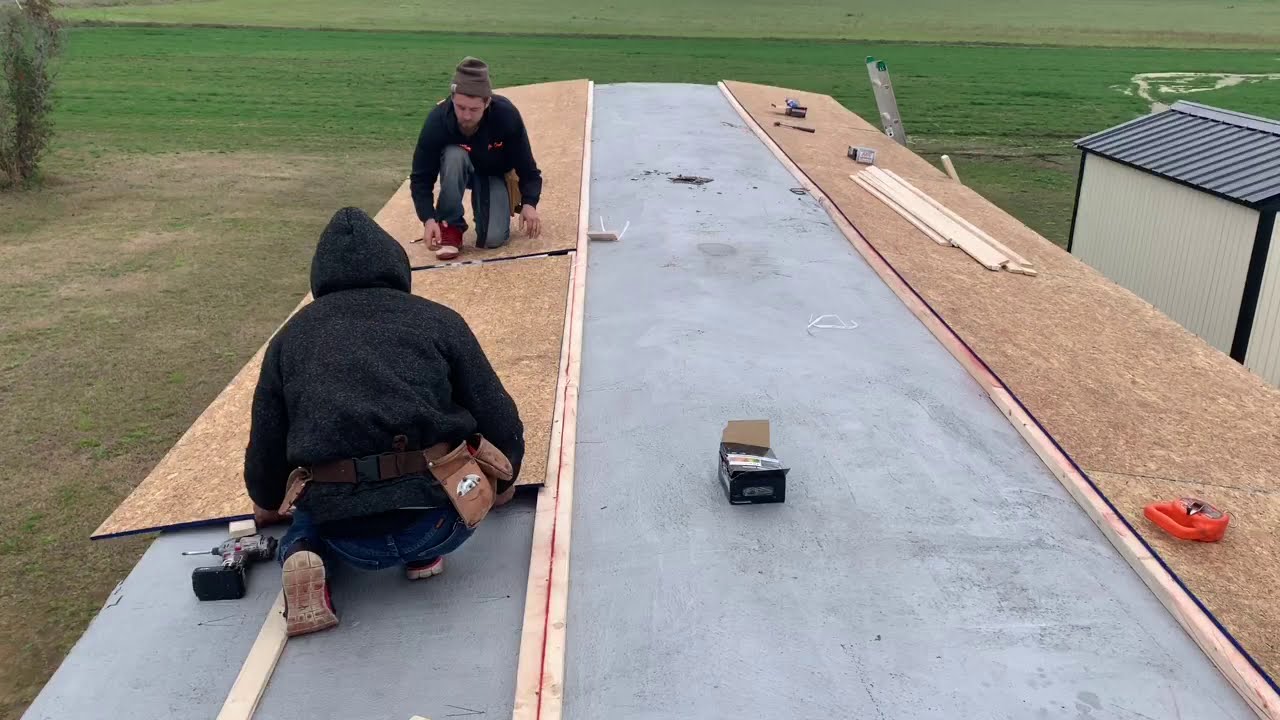
    If your roof is older, consider applying a full coat of elastomeric roof coating. This liquid-applied membrane bridges small cracks and reflects sunlight, reducing the thermal stress on your roof. Use a roller for large areas and a brush for edges. Apply two thin coats rather than one thick coat for better adhesion and drying.

    When Should You Call a Professional?

    While many leaks are DIY-friendly, some situations require expert intervention. If you notice sagging rooflines, extensive rot in the wooden structure, or if the leak persists after your repair attempts, it is time to call a pro. Additionally, if your roof is steep or you are uncomfortable working at heights, do not risk injury.

    According to the Federal Housing Administration, maintaining the structural integrity of manufactured housing is critical for safety and resale value. Professional roofers have the tools to assess hidden damage that might not be visible from the surface.

    Frequently Asked Questions

    How much does it cost to repair a mobile home roof?

    The cost varies widely based on the extent of the damage. A simple DIY patch using sealant and tape may cost under $50. However, hiring a professional to reseal seams or replace sections can range from $300 to $1,500. A full roof replacement typically costs between $3,000 and $8,000 depending on size and materials.

    Can I use regular tar paper for my mobile home roof?

    No, traditional tar paper is not recommended for mobile homes. It lacks the flexibility needed to handle the thermal expansion and contraction of lightweight structures. It can crack and peel quickly, leading to more leaks. Always use materials specifically designed for metal or rubber mobile home roofs.

    How often should I inspect my mobile home roof?

    You should inspect your roof at least twice a year: once in the spring to check for winter damage and once in the fall to prepare for winter storms. Additionally, perform a quick visual check after any severe weather event, such as hail or high winds.

    Is it better to patch or replace the roof?

    If the roof is less than 15 years old and the damage is localized, patching is cost-effective. However, if the roof is older, has multiple leaks, or shows signs of widespread rust or deterioration, replacement is the better long-term investment. Frequent patches can add weight and mask underlying structural issues.

    What is the best sealant for mobile home roofs?

    Polyurethane-based sealants and butyl rubber tapes are generally considered the best options. They remain flexible in extreme temperatures and adhere well to metal and rubber surfaces. Avoid silicone-based sealants for large areas, as they can be difficult to paint over and may not adhere well to certain roofing coatings.

    Conclusion

    Learning how to repair a roof leak on a mobile home empowers you to protect your investment and maintain a safe, dry living environment. By understanding the unique needs of manufactured housing roofs—such as the importance of flexibility and regular maintenance—you can tackle minor repairs with confidence. Remember, the key to longevity is not just the repair itself, but the prevention of future issues through regular inspections and proper material selection.

    Don’t wait for a small drip to become a major disaster. Gather your tools, follow these steps, and secure your home against the elements. If you found this guide helpful, please share it with fellow mobile home owners on social media. Together, we can help everyone keep their homes safe and sound.