Water stains on your ceiling or peeling paint on your fascia boards are often silent screams for help from your roofing system. Many homeowners overlook the critical role of metal flashing until significant water damage has already occurred behind the walls. If you are wondering how to install roof drip edge on an existing roof, you are taking a vital step toward protecting your home’s structural integrity without needing a full roof replacement.
Why Drip Edge Is Non-Negotiable for Roof Health
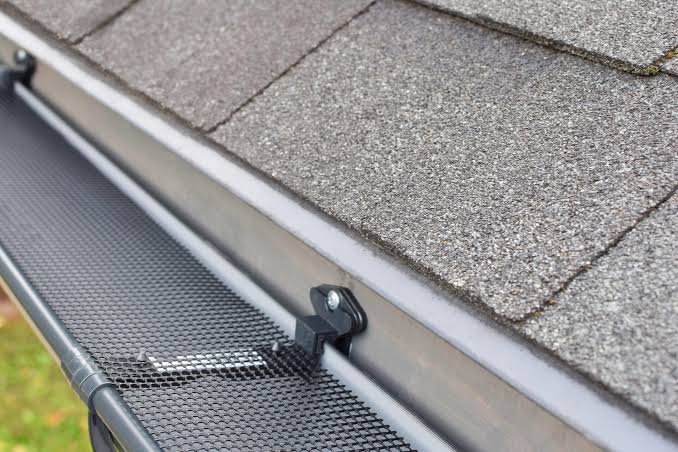
Before we dive into the tools and hammers, it is essential to understand why this piece of metal matters. A drip edge is a metal flashing installed at the edges of your roof to direct water away from the fascia and into the gutters. Without it, wind-driven rain can curl back under your shingles, soaking the roof deck and rotting the wooden fascia board behind it.
According to building science principles, proper water management is the single most important factor in roof longevity. While asphalt shingles get all the attention, the drip edge is the unsung hero that ensures water leaves the roof efficiently. Ignoring this component can lead to costly repairs down the line, including fascia replacement and interior drywall fixes.
Tools and Materials You Will Need
Preparation is half the battle in any DIY roofing project. Having the right tools on hand prevents mid-job trips to the hardware store and ensures a professional finish.
Essential Tools
- Tin Snips or Aviation Shears: For cutting the aluminum or steel drip edge to length.
- Hammer: A standard 16-oz claw hammer works best.
- Roofing Nails: Use 1-1/4 inch galvanized roofing nails with large heads to prevent pull-through.
- Chalk Line: To ensure straight alignment along the fascia.
- Ladder: Ensure it is stable and extends at least three feet above the roofline.
- Safety Gear: Non-slip shoes, gloves, and safety glasses.
Materials
- Drip Edge Flashing: Typically sold in 10-foot sections. Choose aluminum for rust resistance or galvanized steel for durability. Match the color to your fascia or trim for aesthetic appeal.
- Roofing Cement (Optional): For sealing overlaps in high-wind areas.
Step-by-Step Guide: Installing Drip Edge on an Existing Roof
Installing drip edge on an existing roof is trickier than doing it during a new build because you must work around the existing shingles. However, with patience, it is entirely manageable.
Step 1: Safety First and Site Preparation
Never work on a wet or windy roof. Ensure your ladder is on solid ground and use a spotter if possible. Clear any debris, leaves, or old caulk from the fascia board where the drip edge will sit. If there is old, damaged drip edge, carefully remove it using a pry bar, being cautious not to damage the underlying wood.
Step 2: Measure and Cut the Drip Edge
Measure the length of your eaves (the horizontal lower edges of the roof). It is better to cut slightly long and trim later than to come up short. Using your tin snips, cut the drip edge sections to size. For corners, you may need to make relief cuts to bend the metal neatly around the angle.
Step 3: Positioning the Drip Edge
This is the most critical step for an existing roof. You cannot simply slide the drip edge under the shingles easily without risking breakage. Instead, follow this technique:
- Lift the bottom row of shingles gently. Do not force them; asphalt shingles become brittle in cold weather and sticky in hot weather. Ideally, perform this task when temperatures are between 50°F and 70°F.
- Slide the upper flange of the drip edge under the existing shingles and over the roof deck.
- Ensure the lower flange hangs over the fascia board by about 1/4 to 1/2 inch. This overhang ensures water drips clear of the wood.
Pro Tip: If lifting the shingles proves too difficult or risky, you can install the drip edge over the existing shingles at the very edge. While not ideal for water shedding compared to going under, it is still significantly better than having no drip edge at all. Seal the top edge with roofing cement to prevent water intrusion.
Step 4: Securing the Drip Edge
Once positioned, nail the drip edge in place. Place nails every 8 to 12 inches along the top flange (the part under the shingles). Drive the nails firmly but do not dent the metal excessively. Ensure the nails are placed high enough so that the next row of shingles (if you were adding one) or the existing shingle overlap covers them.
Step 5: Overlapping Sections
If your roof edge is longer than 10 feet, you will need to join multiple pieces of drip edge. Overlap the sections by at least 2 inches. Always overlap the upstream piece over the downstream piece (following the direction of water flow) to prevent water from seeping into the joint. Apply a dab of roofing cement under the overlap for added security.
Step 6: Gutter Alignment
Ensure the drip edge extends into the gutter channel. If your gutters are already installed, you may need to loosen the gutter hangers slightly to tuck the drip edge behind the gutter’s front lip. This ensures that water flows directly into the gutter rather than running down the face of the fascia.
Common Mistakes to Avoid
Even experienced DIYers can stumble here. Avoid these pitfalls to ensure a watertight seal.
| Mistake | Consequence | Solution |
|---|---|---|
| Nailing too low | Water can seep behind the drip edge | Nail only the top flange, hidden under shingles |
| No overhang | Water runs down the fascia board | Ensure 1/4–1/2 inch overhang past the fascia |
| Gaps at corners | Wind-driven rain entry | Miter cut corners or use pre-formed corner pieces |
| Ignoring slope | Water pooling | Ensure drip edge follows the roof’s natural slope |
When to Call a Professional
While this is a feasible DIY project, certain scenarios require expert intervention. If your roof has a steep pitch (greater than 6:12), the risk of falling increases significantly. Additionally, if you discover rotted fascia wood upon removing the old drip edge, structural repairs are needed before installing new flashing. In such cases, consulting a licensed roofer is wise. For more information on roofing standards, you can refer to general construction guidelines on Wikipedia.
FAQ Section
Can I install drip edge without removing shingles?
Yes, but it is less effective. The ideal method is sliding the drip edge under the shingles. If you cannot lift them, installing it over the shingle edge and sealing it with roofing cement is an acceptable alternative for existing roofs.
What type of drip edge is best for existing roofs?
Aluminum drip edge is generally preferred for DIY projects because it is lightweight, easy to cut, and resistant to rust. Galvanized steel is stronger but harder to work with and can rust if the coating is scratched.
How far should the drip edge hang over the gutter?
The drip edge should extend into the gutter by about 1/2 inch. It should not touch the bottom of the gutter, as this can cause noise during rainstorms, but it must be deep enough to direct water away from the fascia.
Do I need drip edge on all sides of the roof?
Technically, drip edge is required on the eaves (bottom edges). On the rakes (side edges), a different type of flashing called “rake edge” or “gable trim” is used. However, many modern building codes recommend drip edge on all perimeter edges for maximum protection.
Will installing drip edge void my roof warranty?
Generally, no. Adding protective flashing is considered maintenance. However, if you damage existing shingles during the process, that specific area might not be covered. Always check your specific manufacturer’s warranty terms.
Conclusion
Learning how to install roof drip edge on an existing roof is a powerful skill that can save you thousands in water damage repairs. By directing water away from your fascia and into your gutters, you extend the life of your roof and maintain your home’s curb appeal. Remember to prioritize safety, take your time with the shingle lifting, and ensure proper overlapping of sections.
If you found this guide helpful, please share it with your neighbors or on social media. Helping others protect their homes creates a stronger, safer community. Have you tackled a roofing project before? Share your experiences in the comments below!