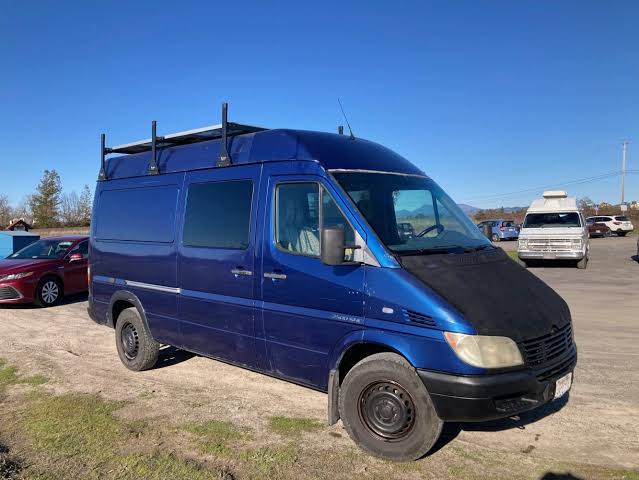
Are you staring at the empty cargo bay of your 2004 Dodge Sprinter, feeling overwhelmed by the possibilities? You are not alone. Many van lifers struggle to balance storage, sleeping comfort, and driving dynamics within the unique constraints of this classic model. Finding the perfect 2004 Dodge Sprinter 2500 140Wb High Roof Camper Van Layout is the key to turning that metal box into a cozy, functional home on wheels.
The 2004 model year is particularly special. It marks the transition era for the Sprinter in North America, offering robust mechanical reliability with a chassis that is slightly more forgiving for DIY modifications than newer, electronics-heavy models. However, the 140-inch wheelbase (WB) presents a specific spatial challenge: it is long enough to stand up in, but short enough that every inch counts.
In this guide, we will break down the most effective layouts, discuss structural considerations, and help you design a space that fits your travel style. Whether you are a solo adventurer or a couple seeking weekend escapes, these insights will streamline your build process.
Why the 140WB High Roof Is a Unique Canvas
Before diving into floor plans, it is crucial to understand the physical dimensions you are working with. The “High Roof” designation typically adds about 12 to 14 inches of interior height compared to the standard roof. For a 2004 Sprinter, this usually results in an interior standing height of approximately 6 feet 3 inches to 6 feet 5 inches, depending on insulation thickness and flooring choices.
The 140-inch wheelbase offers a total cargo length of roughly 10 to 11 feet behind the front seats. This is the “Goldilocks” zone for many builders. It is manageable to drive in urban environments yet spacious enough for a fixed bed or a well-designed convertible setup.
Key Dimensions to Remember
- Interior Height: ~75–77 inches (after insulation/flooring).
- Cargo Length: ~120–130 inches.
- Cargo Width: ~70 inches (narrowest point between wheel wells).
Understanding these limits prevents costly mistakes during the framing stage. A layout that looks good on paper might feel claustrophobic if you do not account for the curvature of the walls or the intrusion of the wheel wells.
Top 3 Proven Layouts for the 2004 Sprinter 2500
When analyzing successful builds from the past two decades, three distinct layouts emerge as the most functional for the 140WB High Roof. Each serves a different type of traveler.
1. The Rear Fixed Bed (The “Weekender”)
This is the most popular layout for couples or solo travelers who prioritize sleep quality over daytime living space.
- The Concept: A permanent queen or full-size bed is installed across the rear of the van.
- Storage: Large garage-style storage is created underneath the bed platform. This is ideal for storing outdoor gear, tools, or bulk supplies.
- Living Area: The front two-thirds of the van houses the kitchen galley and a small dinette or swivel chairs.
Pros:
- No daily setup required for sleeping.
- Maximum under-bed storage volume.
- Simple electrical and plumbing routing along one side.
Cons:
- Reduces daytime lounging space.
- Can feel cramped if two people are trying to move around while one is sleeping.
2. The Convertible Dinette (The “Digital Nomad”)
For those who work from the van or spend significant time indoors during the day, a convertible setup is superior.
- The Concept: A U-shaped or L-shaped dinette transforms into a bed at night.
- Flexibility: During the day, you have a large table for laptops, meals, or hobbies. At night, cushions are rearranged to form a sleeping surface.
- Kitchen: Usually placed along the sliding door side for easy access from both inside and outside.
Pros:
- Maximizes usable living area during daylight hours.
- Socially friendly; guests can sit comfortably.
- Versatile for different activities.
Cons:
- Daily conversion can be tedious.
- Less dedicated storage space compared to the fixed bed layout.
- Mattress comfort may be compromised depending on the mechanism used.
3. The Galley Kitchen Focus (The “Chef’s Van”)
If your travels revolve around food and cooking, this layout prioritizes counter space and appliance capacity.
- The Concept: A expansive kitchen runs along the passenger side, often extending into the rear corner.
- Sleeping: A murphy bed (wall bed) or a lift-up bed mechanism is used to save space.
- Features: Includes larger sinks, two-burner stoves, and ample pantry storage.
Pros:
- Unmatched culinary capabilities.
- Clean separation between cooking and sleeping zones.
- High resale value for food-focused buyers.
Cons:
- Complex construction requires precise carpentry.
- Heavier weight due to appliances and cabinetry.
- Less open floor space for movement.
Structural and Insulation Considerations for the 2004 Model
The 2004 Dodge Sprinter has specific quirks that differ from newer Mercedes-branded Sprinters. The body panels and rib structure require careful attention during insulation.
Dealing with Thermal Bridging
Metal vans are excellent conductors of heat and cold. Without proper insulation, your van will become an oven in summer and a freezer in winter. For the 2004 model, using closed-cell spray foam or rigid foam boards (like XPS) is recommended.
- Step 1: Clean all metal surfaces thoroughly to ensure adhesion.
- Step 2: Apply a vapor barrier if using batt insulation, though spray foam acts as its own barrier.
- Step 3: Leave small air gaps near the ribs to prevent condensation buildup, which can lead to rust—a common issue in older Sprinters.
According to general automotive engineering principles, maintaining a consistent thermal envelope is critical for energy efficiency. You can read more about thermal management in vehicles on Wikipedia.
Weight Distribution
The 2500 series has a higher payload capacity than the 1500, but it is not infinite. A typical DIY build adds 800 to 1,200 pounds.
- Keep it Low: Place heavy items like water tanks and batteries low and centered between the wheel wells.
- Balance Side-to-Side: If your kitchen is on the right, try to place your wardrobe or electrical system on the left to maintain handling stability.
Essential Components for Your Layout
Regardless of the floor plan you choose, certain elements are non-negotiable for a functional camper.
Electrical System
- Battery Bank: Lithium-ion (LiFePO4) batteries are the current standard due to their light weight and deep discharge capability. Aim for at least 200Ah for weekend trips.
- Solar: The high roof provides ample space for solar panels. Two 100W panels are usually sufficient to keep a modest system charged.
Water System
- Fresh Water: A 20–30 gallon tank is ideal for the 140WB. It balances capacity with weight.
- Grey Water: Ensure your grey water tank is accessible for dumping. Some builders opt for portable containers to save complexity.
Ventilation
- Install a roof fan, such as a MaxxAir or Fantastic Fan, directly above the kitchen or sleeping area. This is crucial for moisture control and temperature regulation.
Comparison: Fixed Bed vs. Convertible
| Feature | Fixed Bed Layout | Convertible Dinette |
|---|---|---|
| Setup Time | Zero | 5–10 minutes |
| Sleep Comfort | High (Dedicated mattress) | Medium (Depends on cushions) |
| Daytime Space | Limited | Spacious |
| Storage Volume | High (Under bed) | Low (Under seats) |
| Best For | Couples, Outdoor Enthusiasts | Solo Travelers, Remote Workers |
Frequently Asked Questions (FAQ)
1. Can I stand up straight in a 2004 Sprinter 140WB High Roof?
Yes, most adults under 6’2″ can stand comfortably. After adding insulation and flooring, you will likely have about 6’3″ to 6’4″ of clearance. If you are taller, you may need to look into a “super high roof” modification, which is less common for the 2004 model.
2. Is the 2004 Dodge Sprinter reliable for cross-country travel?
The 2004 model typically features the OM647 diesel engine, which is known for its durability and million-mile potential when maintained properly. However, it is essential to check for common issues like injector harness failures or turbocharger leaks before embarking on long trips.
3. What is the best insulation for a DIY Sprinter build?
Closed-cell spray foam is widely considered the best option for DIYers because it seals air leaks, adds structural rigidity, and provides a high R-value per inch. Rigid foam boards are a good second choice if you are on a budget or prefer a non-chemical approach.
4. How much does a typical 140WB Sprinter conversion cost?
A DIY conversion can range from $10,000 to $25,000, depending on materials and appliances. Professional conversions often exceed $50,000. Budget carefully for electrical systems and insulation, as these are difficult to upgrade later.
5. Do I need to reinforce the floor for a fixed bed?
Generally, no. The factory floor of the Sprinter 2500 is robust. However, if you are installing heavy water tanks or large battery banks under the bed, you should add plywood subflooring over the metal ribs to distribute the weight evenly and prevent flexing.
Conclusion
Designing the ideal 2004 Dodge Sprinter 2500 140Wb High Roof Camper Van Layout is a journey of balancing compromise and creativity. Whether you choose the simplicity of a rear fixed bed or the versatility of a convertible dinette, the key is to align the design with your specific travel habits.
Remember, the 140WB offers a sweet spot of drivability and livability. By focusing on smart storage solutions, proper insulation, and balanced weight distribution, you can create a van that feels much larger than its exterior dimensions suggest.
Don’t let the perfectionism paralysis stop you. Start with a sketch, measure twice, and build with confidence. Your adventure awaits.
Did you find this guide helpful? Share it with your fellow van builders on social media and let us know which layout you’re planning in the comments!