Adding a roof to your existing deck is one of the most rewarding home improvement projects you can undertake. It transforms an open outdoor space into a usable sanctuary, protecting you from harsh sun and sudden rainstorms. However, the structural integrity of this addition relies entirely on one critical step: knowing how to attach 4×4 post to existing deck for roof without compromising the safety of your home.
Many homeowners hesitate at this stage, fearing they might damage their current structure or violate local building codes. You are not alone in this concern. Improperly installed posts can lead to sagging roofs, loose connections, or even catastrophic failure during high winds. This guide will walk you through the professional methods used by contractors, ensuring your new roof is secure, compliant, and built to last.
Why Proper Attachment Matters for Structural Integrity
Before we dive into the tools and techniques, it is vital to understand why the connection method matters. A deck roof adds significant “dead load” (the weight of the structure itself) and “live load” (wind, snow, and maintenance weight) to your existing frame.
According to general engineering principles, vertical loads must be transferred directly to the ground or a reinforced footing. If you simply bolt a post to the side of a deck joist, you risk creating a lever arm that can twist or pull the joist away from the beam. For more detailed information on structural load paths, you can refer to Wikipedia’s article on Load-bearing walls, which explains how forces move through a structure.
In the United States, the International Residential Code (IRC) generally requires that roof supports be independent of the deck’s lateral stability unless the deck was specifically engineered to handle the additional moment forces. Therefore, the goal is to create a connection that supports vertical weight while allowing the deck to function independently.
Method 1: The Through-Bolt Method (Best for Strength)
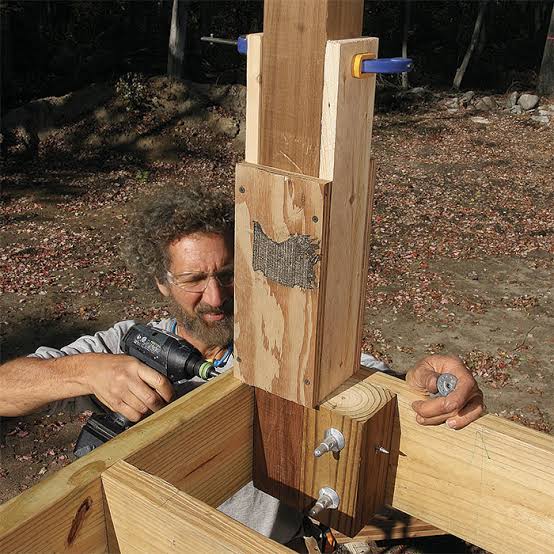
The most robust way to secure a 4×4 post is by bolting it directly through the rim joist or band board of your deck. This method distributes the shear force across the entire width of the wood, preventing splitting and ensuring a tight fit.
Step-by-Step Installation Guide
- Positioning: Place your 4×4 pressure-treated post against the outside face of the deck’s rim joist. Ensure it is perfectly plumb (vertical) using a 4-foot level.
- Drilling Pilot Holes: Mark two holes on the post, aligned with the center of the rim joist. Use a drill bit slightly smaller than your bolt diameter (e.g., if using 1/2-inch bolts, use a 7/16-inch bit). Drill completely through the post and the rim joist.
- Inserting Bolts: Insert two galvanized or stainless steel carriage bolts or hex bolts. These should be at least 6 inches long to pass through the 4-inch post and the 1.5-inch rim joist with room for washers and nuts.
- Securing: Place a large washer on the bolt end, followed by a nut. Tighten securely with a socket wrench. Do not overtighten to the point of crushing the wood fibers, but ensure there is no wiggle room.
- Bracing: For added stability, install diagonal knee braces from the post to the beam below, or use metal post caps if the roof structure sits on top.
Pro Tip: Always use hot-dipped galvanized or stainless steel hardware. Standard zinc-plated bolts will corrode quickly when exposed to outdoor elements, leading to structural weakness over time.
Method 2: Using Metal Post Bases (Cleanest Look)
If you prefer not to drill through your existing deck framing, or if your rim joist is too narrow, heavy-duty metal post bases are an excellent alternative. These connectors are designed to hold the post vertically while transferring the load downward.
Pros and Cons Comparison
| Feature | Through-Bolt Method | Metal Post Base |
|---|---|---|
| Strength | Extremely High | High (if rated for load) |
| Aesthetics | Visible bolt heads | Clean, hidden connection |
| Installation Difficulty | Moderate (requires precise drilling) | Easy (screw-in application) |
| Cost | Low (bolts and washers) | Moderate (specialized hardware) |
| Deck Impact | Drills into existing frame | Minimal intrusion |
To install a metal post base:
- Select a base rated for 4×4 posts and compatible with your roof load requirements.
- Position the base on the deck surface or attached to the side of the rim joist, depending on the model.
- Secure the base using structural screws (such as Simpson Strong-Tie SDWS) rather than standard deck screws.
- Slide the 4×4 post into the base and secure it with the provided nails or screws.
Critical Considerations for Footings and Ground Contact
One common mistake DIYers make is assuming the deck’s existing footings can support the extra roof load. In many cases, they cannot. When you learn how to attach 4×4 post to existing deck for roof, you must also consider where that post ends.
Do You Need New Footings?
If your post extends all the way to the ground, it must rest on a proper concrete footing. You cannot simply set a wooden post on dirt or concrete pavers.
- Frost Line Depth: Check your local building code for the required frost line depth. In northern US states, this may be 3–4 feet deep; in southern states, it may be shallower.
- Concrete Mix: Use a minimum of 3000 PSI concrete mix for durability.
- Post Protection: If the post touches concrete, use a post anchor or elevate the wood slightly above the concrete surface to prevent wicking moisture, which leads to rot.
If you are attaching the post only to the side of the deck (cantilevered style) and it does not touch the ground, ensure the deck’s original footings were oversized or reinforced. If unsure, consult a structural engineer.
Choosing the Right Lumber and Hardware
Not all wood is created equal. For outdoor structures, especially those supporting a roof, material selection is non-negotiable.
- Lumber Grade: Use #1 or #2 Grade Pressure-Treated Southern Yellow Pine or Douglas Fir. Avoid “utility grade” lumber for structural posts.
- Moisture Content: Allow pressure-treated wood to dry for a few weeks before sealing or painting, but install it while it is still straight to avoid warping later.
- Hardware Compatibility: Never mix metals. If you use aluminum flashing, do not use copper fasteners nearby, as galvanic corrosion will occur. Stick to stainless steel or hot-dipped galvanized for all connections.
FAQ: Common Questions About Deck Roof Posts
1. Can I attach a roof post to the deck railing?
No. Deck railings are designed for lateral human impact loads, not vertical structural loads. Attaching a roof post to a railing will likely cause the railing to fail and the roof to collapse. Always attach to the main structural frame (rim joist or beam).
2. What size bolts should I use for a 4×4 post?
For a standard residential deck roof, 1/2-inch diameter carriage bolts are typically sufficient. Use at least two bolts per post, spaced vertically about 6–8 inches apart. Ensure the bolts are long enough to pass through the post and the framing member with at least 1 inch of thread exposed for the nut.
3. Do I need a permit to add a roof to my deck?
In most US jurisdictions, yes. Adding a roof changes the structure’s load profile and wind resistance. Check with your local building department. They may require plans showing how the posts are attached and whether new footings are needed. Ignoring this can lead to fines or issues when selling your home.
4. How far apart should 4×4 posts be for a deck roof?
The spacing depends on the roof material and beam size, but a general rule of thumb is 6 to 8 feet on center. Heavier roofing materials (like clay tiles) require closer spacing, while lighter materials (like aluminum or polycarbonate) allow for wider spans. Always consult span tables for your specific lumber grade.
5. Can I use screws instead of bolts?
Standard deck screws are not strong enough for structural post attachment. However, structural screws (often labeled as ledger locks or construction screws) can be used if they are specifically rated for shear loads and installed according to the manufacturer’s specifications. Bolts remain the gold standard for reliability.
Conclusion
Learning how to attach 4×4 post to existing deck for roof is a pivotal step in creating a safe and durable outdoor living space. By choosing the right method—whether through-bolting for maximum strength or using metal bases for aesthetics—and adhering to local building codes, you ensure your project stands the test of time.
Remember, the key to success lies in preparation: check your footings, use corrosion-resistant hardware, and prioritize vertical load transfer. If you are ever in doubt about the structural capacity of your existing deck, consulting a licensed professional is a small price to pay for peace of mind.
Did you find this guide helpful? Share it with your fellow DIY enthusiasts on social media to help them build safer, stronger decks!