
Tag: Ridge Vent Installation

  • How to Install a Ridge Vent on a Shingle Roof

    How to Install a Ridge Vent on a Shingle Roof

    Is your attic trapping heat like an oven, causing your AC to work overtime? Poor ventilation can lead to premature shingle failure and costly moisture damage. Learning how to install a ridge vent on a shingle roof is one of the most effective DIY upgrades you can make to protect your home’s structural integrity and improve energy efficiency.

    In this comprehensive guide, we will walk you through the entire process, from safety preparations to the final shingle placement. Whether you are a seasoned DIYer or a cautious homeowner, this tutorial provides the clarity and confidence you need to get the job done right.

    Why Ridge Vents Are Superior for Attic Ventilation

    Before we pick up a hammer, it is crucial to understand why you are doing this. Ridge vents are widely considered the gold standard in residential roofing ventilation. Unlike box vents or turbine vents that puncture the roof field, ridge vents run continuously along the peak of your roof.

    This continuous design allows hot air and moisture to escape uniformly across the entire length of the attic. According to building science principles, proper ventilation requires a balance of intake (usually at the soffits) and exhaust (at the ridge). A ridge vent creates a natural convection current, often referred to as the “stack effect,” which pulls cool air in from the bottom and pushes hot air out the top.

    The Benefits at a Glance

    FeatureRidge VentBox/Turbine Vents
    AestheticsLow profile, nearly invisibleBulky, visible protrusions
    CoverageContinuous exhaust along the peakSpot ventilation only
    Leak RiskLow (if installed correctly)Higher (multiple penetration points)
    MaintenanceMinimal to noneMoving parts may jam or wear out

    By choosing a ridge vent, you are opting for a solution that is both aesthetically pleasing and functionally superior. For more detailed information on building standards regarding ventilation, you can refer to general construction guidelines on Wikipedia.

    Essential Tools and Materials Checklist

    Preparation is half the battle in any roofing project. Having the right tools on hand prevents unnecessary trips up and down the ladder, keeping you safe and efficient.

    Tools Required:

    • Circular saw with a depth-adjustable blade
    • Reciprocating saw (for cutting near obstacles)
    • Hammer or pneumatic nail gun
    • Chalk line
    • Tape measure
    • Utility knife
    • Safety harness and non-slip shoes
    • Ladder stabilizer

    Materials Needed:

    • Ridge vent rolls (plastic or aluminum)
    • Roofing nails (galvanized, 1-3/4 inch)
    • Cap shingles (matching your existing roof color)
    • Roofing cement (optional, for extra sealing)
    • Drip edge flashing (if replacing old ridge caps)
    How To Install A Ridge Vent On A Shingle Roof

    Step-by-Step Guide: How to Install a Ridge Vent on a Shingle Roof

    Follow these steps carefully. Remember, working on a roof involves height risks. If you feel uncomfortable at any point, please consult a professional roofer.

    Step 1: Safety First and Site Preparation

    Never underestimate the danger of a sloped surface. Ensure your ladder is secure and use a roof anchor system if the pitch is steep. Check the weather forecast; you need a dry, calm day. Wet shingles are slippery, and wind can make handling large rolls of ridge vent difficult.

    Clear the work area of debris. If there are old box vents near the ridge, plan to remove them later, as the ridge vent will replace their function.

    Step 2: Remove Existing Ridge Cap Shingles

    Start by removing the existing cap shingles along the ridge line. Use a flat bar or pry bar to gently lift the nails. Be careful not to damage the underlying field shingles too much, although some wear is expected.

    Remove all nails and debris. You should expose the original ridge board or the top layer of sheathing. Measure the length of the ridge where you intend to install the vent.

    Step 3: Mark and Cut the Ventilation Slot

    This is the most critical technical step. You need to cut a slot along the peak of the roof to allow air to flow from the attic into the vent.

    1. Measure: Determine the width of the slot based on the manufacturer’s instructions for your specific ridge vent product. Typically, this is between 2 to 3 inches wide.
    2. Mark: Snap a chalk line on both sides of the ridge centerline to ensure a straight cut.
    3. Set Depth: Adjust your circular saw blade depth to exactly 1 inch. This is vital. You want to cut through the roof sheathing (plywood or OSB) but not through the rafters or trusses below. Cutting into structural members compromises the roof’s integrity.
    4. Cut: Carefully cut along the chalk lines. Use a reciprocating saw for the ends or around any obstructions like plumbing stacks.

    Remove the cut strip of wood. You should now see the open attic space below. Check for any protruding nails from the underside and hammer them flat.

    Step 4: Install the Ridge Vent Roll

    Unroll the ridge vent material along the peak. Most modern ridge vents come in flexible rolls that conform to the roof’s shape.

    1. Positioning: Center the vent over the slot you just cut. The mesh or baffles inside the vent should face downward into the attic.
    2. Securing: Start at one end of the ridge. Nail the vent down using galvanized roofing nails. Place nails every 6 to 8 inches along the flange of the vent.
    3. Overlap: If you need multiple rolls, overlap the ends by at least 2 inches to ensure continuous airflow and prevent water intrusion.

    Ensure the vent lies flat against the roof deck. Any gaps can allow rain-driven snow or insects to enter.

    Step 5: Install the Cap Shingles

    Now that the vent is secure, you need to cover it with shingles to protect it from the elements and blend it with your roof.

    1. Prepare Cap Shingles: If you don’t have pre-cut cap shingles, you can cut standard three-tab shingles into thirds.
    2. Nailing Pattern: Place the first cap shingle at the end of the ridge. Nail it down with two nails per side, ensuring the nails penetrate the vent’s nailing flange but do not pierce the ventilation channel itself.
    3. Overlapping: Each subsequent shingle should overlap the previous one by about 5 to 6 inches, following the exposure line recommended by the shingle manufacturer. This ensures water sheds correctly down the roof.
    4. Sealing: In high-wind areas, apply a dab of roofing cement under the leading edge of each cap shingle for added security.

    Continue this process until you reach the other end of the ridge. Trim the final shingle to fit flush with the edge of the roof.

    Common Mistakes to Avoid

    Even experienced DIYers can stumble. Here are the most frequent errors when learning how to install a ridge vent on a shingle roof:

    • Cutting Too Deep: As mentioned, cutting into rafters is a structural hazard. Always double-check your saw depth.
    • Blocking Airflow: Ensure that insulation in the attic does not block the soffit vents. If air cannot get in, it cannot get out through the ridge vent.
    • Using Wrong Nails: Standard steel nails will rust quickly. Always use galvanized or stainless steel roofing nails to prevent staining and failure.
    • Ignoring Local Codes: Some municipalities have specific requirements for net free vent area (NFVA). Check your local building codes before starting.

    FAQ Section

    1. Can I install a ridge vent on an existing roof without replacing all shingles?

    Yes, you can. The process involves removing only the ridge cap shingles and cutting the slot. The field shingles remain intact. However, if your existing shingles are very old or brittle, they may crack during the process, so proceed with caution.

    2. How long does it take to install a ridge vent?

    For an average-sized home (approx. 2,000 sq. ft.), a two-person team can typically complete the installation in 4 to 6 hours. A solo DIYer might take a full day, especially if it is their first time.

    3. Do ridge vents leak?

    When installed correctly, ridge vents are highly resistant to leaks. The key is proper nailing and overlapping of cap shingles. The design allows water to shed over the top while air escapes from the sides. Using roofing cement on nail heads can provide extra peace of mind.

    4. What if my roof has no soffit vents?

    Ridge vents require intake ventilation to work effectively. If you do not have soffit vents, you may need to install them or use drip-edge vents. Without adequate intake, the ridge vent will not create the necessary airflow, and you might even pull conditioned air from your living space into the attic.

    5. Is plastic or aluminum ridge vent better?

    Both materials are effective. Plastic vents are flexible and easier to install on complex roof lines. Aluminum vents are more rigid and durable but can be harder to bend around curves. Choose the material that best fits your roof’s geometry and your comfort level with installation.

    Conclusion

    Learning how to install a ridge vent on a shingle roof is a rewarding project that pays dividends in comfort and cost savings. By improving your attic’s airflow, you reduce the strain on your HVAC system, prevent moisture buildup, and extend the lifespan of your roofing materials.

    Remember, safety is paramount. Take your time, measure twice, and cut once. If you follow the steps outlined above, you will achieve a professional-looking result that enhances your home’s value.

    Did you find this guide helpful? Share it with your friends on social media who might be considering similar home improvements! Let’s help more homeowners breathe new life into their roofs.
  • How to Install a Ridge Vent on an Existing Roof

    How to Install a Ridge Vent on an Existing Roof

    Is your attic trapping heat like a sauna, causing your air conditioner to work overtime? Poor ventilation can lead to premature shingle damage, ice dams in winter, and skyrocketing energy bills. If you are looking for a cost-effective solution, learning how to install a ridge vent on an existing roof is one of the best upgrades you can make to your home’s efficiency and longevity.

    Many homeowners assume that adding proper ventilation requires a complete roof tear-off. However, with the right tools and careful planning, you can retrofit a high-performance ridge vent system without replacing your entire roof. This guide will walk you through the process, ensuring you achieve professional-grade results while adhering to safety standards and building codes.

    Why Upgrade Your Roof Ventilation?

    Before we dive into the tools and steps, it is crucial to understand why this project matters. Proper attic ventilation is not just about comfort; it is about protecting your investment.

    According to the U.S. Department of Energy, adequate ventilation helps maintain a cool attic in summer and a dry attic in winter. Without it, moisture buildup can rot roof decking, while excessive heat can bake asphalt shingles from the underside, reducing their lifespan by up to 50%.

    A ridge vent works in tandem with soffit vents (intake) to create a continuous flow of air. Hot air rises and escapes through the ridge, pulling fresh, cooler air in from the eaves. This natural convection cycle is the most efficient way to regulate attic temperature.

    Tools and Materials You Will Need

    Preparation is half the battle. Having the right equipment ready before you climb the ladder will save time and ensure safety.

    Essential Tools

    • Circular Saw: With a depth-adjustable blade.
    • Chalk Line: For marking straight cut lines.
    • Hammer and Pry Bar: To remove existing ridge cap shingles.
    • Roofing Nailer or Hammer: For securing the vent.
    • Utility Knife: For trimming shingles and underlayment.
    • Caulking Gun: For applying roofing cement.
    • Safety Gear: Non-slip shoes, harness, gloves, and eye protection.

    Materials

    • Ridge Vent Roll: Choose a high-quality, weather-resistant vent (shingle-over type is easiest for DIY).
    • Roofing Nails: 1-1/4 inch galvanized or stainless steel nails.
    • Roofing Cement: High-quality sealant for end caps and overlaps.
    • Replacement Shingles: To match your existing roof color and style.

    Safety Note: Always check the weather forecast. Never work on a wet, icy, or windy roof. If your roof pitch is steep (greater than 6/12), consider hiring a professional.

    How To Install A Ridge Vent On An Existing Roof

    Step-by-Step Guide: How to Install a Ridge Vent on an Existing Roof

    Follow these detailed steps to ensure a watertight and effective installation.

    Step 1: Remove the Existing Ridge Cap Shingles

    Start at one end of the roof ridge. Use your pry bar to carefully lift and remove the existing ridge cap shingles. Work your way across the entire length of the ridge where the vent will be installed.

    • Tip: Save any usable shingles if they match your current roof, but typically, you will need new ones for a seamless finish.
    • Clean Up: Remove all old nails and debris from the ridge area. A clean surface is vital for proper adhesion.

    Step 2: Mark the Cut Lines

    You need to cut an opening along the peak of the roof to allow air to escape. The width of this cut depends on the specific ridge vent product you purchased, but it is typically 2 inches wide.

    1. Measure 1 inch out from the center of the ridge on both sides.
    2. Snap a chalk line along these measurements to create two parallel lines running the length of the ridge.
    3. Ensure the lines stop about 6–12 inches from the gable ends to maintain structural integrity and allow for end-capping.

    Step 3: Cut the Roof Decking

    Set your circular saw blade depth to exactly the thickness of your roof sheathing (usually 1/2 inch or 5/8 inch). Do not cut deeper, as you risk damaging the rafters or trusses underneath.

    Carefully cut along the chalk lines. It is helpful to have a helper vacuum the dust or blow it away to keep the line visible. Once cut, remove the strip of wood between the lines. You should now see the open attic space below.

    Step 4: Prepare the Opening

    Inspect the opening for any protruding nails or rough edges. Smooth them out. If there is existing roofing underlayment, trim it back neatly so it does not interfere with the vent installation.

    For added protection against wind-driven rain, some professionals recommend installing a baffle or filter material inside the attic opening, though most modern ridge vents come with integrated filters.

    Step 5: Install the Ridge Vent

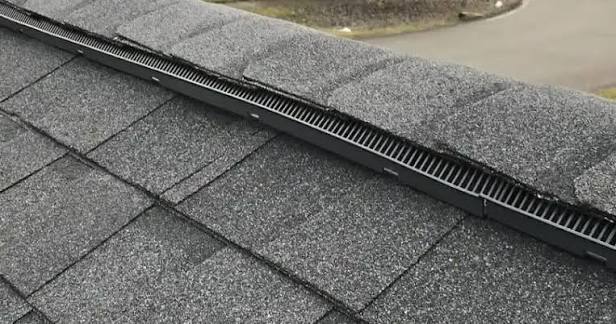
    Unroll the ridge vent material along the peak. Most DIY-friendly vents are flexible and come in long rolls.

    1. Start at one end: Align the vent centrally over the cut opening.
    2. Nail it down: Using roofing nails, secure the vent flange to the roof deck. Place nails every 6–8 inches along both sides of the vent.
      • Critical: Do not nail through the center mesh or filter area, as this will block airflow.
    3. Overlap sections: If using multiple rolls, overlap the ends by at least 2 inches and seal the joint with roofing cement to prevent leaks.

    Step 6: Seal the Ends

    The ends of the ridge vent are vulnerable points. Apply a generous bead of roofing cement under the end flaps of the vent. Fold the flaps down and nail them securely. This prevents wind from lifting the vent and water from seeping in.

    Step 7: Re-Shingle Over the Vent

    Now, cover the ridge vent with new shingles to blend it with the rest of the roof.

    1. Start at the end opposite the prevailing wind direction.
    2. Cut standard three-tab shingles into individual tabs or use pre-cut ridge cap shingles.
    3. Lay the first shingle flat over the vent end. Nail it according to manufacturer instructions (usually 4 nails per shingle).
    4. Continue laying shingles up the ridge, overlapping each subsequent shingle by about 5 inches.
    5. Ensure nails are driven firmly but not so deep that they puncture the vent’s internal structure.

    Ridge Vent vs. Other Ventilation Methods

    Is a ridge vent the right choice for you? Let’s compare it to other common options.

    FeatureRidge VentBox VentsTurbine Vents
    AestheticsExcellent (Hidden)VisibleVisible
    MaintenanceLowLowMedium (Moving parts)
    AirflowContinuous & EvenSpot VentilationWind-Dependent
    Installation DifficultyModerateEasyModerate
    NoiseSilentSilentCan hum in wind

    As noted by building science experts, continuous ridge ventilation provides more uniform airflow than spot vents, reducing the risk of “dead air” pockets in the attic. For more technical details on building envelope science, you can refer to resources like Wikipedia’s entry on Roof Ventilation.

    Common Mistakes to Avoid

    Even experienced DIYers can stumble. Here are pitfalls to watch out for:

    • Cutting Too Deep: Damaging rafters compromises roof structure. Always measure blade depth twice.
    • Insufficient Intake: A ridge vent only works if there is enough air coming in. Ensure your soffit vents are not blocked by insulation.
    • Over-Nailing: Driving too many nails or placing them incorrectly can create leak paths. Follow the manufacturer’s nailing pattern strictly.
    • Ignoring Local Codes: Some municipalities have specific requirements for net free vent area (NFVA). Check your local building codes before starting.

    FAQ Section

    1. Can I install a ridge vent if I don’t have soffit vents?

    Technically, yes, but it is not recommended. Ridge vents rely on the “stack effect,” which requires intake air from the eaves. Without soffit vents, the ridge vent may pull air from other unintended gaps, potentially bringing moist air into the attic. It is best to install soffit vents simultaneously.

    2. How much does it cost to install a ridge vent professionally?

    Professional installation typically ranges from $500 to $1,500, depending on roof size and complexity. DIY installation can reduce this cost significantly, primarily covering materials ($100–$300).

    3. Will installing a ridge vent cause leaks?

    If installed correctly, no. The key is proper sealing of the cut edges and correct shingling over the vent. Using high-quality roofing cement and following the manufacturer’s overlap guidelines ensures a watertight seal.

    4. How long does a ridge vent last?

    Most high-quality ridge vents are made from durable plastics or metals designed to last as long as the roof itself—typically 20 to 30 years. However, the shingles covering it will need replacement during normal roof maintenance.

    5. Do I need a permit to install a ridge vent?

    In many jurisdictions, modifying the roof structure requires a permit. Since you are cutting into the roof deck, it is wise to check with your local building department. Failure to obtain a permit could affect your home insurance or resale value.

    Conclusion

    Learning how to install a ridge vent on an existing roof

    is a powerful skill that can enhance your home’s energy efficiency, protect your roof structure, and improve indoor comfort. By following this step-by-step guide, you can achieve a professional-looking result that stands the test of time.

    Remember, safety is paramount. Take your time, double-check your measurements, and ensure your attic has adequate intake ventilation to maximize the benefits of your new ridge vent.

    Did you find this guide helpful? Share it with your friends on Facebook or Pinterest who might be considering similar home improvements. If you have questions or want to share your own DIY success story, leave a comment below!