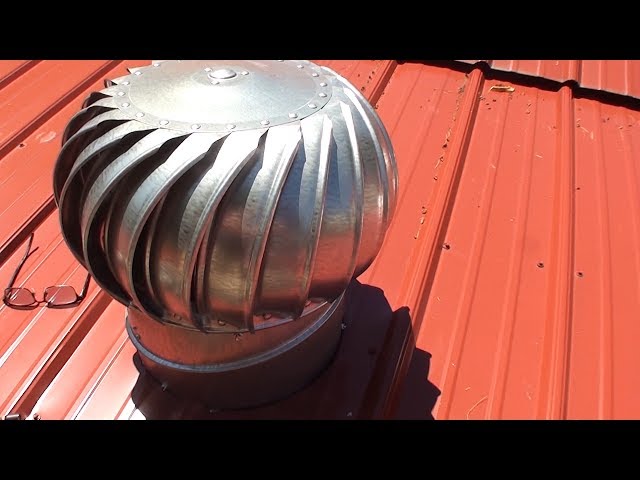
Have you ever stepped into your attic or garage on a scorching summer day and felt like you were walking into an oven? Excessive heat buildup in metal-roofed structures is not just uncomfortable; it can damage stored items, increase cooling costs, and shorten the lifespan of your roofing materials. If you are looking for a cost-effective, passive solution to this problem, learning how to install a whirly bird on a tin roof is the perfect place to start.
In this comprehensive guide, we will walk you through the entire process, from selecting the right turbine ventilator to sealing it properly against leaks. Whether you are a seasoned DIY enthusiast or a first-time homeowner, this tutorial is designed to be clear, safe, and effective.
Why Choose a Whirly Bird for Your Tin Roof?
Before we dive into the tools and steps, it is essential to understand why this specific type of vent is ideal for metal roofing. A whirly bird, technically known as a turbine ventilator, uses wind power to spin its fins. This spinning action creates a vacuum that pulls hot, stale air out of your building while drawing cooler fresh air in through lower vents.
For tin (metal) roofs, which are excellent conductors of heat, passive ventilation is crucial. Unlike electric fans, whirly birds require no wiring, no maintenance, and no electricity bills. They are silent, durable, and highly effective at reducing indoor temperatures by up to 10–15 degrees Fahrenheit during peak summer months.
Tools and Materials You Will Need
Preparation is half the battle. Having the right tools on hand ensures a smooth installation process and minimizes the time you spend on the roof. Here is your checklist:
- Whirly Bird Ventilator: Ensure it matches the size of your intended hole (common sizes are 12-inch or 14-inch).
- Drill with Metal Bits: For pilot holes.
- Tin Snips or Aviation Shears: For cutting the metal sheet.
- Jigsaw with Metal Cutting Blade: Optional, but helpful for larger cuts.
- Measuring Tape and Marker: For precise placement.
- Caulking Gun and High-Quality Roof Sealant: Look for polyurethane or silicone-based sealants rated for metal roofs.
- Self-Tapping Screws: Stainless steel screws with neoprene washers are best to prevent rust and leaks.
- Safety Gear: Non-slip boots, gloves, safety glasses, and a harness if your roof pitch is steep.
Step-by-Step Guide: How To Install A Whirly Bird On A Tin Roof
Follow these steps carefully to ensure a watertight and functional installation.
Step 1: Choose the Right Location
Location matters. You want to install the whirly bird near the ridge of the roof but not directly on the ridge cap unless you have a specific ridge-mount model. Ideally, place it where the wind flow is unobstructed. Avoid areas under overhanging trees where debris might clog the turbine.
Mark the center point of your desired location. Ensure there are no underlying structural beams or electrical wires in the immediate vicinity.
Step 2: Cut the Opening
This is the most critical step. Measure the diameter of the base of your whirly bird. Most manufacturers provide a template; if not, measure the inner flange.
- Drill a small pilot hole in the center of your marked circle.
- Using your jigsaw or tin snips, cut along the marked line. Tip: Cut slightly smaller than the required size first. You can always trim more metal off, but you cannot add it back.
- Deburr the edges of the cut hole using a file or sandpaper to remove sharp metal shards. This prevents injury and ensures a smooth fit for the ventilator base.
Step 3: Apply the Sealant
Waterproofing is key to protecting your tin roof. Apply a generous bead of roof sealant around the perimeter of the cut hole. Do not skimp here; this layer acts as your primary defense against rain infiltration.
Additionally, apply a thin layer of sealant to the underside of the whirly bird’s base flange. This double-layer approach ensures that even if one layer degrades over time, the other remains intact.
Step 4: Position and Secure the Ventilator
Place the whirly bird over the hole, pressing it firmly into the sealant. Ensure it sits flat and level. An uneven installation can cause the turbine to wobble, leading to noise and premature wear.
Using your drill, insert self-tapping screws through the pre-drilled holes in the base flange. Space them evenly, typically every 6–8 inches. Tighten them until the neoprene washer compresses slightly, creating a tight seal. Do not overtighten, as this can strip the metal threads or distort the flange.
Step 5: Final Sealing and Inspection
Once the unit is secured, apply another bead of sealant over the screw heads and around the entire edge of the flange where it meets the roof. Smooth this out with a gloved finger or a caulking tool for a professional finish.
Allow the sealant to cure according to the manufacturer’s instructions (usually 24 hours) before exposing it to heavy rain. Spin the turbine by hand to ensure it moves freely without obstruction.
Common Mistakes to Avoid
Even experienced DIYers can make errors. Here are the most common pitfalls when installing turbine vents on metal roofs:
| Mistake | Consequence | Solution |
|---|---|---|
| Cutting the hole too large | Water leakage and poor seal | Measure twice, cut once. Start small. |
| Using standard screws | Rust and corrosion over time | Always use stainless steel with neoprene washers. |
| Insufficient sealant | Leaks during heavy storms | Use high-quality, UV-resistant roof sealant. |
| Installing near obstructions | Reduced airflow efficiency | Keep at least 3 feet away from walls or trees. |
Understanding the Science Behind Passive Ventilation
To truly appreciate the value of your new installation, it helps to understand the physics involved. Whirly birds operate on the principle of Bernoulli’s equation, where faster-moving air creates lower pressure. As the wind spins the turbine, it lowers the pressure inside the vent, pulling hot air out of the attic space.
According to principles outlined in basic fluid dynamics resources, such as those found on Wikipedia, effective ventilation requires a balance of intake and exhaust. Ensure you have soffit vents or eave vents to allow fresh air to enter; otherwise, the whirly bird will struggle to pull air out efficiently.
FAQ Section
1. Can I install a whirly bird on a standing seam metal roof?
Yes, but it requires special care. You must use a clamp-on mount or a specifically designed flashing kit that does not penetrate the standing seams directly, as this can compromise the roof’s integrity. Always consult the roof manufacturer’s guidelines.
2. How many whirly birds do I need for my roof?
A general rule of thumb is one 12-inch whirly bird for every 100–150 square feet of attic space. However, this varies based on your local climate and roof pitch. For larger roofs, multiple units spaced evenly apart work best.
3. Do whirly birds make noise?
High-quality whirly birds are virtually silent. If you hear squeaking or grinding, it usually means the bearings are dry or the unit is installed unevenly. Regular lubrication (if recommended by the manufacturer) can solve this.
4. What happens if there is no wind?
On windless days, the temperature difference between the hot attic and the cooler outside air can still create a slight thermal updraft, causing the turbine to spin slowly. While less effective than on windy days, it still provides some level of passive ventilation.
5. Is it better than a solar-powered fan?
Solar fans are more powerful and active, but they have moving parts that can fail and require electricity. Whirly birds are purely mechanical, meaning they have a longer lifespan with zero maintenance. For most residential applications, whirly birds offer the best balance of cost and reliability.
Conclusion
Learning how to install a whirly bird on a tin roof is a rewarding DIY project that pays dividends in comfort and energy savings. By following the steps outlined above—choosing the right location, cutting precisely, and sealing thoroughly—you can enjoy a cooler, drier, and more efficient home.
Remember, safety first. If you are uncomfortable working at heights, do not hesitate to hire a professional roofer. But for those ready to take on the challenge, this upgrade is simple, affordable, and highly effective.
Did you find this guide helpful? Share it with your friends on social media who might be battling heat issues in their metal-roofed homes! Let’s help everyone stay cool this summer.